1
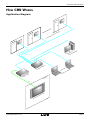
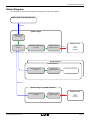
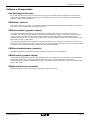
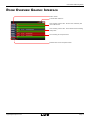
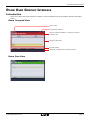
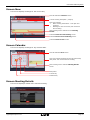
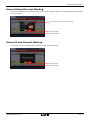
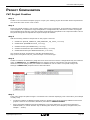
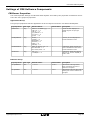
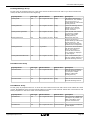
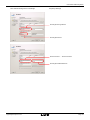
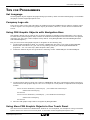
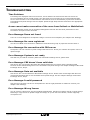
Cue Reservation System
User Manual
UM043_02_Cue_Reservation_System
16.10.2012
Copyright © CUE, a.s., Praha, Czech Republic 1990 - 2012
All rights reserved. Specifications are subject to change without prior notice.
Cue Reservation System
Contents
4
Introduction
4
Overview
4Parts
4Requirements
4
Order and Registration
5
5
6
7
How CRS Works
Application Diagram
Block Diagram
Software Components
16 Settings
of
Microsoft Exchange Server
20Project Configuration
20
22
27
CVC Project Creation
Settings of CRS Software Components
Room Touch Panel Settings
28Tips
for
Programmers
8Room Overview Graphic Interface
28
28
28
28
9Room User Graphic Interface
29Troubleshooting
9Introduction
10 Screen Now
10 Screen Calendar
10 Screen Meeting Details
11 Screen Reserve Now
12 Screen Extend Current Meeting
12 Screen Finish Current Meeting
13
ipCUE-omega
Set Language
Company Logo etc.
Using CRS Graphic Objects with Navigation Bars
Using More CRS Graphic Objects in One Touch Panel
31 Software
and
Firmware License
32Notes
Setup
13Connection
14 Windows Local Network Settings
15 Setup Using Admin Web
www.cuesystem.com
[email protected]
User Manual
Page 3
Cue Reservation System
Introduction
Overview
Cue Reservation System (CRS) is a new application that expands the range of user functions offered
by the Cue System. It is a software solution allowing to plan, schedule and manage conference rooms,
lecture rooms and other spaces using CUE touch panels. Microsoft Exchange Server® 2007/2010 is used
for planning. In this software, every room has its own account and a calendar used to plan the occupation
and use of rooms. Cue units communicate with the server through the Cue Exchange Connector
application.
Users can manage room meetings also by Microsoft Outlook or Microsoft Web Outlook using the internet
browser.
Parts
Part
Product Code
Description
CRS Core Set
CS0407
ipCUE-omega with pre-installed
Cue Exchange Connector
CRS Single Room License
CS0408
Software license for one room.
Note
Touch panels have to be
ordered separately.
Requirements
•
Microsoft Exchange Server® 2007 or 2010 with enabled EWS (Exchange Web Services), room
accounts for all involved rooms and one user account for CRS.
•
CRS Core Set (ipCUE-omega with pre-installed Cue Exchange Connector)
•
IP Connection from CRS to EWS of Microsoft Exchange Server and to the internet.
•
Desired number of CRS Room Licenses. You need one CRS Single Room License for each room
account in Microsoft Exchange Server. It does not have to be equal to the number of touchpanels.
•
Desired number of touchpanels. Resolution must be from 640 x 480 pixels to 1280 x 800 pixels.
•
Resources downloaded from
http://www.cuesystem.com/software_application_resources.aspx.
You need a login.
•
PC with Cue Visual Composer and Internet Explorer 8.0 or higher for setup only.
Order and Registration
The following steps are necessary to order and register
1. Send the order for Cue Reservation System with the desired number of CRS Single Room Licenses to
your sales partner. Use the appropriate product code CS0407 for CRS Core Set and CS0408 for CRS
Single Room Licenses.
2. You will receive a CRS Core set registered with the desired number of room licences. Licenses are
stored in ipCUE-omega.
You can check the number of registered room licenses in hardware debug mode of ipCUE-omega in
debug messages immediately after the start of debug mode (the project must be configured). The
following message will be displayed: “CRS license is valid for total number of X rooms”. If a
license file is missing or corrupted, message “CRS license is not valid” will be displayed.
3. If you need to increase the number of room licenses, contact CUE sales department with details.
www.cuesystem.com
[email protected]
User Manual
Page 4
Cue Reservation System
How CRS Works
Application Diagram
m
Roo
n
els
m
Roo
m
Roo
an
hP
c
2
ll
-wa
On
m
oo
R
Tou
1
ver
t
er
of
os ge S
Micrxchan
E
Ethernet
S
et
n
er
Eth
ch
wit
r‘s
e
-om
UE
pC
Use
ga
s
ter
pu
m
Co
n
ptio
i
e
Rec
DVI
y
pla
Dis
w
ie
rv
ve
mO
Roo
www.cuesystem.com
[email protected]
User Manual
Page 5
Cue Reservation System
Block Diagram
CRS consists of the following software components as described below.
Microsoft Exchange Server
Network
ipCUE-omega
Cue Exchange
Connector
Display Device
CRSServer
(driver)
CRSOverviewInterface
(module)
CRSOverviewUI
(graphic object)
Video
LCD
plasma
projector
...
Touch Panel N
Touch Panel 1
CRSRoomInterface
(module)
CRSRoomUI
(graphic object)
Touchscreen Display
Network
ipCUE-omega or pcCUE-standard
Display Device
CRSOverviewInterface
(module)
www.cuesystem.com
[email protected]
CRSOverviewUI
(graphic object)
Video
LCD
plasma
projector
...
User Manual
Page 6
Cue Reservation System
Software Components
Cue Exchange Connector
It is a special service running on ipCUE-omega. This service makes a bridge between the CUE control
system and Microsoft Exchange Server. The Cue Exchange Connector is pre-installed on ipCUE-omega
and there is no need to configure it.
CRSServer (driver)
This driver is the core of CRS – it communicates with Microsoft Exchange Server (through Cue Exchange
Connector) and provides data to all graphic objects.
CRSOverviewUI (graphic object)
This graphic window type object is used to display the data of all rooms, for example in a lobby or
reception. The instance of this graphic object is typically created in ipCUE-omega, whose video output
is connected to the lobby monitor. This graphic object requires the CRSOverviewInterface module.
CRSOverviewUI can run on touchpanel or other CUE units with graphic output with resolution from 640 x
480 pixels to 1920 x 1080 pixels.
The number of displayed lines depends on monitor resolution. If it is possible to show all room lines on
the screen, all room lines are static. If the number of rooms is higher than the maximum number of lines,
room lines will automatically scroll to show all room data sequentially.
CRSOverviewInterface (module)
CRSOverviewInterface joins the functions of graphic object and driver CRSServer.
CRSRoomUI (graphic object)
This window-type graphic object is used to display data of a single room, for example in the touchpanel
close to the entry door or in the touchpanel inside the room. This graphic object requires the
CRSRoomInterface module. CRSRoomUI requires a touchpanel with a resolution from 640 x 480 pixels to
1280 x 800 pixels.
CRSRoomInterface (module)
CRSRoomInterface joins the functions of a graphic object and driver.
www.cuesystem.com
[email protected]
User Manual
Page 7
Cue Reservation System
Room Overview Graphic Interface
Room names
Current date and time
Line showing a free room. For the rest of the day the
room will be free.
Line showing a free room. There will be some meeting
today later.
Line showing an occupied room
Number of free and occupied rooms
www.cuesystem.com
[email protected]
User Manual
Page 8
Cue Reservation System
Room User Graphic Interface
Introduction
Users can control the basic functions of CRS on room touchpanels using the graphic interface described
below.
Room Occupied View
Room name
Current date and time
Tabs for switching between current day view and
calendar view.
Meeting information
Control buttons
Space for navigation bar, company logo etc.
Room Free View
www.cuesystem.com
[email protected]
User Manual
Page 9
Cue Reservation System
Screen Now
This screen displays meetings for the current day.
This Tab activates Calendar screen
Current meeting description (subject)
This area contains
• Basic meeting information – time span and
organizer
• Meetings for the current day. Use arrows for
time scrolling.
Click meeting area to activate screen Meeting
Details.
Activates Finish Current Meeting screen.
Activates Extend Current Meeting screen.
Activates Reserve Now screen.
Screen Calendar
This screen displays meetings for any selected date.
This Tab activates Now screen.
This area contains meetings for the day selected by
date picker. Use arrows for time scrolling.
Click meeting area to activate Meeting Details
screen.
Date picker
Current day
Selected day
Screen Meeting Details
This screen displayes details of the selected meeting.
www.cuesystem.com
[email protected]
User Manual
Page 10
Cue Reservation System
Screen Reserve Now
This screen enables you to reserve a room. It is necessary to fill in a subject using graphic keyboard and
start /end time using appropriate spin buttons.
In addition, sensitivity of the meeting can be set. If a meeting is marked as PRIVATE, title “PRIVATE
MEETING” is displayed instead of real meeting subject. All details of PRIVATE meeting will be hidden.
Set meeting start time
Set meeting end time
Activates keyboard
Set meeting sensitivity
Cancel reservation
Cancel button
Confirm meeting subject
Confirm reservation
www.cuesystem.com
[email protected]
User Manual
Page 11
Cue Reservation System
Screen Extend Current Meeting
This screen enables you to extend (prolong) the current meeting. Set new requested end the time using
time spin button.
Set new end time for current meeting.
Cancel extend
Confirm extend
Screen Finish Current Meeting
This screen serves for immediate termination of the current meeting.
Cancel finish
Confirm finish
www.cuesystem.com
[email protected]
User Manual
Page 12
Cue Reservation System
ipCUE-omega
Setup
The setup consists of three steps
1. Conection with PC
2. Windows Local Network Settings
3. Setup using Admin Web
Connection
Connect ipCUE-omega to your PC as described in the following picture.
PC
ipCUE-omega
Ethernet cable crossed-over
CUE Adapter
Power supply
www.cuesystem.com
[email protected]
User Manual
Page 13
Cue Reservation System
Windows Local Network Settings
For Windows 7, the steps are
For Windows XP, the steps are
1. Start Windows 7.
1. Start Windows XP.
2. Click Start.
2. Click on Start, then click on Control Panel and
choose the option to switch to Classic View.
3. Enter ncpa.cpl to the Search Box and press
Enter. The following window is displayed.
3. Double-click on Network Connections.
The following steps are
1. Right-click on network adapter used for
connection with touch panel and then rightclick and select Properties.
2. Select Internet Protocol (TCP/IP) and click on
properties button.
www.cuesystem.com
[email protected]
3. Select Use the following IP address option.
Set IP address to 192.168.1.1 (or other
address different from 192.168.1.127 and
from 192.168.1.128) and Subnet mask
to 255.255.255.0. Leave other options
unchanged and click OK.
User Manual
Page 14
Cue Reservation System
Setup Using Admin Web
Take the following steps
1. Start the web browser and enter the address 192.168.1.128.
2. Set IP address and subnet mask and gateway of ipCUE omega in Configuration/IP settings to address
corresponding to your project network topology. It is not recommended to use default IP addresses of
CUE units (192.168.1.127 and 192.168.1.128). Apply changes and confirm restart of ipCUE-omega.
3. If your new IP address is in a different segment, change the IP address of your computer to this
segment. Enter the new IP address of ipCUE-omega to the web browser.
4. Go to section Configuration and set DNS – address of your Domain Name Server.
5. Set the current date, time and your time zone in section Date and Time. Correct settings of time and
time zone are necessary for reliable functioning of CRS.
6. It is recommended to use internet clock for automatic time synchronization using public or local
NTP server. If possible, use the same server as used by Microsoft Exchange Server. You can do
it in adminweb section Date and time / Internet clock. Do the same Internet Clock settings in all
touchpanels involved in CRS.
www.cuesystem.com
[email protected]
User Manual
Page 15
Cue Reservation System
Settings of Microsoft Exchange Server
Step 1
Settings of Microsoft Exchange server are made
using Exchange Management console - see
picture.
Use your Exchange Management console to
create an account for Cue Reservation System
user. CRS works with this account to manage
room data.
In section Recipient Configuration select the
Mailbox folder and start the wizard to create a
new account.
Step 2
Select User Mailbox and click Next.
Step 3
Select New user and click Next.
www.cuesystem.com
[email protected]
User Manual
Page 16
Cue Reservation System
Step 4
Choose CRS user account name in the item User
logon name (User Principal Name), for example
AdminReservation, a domain of mailserver (for
example @cue.local) and a password.
This parameter will be needed later in CRSServer
settings
•
User logon name is identical with the
ExchangeUserLogonName in CSRServer
properties
•
E-mail domain (in our example
“@cue.local”) is identical with the
ExchangeRoomEmailDomain in CSRServer
properties.
•
Password is identical with the
ExchangePassword in CSRServer properties.
Step 5
Now we can create accounts for each room
involved in CRS including the permissions using
the Exchange Management Console.
In section Recipient Configuration, select folder
Mailbox and start wizard to create a new account.
Step 6
Select Room Mailbox and click Next.
www.cuesystem.com
[email protected]
User Manual
Page 17
Cue Reservation System
Step 7
Select New user and click Next.
Step 8
Choose a room account name in the item User
logon name (User Principal Name), for example
Boardroom, and a domain of mailserver (use the
same domain as used in CRS user account).
User logon name is identical with the
RoomAccountXX in CSRServer properties, section
ExchangeRoomAccounts.
Step 9
Now we will set the permission for the CRS user
account to manage this room account.
We will use the wizard in Exchange Management
Console – Manage Full Access Permisions.
In section Recipient Configuration, select folder
Mailbox and start wizard to Manage Full Access
Permisions.
www.cuesystem.com
[email protected]
User Manual
Page 18
Cue Reservation System
Step 10
Click on +Add... and choose CRS user account (in
our example it is AdminReservation).
Repeat steps 9 and 10 for each room involved in
CRS.
Step 11
Now test the accessibility of Exchange EWS
services using Internet Explorer. Run Internet
explorer and enter the address of Exchange
server in the following format:
https://ExchangeServerAddress/ews/Exchange.
ASMX
This address will be needed later in CRSServer
settings as Property ExchangeUR.
Exchange server will require a login. Use CRS
user logon name and password created in step 4.
After logon, a page like this should be displayed.
Step 12
If you have problems passing test described
above, you have to configure EWS access using
IIS manager on your server. Please check the
settings of firewall to see whether it does not
block HTTPS protocol on the port 443.
www.cuesystem.com
[email protected]
User Manual
Page 19
Cue Reservation System
Project Configuration
CVC Project Creation
Step 1
Create a new Cue Visual Composer project or open your existing project where CRS will be implemented.
You must have CVC version 1.36 or later.
Step 2
Insert one ipCUE-omega to your project (name of this unit is Controller1 in the following examples) and
one touchpanel. It is possible to copy touchpanels in configuration tab, therefore it is easier to program
the touchpanel first and then copy this (already programmed) touchpanel to the required number. Set on
the ipCUE-omega and touchpanel the required unique IP address.
Step 3
Add the following software components to the project resources:
1. CRSServer (fileCUE_CRSServer_CRS_MSEx2007_Tcp_Client_x.xx.cvcd)
2. CRSRoomUI (fileCRSOverviewUI_x.xx.cvcg)
3. CRSOverviewUI (file CRSRoomUI_x.xx.cvcg)
4. CRSOverviewInterface (file CRSRoomInterface_x.xx.cvcm)
5. CRSRoomInterface (file CRSRoomInterface_x.xx.cvcm)
You can find all these components in ZIP file downloaded from
http://www.cuesystem.com/crs_resources.aspx. You need a login.
Step 6
Create an instance of CRSServer (drag this driver from resources area to configuration tab). Set instance
name to CRSServer1. The CRSServer1 driver instance must be connected to two free TcpClient
channels on ipCUE-omega. Only one instance of CRSServer can be used in one ipCUE-omega. The
settings of CRSServer1 properties will be described later.
Step 7
If the video output of ipCUE-omega is connected to the monitor displaying room reservation (for example
in lobby area)
•
Create an instance of CRSOverviewUI window in ipCUE-omega (drag and drop CRSOverviewUI from
graphic resources to Controller1/Windows) and name it CRSOverviewUI1.
•
Place command CRSOverviewUI1.ShowObject() to process Autoexec (it is placed inController1/
Modules/Main) or choose another way of showing this window (for example by navigation bar, see
Chapter …. below).
www.cuesystem.com
[email protected]
User Manual
Page 20
Cue Reservation System
•
Import module from file CRSOverviewInterface_x.xx.cvcm to Controller1/Modules and rename it to
CRSOverviewInterface1 (right-click on free space in tab Controller1/Modules, select Import... and
select the file).
Step 8
•
Create an instance of CRSRoomUI window in the touchpanel (drag and drop CRSRoomUI from graphic
resources to TouchPanel1/Windows) and name it CRSRoomUI1.
•
Place the command CRSRoomUI1.ShowObject() to process Autoexec (it is placed inTouchPanel1/
Modules/Main) or choose another way of showing this window (for example by navigation bar, see
Chapter …. below).
•
Import module from file CRSRoomInterface_x.xx.cvcm to TouchPanel1/Modules and rename it to
CRSRoomInterface1.
Step 9
Set Exchange Server (see chaptes Settings of Microsoft Exchange Server)
Step 10
Set the properties of CRSServer1 corresponding to the settings of Microsoft Exchange Server
Step 11
Set the properties of graphic objects (see chapter CRS RoomUI Properties and CRSOverviewUI
Properties).
Step 12
Copy the touch panel to the required number (select the touchpanel in CVC Configuration tab, copy the
panel to clipboard by CTRL-C shortcut and then paste the required number of copies by CTRL-V shortcut).
After that it is necessary to set the required unique IP addresses on all touchpanels in the project
(touchpanel properties).
Step 13
Set the required IP addresses (corresponding to IP addresses in the CVC project) on all hardware units
(ipCUE-omega and touchpanels) using webadmin or OSD.
Step 14
Connect all touch panels, ipCUE-omega and your PC to the network (set a suitable unique IP address of
your PC).
Step 15
Upload the project to all CUEunits. Please be patient, the initialization of all programs needs about 30
seconds.
Step 16
On all touchpanels with CRSRoomUI, the error message Room not found will appear. Now you have to
assign a room to each panel. See Chapter User Settings.
Step 17
In case of any troubles, see the chapter Troubleshooting.
www.cuesystem.com
[email protected]
User Manual
Page 21
Cue Reservation System
Settings of CRS Software Components
CRSServer Properties
The most important settings of CUE Reservation System are made by the properties of CRSserver driver.
There are more groups of properties.
Appearance Group
This group of properties sets the appearance of all GUI objects involved in Cue ReservationSystem.
Property Name
Data Type
Allowed Values
Default Value
Description
DateFormat
Long
dddd<nl>d. MMMM yyyy := 1
d.M.yyyy := 2
d-M-yy := 3
yyyy-MM-dd := 4
yyyy-M-d := 5
yy-M-d := 6
1
Format of date displayed on
graphic objects in top right
corner
FirstDayOfWeek
Long
Monday := 1
Tuesday := 2
Wednesday := 3
Thursday := 4
Friday := 5
Saturday := 6
1
First day of week displayed in
month calendars in GUI
FirstWeekOfYear
Long
Starts on January 1st := 0
First full week := 1
First 4-day week := 2
0
Determines which week of the
year is calculated as the first in
month calendars in GUI
TimeFormat
Long
‘24’ := 2
‘12 AM/PM’ := 3
2
Determines which time format
(24 hour or 12 hour AM/PM) is
used in GUI
Property Name
Data Type
Allowed Values
Default Value
Description
OccupiedBefore
Time
>= 0:0.0
10:00.0
Determines how long before
start of meeting the room is
marked as occupied
OccupiedAfter
Time
>= 0:0.0
2:00.0
Determines how long after end of
meeting the room is marked as
occupied
Behavior Group
www.cuesystem.com
[email protected]
User Manual
Page 22
Cue Reservation System
ExchangeSettings Group
In this group of properties there is a list of all room accounts involved in CRS. If you have less then 40
rooms, fill the accounts from the beginning.
Property Name
Data Type
Allowed Values
Default Value
Description
ExchangeURL
Text
Max. length 256 chars
Empty
URL address of Exchange
Web Services. This address
was used in step 11 in
chapter Settings of Microsoft
Exchange Server.
ExchangeDomain
Text
Max. length 100 chars
Empty
Domain of Exchange server.
Typically it is a network
domain name from your
domain controller.
ExchangeUserLogonName
Text
Max. length 100 chars
Empty
Name of CRS user account
(see step 4 in chapter
Settings of Microsoft
Exchange Server).
ExchangePassword
Text
Max. length 100 chars
Empty
Password of CRS user
account (see step 4 in
chapter Settings of Microsoft
Exchange Server). This
value can be changed from
CRSRoomUI in touchpanels.
ExchangeTimeout
Time
Any positive
:10.0
Timeout for communication
with Microsoft Exchange
Server. If no reply is
received within this time,
error message is displayed
on GUI objects.
ExchangeRoomEmailDomain
Text
Max. length 100 chars
Empty
Room e-mail domain (see
step 8 in chapter Settings of
Microsoft Exchange Server)
Property Name
Data Type
Allowed Values
Default Value
Description
RoomAccount01
Text
Max. length 256 chars
Empty
Name of room 1 account in
Microsoft Exchange Server
(see step 8 in chapter
Settings of Microsoft
Exchange Server)
...
...
...
...
...
RoomAccount40
Text
Max. length 256 chars
Empty
Name of room 40 account in
Microsoft Exchange Server
RoomAccounts Group
RoomNames Group
In this group of properties there is a list of all room names involved in CRS. These room names are used
in GUI. RoomNames serve as user friendly names of rooms if room account names are not mnemonic. Fill
these properties in the same order as in RoomAccounts.
Property Name
Data Type
Allowed Values
Default Value
Description
RoomName01
Text
Max. length 256 chars
RoomAccount01
Name of room 1 displayed in
GUI objects. By default (not
filled), RoomName is the
same as RoomAccount.
...
...
...
...
...
RoomName40
Text
Max. length 256 chars
RoomAccount40
Name of room 40 displayed
in GUI objects.
www.cuesystem.com
[email protected]
User Manual
Page 23
Cue Reservation System
Microsoft Exchange Server Settings
Property Settings
ExchangeUserLogonName
ExchangePassword
RoomAccount01 ... RoomAccount40
ExchangeRoomEmailDomain
www.cuesystem.com
[email protected]
User Manual
Page 24
Cue Reservation System
CRSOverviewUI Properties
Appearance Group
Property Name
Data Type
Allowed Values
Default Value
Description
FullScreen
Boolean
Any
True
This flag determines whether
CRSOverviewUI is fullscreen or not. If it
is True, object will fill the whole screen
and size and position properties will be
ignored. If it is False, size and position of
CRSOverviewUI can be changed in the
standard way.
Property Name
Data Type
Allowed Values
Default Value
Description
LineRefreshTime
Time
Any Positive
:5.0
If number of involved rooms exceeds
number of rooms possible to display
on CRSOverviewUI (depending on
display resolution), room info lines will
automatically scroll to display all rooms.
This property sets line scrolling period.
HidePrivateMeetings
Boolean
Any
True
Each meeting in Exchange Server has
a flag stating whether it is public or
private. If HidePrivateMeeting is True,
real name of meeting on the display will
be replaced by „Private Meeting“ label to
protect privacy. If HidePrivateMeeting is
False, real name of the meeting will be
displayed.
Property Name
Data Type
Allowed Values
Default Value
Description
ExcludedRooms
Text
Any
Empty
You can set if all rooms will be displayed
on CRSOverviewUI or not. If you
need to exclude some rooms from
being displayed on this object, write
RoomAccounts list of excluded rooms to
this property. Each RoomAccount must
be on separate line.
Behavior Group
Rooms Group
www.cuesystem.com
[email protected]
User Manual
Page 25
Cue Reservation System
CRSRoomUI Properties
Behavior Group
Property Name
Data Type
Allowed Values
Default Value
Description
HidePrivateMeetings
Boolean
Any
True
Each meeting in Exchange
Server has a flag stating
whether it is public or private. If
HidePrivateMeeting is True, real
name of meeting on the display will
be replaced by „Private Meeting“
label and other sensitive data
will be hidden to protect privacy.
If HidePrivateMeeting is False,
real name of the meeting will be
displayed and all meeting data will
be displayed.
ObjectID
Long
1 - 10
1
Object ID, see Note 1 below.
EnableReserveNow
Boolean
Any
True
If EnableReserveNow is True, you
can make reservations of the room
from CRSRoomUI object, otherwise
button Reserve Now will be hidden.
EnableCurrentMeetingEdit
Boolean
Any
False
If EnableCurrentMeetingEdit
is True, it is possible to edit
current meeting (buttons
ExtendCurrendMeeting and
FinishCurrentMeeting are
displayed), otherwise editing of
current meeting is disabled. See
note 2 below.
Note 1
Room identification of the CRSRoomUI object is stored in the touchpanel file storage in file
MyRoomUIConfig_xx.cfg, where xx is ObjectID of CRSRoomUI instance. If you have more instances
of CRSRoomUI graphic object in one touchpanel, set different ObjectID for every instance, otherwise
all graphic objects will show data for only one room. You can use up to 10 instances of object in one
touchpanel.
Note 2
Using functions ExtendCurrentMeeting and FinishCurrentMeeting is not safe on panels placed outside
the room (for example touchpanel located next to entrance to the room, where everybody has access).
Enable these functions only on panels where it can not cause any troubles (usually inside the room).
www.cuesystem.com
[email protected]
User Manual
Page 26
Cue Reservation System
Room Touch Panel Settings
Users can change the following configuration on touch panels with CRSRoomUI
•
Room shown on touchpanel
•
ExchangePassword
To change this item, take the following steps
1. Press the touchpanel in room name area (top left corner) for 10 sec. until keyboard appears
2. Enter ExchangePassword
3. Cue Reservation System Configuration screen appears.
4. If you need to set the room for which reservation data are displayed, push button Room Name
“Change”.
5. Listbox of available rooms appears; now you can select the room.
6. If you need to change ExchangePassword (password for Cue Reservation System user), push button
CRS User Password “Change”, enter and re-enter the new password. This change of password does
not change the password in Microsoft Echange Server, so you have to change it also in “Active
Directory Users and Computers” on Microsoft Windows Server.
7. You can close the settings window by Exit button.
www.cuesystem.com
[email protected]
User Manual
Page 27
Cue Reservation System
Tips for Programmers
Set Language
All CRS graphic objects support language settings provided by XPL2 command SetLanguage. For available
languages contact [email protected].
Company Logo etc.
There is free space on the top and bottom of CRSOverviewUI and CRSRoomUI for placing company logos
or other objects. You can place any graphic object (PictureBox, Label etc.) to this area to customize the
screen.
Using CRS Graphic Objects with Navigation Bars
CRS graphic objects can be used as one of control windows in standard control application. They cannot
be used directly with navigation bars, because all windows and navigation bars must be from one graphic
collection (see CVC Help / Basic Graphic Library API for using NavigationBar and VerticalNavigationBar
and HiddenNavigator).
But you can involve CRS graphic objects in navigation in the following way
1. Create FullScreenWindow called, for example, CRSWindow and set it to be open by NavigationBar Button with reservation icon (you can do it by settings of the join and NavigationBarButtonID
properties – see see CVC Help / Basic Graphic Library API).
2. FullScreen window objects can generate the following events: OnShowObject and OnHideObject.
3. Create functions links to these two events for CRSWindow and place commands to these functions to
show and hide CRS graphic objects. Here is an example of a code placed in GraphicEvents touchpanel
module.
Private Function CRSWindow_OnShowObject( ) Link CRSWindow.OnShowObject
CRSRoomUI1.ShowObject()
End Function
Private Function CRSWindow_OnHideObject( ) Link CRSWindow.OnHideObject
CRSRoomUI1.HideObject()
End Function
4. Now the CRS graphic object will be navigated by NavigationBar.
Using More CRS Graphic Objects in One Touch Panel
You can use more instances of CRSRoomUI windows in one touchpanel, for example for using reservation
system with more rooms on one touch panel. In this case contact [email protected].
www.cuesystem.com
[email protected]
User Manual
Page 28
Cue Reservation System
Troubleshooting
Time Problems
If meetings are displayed with incorrect times, check whether the same times and time zones are
set on touchpanels and on ipCUE-omega. The right time zone must also be set in Microsoft Exchange
server room accounts. It is recommended to use Internet Clock to automatically synchronize clocks on
touchpanels and ipCUE-omega. See the chapter ipCUE-omega Setup and the manual for the appropriate
touchpanel.
A user cannot make reservation of the room from Outlook or WebOutlook
Check permissions of this user in Exchange Management Console and set these permissions to Full
Acccess for all required room accounts.
Error Message: Room not found
There is no room assigned to touchpanel. Assign a room to the touchpanel (see chapter User Settings).
Error Message: No room registered
You have not filled room accounts in CRSServer RoomAccounts group of properties. Please check it.
Error Message: No connection with CRS server
Touchpanel can not connect to ipCUE-omega with CRS server. Check your network and power source of
ipCUE-omega.
Error Message: System is not ready
CRS has not yet read all necessary data from Microsoft Exchange Server, please wait.
Error Message: CRS doesn’t have valid data
CRS server can not read the data from Microsoft Exchange Server. Please check if Exchange Web
Services of Microsoft Exchange Server are accesible from ipCUE-omega. See chapter Settings of Microsoft
Exchange Server, step 5.
Error Message: Data not available
CRS server can not read data from Microsoft Exchange Server. Please check if Exchange Web Services
of Microsoft Exchange Server are accessible from ipCUE-omega. See the chapter Settings of Microsoft
Exchange Server, step 5.
Error Message: Invalid password
CRS user account does not have a valid password. Set the right password for CRS user account (see
chapter User Settings).
Error Message: Wrong license
You do not have valid licence key file CueReservationSystem_CS0407.LicenseKey stored in ipCUE-omega
filestorage. Copy this file to ipCUE-omega file storage. If you do not have this file, contact support@
cuesystem.com.
www.cuesystem.com
[email protected]
User Manual
Page 29
Cue Reservation System
Error Message: License file is not valid
Licence key file CueReservationSystem_CS0407.LicenseKey stored in ipCUE-omega filestorage is
corrupted. Copy the valid file to ipCUE-omega file storage. If you do not have this file, contact support@
cuesystem.com.
Error Message: Internal IP communication error XX
There are some problems with your network. Please check your network infrastructure.
Error Message: Internal file operation error XX
The ipCUE-omega or touchpanels have problem with file operations. Please check if filestorage is not full
and delete unnecessary files. If the problem persists, contact [email protected].
www.cuesystem.com
[email protected]
User Manual
Page 30
Cue Reservation System
Software and Firmware License
END-USER NOTICE AND LICENSE AGREEMENT FROM CUE, a.s.
NOTICE TO END-USER: CAREFULLY READ THE FOLLOWING LEGAL AGREEMENT (THIS “LICENSE”).
INSTALLATION OR USE OF THE ENCLOSED CUE, a.s. SOFTWARE PROGRAMS (COLLECTIVELY,
“SOFTWARE”) ON YOUR COMPUTER SYSTEMS OR HARDWARE DEVICES CONSTITUTES YOUR
ACCEPTANCE OF THESE TERMS. IF YOU DO NOT AGREE TO THE TERMS OF THIS LICENSE, PROMPTLY
DELETE THE SOFTWARE FROM YOUR COMPUTER SYSTEMS AND HARDWARE DEVICES, DESTROY ANY
COPIES YOU MADE OF THE SOFTWARE OR ANY INSTALLATION MEDIA OF THE SOFTWARE INCLUDED
WITH YOUR SYSTEM, AND DISPOSE OF ALL WRITTEN MATERIALS IN YOUR POSSESSION REGARDING
THE SOFTWARE.
License Grant: CUE grants to You, as an individual, a license to install and use one (1) copy of the
Software on a single computer at a time; provided, however, that You may make copies of the Software
solely for Your development of applications for CUE hardware and demonstration versions of such
applications. Any applications created with the Software may only be used with Cue hardware. Your
license to use the Software is conditioned upon Your compliance with the terms of this License. A License
is required for each end-user of the Software. A license is required for each installation of the Software.
You may make one (1) copy of the Software for archival purposes only. You may use this Software only
in connection with CUE hardware. You must have acquired the Software directly in connection with the
purchase of CUE hardware from CUE or from a CUE approved reseller for this license to be effective. If
You have purchased a Site License, You may complete only the number of installations specified in the
License Agreement accompanying the Software.
Copyright: The Software and software built into CUE hardware (“Firmware”) are protected by copyright
law and international treaty provisions. You acknowledge that no title to the intellectual property in the
Software and Firmware is transferred to You. You further acknowledge that title and full ownership rights
to the Software and Firmware will remain the exclusive property of CUE, and You will not acquire any
rights to the Software and Firmware except as expressly set forth in this License. You agree that any
copies of the Software will contain the same proprietary notices which appear on and in the Software.
Prohibited Uses: Without obtaining prior written permission from CUE, You may not (a.) use, copy,
modify, alter, or transfer the Software or documentation except as expressly provided in this License;
(b.) translate, disassemble, decompile, reverse program or otherwise reverse engineer the Software
and Firmware; (c.) sublicense or lease the Software or its documentation (d.) use this Software with
any hardware other than products produced by CUE or in connection with applications being developed
for CUE hardware; or (e.) use the Software in a multi-user, network, or multiple computer environment
or in a rental, time sharing or computer service business. Without prejudice to any other rights, CUE
may terminate this License if You fail to comply with its terms and conditions. In such event, You must
immediately destroy all copies of the Software.
No Other Warranties: CUE DOES NOT WARRANT THAT THE SOFTWARE AND FIRMWARE IS ERROR FREE.
CUE DISCLAIMS ALL WARRANTIES WITH RESPECT TO THE SOFTWARE AND FIRMWARE, EITHER EXPRESS
OR IMPLIED, INCLUDING BUT NOT LIMITED TO IMPLIED WARRANTIES OF MERCHANTABILITY, FITNESS
FOR A PARTICULAR PURPOSE AND NONINFRINGEMENT OF THIRD PARTY RIGHTS. SOME JURISDICTIONS
DO NOT ALLOW THE EXCLUSION OF IMPLIED WARRANTIES OR LIMITATIONS OF HOW LONG AN IMPLIED
WARRANTY MAY LAST, OR THE EXCLUSION OF LIMITATION OF INCIDENTAL DAMAGES, SO THE ABOVE
LIMITATIONS OR EXCLUSIONS MAY NOT APPLY TO YOU. THIS WARRANTY GIVES YOU SPECIFIC LEGAL
RIGHTS AND YOU MAY ALSO HAVE OTHER RIGHTS WHICH VARY FROM JURISDICTION TO JURISDICTION.
No Liability for Consequential Damages: IN NO EVENT SHALL CUE BE LIABLE TO YOU FOR ANY
CONSEQUENTIAL, SPECIAL, INCIDENTAL, OR INDIRECT DAMAGES OF ANY KIND ARISING OUT OF THE
PERFORMANCE OR USE OF THE SOFTWARE, EVEN IF CUE HAS BEEN ADVISED OF THE POSSIBILITY OF
SUCH DAMAGES.
Label on Hardware: Use of this hardware and the software programs controlling this hardware is subject
to the terms of the Software and Hardware License Agreements (the “License Agreements”). You should
not use the software and hardware until you have read the License Agreements. By using the software
and hardware, you signify that you have read the Licenses Agreements and accept their terms. The
“License Agreement” is available at www.cuesystem.com.
Trademark Notice: CUE and the CUE logo are trademarks of CUE, a.s. in the United States and in other
countries.
www.cuesystem.com
[email protected]
User Manual
Page 31
Cue Reservation System
Notes
..............................................................................................................................................
..............................................................................................................................................
..............................................................................................................................................
..............................................................................................................................................
..............................................................................................................................................
..............................................................................................................................................
..............................................................................................................................................
..............................................................................................................................................
..............................................................................................................................................
..............................................................................................................................................
..............................................................................................................................................
..............................................................................................................................................
..............................................................................................................................................
..............................................................................................................................................
..............................................................................................................................................
..............................................................................................................................................
..............................................................................................................................................
..............................................................................................................................................
..............................................................................................................................................
..............................................................................................................................................
www.cuesystem.com
[email protected]
User Manual
Page 32
CUE, a.s.
K Nouzovu 6, 143 00 Praha 4, Czech Republic
www.cuesystem.com
[email protected]