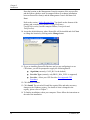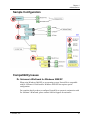
1
© 2010 SafeNet, Inc. All rights reserved. Part Number 007769-001 (Rev F, 6/2010) Software Version 3.6.3 All intellectual property is protected by copyright. All trademarks and product names used or referred to are the copyright of their respective owners. No part of this document may be reproduced, stored in a retrieval system or transmitted in any form or by any means, electronic, mechanical, chemical, photocopy, recording or otherwise without the prior written permission of SafeNet. SafeNet makes no representations or warranties with respect to the contents of this document and specifically disclaims any implied warranties of merchantability or fitness for any particular purpose. Furthermore, SafeNet reserves the right to revise this publication and to make changes from time to time in the content hereof without the obligation upon SafeNet to notify any person or organization of any such revisions or changes. SafeNet invites constructive comments on the contents of this document. These comments, together with your personal and/or company details, should be sent to the address below. SafeNet, Inc. 4690 Millennium Drive Belcamp, Maryland 21017 USA Technical Support If you encounter a problem while installing, registering or operating this product, please make sure that you have read the documentation. If you cannot resolve the issue, please contact your supplier or SafeNet Support. SafeNet Support operates 24 hours a day, 7 days a week. Your level of access to this service is governed by the support plan arrangements made between SafeNet and your organization. Please consult this support plan for further information about your entitlements, including the hours when telephone support is available to you. Technical Support Contact Information: Phone: 800-545-6608 Email: [email protected] Acknowledgements Windows is a registered trademark of Microsoft Corporation in the United States and other countries. Windows Vista is either a registered trademark or trademark of Microsoft Corporation in the United States and/or other countries. Table of Contents Table of Contents Chapter 1 Introduction................................................................................................................. 1 Security Overview .................................................................................................................... 2 Key Management ...................................................................................................................... 2 Symmetric Key Management .................................................................................................... 2 Asymmetric Key Management (PKI Mode) .............................................................................. 3 Algorithm Support .................................................................................................................... 4 Integration with Third-Party Authentication Products ................................................................ 5 ProtectFile Premium ................................................................................................................ 5 ProtectFile Business ................................................................................................................. 5 Chapter 2 Installation ................................................................................................................... 7 ProtectFile Premium Dependencies ............................................................................................. 7 ProtectFile Premium - Entrust Version ................................................................................... 7 ProtectFile Premium - Microsoft PKI Version ........................................................................ 8 ProtectFile Business Dependencies ............................................................................................. 8 Setup ............................................................................................................................................ 8 ProtectFile Installation ............................................................................................................ 9 Components of ProtectFile ........................................................................................................ 19 Invoking ProtectFile .................................................................................................................. 19 Starting ProtectFile for the First Time ....................................................................................... 20 Invalid License Number ......................................................................................................... 20 Evaluation License Number ................................................................................................... 20 Full License Number .............................................................................................................. 20 Starting ProtectFile with the Management Console .................................................................. 21 Uninstalling/Upgrading ProtectFile ........................................................................................... 22 Manual Uninstall.................................................................................................................... 22 Silent Uninstall ....................................................................................................................... 22 Chapter 3 Authentication Methods ........................................................................................... 25 Invoking ProtectFile .................................................................................................................. 25 ProtectFile Log On................................................................................................................. 25 Password Log On ................................................................................................................... 26 ProtectFile/Windows Single Sign-On .................................................................................... 27 CSP Token Log On ................................................................................................................. 27 Workstation Security ................................................................................................................. 28 Chapter 4 Administration .......................................................................................................... 29 Administration Tasks ................................................................................................................. 29 Changing the User Password................................................................................................. 29 Hashing a Keyphrase ............................................................................................................. 29 Recovering After Losing the User Password ......................................................................... 30 Dealing With Lost User Passwords ....................................................................................... 30 Temporarily Disabling Protection ......................................................................................... 31 © SafeNet, Inc. i Table of Contents Defragmenting FAT/FAT32 Partitions .................................................................................. 31 Configuring the Screen........................................................................................................... 31 Updating Your License ........................................................................................................... 32 Configuring User Profile Details ........................................................................................... 32 Viewing the Event (Log) File ................................................................................................. 32 Defining a Policy.................................................................................................................... 33 Backing Up Files .................................................................................................................... 36 Creating an Encrypted CD ..................................................................................................... 37 Restrictions ................................................................................................................................ 37 Using NetBIOS vs. Fully Qualified Name Paths for Envelopes ............................................. 37 Sleeping Domains/Envelopes ................................................................................................. 38 Nested Domains/Envelopes .................................................................................................... 38 NTFS Compression ................................................................................................................ 38 Renaming Envelope Root Folder ........................................................................................... 38 Using a New Token with a Newly Issued Certificate ............................................................. 38 Adding/Deleting Envelopes .................................................................................................... 39 Deregistering Assigned Domains ........................................................................................... 39 PATH Length Limitation ........................................................................................................ 39 Supported DFS Configurations ................................................................................................. 39 Reference Materials ............................................................................................................... 40 Configure DFS ....................................................................................................................... 41 Sample Configuration ................................................................................................................ 43 Compatibility Issues .................................................................................................................. 43 Dr. Solomon’s WinGuard for Windows 2000/XP .................................................................. 43 Chapter 5 Advanced Domain Configurations .......................................................................... 45 Replicated Domains ................................................................................................................... 45 Share Encrypted Directories ...................................................................................................... 46 Add a Shared Legacy Domain ................................................................................................ 46 Create Domains on Remote Machines ................................................................................... 46 Chapter 6 Envelope Control Via Scripting .............................................................................. 47 How Scripting Works ................................................................................................................ 47 Script File Syntax ...................................................................................................................... 49 Master Script.............................................................................................................................. 49 Warning Message Directive ...................................................................................................... 50 Register an Envelope ................................................................................................................. 51 De-Register an Envelope ........................................................................................................... 51 Access Control ........................................................................................................................... 52 Create an Envelope .................................................................................................................... 52 Remove an Envelope Instruction ............................................................................................... 53 Add a User to an Envelope ........................................................................................................ 53 Remove a User from an Envelope ............................................................................................. 54 Migrate a Domain ...................................................................................................................... 55 Use of Windows Environment Variables .................................................................................. 56 Security Considerations and Recommendations on Use ........................................................ 56 Scripting Guidelines and Tips ................................................................................................ 57 ii © SafeNet, Inc. Table of Contents Chapter 7 Registry Settings ....................................................................................................... 59 Disclaimer .................................................................................................................................. 59 How to Use This Chapter ....................................................................................................... 59 Sample Registry Key Table ....................................................................................................... 60 Miscellaneous Registry Keys .................................................................................................... 60 CSP Registry Keys .................................................................................................................... 62 GINA Registry Keys ................................................................................................................. 66 Migration Registry Keys ........................................................................................................... 68 PKI Registry Keys ..................................................................................................................... 68 Script Registry Keys .................................................................................................................. 69 MS PKI Configuration Registry Keys ....................................................................................... 70 Policy Registry Keys ................................................................................................................. 78 Driver Registry Keys ................................................................................................................. 88 Envelope Administration Registry Keys ................................................................................... 91 Example—Modify the Registry Settings That Control the Default Excluded Extensions...... 100 Chapter 8 Server Extension ..................................................................................................... 101 ScrCtrl.exe Utility.................................................................................................................... 101 Chapter 9 Silent Installation .................................................................................................... 103 Using the Silent Install Feature ............................................................................................... 103 Default Values ......................................................................................................................... 104 Example ................................................................................................................................... 104 Reference ................................................................................................................................. 105 Installation Settings .............................................................................................................. 105 Glossary ..................................................................................................................................... 111 Appendix A ProtectFile Scripting Example ........................................................................... 115 © SafeNet, Inc. iii Table of Contents THIS PAGE INTENTIONALLY LEFT BLANK iv © SafeNet, Inc. Chapter 1 Introduction Chapter 1 Introduction ProtectFile is a high strength data security solution for network applications. The product operates transparently to the user, but performs encryption for all data files that are found on: the secured network file servers attached to the secured network local hard disks on workstations connected to the secured network local removable media (such as floppy disks) for workstations connected to the secured network The principle behind ProtectFile is to allow users to safely store or transmit sensitive data within a network environment. Files are encrypted locally at the workstation before storage or transmission via the network. Secure files can only be viewed by those users who have access to the correct cipher keys. In this way, ProtectFile not only protects stored data, but also ensures that an unauthorized entity cannot gain access to the contents of sensitive files by using techniques such as wire-tapping. Figure 1: ProtectFile functional overview ProtectFile is designed to be installed on individual workstations and server computers. The ProtectFile Management Console is an application that provides central user and envelope management, file-based user profiles, token and smart card initialization, and user key recovery for ProtectFile Business clients. ProtectFile Management Console is installed on a central computer, which is part of an organization‘s IT management infrastructure. © SafeNet, Inc. 1 Chapter 1 Introduction Security Overview There are a number of simple cryptographic terms mentioned throughout this manual which the reader is required to understand. This section is intended as a brief overview of what these terms mean in the context of the ProtectFile product. In the field of cryptography, the term key refers to a value which is used to encrypt data using an algorithm. There are many different types of keys and algorithms. The term algorithm refers to a defined mathematical calculation that is used to encrypt, decrypt, or verify data using a key. Key Management Keys are used to protect or unlock data. It is important to correctly manage your keys in order to minimize the risk of compromise to your protected files. In ProtectFile, key management is performed in software and, for the most part, an administrator or user of ProtectFile does not need to know or perform any special actions to manage their keys. ProtectFile Premium can be configured to operate in two different modes, each using a different type of key management. These are: Domain mode, which uses symmetric key management PKI mode, which uses asymmetric key management ProtectFile Business uses symmetric key management. The following sections are presented as an overview to help explain the benefits and disadvantages within each of the discussed key management environments. It is up to the individual to select which type of key management is considered best for a particular application, or contact SafeNet Support for assistance. Symmetric Key Management Symmetric encryption systems (for example, DES) have been used in government and business applications for a long time. The encryption algorithm is published to allow independent and widespread analysis of the algorithms. The security of these systems depends on the security and strength of a secret key shared by sender and recipient. 2 © SafeNet, Inc. Chapter 1 Introduction Figure 2 illustrates an example of two users who wish to access the same encrypted data file under a symmetric key management system. For each pair of users, a secret key needs to be exchanged. Problems can arise within this environment because the key must be present on each workstation in order for a user to access encrypted data. This increases the probability of compromising the encryption key, and hence compromising all data secured by that key. An administrator has the responsibility for safeguarding the key and securely installing the key on each system. Under a symmetric key management scheme, larger scale deployments are often inflexible and unworkable. Figure 2: Example of file encryption/decryption using symmetric keys Asymmetric Key Management (PKI Mode) An alternative solution to working with a symmetric system is to implement a Public Key Infrastructure (PKI) system. The PKI system is based on asymmetric key and cipher technology. Unlike its counterpart, the PKI system can be scaled to cover a large number of computer users with relative ease. Since PKI systems tend to be implemented on a larger scale, it is imperative to implement software that enables key distribution to be efficiently managed. Figure 3 illustrates an example of two users who wish to access the same encrypted data file under an asymmetric key management system. The general principle utilized in this system is that each user has two key values: A private value, which is never disclosed but used to decipher data A public value, which is distributed to others and used to encipher data © SafeNet, Inc. 3 Chapter 1 Introduction Figure 3: Example of file encryption/decryption using asymmetric keys within a PKI ProtectFile Premium incorporates asymmetric key technology into its key management using third-party PKI products (for example, Entrust). This makes ProtectFile administration as simple as possible, while maintaining a high level of security. Algorithm Support Algorithms supported by this version include: DES1 2 Key Triple DES IDEA2 AES (128 Bit) AES (192 Bit) AES (256 Bit) 4 1 Legacy files encrypted with DES are still accessible. 2 The IDEA algorithm is only supported when an IDEA license is installed and the FIPS option is not selected. © SafeNet, Inc. Chapter 1 Introduction NOTE It is recommended that while you have a mixed environment (Clients and Management Console of differing versions) that you do not use AES encryption for anything you wish to share with clients running earlier versions. Integration with Third-Party Authentication Products ProtectFile Premium ProtectFile Premium integrates seamlessly with the EntrustTM, RSA KeonTM, , and MicrosoftTM PKI environment. The ProtectFile Premium—EntrustTM Version interfaces to the Entrust Certificate Authority (CA) via the EntrustTM proprietary API. The ProtectFile Premium—MicrosoftTM PKI Version utilizes the MicrosoftTM Cryptographic Service Provider (CSP) API and integrates with the RSA KeonTM and MicrosoftTM PKI environments. The use of hardware tokens or smart cards with CSP interfaces is achieved via the PKI CA. These devices do not directly interface to ProtectFile Premium. ProtectFile Business ProtectFile Business log on authentication may be achieved via the use of CSP tokens or passwords. © SafeNet, Inc. 5 Chapter 1 Introduction THIS PAGE INTENTIONALLY LEFT BLANK 6 © SafeNet, Inc. Chapter 2 Installation Chapter 2 Installation ProtectFile Premium Dependencies ProtectFile Premium performs public key cryptographic functions via calls to a PKI API. It is required that the underlying PKI environment has been installed, correctly configured and is in an operational state prior to the installation of ProtectFile. The PKI environment can be customized and configured to suit many different operational requirements. It is strongly recommended that these services are tested and confirmed as working correctly prior to commencing a ProtectFile installation. Please refer to your PKI‘s documentation for details on how to check its operational state. As a guideline, the following should be confirmed: LDAP/X.500 directory services should be accessible and available. Public key encryption should perform correctly without errors. ProtectFile Premium - Entrust Version ProtectFile requires access to the following files: Entrust initialization file (Entrust.ini)—This file contains essential information such as the IP address of the Entrust CA and other system-critical information. User profile files (*.epf)—These files are used to perform authentication and public key cryptography, and to store public key certificates and private keys. When starting, ProtectFile attempts to find the location of these files in the Entrust defined default directories. If the files cannot be found, the ProtectFile installation will request the user to specify their location. Before starting ProtectFile, it is recommended that you note the location of these files should they be required. The detailed configuration, installation, and operation of the Entrust environment are beyond the scope of this document. This manual assumes that the user is competent with the use of Entrust. © SafeNet, Inc. 7 Chapter 2 Installation ProtectFile Premium - Microsoft PKI Version The required configuration requires technical know-how on how a Microsoft PKI is set up. The registry entries required by ProtectFile are described in Chapter 7. ProtectFile Business Dependencies It is strongly recommended that when ProtectFile Business is used in conjunction with CSP tokens, that these services are tested and confirmed as working correctly prior to commencing a ProtectFile installation. If you intend to use ProtectFile in conjunction with the Management Console, it is recommended that the Management Console be installed prior to installing ProtectFile on either the administrator‘s workstation or any clients‘ workstations. Setup Before you begin the ProtectFile installation, please ensure the following: Uninstall any previous version of ProtectFile you have on your system and then reboot your computer. ProtectFile does not delete the user‘s profile during the uninstall process. Therefore, if you want to reuse the old configuration, use the same keyphrase that was used in the prior installation(s). If you do not want to reuse the old configuration, manually delete the <User_name.>.prof file stored in the ProtectFile Management Console Profiles folder prior to installing the new version of ProtectFile. If you have anti-virus software (AVS) installed, deactivate it prior to starting the installation. If installing on a Windows 2000/XP system, please ensure that you are logged in as a user belonging to the ―administrators‖ group. When installing ProtectFile to operate with the Management Console, have the relevant details of your system setup at hand. These details are: Where (on the computer running the Management Console) the ProtectFile client can find the configuration information (profiles). The location of the Transport IN and Transport OUT directories on the computer running the Management Console. A profile should exist for the user authenticating to ProtectFile. For details of Management Console installation and usage, refer to the ProtectFile Management Console User Guide or the Management Console Tutorial. 8 © SafeNet, Inc. Chapter 2 Installation ProtectFile Installation 1. Insert your ProtectFile installation CD into the workstation CD-ROM drive. 2. Go to the root directory of the installation CD and double-click on setup.exe. The install application will start. Click Next. 3. Accept the License Agreement and click Next. © SafeNet, Inc. 9 Chapter 2 Installation 4. Fill in the appropriate Customer Information—User Name, Organization, Serial Number, and select the appropriate options as described below, and then click Next. The Serial Number is the license code which determines whether you are installing ProtectFile Business, or ProtectFile Premium. Note: If you enter an invalid Serial Number (license code), or if you do not enter a number at all, the following message will display. Click Back and re-enter the correct Serial Number, or click Next to install the 30-day trial version of ProtectFile Business (Demo Mode). 10 © SafeNet, Inc. Chapter 2 Installation Select any of the following options as needed: Hide tag files—If this option is selected, the ProtectFile driver will hide Domain tag files (ENVELOPE.SYS) from all other applications. Use GINA for user authentication—(GINA functionality is not supported if Windows Vista is installed.) If this option is selected, the ProtectFile GINA component is installed, which facilitates the Single Sign-On capability. Additionally, if this option is selected, the following check boxes are automatically selected: o Allow Password Sync—If this option is selected, the ProtectFile password will always be synchronized with the Windows login password (Single Sign-On). o Suppress Login Dialog—If Single Sign-On is used and this option is selected, the ProtectFile login dialog is disabled (hidden) when logging in to Windows. NOTE Do not select the Use GINA for user authentication option if you opted to install the trial (Demo Mode) version of ProtectFile, as this will prevent the user from launching ProtectFile from the system tray. Start ProtectFile automatically on login—If this option is selected, ProtectFile will start automatically. It is advisable to select this option so that ProtectFile starts automatically following a re-boot of your computer. If you select No, ProtectFile will have to be launched manually via the Start menu. Mark encrypted folders with a red key—If this option is selected, a ―red key‖ icon is placed over encrypted folders and shortcuts when displayed in Windows Explorer or on the Desktop. Install SecLan migration tools—This feature is only available in ProtectFile Business. If this option is selected, the migration tools required for migrating SecLan Profiles are installed. This will also enable the SecLan profile edit box, which allows you to enter the path to the SecLan Profiles to be migrated. This feature is only available when the GINA component is installed. Ensure that the Use GINA for user authentication check box is selected (described above). Show Domain/Envelope Access Warning—If this option is selected, an access warning will display when attempting to access a registered remote domain/envelope. If this option is not selected, the warning does not display. Mobile users may want to disable this feature. © SafeNet, Inc. 11 Chapter 2 Installation 5. Select your CSP Provider and then click Next. Refer to Chapter 7 and the registry key entry labeled CSPProvider for further details. 6. If you are installing ProtectFile Premium (MS PKI), which is determined by the Serial Number you entered in step 4, four dialogs are displayed consecutively, and allow you to configure LDAP parameters, certificate parameters, and Auto Registration configuration details. If you are authenticating to Active Directory, you can accept the defaults for the LDAP settings. Detailed descriptions of the LDAP Settings are provided in Chapter 7. Refer to the descriptions for the Registry Key Entries listed in the following tables. LDAP Settings Page 1 12 © SafeNet, Inc. Chapter 2 Installation Dialog Entry Registry Key Entry The name of the LDAP host LdapHost The name of the attribute containing the user's distinguished name (DN) AttributeDN The name of the attribute identifying the user's certificate AttributeCertificate The name of the attribute identifying the user’s display name AttributeDisplayName The first alternate search base entry SearchBase0 SearchBaseX The distinguished name of a certificate issuer to narrow down certificate selection RequiredIssuer LDAP Settings Page 2 © SafeNet, Inc. Dialog Entry Registry Key Entry The name of the attribute containing the user's common name (CN) CommonName An alternative naming context to use in directory searches NamingContext The distinguished name of the recovery agent RecoverAgent The intended certificate usage identifier CertificateIntendedKeyUsage The first enhanced key usage entry (CertificateEnhancedKeyUsage0) CertificateEnhancedKeyUsageX A default LDAP filter LdapDefaultFilter 13 Chapter 2 Installation 7. If you are installing ProtectFile Premium (MS PKI) with certificates stored on a cryptographic token, which is determined by the Serial Number you entered in step 4, follow this procedure: Set up an Active Directory domain controller with Certificate Authority (CA) service configured to issue certificates stored on a cryptographic token. To do this: Run the Microsoft Management Console (MMC) and select File > Add/Remove Snap-in. Select the Certificate Authority and the Certificate Template snapins. Click Add for each one, click Finish, and then click OK. Select the Certificate Templates item from the tree in the left window pane. Scroll down to Smartcard User template. Right-click and select Duplicate Template. Under the General tab, provide the new template name (for example, Custom Smartcard User). Verify that the Publish Certificate in Active Directory option is selected. Do not change the default value set under the Request Handling tab (all CSPs). Under the Subject Name tab, select the Build Info. From Active Directory radio button. Clear the Include E-Mail Name in Subject Name and the E-Mail Name settings. Under the Security tab, assign the Authenticated Users group the Enroll permission, otherwise only domain administrators will be able to enroll with this template. Click OK. The new template is created. Select the Certification Authority item from the tree in the left pane. In the tree at Certification Authority > [Your CA Name] > Certificate Templates, right-click on the panel on the right side and select New > Certificate Template to Issue from the context menu. Select the Certificate Template just copied and click OK. 14 © SafeNet, Inc. Chapter 2 Installation The token or smart card must contain a valid certificate for ProtectFile to use before ProtectFile starts. Perform the following procedure on the Client as the user that you want to run ProtectFile with: Run the Microsoft Management Console (MMC) and select File > Add/Remove Snap-in. Select the Certificate snap-in, choose the certificate, and click Add. You may also need to select ―for this user account‖ if the user is an Administrator. Click Finish, then Close, and then click OK. The Certificate snap-in should display under Console Root. Open this tree item. Right-click on Personal and select All Tasks > Request New Certificate from the context menu. Select the Custom Smartcard User certificate template created earlier and select Advanced, then click Next. Select the CSP that your token vendor uses. For example, if you have a Rainbow iKey, select Datakey RSA CSP. Select the Key Length of 1024 bits. Accept the defaults for the rest of the certificate request process. ProtectFile must now be installed on the client system. Perform the following procedure on the Client as the Administrator: CSP - Settings Select your CSP Provider and then click Next. All other settings on the subsequent LDAP Settings pages should be configured per your particular operating environment. Refer to the previous pages for LDAP settings. Reboot the system. © SafeNet, Inc. 15 Chapter 2 Installation Log in as the same user as in the above steps. ProtectFile will start immediately after logging in. A blue key will display in the system icon notification area. Certificate Handling This screen provides options for handling certificate chain checking. The Verify Certificate Chain default value is CERT_CHAIN_REVOCATION_CHECK_END_CERT, which enables certificate chain checking. When this option is selected, individual errors can be selected or cleared in the check boxes located below the Verify Certificate Chain box. To disable certificate chain checking, set Verify Certificate Chain to CERT_CHAIN_REVOCATION_CHECK_DISABLE, and select the IGNORE_ALL option. Auto Registration Configuration 16 © SafeNet, Inc. Chapter 2 Installation This only applies to ProtectFile Premium MSPKI. If Auto Registration is enabled, ProtectFile will automatically attempt to register all unregistered envelopes upon their first access attempt. Although this feature is convenient in a small or medium sized network environment, there can be performance issues in a large-scale enterprise environment. This dialog allows you to enable/disable auto registration and configure timeouts (in seconds) for de-registration history and initial access. See AutoRegisterTimeout and PendingCreateTimeout in Chapter 7 for more details. 8. Select your preferred language and then click Next. 9. (This step only applies to ProtectFile Business.) Enter the details of ProtectFile and Management Console interaction. Select the Use Management Console features check box to activate the input fields. © SafeNet, Inc. 17 Chapter 2 Installation Enter the location on the Management Console computer of the user profiles and the folders which are used as transport folders to exchange information between ProtectFile client(s) and the Management Console and then click Next. Refer to the section, ―Policy Registry Keys‖ for details on the formats of the primary and secondary user profiles (ConfigFilePrimary, ConfigFileSecondary) and the transport folders (TransportIn and TransportOut). 10. Accept the default directory where ProtectFile will be installed and click Next or change the location by clicking on the Change button. 11. If you are installing ProtectFile Business and you are configuring it to use CSP tokens, you will be prompted to supply the following details: Algorithm (currently, CALG_RC4 is the default) Provider Type (currently, only PROV_RSA_FULL is supported) Provider—Select your CSP Provider. (See supported CSP Providers) 12. Click Next to continue. 13. Click Install. The wizard will install the required files and make necessary changes to the Windows registry. For details of what is changed in the registry, please refer to Chapter 7. 14. To finalize installation, reboot your computer. Please follow the instructions at the end of the installation. 18 © SafeNet, Inc. Chapter 2 Installation NOTE Should the installation fail, check that you have logged in as a member of the administrators group. Most installation failures are related to insufficient system permission or access rights. If the problem persists, please contact SafeNet Support for assistance. The automatic start is not required if the ProtectFile GINA component was selected. For information on silent installation, see Chapter 9. Components of ProtectFile ProtectFile has five (5) active components: PROTECTF.SYS for Windows 2000/XP is the driver that performs the selective and transparent encryption/decryption of files. PROTECTF.DLL is the control panel for the ProtectFile driver, and must reside in the ProtectFile installation directory. Each user can define a personal configuration for ProtectFile, either by registering to at least one envelope (PKI mode), or by defining at least one domain (Domain mode). PROTECTF.EXE is the startup executable that is used if the user chose to start ProtectFile without the help of the GINA. PFGINA.DLL is the Windows GINA startup .dll used to start ProtectFile right after the Windows‘ user authentication, and must reside in the ProtectFile installation directory. BSHELLICON.DLL is the Shell Extension that displays red keys over envelopes in Windows Explorer and on the desktop. NOTE The shell extension requires Windows 2000 or later. Invoking ProtectFile Select Start > Programs > SafeNet > ProtectFile > ProtectFile to point to PROTECTF.EXE to allow manual execution of ProtectFile. Alternatively, if ProtectFile was placed into the Startup menu during the install, it will automatically execute following system reboot. After ProtectFile starts, the ProtectFile Login dialog displays. © SafeNet, Inc. 19 Chapter 2 Installation Starting ProtectFile for the First Time During the installation, you were asked to enter a license number. There are two types of valid licenses available for the operation of ProtectFile. After ProtectFile starts, depending on the type of license you selected, the following dialog applies: Invalid License Number If you entered an invalid license number, a dialog is shown, requesting you to update your license. Click OK to continue. You will be prompted to enter a new license number. Refer to Chapter 4 for details regarding license updates. Evaluation License Number If you entered an evaluation license number, the number of days remaining for evaluation will be shown in a dialog box. Click OK to continue in the same manner as if using a full license. (See below). Full License Number If you have entered a full license number, you will be directed to the appropriate logon screen depending on which mode ProtectFile is running. The user will be presented with the standard ProtectFile login. The first time this is run, the login will prompt for a new password. Enter and confirm your new user password. The OK button is not enabled until you have entered correct and matching values. NOTE A user password must have at least 10 characters and may consist of arbitrary values. User passwords are case-sensitive, i.e., upper- and lowercase letters are different. 20 © SafeNet, Inc. Chapter 2 Installation Starting ProtectFile with the Management Console When using ProtectFile with the Management Console, a primary and a secondary user profile may be specified at installation time. This allows for a primary user profile to be stored on a network drive (usually the computer where the Management Console resides) and a secondary user profile to be stored on the ProtectFile user‘s computer, which is a backup of the primary user profile. ProtectFile creates a backup of the primary user profile to the secondary user profile on logon with the primary user profile. On startup, ProtectFile will attempt to access the primary user profile specified on installation. This can fail if the primary user profile resides on a remote computer— a network connection to that computer cannot be established and a secondary user profile is not available locally. It may also fail if a user profile has not been created for the ProtectFile user yet. In either case, ProtectFile displays an error message and terminates. If a network connection cannot be established, but a secondary user profile exists, ProtectFile can use a secondary copy of the profile and will start up. If a profile is read successfully, ProtectFile starts up and executes any pending operations. Refer to Policy Registry Keys in Chapter 7 for further details regarding user profiles. Refer to the ProtectFile Management Console User Guide for detailed information regarding its functionality. © SafeNet, Inc. 21 Chapter 2 Installation Uninstalling/Upgrading ProtectFile NOTE To upgrade ProtectFile, you must uninstall the current version first. After you have rebooted the computer, you can install the new version of ProtectFile. Prior to uninstalling ProtectFile, make sure that you have removed and decrypted all domains for data that no longer requires protection. Refer to Chapter 5 for details on removing domains. Any domains/envelopes not removed will remain encrypted after uninstalling ProtectFile. ProtectFile does not delete the user‘s profile during the uninstall process. Therefore, if you are planning to upgrade ProtectFile and you want to reuse the old configuration, use the same keyphrase that was used in the prior installation(s). If you do not want to reuse the old configuration, manually delete the <User_name.>.prof file stored in the ProtectFile Management Console Profiles folder prior to installing the new version of ProtectFile. Manual Uninstall 1. Open Windows Control Panel and select the Add/Remove Programs icon. 2. Choose ProtectFile from the list of installed software and click Add/Remove. Follow the on-screen prompts to complete the un-installation. 3. All software, all files, and all entries in the registry that were installed will be removed. Please note that files or registry entries, which were added after the installation procedure, will remain. This also applies to the user profile and the log file. For details of which keys are installed in the registry, please refer to Chapter 7. 4. Reboot your computer to complete the uninstall procedure. Silent Uninstall 1. Log in to Windows as the Administrator. 2. Open the Windows Registry with REGEDIT. 3. Click on HKEY_LOCAL_MACHINE\Software\Microsoft\Windows\ CurrentVersion\Uninstall\. 4. From the REGEDIT Edit > Find menu, search for ―ProtectFile,‖ and select the Values and Data options. The first entry you find will point you to the ProtectFile GUID Subkey. For example, this Subkey may be: {A256E68C-4873-4C47-954651F6F0E903E4} 22 © SafeNet, Inc. Chapter 2 Installation 5. Locate the UninstallString REG_EXPAND_SZ value inside this ProtectFile GUID Subkey. For example, this value may be: “MsiExec.exe /X{A256E68C-4873-4C47-9546-51F6F0E903E4}” 6. Copy this value to the Command Prompt (CMD) and add the following to it so the entire command line looks like the following example. Please note that the log file is optional, but highly recommended. C > MsiExec.exe /qn /forcestart /log c:\temp\pf_uninstall.log /X{A256E68C-4873-4C47-9546-51F6F0E903E4} 7. Run the above command to uninstall ProtectFile. 8. Reboot your computer to complete the uninstall procedure. © SafeNet, Inc. 23 Chapter 2 Installation THIS PAGE INTENTIONALLY LEFT BLANK 24 © SafeNet, Inc. Chapter 3 Authentication Methods Chapter 3 Authentication Methods Invoking ProtectFile From the Programs or All Programs menu, select SafeNet > ProtectFile > ProtectFile. If, during installation, it was specified that ProtectFile should be placed in the startup menu, it will automatically be executed following a reboot of your computer system. The ProtectFile login dialog displays. ProtectFile Log On ProtectFile Business supports three methods to authenticate a user at log on: Password Log On ProtectFile/Windows Single Sign-On CSP Token Log On ProtectFile supports a single method to authenticate a user at log on: Third-Party Authentication Starting ProtectFile will result in authentication by the third-party product installed on the system. The method used to authenticate maybe transparent to the user. EntrustTM installations use EntrustTM authentication. MSPKI installations use the CSP configured during installation to authenticate. Refer to the documentation supplied with the appropriate third-party product for further details. NOTE The authentication mode is determined by the license code entered on installation. © SafeNet, Inc. 25 Chapter 3 Authentication Methods Password Log On NOTE If you are upgrading from ProtectFile versions prior to v2.01.0, the following password-related considerations need to be made: o ProtectFile prior to v2.01.0 - Passwords are not case-sensitive. If special characters such as Space, ―#,‖ etc. were used, they are automatically removed. o ProtectFile v 3.x - Passwords are case-sensitive. When using passwords created during the use of ProtectFile prior to v2.01.0, the users should type their passwords in ALL CAPS. Furthermore, the users need to be instructed not to enter any of the special characters. 1. Enter your user password. 2. If the Save User Password check box is selected, your user password will be shown automatically in a non-readable form the next time you log on. 3. The Hide check box can be cleared if you want to use the ProtectFile menu features immediately. Alternatively, the main menu can be invoked later by clicking the icon in the Windows System Tray. A correct login will minimize the dialog and place a key folder icon in the taskbar, which can be used to gain access to the ProtectFile main menu screen. An unsuccessful login attempt will clear the password entry field and prompt for a new password. The login will allow for three unsuccessful attempts, after which the dialog will close and leave ProtectFile inactive. NOTE Recovery will start automatically, if the Management Console was used to generate the user‘s configuration. Refer to the section, Recovering After Losing the User Password for further details. 26 © SafeNet, Inc. Chapter 3 Authentication Methods ProtectFile/Windows Single Sign-On ProtectFile/Windows Single Sign-On (also referred to as GINA authentication) is similar to the password authentication method as described above. The main difference is that ProtectFile authentication happens simultaneously with the Windows login. Single Sign-On has two advantages: The user authenticates only once. More importantly, this early authentication allows for encryption of data that may be required immediately after the Windows login and before the user is able to invoke ProtectFile, i.e., data required by auto-start applications (for example, Outlook mailbox). NOTE GINA is not supported if Windows Vista is installed. NOTE Recovery will start automatically, if the Management Console was used to generate the user‘s configuration. Refer to section Recovering After Losing the User Password for further details. CSP Token Log On When authenticating to ProtectFile for the first time, the user can specify the keys on the token to be used. The default for ProtectFile is to use the most recent. However, if the registry setting, OlderCertificateBehaviour, is not set to 0, and there is more than one key pair on the card, ProtectFile displays a dialog to allow the user to select the required key pair. The key pair selected is stored by ProtectFile and subsequent authentication will use this selection. The user is then prompted to authenticate to the token (for example, with a PIN). The dialog displayed will depend on the type of security token used. ProtectFile supports tokens that follow the Microsoft CSP definition. Installation, configuration, and initialization of a token are token-dependent, and are outside the scope of this manual. Quick installation guides are available for selected token types from SafeNet. For detailed information, contact your token issuer. Specific ProtectFile configuration is described in Chapter 7. © SafeNet, Inc. 27 Chapter 3 Authentication Methods Workstation Security To safeguard against unauthorized users gaining access to an unattended workstation, it is strongly recommended that some type of timed lock-out workstation functionality be implemented as a minimum precaution. This could include a password protected screensaver feature or EntrustTM's Single Sign-On solution. 28 © SafeNet, Inc. Chapter 4 Administration Chapter 4 Administration Administration Tasks Changing the User Password By default, ProtectFile is configured in such a manner that the user login password must be changed periodically. The administrator can configure the period of time between required password changes. It is also possible for users to change their password at any time via the main menu. 1. From the Keyphrase menu, select Set New Password, or click the Change Password button on the toolbar. The new user password dialog displays. 2. Enter and confirm the new user password. Following correct entry, the new user password takes effect immediately. Hashing a Keyphrase The term hashing refers to a cryptographic operation, which can be used to derive a value from a specific input. The ProtectFile cipher keys are generated from the keyphrase using a hashing algorithm. Each different keyphrase generates a unique cipher key. At times, it may be necessary to know the actual cipher key value that corresponds to a particular keyphrase (for example, to comply with local regulations on the use of ciphers, or to comply with a company policy). The Hash Keyphrase option is available from the main menu for such a requirement. Follow these steps to view the key derived from a keyphrase: 1. From the Keyphrase menu, select Hash Keyphrase. The hash keyphrase dialog displays. 2. Enter and confirm the particular keyphrase for which you want to derive the key. 3. Select the required algorithm to use with the key. 4. Press the Show button. A string of hex digits will be displayed. This is the derived Key for the selected algorithm. Hyphens are inserted to assist you when reading and copying down this value, but do not form part of the key itself. © SafeNet, Inc. 29 Chapter 4 Administration NOTE The Show button is not enabled until you have entered correct and matching values as a keyphrase. Cipher key values must be guarded as carefully as your keyphrases since knowledge of these values can compromise your data. Recovering After Losing the User Password Password recovery is possible if ProtectFile is configured in conjunction the Management Console. If you have forgotten your user password and are presented with a dialog requesting an Unlock Key, you will need to take the following actions: Contact your ProtectFile Administrator and supply the Lock Code pair displayed (Lock Code 1, Lock Code 2). Your ProtectFile Administrator will supply you with an Unlock Key. Enter the supplied Unlock Key. If the Unlock Key is correct, you will be required to enter a new password, after which you will be able to continue using ProtectFile as normal. NOTE If you are not asked to enter a new password and ProtectFile closes, the Unlock Key entered is incorrect. This could be due to a number of factors: The Unlock Key was entered incorrectly. The Unlock Codes you supplied to the ProtectFile Administrator were incorrect. The Unlock Key supplied by your ProtectFile Administrator was incorrect. Dealing With Lost User Passwords If you have forgotten your user password and you are not presented with a dialog requesting an Unlock Key, it may be possible to recover data, provided that one of the following conditions is met: The domain/envelope keyphrases are known. An old configuration with your current user password was previously saved. Contact your system administrator for assistance. 30 © SafeNet, Inc. Chapter 4 Administration Temporarily Disabling Protection You can temporarily disable the ProtectFile driver when required. While ProtectFile is disabled: A check mark is shown next to the Disable option in the File menu. The text ―(Disabled)‖also appears in the status bar. The icon in the system tray will change to a key with a stop sign. You can safely backup and restore folders within domains/envelopes. When ProtectFile is disabled, your protected files are not readable but can be copied and transferred in their protected form. This feature is especially helpful when you need to transfer the files in an encrypted format (for example, when you backup the files). Before performing a Windows Backup or Restore procedure, always make sure you disable the ProtectFile driver first: To disable ProtectFile, from the main menu, select File > Disable. To re-enable ProtectFile, from the main menu, select File > Disable. The operation is reversed and all the ―disabled‖ indicators are removed. NOTE This feature has been designed with great care to avoid loss of data. However, never forget that disabling ProtectFile influences access to all files located in the defined domains/envelopes. Therefore, do not forget to re-enable ProtectFile immediately after you have completed the operation for which it was disabled. Defragmenting FAT/FAT32 Partitions When running the Windows Defragmentation utility on FAT/FAT32 partitions, it is necessary to temporarily disable the ProtectFile driver to avoid data corruption. Reenable the ProtectFile driver when defragmentation is complete. Configuring the Screen The toolbar component of the main menu can be turned on or off via the view menu. To hide or display the toolbar from view, from the View menu, select Toolbar. © SafeNet, Inc. 31 Chapter 4 Administration Updating Your License There are two types of license numbers available: those without any time limitation for professional use those with 90 days time limitation for evaluation If your ProtectFile license is a trial (evaluation) license, upgrade to a full license by changing the license code. You can upgrade your license any time. 1. From the main menu, select Help > About ProtectFile. The About ProtectFile dialog displays. 2. Click the License button next to the License Number. 3. Enter the new license number into the fields provided and click OK. 4. Click OK again to close the window. NOTE To upgrade from one version to another (for example, BUSINESS PASSWORD to BUSINESS CSP), you need to uninstall ProtectFile and then reinstall with the new license number. Your personal configuration will not be affected. Configuring User Profile Details For ProtectFile Premium and ProtectFile Business operating without the Management Console, the ProtectFile user profile is stored in the Windows Profile folder: For example, in the file C:\Documents and Settings\<username>\<username>.prof (where <username> is replaced by the Windows user name). When ProtectFile Business is operating with the Management Console, the ProtectFile user Profile is stored in a primary user profile and a backup is made to a secondary user profile. The primary user profile and secondary user profile are specified at installation time. Refer to Policy Registry Keys in Chapter 7 for further details. Viewing the Event (Log) File All security-related actions performed within ProtectFile are recorded in the PFLOG.SYS event log file. This log file is stored in the following locations: Windows 2000/XP - [User Folder]\Application Data (For example, C:\WINNT\Profiles\Username\Application Data.) C:\Documents and Settings\Username\Application Data 32 © SafeNet, Inc. Chapter 4 Administration The PFLOG.SYS log file never exceeds the maximum size indicated by the policy settings found in the Windows registry. When the current PFLOG.SYS file reaches the maximum size, it is renamed to PFLOG.OLD and a new PFLOG.SYS file is created automatically. Any existing PFLOG.OLD file will be overwritten. You can view the PFLOG.OLD file with any text editor. The event log contains a scrollable list of all security related events. Events are shown in chronological order with the most recent event at the bottom of the list. To view the event log: 1. From the main menu, select View > Log file or click the View log file icon on the toolbar. 2. Click OK to close the dialog box. Defining a Policy ProtectFile allows administrators to set a range of permissions (policy settings) that restrict the features of ProtectFile available to typical users. This feature can help prevent accidental data loss, for example, resulting from misuse of some advanced features. Members of the Windows Administrators group are not affected by the ProtectFile policy settings. 1. From the main menu, select Help >About. 2. Click Properties. The Settings dialog displays. The ProtectFile policy is defined by selecting or clearing the appropriate check box(es). Select a check box to allow the corresponding function, or clear the check box to disable its function. Refer to the descriptions on page 35 to determine the settings of your ProtectFile policy. © SafeNet, Inc. 33 Chapter 4 Administration 3. Click Save to save the settings. NOTE By default, this feature is only available to members of the Windows Administrators Group and Windows Power Users Group. This may be disabled for each group by turning off the Administrator and PowerUser settings, respectively, in the Policy Registry Key. Before a non-administrator can use ProtectFile, the policy has to be defined by the administrator either directly via the registry, or using the policy dialog. Administrators are not affected by the policy settings and can continue to use all ProtectFile features (except if the Administrator or PowerUser registry settings are set to 0). A normal user trying to access the policy will be prompted for the keyphrase. If the correct keyphrase is presented, a user will be permitted to change all aspects of the policy except for the keyphrase. Policy settings changed in this way will only remain valid for the period of the current logged in session, after which all values will be reset to the standard policy settings as defined in the registry. This feature is available to temporarily allow administrators to perform a certain action, which would normally not be permitted via the user‘s machine. When increasing the minimum keyphrase length, existing, shorter keyphrases will not be accepted any longer. 34 © SafeNet, Inc. Chapter 4 Administration Policy Settings Setting Policy Keyphrase Enter Keyphrase Reenter Keyphrase Description Enter and confirm a policy keyphrase in these fields. A keyphrase is used to ensure that only authorized users will have access to alter the policy settings. The default password is set to DONOTENTER. Envelope Policy (PF Premium only) Envelope Add Envelope Remove Update Protected Automatic Register Allow the user to create a new envelope. Allow the user to remove an envelope. Allow the Access Control check box on the Add Domain and Add Envelope dialogs to display. Allows an envelope to be automatically registered when it is added. Disable Policy Allow Disable Allow the user to temporarily disable ProtectFile. Log File Policy Log File View Allow the user to view the event log. Log File Size ___ k Byte Change the event log size. Encryption Mode Allow change mode Default Mode Default FIPS Mode Allow the user to change encryption mode of a domain. Choose the default encryption mode. Enable FIPS-compliant CGX Cryptographic module. The setting of this option affects the default setting of the FIPS Mode check box in the Add Domain/Add Envelope dialogs. LogOff Policy Allow LogOff Allow the user to shut down ProtectFile to stop cipher operations. Extension Policy Extension Add Extension Remove Allow the user to create a new extension. Allow the user to remove an extension. Exclusion Policy Exclusion Add Exclusion Remove Allow the user to create a new exclusion. Allow the user to remove an exclusion. Domain Policy (PF Business only) Domain Add Domain Remove Share Domain Allow the user to create a new domain. Allow the user to remove an domain. Allow the user to share a domain. Keyphrase Change Period Days Specify the maximum time interval between user password changes. Keyphrase Policy User Password Set Domain Keyphrase Set Hash Keyphrase Minimum Length © SafeNet, Inc. Allow the user to change their password. Allow the user to set the domain keyphrase. Allow the user to hash a keyphrase (from PF main menu). Define the minimum length of all ProtectFile keyphrases. 35 Chapter 4 Administration Backing Up Files Encrypted data on a disk commonly needs to be backed up. When using automated tools to perform backup operations, it would be inefficient for you to disable ProtectFile and then re-enable ProtectFile after the backup is completed. ProtectFile offers a feature called Encrypted Access, which allows you to designate which applications will always be presented with encrypted data in a domain, regardless of whether you are logged into ProtectFile or not. Backups made with the help of this feature ensure sensitive data can not be read by an unauthorized person after it is moved onto a tape or other archival format. To give an application encrypted access: 1. From the Windows Start menu, select Run. 2. Type regedit.exe and press Enter. 3. Use the tree on the left to navigate to the registry key HKEY_LOCAL_MACHINE\SYSTEM\CurrentControlSet\Services\ProtectF\Parameters. 4. Right-click on the EncryptedAccess value and select Modify. 5. Type the executable file name of the application that you want to have encrypted access (for example, backup.exe). 6. Click OK. 7. From the Registry menu, select Exit to close the Registry Editor. 8. Restart your computer for the changes to take effect. NOTE Adding an executable filename to the encrypted access list means that all applications with that executable filename will only be able to read data in encrypted form from domains. To decrypt data that has been backed up separate from the domain, you must ensure that the envelope.sys file is backed up as well. Without the envelope.sys file, data recovery is not possible. NOTE Windows Vista only: Do not use the standard Vista Backup and Restore Center to backup and restore ProtectFile envelope.sys files, as encrypted files will be filtered out (skipped). Use an alternate backup/restore utility to avoid possible data corruption. 36 © SafeNet, Inc. Chapter 4 Administration Creating an Encrypted CD You can create a CD that contains an encrypted domain to securely share files over physical media. The procedure for creating a CD containing a domain is similar to creating a CD without a domain and may vary depending on your preferred CD writing software. When encrypted files are written to a CD, accessing these files and decrypting them again is only a matter of registering the domain on the CD. To create a CD containing encrypted files: 1. Choose a domain that you want to copy to a CD (for example, C:\CDFILES). 2. Copy all files that you want to be encrypted on the CD into that domain. 3. Disable ProtectFile. 4. Using your CD writing software, copy the entire domain folder to the CD. 5. Write the files to the CD. 6. Re-enable ProtectFile. NOTE The envelope.sys file contains important information for decrypting files in the domain. Make sure this hidden file is copied to the CD or the encrypted files may not be able to be decrypted. To access files in a domain on a CD, simply insert the CD and register the domain. Restrictions Using NetBIOS vs. Fully Qualified Name Paths for Envelopes If an envelope for a particular share was created using the NetBIOS path (i.e., \\server\share) and later the files in that share are accessed using the share‘s Fully Qualified Path (i.e., \\server.domain.com\share\file), then the ProtectFile driver will not recognize that these files are inside a domain. As a consequence, encrypted files may appear encrypted, while newly created files will not be encrypted. The solution is to register this envelope using the share‘s Fully Qualified Path. This will solve the problem, and all files located in that share (when pointed to by the Fully Qualified Path) will be encrypted. © SafeNet, Inc. 37 Chapter 4 Administration Sleeping Domains/Envelopes During startup, ProtectFile reads the tag file of all registered domains/envelopes. Sometimes this is not possible (for example, the CD with the domain/envelope is not inserted or the server hosting a domain/envelope is not available). Such domains/envelopes are called ―sleeping domains/envelopes.‖ They are marked as Asleep in the View Domains/Envelopes dialog. Typically, their existence is of no importance, as the corresponding files are not available. However, it may happen that a sleeping domain/envelope becomes available later on (for example, the CD is inserted or the network server is restarted). In this case, ProtectFile offers the possibility of waking these domains/envelopes. In order to do so, the user has to click on the ProtectFile icon in the task bar. Nested Domains/Envelopes It is not possible to define a domain/envelope inside an existing domain/envelope. NTFS Compression The NTFS compression attribute and the encryption are not compatible with one another. Compressed files should not be encrypted, and encrypted files should therefore not be compressed in order to avoid file corruption. Renaming Envelope Root Folder Envelope folder structure consists of a root (top-level) folder and all of its subfolders. Renaming an envelope‘s root folder is not supported by ProtectFile, but renaming all subsequent subfolders is permitted. Using a New Token with a Newly Issued Certificate Logging on to ProtectFile Premium MSPKI using a new token/smartcard with a new certificate on it may result in an error. This is due to the fact that ProtectFile will still be looking for the private key associated with the previously used (―old‖) certificate located on the previously used (―old‖) token/smartcard. To circumvent this scenario, the user must initially log on to ProtectFile with the ―old‖ token to allow ProtectFile to query the server for the new certificate and decrypt the existing configuration (and then re-encrypt it) using the new certificate. Incidentally, the user may experience a log on error while using this method. The user must then log on again using the new token/smartcard. The user will not be able to access registered envelopes (or get their content in plain text form) until these envelopes get administered and, therefore, encrypted with the new public key. 38 © SafeNet, Inc. Chapter 4 Administration Adding/Deleting Envelopes The proper method of adding or deleting envelopes is to do it while they are online. Adding or deleting offline envelopes may lead to unpredictable or erroneous results. Deregistering Assigned Domains ProtectFile does not currently distinguish between assigned domains with a random key created on the client side and domains from a transport operation. There is no way to re-register an assigned domain once it has been de-registered. PATH Length Limitation Any path entered at any time into ProtectFile must be less than 260 characters. Supported DFS Configurations In Version 3.3.2 and higher, ProtectFile domains and envelopes can now be logically grouped for easy access within a DFS (Distributed File System) network environment. With DFS, administrators can create a virtual organization, called a DFS tree or namespace, which consists of shared directories and folders that are physically located on different computers on the network. For example, an administrator can create a single namespace for commonly accessed corporate documents called \\myCompany.com\2006\Sales that maps to physical resources residing on multiple servers. To connect to a DFS tree, the server and client computers must be configured to support DFS. Users connect to the root of the tree using any standard method of accessing shared folders and then browse it to find the child node they want to access. Once connected, from a user‘s point of view, the DFS tree will appear to be a single hierarchy of folders, located on a single server. DFS does not add any additional access control to the shared folders it manages. If a user has suitable permission to access a shared folder on the network, he can access it through a DFS tree. © SafeNet, Inc. 39 Chapter 4 Administration Reference Materials To configure DFS for your system, you must already be familiar with the DFS concept. Refer to Microsoft‘s Web site (www.microsoft.com) for the following information: A detailed description of DFS (Simplifying Infrastructure Complexity with Windows Distributed File System) A detailed description of the Windows DFS Administrator Tool (Step-by-Step Guide to Distributed File System) The following terms should provide you with a basic understanding of the components in a DFS hierarchy. For more detail, please review the reference materials mentioned above. DFS tree or DFS namespace—A hierarchical collection of shared resources, including a DFS root and DFS links (targets). Administrators can group shared folders located on different servers and then present them to users as a virtual tree of folders known as a ―namespace.‖ DFS root—The starting point for a DFS tree or namespace. Each DFS root is mapped to a DFS target (link). Clients can locate and access shared resources in DFS trees by browsing the root. When you first set up DFS, configure a starting point for the DFS tree (the DFS root). There are two types of DFS Roots—Stand Alone (SA) and Domain-based. DFS link or DFS target—The point beneath the root in a DFS tree or namespace. This link points to one or more shared folders on the network to which a DFS root is mapped. Folders must be shared before they can be added as DFS links. Domains and envelopes must be created on a DFS link (not a DFS root, or a DFS Link to a DFS root) that maps directly to a DFS target. In summary, the namespace starts with a root which maps to one or more links (targets). The root is often used to refer to the namespace as a whole. Below the root are links that can map to one or more shared folders on different servers. A DFS root uses one of the following formats: \\servername\rootname or \\domainname\rootname. 40 © SafeNet, Inc. Chapter 4 Administration Configure DFS Before you configure DFS, keep the following in mind: DFS must be set up on the servers and clients. Domains/envelopes must be created on a DFS link (not a DFS root or a DFS link to a DFS root). They must also be created on a DFS link which maps directly to a target. DFS links on both Domain-based DFS roots and Standalone DFS roots are supported. Cascading DFS links (DFS link to another DFS link) are supported. Be careful to avoid circular DFS links (LinkA LinkB LinkA). Replication is supported. This may require the File Replication Service on all servers within the replication scheme to be stopped and restarted. Use the Windows DFS Administrator Tool to configure DFS for your system. To perform these steps, you must be logged in as a user with administrative privileges. The following generic configurations outline the minimum requirements that must be met in order for domains and envelopes to be accessible in a DFS environment. Domains and envelopes must be created in a DFS folder that maps directly to, or is parented by, a physical share. A more detailed graphic is shown on the following page. Domain DFS Root (DFS Namespace Physical Share) \\Domain\Root \\DC\DFS-Root-Share | + Link-1 \\S1\DFS-Link, \\S2\DFS-Link | + Link-2 \\SA\Root\Link-1 (used as a cascaded link in the SADFS configuration, below) | + Link-3\SubLink \\S3\DFS-Link © SafeNet, Inc. 41 Chapter 4 Administration Stand Alone (SA) DFS Root (DFS Namespace Physical Share) \\SA\Root \\SA\DFS-Root-Share | + Link-1 \\S4\DFS-Link | + Link-2\SubLink ---> \\S5\DFS-Link Given the above configurations, an envelope can reside at any of the following locations: Domain DFS \\Domain\Root\Link-1[\Folder\...\] \\Domain\Root\Link-2[\Folder\...\] \\Domain\Root\Link-3\SubLink \\Domain\Root\Link-3\SubLink[\Folder\...\] Stand Alone DFS \\SA\Root\Link-1[\Folder\...\] \\SA\Root\Link-2\SubLink[\Folder\...\] NOTE The following locations are not supported because these links do not reference a physical share: o \\Domain\Root\Link-3[\Folder\...\] o \\SA\Root\Link-2[\Folder\...\] If you register a DFS share (or a mapped drive to a DFS share) then access will be denied to the actual server through its UNC or IP address, but will be accessible via the DFS share. That is, if you register a path using DFS (\\DFS\Share), access will only be granted through the DFS path. 42 o If you register the actual UNC (\\Server\Share), access will only be available through the UNC. o If you register a path through the IP address (for example, \\192.172.201.76\Share), then access will only be granted through the IP address. © SafeNet, Inc. Chapter 4 Administration Sample Configuration Compatibility Issues Dr. Solomon’s WinGuard for Windows 2000/XP When using Windows 2000/XP as an operating system, ProtectFile is compatible with Dr. Solomon‘s WinGuard for Windows 2000/XP but requires special configuration. For complete details on how to configure ProtectFile to operate in conjunction with Dr. Solomon‘s WinGuard, please contact SafeNet Support for assistance. © SafeNet, Inc. 43 Chapter 4 Administration THIS PAGE INTENTIONALLY LEFT BLANK 44 © SafeNet, Inc. Chapter 5 Advanced Domain Configurations Chapter 5 Advanced Domain Configurations Replicated Domains This feature is tied to the user roaming profiles, and is designed to allow users who frequently use different computers to find the same encrypted environment on every system they log onto. Setting up ProtectFile for roaming profiles and assigning the value of three (3) to the AllowIdenticalLocalDomains policy setting causes automatic domain replication to the local machine. Alternatively, the policy setting of one (1) causes automated domain replication, but with user approval (a dialog box displays to prompt for user approval). The default setting of zero (0) suppresses all local domain replication. As soon as a user logs onto ProtectFile, and ProtectFile detects that a registered local domain is asleep (or doesn't exist), it will automatically create the missing domain without asking the user to enter a keyphrase. ProtectFile will use the same envelope encryption key it used for the other (registered) domain and use a random data encryption key (DEK) to encrypt the files. ProtectFile keeps track of all replicated domains by storing the computer‘s NetBIOS name in the user profile. ProtectFile allows a user to remove a replicated domain, just as any other domain. ProtectFile will decrypt the domain and remove the envelope file and mark that particular entry in the user profile as ‗removed‘. ProtectFile will not remove the envelope encryption key from the cipher key entry until the last replicated domain is removed. When a replicated domain has been removed, ProtectFile will not attempt to recreate that domain the next time the user logs on, unless the NetBIOS name is removed from the user profile. When adding a local domain, ProtectFile will check if it was just marked as removed. If this is the case, ProtectFile will not use the supplied keyphrase and algorithm to create the domain, but rather replicate it. As long as a domain is just marked as ―removed,‖ you can restore the domain by registering it. © SafeNet, Inc. 45 Chapter 5 Advanced Domain Configurations Share Encrypted Directories From a security point of view, it is sometimes required to have shared temporary directories encrypted. In contrast to normal domains, the files stored in these temporary directories should not be accessible by other users. This can be achieved by making a domain a ―legacy domain,‖ which does not use envelope files, and allows each user to have their own encryption key. These shared encrypted domains need to be set up for each user separately. Add a Shared Legacy Domain 1. From the Domain menu, select Add, or click on the Add domain button on the toolbar. 2. Click the Browse button to display a Folder Selection dialog. 3. Select the folder (for example, C:\temp) to add as a ProtectFile domain. Ensure that the Path Selected field in the Add Domain dialog matches the folder that you want to protect. Any subfolders contained within the selected folder will also be secured. 4. In the Add Domain dialog, click the Advanced button. 5. Provide the key-phrase to be used for generating the individual user data encryption key. 6. Select the Legacy domain option. Files added, created, or moved into or out of the temp directory will be encrypted or decrypted transparently using a unique key for each user. Create Domains on Remote Machines If a domain on a remote machine is created with Access Control in a state of ON, and the owner of that machine wishes to view the unencrypted data, they are required to register the domain and restart their machines. This will cause other machines accessing the domain to no longer have access to the domain. If other users require access, then the owner of the remote machine is required to use the Administration functionality of the domain and turn Access Control OFF. They are then required to restart their machine. This will allow other users access to the domain. 46 © SafeNet, Inc. Chapter 6 Envelope Control Via Scripting Chapter 6 Envelope Control Via Scripting This chapter applies to ProtectFile Premium installations only. ProtectFile offers scripting support to provide a timesaving and error-free alternative in managing the normal user and envelope setup procedure. Scripts can define a range of user and envelope configuration settings. The scripting support for ProtectFile was designed with the following goals in mind: Security Robustness Customizable feedback mechanism Extensibility Flexibility With the benefits of script-based instructions to set up users, it is possible that end users never need to access the ProtectFile Graphical User Interface (GUI), and they may not even know they are using the encryption functionality of ProtectFile. This also reduces administration and Help Desk support for end users. How Scripting Works A ProtectFile script file is a simple text file with instructions for ProtectFile to perform user setup operations. These operations are normally executed through the application‘s GUI. NOTE To use scripting with ProtectFile, make sure the following registry entry is set to 1: HKLM\Software\SafeNet\ProtectFile\ScriptSupport. For more information about this registry entry, refer to Script Registry Keys in Chapter 7. A script file can be authored and edited with any text file editor, and the syntax is simple and straightforward. These instructions are typically used to register or deregister an envelope on behalf of a user. Another option is to create an envelope, with optional Exclusions, on behalf of a logged on user so that only that specific user can have access to the protected envelope. © SafeNet, Inc. 47 Chapter 6 Envelope Control Via Scripting Script files are passed to a script engine when ProtectFile is launched in the form of command line parameters, such as <protectf.exe script1.env script2.env …scriptN.env>. There is no limit to the number of script files for processing and script files can be located on any accessible network path. For example, a user‘s Windows logon script can execute ProtectFile scripts stored on several server machines across the business enterprise. Using this approach, an administrator can determine which sets of envelopes a user group or a single user should have access to, by simply editing the relevant logon script, without the need for any user communication. All script files have a file extension of *.env, and can be arranged in a hierarchical structure. This means a ―master script‖ (discussed on page 49) contains other script files. This provides a structured approach to managing envelopes, and allows for an unlimited number of script files to be passed to the script engine, also bypassing the operating system‘s command line maximum length restriction. Another feature is that an instruction in one script file can be overridden by a subsequent instruction if it relates to the same envelope. For example, a ―register Envelope‖ instruction is ‗overruled‘ by a subsequent ―de-register Envelope‖ instruction (in the same or another script file). The script engine in this case will not execute a register and then a de-register operation, but rather will determine the sum or final instruction status and perform one operation only. Appropriate warning messages (Level 1) will report such occurrence as ‗conflicting‘ instructions. An administrator can then audit if such ‗conflicting‘ instructions are intentional or otherwise. The ability to update or override previous instructions, as described above, allows for a very flexible and structured method to manage users in a large organization or business enterprise. For instance, the head office of an organization can instruct to register all protected envelopes for all regional offices or departments in a ‗toplevel‘ script file. For regional offices, a second level script might override some instructions in the top-level script to enforce an access policy appropriate to the local requirements, by not registering users to access envelopes belonging to other regional offices. As demonstrated, the model is extremely flexible, and allows for the design of an implementation that can easily meet an organization‘s needs. The script engine provides a configurable multi-level feedback to a user in the form of error message warnings, to cover the full range of script operation results. It reports from non-critical minor scripting syntax errors to serious errors such as the instruction to register a non-existing envelope. 48 © SafeNet, Inc. Chapter 6 Envelope Control Via Scripting Script File Syntax This section introduces two new terms which can be defined as follows. The term directive needs to be interpreted as causing the script engine to perform some actions internally. The term instruction refers to an operation to register, deregister, or create an envelope. A script file is identified by a filename with an extension of <*.env>. For all script files, a comment line begins with a ‗//‘ sign. Directives are prefaced by a ‗#‘ sign with no blank space between the sign, and the directive key word. Blank lines are ignored during processing. All script commands have a long and a short syntax that can be used interchangeably. Please see the examples later in this chapter of the actual command Long and Short command syntax. Please also refer to Appendix 1 for an example of an actual script which illustrates the use of all available commands. Master Script A master script file is the first filename parameter being passed in the application launch command line (for example, <C:\protectf\protectf.exe master.env>). No special identifier is necessary for a master script file. To maintain and implement a structured approach to scripting, it is recommended that the master script is only used to introduce or include other script files and to set warning levels. This, however, is not mandatory, and you may choose not to use a master script at all. For all intents and purposes, a master script is processed as a standard script file. The syntax to introduce other script files is as follows: #include <FULL_PATH\FILENAME.ENV> The following directives are all valid examples of how to include script files for processing. In this example, the scripts would be run in the same order as they are listed. #include i:\All_script\CH.env #include j:\script\Zurich.env #include k:\dept_script\Marketing.env #include p:\userhome\UserGroupA.env © SafeNet, Inc. 49 Chapter 6 Envelope Control Via Scripting NOTE It is important that the full path information to the script file must be valid and is accessible from the machine on which ProtectFile executes. Attention should be paid to situations where script files are stored on network share drives that are mapped to a user machine. Warning Message Directive There are two levels of warning messages, and they can be defined anywhere in a script file. The warning levels are as follows: Level 0—No message is displayed to notify the user of errors/warnings while processing the script. Level 1—A message is displayed to notify the user of errors/warnings while processing the script. A warning level directive takes immediate effect until superseded by the next warning level directive. This only affects the message displayed to the user. All errors/warnings are written to the log file, which can be viewed by ProtectFile administrators for further investigation, if required. The syntax for the warning level directive is as follows: #WarningLevel = n (where n defines the warning level 0 or 1) NOTE All following commands do not use the # sign. It is not necessary to specify envelope exclusions on the instruction line. The script engine registers all exclusions, if any, automatically. All paths can be specified as a UNC (\\server\share\…) or a drive mapping (c:\path\…). All paths are resolved to a UNC name (\\server\share\…) when comparing paths on other commands. When specifying an envelope the filename ―ENVELOPE.SYS‖ is optional. 50 © SafeNet, Inc. Chapter 6 Envelope Control Via Scripting Register an Envelope This instruction is used to register an envelope for a user. The syntax for the register envelope instruction is as follows: Legacy Format +FULL_PATH[\ENVELOPE.SYS] Long Format RegisterEnvelope FULL_PATH[\ENVELOPE.SYS] Short Format RE FULL_PATH[\ENVELOPE.SYS] Example +d:\MarketData\envelope.sys De-Register an Envelope This instruction is used to de-register an envelope for a user so that they cannot access data in that envelope. Note that the user will still remain as a legal user unless an envelope administrator explicitly removes them from the user list. The syntax for the de-register envelope instruction is as follows: Legacy Format -FULL_PATH[\ENVELOPE.SYS] Long Format UnregisterEnvelope FULL_PATH[\ENVELOPE.SYS] Short Format UE FULL_PATH[\ENVELOPE.SYS] Example -d:\MarketData\envelope.sys -d:\MarketData\envelope.sys © SafeNet, Inc. 51 Chapter 6 Envelope Control Via Scripting Access Control When executing the Create Envelope and Migrate Domain instructions, the access control applied to the envelope can be controlled by inserting a ―+‖ or a ―-‖ character after the instruction token. Specification of the access control token is optional when using these instructions. By default, access control is enabled. Create an Envelope This instruction is used to create or define a new envelope that only the logged user can access, with optional exclusions. NOTE If the Default FIPS Mode option is selected in Help > About > Properties, or the DefaultFipsMode policy registry value is set to 1, then FIPS-compliant envelopes or domains will be created via the CreateEnvelope or CE script command. The syntax for the create envelope instruction is as follows: Legacy Format *[+ | -] FULL_PATH[\ENVELOPE.SYS][!FULL_PATH][…] Long Format CreateEnvelope [+|-] FULL_PATH\ENVELOPE.SYS[!FULL_PATH][…] Short Format CE [+|-] FULL_PATH\ENVELOPE.SYS [!FULL_PATH][…] Example To create a new envelope at C:\User with no exclusions, the following can be used: *C:\User\envelope.sys Example The following command would create an envelope called C:\Personal, with access control enabled and one exclusion in C:\Personal\AllShare: *+C:\Personal\envelope.sys ! C:\Personal\AllShare 52 © SafeNet, Inc. Chapter 6 Envelope Control Via Scripting Remove an Envelope Instruction This command is used to remove an envelope from the system. The envelope location is pointed to by FULL_PATH\ENVELOPE.SYS. Legacy Format N/A Long Format DeleteEnvelope FULL_PATH[\ENVELOPE.SYS] Short Format DE FULL_PATH[\ENVELOPE.SYS] Add a User to an Envelope This command is used to add users to an envelope. The ProtectFile @Admin tag promotes this user to the envelope administrator. The @ tag indicates an envelope user. This command must be executed by the envelope administrator. Legacy Format N/A Long Format AddUser FULL_PATH[\ENVELOPE.SYS] @[Admin] DN Short Format AU FULL_PATH[\ENVELOPE.SYS] @[Admin] DN Example The following command adds John Johnson as an envelope administrator to C:\TEST\SECURE\ENVELOPE.SYS: AU "C:\test\secure\envelope.sys" @admin "CN=John Johnson, CN=Users, DC=protectf1, DC=et, DC=com" Example The following command adds John Johnson as an envelope user to C:\TEST\SECURE\ENVELOPE.SYS: AU "C:\test\secure\envelope.sys" @ "CN=John Johnson, CN=Users, DC=protectf1, DC=et, DC=com" © SafeNet, Inc. 53 Chapter 6 Envelope Control Via Scripting Example The following command adds John Johnson as an envelope user to C:\TEST\SECURE\ENVELOPE.SYS: AU "C:\test\secure\envelope.sys" @ "CN=John Johnson, CN=Users, DC=protectf1, DC=et, DC=com Remove a User from an Envelope This command is used to remove users from an envelope. This command must be executed by the envelope administrator. Legacy Format N/A Long Format RemoveUser FULL_PATH[\ENVELOPE.SYS] @ DN Short Format RU FULL_PATH[\ENVELOPE.SYS] @ DN Example The following command removes John Johnson from C:\TEST\SECURE\ENVELOPE.SYS: RU "C:\test\secure\envelope.sys" @ "CN=John Johnson, CN=Users, DC=protectf1, DC=et, DC=com" 54 © SafeNet, Inc. Chapter 6 Envelope Control Via Scripting Migrate a Domain This instruction is used to migrate legacy domains and new style envelopes from a previous ProtectFile Business installation to PKI envelopes. Legacy Format &[+ | -]FULL_PATH[\ENVELOPE.SYS] Long Format MigrateDomain [+ | -] FULL_PATH[\ENVELOPE.SYS] Short Format ME [+ | -] FULL_PATH[\ENVELOPE.SYS] Example To migrate an existing legacy domain at C:\User, the following instructions can be used: &C:\User\envelope.sys Example The following command would migrate a new style Business domain to a PKI envelope called C:\Personal, with access control enabled C:\Personal: &+C:\Personal\envelope.sys © SafeNet, Inc. 55 Chapter 6 Envelope Control Via Scripting Use of Windows Environment Variables All script command lines are examined for environment variables. If the variable is set, it is replaced by its corresponding value. Environment variables are denoted by a string enclosed by % symbols (i.e., %ENVIRONMENT_VARIABLE%). If the environment variable is not set, it is not replaced. Similarly, if there are unmatched % in the string or a %%-sequence, they are not replaced, and the corresponding scripting operation will most likely fail. The following example assumes that the user‘s log on name is AUser. The following command... CreateEnvelope %USERPROFILE%\desktop\myEnvelope … would create an envelope in: C:\Documents and Settings\AUser\desktop\myEnvelope Security Considerations and Recommendations on Use Scripting, by its very nature, performs security-sensitive action in a silent manner and therefore demands special attention with regards to security implications. While the ProtectFile script engine is robust and can handle a reasonable amount of abnormal and unexpected situations, an administrator must work on the assumption that no system, however secure, is infallible. Scripting provides significant benefits and ease for envelope administration and user setup. However, this also comes at a cost since it opens opportunity for abuse, and exposes certain vulnerabilities that an administrator must be aware of. Adequate counter-measures, examples of which are discussed below, can be implemented to ensure security is not compromised. It is strongly recommended that all script files have at least the Read-Only file attribute set to stop unrestricted editing of these files. Restriction to access can be further enhanced by employing Windows NTFS security features that limit access permission. One suggested strategy is to set up appropriate file access permission in the NTFS ACL, and designate ownership of the script files to a special Envelope Administrator Group so that only members of this group are allowed to have Change privilege. Default ProtectFile installation disables scripting. This is done to minimize the risk of unauthorized script execution. If scripting support is required, the corresponding Registry Key must be changed. This also enables the ProtectFile Security Officer (or Administrator) to enable script execution on the workstation level. This registry key must be access controlled at Read-Only. 56 © SafeNet, Inc. Chapter 6 Envelope Control Via Scripting ProtectFile is also set up by default to process script files that are Read-Only. However, in some situations, such restriction may not be practical or necessary. It is, therefore, possible to override the default setting by changing a registry entry. If more stringent access control is required, please contact SafeNet for a customized solution. For full details with regard to ProtectFile registry values, please refer to Chapter 7. Scripting Guidelines and Tips To gain the full advantage of the scripting facility, the following suggestions should be observed: As a good security practice, use only a master script to introduce other script files for processing. The master script file should always be the first file parameter that is passed in on the application launch command line. If possible, use NTFS or other measures to restrict access to script files. The default minimum-security setting for a script file is the Read-Only attribute enabled and this should only be overridden if necessary. A security officer or an administrator must understand the security implications of disabling the default minimum protection option. Set the highest warning level in order to monitor results of script operations, especially when the system is first installed. Since script-based instructions such as Register/De-register and Create New Envelope are not subjected to the restrictions imposed by the policy settings set from the main menu, it is strongly recommended that the administrator implements the above security policy as a minimum precaution. © SafeNet, Inc. 57 Chapter 6 Envelope Control Via Scripting THIS PAGE INTENTIONALLY LEFT BLANK 58 © SafeNet, Inc. Chapter 7 Registry Settings Chapter 7 Registry Settings The following sections explain the registry keys that ProtectFile uses as configuration inputs. This chapter discusses methods of changing the Windows registry to customize the ProtectFile configuration. Disclaimer The topics and procedures discussed herein are administration-specific tasks. The reader is required to be familiar with the Windows registry and the regedit utility. Incorrect interaction with the registry can leave your system in an unstable or unrecoverable state. SafeNet cannot be held responsible for incorrect changes to the registry due to negligent action. If you are unfamiliar with editing the registry, it is strongly advised to refer to your Windows documentation or seek help from a qualified systems administrator prior to making any changes to the Windows registry. NOTE It is prudent to backup the registry before applying any changes. How to Use This Chapter Each registry group will be contained with in its own section consisting of the following elements: A group title The registry key in question A table of available values under the registry key A brief description of the values found in the table Most registry values can be set during silent installation. The last column in the table shows the silent installation property corresponding to the registry value. Refer to Chapter 9 for more details on silent installations. © SafeNet, Inc. 59 Chapter 7 Registry Settings Sample Registry Key Table Key: <Registry Key> Value Registry Value Data Type: Possible Values Data Type: Default Value Other Possible Values Silent Installation Property MSI Property used for silent installation Description This is a brief description of the registry values listed in the above table. Miscellaneous Registry Keys Key: HKLM\Software\SafeNet\ProtectFile Value Data Type: Possible Values Silent Installation Property Company REG_SZ: <Company Name> COMPANY InstallDir REG_SZ: <target installation directory> INSTALLDIR KeepKeysAfterShutDown REG_DWORD 1, 0 KeyChangePeriod REG_DWORD: 90 KEYCHANGEPERIOD LicenseNumber REG_SZ: <license number> LIZENZNUMMER Name REG_SZ: <User Name> USERNAME Started REG_DWORD: 0, 1, 2 TraceFile REG_SZ: <absolute path of the log file> For example, C:\Logs\PFTrace.log 60 © SafeNet, Inc. Chapter 7 Registry Settings Description Company—The company name entered during installation dialog. InstallDir—The target installation directory that is created during the installation process. The default is C:\Program Files\SafeNet\Protectfile\, but can be changed by the user during the installation process. The ProtectF.dll and PFGina.dll files must reside in this directory. KeepKeysAfterShutdown—If set to 0 (disabled), cipher keys are cleared from the driver when ProtectFile is shut down. The driver will not be able to decrypt files transparently. KeyChangePeriod—The number of days a user password will remain active if GINA and Password synchronization are not in use. Setting this value to 0 will cause the login keyphrase to never expire. LicenseNumber—The license number entered during installation dialog. Name—The user name entered during installation dialog. Started—Determines the status of ProtectFile and is for ProtectFile system use only. Do not modify. TraceFile—SafeNet may provide a ProtectF.dll file with logging enabled to diagnose support incidents. By default, the output of the log is written to a file named trace.log in the root of the system drive, for example, C:\. The location of the log file may be changed via this registry entry. It should contain the absolute path of the trace file, for example, C:\Logs\PFTrace.log. This registry entry has no effect in ProtectF.dll files without trace logging enabled. © SafeNet, Inc. 61 Chapter 7 Registry Settings CSP Registry Keys Key: HKLM\Software\SafeNet\ProtectFile\Policy Value Data Type: Possible Values Silent Installation Property CSPAlgorithm REG_DWORD: 26625 (CALG_RC4) 26115 (CALG_3DES) CSPALG CSPCertificate REG_DWORD: 1, 0 CSPCERT CSPCheck REG_DWORD: 1, 0 CSPCHECK CSPDialog REG_DWORD: 1, 0 CSPDLG CSPEncrypt REG_DWORD: 1, 0 CSPENCRYPT CSPEnvelopeAlgorithm REG_DWORD: 26625 (CALG_RC4) 26115 (CALG_3DES) CSPENVALG CSPEnvelopeProvider REG_SZ: <CSP provider name> CSPENVALG For example, “Microsoft Base Cryptographic Provider v1.0” CSPEnvelopeProviderType REG_DWORD: 1 (PROV_RSA_FULL) CSPENVPROV CSPProvider REG_SZ: "Datakey RSA CSP" "ActivCard Gold Cryptographic Service Provider" "eToken Base Cryptographic Provider" "Microsoft Base Cryptographic Provider 1.0" "SPYRUS HARDWARE RSA CSP" "Infineon TPM Cryptographic Provider" "CardOS_CSP" "A-Trust a-sign Client v1.0" "Entrust Enhanced Cryptographic Provider" "Passage Enhanced Cryptographic Provider" CSPPROVIDER "Schlumberger Cryptographic Service Provider" 62 CSPProviderType REG_DWORD: 1 (PROV_RSA_FULL) TokenContainer REG_SZ: <container name> CSPTYPE © SafeNet, Inc. Chapter 7 Registry Settings Description ProtectFile is designed to work with all authentication devices that follow Microsoft Cryptographic Service Provider (CSP) specification. In its default setup, ProtectFile assumes a fully compliant implementation. As not all authentication devices provide a fully compliant implementation, ProtectFile offers a number of settings that allow modification of this default behavior so that ProtectFile will operate with devices supplied with an erroneous or only partial implementation of the CSP specification. These entries describe the way in which ProtectFile interacts with a CSP token. They are only valid with a ProtectFile Premium or ProtectFile Business CSP installation. CSPAlgorithm—Indicates the symmetric algorithm used for the hybrid encryption of the user configuration. ProtectFile defaults to using the RC4 algorithm if CSPAlgorithm is not specified, as it is the most common algorithm supported by CSP Providers (CSPs). However, some CSPs may not implement RC4 or a customer specific requirement may impose another algorithm. The value of CSPAlgorithm is a value corresponding to Microsoft‘s CSP specification as follows. Algorithm Value DES 0x6601 3DES_112 0x6609 3DES 0x6603 RC2 0x6602 RC4 0x6801 CSPCertificate—(This registry value only applies to ProtectFile Business.) Determines the mechanism which ProtectFile uses to select a suitable key pair. Smart cards allow the user to store more than one RSA key pair. During startup and when CSPCertificate is set to 0 (default), ProtectFile scans the card for available key pairs by using the enumeration facility of the card‘s CSP. However, some CSPs do not implement this facility or implement it in a way not useable by ProtectFile. When CSPCertificate is set to 1, ProtectFile is forced to use another mechanism to determine a suitable key pair. In this case, ProtectFile uses the ―My‖ certificates store of the current user to enumerate all available certificates. © SafeNet, Inc. 63 Chapter 7 Registry Settings As a second step, ProtectFile checks these certificates to see whether they have an associated private key and whether the CSP provider defined in CSPProvider handles them. This approach has the advantage that it is possible to work around a problematic CSP implementation. The drawback of this solution is that it requires an appropriate certificate for the key pair that should be used by ProtectFile. ProtectFile will not verify the certificate. CSPCheck—Set to 1 by default, which indicates to ProtectFile that on startup, it should first check whether the key pair on the smart card is actually useable. ProtectFile does this by executing a ―dummy‖ encrypt/decrypt operation. This may lead to multiple pin entries if the CSP provider does not implement any pin caching mechanisms. By setting CSPCheck key to 0, this check may be turned off. CSPDialog—Determines whether a ProtectFile dialog is displayed to prompt for the card‘s PIN. CSPDialog should be set to the default value of 0 for most CSPs. When CSPDialog is set to 0, ProtectFile does not present a dialog prompting for the card‘s PIN, but delegates this responsibility to the CSP. This setting is valid for most environments. With some cards, this may result in multiple subsequent PIN requests from the CSP. If this is the case, this may be overcome by setting CSPDialog to 1. In this scenario, ProtectFile opens up a dialog requesting the user PIN for the smart card or token. ProtectFile then caches this PIN for the duration of the current authentication/decryption process. Whenever required, ProtectFile supplies the CSP with the user‘s PIN and thereby prevents multiple, subsequent PIN entries. CSPEncrypt—Set to 1 by default. The CSP specification defines decryption as well as encryption functionality. By default, ProtectFile assumes a complete CSP implementation (i.e., it delegates all CSP specific encryption to the CSP [CSPEncrypt = 1]). However, it is common that actual CSP implementations only implement the decryption functionality (i.e., they do not offer any encryption facilities). In such a scenario, CSPEncrypt has to be set to 0. In this case, ProtectFile delegates all encryption activity to the so called ―envelope provider.‖ This allows ProtectFile to work with virtually all CSPs. For details on the envelope provider, check the sections on the settings for CSPEnvelopeProvider and CSPEnvelopeAlgorithm. CSPEnvelopeAlgorithm—Defines the symmetric algorithm used by the CSPEnvelopeProvider during a hybrid encryption operation. This value has to be the same as the value of CSPAlgorithm. CSPEnvelopeProvider—Defines the name of the CSP that should be used for the hybrid encryption process. Its value is only relevant if CSPEncrypt is set to 0. Typical values are the soft token CSPs from Microsoft. 64 © SafeNet, Inc. Chapter 7 Registry Settings CSPEnvelopeProviderType—Defines the type of the CSP that should be used for the hybrid encryption process. ProtectFile currently supports only the ―RSA full‖ type as specified by Microsoft. Therefore, this value should always be set to 1. CSPProvider—Defines the CSP to be used by ProtectFile for user authentication and en-/decryption of the user‘s configuration. The content of this string has to be an exact copy of the name given by the chosen smart card vendor. CSPProviderType—Indicates the type of the CSP to be used by ProtectFile for user authentication and en-/decryption of the user‘s configuration. ProtectFile currently supports only the ―RSA full‖ type as specified by Microsoft. Therefore, this value should always be set to 1. TokenContainer—Contains the name of the container that includes the key pair used by ProtectFile. This entry is automatically generated during the first startup. As noted in the section on CSPCertificate, smart cards can contain several key pairs. To guarantee deterministic behavior, ProtectFile must know which of the available and valid key pairs it should use to encrypt the users configuration. To achieve this, ProtectFile presents a list of available containers to the user (if more than one is available) on the first startup. For a user, this information may be difficult to understand and may lead to erroneous input. Therefore, ProtectFile offers the administrator the registry key TokenContainer. If it exists, ProtectFile assumes that this key contains the name of the key pair that should be chosen for its cryptographic operations and the user is not prompted to make the selection. © SafeNet, Inc. 65 Chapter 7 Registry Settings GINA Registry Keys Key: HKLM\Software\SafeNet\ProtectFile Value GinaDLL Data Type: Possible Values Silent Installation Property REG_SZ: <Path to previously installed GINA> Description This entry is used by ProtectFile GINA to cascade to other GINA installations. This key is only set if GINA is enabled during installation. Key: HKLM\Software\SafeNet\ProtectFile\Policy Value Data Type: Possible Values Silent Installation Property GINALoginOnFaild REG_DWORD: 1,0 LOGINONFAIL GINAWinPasswordSync REG_DWORD: 1,0 SYNCPSW UsingGINA REG_DWORD: 1,0 SuppressLoginDialog REG_DWORD: 1,0 SUPPRESSLOGINDLG Description These entries describe the way in which ProtectFile interacts with the GINA. These keys are only set if GINA is enabled during installation. GINALoginOnFaild—If set to 0, prohibits the user from starting Windows if ProtectFile login fails. Otherwise allows the user to logon to Windows but does not give the user access to encrypted data. GINAWinPasswordSync—If set to 0, prohibits automatic synchronization of Windows and ProtectFile logins. Otherwise if the Windows password is changed, ProtectFile password will be automatically set to the new Windows password. UsingGINA— If not set to 0, ProtectFile application will not be loaded upon GINA authentication. Otherwise the ProtectFile application will be loaded. 66 © SafeNet, Inc. Chapter 7 Registry Settings SuppressLoginDialog— If set to 0, this option displays the ProtectFile Login dialog. If set to 1, the ProtectFile Login dialog is not displayed to the user. Additionally, if set to 1, all error messages that do not require user interaction (other than clicking the OK button) are suppressed and logged to the log file. NOTE Changing the ProtectFile login password will not automatically change the Windows password. Key: HKLM\Software\Microsoft\Windows NT\CurrentVersion\WinLogon Value GinaDLL Data Type: Possible Values Silent Installation Property REG_SZ: <ProtectFile GINA DLL> Description GINADLL—Replace the current GINA with the ProtectFile GINA. This key is only set if GINA is enabled during installation. Key: HKLM\Software\Microsoft\Windows NT\CurrentVersion\Run Value ProtectFile Data Type: Possible Values Silent Installation Property REG_SZ: <ProtectFile Path>\ProtectF.Exe Description ProtectFile—Run ProtectFile application on Windows start up. This key is only set if the ProtectFile application is to be started on Windows start up. © SafeNet, Inc. 67 Chapter 7 Registry Settings Migration Registry Keys Key: HKLM\Software\SafeNet\ProtectFile Value SeclanProfile Data Type: Possible Values REG_SZ: <SeclanProfile-Path> Silent Installation Property SECLANPROFILE (this property must be used in conjunction with ERA_MIGRATETOOLS=1) Description SeclanProfile—The path to the Seclan Profile to be migrated. This key is only set if Seclan Migration is requested during installation. If SeclanProfile is specified for a silent installation, you must also include the property, ERA_MIGRATETOOLS=1, for the SeclanProfile value to take effect. PKI Registry Keys Key: HKLM\Software\SafeNet\ProtectFile Value Data Type: Possible Values PKI REG_DWORD: 1, 0 PKITimeoutBehaviour REG_DWORD: Lock Configuration on Timeout (0) Silent Installation Property On Timeout Ignore (1) Shutdown ProtectFile on Timeout (2) SystemLogLevel 68 REG_DWORD: 1, 0 © SafeNet, Inc. Chapter 7 Registry Settings Description PKI—Set to 1 by default, this option activates the use of the PKI. This option should not be modified by the user. PKITimeoutBehaviour—If set to 0, it disables all access to configuration changes. This prevents the user from changing their current ProtectFile configuration. This is the default behavior. If set to 1, PKI Timeout is ignored by ProtectFile. Note that setting PKITimeoutBehaviour to TIMEOUT_IGNORE (1) is invalid when used in conjunction with hardware tokens. If set to 2 ProtectFile will shut down as soon as PKI times out. SystemLogLevel—No longer used. Script Registry Keys Key: HKLM\Software\SafeNet\ProtectFile Value Data Type: Possible Values ScriptReadOnly REG_DWORD: 1, 0 ScriptSupport REG_DWORD: 1, 0 Silent Installation Property Description ScriptReadOnly—If set to 1, this option ensures that only the scripts that have the Read-Only attribute set can be used. If set to 0, runtime checking of the Read-Only attribute is disabled. The default value is 1. ScriptSupport—If set to 1, scripting support is enabled. If set to 0, scripting support is disabled. The default value is 0. © SafeNet, Inc. 69 Chapter 7 Registry Settings MS PKI Configuration Registry Keys Key: HKLM\Software\SafeNet\ProtectFile Value Data Type: Possible Values AttributeCertificate REG_SZ: <name of attribute containing the user's certificate > AttributeDN REG_SZ: <name of attribute containing the distinguished name> AttributeDisplayName REG_SZ: <name of attribute containing the display name> CertificateChainPolicy REG_REG_DWORD: Option for certificate validation (CERT_CHAIN_REVOCATION_CHECK_EN D_CERT) Silent Installation Property (Check MSDN) 70 CertificateEnhancedKeyUsageX REG_SZ: <OID for required key usage for certificate selection> CertificateIntendedKeyUsage REG_REG_DWORD: <Bit mask of acceptable certificate usage for certificate selection> CertificateVerificationPolicy REG_REG_DWORD: Option for certificate validation (1) CommonName REG_SZ: <alternate name for common name attribute> LdapDefaultFilter REG_SZ: <restrictions for LDAP searches> LdapHost REG_SZ: <name of server hosting the directory service and port number> LdapUser REG_BINARY: <encrypted user credentials for LDAP directory authentication> NamingContext REG_SZ: <alternative naming context> © SafeNet, Inc. Chapter 7 Registry Settings Value Data Type: Possible Values RequiredIssuer REG_SZ: <name of issuer of certificates> SearchBaseX REG_SZ: <name of search base> SearchFilter REG_SZ: <comma separated list of search attributes> Silent Installation Property Description The Microsoft PKI edition of ProtectFile premium has two preconditions: A CSP provider handling the user‘s private key An LDAP environment This section describes all the settings relating to LDAP and Active Directory (AD) lookups. For most installation environments, the following registry keys do not have to be set. They are only necessary in either ―non-standard‖ environments or in very large installations with multiple LDAP search contexts or third-party LDAP servers. The following sections require at least a basic knowledge of LDAP, distinguished names, and certificates. Some CAs use names for their schema objects, which are different from those used by Microsoft‘s Active Directory. The AttributeCertificate, AttributeDN and AttributeDisplayName values allow the administrator to specify the schema object. AttributeCertificate—Defines the name of the LDAP attribute that contains the users‘ certificates. By default, ProtectFile assumes ―userCertificate.‖ AttributeDN—Defines the name of the LDAP attribute that contains the user‘s distinguished name. By default, ProtectFile assumes ―distinguishedName.‖ AttributeDisplayName—Defines the name of the LDAP attribute that contains the user‘s name in an easily readable format. By default, ProtectFile assumes ―displayName.‖ If no display name is found, ProtectFile uses the user‘s distinguished name. This attribute is optional. © SafeNet, Inc. 71 Chapter 7 Registry Settings The following example illustrates how these three attributes should be configured to operate with the RSA Keon CA: Registry Setting Value AttributeCertificate pem_x509 AttributeDN cn AttributeDisplayName certdn CertificateEnhancedKeyUsageX—Besides the key usage, certificates may also contain enhanced key usage information in the form of Object Identifiers (OIDs). An OID is a basic type of the ASN.1 syntax notation and is used in the encoding of certificates. By defining CertificateEnhancedKeyUsage0, CertificateEnhancedKeyUsage1, etc., administrators can restrict the set of certificates that are valid for ProtectFile. Typical values are shown in the table below: Registry Setting Value Typical Usage CertificateEnhancedKeyUsage0 1.3.6.1.4.1.311.20.2.2 SMARTCARD LOGON CertificateEnhancedKeyUsage1 1.3.6.1.5.5.7.2 AUTHORITY INFO ACCESS For details on further values please consult the appropriate Microsoft documentation or contact SafeNet Support for assistance. CertificateIntendedKeyUsage—As with the setting RequiredIssuer, CertificateIntendedKeyUsage restricts the set of certificates, which can be used by ProtectFile. It contains a set of usage bits OR‘d together into a REG_DWORD value. ProtectFile ignores all certificates that do not have at least those usages defined in CertificateIntendedKeyUsage. Typical values are: 72 CERT_DIGITAL_SIGNATURE_KEY_USAGE 0x80 CERT_NON_REPUDIATION_KEY_USAGE 0x40 CERT_KEY_ENCIPHERMENT_KEY_USAGE 0x20 CERT_DATA_ENCIPHERMENT_KEY_USAGE 0x10 CERT_KEY_AGREEMENT_KEY_USAGE 0x08 CERT_KEY_CERT_SIGN_KEY_USAGE 0x04 CERT_OFFLINE_CRL_SIGN_KEY_USAGE 0x02 © SafeNet, Inc. Chapter 7 Registry Settings The value for this setting must be entered in decimal when configuring this setting via the installer. For example, if the CertificateIntendedKeyUsage is to be set to the hex value of 0x20 (Key Encipherment), enter the decimal value 32 instead of 0x20. Similarly, if Digital Signature (0x80) as well as Key Encipherment (0x20) certificates are to be used then CertificateIntendedKeyUsage should be set to 0xA0 and if configured during installation, entered as the decimal value 160. For additional details on these values, please consult the appropriate Microsoft documentation or contact SafeNet Support for assistance. The following two values are used during CRL checking. CRL stands for Certificate Revocation List. It is a list of certificates that have been revoked. CRL checking is used to verify the validity of a certificate. In most cases, these values should not be defined. They are only required when either no CRL checking is required or when CRL checking cannot be done for all certificates (including intermediates). To turn CRL checking completely off, set CertificateChainPolicy to 0x0 and CertificateVerificationPolicy to 0xFFFFFFFF. CertificateChainPolicy—If set to 1, ProtectFile will attempt to build a trust chain to the certificate issuer upon user authentication. Authentication will fail, if the trust chain cannot be established. CertificateVerificationPolicy—The exact values depend on the Microsoft Windows functions CertVerifyCertificateChainPolicy() and CertGetCertificateChain(). For additional details on these values, please consult the appropriate Microsoft documentation or contact SafeNet Support for assistance. CommonName—By default, ProtectFile assumes that user lookup is done by searching for the attribute ―cn,‖ (for example, cn=Donald*). Setting CommonName to a different string value changes this behavior and ProtectFile will search using the specified attribute name. LdapDefaultFilter—Filters the matching result set of an LDAP lookup with an additional condition. For example, when LdapDefaultFilter on a standard active directory is set to ―(objectClass=user),‖ an LDAP lookup will return only those users that are actually stored as users on the Active Directory (not computers or groups). By default, this registry key does not exist. LdapHost—ProtectFile directs LDAP lookup to the Windows‘s default LDAP host. This is typically the domain controller. By setting LdapHost to a different host name, the search requests can be diverted to an alternate LDAP host (for example, LDAPServer:port number). © SafeNet, Inc. 73 Chapter 7 Registry Settings LdapUser—Some LDAP directories require authentication before access is granted. LdapUser (REG_BINARY) contains the encrypted User ID and Password for this authentication. To store this information in the registry use the StoreLdapUser.exe utility using the following syntax: StoreLdapUser <LDAPUserId>/<LDAPUserPassword> NamingContext—ProtectFile by default searches LDAPs using Windows‘s default naming context. Setting NamingContext to an alternative context changes this behavior. RequiredIssuer—In the case where multiple certificates are available, ProtectFile must determine which of the user‘s certificates should be used. One possibility to restrict the set of possible certificates is to define a required issuer. ProtectFile will ignore any certificates issued by a different issuer to that specified in RequiredIssuer. RequiredIssuer has to be set to the distinguished name of the issuer. SearchBaseX—In larger installations, it is common to have several naming contexts. You can create multiple keys, beginning with SearchBase0, SearchBase1, SearchBase2, etc., to allow the definition of multiple naming contexts. The search base must be fully qualified. This allows a user to explicitly define the context to be searched. This setting applies to all (not only the GUIbased) LDAP lookups. Windows AD supports the notion of a global catalog that allows searches covering all contexts simultaneously. ProtectFile supports this mechanism by defining a search base with the name ―GLOBAL CATALOGUE‖ (it is case-sensitive). For example, setting SearchBase0 to GLOBAL CATALOGUE will enable this feature. SearchFilter—In its advanced search dialog (GUI), ProtectFile allows the envelope administrator to search for alternative attributes in the users‘ distinguished names. To activate this feature, the SearchFilter registry key must be set (in pairs) to the required attributes. The first value must be the LDAP‘s attribute name, followed by a user-defined display name. The actual attribute names must be comma-separated (for example, CN, Common Name, DN, Distinguished Name, userPrincipalName, e-mail). If not defined, ProtectFile only searches for cn. 74 © SafeNet, Inc. Chapter 7 Registry Settings Key: HKLM\Software\SafeNet\ProtectFile\Policy Value CheckLDAPOnFirstLogin (DEBUG only) Data Type: Possible Values Silent Installation Property REG_DWORD: 1, 0 CheckLDAPForPersonalEncryption (DEBUG only) REG_DWORD: 1, 0 DNCertAttributes REG_SZ: <attribute replacement expression> DNCerttType REG_DWORD: <attribute replacement expression> DNCertTypePara REG_DWORD: <attribute replacement expression> RecoverAgent REG_SZ: <Distinguished name of recover agent> Note: The first two parameters listed below are only used for debugging purposes and should not be created unless advised by SafeNet support personnel. CheckLDAPOnFirstLogin—If set to 1 or does not exist, the LDAP directory is checked when a new user logs in for the first time. Set this value to 0 to prevent ProtectFile to silently terminate during the first login. CheckLDAPFor PersonalEncryption—If set to 1 or does not exist, the LDAP directory is checked whenever the personal encryption key needs to be used (for example, when adding an envelope). Set this key to 0 to ensure that besides the first login, the adding of an envelope works as well, if the there are problems contacting the directory. DNCertAttributes—This value facilitates the translation of the user name from the format used on certificates to a format suitable for LDAP lookup. The default value is ALL, which means that the certificate‘s DN is used without translation during LDAP lookup. The syntax to specify a value is: <CertSubjectAttribute>[/<SubstitutedLDAPSearchAttribute>]{,<CertSubjectAttribute> [/<SubstitutedLDAPSearchAttribute>]} ProtectFile searches for the <CertSubjectAttribute> and replaces it with the <SubstitutedLDAPSearchAttribute>. The same attribute name can occur several times. The sequence of the attributes corresponds to the sequence in the string. © SafeNet, Inc. 75 Chapter 7 Registry Settings The search for the attributes is case-sensitive. The search starts at ‗NamingContext‘ including all sub-trees, if possible. For example: DNCertAttribute = CN/actualcn,DC,DC converts the attribute sequence CN=XYZ 123456789,DC=NT,DC=NTG found in the certificate with the sequence actualcn=XYZ 123456789,DC=NT,DC=NTG as search argument for the LDAP directory. NOTE Rather than using the DNCertAttirbute registry key to construct the user name, Active Directory users can enable ProtectFile to automatically retrieve the logged in user object name from Active Directory, by either manually deleting the DNCertAttribute registry key, or simply clearing its current value. DNCertType—This value can be used in conjunction with the DNCertAttributes key (above). It defines the name type of the attribute to be returned. Typical values are: CERT_NAME_EMAIL_TYPE 0x00000001 CERT_NAME_RDN_TYPE (default) 0x00000002 CERT_NAME_ATTR_TYPE 0x00000003 CERT_NAME_SIMPLE_DISPLAY_TYPE 0x00000004 For additional details on these values, please consult the appropriate Microsoft documentation or contact SafeNet Support for assistance. DNCertTypePara—This value can be used in conjunction with the DNCertAttributes key (above). It specifies the returned string type of the attribute. Typical values are: CERT_SIMPLE_NAME_STR 0x00000001 CERT_OID_NAME_STR 0x00000002 CERT_X500_NAME_STR (default) 0x00000003 CERT_NAME_STR_REVERSE_FLAG (default) 0x02000000 CERT_NAME_STR_CRLF_FLAG 0x08000000 CERT_NAME_STR_NO_QUOTING_FLAG 0x10000000 CERT_NAME_STR_NO_PLUS_FLAG 0x20000000 CERT_NAME_STR_SEMICOLON_FLAG 0x40000000 For additional details on these values, please consult the appropriate Microsoft documentation or contact SafeNet Support for assistance. 76 © SafeNet, Inc. Chapter 7 Registry Settings RecoverAgent—By default, ProtectFile Premium does not offer the capability to recover encrypted data if all valid users no longer have access to their private key. Typically this situation does not arise, as the PKI offers key recovery possibilities. However, PKI key recovery is not always possible or a recover agent may be required for internal reasons when access to all data is required for regulatory or policy reasons. For such scenarios, ProtectFile offers the RecoverAgent feature. To introduce such a feature the registry entry RecoverAgent has to be created prior to creating any envelopes. When this key is configured, the recovery capability is available automatically to all envelopes created by all users on the system in which the RecoveryAgent key is configured. This entry is a STRING value and must contain the Active Directory (AD) user Distinguished Name (DN) of the recover agent. ProtectFile does not detect any changes to the required Recovery Agent (for example, if the Distinguished Name of the recovery agent changes, this registry key needs to be updated accordingly). For existing envelopes, the change becomes effective only after the envelope administration is exercised, i.e., a user is added or removed, or the Refresh Tagfile option is selected, and the OK button is clicked in the Envelope Administration dialog. © SafeNet, Inc. 77 Chapter 7 Registry Settings Policy Registry Keys Key: HKLM\Software\SafeNet\ProtectFile\Policy Value Data Type: Possible Values Silent Installation Property AddDomain REG_DWORD: 1, 0 ADDDOMAIN AddEnvelope REG_DWORD: 1, 0 ADDENVELOPE AddExclusion REG_DWORD: 1, 0 ADDEXCLUSION AddExtension REG_DWORD: 1, 0 ADDEXTENSION Administer REG_DWORD: 1, 0 ADMINISTERDOMAIN Administrator REG_DWORD: 1, 0 POLYADMIN AdvancedButtonInAddDialog REG_DWORD: 1, 0 AllowIdenticalLocalDomains REG_DWORD: 3,1, 0 IDENTICAL AuthCertExpiryWarningPeriod REG_DWORD: 0, 0 - AUTHCERTEXPIRYWARNINGPERIOD AutoRegister REG_DWORD: AUTOREGISTER 1,0 AutoRegisterTimeout REG_DWORD 3600, 5 – 2 78 32 AUTOREGISTERTIMEOUT -1 ChangeCryptMode REG_DWORD: 1, 0 CHANGECRYPTMODE ConfigFile REG_DWORD: 1, 0 USECONFFILE ConfigFilePrimary REG_SZ <Path to Primary Profile> CONFFILE1 ConfigFileSecondary REG_SZ <Path to Secondary Profile> CONFFILE2 © SafeNet, Inc. Chapter 7 Registry Settings Value Data Type: Possible Values Silent Installation Property DEFAULTCRYPTMODE DefaultCryptMode REG_DWORD: DES (0) Two Key Triple DES (1) IDEA (2) SecLAN IDEA (3) AES 128 (4) AES 192 (5) AES 256 (6) DefaultFipsMode REG_DWORD: 1, 0 Deregister REG_DWORD: 1, 0 DEREGISTERDOMAIN Disable REG_DWORD: 1, 0 DISABLE DNEmailAttribute REG_SZ: <name of attribute containing the user’s email name> EncryptionCheck REG_DWORD: 1, 0 Export REG_DWORD: 1, 0 HashKeyphrase REG_DWORD: 1, 0 HASHKEYPHRASE KeyphraseDomain REG_DWORD: 1, 0 KEYPHRASEDOMAIN KeyphraseMaster REG_DWORD: 1, 0 KEYPHRASEMASTER LogFileSize REG_DWORD: Size of Log File in KB (50) LOGFILESIZE LogOff REG_DWORD: 1, 0 ALLOWLOGOFF MinPasswordLength REG_DWORD: Min Password Length (10) MINPSWLEN OlderCertificateBehaviour REG_DWORD: ENCRYPTCHECK 0, 1, 2 OpenConfigWindow © SafeNet, Inc. REG_DWORD: 1, 0 79 Chapter 7 Registry Settings Value 80 Data Type: Possible Values Silent Installation Property PolicyKey BYTE Array: POLICYKEY PowerUser REG_DWORD: 1, 0 POLYPOWER Register REG_DWORD: 1, 0 REGISTERDOMAIN RemoveDomain REG_DWORD: 1, 0 REMOVEDOMAIN RemoveEnvelope REG_DWORD: 1, 0 REMOVEENVELOPE RemoveExclusion REG_DWORD: 1, 0 REMOVEEXCLUSION RemoveExtension REG_DWORD: 1, 0 REMOVEEXTENSION RestrictedFolderBrowse REG_DWORD: 1, 0 SaveKeyphrase REG_DWORD: 1, 0 SAVEKEYPHRASE SendTransport REG_DWORD: 1, 0 SENDTRANSPORT ShowDomainAccessWarning REG_DWORD: 1, 0 SHOWDOMAINACCESSWARNING SuppressCertSearchWarning REG_DWORD 0, >0 SUPPRESSCERTSEARCHWARNING SuppressConfigNotFoundError REG_DWORD: 1, 0 NOCONFERROR SuppressLoginDialog REG_DWORD: 1, 0 SUPPRESSLOGINDLG TransportIn REG_SZ <Path to TransportIn folder> TRANSPORTIN TransportOut REG_SZ <Path to TransportOut folder> TRANSPORTOUT UpdateLicenseNo REG_DWORD: 1, 0 UPDATELICENSENO UpdateProtectedEnvelope REG_DWORD: 1, 0 UPDATEPROTECTEDENVELOPE © SafeNet, Inc. Chapter 7 Registry Settings Value ViewLogFile Data Type: Possible Values REG_DWORD: 1, 0 Silent Installation Property VIEWLOGFILE Description These keys determine the user‘s rights to perform specific actions. Not all of these settings can be set via the Policy dialog. Keys that are marked with an asterisk (*) are only used when using ProtectFile in conjunction with the Management Console. These keys are ConfigFile, ConfigFilePrimary, ConfigFileSecondary, TransportIn, and TransportOut. AddDomain—Set to 0 by default, this option disables the Domain/Add menu item. If set to 1, this option enables the Domain/Add menu item. AddEnvelope—Set to 0 by default, this option disables the Envelope/Add menu item. If set to 1, this option enables the Envelope/Add menu item. AddExclusion—Set to 0 by default, this option disables the Exclusion/Add menu item. If set to 1, this option enables the Exclusion/Add menu item. AddExtension—Set to 0 by default, this option disables the Extension/Add menu item. If set to 1, this option enables the Extension/Add menu item. Administer—Set to 0 by default, it disables the Domain or Envelope Administration menu item. If set to 1, this menu item is enabled. Administrator—Set to 1 by default, this option enables all menu items members of the Windows Administrators Group. It effectively overrides all other restriction imposed by options that control access rights to various ProtectFile features. Set to 0, Windows Administrators are controlled by all applicable restriction policy settings. AdvancedButtonInAddDialog—No longer used. AllowIdenticalLocalDomians—Controls local replication (to the computer the user is logging into) of the user profile defined domains and/or envelopes. Default setting of 0 causes no domain (or envelope) replication to the local machine. One (1) combined with domain (or envelope) definition in the user profile, and no domain (or envelope) existing on the local machine leads to a dialog display prompting the user to decide whether to create a local domain (or envelope). © SafeNet, Inc. 81 Chapter 7 Registry Settings Three (3) combined with a domain (or envelope) definition in the user profile, and no domain (or envelope) existing on the local machine, leads to automatic creation of the local domain (or envelope). User receives no notification in this case. AuthCertExpiryWarningPeriod—This value indicates the number of days a user is warned prior to the expiration of their ProtectFile authentication certificate. Default setting of 0 suppresses the warning display. AutoRegister—This feature is available in ProtectFile Premium only. Default setting of 0 turns this feature off. Alternatively, if set to 1, it will cause ProtectFile to automatically attempt to register all unregistered envelopes upon their first access attempt. An exception exists as follows: All envelopes with previously added exclusion(s) will not auto register. This is caused by adding an exclusion to an envelope (either before or after the envelope creation) which turns the Access Control for that envelope to OFF. This never gets automatically reset to ON, unless the user turns it on manually. In general, every unsuccessful envelope registration attempt will automatically time out and access to the relevant folder will be denied. AutoRegisterTimeout—The default value for this option is 3600 seconds (1 hour). This option determines the time-out period following a de-registration of an envelope before it can be automatically re-registered by ProtectFile. Once the user has de-registered an envelope, ProtectFile will wait at least AutoRegisterTimeout number of seconds before responding to any requests to register the relevant envelope. This value ranges between 5 and 232 – 1 seconds. The timeout period does not persist over sessions. ConfigFile *—Points to the location of the controls where user profiles are stored. The default value is 0, which indicates a local profile, stored in the Windows User Profile folder. All ProtectFile users must have Read/Write permissions to this folder. In the following example, <username> represents the Windows User Name: C:\DocumentsandSettings\<username>\<username>.prof In this case, ProtectFile will ignore the settings of ConfigFilePrimary, ConfigFileSecondary, TransportIn and TransportOut. An alternative value of 1 is used in conjunction with the use of the Management Console. ProtectFile attempts to use the profile set by ConfigFilePrimary. It also makes a copy of the profile into the path specified by the ConfigFileSecondary. If using the ConfigFilePrimary profile fails, ProtectFile will attempt to use the profile set by ConfigFileSecondary. In this case, the user cannot make any changes to their personal configuration. Adding, removing, or registering domains/envelopes is impaired. If the attempt to use the ConfigFileSecondary profile fails, ProtectFile will terminate following the display of a warning message. 82 © SafeNet, Inc. Chapter 7 Registry Settings ConfigFilePrimary *—A string specifying the primary user profile path and filename. It can take the formats PATH\ FILENAME or PATH\ %s, where: PATH specifies the path to the folder containing the profile. FILENAME specifies the filename of the profile (including extension). %s specifies that the filename of the profile is of the form <username>.prof (where <username> is replaced by the Windows user name). For example, using the path\ filename format, a valid string is \\Mgmt-Console\ProtectFile\JohnSmith.prof For example, using the path\%s format, a valid string is \\Mgmt-Console\ProtectFile\ %s Usually the path is set to a network folder. All ProtectFile users must have Read/Write permissions to this folder. When ProtectFile is used with the Management Console, this will be a folder of the computer running the Management Console. ConfigFileSecondary *—A string specifying the secondary configuration file path and filename. It can take the same formats as the ConfigFilePrimary value. Usually the PATH is set to a local folder. If this value is not set, the ProtectFile will default to the Windows user profile (local) profile. In the following example <username> represents the Windows user name: C:\Documents and Settings\<username>\<username>.prof DefaultCryptMode—Specifies the default algorithm used during envelope or domain creation. DefaultFipsMode—If set to 0, FIPS mode is disabled, and the native cryptographic API is used. If set to 1, the FIPS-compliant cryptographic module is used (and the FIPS check box on the Add Domain and Add Envelope dialogs is automatically enabled), and the use of the IDEA algorithm is disabled. The default value is 1. Deregister—By default, this option is set to 1, and it enables the Domain or Envelope Deregister menu item. Disable—Set to 0 by default, this option disables the File > Disable menu item. Set to 1 to enable this menu item. © SafeNet, Inc. 83 Chapter 7 Registry Settings DNEmailAttribute—Depending on how the Directory Service (DS) was configured, it may not be possible to link a user‘s certificate with the user‘s Distinguished Name (DN). The DNEmailAttribute key, used in combination with the SearchFilter key, allows ProtectFile to link the user‘s e-mail attribute with the certificate‘s rfc822name—the e-mail address of the certificate‘s subject. To use this feature, you will need to set both attributes of to the attribute name returned by the DS for the user‘s e-mail address. This can be different for each DS, and is usually userPrincipalName for Microsoft‘s Active Directory. For example: DNEmailAttribute = userPrincipaName SearchFilter = userPrincipalName, e-mail EncryptionCheck—This option is enabled by default. ProtectFile will produce a warning to the user advising if any files appear to be already encrypted during envelope creation (initial encryption). ProtectFile uses statistical analysis of the file contents and can produce false positives depending on the file type. In such situations, this check can be disabled. Export—No longer used. HashKeyphrase—This only applies to ProtectFile Business. Set to 1 by default, it enables the user to view a Key generated from a Password. KeyphraseDomain—No longer used. KeyphraseMaster—No longer used. LogFileSize—Specifies the maximum size in Kbytes of the log file generated by ProtectFile. The file size range is limited to 1Kbytes to 1000 Kbytes. If these limits are breached, the default size of 50 Kbytes is applied. LogOff—Set to 1 by default, it enables the File > Log Off menu item. Set to 0 to disable this menu item. MinPasswordLength—This only applies to ProtectFile Business. It specifies the minimum length required for any specified password. This option is set to 10 by default. 84 © SafeNet, Inc. Chapter 7 Registry Settings OlderCertificateBehaviour—This option determines the certificate selection method when a user logs in to ProtectFile. Certificate selection occurs during the initial (first) launch of ProtectFile. If more than one certificate survives the certificate filtering, the user is asked to choose a certificate. If set to 0, ProtectFile will query the LDAP for certificates. The latest valid certificate issued will display when a user launches ProtectFile for the first time. On subsequent logins, ProtectFile will search the LDAP for a more recently issued certificate. If one is found, the user profile is re-encrypted with the newer certificate. If a newer certificate is not found, ProtectFile will cache the certificate that was initially selected to decrypt the user profile for later use. The user will not be prompted to select a certificate in subsequent logins. If set to 1, all valid certificates issued will display when a user launches ProtectFile for the first time, and allows the user to choose a certificate to use for the profile encryption. In this scenario, ProtectFile will not filter the certificates by their effective dates. On subsequent logins, ProtectFile will cache the certificate that was initially selected to decrypt the user profile. An LDAP search for a newer certificate is not performed. If set to 2, all valid certificates display every time a user launched ProtectFile and allow the user to choose a new profile encryption certificate. ProtectFile will cache the selected certificate and re-encrypt the user profile if the certificate used previously for profile decryption is different from the one selected. In this case, ProtectFile will not filter the certificates by their effective dates. OpenConfigWindow—No longer used. PolicyKey—This key is required to access the Policy configuration dialog. To obtain this key, the user is required to enter the correct password associated with this dialog. PowerUser—Set to 1 by default, this option enables all menu item members of the Windows Power User Group. It effectively overrides all other restriction imposed by options that control access rights to various ProtectFile features. Set to 0 to enable Windows Power Users to be controlled by all applicable restriction policy settings. Register—Set to 1 by default, this option enables the Domain or Envelope Register menu item. Set to 0 to disable this menu item. RemoveDomain—Set to 0 by default, this option disables the Domain/Remove menu item. Set to 1 to enable this menu item. © SafeNet, Inc. 85 Chapter 7 Registry Settings RemoveEnvelope—Set to 0 by default, this option disables the Envelope/Remove menu item. Set to 1 to enable this menu item. RemoveExclusion—Set to 0 by default, this option disables the Exclusion/Remove menu item. Set to 1 to enable this menu item. RemoveExtension—Set to 0 by default, this option disables the Extension/Remove menu item. Set to 1 to enable this menu item. RestrictedFolderBrowse—Set to 0 by default, this option allows a user to browse folders to add an exclusion after a domain is created. Set to 1 to prevent a user to browse folders to add an exclusion after a domain is created. If this is attempted, an "Access Denied" message displays. SaveKeyphrase—No longer used. SendTransport—Controls whether the user is permitted to send transport files to other users. A value of 0 indicates that a user is not permitted to send transport files to other ProtectFile users. A value of 1 indicates that a user is permitted to send transport files to other ProtectFile users. In this case, the Domain > Share… menu option will be enabled. ShowDomainAccessWarning—Set to 1 by default, this enables the user to be notified when domains become available or unavailable. Set to 0 if the user should not be notified. SuppressCertSearchWarning—If the policy value is set to 0 (the default) and a valid certificate is not found in the local store, then ProtectFile will prompt the user with Certificate not Found [Retry]/[Cancel], and attempt to search for the certificate again if the user selects Retry. If this policy value is set to a non-zero value, then no [Retry]/[Cancel] prompt displays if a valid certificate cannot be found. A standard 'No Certificate Found' error message will display instead. SuppressConfigNotFoundError—No longer used. SuppressLoginDialog—Set to 0 by default, this option displays the ProtectFile Login dialog. If set to 1, the ProtectFile Login dialog is not displayed to the user. Additionally, if set to 1, all error messages that do not require user interaction (other than clicking the OK button) are suppressed and logged to the log file. 86 © SafeNet, Inc. Chapter 7 Registry Settings TransportIn * TransportOut—Folders residing in a network folder (usually on the computer running the Management Console) which are used to exchange information between the ProtectFile client(s) and the Management Console. All ProtectFile users must have Read/Write permissions to these folders. UpdateLicenseNo—Set to 0 by default, this option disables the user‘s ability to update the license number in the Help > About dialog. Set to 1 to allow the user to update the license number. UpdateProtectedEnvelope—Enables/disables the Access Control check box in the Add Envelope and User Administration dialogs (in ProtectFile Premium) and Add Domain dialog (in ProtectFile Business). If set to 1, the user can enable/disable the Access Control feature for a domain/envelope. ViewLogFile—Set to 1 by default, this option enables the View > LogFile menu item in both ProtectFile Business and Premium. Set to 0 to disable this menu item. © SafeNet, Inc. 87 Chapter 7 Registry Settings Driver Registry Keys Key: HKLM\System\CurrentControlSet\Services\ProtectF\Parameters Value Data Type: Possible Values AccessControl REG_DWORD: 0, 1, 2, 3 AllowedProcesses REG_SZ: List of applications; separated by semicolons. Silent Installation Property ALLOWEDPROCESSES Note: No paths are required. AllowForAdmin REG_DWORD: 1, 0 AllowNetworkCaching REG_DWORD: 0 BackupProcesses REG_MULTI_SZ: List of applications separated by New-Line character. Application names must be in upper case. For example, NTBACKUP.EXE 88 DisallowIfFilesOpen REG_DWORD: 1, 0 HideTagFile REG_DWORD: 1, 0 LateNetworkStart REG_DWORD: 1, 0 MSOfficeInterlock REG_DWORD: 1 PendingCreateTimeOut REG_DWORD 20, 0 - HIDETAGFILE PENDINGCREATETIMEOUT © SafeNet, Inc. Chapter 7 Registry Settings Description These keys are used by the driver to determine driver behavior. AccessControl—Set to 0 by default, ProtectFile denies all access to unregistered envelopes. Users who have not registered an envelope will not be able to open that envelope (folder) for browsing, nor will they be able to open any files in that envelope. If set to 1, the user will be allowed to browse local envelopes and open files in them. The data in the open files, however, will remain encrypted and will be displayed that way to the user. If set to 2, the user will be allowed to browse network based (remote) envelopes and open files in them. The data in the open files, however, will remain encrypted and will be displayed that way to the user. If set to 3, the user will be allowed to browse and open files in both local and network based envelopes. The data within the files, however, will remain encrypted and will be displayed that way to the user. AllowedProcesses—Lists all applications that are allowed access to protected folders. The applications listed will only be given access to all folders/files within domains. They will not be given access to decrypted data. AllowForAdmin—If set to 1, Local and Domain Windows Administrators will have access to files within a ProtectFile Domain/Envelope, and the setting of the AccessControl parameter is ignored. If set to 0, the setting of the AccessControl parameter will be used to determine if access will be checked. See AccessControl, above. The default value is 0. AllowNetworkCaching—If set to 1, network caching is enabled. This should not be modified. BackupProcesses—Lists applications, which will be given access to the envelope.sys and encrypted files for backup purposes. Normally, access to files residing in envelopes with access control enabled and access to the envelope tag file (envelope.sys) is denied by the ProtectFile driver, if the application requesting access is not run in the context of an authorized user. The BackupProcesses setting allows backup applications access to the encrypted files in an envelope and to the envelope tag file. The application name must be specified in upper-case characters. © SafeNet, Inc. 89 Chapter 7 Registry Settings DisallowIfFilesOpen—If set to 1, the driver will not accept any update requests if a file is open in a domain or envelope. Attempting to add/remove/deregister domains, envelopes, exclusions, and extensions should fail. In such a case, any changes will be rolled back to ensure the status remains the same. The default value is 0. HideTagFile—If set to 1, the driver will hide the Envelope file (envelope.sys) from all applications. Otherwise, this file will be visible to applications such as Windows Explorer. LateNetworkStart—In some environments, it has been observed on startup, that file access to network shares circumvents the normal file filter stack (including ProtectFile). In such environments, it might be necessary to delay the attachment of the ProtectFile encryption driver to the network devices. The default value is 0, and should only be modified if problems with access to network resources are experienced after installing ProtectFile. Setting this value to 1 will delay the activation of the ProtectFile encryption driver until the ProtectFile application has started. MSOfficeInterlock—Indicates to the driver whether or not it will show a message when a document is already in use. This setting should not be modified. PendingCreateTimeOut—The time-out period for the envelope auto registration request generated by third-party applications. By default, this option is set to 20. If an application attempts to access an unregistered envelope, ProtectFile will attempt to auto register this envelope. If the envelope registration request fails, it will eventually time out in PendingCreateTimeOut seconds, leading to the denial of access to the relevant envelope. Since the registration process needs to perform LDAP lookups in this case, it is possible that this process will take some time. During this time, the application accessing the required data may appear to not respond. 90 © SafeNet, Inc. Chapter 7 Registry Settings Envelope Administration Registry Keys Key: HKLM/Software/SafeNet/ProtectFile Value Data Type: Possible Values CertificateEnhancedKeyUsageEx0 REG_SZ: <OID for required key usage for certificate selection> (exclusive) CertificateIntendedKeyUsageEx REG_DWORD: <Bit mask of acceptable certificate usage for certificate selection> (exclusive) CertificateSelection REG_DWORD: 0, 1, 2 Silent Installation Property Description These keys are used to determine certificate filtering to limit which certificates are used if a user has multiple certificates. CertificateEnhancedKeyUsageEx0—Specify the certificate enhanced key usage that a certificate must not have defined (exclusive). This value accepts OID values. Additional values can be added incrementally, i.e., the next value would be CertificateEnhancedKeyUsageEx1, and so on. CertificateIntendedKeyUsageEx—Specify the certificate intended key usage that a certificate must not have defined (exclusive). This is a bitmask value which indicates which features are enabled and disabled. The features are: CERT_DIGITAL_SIGNATURE_KEY_USAGE CERT_NON_REPUDIATION_KEY_USAGE CERT_KEY_ENCIPHERMENT_KEY_USAGE CERT_DATA_ENCIPHERMENT_KEY_USAGE CERT_KEY_AGREEMENT_KEY_USAGE CERT_KEY_CERT_SIGN_KEY_USAGE CERT_CRL_SIGN_KEY_USAGE CertificateSelection—This key is not automatically created during or after the ProtectFile installation. If created by the user, these values can be used: 0—All certificates that match the filtering rules are selected; 1—The certificate with the latest effective date that matches the filtering rules is selected; 2—The certificate with the latest expiry date that matches the filtering rules is selected. © SafeNet, Inc. 91 Chapter 7 Registry Settings The DSA keys described on the following pages are used to determine where information about the LDAP server is stored. This information is used during envelope administration to contact the LDAP to verify certificate validity. Key: HKLM/Software/SafeNet/ProtectFile/DSA Value Data Type: Possible Values Default REG_SZ: <default directory> SaveCredentials REG_DWORD: 1, 0 Silent Installation Property Description Currently, only one directory is supported under the /DSA key. Future versions of ProtectFile will support multiple directories. Default—This value names the type of directory and must match the sub-key value. For example: For Active Directory, the value would be set to Active Directory, and there would be a sub-key of: Software/SafeNet/ProtectFile/DSA/ActiveDirectory/. For OpenLDAP, the value would be set to OpenLDAP, and there would be a sub-key of: /Software/SafeNet/ProtectFile/DSA/OpenLDAP/. SaveCredentials—If set to 1, the directory credentials, such as the default naming context and naming contexts, will be cached to the current user‘s registry. The default value is 0. 92 © SafeNet, Inc. Chapter 7 Registry Settings Key: HKLM/Software/SafeNet/ProtectFile/DSA/Active Directory Value Data Type: Possible Values Anonymous REG_DWORD: 1, 0 Flags REG_DWORD: <Bit mask of options used by server> GlobalCatalog REG_DWORD: 1, 0 Silent Installation Property (currently not implemented) Server REG_SZ: < directory service> Version REG_DWORD: 2, 3 Description These keys are installed by default. The key name is used for display purposes and can be changed to suit your specific needs. If the name is changed, however, make sure the DSA Default value is changed to match the new registry key name. Anonymous—Is set to 1, anonymous binding to this DSA is enabled. If set to 0, anonymous binding is disabled. The default value is 1. Flags—Directory specific authentication flags. This is a bitmask value which indicates any options the server uses. The default value is 0. The options are: ADS_SERVER_BIND = 0x200 ADS_USE_DELEGATION = 0x100 ADS_USE_SEALING = 0x80 ADS_USE_SIGNING = 0x40 ADS_FAST_BIND = 0x20 ADS_NO_AUTHENTICATION = 0x10 ADS_PROMPT_CREDENTIALS = 0x8 ADS_READONLY_SERVER = 0x4 ADS_USE_SSL = 0x2 © SafeNet, Inc. 93 Chapter 7 Registry Settings ADS_USE_ENCRYPTION = 0x2 ADS_SECURE_AUTHENTICATION = 0x1 GlobalCatalog—This key is only intended for use with Microsoft Active Directory only, but is currently not implemented. Server—Specify the directory service when not using Active Directory as server:port. Examples are: 192,168.36.254.389 dcBur01:389 et.com:389 The default port is 389. Version—Specify the LDAP protocol version to be used. The version number must be set to 2 when using ADAM (Active Directory Application Mode), or when the directory service can not access or does not support rootDSE. When specifying version 2 or lower, the ―cache‖ values must be manually entered. The default is 3. Key: HKLM/Software/SafeNet/ProtectFile/DSA/Active Directory/Cache Value Data Type: Possible Values DefaultNamingContext REG_SZ: <default naming context> NamingContexts REG_SZ: <additional naming contexts> Silent Installation Property Description This key is used only if you have specified the directory service to use LDAP version 2. DefaultNamingContext—Specify the default naming context (search base). For example: ―cn=Users,dc=et, dc=com‖ NamingContexts—Specify the one or more naming contexts (search base). 94 © SafeNet, Inc. Chapter 7 Registry Settings Key: HKLM/Software/SafeNet/ProtectFile/DSA/Active Directory/Properties The Properties keys described on the following pages all have the same structure and values. Key: HKLM/Software/SafeNet/ProtectFile/DSA/Active Directory/Properties/ DisplayName Value ADsEncoding Data Type: Possible Values Silent Installation Property REG_DWORD: 3 AttributeName REG_SZ: <”cn”> AttributeOID REG_SZ: <2.5.4.3> DisplayName REG_SZ: <”CN”> ProviderEncoding REG_DWORD: 0 Description ADsEncoding—Specify the ADs encoding type. The default is 3. AttributeName—Specify the attribute‘s display name, specified by the schema. AttributeOID—Specify the attribute‘s OID, as specified by the schema. DisplayName—Define the display name to be used by the GUI. ProviderEncoding—Currently not implemented. Define the provider-specific encoding type where the user is Base64 encoded and needs to be decoded first. The default is 0. © SafeNet, Inc. 95 Chapter 7 Registry Settings Key: HKLM/Software/SafeNet/ProtectFile/DSA/Active Directory/Properties/ DistinguishedName Value ADsEncoding Data Type: Possible Values Silent Installation Property REG_DWORD: 1 AttributeName REG_SZ: <”distinguishedName”> AtrributeOID REG_SZ: <2.5.4.49> DisplayName REG_SZ: <”Distinguished Name”> ProviderEncoding REG_DWORD: 0 Description ADsEncoding—Specify the ADs encoding type. The default is 1. AttributeName—Specify the attribute‘s display name, specified by the schema. AttributeOID—Specify the attribute‘s OID, as specified by the schema. DisplayName—Define the display name to be used by the GUI. ProviderEncoding—Currently not implemented. Define the provider-specific encoding type where the user is Base64 encoded and needs to be decoded first. The default is 0. 96 © SafeNet, Inc. Chapter 7 Registry Settings Key: HKLM/Software/SafeNet/ProtectFile/DSA/Active Directory/Properties/ UserCertificate Value ADsEncoding Data Type: Possible Values Silent Installation Property REG_DWORD: 8 AttributeName REG_SZ: <”userCertificate”> AttributeOID REG_SZ: <2.5.4.36> DisplayName REG_SZ: <”User Certificate(s)”> ProviderEncoding REG_DWORD: 0 Description ADsEncoding—Specify the ADs encoding type. The default is 8. AttributeName—Specify the attribute‘s display name, specified by the schema. AttributeOID—Specify the attribute‘s OID, as specified by the schema. DisplayName—Define the display name to be used by the GUI. ProviderEncoding—Currently not implemented. Define the provider-specific encoding type where the user is Base64 encoded and needs to be decoded first. The default is 0. © SafeNet, Inc. 97 Chapter 7 Registry Settings Key: HKLM/Software/SafeNet/ProtectFile/DSA/Active Directory/Properties/ PropertyPath Value ADsEncoding Data Type: Possible Values Silent Installation Property REG_DWORD: 3 AttributeName REG_SZ: <”ADsPath”> AttributeOID REG_SZ: <””> DisplayName REG_SZ: <”Path”> ProviderEncoding REG_DWORD: 0 Description ADsEncoding—Specify the ADs encoding type. The default is 3. Other values for this field are defined by the ADSTYPEENUM structure which is available in MSDN. The valid values range from 1 to 28, as defined in MSDN. For details on ADSTYPEENUM, go to: www.msdn2.microsoft.com/en-us/library/Aa772240.aspx. AttributeName—Specify the attribute‘s display name, specified by the schema. AttributeOID—Specify the attribute‘s OID, as specified by the schema. DisplayName—Define the display name to be used by the GUI. ProviderEncoding—Currently no implemented. Define the provider-specific encoding type where the user is Base64 encoded and needs to be decoded first. 98 © SafeNet, Inc. Chapter 7 Registry Settings Key: HKLM/Software/SafeNet/ProtectFile/DSA/SimpleSearch Value Data Type: Possible Values SearchAttributes REG_MULTI_SZ: <”search attributes”> SearchBase REG_MULTI_SZ: <”specify search bases”> SearchDepth REG_DWORD: <specify search depth> Silent Installation Property 0, 1, 2 SearchFilter REG_SZ: <”predefined search filter”> Description These keys would allow you to specify the simple LDAP search behavior. SearchAttributes—Specify the attributes a user may select in the simple search dialog. For example: cn displayName commonName SearchBase—Specify one or more search bases a user may use to perform searches. For example: dc-et,dc=com cn=users,dc=et, dc=com SearchDepth—Specify the search depth. If set to 0, search this object only. If set to 1, search down one level. If set to 2, recursive searching is enabled. SearchFilter—Define a predefined search filter. For example: “(&(%s)(userCertificate=*))‖, where the ―%s‖ will be replaced with the SearchAttribute that the user selected, and with the search criteria that was entered. The SearchFilter will be expanded to something, such as: ―(&(cn=arnold*)(userCertificate=*))‖. © SafeNet, Inc. 99 Chapter 7 Registry Settings Example—Modify the Registry Settings That Control the Default Excluded Extensions ProtectFile provides the capability to define the default excluded extensions for newly created profiles. This can be achieved via the ProtectFile HKEY_LOCAL_MACHINE registry entry. The following registry keys can be created within the registry entry HKEY_LOCAL_MACHINE\SOFTWARE\SafeNet\ProtectFile\Defaults. The table below shows the values of the registry keys that would result in a profile where the excluded extensions are the same as the default excluded extensions (i.e., .BAT, .COM, .DLL, .EXE, .SYS and .PROF). These six registry keys are the minimum number needed to overwrite all the default excluded extensions. Registry Key Setting HKEY_LOCAL_MACHINE\SOFTWARE\eracom\ProtectFile\Defaults\EXTENSION_0 "PATH"=".BAT" HKEY_LOCAL_MACHINE\SOFTWARE\eracom\ProtectFile\Defaults\EXTENSION_1 "PATH"=".COM" HKEY_LOCAL_MACHINE\SOFTWARE\eracom\ProtectFile\Defaults\EXTENSION_2 "PATH"=".DLL" HKEY_LOCAL_MACHINE\SOFTWARE\eracom\ProtectFile\Defaults\EXTENSION_3 "PATH"=".EXE" HKEY_LOCAL_MACHINE\SOFTWARE\eracom\ProtectFile\Defaults\EXTENSION_4 "PATH"=".SYS" HKEY_LOCAL_MACHINE\SOFTWARE\eracom\ProtectFile\Defaults\EXTENSION_5 "PATH"=".PROF" ProtectFile makes a straight substitution of the registry key setting over the default excluded extension. For example, if the entry ProtectFile\Defaults\EXTENSION_2 is specified as .TXT and no other entries are specified, then ProtectFile will add the following extensions to a newly created profile: .BAT, .COM, .TXT, .EXE, .SYS, .PROF. To completely remove all default excluded extensions, set all six of these registry keys to an empty string. The registry settings for the default excluded extensions will only affect newly created profiles. Excluded extensions in existing profiles must be removed manually. 100 © SafeNet, Inc. Chapter 8 Server Extension Chapter 8 Server Extension When using database systems, there is often a requirement to encrypt the database files. Since ProtectFile encrypts data just before transferring these to the file handling system, ProtectFile must be installed on the server. If in addition, these encrypted data files need to be backed up without changing the encryption, the manual procedures of deactivation and activation would prove to be far too complicated. The server version was created to meet the above requirement. It allows the integration of a backup as a very simple batch procedure. Integration requires a change to the Windows registry. Starting and stopping the encryption service is done via the ScrCtrl.exe utility. ScrCtrl.exe Utility The ScrCtrl.exe utility is a command line program which allows the operator to perform encrypted backups without having to manually stop and restart ProtectFile encryption or re-enter the master keyphrase. This utility can not be used while ProtectFile is running. Usage: scrctrl [ enable | disable ] Call Return in DOS-Prompt ScrCtrl enable Activates encryption ScrCtrl disable Deactivates encryption Returned Success Codes 0 = the encryption driver is enabled 1 = the encryption driver is disabled Returned ERROR codes 251 = incorrect usage 252 = the check for an active ProtectFile instance failed 253 = ProtectFile is running 254 = no encryption driver found 255 = an unknown error occurred © SafeNet, Inc. 101 Chapter 8 Server Extension THIS PAGE INTENTIONALLY LEFT BLANK 102 © SafeNet, Inc. Chapter 9 Silent Installation Chapter 9 Silent Installation Using the Silent Install Feature The ProtectFile install package offers the possibility of being installed silently in the background by writing a small batch file with the following line: Drive:\path\Setup.exe /s /v“/qn LIZENZNUMMER=0000-0000-0000-0000” Parameters are used to modify the default installation as described above. All parameters must be specified on a single line. They are specified as parameter and value pairs (parameter=value) and separated by a space character. Where parameters contain a space character, they must be enclosed by double quotes. These double quote characters and any backslash characters must be escaped by a backslash character. For example: setup.exe /s /v“/qn INSTALLDIR=\”D:\\Program Files\\SafeNet\\ProtectFile\”” Most parameters control the initial values of policy settings and have a corresponding registry key. Some parameters are used to inject information into the installation process that would otherwise be selected by the user in the interactive installation process. NOTE The LIZENZNUMMER parameter (license number) is always required. NOTE Windows Vista installations only – If the UAC (User Access Control) feature is enabled, you must launch the command prompt as the administrator (right-click on Command Prompt and select Run as administrator) to launch the ProtectFile silent installation. For details on UAC, go to http://technet.microsoft.com/en-us/default.aspx. © SafeNet, Inc. 103 Chapter 9 Silent Installation Default Values If no further parameters are specified, ProtectFile is installed as follows: No GINA Red keys for encrypted folders No Management Console support Reboot of the system after installation Entry in startup menu ProtectFile is available for all users English version Tag files are visible Example Assume a ProtectFile installation with the following settings: German, red keys in Explorer, no automatic startup, no reboot after installation, an application for encrypted backups and unlimited access for the AVMGR.EXE. “\\Computer\drive\path with spaces\Setup.exe” /s /v”/qn LIZENZNUMMER=xxxx-xxxx-xxxx-xxxx PFLANGUAGE=German AUTOSTART=NO REBOOT=ReallySuppress ALLOWEDPROCESSES=AVMgr.exe” 104 © SafeNet, Inc. Chapter 9 Silent Installation Reference The following table provides a reference for all silent installation parameters. For parameters that have a corresponding Registry Key, refer to Chapter 7, Registry Settings for a description of the setting and valid values. Installation Settings Parameter Values Description AUTOSTART YES ProtectFile is added to the StartUp folder. NO ProtectFile is not started automatically. 1 ProtectFile is installed for all users. 0 ProtectFile is installed for the current user only. ALLUSERS INSTALLVERSION GINA PFLANGUAGE The Business edition of ProtectFile is installed. PREMIUM The Premium edition of ProtectFile is installed. 0 The ProtectFile GINA is not installed. 1 The ProtectFile GINA is installed. English The English version of ProtectFile is installed. German Die deutsche Version von ProtectFile wird installiert. REBOOT REDKEYS After installation, the machine is automatically rebooted. ReallySuppress An automatic reboot after installation does not occur. YES Encrypted folders are marked with a red key icon. NO Encrypted folders are displayed as normal in Windows Explorer. SPEZIALVERSION © SafeNet, Inc. ProtectFile Business Password CSP ProtectFile Business CSP MSPKI ProtectFile Premium Microsoft PKI ENTRUST ProtectFile Premium Entrust PKI 105 Chapter 9 Silent Installation Password CSP Microsoft Entrust Premium Silent Install. Business ○ ○ ○ ○ 0 ○ ○ ○1 ○1 REG_DWORD 0 - - ○ ○ ADDEXCLUSION REG_DWORD 0 ○ ○ ○ ○ ADDEXTENSION REG_DWORD 0 ○ ○ ○ ○ ADMINISTERDOMAIN REG_DWORD 0 ○ ○ ○1 ○1 AUTHCERTEXPIRYWARNINGPERIOD REG_DWORD 0 - - □ - AUTOREGISTER REG_DWORD 0 - - ○ ○ AUTOREGISTERTIMEOUT REG_DWORD 3600 - - ○ ○ AUTOSTART STRING YES ○2 ○2 ○2 ○2 COMPANYNAME STRING ○ ○ ○ ○ CONFFILE1 STRING ●3 ●3 - - CONFFILE2 STRING ○3 ○3 - - CSPPROVIDER STRING Microsoft Base Cry.. - ○ ○ - CSPALG REG_DWORD CALG_RC4 (26625) - ○ ○ - CSPTYPE REG_DWORD PROV_RSA_ FULL - ○ ○ - CSPCERT REG_DWORD 0 - ○ ○ - MSI Property Type Default ALLUSERS REG_DWORD 1 ADDDOMAIN REG_DWORD ADDENVELOPE 106 © SafeNet, Inc. Chapter 9 Silent Installation CSPCHECK REG_DWORD 1 - ○ ○ - CSPDLG REG_DWORD 0 - ○ ○ - CSPENCRYPT REG_DWORD 1 - ○ ○ - CSPENVALG REG_DWORD CALG_RC4 (26625) - ○ ○ - CSPENVPROV STRING Microsoft Base Cry.. - ○ ○ - DEFAULTCRYPTMODE REG_DWORD 6 = AES 256 ○ ○ ○ ○ 2 = IDEA DISABLE REG_DWORD 0 ○ ○ ○ ○ ENCRYPTCHECK REG_DWORD 1 ○ ○ ○ ○ GINA REG_DWORD 0 □5 □5 - □5 HASHKEYPHRASE REG_DWORD 1 ○ ○ - - INSTALLVERSION STRING BUSINESS - - ● ● KEYCHANGEPERIOD REG_DWORD 90 ○ - - - KEYPHRASEDOMAIN REG_DWORD 0 ○ ○ - - KEYPHRASEMASTER REG_DWORD 1 ○ - - - LIZENZNUMMER STRING ● ● ● ● LOGFILESIZE REG_DWORD 50 ○ ○ ○ ○ LOGINONFAIL REG_DWORD 0 ○4 - - - MINPSWLEN REG_DWORD 10 ○ - - - PENDINGCREATETIMEOUT REG_DWORD 3600 - - ○ ○ PFLANGUAGE STRING English ○ ○ ○ ○ © SafeNet, Inc. 107 Chapter 9 Silent Installation CSP Microsoft Entrust Premium Password Silent Install. Business ○ ○ ○ ○ 1 ○ ○ ○ ○ REG_DWORD 1 ○ ○ ○ ○ REBOOT STRING Force ○ ○ ○ ○ REMOVEDOMAIN REG_DWORD 0 ○ ○ ○1 ○1 REDKEYS REG_DWORD 0 □5 □5 □5 □5 REMOVEENVELOPE REG_DWORD 0 - - ○ ○ REMOVEEXCLUSION REG_DWORD 0 ○ ○ ○ ○ REMOVEEXTENSION REG_DWORD 0 ○ ○ ○ ○ RESTRICTEDFOLDERBROWSE REG_DWORD 1 ○ ○ ○ ○ □ - - - MSI Property Type POLICYKEY STRING POLYADMIN REG_DWORD POLYPOWER SECLANPROFILE Default STRING (If used, you must also include ERA_MIGRATETOOLS=1.) SENDTRANSPORT REG_DWORD 1 ○3 ○3 - - SHOWDOMAINACCESSWARNING REG_DWORD 1 ○ ○ ○ ○ SPEZIALVERSION STRING - ● ● ● SUPPRESSLOGINDLG REG_DWORD 0 ○4 - - - SYNCPSW REG_DWORD 0 ○4 - - - TRANSPORTIN STRING ○3 ○3 - - 108 © SafeNet, Inc. Chapter 9 Silent Installation ○3 ○3 - - □3 □3 - - ○ ○ ○ ○ 0 ○ ○ ○ ○ REG_DWORD 0 - - ○ ○ REG_DWORD 1 ○ ○ ○ ○ TRANSPORTOUT STRING USECONFFILE REG_DWORD USERNAME STRING UPDATELICENSENO REG_DWORD UPDATEPROTECTEDENVELOPE VIEWLOGFILE 0 ) Controls the installation process. -) Not used for this type of installation. ○) The default value can be set using silent installation. ●) This value must be set during silent installation. □) This value is optional. 1 ) Only used if ProtectFile is not operating in PKI mode. 2 ) Can not be combined with ProtectFile GINA installation. 3 ) Only used if ProtectFile is being used in conjunction with ProtectFile Management Console. 4 ) Only used when ProtectFile GINA installation is selected. 5 ) Requires Windows 2000 or higher. © SafeNet, Inc. 109 Chapter 9 Silent Installation THIS PAGE INTENTIONALLY LEFT BLANK 110 © SafeNet, Inc. Glossary Glossary Access Control A feature that is used to prevent unauthorized viewing of files within a domain. ADSI Active Directory Services Interface. AES (128, 192, 256 bit) Advanced Encryption Standard, established as a replacement to DES by the US Federal Information Processing Standard. API Application Programming Interface. Authentication The process of establishing your identity. AVS Anti-virus Software. Backing up The process of making a copy of important data files in case of computer failure. CA Certificate Authority. Challenge/Response The process of responding to a cryptographic challenge, usually a sequence of numbers. CSP Cryptographic Service Provider. Data Encryption Keyphrase A keyphrase which is entered during the domain creation process. This keyphrase is used to generate the DES or Triple DES cipher key used during encryption operations. Specifying a data encryption keyphrase allows you greater control over how domains are encrypted. Note that if a data encryption keyphrase is specified during domain creation, it will automatically become the domain administration keyphrase. You will need to specify a data encryption keyphrase when creating a domain when you want to record the cipher key to make encrypted file recovery possible after a system disk failure. DES or 2 Key Triple-DES Data Encryption Standard. First proposed as a U.S. Federal Information Processing Standard, and now the recognized industry encryption standard. (See also IDEA.) Domain © SafeNet, Inc. A directory including its sub-directories that are protected by ProtectFile Premium. Each domain has a unique keyphrase assigned when it is created. 111 Glossary Domain Administration Keyphrase Used to allow administration of the domain. Only the creator of the domain should know the domain administration keyphrase. You will need the domain administration keyphrase of a domain to remove that domain, modify the settings of that domain, change the domain keyphrase of that domain, or add an exclusion inside that domain. 112 Domain Keyphrase Used to allow access to the domain for authorized users. You will need the domain keyphrase of a domain to register that domain. Domain Mode An operating mode of ProtectFile where a user can create and administer domains. (See also PKI Mode.) Encryption A reversible transformation of data using a key and mathematical algorithm, which prevents unauthorized persons from viewing the transformed data (cipher text) in its original form (plain text) without possessing the key. Envelope A directory including its sub-directories that are protected by ProtectFile Business with a PKI key management scheme. It is like a PKI-enabled domain. Envelope Administrator The envelope administrator has the right to create or remove envelopes, allow or deny other users to access envelopes or to delegate these rights to other users for specific envelopes. Excluded Extensions Files with certain specified file name extensions are always excluded from the protection of ProtectFile. There are five default excluded extensions: ―.BAT,‖ ―.COM,‖ ―.DLL,‖ ―.EXE,‖ and ―.SYS.‖ Eleven more can be defined. Exclusion A directory (including its sub-directories) under a domain or envelope which is not included under the protection of ProtectFile. FAT File Allocation Table. A type of Windows File System. (See also NTFS.) GINA A Graphical Identification and Authentication dynamic-link library (DLL). The Windows sub-system that controls authentication. Hashing The transformation of data into a usually shorter fixed length value that uniquely represents the original string, and is difficult or impossible to reverse (i.e., it is difficult or impossible to find the data that produces a given hash value). IDEA International Data Encryption Algorithm. Symmetric encryption algorithm developed by ETH Zurich and Ascom AG owned by Ascom AG. © SafeNet, Inc. Glossary Keyphrase A string of characters that can represent a password, or can be used to generate a cryptographic key. ProtectFile defines a number of different keyphrase types. Each keyphrase type has a different purpose in securing encrypted files inside domains and ProtectFile features. All keyphrases entered must adhere to normal password rules. (See Data Encryption Keyphrase, Domain Administration Keyphrase, Domain Keyphrase, Policy Keyphrase, and User Password.) LDAP Lightweight Directory Access Protocol. NTFS NT File System. A type of Windows file system. (See also FAT.) Orphan Exclusion An exclusion not contained within a domain. Personal Configuration A set of domains, exclusions, and excluded extensions protected under a private user password, which defines the location and type of protected files for a particular user. A personal configuration is usually unique to an individual. PKI Public Key Infrastructure. PKI Mode An operating mode of ProtectFile where a user can create and administer envelopes. (See also Domain Mode.) Policy A range of permissions that restrict the features of ProtectFile available to an unprivileged user. Policy Keyphrase The keyphrase used to view and modify policy settings. The system administrator uses policy settings to prevent users from accessing specific ProtectFile features. ProtectFile Administrator The ProtectFile administrator allows users to create and remove envelopes and domains. (Note that for Windows 2000/XP, the user for this role must have system administrator rights.) ScrCtrl Utility A command line utility that is used to perform encrypted file backups. Shared Domain A domain where more than one user has access and knows the domain keyphrase (for example, on group directories). Sleeping Domain A domain that cannot be accessed. © SafeNet, Inc. 113 Glossary 114 User Password Your User Password is set the first time ProtectFile starts. Each user should have a unique User Password to log on to ProtectFile. It is a text string that consists of arbitrary characters (case-sensitive), and is a minimum of 10 characters long. If the GINA authentication and Password Synchronization options were selected during the installation of ProtectFile, your User Password is always the same as your Windows Logon password. Windows Registry A database built into the Windows operating system where configuration information is stored. © SafeNet, Inc. Appendix A ProtectFile Scripting Example Appendix A ProtectFile Scripting Example //////////////////////////////////////////////////////////////////////// // // Example: All commands are case insensitive // //////////////////////////////////////////////////////////////////////// #include \\server\share\script\common.env #IldOverride TRUE // // // // // include this script Overrides the policy setting AllowIdenticalLocalDomains during scripting. True -> enable Identical Local Domains False -> disable Identical Local Domains // Creating an envelope with access control (default) CreateEnvelope "c:\secure\envelope.sys" // Creating an envelope with access control disabled CE - "C:\secure 2\envelope.sys" // // // // Creating an envelope with two exclusions (exclusions automatically disable access control) could also use CE "C:\secure 3\envelope.sys" ! "C:\secure 3\excluded" ! "C:\secure 3\general\public" CreateEnvelope "C:\secure 3\envelope.sys" ! "C:\secure 3\excluded" ! "C:\secure 3\general\public" // // // // // Adding an envelope administrator -> The user executing the script must be an envelope administrator could also use the short form of the command as follows AU "C:\secure 2\envelope.sys" @admin "CN=John Johnson,CN=Users,DC=protectf1,DC=et,DC=com" AddUser "C:\secure 2\envelope.sys" @admin "CN=John Johnson,CN=Users,DC=protectf1,DC=et,DC=com" // Adding a user to an envelope // -> The user executing the script must be an envelope administrator // could also use AU AddUser "C:\secure 2\envelope.sys" @ "CN=Peter Peterson,CN=Users,DC=protectf1,DC=et,DC=com" // or AU "C:\secure 3\envelope.sys" @ "CN=Peter // Peterson,CN=Users,DC=protectf1,DC=et,DC=com" © SafeNet, Inc. 115 Appendix A ProtectFile Scripting Example // Removing a user from an envelope. // -> The user executing the script must be an envelope administrator RU "C:\secure 2\envelope.sys" @ "CN=John Johnson,CN=Users,DC=protectf1,DC=et,DC=com" // Removing an envelope // -> The user executing the script must be an envelope administrator RemoveEnvelope "c:\secure\envelope.sys" // Migrating an envelope: // When migrating a legacy domain, the user can enable access control, not // set by default. The access control flag is copied when migrating an new // style domain // MigrateDomain + "c:\LegacyDomain\envelope.sys" END OF DOCUMENT 116 © SafeNet, Inc.