1
Installation
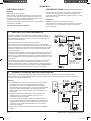
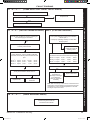
28connecting the flue to THE BOILER
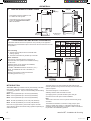
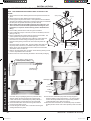
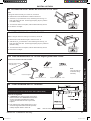
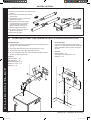
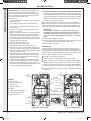
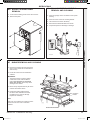
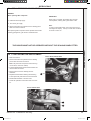
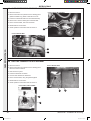
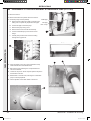
1. Measure 68mm from the cut end of the flue assembly and mark a line on the
flue.
2. Fit the flue connector over the end of the flue and align the end of the connector
with the marked line.
3. Ensure the ‘V’ cutout on the flue connector is aligned with the top of the turret
(use label as a guide).
4. Mark the 3 fixing screw holes and drill the three holes with a 3.2 (1/8”) dia drill.
Do not drill through the inner flue pipe.
5. Retain the connector with the 3 screws provided.
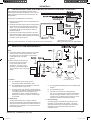
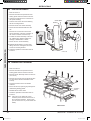
6. Adhere the 70mm wide x 20mm deep foam strip (found in the
hardware pack box) to the flue assembly tube to provide an
inner seal to the hole cut in the wall.
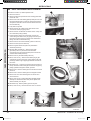
7. Insert the flue assembly through the prepared hole in the
wall.
4
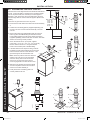
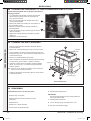
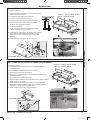
8. Remove the top outlet blanking plate or boiler top panel
to facilitate turret fitting. To ensure a positive flue seal is
confirmed it may be necessary to remove the worktop or
adjacent cupboard to view the joint.
10
A
1
6
5
Flue Outlet
9
Top outlet
blanking plate
Sealing Gasket
mxhe7710
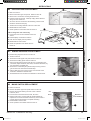
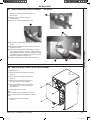
Fix the flue support bracket to
the wall, using the wall plug
and wood screw.
2
68mm
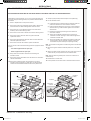
12.Flues over 1 metre long.
B
9
10.Smear lubricant (to be found in hardware pack)
over both inner flue duct seal and outer air duct
seal and locate the flue onto the turret ensuring
the 2 bayonet fixings on the flue connector
(B) engage to the lugs on the turret (A).
11.Replace the top outlet blanking plate.
7
FLUE OUTLET
9. Fit the sealing gasket and push the flue turret into the
top of the boiler flue sealing ring and retain with the 4
screws provided.
Label
3
mexico HE - Installation & Servicing
201787-9.indd 23
23
25/03/2013 13:53:35