1
Introduction
1
1
Introduction
TS MAN
Service & Repair
Management Software
by
BLANCHESOFT LIMITED
www.blanchesoft.com
1.1
Welcome
Dear user,
Thank you for your interest in our TS Man (Technical Support Manager) software . This help file should give
you basic information about the software itself.
Introductory overview
TS Man is a professional computer service & repair tool, designed to support the computer service & repair
businesses in achieving a fast, professional and accurate service delivered to their customers. It is the
ideal choice for small companies and individuals who are in the business of computer maintenance and
repair.
2
TS Man User Manual
Very intuitive, using a fast and royalty free database server for multi-user connectivity, a simple and almost
self explanatory graphical user interface, through which you, the end user, will complete the daily service &
repair tasks with ease and accuracy.
Benefits
•
•
•
•
•
•
•
Professional and faster service for your customers
Increase your productivity times fold
Keep track of changes in the details and owners of the computer systems passing through your workshop
Local (LAN) and Internet access
Access your database from anywhere in the world if you have an internet connection
Fast , free and reliable database server
Generation of detailed reports exportable to Word and Adobe Acrobat format
Key Features
True client -server
Work order creation (jobs)
invoicing and Time Billing
Inventory Tracking (professional version)
Purchase Orders (professional version)
Billing
Quotations (estimates)
Mass e-mailing for post-sales marketing - send emails to all your customers with new bargains, special offers,
etc.
• Reporting
• Create your own custom reports with the built-in report designer
•
•
•
•
•
•
•
•
Introduction
•
•
•
•
3
Database Back-up and restore
Access rights levels for users
SMS integration (Alcatell & Kapow)
Email to SMS (providing your mobile telephone provider supports it)
We wish you many satisfactory moments using TS Man !
http://www.blanchesoft.com
2
Installation
We are constantly working towards improving the setup (installation) process of TS Man.
Currently the setup process is straight forward, with most of the required options selected by default.
There are two types of installation:
• Server which can also be used as standalone setup
• Client which is used to connect to the database through the Firebird Server
If you are not sure which one to choose at first, then choose Server.
2.1
Server & Client (standalone)
Server installation can be used as standalone installation (default for single individuals).
Can also be used as "Server" the place where Firebird Server and database file reside, so all clients
may connect to it.
TS Man is using a fast, open source, royalty free database server - FIREBIRD SERVER.
The current version of Firebird server that is being used with TS Man is Firebird 2.1.4
The "Server" Concept in TS Man
is that of the place (computer) where database file (TSM.FDB) and Firebird Database Server are
installed.
TS Man executable is all ways the same. In fact it is just another client application for the famous
Firebird Server.
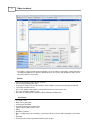
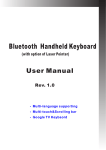
Installing the "TS Man Server"
Start by running the executable you downloaded.
During the installation process, at the beginning, you will be presented with a screen asking you to
choose the type of the installation. Choose "TS Man Server" and continue by clicking next, leaving all
the default values. See picture:
4
TS Man User Manual
(on some computers, you will have to reboot the computer in order to have firebird service started)
2.2
Client
Client installation is required only if you want to access the TS Man database from another computer.
The "Client" concept in TS Man
is that of a database client, with no other exceptions. Install the "TS Man Client" option on as many
computers as you wish. The connection to database is being regulated by the license which will only
allow a maximum of users based on the number of licenses you have purchased.
Trial version comes with 3 users, so it can be fully tested in the client-server environment.
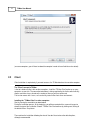
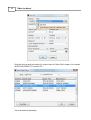
Installing the "TS Man Client" on other computers
Start by running the executable you downloaded.
During the installation process, at the beginning, you will be presented with a screen asking you to
choose the type of the installation. Choose "TS Man Client" and continue by clicking next, leaving all
the default values. See picture:
Then continue the installation following the wizard. You don't have to leave the default options,
although recommended.
Installation
3
5
Connection
Being a true client-server application, TS Man requires a connection to the database server and the
database file itself.
There are few details that you may want to know about the communication between client and server
in TS Man:
•
•
•
•
•
3.1
Protocol...................................................... TCP
Port............................................................ 3050
Firewall access (TSMan.exe)........................ required
Port forwarding............................................ required for WAN access
NIC (Network Interface Card)......................... required even for local computer connection
Local (same computer)
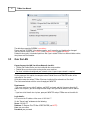
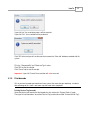
Connecting to the server and database on the local computer (if you installed the Server that is) is very
straight forward.
When the "Server Login" window appears, enter the following:
6
TS Man User Manual
The default password for SYSDBA is masterkey
Please note that "SYSDBA" is the database owner, and it cannot be and should not be changed.
You may also for server, enter 127.0.0.1 or the computer name instead of localhost.
Database value (path) is the default path here. But if you installed TS Man in a different folder or drive,
then please enter that location.
3.2
Over the LAN
Connecting over the LAN (Local Area Network) checklist:
• TS Man and Firebird Server must be installed on the server machine
• Firebird Server service must be running on the server machine
• You have installed and configured your network, at least a peer to peer network is required
For the purpose of this tutorial, the computer where Firebird Server and TSM.FDB reside, will be
referred to as "the server".
All the other computers where TS Man Client was installed, will be referred to as "the client".
The client communicates with the server through port 3050 TCP
Requirements:
- The server must have a static IP address, not DHCP assigned, and that is because when the IP
address lease expires, you will no longer be able to log in until you find out what the new IP address
is.
- If you have strict firewall rules in place, open port 3050 TCP and put TSMan.exe on the white list.
Login details:
Let's assume the IP address of the server is 192.168.1.7
On the "Server Login" window enter the following:
Server: 192.168.1.7
Database: C:\Program Files\TS Man 3\DB\TSM.FDB (see NOTE)
User: your user name
Password: your password
Connection
7
You may also use the computer name as "Server"
NOTE:
As you can see from this example, the database path and file name is a local path. When connecting,
that path is being passed to the Firebird Server as a string of text (connection string). The Firebird
Server takes it as the location and name of the database file it should connect to. Being a local path by
definition, it looks into it's own C: drive, finds it and successfully connects to it
.
As a rule of thumb: database path should always be the same as when you use TS Man locally on the
server.
3.3
Over the Internet (WAN)
Connecting over the WAN (Wide Area Network or Internet) checklist:
8
TS Man User Manual
• TS Man and Firebird Server must be installed on the server machine
• Firebird Server service must be running on the server machine
• You have installed and configured your network, at least a peer to peer network is required
For the purpose of this tutorial, the computer where Firebird Server and TSM.FDB reside, will be
referred to as "the server".
All the other computers where TS Man Client was installed, will be referred to as "the client".
The client communicates with the server through port 3050 TCP
Requirements:
- The server must have a static IP address, not DHCP assigned, and that is because when the IP
address lease expires, you will no longer be able to log in until you find out what the new IP address
is.
- You will need a static WAN IP address, assigned by your ISP - a dynamic WAN IP address may still
work, but is not guaranteed
- Log on to the router, and create a "virtual server", or as on some routers is called, "port
forwarding". That means, forward all incoming requests to port 3050 TCP to go to the IP address of
the server. That only needs to be done at the server's physical network.
- If you have strict firewall rules in place, open port 3050 TCP and put TSMan.exe on the white list.
Login details:
Let's assume that the static WAN IP address assigned to you by your ISP is 192.231.57.164
Server: 192.231.57.164
Database: C:\Program Files\TS Man 3\DB\TSM.FDB (see NOTE)
User: your user name
Password: your password
Unlike in the LAN connection, you may not be able to use the computer name as server. That is
because you will need a registered domain name, and probably your very own web server.
NOTE:
As you can see from this example, the database path and file name is a local path. When connecting,
that path is being passed to the Firebird Server as a string of text (connection string). The Firebird
Server takes it as the location and name of the database file it should connect to. Being a local path by
definition, it looks into it's own C: drive, finds it and successfully connects to it
.
Connection
9
As a rule of thumb: database path should always be the same as when you use TS Man locally on the
server.
4
First time login
This topic needed to be added, and this is mainly due to the database setup wizard, where you will set
the required and optional parameters for the proper functioning of the software.
However, the optional parameters can be setup later in the "Company" window.
Also the required parameters can be changed later in the same place.
4.1
Login parameters
As TS Man is build to be a client of the Firebird Database Server, there are certain default parameters
that need to be mentioned at the first login.
The very first time when you start TS Man, and that happens on every computer, not only on the
server, a tip will pop up displaying the default user name and password.
After a successful login, that tip will not show anymore.
Defaults:
• User.................. SYSDBA
• Password............ masterkey
5
How To
This topic will try to explain some of the main processes in TS Man and how can or should be done.
10
5.1
TS Man User Manual
Start new job
Assuming you started TS Man and logged in to the database, click on the "New Job" button at the top
of the page
.
The "New Job" window will pop up.
Select client from the drop-down list and fill in all the required details.
If this is the first time for that particular system, then leave the "Barcode" and "Serial Number" blank.
These two boxes are used for systems that have been there before.
However, if you want to make sure, scan the barcode or enter the serial number and click on the
"Check" sign button to find out if that particular system has ever been in your workshop before.
When done, click "OK".
You will be taken to the "System Check-in" page where you have to enter the details for the system
and job.
How To
5.1.1
New/Edit client
This topic, will outline the situation where you start a new job for a new client. Before you can go
further with the new job details, you must create a record for that client.
If there are no clients in your database, just click on the icon button to add a new client.
11
12
TS Man User Manual
The "Select Client Dialog" window will pop up.
Click on the "New Client" button at the bottom left of the window.
The "New Client" window will pop up.
Enter client details. Click on the "Same" button if the main contact name is the same as the client
name.
Click on "Ship To" tab to add extra "Ship To" addresses.
Click on "Contacts" to add extra contact names for this client
Click on "Taxes" to manage tax settings for this client
Click on "Terms" to set the sales terms.
How To
13
Click on "Systems & Jobs" to manage client's system details.
Click on "Files" to manage files associated with this client.
Click on "Retainer" see the balance of the retainer for this client.
5.1.2
By serial number
Sometimes it happens that the barcode was scratched off, or if printed on poor quality paper, or the
computer hardly used, the barcode may become unreadable or it may fall off.
What then? Well, if the last time around you entered the system's serial number as well as the
barcode, then you have nothing to worry about. Just type the system's serial number into the "Serial
Number" box and click on the "check" button.
It has the same result as you have scanned the barcode.
5.1.3
Scan barcode
A good way of keeping track of systems that pass through your workshop, is to assign them a unique
"SERVICE TAG" in the form of a barcode. Once a new system is checked in, a unique number is
generated for that system, and a barcode is being generated for it. All you have to do is print the
barcode, stick it on to the system itself, and the next time the system comes into your workshop, just
scan it. Client name and all system details will be automatically filled in for the new job.
Scanning the barcode
14
TS Man User Manual
When a new job is entered, it is strongly recommended you first scan the barcode in, then click on the
"Check" button, so all the system details and client name will be automatically filled in.
Place the cursor into the "Barcode" box, then perform the actual scan.
Once the scan is performed the barcode will be automatically "typed" into the box.
Then click on the "check" button to retrieve the system details.
Enter the "Requested By" and "Check-out Type" values.
How To
15
Click "OK" to be taken to the "System Check-in" page where all the system details are already filled in.
5.1.4
Associate client
Sometimes, the computers change hands (owners), and the same computer may have been in your
workshop before but under a different client. Because of this, TS Man provides you with an easy way
of associating a particular system with a client. It's "easy as 1-2-3".
Right-click on the client name and select "Associate this system with a different client"
16
TS Man User Manual
Select the client you want to associate this system to from the "Select Client" window, in this example
"NORTON SUPPLIES LTD" and click "OK"
You will be asked for confirmation,
How To
17
If you click "no", the association process will be canceled.
If you click "Yes", the association will be performed
Click "OK" to that and you will see the new client name on the "New Job" window associated with this
system.
Fill in the "Requested By" and "Check-out Type" values.
Click "OK" to start the new job.
Click "Cancel" not to start the new job.
Important: if you click "Cancel" the association will not be reversed.
5.1.5
Print barcode
OK, so you have barcodes generated for all new systems that come into your workshop. In order to
take advantage of this, there is one more step that needs to be completed.
Printing Service Tag (barcode)
Select the job that you need to print the barcode for, then click on the "System Check-in" page.
There you will see two buttons, one called "Service Tag" and the other called "Custom Service Tag".
18
TS Man User Manual
Click on on of the two buttons shown above to print the barcode. A print options dialog will pop up..
How To
5.1.6
19
Scanners
TS Man can be used with two types of scanners, USB and Keyboard Wedge, regardless if they are
handheld or not.
Scanners that use Serial port or COM port are not compatible with TS Man.
Wireless scanners can also be used
Before you start using the barcode system in TS Man, please make sure your scanner can read the
barcode type that TS Man generates for Service Tag.
Scanner settings
- Barcode type = 2 of 5 INTERLEAVED
- Check digits = NO
- Checksum = NO
20
5.2
TS Man User Manual
System Check-in
As with every new job, you are required to fill in an entire range of details about the new job and the
system itself.
If the job is performed on a system that was in your workshop before, and of course you have used the
barcode (Service Tag) to check for that system, some of the details will automatically be filled in.
5.2.1
Job Title
The job title is there to help you describe in one line of text what the job is about. That title will show on
the invoice as the invoice description. You may edit this description on the invoice itself before actually
printing the invoice.
You may enter the job title manually, or you can select one from the list by clicking on the button at the
right side of the box.
Alternatively, you may enter a new job title, also by clicking on the button at the right side of the box
To enter an already existent job title, click on the button at the right side of the box.
"Job Titles" window will pop up.
Select one from the list and click "OK" .
To add a new job title, click on the plus sign (new record)
Enter the title, "IS ROUGH ESTIMATE" or "IS FIXED PRICE"
If you want to charge a down payment for this type of job, enter the "DEPOSIT_AMOUNT" value.
and click "OK"
How To
21
IMPORTANT:
You may not have both prices greater than zero. It's either "IS ROUGH ESTIMATE" or "IS FIXED
PRICE".
5.2.2
Rough Estimate
The "Rough Estimate" is there for the clients that are asking sort of informatively for the price, but they
don't request an accurate estimate. Both "Rough Estimate" and accurate estimate are there as a
guidance. You may go over or under the estimated price.
If you enter the job title manually, then the text "N/A" will show, meaning "Not Applicable"
To have a value for "Rough Estimate", you must select a job title from the list, that has "Rough
Estimate" value greater than zero.
And only then the "Rough Estimate" value will change.
22
5.2.3
TS Man User Manual
Max. Price
Sometimes the client doesn't have time to wait for an accurate estimate, but doesn't want a rough
estimate either.
In this cases, you may ask the client what is the maximum price he/she is prepared to pay for the
repair.
That's were "Max Price" comes into effect.
Let's suppose that the problem with that PC is the hard drive.
The client wants the hard drive replaced, but he wants it replaced with the same type, model and size,
which you don't have in stock.
What can you do?
Well, you can tell the client that you will purchase yourself the required hard drive, but you don't know
exactly the price you will be required to pay for it.
What you know, is how much you will charge for the labor.
So, the best approach is to ask the client how much he/she is prepared to pay, to have the hard drive
he/she wants.
In this case, you enter the maximum price the client is prepared to pay into the "Max Price" box
manually.
IMPORTANT:
Once you have entered a "Max. Price", TS Man will not allow you to create an invoice that exceeds
that price.
5.2.4
Fixed Price
More often than not. you may have "Set Price" jobs. For example, Virus disinfection. Is more or less
the same for all computer systems.
So, in this case, you enter a job title called "Virus Disinfection" and give it a fixed price.
How To
23
Click on the "OK" button to have the job title and the fixed price updated.
IMPORTANT:
Same as "Max. Price", with the "Fixed Price", TS Man will not allow you to create invoices if the price is
not exactly the same as the "Fixed Price".
5.2.5
System Description
This is where you enter the details characteristic to that very system. It is always recommended that
you take the time and enter the serial number. It will save you a lot of time when that system comes
back without the System Tag barcode.
This part is no rocket science, the labels and boxes are self explanatory, so just enter the details.
If one or more details are not on the list of drop-down boxes, then click on the buttons at the right side
of the boxes to add a new item to the list.
24
5.2.6
TS Man User Manual
System Details
Like the previous topic, this one is quite simple also. Just enter the details by selecting from the list. If
it's not on the list, you can add it by clicking on the buttons at the right side of the boxes.
5.2.7
Initial Check
This is the check that is done at the counter, when the system comes in.
It is essential that this initial check is performed, because it will help the engineers in the lab, and will
also give the client the chance to see and even ask for parts replacement, etc. It is also an opportunity
for cross-selling. Don't miss it.
The data you are required to enter, is also self explanatory. Select appropriate values from the lists,
and enter a brief problem description, and system passwords if any.
Finally, print the check-in receipt and service tag, stick the service tag on the system and ask the client
to sign the "Check-in Receipt"
IMPORTANT:
Always ask the client to sign the check-in receipt. This will cover you for unfounded claims.
How To
5.3
25
Service & Repair
This topic will try to explain the service & repair process in TS Man. Although from a logical point of
view the concept is not new, the way it is presented in the graphical user interface is unique. Read
carefully throughout this chapter, as this chapter refers to the most important part of your business. In
fact, this is what is it all about, Service & Repair.
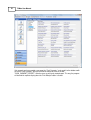
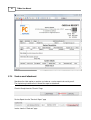
5.3.1
System analysis
This chapter could also be called "TEN-STEP CHECK", because it covers the 10 most important
areas that a computer system must be analysed in order to fully reveal any obvious or less obvious
problems with that system.
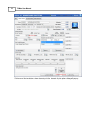
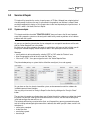
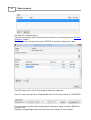
As you can see from the picture below, the ten categories are arranged in two columns of five each,
with the "Action Required" box in the middle.
By clicking on any of the categories (the words in capital letters with icons on their left side) you will
bring up the selected category "Action Required" notes in the square panel from the middle.
You can:
• specify what tests to be performed by selecting "YES" or "NO" under the "Perform" area.
• enter the appropriate result of the test under the "Status" area
• if the result is "FAIL" , then you can type the text in the "Action Required" box
The picture below portrays a system that has failed the security test (virus and spyware)
So, you have ran the virus check, cleaned the system, and recommend an antivirus software be
installed to prevent future infections.
You may also print or email an "Analysis Report" to the client by clicking on the "Analysis Sheet"
button.
The next step is to create an estimate where you will enter the antivirus software, any labor that should
be paid for, like the time it took you to find and remove the 10 viruses, the time that will take you to
install and configure the new antivirus, etc.
That estimate will then be passed on to the client, and if agreed, then you may proceed to the actual
task of installing and configuring the new antivirus software, after which your job is done, and all is left
to be done is:
• set the job as complete
• invoice the client
• receive the payment
• close the job
26
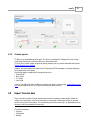
5.3.2
TS Man User Manual
Estimates (Quotations)
Sometimes, the client asks for an estimate. He/she will not be happy with a rough estimate, but an
accurate estimate of the cost.
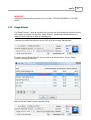
Once the system analysis is complete, if required you may create an accurate estimate for the job.
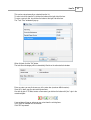
Click on the button with plus sign to start a new Estimated Task.
The "New Estimated Task" window will pop up, where you will enter the following:
• Estimated Task Title
• Estimated Task Category
• Notes
• Estimated Items Required
How To
Title can be entered manually or selected from the list.
To select a task title from the list click on the button at the right side of the box.
To enter a new task title, also click on the button at the right side of the box.
The "Task Titles" window will pop up.
When finished, click the "OK" button.
The task title and category will be automatically filled in on the estimated task window.
Enter any notes you may find necessary in the notes box (maximum 400 characters)
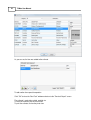
Once this is done, you can start entering new items.
Like with all grids in TS Man, to enter a new record, you click on the button with "plus" sign in the
record navigator.
A new window will pop up, where you can select from the existing items.
In this case we selected Virus disinfection
Click "OK" to proceed.
27
28
TS Man User Manual
As you can see, the item was added to the estimate.
To add another item repeat the operation
Click "OK" to close the "New Task" window and return to the "Service & Repair" screen.
The estimate is ready to be printed, emailed, etc.
To email the estimate, click on the mail icon
To print the estimate, click on the printer icon
How To
29
Once the estimate is approved by the client, click on "OK To Proceed".
This will lock the estimate (no more edits allowed) and will unlock the "Tasks", and automatically add
all the estimated tasks to the actual tasks, so you can start working on it.
That's it. You have successfully created an estimate.
To revert the "OK To Proceed" action and unlock the estimate for editing, click again on "OK To
Proceed" icon.
5.3.3
Repair tasks
Whether you have created an estimate or not, you will need to have the repair tasks finished before
you can set the job status to "COMPLETED".
However you may finish a job without any tasks, but in this case the invoice total will be zero.
It has to be mentioned here, that jobs which have estimates, automatically have the tasks created.
In these cases, you only need to set the "Items Used"/"STATUS" to the appropriate value ("DONE" or
"USED")
Here we will start from scratch, using a job that has no estimate.
Click on the "OK To Proceed" icon to unlock the "Tasks" controls and set the "Approved By" value to
the current user.
Once that's done, you can start by creating a new task.
To do that, click on the plus sign button at the bottom of the "Tasks" grid.
30
TS Man User Manual
The "New Task" window will pop up.
The process of entering task title, and items from the stock list is the same as described in "Estimates
(Quotations)" chapter.
The difference here is that you have to set the "STATUS" of each item manually when is done.
Click "OK" button to return to the "Task" window, featured here underneath.
Once this is done, you may click on "Completed By" icon to set the status of the job as "COMPLETED"
.
The current user name will be filled in automatically. Based on your settings, an email or SMS will be
sent to the client.
Following is a popup dialog based on the fact that the current settings are "Let me choose"
How To
31
Click "OK" button to close this dialog and perform the action selected.
Now the job is ready for invoicing.
5.4
System check-out
On the "Check-out" page you can:
• create and print invoice for the current job
• receive payment and print payment receipt
• set which items were collected
• close the job
• print collection/delivery receipt
• print barcode
• search jobs
5.4.1
Create Invoice
Invoices in TS Man are created based on the tasks and the "Items Used" you have entered for every
task. If a job has not tasks, you will still need to create the empty invoice in order to close the job. It is
important to mention here that invoices can be created one by one, for the selected jobs. No batch
invoicing available as yet in TS Man.
Click on "System Check-Out" tab to move to the check-out page.
Click on the "CREATE INVOICE" button to create the invoice for that job. If the "CREATE INVOICE"
button is grayed out, that means the job has not been completed yet.
32
TS Man User Manual
The invoice will automatically be created and displayed in edit mode.
If for example the client is in front of you, you may enter a payment at this time by clicking on the
payment button.
How To
33
You may save the invoice as it is and edit it later.
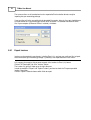
5.4.2
Receive Payment
Every invoice can have more than one payment. However, once the full amount has been paid, no
more payments can be entered. Payments can be received only for jobs that have been invoiced and
invoices are not paid in full. If the "PAYMENT" button is disabled, it means that either the job has not
been invoiced yet, or the invoice has been paid in full.
There are two ways of receiving a payment:
1. Click on the "PAYMENT" button within the "System Check-Out" page
2. Click on the "Receive Payment" button from within the "Invoice Window" itself.
The payment window will pop up.
Enter the amount paid and click on "Save" button.
34
TS Man User Manual
Payment methods:
• Cash
• Credit Card *
• Debit Card *
• Cheque
* The credit and debit card payment methods are there as a means of record keeping. No online
payment processing takes place in TS Man. You will need to have your own solution for online
payment.
5.4.3
All Items Collected
As you probably remember from the System Check-in, there was a place where you could enter extra
items left by the customer together with the system. This items are usually power cables and adaptors,
laptop carry bags, etc. In this chapter we will see how to make sure that everything it was left in your
workshop will be collected.
After you have received the payment, the system is ready for collection by the client, or for delivery to
the client.
That depends on the "Check-out Type" of the job. That value it was entered when the job was created,
and can be modified from within the invoice window.
If the client has left other items with the system, like power adaptor, laptop bag, etc, they will show up
above the "Check-out Type". To mark those items as collected, click on the button next to the list.
How To
35
In case of a "Delivery" type of check-out, you can set the delivery type itself.
There are two types of delivery that can be set from within the invoice:
• IN HOUSE
• EXTERNAL
The in house delivery means that the system is being delivered to the customer by someone in your
company, like a special delivery boy or a field engineer.
The external delivery means that the system is being delivered by a shipping company like DHL, etc.
5.4.4
Close job
Closing a job is simple. Just click on the "CLOSE JOB" button.
36
TS Man User Manual
The reason for this button is that the status of the job will be set to "CLOSED" and it will be included in
certain reports.
5.5
Handle look-up parameters
Due to the nature of the business (computer repairs), there was necessary to implement look-up
parameters that can be added, edited or deleted at any time.
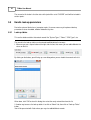
5.5.1
Look-up tables
This are the database tables that contain records like "System Types", "Colors", "CPU Types", etc.
The records in the look-up tables can be entered/modified/deleted in two ways:
1. Wherever you see a square button at the right side of a box, that means you can add/edit/delete the
values on that list.
By clicking on that button, you will bring up a new dialog where you can handle the records on the list.
When done, click "OK" to close this dialog, then select the newly entered item from the list.
2. Another way to access the look-up tables is to click on "Admin" tab, then click on "Look-up Tables"
button.
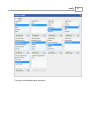
You will be presented with 2 tabs where you may also add/edit/delete records.
How To
Then page 2 with additional look-up parameters.
37
38
TS Man User Manual
Please bare in mind that if you will ever be asked for "Manual Override Password" the password is the
word password, shown above here in red font.
5.5.2
Override password
When a job was completed, the record will be locked, so no accidental editing can take place.
If you need to edit a closed job, you will be asked for a "Override Password".
The default password is the word "password" without quotes.
How To
39
To change this password, click on "Admin" tab, then "Look-up Tables" button.
Click on "Page 2". At the bottom right, there are the boxes where you can enter a new password:
IMPORTANT:
This password is being stored as encrypted text to the database. If you forget it, contact
[email protected] .
But best of all, DO NOT FORGET IT !!!
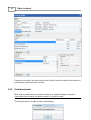
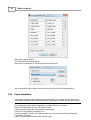
5.6
Database Admin
TS Man is using Firebird Server as database server. For that reason, an admin interface was
implemented, enabling you to change password, add/edit/delete users, back-up and restore the
database file, print server log and database file details.
All tasks related to back-end database administration that TS Man incorporates, are handled from
here.
Please note that only "SYSDBA" can perform this task.
Frist, log out if you are logged in. Then, from the main menu, click on "Database Admin"
40
TS Man User Manual
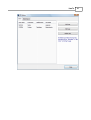
Please note that if you are logged on, that menu item will be disabled.
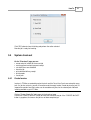
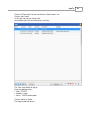
Click on it, and the "Server Login" window will pop up. The login process this time only differs because
you may choose which protocol to use. Other than that, is the same as the normal login window.
Select the server, database file name and location, protocol, then enter password and click "OK".
Please note that the "User Name" cannot be changed. It will always be "SYSDBA"
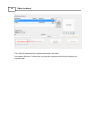
Once your login was validated, the "DB Admin" window will pop up.
Here you can do all the tasks related to database administration that TS Man supports.
How To
41
42
5.6.1
TS Man User Manual
Change password (current user)
Changing password is extremely easy.
Log in first, then from the main menu, click on "Change Password"
Click on the "Change Password" menu link. The "Change Password" dialog will pop up.
Enter the new password.
That's it.
Please note that you must be logged on to the database to change the password as described above.
How To
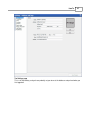
The password of any user may be changed from within the "DB Admin" window as well.
Log in to the administration module as explained in "Database Admin"
Here you have many other options, but in this topic we will focus on changing the password.
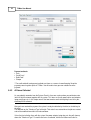
Select the user by clicking on the "User Name" part of the text, then click on "Edit User" button.
The "User Information" dialog will pop up.
Now, enter a new password, confirm the new password and click "OK"
43
44
TS Man User Manual
That's it, the user's password was changed.
5.6.2
Add/edit users
Handling users is no different to other database software. At first, the interface will look a bit different,
but the tasks are all the same as in any other database application.
Log in to the administration module as explained in "Database Admin"
Here you have many other options, but in this topic we will focus on changing the password.
Select the user by clicking on the "User Name" part of the text, then click on "Edit User" button to edit
the selected user, or "Add User" button to add a new user.
How To
45
The rest is simple and straight forward.
5.6.3
Users and user rights
It is widely accepted that it is better not to reveal a certain window to a user that does not have the right
to perform the operations allowed in that window.
Some other software developers, will show all controls and windows to the users, but not allowing
them to perform tasks, except for the ones that they have the right to.
TS Man will hide may controls and windows from users if they don't have those certain rights. Our
philosophy with regards to user rights is: "What you don't need to know, you don't worry'.
Log in to the administration module as explained in "Database Admin"
To give or edit access rights to your users, select the exiting user or add a new user as explained in
"Add/edit users" .
There are three main types of access rights:
1. Administrator
2. Senior Technician
3. Technician
Choose them one by one to see what the default unchangeable rights are and what optional rights you
46
TS Man User Manual
can give or take are.
Once you are satisfied with the right you have given to your user, click "OK" to return to the "DB
Admin" window.
5.6.4
Back-up database
Although TS Man provides an Auto Backup Schedule, you may need to take a snapshot of the
database at certain time.
For that, you can do a manual back-up.
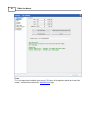
Log in to the administration module as explained in "Database Admin"
Click on "Maintenance" tab.
Click on "Back-up" tab (by default it is already selected).
Select the source.
Select the destination.
Click on "Back-up" button.
How To
47
The back-up log will show on the panel, which you my print by clicking on the "Print" button.
5.6.5
Restore database
If the need arises, you will want to restore the database file. Database file restore can be done from
both the manual back-up and the Auto Back-up Schedule files.
Log in to the administration module as explained in "Database Admin"
Click on "Maintenance" tab
Click on "Restore" tab.
Select source.
Select destination.
Click on "Restore" button.
48
TS Man User Manual
The restore log will show on the panel, which you my print by clicking on the "Print" button.
5.7
Reports
We are constantly improving the report in TS Man and adding new ones. However, it is impossible to
keep everyone happy, and for that reason, a report designer was embedded into the application.
You may modify existing reports and create new ones. Some scripting knowledge required.
Scripting languages supported by the report designer in TS Man are:
• Pascal Script
• Visual Basic Script
• Java Script
Accessing the reports:
apart from the usual reports that can be accessed by everybody in the "System Check-in", "Service &
Repair" and "System Check-out", there are additional reports that can only be accessed by users who
have access rights as "Administrator".
This users can click on "Reports" buttons to see the list of reports, edit and create new ones.
Please visit http://www.blanchesoft.com/support.html "demos" rubric for a demo showing you how to
create a custom report.
How To
5.7.1
49
Report names
Some of the reports in TS Man are linked to the buttons in the main page. For that reason, if you
change the report names, you must change the reference names as well.
Click on "Admin", then "Settings", then "Report Names".
On this window you will see the list of reports names that are linked to the buttons in the workshop
page.
50
TS Man User Manual
If for example you have created a new report for "Cash Payments", and saved it to the database with
the name "Cash Payments" then you will have to change the value in the box
"CASH_PAYMENT_RECEIPT", to be the same as your newly created report. This way, the program
will know which report to display when the "Print Receipt" button is clicked.
How To
51
As you can see, the name had to be changed to reflect the actual report name that you wanted to be
used as cash payment receipt.
5.7.2
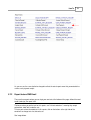
Report footers SMS Email
There are three reports where you can input your own text at the bottom of the page, without the need
to edit (redesign) the report itself.
The boxes where you put the text for this reports, are "rich text containers", meaning they accept
colored font, bold, italic, underline, etc.
To have your custom formatted text in this reports, click on the buttons at the right side of the
containers to change text size, font color, etc.
See image below:
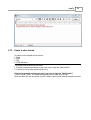
52
TS Man User Manual
See text editor in action
For example you want to edit the text for the estimate footer.
Click on the button shown below
Then format the text to your liking and click "Close"
How To
5.7.3
53
Export to other formats
All reports can be exported to many formats:
1. Word
2. Excel
3. PDF
4. HTML and ohters
The exporting can be done from two places:
1. From the incorporated preview pane (only if your access rights are "Administrator")
2. From the full screen report preview (for all users)
From the incorporated preview pane (only if your access rights are "Administrator")
Click on "Reports" button. The incorporated preview pane will show up on the right.
Select the report you want and click on any of the buttons within the red rectangle marked here below.
54
TS Man User Manual
Then just follow the instructions.
From the full screen report preview (for all users)
For this you will need to have the "Preview before printing" option selected in the "Admin"/
"Settings"/"Miscellaneous" .
Of course, that instead of printing the preview will show up, and you have to do the printing afterwards
yourself by clicking on the "Printer" icon in the report preview window.
How To
55
Once you have the above option selected, every time you click on a button that is printing a report, the
full window preview will show up.
From there, click on the "Export To" icon to export the report to your desired format. See below:
56
5.7.4
TS Man User Manual
Send as email attachment
Sometimes the client requires a receipt or an invoice or a service report to be sent by e,mail.
The simplest way to achieve that is to email the report as attachment.
Check-in Receipt from the "Check-in" Page
Service Report from the "Service & Repair" page
Invoice from the "Check-out" page
How To
5.7.5
57
Custom reports
TS Man has an embedded report designer. The library is provided by FastReport VCL and is being
used successfully by tens of thousands of users around the world.
This help file is not the subject of report designing, therefore you may want to download and read the
Report Designer User's Manual
However, you must know that a certain level of Scripting and SQL knowledge is required, depending
on the complexity of the reports.
Scripting languages supported by the report designer are:
• Pascal Script
• Basic Script
• C++ Script
• Java Script
If you run into difficulties while modifying or creating new reports, please contact support@blanchesoft.
com and we might be able to assist you in achieving your desired results.
5.8
Export financial data
Every financial transaction is being recorded and saved to the database automatically, without the
need of user intervention. In fact user intervention is not possible, allowing you to have an accurate
count of every financial transaction. This functionality we consider necessary in an application that can
function in multi user/networked environment.
Financial transactions:
• Payment
• Cancellation
• Writeoff
58
TS Man User Manual
These transactions are all recorded and can be exported to Excel and other formats ready for
importing into your accounting package.
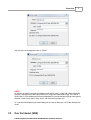
If you want the cells in the spreadsheet to be formatted like number, date, etc, then you should choose
as export format the "Data Interchange Format" which by default is associated with Microsoft Excel
files in your computer (if Microsoft Office is installed), see below:
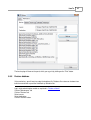
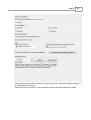
5.8.1
Export invoices
Invoices can be exported to may formats, including Excel (.xls), and you may use those files to import
data into whatever your accounting package is, providing it can import data from Excel sheets.
Let's suppose for example, that you want to export al the invoices to Excel (.xls) format.
Click on "AC Receivable" tab, then "Invoices" button.
The invoices list (grid) will show up on the right side pane.
In order to enable the "Export" and "Options" buttons, you have to check the "Prepare exportable
invoices" check box.
Click on "Options" button to choose which fields to export.
How To
The "Select Exportable Fields" dialog will pop up.
Select which fields you want to be exported. Your choice will be saved to database.
Click "OK" to close the dialog.
59
60
TS Man User Manual
Now, click on "Export" button.
The "Export DBGrid" dialog will pop up.
Select from the combo box list what format you want to export it to.
Your selected fields were exported, and next time the same fields will be selected by default.
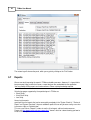
5.8.2
Export transactions
Transactions can be exported to may formats, including Excel (.xls), and you may use those files to
import data into whatever your accounting package is, providing it can import data from Excel sheets.
For example, you want to export al exportable transactions to Excel (.xls) format.
Click on "AC Receivable" tab, then "Transactions" button.
The transactions list (grid) will show up on the right side pane.
Click on "Post All Unposted Transactions" first.
In order to enable the "Export" and "Options" buttons, you have to check the "Prepare Exportable
Transactions" check box.
Click on "Options" button to choose which fields to export.
How To
The "Select Exportable Fields" dialog will pop up.
Select which fields you want to be exported. Your choice will be saved to database.
Click "OK" to close the dialog.
61
62
TS Man User Manual
Now, click on "Export" button.
The "Export DBGrid" dialog will pop up.
Select from the combo box list what format you want to export it to.
Choose wether you want to export to file or view only and later save.
Click "Export"
Your selected fields were exported, and next time the same fields will be selected by default.
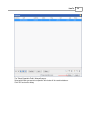
5.9
Create custom filters
TS Man provides you with the functionality of custom filters which can be saved to database and
reused. Almost all grids have the filter toolbar displayed at the bottom right of the grid.
In this topic we will focus on the "Jobs Grid".
The procedure of creating and saving filters is the same all throughout the application.
All OPEN jobs example:
How To
Click on "AC Receivable" tab (you need to be an "Administrator" user.
Click on "Jobs" button.
On the right side you have the jobs grid.
At the bottom right, click on the fourth icon (new filter).
The "Filter setup dialog" will pop up.
Select the following values:
• Field = STATUS
• Condition = equal
• Value = "OPEN" without quotes
Click on "Add to list" button.
The dialog should look like this:
63
64
TS Man User Manual
Now click on "OK" button.
The job grid is filtered (in fact the database table is filtered) and now is displaying only the jobs that are
open.
Saving the filter to database:
While the filter is still active, click on the third icon (save filter)
This action will bring up the "Save New Filter" dialog.
Choose a name, a description then click on "OK".to save filter to database.
How To
65
Removing the filter (not delete 'just deactivate")
To remove the active filter, click on the sixth icon
Loading and applying a saved filter:
Click on the second icon (Load saved filter)
The "Load Filter Template" dialog will pop up, showing you a list of all saved filters within that category.
66
TS Man User Manual
Click the "OK" button to apply the selected filter.
Please note that if you have more than one saved filter on the list, and do not select anything, the first
saved filter will be applied.
Editing a saved filter:
To edit a saved filter do the following:
• Load the saved filter
•
•
•
•
Click on "edit current filter" icon
Edit the filter expression
Click "OK" to apply the filter
Either save it to database or not
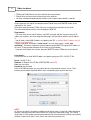
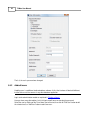
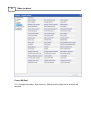
5.10 Edit Company Details & other settings
Well, company details may be considered here soft of an understatement. In fact on the company
page there is more than just company name, address, etc.
We will go through every and each one of the three pages, so you will have a good understanding
about all that is in there.
Address and Logo page
This is the page where literarily the company details are. Is simple and straight forward, with one
exception, and that is the Telephone and Fax numbers.
These two numbers will show on the already existent reports as just numbers. If you want to have
"Tel." or "Fax" as labels in the reports then when you enter the tel no. write first "Tel.:" without quotes.
See below:
How To
67
Tax Settings page
This is self explanatory, and you have probably set your taxes at the database setup wizard when you
first logged on.
68
TS Man User Manual
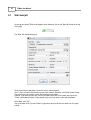
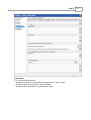
Terms
This is the page where the default terms are set. This terms will be applied as default to all new client
records, , and have been explained in "New/Edit Client" topic.
How To
Report names page
This is where reports variables are entered and saved to the database. The subject has been
explained in "Report names" and "Report footers".
69
70
TS Man User Manual
Footers SMS Email
This is the page where footers, legal disclaimers, SMS text and Email body text can be written and
formatted.
How To
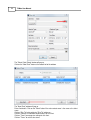
Label Names
This is the place where you can
• change the name of the 4 custom fields that appear on the "Check-in Page"
• change the labels for some fields in "System Check-in"
• change the labels of the fields in "System-Analysis" page
71
72
TS Man User Manual
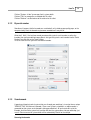
Miscellaneous page
As the title suggests, this page contains miscellaneous settings related to the software itself and your
company.
How To
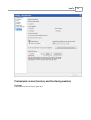
Professional version (Inventory and Purchasing modules)
Purchases
Explanations can be see here in green text.
73
74
TS Man User Manual
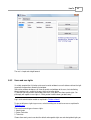
5.11 Purchasing & Inventory
Online & Downloadable Demos Only
Purchasing and inventory module are more complicated, and users don't really read
through the help files.
Therefore, online or downloadable demos are available on our website http://www.
blanchesoft.com
6
EULA
TS Man - End User License Agreement
EULA
75
THIS SOFTWARE END USER LICENSE AGREEMENT (”EULA”) IS A LEGAL AGREEMENT BETWEEN YOU
AND BLANCHESOFT. PLEASE READ THIS LICENSE AGREEMENT CAREFULLY BEFORE INSTALLING OR
USING THE PRODUCT. A COPY OF THIS LICENSE IS AVAILABLE IN THE “LICENSE.RTF” FILE PROVIDED
WITH THE PRODUCT.
ANY USE BY YOU OF THIS PRODUCT ALSO CONSTITUTES YOUR ACCEPTANCE OF THESE TERMS. IF
YOU DO NOT AGREE TO THE TERMS OF THIS AGREEMENT, YOU MUST UNINSTALL AND DELETE THE
SOFTWARE FROM ALL STORAGE MEDIA.
1. Definitions
1.1 "Product" - means TS MAN with its accompanying documentation.
1.2 "BLANCHESOFT" - means BLANCHESOFT LIMITED, Company Registration No.: 5884781 (England and Wales),
United Kingdom.
1.3 "Trial version" - means a version of the product to be used to review, demonstrate and evaluate the Product.
The trial version may have limited features, may lack the ability for end user to save, edit, print certain details
featured in the product's back-end database. The trial version may also be limited to a period of usage, usually
30 days, after which the product will stop working.
1.4 "Activated version" - means a trial version, unlocked by special, purchased, License file. The Activated
version is fully functional and its features are not limited.
1.5 "Activating key" - means a special file to be used to unlock the trial version and to enable all features of the
Product.
1.6 "Designated user" - is an individual, or, if you are an entity, one (1) designated person in your organization.
2. General License grants and restrictions
2.1 TS Man is protected by copyright and other international treaties. This product, together with its
accompanying documentation, is the property of BLANCHESOFT.
2.2 You may not alter the product in any way, including changing or removing any messages or windows.
2.3 You may not de compile, reverse engineer, disassemble or otherwise reduce the product to a human
perceivable form. You may not modify, rent or resell for profit the product.
2.4 You may not create derivative works based upon the product without the permission of BLANCHESOFT.
2.5 You may not publicize or distribute any registration code algorithms, information, or registration codes or
Activating keys used by the product without written permission of BLANCHESOFT.
3. Terms that apply to the use of the TRIAL version
3.1 You may install the trial version and create as many copies of the Trial version on storage media as you
wish.
3.2 You may redistribute the trial version freely on on-line services, bulletin boards, or other electronic media as
long as the files are distributed in their entirety.
3.3 The trial version may not be distributed on CD-ROM, disk, or other physical media for a fee without the
permission of BLANCHESOFT.
4. Terms that apply to the use of the Activated version
4.1 The Product is licensed, not sold.
4.2 Grant of license. Subject to the terms and conditions of this License, BLANCHESOFT grants to you, if you
are an individual or one designated person in your organization ("Designated user"), a personal, nontransferable,
nonexclusive, and limited license to use the product. You may install the product on a reasonable number of
machines provided that the Designated User is the only individual permitted to use the product. You may also
make a reasonable number of copies of the product to backup devices such as hard disks, optical media, or tape
and one physical CD media backup copy of the product solely to replace the original copy provided to you if the
original copy is damaged or destroyed. All rights not specifically granted to you herein are retained by
BLANCHESOFT.
76
TS Man User Manual
4.3 Multiple Licensed Copies. You may purchase from BLANCHESOFT or its authorized reseller additional
licenses to permit multiple Designated Users to use the product. If you purchase additional Designated User
Licenses for the product then you are granted for each Designated User License the personal, nonexclusive,
nontransferable and limited license to designate one individual in your organization as the Designated User and
permit such Designated User to install and use the product solely as permitted under Section 4.2. In such case,
the product may be used exclusively by the specifically Designated Users, subject to all the terms and conditions
of this License. You agree that you will not designate more Designated Users than the number of Designated
User Licenses that BLANCHESOFT or its authorized resellers have expressly granted to you and you will not
allow the Product to be used by any individuals other than the Designated Users designated by you from time to
time. You agree to maintain accurate records of the Designated User designated by you to use the Product
under each Designated User License you hold.
5. Limited warranty and limitation of liability
5.1 BLANCHESOFT neither makes any warranty or representation nor authorises the making of any warranty or
representation that the product will meet the requirements of any particular user or that operation of the product
will be uninterrupted or error free.
5.2 THE PRODUCT IS PROVIDED TO LICENSEE "AS IS". ALL EXPRESS OR IMPLIED CONDITIONS,
REPRESENTATIONS, AND WARRANTIES, INCLUDING ANY IMPLIED WARRANTY OF MERCHANTABILITY,
SATISFACTORY QUALITY, FITNESS FOR A PARTICULAR PURPOSE, OR NON-INFRINGEMENT, ARE
DISCLAIMED, EXCEPT TO THE EXTENT THAT SUCH DISCLAIMERS ARE HELD TO BE LEGALLY INVALID.
5.3 TS MAN WAS DEVELOPED WITH GREAT ACCURACY AND CARE ABOUT END-USER. BUT IN NO
EVENT SHALL BE THE AUTHORS LIABLE FOR ANY INDIRECT, PUNITIVE, SPECIAL, INCIDENTAL OR
CONSEQUENTIAL DAMAGE CAUSED BY THE SOFTWARE (INCLUDING LOSS OF BUSINESS, REVENUE,
PROFITS, USE, DATA OR OTHER ECONOMIC ADVANTAGE).
5.4 No oral or written information or advice given by BLANCHESOFT, its dealers, distributors, agents or
employees shall create a warranty or in any way increase the scope of ANY warranty PROVIDED HEREIN.
All questions concerning this End User License Agreement shall be directed by email to [email protected]
TS Man - computer service & repair system.
Copyright © 2006 - 2011 BLANCHESOFT.
All rights reserved.
7
Pricing and licensing
Pricing
For the latest prices, please check our purchase page
The base price is set to British Pounds, and may fluctuate according to the exchange rate if you are
purchasing using your local currency.
Licensing
Licensing for TS Man is done by the concurrent connections.
You may install TS Man on as many computers as you wish. The maximum number of users that can
be connected to the database at any one time equals the number of licenses you have purchased.
Trial version however comes with three (3) concurrent connections allowing you to test it in a multi
user environment.
Legal matters
Blanchesoft reserves the right to change the price or pricing structure for TS Man and all ohter
software products without notice to existing or prospective customers.
Purchasing
8
77
Purchasing
You may purchase one or more licenses for TS Man in two ways.
1. Visit http://www.blanchesoft.com and click on the purchase page.
2. Start TS Man, from the main menu click on Help/About. The "About TS Man" window will pop up
and you may click on "Purchase License" button for trial version, or "Upgrade License" for registered
versions.
Vendors
At this time, TS Man is being distributed through Share-it http://www.shareit.com
Resellers are using their own exchange rates and commissions, therefore the price may vary
Please note that some of this resellers may change, either new ones will become available or the
existing ones will not be available any longer.
For an up to date list, please visit www.blanchesoft.com/purchase.html
9
Upgrades policy
Upgrades
You are entitled to 1 year free upgrades with your purchase.
Licenses purchased for older versions will not work with the new versions if upgrade period has
expired.
Legal matters
Blanchesoft reserves the right to change in part or entirely the upgrade policy, at any time and without
notice to existing or prospective customers.
10
Sales policy
Refunds and our money-back policy
Before purchasing a license, you were provided a 30-day evaluation period to determine whether the
Software fits your business needs, works on your computer/network, and provides the benefits for
which you would purchase the Software license.
You did not have to provide Blanchesoft with a credit card or any other purchase information when you
downloaded, installed or used the Software during this 30-day evaluation period.
It was required only when you decided to purchase the software license. The purchase price for the
license is non refundable.
Therefore, the sale is irrevocable, and no refunds will be made.
PLEASE USE THE TRIAL VERSION FOR THE MAXIMUM TIME (30 DAYS) BEFORE
PURCHASING
78
11
TS Man User Manual
Data protection act
Blanchesoft will not use nor it will sell or give/forward any of your private information you have entered
in the purchase form.
Nor it will (Blanchesoft) disclose any further communication details containing private information
about you to anybody, unless required by law or court order.