1
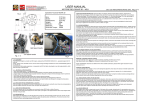
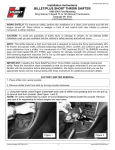
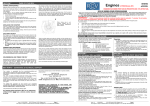
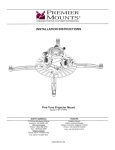
USER MANUAL
NOVAROSSI WORLD S.R.L.
Via Europa, 20/a – 25040 Monticelli Brusati (BS) Italy
Tel. (+39) 030.6850316 – Fax (+39) 030.6850314
Web: www.novarossi.com – E-mail: [email protected]
Codice fiscale/Partite IVA 02812810980
ENGINE REX R91HR 3D – HELI
Tested and advised Heli Mix Fuel: Novarossi HRK, Cool Power, Wild Cat, Power Master, Rapicon, Power Mix Jet.
Technical Specifications R91HR 3D
Bore:
Stroke:
Displacement:
Weight:
RPM Min.:
RPM Max.:
RPM Max Torque:
Compression / Timing, Shimming Setting:
Different Nitro percentages will affect the engine timing, therefore the amount of compression rings MUST set according to
the Nitro percentage. The Factory setting is: 0.3 mm, set for approx. 20% Nitro percentage. For a Nitro percentage of 10% we
recommend to set the compression rings to 0.2 mm totally, and 0.4 mm totally for 30% Nitro.
Engines box contain extra shims, one of 0.1 mm and one of 0.2 mm, for personal setting proposes.
SHIMMING SETTING NOTE: Per instruction, Advised Factory shimming set, is optimized to get best engine performance
with HIGH engine rpm, than if yours needs / setting are for low, medium rpm setting, Novarossi advise to add 0.1 mm shim
from advised values.
In need of changing the amount of compression rings, use calibrated tools to check sizes, work in a well light and clean
environment and use the appropriate tools for this job.
When removing/mounting the cooling head & combustion chamber, use the X order to loosen/tighten the head screws
Max torque to tighten the head screws is 2,5Nm, do NOT over tight!
27,70 mm
24,80 mm
15,0 cmq
613g
800
19000
16500
Fig. 3
Fig. 1
1.Medium Needle
2.Idle Needle
3.High Needle
1
2
3
Fig. 2
Doc. User Manual-REX91-Rev02 ENG Pag. 1of 2
Fig. 4
1.0 - FEATURES
The R91HR 3D engine is a brand new REX engine, produced by NOVAROSSI WORLD S.r.l., specially designed for 3D
Heli use.
Power, Torque curve, fast RPM recover, ease of mixture tuning and fatigue resistance are some of NOVAROSSI goals for
the R91HR 3D.
NOVAROSSI’s Micro engine experience, in cooperation with 3D Heli pilots, developed a new Heli engine platform, which
pilots will enjoy at all skill levels.
1.1 – TECHNICAL SPECIFICATIONS
-New 3 Needle ADJ. carburetor, allowing separate Idle, Medium and High speed setting.
- Dedicated Carburetor Thermal Insulation Bushing, to avoid “vapor lock” effect and optimize air-fuel ratio .
- New Piston design with an dykes piston ring;
- Piston, Rod and Crankshaft with special mechanical features, will reduce vibration and improve power;
- Engine Head is CNC machined of two separate Aluminum alloy parts to improve thermal exchange. Built-in cavities for
“Carb Smart” thermal sensor assembly.
- New Crankcase design with special heat sink to improve thermal exchange.
-New sleeve with eight (8) transfer ports and an exhaust with booster ports designed for 3D Heli use.
-Double O-Ring seal between carburetor and crankcase.
2.0 - MAIN GEAR RATIO TRANSMISSION - CAUTION
REX Heli engines are designed to be used in high quality RC Heli mechanics and with correct class size correspondence.
REX Heli engine should be used with a main rotor gear ratio of approx 8,4.
2.1 – MAIN ROTOR RPM SETTING
In order to optimize the REX Heli engine we recommend using a RPM limiter or better Governor.
We advise to set Head speed target point as value equal or just higher to the rapport between Max Torque Engine RPM /
Heli Main rotor gear ratio.
3.0 - ENGINE SET-UP
REX engines are designed to run with Heli glow fuel mix with min. Nitro percentage of 10% and a max. of 30%. For the
heavy-duty flyer, we recommend to use 30% Nitro, which will optimize power and efficiency. The fuel oil must be of low
viscosity and have a percentage between 18% and 22%.
3.1 - ENGINE ASSEMBLY
1) Remove the crankcase rear back plate and using the special crankshaft holder tool (NOVAROSSI part nr. 70000) and hold
crankshaft, than, per instruction of your heli kit, install all parts such as: clutch, engine support and eventually start shaft. Reassembly crankcase rear back plate and install your prepared engine into you heli frame.
2) Make a right fuel line connection, between tank and carburetor and between muffler and tank. See example showed at
Fig.4. Use specific Heli glow fuel line (Advised NOVAROSSI part nr. 35000)
3) Carburetor and engine internals are sensitive to dirt in the fuel, a fuel filter strongly advised. (Advised NOVAROSSI part nr.
34350).
4) In order to reduce exhaust pressure gas temperature it is recommend installing a special radiator between muffler and
tank. (Advised NOVAROSSI part nr. 36000).
5) Install throttle links and ADJ the throttle lever according to your heli needs, to ease the mechanical adjustment we advise to
use 7 mm HEX key to operate directly over the barrel’s nut, and with screw driver 2.5 mm Hex tip, lock the eternal screw .
We recommend adding Lock-thread (243 – blue) to assure the mechanical assembly.
6) Check that carburetor barrel will operate for all 90 degree rotation, and assure that throttle servo don’t bind, eventually ADJ
it from radio, travel ADJ.
OPENING / CLOSING CARBURETOR BARREL NOTE: Looking the Carburetor barrel, OPEN in counter clockwise turn and
CLOSE in clockwise turn.
7) If the carburetor is removed, pay attention during re-assembly to insert it completely into the crankcase before lock the
special screw. After the first few flights, please re-check the carburetor screw lock.
8) Install the glow plug according of the outside temperature (Hot, Medium, Cold) We recommend to use NOVAROSSI’s heli
type glow plug, don’t use plane, car or turbo glow plugs. Advised Glow plugs are NOVAROSSI HR2 or HR3.
4.0 – STANDARD NEEDLE VALVE ADJUSTMENT
Before starting the REX engines we recommend to read the information below to understand the carburetor needle settings.
REX engine carburetors come with factory set-up, so that this engine will start-up easily, then according the following
variables: ambient temperature and fuel, will be probably necessary to re-adjust the needle settings.
To help the needle adjustment, Medium and High speed needles heads have 2.5 mm HEX socket insert, than using a STD
Heli Hex tip screwdriver, Idle Needle has a STD flat screw driver insert for fine tuning.
Fig. 2, and 3 shown the position of the 3 needles valve.
Fig. 3 shown Idle Advised throttle Barrel position. Barrel position mark, must faced the Carburetor Body mark, near the Close
position. Re ADJ fine Idle setting for your need.
3 Needles Carburetor - Standard setting:
Idle Needle Valve: Close (turn clockwise) it completely and then open it 1.5 turns.
Medium Needle Valve: Close (turn clockwise) it completely and then open it 1.5 – 2 turns
High Needle Valve: Close (turn clockwise) it completely and then open it 2.5 - 3 turns.
Carburetor setting advises:
Idle Needle Valve: Rotate 1/8 of turn a time during first adjustment, than reduce the amount of needle rotation when coming
closer to the correct setting.
Medium and High Speed Needle Valve: Needle as a knurl head with clicks, use it for reference, operate of 3 or 5 clicks during
first adjustment, than reduce to one click coming closer the correct setting.
NOTE: ALL 3 needle valves work the same way: Turning the needles clockwise (closing) will lean the fuel mixture, and
counter clockwise (opening) will richen the fuel mixture.
5.0 – FIRST ENGINE START-UP AND SETTING
Full up the heli tank, closing line connection to the carburetor, when done, open fuel line connection to the carburetor.
Switch on radio system (TX and RX) , don’t connect the glow plug at this moment, open from transmitter the throttle to the
high speed position, and (without glow plug connection) using the starter, run the engine for 5, 10 second. Then close the
throttle to the idle position, connect the glow plug driver. The engine now is ready to start.
This operation is recommend each time that engine will start up, because the engine will start better and is lubricated.
While the engine starts, adjust the throttle idle position operating with throttle trim or sub trim.
NOVAROSSI WORLD S.R.L.
Via Europa, 20/a – 25040 Monticelli Brusati (BS) Italy
Tel. (+39) 030.6850316 – Fax (+39) 030.6850314
Web: www.novarossi.com – E-mail: [email protected]
Codice fiscale/Partite IVA 02812810980
USER MANUAL
REX HELI ENGINE R91HR – 3D
5.1– ENGINE BREAK-IN
REX engines don’t require a long break-in period, 5 full tanks will be enough, during break-in fly, pay attention not to run at
max RPM, but set it to 80 / 90% of target RPM. Do not use special break-in fuel mixtures or mix with Castor oil, standard
Heli fuel mix will be perfect. Set the high-speed needle to a rich setting, respect its optimum setting and fly gently
maneuvers without loading the engine. The gentler the first flight is, the more powerful the engine will become.
After break-in period is possible set RPM at desired target point and start to lean the high speed needle setting, to get the
engine towards max. performance.
NOVAROSSI ADVISE: After break-in period, and finalized the firth 10 / 15 fly, replace the glow plug, this operation will
assure you the best engine performance.
5.2 – FUEL MIXTURE SET
Rich??, Lean?? Practical advises for ease fuel mixture set.
Idle Needle set –while Heli in landing position.
With an running engine and a correct mechanical idle set-up and mixture settings, idle RPM and the engine stroke rhythm
will be regular, and will not affected by disconnecting the glow plug driver.
WHEN LEAN: idle will be higher, taking RPM without throttle valve movement, sound will be constant but in case of auto
engine stop, it will be difficult to restart the engine immediately. In this condition: open (turn counter clockwise) the Low
Speed Needle by a 1/8 turn and retest.
WHEN RICH: idle will be lower, loosing RPM without throttle valve movement, sound will be inconstant, also when
disconnecting the glow plug driver, the engine will loose RPM and eventually stop. In this condition: close (turn clockwise)
the Low Speed Needle by a 1/8 turn and retest.
To practice and understand clearly the effects of Low Speed needle adjustments, we advise, with a running engine, to
carefully turn the Low Speed Needle in both directions and listen to the different engine sounds.
Medium Speed Needle set – while Heli is hover position.
With correct Medium Speed Needle setting, engine sound and smoke with Heli RPM in Hover position, will be constant.
WHEN LEAN: Engine sound will be inconstant and crackly, smoke will reduce progressively. In this condition, land and
open (turn clockwise) Medium Speed Needle by 3 clicks and retest.
WHEN RICH: Engine sounds will be like it was 4-stroking, smoke will increase progressively. In this condition, land and
close (turn counter clockwise) Medium Speed Needle by 3 clicks and retest.
To check the Hover mixture before passing to high speed mixture settings, we suggest holding the hover position for few
minutes, then land and use a digital thermometer check crankcase rear cover and engine head temperature without giving
your engine time to cool down. Crankcase rear cover advised temperatures are 40~50’C (104~125 F), and the engine
cooling head: 100~120’C (212~248F).
High Speed Needle set –while Heli is flying.
With Idle and Medium Speed Mixture set-up correct, you can set-up the High Speed Mixture. Testing engine max speed
can be dangerous; we recommend doing the two-test typology according the experience of the pilot. During a standard
flight add progressively pitch to maximum, then reduce suddenly pitch to avoid that the Heli is losing control, or if you are
comfortable, practice fast vertical climb, longer and faster enough to get full throttle barrel opening.
If the High Speed needle mixture is correct, the climb will be progressive and engine sound consistent without stroke
interruption and smoke will stay constant.
WHEN LEAN: Climb will fast, but the engine sound’s inconstant and crackly, and smoke will reduce progressively during
the climb. In this condition, land and open (turn clockwise) the High Speed Needle by 3 clicks and retest.
WHEN RICH: Climb will slow, the engine sounds like it is 4-stroking, with smoke increase during climb. In this condition,
land and close (turn clockwise) the High Speed Needle by 3 clicks and retest.
5.3 - 3D FLIGHT FUEL MIXTURE SET
To define fuel mixture to use during 3D maneuvers we recommend adjusting the mixture as stated above, then check
engine responsiveness when making fast stop and go’s, eventually ADJ Medium speed needles carefully, this procedure is
similar to the set-up of the mixture during hover position.
We advise to check the engine temperature often, to avoid possible overheating. The 3D series REX Engines have
dedicated “carb smart” temperature sensor mounting hole. To ease this mixture / temperature management there is an “inflight adjustable High Speed needle” available. (NOVAROSSI part n. 11900).
6.0 – FIRST FLIGHT RECOMMENDED CHECK-UP
After the first flight we recommend to check the assembly of the following mechanical components::
1) Tuned-Pipe and header;
2) Engine mount;
3) Carburetor and throttle arm;
4) Glow Plug
This procedure is advised only after the first flight, and after component replacement or re-assembly.
After first 10 / 15 flights we recommend to check the engine compression, color + condition of glow plug coil and the
surface color around the coil. When the compression is correct, the coil will be silver as a new glow plug and the surface
around the coil will have a brown copper color.
Doc. User Manual-REX91-Rev02 ENG Pag. 2 of 2
If the compression is low, the glow plug coil will have a brown copper color and surface color around the coil will also have a
dark brown color.
In case of wrong compression settings, we advise to check and adjust the amount of compression rings as explained in point
3.0.
7.0 TROUBLE SHOOTING:
If engine does not start or while running it stops suddenly, please follow the advice below.
Following information at point, 4.0 adjust needle valve as factory standard set.
Check if the glow plug driver is working, replace it if necessary;
Check if fuel reaches the carburetor;
Check muffler pressure line, holes can reduce pressure in the tank;
Adjust carburetor throttle lever position; with transmitter stick in idle position, the carburetor throttle valve is marked and
should be positioned as explained at point 4 – (Fig. 3).
Switch on the radio system (TX and RX) , don’t connect the glow plug at this moment, adjust the throttle position to full
throttle, and (without glow plug driver connected) using the starter, run the engine for 5, 10 second. Than reduce the throttle
position to idle, connect the glow plug driver and your engine now is ready to start.
If the engine starts but stops suddenly, increase the idle position operating from Tx throttle trim, than retest.
If the engine is unable to start, try to start it while closing fuel line near the carburetor. If engine will starts with closed fuel line,
that means that the Idle Speed mixture is to rich, in this condition, close (turn counter clockwise) Idle Speed Needle by 1/8
turn and retest.
If the engine continues to be unable to start, also with a closed fuel line, then the Idle speed mixture is too lean, then open
(turn clockwise) the Idle Speed Needle by 1/8 turn and retest.
For further support you can visit the heli section of the Novarossi forums.
8.0 – SAFETY
Many indications referring the right and safe use of the engine have been supplied in this manual. In this chapter we
resume and complete them with other ones pointing out that the user is the only responsible for a safe conduct towards him
self, third parties, animals and locations. Being the engine part of a complex model which can potentially be dangerous,
it must be started up after having checked the model responses to the most important safety requirements.
8.1 Everybody who can be injured by the model (above all children) must be kept away from the operator and from the model.
Spectators must always respect safety distances.
8.2 The engine must be carefully fixed on the Heli. Attention to the heat developed and the noise must be reduced using an
appropriate tuned-pipe. You cannot start the engine a tuned-pipe.
8.3 The pipe and size of the blades, must be suitable to the engine and to the model and must be of high quality. Ask to the
manufacturer of the models for detailed information and for installation ways.
8.4 When you start the engine you must keep your body away from moving parts (propellers, gears, wheels,…). Touch the
engine only when Heli is landed, holding firmly main rotor head, and pay attention to parts with high temperatures such
as the tuned-pipe or the engine cooling head.
8.5 All adjustments must be made using instruments (screw drivers) of correct dimensions.
8.6 You must use a radio control and components of high quality, this allows a perfect control of the engine (acceleration and
stop).
8.7 Main rotor can be dangerous for many reasons such as:
- on dusty soil: propeller can blow dust and other objects in the eyes;
- ties, pens and other hanging objects can be attracted by the main rotor.
Even when the engine is stopped, the helicopter rotor blades will turn for some time, be careful.
8.8 Keep fuel in a suitable and secure place.
8.9 Carefully follow the safety rules given by different federations, basing on category and use of model.
9.0 - CONCLUSION AND WARRANTY INFORMATION
Novarossi World S.r.l. will always try to use the best materials available to maintain the high quality and reliability of products.
We reserve the right to make changes without prior notice.
No warranty is given for:
Ball bearings;
Rod;
Sleeve, piston and piston ring;
Crankshaft.
These components are moving engine parts, and are exposed to wear.
Novarossi advise to maintain the engine internal parts in good condition, replace if required.
In any case Novarossi cannot replace under warranty any engines or spare parts which after examination present
manipulation of one of the defaults above listed.