1
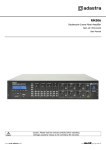
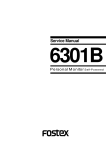
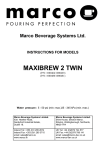
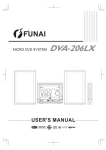
BLA-1600 digital music system
,
USER S MANUAL
PC
Table of Contents
Important Safety Instructions
1. Read these instructions.
2. Keep these Instructions.
3. Heed all Warnings.
4. Follow all instructions.
5. Do not use this apparatus near water.
6. Clean only with damp cloth.
7. Do not block any of the ventilation openings. Install in accordance
with the manufacturers instructions.
8. Do not install near any heat sources such as radiators, heat registers,
stoves, or other apparatus (including amplifiers) that produce heat.
9. Do not defeat the safety purpose of the polarized or grounding type
plug. A polarized plug has two blades with one wider than the other.
A grounding type plug has two blades and a third grounding prong.
The wide blade or the third prong is provided for your safety. When
the provided plug does not fit into your outlet, consult an electrician
for replacement of the obsolete outlet.
The lightning flash with arrowhead symbol,
within an equilateral triangle is intended to alert
the user to the presence of uninsulated
"dangerous voltage" within the product's
enclosure that may be of sufficient magnitude
to constitute a risk of electric shock to persons.
The exclamation point within an equilateral
triangle is intended to alert the user to the
presence of important operating and
maintenance (servicing) instructions in the
literature accompanying the appliance.
03
10. Protect the power cord from being walked on or pinched particularly at
plugs, convenience receptacles, and the points where they exit from the
apparatus.
11. Only use attachments/accessories specified by the manufacturer.
12. Use only with a cart, stand, tripod, bracket, or table specified by the
manufacturer, or sold with the manufacturer, or sold with the apparatus.
When a cart is used, use caution when moving the cart/apparatus
combination to avoid injury from tip-over.
15. The apparatus shall not be exposed to dripping or splashing and no objects
filled with liquids, such as vases, shall be placed on the apparatus.
16. The socket-outlet shall be installed near the equipment and shall be easily
accessible.
17. The equipment is to be supplied from an identified USB port complying
with the requirement of Limited Power Source.
You can help protect the environment!
Please remember to respect the local regulations:
hand in the non-working electrical equipments
to an appropriate waste disposal center.
Warning:
PORTABLE CART WARNING
TO REDUCE THE RISK OF FIRE OR ELECTRIC SHOCK, DO NOT EXPOSE
THIS APPLIANCE TO RAIN OR MOISTURE. DANGEROUS HIGH VOLTAGES
ARE PRESENT INSIDE THE ENCLOSURE. DO NOT OPEN THE CABINET.
REFER SERVICING TO QUALIFIED PERSONNEL ONLY.
13. Unplug this apparatus during lightning storms or when unused for long
periods of time.
14. Refer all servicing to qualified service personnel. Servicing is required
when the apparatus has been damaged in any way, such as power-supply
cord or plug is damaged, liquid has been spilled or objects have fallen into
the apparatus, the apparatus has been exposed to rain or moisture, does
not operate normally, or has been dropped.
Note
Please read Rating Label at the bottom of this main unit
for power input and other safety information.
04
Proper Ventilation:
5cm
To avoid risk of electric shock and fire, and to prevent damage, locate
the apparatus as follows:
1. Front: No obstructions and with open spacing.
2. Sides / Top / Back: No obstructions should be placed in the areas
shown as below.
5cm
5cm
Front View of Subwoofer
15cm
15cm
5cm
5cm
1cm
1cm
5cm
5cm
5cm
Front View of Main Unit
and Satellites
Side View of Main Unit
and Satellites
05
Side View of Subwoofer
Chapter 1 Getting Started
Welcome
Using the Remote Control
Welcome to use the BLA-1600 digital music system-a complete
system with a MP3 docking station, built-in amplifier and USB hub.
Now you can enjoy all your favorite music in one integrated package,
including:
Music files from MP3 player
Music from PC
USB hub features
IR Senor
Package Contents:
1. Main Unit (1)
3. Subwoofer (1)
5. Remote Control with Battery (1)
7. User's Manual (1)
2. Satellite Speaker (2)
4. USB Host Converter (1)
6. AC to DC Adaptor (1)
1. Remove battery Protector before using for the first time.
2. Aim the remote control at the IR senor on the front panel's
mirror from a maximum distance of 7m (23 feet) away.
06
Chapter 2 System Overview
13
1
12
11
10
9
4
8
5
7
6
1. SOURCE:
To select among three basic sound sources (MP3 IN / AUX IN / PC AUDIO)
2. MUTE:
To toggle mute on/off for audio output
2
3
Remote Control:
3. EQ:
To select among the sound effects (NORM / ROCK / POP / JAZZ / CLASS)
4. REP(Repeat) / RAND(Random):
To select Normal playback, different Repeat modes or different Random
modes when listening to MP3 IN source. For more details, please go to page
10 about the description of Front Panel Display.
5. PLAY/PAUSE:
To play or pause a track when listening to MP3 IN source.
6. STOP/POWER ON:
To stop playback.
Press and hold the key to power on/off the unit.
07
7. USB/SD:
To select either USB Host or SD card mode for playback when listening
to MP3 IN source.
8. LANG:
To select the supported language for ID3 display when listening to MP3
IN source.
9. ENTER:
To allow for specific track selection (Using Arrow Keys)
10. ARROW KEYS:
To change the LCD backlight color using UP/DOWN ARROW key.
When listening to MP3 IN source, you can select the previous or next
folder using LEFT/RIGHT ARROW key. Or after pressing ENTER, you
can select a specific track number using UP/DOWN ARROW key.
11. TRB/BASS:
To select Treble or Bass sound effect
12. < / > SKIP:
To skip to the previous/next track
13. +/- VOL:
To adjust the volume level
08
Top Panel Button Controls:
1. POWER
To switch between power on and standby modes
2. +/- VOL
To adjust the volume level
3. < / > SKIP
To skip to the previous/next track
1
4. PLAY/PAUSE
To play or pause a track when listening to MP3 IN source.
2
4
3
09
5. Track Time
Shows the time elapsed for current track
2
1
6. Track Number
Shows the current track number
3
10
7. Folder Number
Shows the current folder number
4
8. Normal/Repeat/Random Status
Shows the current playback status
9
8
7
6
Normal playback
5
Repeat one track
Front Panel Display:
Repeat all songs in one folder
Repeat all songs
1. Equalizer
Shows the Frequency Spectrum of the current audio signal
Random playback of all songs
2. Volume/Treble/Bass
Shows the current Volume / Treble / Bass level
Random playback of all songs in one folder
3. EQ Display
Shows the set EQ mode (NORM / ROCK / POP / JAZZ / CLASS)
9. Operation Status
Shows the current operation status (Play / Pause / Stop)
4. ID3 Tag Display
Shows the ID of the song currently playing
10. USB/SD Mode
Shows the current USB Host or SD Card mode
10
Parts of Main Unit:
Warning:
For factory use only.
Do not insert anything into this port.
A. Subwoofer Terminal
F
B. Speaker Terminals
C. DC IN Jack
D. AUX IN Jack
E. USB HUB Ports
E
F. Connection to USB
Host Converter
A
G. PC Port
H. IR Sensor
B
C
Back Panel
D
G
Top Panel
H
Front Panel
11
I
I.
Headphone Jack
Chapter 3 Connections
Connecting the System
Follow these simple steps to connect your digital music system. It is
recommended that you turn off all components (or unplug AC power)
while you are connecting the system.
Step 1 - Place Speakers
Front Speakers (L, R)
Align the front speakers at ear level and place one speaker on each side
of main unit.
Subwoofer (SUB)
Place the subwoofer at any convenient location within the vicinity of
the listening area.
12
Step 3 - Connect DC In Jack
Step 2 - Connect Speakers and Subwoofer
1. Make sure the power is turned off to prevent possible damage to
the system.
2. Connect the speaker wires from the connector at the back of each
speaker to the connectors at the back panel of main unit.
3. Connect the subwoofer wires from the connector at the back of the
subwoofer to the connectors at the back panel of main unit.
1. Connect the supplied power cable to the DC in jack on the back panel.
2. Connect the other end of the power cable to the power outlet.
3. The red LED located on the top panel with the
button will glow
to indicate that the system is plugged in and in Standby mode.
L
DC IN
24V
WOOFER
R
SPEAKER
Note
Right side (rear view)
Left side (rear view)
13
The Standby LED only lights up in Standby mode.
The Red light will go off after you press the
button
and the system is powered on.
PC Audio (Front Panel)
Step 4 - Connect to External Devices
You are allowed to use the music system as an amplifier and enjoy
listening to sound effects or music from your PC. Connect the USB cable
(not supplied) from the USB port of the PC to the
PC port on the front
panel of main unit. It is recommended to connect the USB cable to the
built-in USB socket of your PC directly and not to any USB socket from the
USB hub indirectly.
The different ports and jacks of the main unit provide additional
input/output that you can use to connect other external audio devices,
such as portable MP3 players and headphones. The functions of the
different ports and jacks are listed below:
Headphone Jack (Front Panel)
Connect to headphones with a 3.5 mm stereo plug (not supplied).
USB Hub (Back Panel)
Important:
AUX Input (Back Panel)
Connect from an A/V unit with a 3.5 mm stereo cable (not supplied).
This USB Hub can be available only when your PC is connected to PC
Audio port at the front panel.
Warning:
The input signal should be less than 2Vrms; otherwise, the main unit
may be damaged.
There are two USB output ports located at the back panel of the main unit.
They provide the same functions as the PC USB output ports do. For
example, you may connect your keyboard and mouse to these ports as you
connect the same stuff to your PC through the USB output ports.
14
USB Host Converter (Top Panel)
Note
Connecting the USB Host and USB interface device
1. Plug the USB Host converter (additional unit) to the cradle on the top
of main unit.
2. Connect any USB interface device with music or audio files to the
top connection port of the USB Host converter.
For example, you may store music files into a flash drive and connect
it to the USB Host converter for playback.
Some MP3 players rely on a specified software to download
music files from PC. When playing those MP3 players, the
music files may not be shown in the same order as the playlist
order on the software.
USB Music
Device
Important:
It is strongly recommended that the USB Host converter should be
connected before powering on the main unit. Do not unplug the USB
Host converter when the main unit is powered on.
Note
USB Host
Converter
This system supports only audio files in MP3 and WMA
formats.
Make sure the USB interface device should be set to the
status that PC can detect. For example, some MP3 players
need to POWER ON before connection.
This system cannot play music files with copyright protection
of DRM (Digital Right Management).
15
To unplug the USB Host converter
from the main unit, as illustrated
below, push forward the curved
corner until a click sound, and finally
pull up the converter for removal.
Chapter 4 Basic Operations
First Things First
Using the MP3 IN
To select one of the three basic sound sources (MP3 IN, AUX IN and
The main unit has a specially designed plug, which connects with the
PC AUDIO).
USB Host converter. The music system can play the sound tracks in
your MP3 player by transferring audio signals into the system and
Do this by pressing SOURCE on the remote control.
then to the speakers.
For operations about USB Host converter, please go to Chapter 5.
1. MP3 IN
Using the AUX IN
For listening sound from an external MP3 player
2. AUX IN
For listening sound from an external AUDIO source.
External stereo audio from different kinds of A/V units can be
transferred to the system. The system will amplify these audio signals
3. PC AUDIO
and then output them to the speakers. To use this feature:
For listening sound from the personal computer.
16
3. Enjoy doing with your PC while listening to the music system.
1. Make sure the A/V unit to AUX IN jack at the back panel is
connected by a 3.5mm stereo audio cable (not supplied).
2. Switch to AUX IN source by pressing the SOURCE button on the
remote control.
3. Switch on the external A/V unit just connected to the music system
for great joy!
B. Using the USB Hub Feature
A USB Hub is a small box with multiple ports for plugging in USB
devices. It is commonly connected to a USB port located at the back
of a desktop computer by using an extension cable. Once the Hub is
connected to your PC, you can set it wherever is convenient,
avoiding the hassle of accessing the rear of the PC system.
Using the PC Audio
A. Using the PC Port Feature
The music system can act as a USB HUB when connected to the PC.
There are two ports labeled as USB HUB at the back panel of the
main unit.
PC users may use the music system as an amplifier. The audio signals
from PC can be transferred to the system using the ± PC port. The
system amplifies these audio signals and then outputs them to the
speakers.
1. Make sure a USB cable (not supplied) is connected from PC to the
PC socket at the front panel.
2. Connect any USB interface devices, such as your digital camera,
card reader, keyboard, mouse, MP3 player and memory stick, to
the USB HUB ports at the back panel of the main unit. Your PC
will then detect the external devices just plugged in.
1. Make sure a USB cable (not supplied) is connected from PC to the
± PC socket at the front panel.
2. Switch to PC AUDIO source by pressing the SOURCE button on the
remote control.
17
Activate Sound Effects
1. Press UP ARROW or DOWN ARROW button to change the LCD
backlight color.
A. EQ
Replace Battery for Remote Control
1. Press EQ button repeatedly to select one of below sound effects in cycle.
NORM ROCK POP JAZZ CLASS BACK to the beginning.
1. Follow below steps to remove the battery cover of remote control.
You can remove the battery door with your fingernails by using the
spaces set back in wall.
2. The set EQ mode is shown on the display.
B. Treble/Bas
2
1. Press TRB/BASS button repeatedly to select Treble or Bass. You will
1
notice Trb: / Bas: on the top right corner of display.
2. Adjust the treble or bass level from -6 to +6 by pressing the volume
2. Match the polarity on the Lithium Cell with a plus sign (+) on the
battery tray.
control buttons.
+
Change LCD Backlight Color
CR2025
3V
There are seven different LCD backlight colors for users to choose. These
3. Slide the tray with new battery into the battery compartment until
you hear a click sound.
are red, yellow, green, blue, light blue, purple and white.
18
Chapter 5 USB Host Operations
Supported Languages for ID3 Display
Before using the USB Host, make sure all the devices are
properly connected. (See Chapter 3 for Connections)
USB Host converter supports several languages for displaying the ID3
information of music files. Users can press LANG button on the
remote control to switch among the supported languages.
The music system can play only supported audio files:
mp3 and wma formats
The 27 supported languages are:
English, Finnish, French, German, Italian, Norwegian, Portuguese,
Spanish, Swedish, Greek, Turkish, Chinese (Simplified), Chinese
(Traditional), Japanese, Croatian, Czech, Hungarian, Polish, Romanian,
Slovak, Slovenian, Bulgarian, Russian, Serbian, Ukrainian, Danish and
Dutch.
19
not be shown in the same order as the playlist order on the
software.
Using the USB Host with USB Interface Device
Using the USB Host with SD Card
For Music and Audio playback only
The main unit along with the additional USB Host converter can act
as an amplifier for any USB interface device such as your portable
player with music files. The music system amplifies music or other
audio signals in the USB interface device and then outputs them to the
speakers.
Make sure the USB interface device is well connected to the USB
Host converter.
1. Press
to power on the system from standby mode.
2. Switch to MP3 IN source by pressing the SOURCE button on the
remote control.
3. Press
to start playback.
SD
Note
The secondary function of the USB Host converter is to act as an
amplifier for SD cards. The system will amplify supported audio files in
the SD card and then output them to the speakers.
1. Insert a SD card with music or audio files into the SD card slot.
2. Press
to power on the system from standby mode.
3. Switch to MP3 IN source by pressing the SOURCE button on the
remote control.
4. Press
to start playback.
5. Optionally, press the USB/SD button on the
remote control to switch between the sound
modes: USB interface device and SD card.
This system supports only audio files in MP3 and WMA formats.
Make sure the USB interface device should be set to the status that
PC can detect. For example, some MP3 players need to POWER
ON before connection.
This system cannot play music files with copyright protection of
DRM (Digital Right Management).
Some MP3 players rely on a specified software to download music
files from PC. When playing those MP3 players, the music files may
Note
Before the music system is powered on, if
you connect the USB interface device
and SD card simultaneously, the music
system will play the USB interface device.
After the music system is powered on, the music system will play
the USB interface device or SD card according to the priority of
which is connected to the USB Host converter first.
20
Additional Playback Options
3. To enter 253, do the above steps (1&2) to get ±25 , then press
LEFT ARROW to add ±0 to the left, then press UP/DOWN
ARROW repeatedly to get 3 .
4. To edit 253 to 27, press RIGHT ARROW to cancel ±3 , then press
UP/DOWN ARROW repeatedly to get 7 .
Remember to press ±ENTER to confirm selection.
The user can select a specific track within a folder using the remote
control.
Track Selection Method:
1. Press ENTER button. You will notice the current track number
on the display disappears to allow input.
2. Press UP ARROW button to do +1 increment.
3. Press DOWN ARROW button to do -1 decrement.
4. Press LEFT ARROW to add one digit to the left.
5. Press RIGHT ARROW to cancel one added digit.
6. Press ENTER button to confirm the input track number. Then,
the system will play from the selected track.
Here are examples for you to follow in step by step.
After pressing ENTER ,
1. To enter 2, press UP/DOWN ARROW repeatedly until 2
appears as the current track number on the display.
2. To enter 25, do the above step to get 2 , then press LEFT
ARROW to add ±0 to the left, then press UP/DOWN ARROW
repeatedly to get 5 .
The user can select a specific folder using the remote control.
Folder Selection Method:
1. Press LEFT ARROW button to select the previous folder.
2. Press RIGHT ARROW button to select the next folder.
Note
The maximum number of folders allowed for selection is
63. That is, you are not allowed to select the 64th folder if
there are more than 63 folders in the USB interface device
or SD card.
Battery Recharge Function
The rechargeable battery of your USB interface device can be
charged once the music system is powered on. And the music system
supports slow charging.
21
Chapter 6 Help
Troubleshooting
Frequently Asked Questions
Problem
Solution
Make sure the AC Power cord is securely connected.
No power
Securely connect all audio cables.
Repair or replace any damaged audio or speaker cable.
The system is in pause mode. Press
to return to normal playback mode.
Press MUTE on the remote control if "MUTE ON" appears on the display.
Disconnect the headphones if they are connected.
Reset the main unit using the POWER key (turn it off, then turn it on again) on the main unit.
No sound
No stereo sound during AUX IN mode
Check speaker, AUX in connections and settings.
The music system does not recognize USB
interface device
Check connections between USB Host converter and main unit.
Check connections between USB interface device and USB Host converter.
Make sure the music system is set to MP3 IN source.
Make sure the USB interface device should be set to the status that PC can detect.
22
Problem
Abnormal display
Remote does not work
Severe hum or noise
Solution
Reset the main unit using the POWER key (turn it off, then turn it on again) on the main unit.
Remove the battery protector before using.
Make sure the sensor is not covered up.
Point the remote towards the front panel of the main unit.
Make sure no objects are in between the sensor and the remote's line of sight.
Remote control is only effective within 7 meters range.
Make sure all speakers and components are correctly and securely connected.
Make sure to connect cables that are away from a transformer or motor, and at least
10 feet away from a TV or fluorescent light.
Move your TV away from your audio components.
The plugs and jacks are dirty. Wipe them with a cloth with moderate alcohol.
23
Chapter 7 Technical Specifications
Model
BLA-1600
Frequency Range
20Hz
Signal to Noise Ratio
>70dB
Speaker Output Power
10Wrms (6
Speaker Impedance
6
LCD
128 X 64 Dot Matrix LCD Display
)+10Wrms (6
)+30Wrms (6
)
Backlight
7 colors
USB Host
MPEG 1/2/2.5 layer2 and 3
Window Media Audio (WMA V9 compatible)
This system cannot support those WMA files with
DRM-protection.
File Support
USB Hub
USB 2.0 (High-speed)
AC Voltage to Adapter
100-240V ~ 50/60Hz 1.3A
Power Consumption
110W maximum
20kHz
Tag Info
ID3 tag V1.1 and V2.3 extraction
Language
27 Languages
Main Unit
100mm x 105mm x 100mm (approx.)
Satellite
100mm x 105mm x 100mm (approx.)
Dimensions Subwoofer
(W x H x D)
USB Host Converter
200mm x 112mm x 185mm (approx.)
Weight
74mm x 35.5mm x 53.5mm (approx.)
Main Unit
440g (approx.)
Satellite
600g (approx.)
Subwoofer
1900g (approx.)
USB Host Converter
50g (approx.)
Operation Temperature
0
40