1
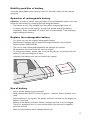
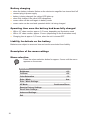
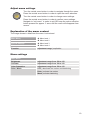
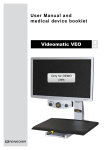
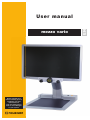
mezzo vario Please read this user manual carefully prior to installation, use and maintenance for your own safety and in order to avoid damages on your system. EN User manual Contents I. General information................................................................................................6 Notes on the electromagnetic compatibility (EMC)......................................................6 Storage of the user manual..........................................................................................6 Product description.......................................................................................................6 Medical device..............................................................................................................7 Purpose........................................................................................................................7 Life span of product......................................................................................................7 Safety advice................................................................................................................7 Combination with other products..................................................................................7 Precautions by alteration of the performance of the system.......................................7 Reinstatement and installation.....................................................................................7 Cleaning of the system.................................................................................................8 Special advice for transport and storage.....................................................................8 Disposal of the unit according to EU directive 2002/96/EEC.......................................8 Power supply................................................................................................................8 Safety instructions .......................................................................................................9 II. Instructions for the reading system mezzo vario.............................................10 Delivery content..........................................................................................................10 Optionally available accessories................................................................................10 Installation of the system............................................................................................10 Connection of the unit................................................................................................11 Alignment of monitor..................................................................................................12 Description of the control elements............................................................................13 Control panel base plate.....................................................................................13 ON/OFF (power switch).......................................................................................13 Light ON/OFF/Dimm............................................................................................13 Indicator for rechargeable battery.......................................................................13 Control panel monitor.................................................................................................14 Left button:.................................................................................................................14 Colour mode selection.........................................................................................14 Menu selection ON/OFF......................................................................................14 Central button:............................................................................................................14 Adjustment of enlargement.................................................................................14 Autofocus ON/OFF..............................................................................................15 Overview mode....................................................................................................15 Right button:...............................................................................................................15 Automatic colour saturation.................................................................................15 Contrast/Brightness.............................................................................................15 Windowing and line marker.................................................................................15 Start-up mezzo vario..................................................................................................16 Mains operation..........................................................................................................16 Power ON............................................................................................................16 Power OFF..........................................................................................................16 Automatic save regulation for the device set-up........................................................16 Replacement of lighting.......................................................................................16 Mobility pack/Use of battery.......................................................................................17 Operation of rechargeable battery.......................................................................17 Replace the rechargeable battery.......................................................................17 Use of battery......................................................................................................17 Battery charging..................................................................................................18 Operating time once the battery had been fully charged....................................18 Liability for defects on the battery.......................................................................18 Description of the menu settings................................................................................18 Menu selection....................................................................................................18 Adjust menu settings...........................................................................................19 Explanation of the menu content.........................................................................19 Menu settings......................................................................................................19 Check list: in case problems occur............................................................................23 Technical characteristics............................................................................................24 Warranty Information..................................................................................................25 Notes..........................................................................................................................26 I. General information Important notes on the operation of the reading system mezzo vario! Please read them carefully prior to the operation of the reading system! Notes on the electromagnetic compatibility (EMC) This reading system is suited for use in all set-ups including the domicile that are connected directly to a public power supply for buildings with residential purposes. This reading system is designed for the use in the indicated electromagnetic environment. The user should ensure the use in the indicated environment. This reading system operates on HF-Energy exclusively for its own function. Therefore the emitted interference of high frequency disturbances is very low and the interference with other appliances operated close-by is improbable. When operating the reading system simultaneously with other systems, however, the possibility of disturbances of the system or other systems should not be neglected. For this reason it should be ensured that the system is not placed directly beside or on top of another system. If the set-up of this system in the proximity of medical, measuring devices cannot be avoided, the operator of these devices has to be informed that it is necessary to observe the performance of the system to control the conventional use of the system in the chosen set-up. Electronic devices are sensitive towards electric discharge and towards high frequency electromagnetic fields. Attention: In order to avoid high frequency disturbances the operator should respect a minimum distance of one meter to portable and mobile HF-telecommunication devices. The device may not be used in the patients environment. Storage of the user manual The user manual is an essential part of your reading system. Please keep the booklet in a safe place for future reference. Product description mezzo vario is an opto-electronic reading system, which magnifies text and pictures. It may be used permanently for private and professional appliance. The text or pictures are being captured by the integrated camera and then displayed on the monitor. ●● ●● ●● 6 The transportable and compact reading system mezzo vario convinces by pin sharp pictures in HD+quality (1366 x 768 pixels). The Vario camera offers a mangification range from approx. 1x to 100x by offering reduced noise and almost no reflections even when reading glossy papers. Thanks to the easy movement of the monitor into three directions, the user will always read in the most ergonomic position. Medical device This reading system is classified as a Medical Device, class I according to 93/42/EEC, Annexe IX, standard 12. For the distribution to countries outside the EU the respective country-specific guidelines have to be regarded. Purpose This opto-electronic reading system is a medical device to assist with the reading and magnifying of printed text and pictures. Visually impaired people can compensate for their loss of visual acuity by using this device. Life span of product Seven years from the date of invoice (ex Reinecker). According to EEC the supplier of medical devices is obliged to define the life span of a product. Note: The mentioned life span does not reflect the complete life span of the mezzo vario. It is rather an indication on when the product might be obsolete and substitution might be recommended due to new product developments. Safety advice mezzo vario has to be installed in closed and dry rooms only. Do not plug mezzo vario into an electrical circuit that is also being used for any life sustaining or support systems. The device may not be used in the patients environment. This device should not be operated in explosion-endangered environments. This opto-electronic device should only be installed in conjunction with modern electrical circuitry. It is a device of protection class II. The openings in the casing ensure optimum cooling and must not be covered. Combination with other products Warning: This reading system must not be located directly beside, next or on top of another medical device. If the device is used near another electrical device, monitor the other device to ensure that it is working properly. In case of doubt please contact Reinecker Vision GmbH or any licensed distribution partner. Precautions by alteration of the performance of the system Stop using the reading device if technical features or performances should change. Switch the device off and disconnect the power supply from the mains wall socket. Refer directly to your authorized dealer or to Reinecker Vision GmbH Service Center. Reinstatement and installation This device may be technically maintained and reconditioned by Reinecker Vision GmbH only or by an authorized technician. Reinstatement may only take place after the system has been cleaned and safety checked. 7 Cleaning of the system ●● mezzo vario has to be disconnected from the power supply before cleaning. ●● The monitor and the system has to be cleaned with a glass cleaner. ●● Interior of device must NOT come in contact with liquids. Special advice for transport and storage For reasons of safety, the unit must only be transported and stored in the original packing. The unit must be stored in dry and closed rooms in the original packing. The following conditions for transport and storage have to be respected: ●● Air pressure 700 - 1000 hPa ●● Temperature range +5° to + 50° ●● Relative air humidity 30% to 80% Disposal of the unit according to EU directive 2002/96/EEC mezzo vario contains of electronic components. In order to avoid damage to the environment, the country-specific rules have to be respected. Power supply Only use the original power supply which is included in the delivery by Reinecker Vision GmbH. Caution: The use of any other equipment might lead to an increased electromagnetic emission and to a product damage. 8 Safety instructions Please respect the following safety instructions: 1. Do not plug the AC adapter into a faulty electrical outlet. Doing so may cause electrical shock or fire. 2. Do not touch the AC adapter with wet hands. 3. Only use the original power supply which is included in the delivery by Reinecker Vision GmbH. The use of any other equipment might lead to a product damage. 4. Only use the original battery which is included in the delivery by Reinecker Vision GmbH. The use of any other equipment might lead to a product damage. 5. Do not expose the system to direct sunlight or to very hot or cold environment, as this would harm the picture quality. 6. Do not use this device below +5°C or above +40°C. 7. No liquids must reach the interior of the system. Only use the device in a dry environment. 8. The device may not be used next to medical devices (patients environment). 9. Do not lean on the screen, touch the screen with any object or lay heavy objects on the device. This may cause damage to the device. 10.Do not try to repair or to dismantle the system by your own. This would automati- cally void the warranty. If you need any technical assistance please get in contact with the local distributor or with Reinecker Vision GmbH. 11.Always switch OFF the system and disconnect it from the power supply before cleaning it. Only use a soft and slightly damped cloth. Only use a mild household detergent. Do not use alcohol containing or strong detergents. 9 II. Instructions for the reading system mezzo vario Delivery content ●● ●● ●● ●● ●● Reading system mezzo vario Power adapter 12V DC / 5000mA Adapter cable (country-specific) User manual Information sheet for repair cases Optionally available accessories ●● Mobility pack (battery and carrying case) ●● xy-table Installation of the system Your reading system will normally be unpacked and set up by the supplier’s representative. If you have not purchased an optionally available stand that fits to the product you must provide a solid surface for the system with sufficient surface area. Set up your mezzo vario as described below: Interlock release Battery (optional) Power supply ●● Folded mezzo for transport Operation buttons located on the base plate ●● Bring the monitors arm in the upright position until it snaps in 10 ●● Release the locking lever in order to move the monitor into the upright posi tion. Use the integrated grip to do so. locking lever open Control panel close Camera LED Light ●● The locking lever can be brought into the desired position, by pulling it out. Connection of the unit Connect the power supply to a mains wall socket and plug the adapter end of the cord into the DC12V power supply socket located on the base plate of the mezzo vario. Note: The delivered power cable is to be used exclusively in connection with the mezzo vario. Once the device is plugged in, it is ready to use. Adapter cable Power supply Electrical outlet 11 Alignment of monitor Due to the monitor’s technology contrast and brightness change depending on the angle of view. The highly flexible three-dimensional monitor arm enables the user to adjust the monitors height and angle according to their best ergonomic position. rotatable by 90 degrees ●● The monitor can be moved vertically up and down. ●● The monitor can be tilted up or down. 12 ●● The monitor can be rotated anticlockwise by 90 degrees in order to make column reading easier. The image will adapt automatically to the monitors position. Description of the control elements Control panel base plate ON/OFF (power switch) By pressing the power switch on the right side of the base plate the electronic magnifier is switched on. Attention: If there is no light after the unit has been turned ON, press the “light” button (see Light ON/OFF/Dimm). If there is still no light, double check if the power cable has been connected correctly and if there comes electricity from the wall socket. Light ON/OFF/Dimm ●● ●● ●● Switch between full light and dimmed light, by pressing the black button briefly. Turn OFF the light by pressing and holding the black button for some seconds. Turn ON the light again by pressing the black button briefly. Note: Whenever the mezzo vario will be turned ON, the maximum light will be activated. Indicator for rechargeable battery Only operates with built-in battery, see page 17 (mobility pack/ use of battery). 13 Control panel monitor Colour selection Menu selection ON/OFF Magnification/Zoom Autofocus Overview Mode Brightness/Contrast Line marker/Shadowing Left button: Colour mode selection By turning the colour mode selection-button from the left to the right the following colour modes can be selected: Position 1: full colour display Position 2: black font, white background Position 3: white font, black background Position 4: green font, black background Position 5: yellow font, black background Position 6: yellow font, blue background The chosen colour mode appears temporarily on the lower side of the screen (when activated). Note: The above mentioned colour combiniations correspond to the factory settings. However, the user can reduce those colour combinations in the user menu. When reducing the colour combinations, the colour selection button split the remaining colour combinations evenly. Menu selection ON/OFF When pushing the left button for approx. 2 seconds the internal menu will be shown on the screen. Press and hold it again for approx. 2 seconds, until the internal menu will disappear. Central button: Adjustment of enlargement 14 By turning the central button (from left to right) text and pictures can be zoomed in an out continuously. Magnification range is from approx. 1x to 100x, however, it’s dependent from the distance between the camera and the object to be displayed. The last magnification set will be memorised and displayed when turning mezzo vario ON again. The current magnification will be displayed briefly at the downside of the screen (this display can be deactivated in the user menu). Note: The camera is equipped with an autofocus. When turning the central button to the maximum magnification, objects of a height of approx. 7cm shall be displayed sharply. Sharpness can be enhanced in the internal menu or when switching to artificial colour mode. Autofocus ON/OFF By briefly pressing and releasing the central (“zoom”) button you can activate/deactivate the automatic focus. By having the autofocus activated the camera adjusts the picture sharpness automatically. Overview mode When you are reading at a higher magnification level and want to find out which part of the page you have reached this function helps you to get the overview. Press the central („zoom“) button for approximately 2 seconds until the overview mode is activated. The image on the screen will minimise and you will see an overview of the whole document/image/printed text. A faded cross will appear and indicate the area that is currently being magnified. Once the central button is released it will return back to the reading mode and selected magnification level. Right button: Automatic colour saturation Brightness and colour saturation are automatically adjusted, colours are displayed true to original. Contrast/Brightness By turning the button on the right, contrast and brightness can be adjusted. Windowing and line marker By pressing and turning this button, Windowing and line marker will be activated. To deactivate those functions, press the button again. 15 Start-up mezzo vario Mains operation Check if the power adapter is connected with the mains and the power supply socket (12 VDC) of the mezzo vario. Power ON Press the ON/OFF button to switch on the device. When the mezzo vario and the base plate is illuminated, you can put a page or an object onto the table. All the optional settings – for example zoom, colour or brightness- can be adjusted individually. Power OFF Switch off the device by pressing the ON/OFF button. Automatic save regulation for the device set-up When you reset the device all settings used before will be activated again. Replacement of lighting The electronic magnifier is equipped with a high power LED Illumination. If replacement of the lamp is required it should only be done by a specialist or by Reinecker Vision GmbH. Important note: Please only use the power supply included in the delivery. Use of any other power supply will void the warranty. 16 Mobility pack/Use of battery A mobility pack (battery and carrying case incl. shoulder strap) can be ordered optionally. Operation of rechargeable battery Attention: In order to assure a long life span of the rechargeable battery you must follow the instructions for charging and operating the battery: ●● The battery is only fully charged once the yellow charging light turns off. ●● If mezzo vario will not be used for a long time, please charge the battery completely. Even if switched off, mezzo vario may discharge. Total discharge might damage the battery. Replace the rechargeable battery ●● ●● ●● ●● ●● You must only use the original rechargeable battery. Replacement batteries can be ordered through Reinecker Vision GmbH. Article number: (MEZVARAK) The use of other rechargeable batteries will damage the system. All warranties for mezzo vario will then be voided. To change the battery, please take it out first by pulling it out and put the new battery in until you recognize it locks. optionally the battery pack can be covered by a panel. Use of battery ●● ●● ●● ●● ●● plug-in power supply is not connected keep pressing the ON/OFF button for approx. 1 second; device is ready to be used after switching on the system, the battery indicator is shown on the display for approx. 6 seconds flashing of the battery indicator: battery is empty and has to be re-charged. There is a remaining time of a few minutes before the electronic magnifier switches itself off Make sure the battery will be charged before use 17 Battery charging ●● ●● ●● ●● ●● ●● when the battery indicator flashes or the electronic magnifier has turned itself off connect plug-in-power supply battery is being charged; the yellow LED lights up when fully charged, the yellow LED disappears mezzo vario can be used again in battery mode mezzo vario can be used and operated whilst it is being charged Operating time once the battery had been fully charged ●● With a 16" class monitor: approx. 2,5 hours, depending on illumination used ●● With a 19" class monitor, approx. 2 hours (depending on the illumination used) ●● Charging time is approx. 3,5 hours, when the unit is turned OFF Liability for defects on the battery Batteries are subject to wear and tear and are thus excluded from liability. Description of the menu settings Menu selection Press the colour selection button for approx. 2 secs until the menu appears on the screen. Main Menu Brightness +10 Contrast +50 Color Saturation - 30 Ruler / Mask Aus Ruler / Mask Settings... AF Mode Reset to Factory Settings Recall User Settings... Advanced Settings... Exit 18 Continuous/Zoom Adjust menu settings Turn the central zoom button in order to navigate through the menu. Press the central zoom button in order to open the menu selection. Turn the central zoom button in order to change menu settings. Press the central zoom button in order to confirm menu settings. Navigate to “exit menu” in order to quit OR keep the colour selection button pressed for approx. 2 secs until the menu will disappear from screen. Explanation of the menu content The image shows in detail how the menu is structured. Main Menu Menu level 1 Advanced Settings Menu level 2 Special Settings Menu level 3 Customize Buttons Menu level 4 Function adjustment range | explication Menu settings Main Menu Brightness adjustment range from -50 to +50 Contrast adjustment range from -50 to +50 Color Saturation adjustment range from -50 to +50 Ruler / Mask OFF | deactivate line marker and shadowing Ruler | activate line marker Mask | activate shadowing 19 Main Menu Ruler / Mask Settings Ruler / Mask OFF | deactivate line marker and shadowing Ruler | activate line marker Mask | activate shadowing Ruler Position 0 to 100 | adjust line marker position Mask Position 0 to 100 | adjust shadowing Ruler Mode Horizontal | anlign line marker horizontally Mask Mode Mask Transparency Vertical | anlign line marker vertically Left/Right | Shadowing left/right; shadowing up to 50% Top/Bottom | Shadowing top/bottom; shadowing up to 50% Left/Right FS | Shadowing left/right; shadowing up to 90% Top/Bottom FS | Shadowing top/bottom; shadowing up to 90% Full-Screen | Shadowing covers whole screen 50% | 25% | 0% Main Menu Ruler / Mask Settings Ruler Color Red adjustment range from 0 to 31 Green adjustment range from 0 to 31 Blue adjustment range from 0 to 31 Return Main Menu AF Mode Reset to Factory Settings Continuous | Semi-Autom. + Zoom | Continuous / Zoom Return to factory settings Recall User Settings Return to customer selected settings Advanced Settings (see overview) Exit 20 Overview: Advanced Settings Color Combination Setup Anti Reflection Mode Auto (5) Monitor Brightness Language 100 English Perform White Balance White Balance Mode Auto Sharpness Settings OSD Messages OFF Special Settings Return Main Menu Advanced Settings Color Combination Setup Color Combination 1- 6 Mode Foreground Background Swap Fore-/ Background Disabled | Full Color | Grayscale | False Color Black | Red | Green | Blue | Yellow | Magenta | Cyan | White | User 1 | User 2 Black | Red | Green | Blue | Yellow | Magenta | Cyan | White | User 1 | User 2 invert foreground and background colours Return Main Menu Advanced Settings Color Combination Setup User colors User color 1 - Red adjustment range from 0 to 31 User color 1 - Green adjustment range from 0 to 31 User color 1 - Blue adjustment range from 0 to 31 User color 2 - Red adjustment range from 0 to 31 User color 2 - Green adjustment range from 0 to 31 User color 2 - Blue adjustment range from 0 to 31 Return 21 Main Menu Advanced Settings Anti Reflection Mode OFF | ON | Auto (0-9) | adjust default value Monitor Brightness adjustment range from 37 to 100 Language English | German | French | Norwegian Perform White Balance execute white balance White Balance Mode Auto | One-Push Main Menu Advanced Settings Sharpness Settings Real Color Sharpness adjustment range from 0 to 24 False Color Sharpness adjustment range from 0 to 24 Return Main Menu Advanced Settings OSD Messages ON | OFF Special Settings (see overview) Return Overview: Special Settings Zoom Extension Max. Digital Zoom ON 3.5x Customize Buttons Store User Settings Recall User Settings Reset to Factory Settings Expert Settings Monitor size Return Main Menu Advanced Settings Special Settings 22 Zoom Extension ON | OFF Max. Digital Zoom OFF | adjustment range from 1,5x to 15x 19" Main Menu Advanced Settings Special Settings Store User Settings Confirm selection to the user setting to save Recall User Settings Confirm selection to the user setting restore Reset to Factory Settings Confirm to the factory setting restore Expert Settings Access - only by authorized service Monitor size 16" class | 19" class Return Check list: in case problems occur Problem Solution Dark image Have the lights turned OFF? No display of the image Have the lights switched ON? If not:What is the charging status of the battery? Is the power supply connected? If so: Check the correct settings of the image (brightness, contrast) Missing colour Is the reading material you want to see displayed in colour? Make sure you are in colour mode. Battery does not charge The yellow LED does not light up Check if the power supply is properly connected to the socket and the adapter is correctly contacted. 23 Technical characteristics ●● LED flat screen monitor: 19" class (48cm) or alternitavely 16" class (41cm), height adjustable, vertically inclinable, rotatable ●● camera: magnification range from approx. 1x - 100x ●● System resolution: 1366 x 768 pixels ●● Battery lithium polymer battery, replaceable ●● Operating time of battery: approx. 2 hours with a 19" class monitor (depending on the illumination used) approx 2,5 hours with a 16" class monitor (depending on the illumination used) ●● Charging time of battery: approx. 3,5 hours ●● Autofocus: can be switched OFF ●● Colour modes: True colours, preset and individually adjustable artificial colour modes ●● Weight: approx. 6,2kg (19" class monitor) approx. 5,3kg (16" class monitor) ●● Measurements (WxHxL): erected: approx. 45x50x52cm folded: approx. 45x18x52cm (with a 19" class monitor) erected: approx. 39x49x49cm folded: approx. 39x18x49cm (with a 16" class monitor) Warranty Information 1. R einecker Vision GmbH grants a warranty of 24 months (warranty period only valid within the European Union) against defects in manufacture counted from date of invoice ex Reinecker Vision GmbH. 2. A ll parts that have been replaced when repairing the unit will automatically become property of Reinecker Vision GmbH. 3. D amage caused by improper use or by non-compliance with the operating instructions will result in the invalidation of the warranty. 4. Interventions from persons other than Reinecker Vision GmbH authorised specialists may lead to invalidity of warranty. 5. N ot included in this warranty are light sources serving to illuminate the reading object, batteries and other parts subject to wear and tear. 6. If a warranty claim is necessary, the system has to be returned to the manufacturer in Alsbach-Hähnlein or to your authorised dealer in the original packaging including all components. The manufacturer does not carry the cost for transport, packaging and insurance. Phone number: +49 (0) 625793110 View our General Terms and Conditions. Your authorized distributor: Notes Type: mezzo vario Serial-Number: Manufacturer: Reinecker Vision GmbH Final examination: Power supply: 100 - 240VAC 50/60 Hz over plug- in power supply: 12V DC / 5000mA Type: WTI205000 Power consumption: max. 80 Watt Reinecker Vision GmbH International Contact In case service is necessary, please contact your authorized distributor. sales department, customer relations: Sandwiesenstraße 19 DE-64665 Alsbach-Hähnlein customer service: Erlenweg 3 DE-64665 Alsbach-Hähnlein Tel.: + 49 62 57-93 11- 0 Fax: + 49 62 57-93 11-8230 Email: [email protected] www.reineckervision.com Reinecker Vision GmbH Zentrale Deutschland und Export Vertrieb, Kundenberatung: Sandwiesenstraße 19 64665 Alsbach-Hähnlein Kundendienst: Erlenweg 3 64665 Alsbach-Hähnlein Tel.: 0 18 05-54 56 65* Fax: 0 62 57-93 11-8008 Email: [email protected] www.reineckervision.de *Festnetzpreis 14 ct/min, Mobilfunkpreis max. 42 ct/min Version 1.3, Stand 10/15, Art.-Nr. 000 10 278 Subject to change. Bitte wenden Sie sich bei Fragen oder einem Servicefall direkt an unser Hauptwerk in Alsbach-Hähnlein oder an eine unserer Niederlassungen. Bei im Ausland erworbenen Produkten kontaktieren Sie im Servicefall bitte Ihren dort ansässigen Händler.