1
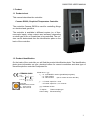
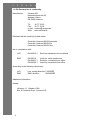
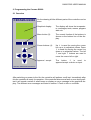
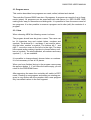
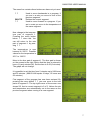
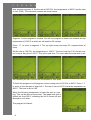
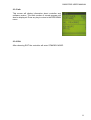
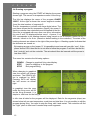
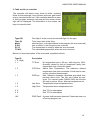
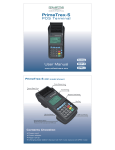
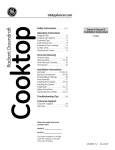
Manual Cerama G 9000 PRO C O N TA C T I N F O R M AT I O N 16 Programs with 9 steps CEBEX Keramikexperterna AB Malmö Erlandsrovägen 3 S-218 45 VINTRIE Tel +46 40 - 671 77 60 Fax +46 40 - 671 77 61 Stockholm Hammarby Fabriksväg 43 S-120 33 STOCKHOLM Tel +46 8 - 658 50 04 Fax +46 8 - 669 60 98 Göteborg Argongatan 8 S-431 53 MÖLNDAL Tel +46 31 - 87 51 30 Fax +46 31 - 87 97 61 Web www.cebex.se Mail [email protected] Digital display with error codes 5 extra realy outputs and 1 printer- / PC-Out Put as an option. Self diagnostic C E R A M A Contents 1. Product . . . . . . . . . . . . . . . . . . . . . . . . . . . . . . . . . . . . . . . . . . .1 1.1 Product sheet . . . . . . . . . . . . . . . . . . . . . . . . . . . . . . . . . . .1 1.2 Product identification . . . . . . . . . . . . . . . . . . . . . . . . . . . . . .1 1.3 EU-Declaration of conformity . . . . . . . . . . . . . . . . . . . . . . . .2 2. Programming the Cerama G9000 . . . . . . . . . . . . . . . . . . . . . . .3 2.1 Overview . . . . . . . . . . . . . . . . . . . . . . . . . . . . . . . . . . . . . . .3 2.2 Programming . . . . . . . . . . . . . . . . . . . . . . . . . . . . . . . . . . .4 2.3 Program menu . . . . . . . . . . . . . . . . . . . . . . . . . . . . . . . . . .5 2.3.1 New . . . . . . . . . . . . . . . . . . . . . . . . . . . . . . . . . . . . . . . . .5 2.3.2 New (Edit) . . . . . . . . . . . . . . . . . . . . . . . . . . . . . . . . . . . .6 2.3.3 Edit . . . . . . . . . . . . . . . . . . . . . . . . . . . . . . . . . . . . . . . . .9 2.3.4 Start . . . . . . . . . . . . . . . . . . . . . . . . . . . . . . . . . . . . . . . .10 2.3.4.1 Delayed start . . . . . . . . . . . . . . . . . . . . . . . . . . . . . . . .10 2.3.5 Info . . . . . . . . . . . . . . . . . . . . . . . . . . . . . . . . . . . . . . . . .11 2.3.6 Exit . . . . . . . . . . . . . . . . . . . . . . . . . . . . . . . . . . . . . . . . .11 2.4 Running a program . . . . . . . . . . . . . . . . . . . . . . . . . . . . . .12 2.5 End of program . . . . . . . . . . . . . . . . . . . . . . . . . . . . . . . . .14 3. Fault on kiln or controller . . . . . . . . . . . . . . . . . . . . . . . . . . . . .15 4. Connecting the controller to the kiln . . . . . . . . . . . . . . . . . . . . .16 5. Technical specifications . . . . . . . . . . . . . . . . . . . . . . . . . . . . . .16 6. Notes . . . . . . . . . . . . . . . . . . . . . . . . . . . . . . . . . . . . . . . . . . .17 G9000 PRO USER MANUAL 1. Product 1.1 Product sheet This manual describes the controller: Cerama G9000, Graphical Temperature Controller The controller Cerama G9000 is used for controlling firings on electrical and gas kilns. The controller is available in different version (no. of thermocouple inputs, relays outputs and software) depending on what type of kiln or furnace has to be controlled. The version can be determined from the identification plate on the back of the controller. 1.2 Product identification On the back of the controller you will find the product identification plate. The identification plate gives information on type, electrical values for correct connection and what type of thermocouple the controller is adjusted for. CERAMA G9000 Model : 90 ____ / ______ TC Adjust. Pt10% NiCr-Ni Pt13% ______ Power rating ~24V, 50Hz, 5VA ~230V, 50Hz, 5VA Cerama A/S DK-2650 Hvidovre, Denmark Tel. + 45 36 77 22 22 Web. www.cerama.dk Model 90 xx / yyy x_ = 2 : AUTOMATIC version (predefined programs) = 4 : PRO version = 8 : GAS version (I/O for control of motor and fan) _x = 1 Control output for 1 zone = 3 Control output for 1,2 or 3 zones yyy= Software version. TC Adjust : Thermocouple type. Power rating : Electrical rating. 1 C E R A M A 1.3 EU-Declaration of conformity Manufacture: Cerama A/S Hammerholmen 44-48 Avedøre Holme DK-2650 Hvidovre Tlf.: Fax.: e-mail: Web: 36 77 22 22 36 77 26 24 [email protected] www.cerama.dk Declares that the product(s) listed below: Controller Cerama G9000 Automatic Controller Cerama G9000 Pro Controller Cerama G9000 Gas Are in compliance with: LVD EN 60335-1 Electrical equipment for household EMC EN 55014 EN 50081-1 EN 50082-1 Limits for radio interference Emission, household and office. Immunity, household and office. According to the following directive(s) : LVD EMC Low voltage directive 73/23/EØF EMC-directive 89/336/EØF Additional information : Issued: Hvidovre, 11. Oktober 1999 Kiln & Controller Dept., Cerama A/S 2 G9000 PRO USER MANUAL 2. Programming the Cerama G9000 2.1 Overview CERAMA G9000 On the drawing left the different parts of the controller can be seen: Graphical display: The display will show the temperature, messages, texts, menus, program state etc. Menu button (3): The current function of the buttons is shown on the bottom line of the display. Cursor buttons (4): Up 5 is used for moving the cursor line up or to adjust/set values. Down 6 is used for moving the cursor line down or to adjust/set values. The left 3 and right 4 buttons are used to move the cursor left or right. Approve / accept: The button i is used to approve/accept a choice or input. GRAPHICAL TEMPERATURE CONTROLLER After switching on power to the kiln the controller will perform a self-test. Immediately after this the controller is ready for operation. If the controller discovers a fault or error during selftest it will sound a series of small beeps or display an error message in the graphical display. The different error messages are listed in section 3 Fault on kiln or controller. 3 C E R A M A 2.2 Programming The controller will start in standby mode after power is applied. The display (screen) will show the current temperature in the kiln and the text TO START PRESS. The symbol for the accept button i is flashing to indicate that after pressing this button the controller can be used. It is possible to adjust the display contrast while the controller is in standby mode. Pressing the left menu button will make the display lighter and pressing the right menu button will make the display darker. After pressing the Accept button i the program menu appears. This is the main menu of the controller. The display contains different elements. hTitle bar hOptions hMenu line PROGRAM NEW, EDIT, DELETE, START, … Empty in this screen. The menu buttons are therefore not used. In the screen above the cursor line is positioned on NEW. (The cursor line is shown with inverted characters). The cursor line is moved up with 5 or down with 6. The buttons left 3 and right 4 are not used in this screen. The PROGRAM menu contains the following options: hNEW hEDIT hDELETE hSTART hINFO hEXIT Programming of new programs (firings) Editing of a program already in memory. Used for deleting a program from memory. Start a program (firing) Info on controller type, software version etc. Exit from the program menu and return to STANDBY MODE. The lines ---------- can’t be chosen. They are merely used for dividing the options into logical groups. After setting/moving the cursor line press the Accept button i to accept the choice. If the controller is not used or operated in five minutes it will automatically return to standby mode. 4 G9000 PRO USER MANUAL 2.3 Program menu This section describes how programs are made, edited, deleted and started. The controller Cerama G9000 can store 16 programs. A program can consist of up to 9 segments (steps). All programs can be associated with real names (i.e. RED GLAZE 1020) making them easy to remember and distinguish. It is possible to have the same name for two programs. It is also possible to rename a program and to alter (edit) the contents of a program. 2.3.1 New When choosing NEW the following screen is shown. The program should now be given a name. The name can be 14 characters long and contain letters, numbers and symbols. The buttons up 5 and down 6are used for selecting the letter, number or symbol. The buttons left 3 and right 4 move the cursor to the left or to the right. The keys have repeat-action making it quicker to choose letters, numbers or symbols. The whole alphabet, all numbers and many symbols (°, / , #) are available. It is possible to change already chosen letters or numbers. It is not necessary to use all 14 places. When you have finished keying in the program name press the approve button i. If you leave the name empty you will return to the PROGRAM menu. After approving the name the controller will switch to EDIT mode. Creating a new program and editing an existing program is very similar with the exception that a new program only has default values in the first segment. 5 C E R A M A 2.3.2 New (Edit) A program can consist of up to nine segments. Each segment consist of three parts: Rate Temperature Time the rate of temperature change in the kiln. Given in °C/hour. the temperature at which the rate ends. Given in °C for how long the temperature should soak/hold when the temperature is reached. Given in hours and minutes. The time can be set for zero. When starting to edit a new program the screen on the right is shown. At the top of the screen is the title bar. It contains the program name GLAZE 1020°C. At the right top corner is the current segment number 1 and the total number of segments in the program 1. Below is shown a graphical representation of the program. The vertical axis has 100°C division and the horizontal has 1 hour division. The horizontal axis changes enabling longer programs to be displayed. The screen shows a heat-up by 50°C/H to 400°C. When the kiln reaches 400°C it is switched off. This is shown by the dotted line going from 400°C to 20°C. Below the graph is shown the current value, in this case the rate of the first segment in the program. 5 is inverted in the number 50 (the cursor is placed here). This means that using the buttons 5 and 6 you change the rate in steps of 10°C/H. If you wish to change the rate in larger or smaller steps move the cursor using the buttons 3 and 4. Do not approve/accept the input value using the approve button i. It is stored automatically when changing to the temperature part of the segment. Change the rate to 100°C/H as shown. The graphical representation will change and so will the horizontal axis. It is possible to set the rate from 0.1°C/H to 999°C/H and to MAX°C/H. At MAX°C/H rate it is the kiln performance that determines how fast the firing will be. That is heat-up or cooling is at maximum and will be as fast as the kiln can go. 6 G9000 PRO USER MANUAL The menu line contains three buttons we have not yet used. 33 DELETE 44 Used to move backwards in a program. If you are in a rate you move to time of the previous segment. Deletes the current segment. Used to move forward in a program. If you are in a rate you move to the temperature of the same segment. Now change to the temperature part of segment 1. Pressing the menu button below 44 does this. You can still return to the rate part of segment 1 by pressing 33. The temperature is now lowered to 200°C. Possible values for the temperature is 20°C to 1300°C. Move to the time part of segment 1. The time part is shown on the screen to the right. Notice that the time is entered in hours (H) and minutes (M). Set the time to 0:00 (0 minutes). The graph will not change. It is possible to set the time from 0 minutes up to 999 hours and 59 minutes. (999:59 H:M equals 41 days, 15 hours and 59 minutes.) First segment of the program has now been entered, By pressing the menu button 44 you now move to the rate parts of segment 2. The top right corner of the screen now shows 2/2, that is current segment is 2 of 2. Values for rate and temperature are automatically set to the same as the previous segment when moving to a new segment. 7 C E R A M A Now program segment 2. Set the rate at 250°C/H, the temperature to 900°C and the time to zero (0:00). The individual screens are shown below. Segment 2 of the program is finished. We will now program a slower rate towards the top temperature of 1020°C at which we will soak for 30 minutes. Press 44 to move to segment 3. The top right corner now says 3/3, segment three of three. Set the rate at 150°C/H, the temperature to 1020°C. The time is set for 0:30. On the screen is now a flat part at 1020°C. This is the soak time. The curve after the soak time is dot- ted indicating the kiln is turned off and allowed to cool down. To finish the program we will program a slow cooling rate of 150°C/H to 900°C. Press 44 to move to the rate part of segment 4. The rate is set at 150°C/H and the temperature to 900°C. The time is set to 0:00. When the following temperature is lower the rate is a cooling. This can be seen on the screen. The graph ends with a dotted line from 900°C indicating the kiln is turned off and allowed to cool down. The program is finished. 8 G9000 PRO USER MANUAL End program edit by “approving it”, using the approve/ accept button i. After pressing the approve button you are asked to confirm end of program edit. Choose YES to end and return to the PROGRAM menu. Choose NO if you wish to return to program edit. 2.3.3 Edit Editing and making a new program is very similar. There are only some small differences. When you choose to EDIT a screen listing all the programs stored in memory is shown. The programs are listed alphabetically. Choose the program you wish to edit using the buttons up 5 and down 6. After making your choice approve with i. The screen only has room for showing eight programs at a time. The rest of the programs can been shown by pressing 5 or 6. The screen will scroll to show the rest of the programs. If you wish to rename a program press the left menu button RENAME. You can then alter the name and subsequent edit the program. Editing a program is identical to making a new program with the exception that the values for rate, temperature and time are not default values but the ones programmed earlier. 2.3.3 Delete Choose the program you wish to delete using the buttons up 5 and down 6. After making your choice approve with i. You will be prompted to confirm your choice. It is not possible to restore a deleted program. The right menu button CANCEL is used to exit the DELETE menu. 9 C E R A M A 2.3.4 Start Choosing START will display a list of all the stored programs. Choose the program you wish to start using the buttons up 5 and down 6. After making your choice approve with i. The section Running a program shows how the actual firing works. Pressing the middle menu button will start the kiln in manual mode where you manual can control the temperature. Section 2.4.1 Manuel Control contains a description on how to use this mode. 2.3.4.1 Delayed start By pressing the middle menu button instead of the approve button it is possible to start the firing delayed, e.i. for the purpose of firing at night at reduced cost. Use up 5 and down 6 to set the time delay in hours. After setting the delay press the approve button i . The “count down” clock will start. The clock will count down to zero and the firing will start. By pressing START during count down it is possible to skip delayed start and start immediately. Pressing STOP will stop the delayed start and firing. 10 G9000 PRO USER MANUAL 2.3.5 Info This screen will display information about controller and software version. The total number of stored program will also be displayed. Press any key to return to the PROGRAM menu. 2.3.6 Exit After choosing EXIT the controller will enter STANDBY MODE. 11 C E R A M A 2.4 Running a program Starting a program using the START will display the screen shown right. This screen is temperature screen of the firing. The title bar displays the name of the program GLAZE 1020°C. At the right is shown the current segment number 1 and the total number of segments 3. The kiln temperature is shown with large digits below. The next frame shows the kiln temperature (again), the power % that the controller has calculated must be applied to the kiln. If the kiln is equipped with more than one zone, information for zone 2 and 3 is displayed below zone 1. A power % of 30% corresponds to the heating element being turned on for 9 seconds, turned off for 21 seconds, turned on for 9 etc. (based on default setting in the controller). The state of the heating elements are shown to the right of the power figure. A flashing symbol indicates that the elements are turned on. By keeping an eye on the “power %” it is possible to see how well your kiln “runs”. If the power shows 100% then the kiln is not able to follow the program. It will then be the kiln that “controls” and not the controller. The rate should then be lowered until the power is less than 100%. The menu line contains the following options : GRAPH STEP STOP Change to graphical firing view/display. Used to step/jump in the program. End program/firing. When changing to graphical view the screen will change as shown. The GRAPH button is replaced by INFO. Pressing INFO will display the info screen as shown right. In graphical view the area under the firing curve will fill as the firing proceeds. It is simple to view how far the firing is. In info view all data for the program will be displayed. Data for the segments (steps) are shown below info on max temperature, soak time and total time. It is not possible to edit the program during firing. You need to stop the firing, edit it and restart. The controller will find the “right” place to start and if needed skip some segments. 12 G9000 PRO USER MANUAL By pressing the STEP menu button it is possible to step/jump in the program.. Example 1 A kiln is programmed to go with 100°C/H to 820°C, and the soak at 820°C for 120min. After this the kiln is allowed to cool with 100°C/H. I.e. STEP is pressed when the kiln is 620°C. The controller wil “jump” to the soak time (120min) and soak at 620°C for 120 min. Example 2 Pressing the STEP button during soak time. The controller will skip the rest of the soak time and start cooling the kiln. During program execution it is possible to change the soak time for the current segment. To do this the controller must be en temperature screen mode. Use the buttons up 5 and down 6 to alter the soak time. The “new” soak time is not stored and the next time the program is started it will be with the “original” time. Pressing the STOP menu button will end the firing/program. You are asked to confirm that you actual wish to stop. If you choose NO you will return to the program. It is possible to restart a program. The controller will find the “correct” place to start and if needed skip segments. I.e. If you start the program GLAZE 1020°C at 650°C the controller will “jump” over segment 1 and start at 650°C in segment 2. 13 C E R A M A 2.5 End of program The controller will turn of the kiln at the end of the program and the kiln will be allowed to cool naturally (the dotted line). Press the stop key to return to the PROGRAM menu. 14 G9000 PRO USER MANUAL 3. Fault on kiln or controller The controller will detect many kinds of faults, including faults on thermocouple, loss of power and heat, gas burner errors, uncontrolled kiln etc. If the controller detects an error or fault, program execution will stop and the screen shown right will be displayed. The information in the screen can help to locate the fault. Type (ID) Time (S) Mode P:S:R Z1,2,3 T.CALC First digit 1 is the source and second digit 3 is the type. Time since start of the firing. Internal figure. (info about where in the program the error occurred) Info on where in the firing the error occurred. The temperature in zone(x) when the error occurred. The calculated temperature when the error occurred. Below is a short description of the errors and a possibel solution. Type ID 1. 2. (digit) 1 1 TC Error 1 2 OTS Error 1 3 DIF.Error 1 4 1 5 Low Error High Error 2 X 3 X 10X Description No temperature rise in 30 min. with output at 100%. Normally caused by lack of heat/power, faulty fuse, temperature fuse or door/lid switch. Above Max. Temperature. The maximum allowed temperature has been exceeded. Could also be caused by a broken thermocouple. Max. difference between calculated and actual temperature above limit. The kiln can’t follow the program. For manual mode (G9000 GAS) this function will only be active 30min. after last temperature set. Temperature below temperature limit. Temperature above temperature limit. See TC1 for description See TC1 for description PWR Fault. A power fault has been detected. Power has been cut off during program run. 15 C E R A M A 4. Connecting the controller to the kiln Cerama G9000 can be delivered for connection to a Cerama kiln or for connecting to other brands. The controller can be delivered for 230~ supply. For diagrams on how to connect the controller please see seperate manual. Connecting the controller to a Cerama kiln is very easy. Simply put the multi-plug in the receptacle on the kiln and the controller is ready for use. The temperature of the room in which the controller is installed must not exceed the 35°C or be below 5°C. 5. Technical specifications MODEL Connecting voltage Rated power Internal fuse G9000 PRO 24V~ / 230V~ 5 VA 1 AT Dimensions HxWxD (mm) (excl. connector and cable) 205x74x70 Relay outputs 5 relays Max 250Vac / 5A Max 30Vdc / 5A Thermocouple inputs PWM DA OPTO Input No. programs No. segments / program Min. Rate Max. Rate Min. Temp Max. Temp Min. Time (T:M) Max. Time (T:M) Delayed start Manuel control 3 type S/R/K/N 1 (Option) 1 x 8 bit (Option) 2, Max 24 DC 16 9 0.1°C/T 999°C/T (+MAX) 20°C 1300°C (Depends on settings) 0:00 999:99 No Yes Printer/PC Output 1 (Option) The number of thermocouple inputs and relays outputs depend upon the model. The controller can be delivered with 1,2 or 3 thermocouple inputs and up to 5 relay outputs. 16 G9000 PRO USER MANUAL 6. Notes On this page you can make notes concerning the kiln and controller. This information are important to have ready if you need to contact your supplier of kiln or controller. Controller : Model : No. of zones : Thermocouple type : Kiln : Model : Production number : Date of purchase : 17