1
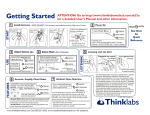
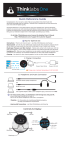
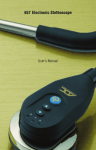
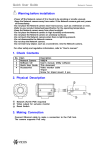
Getting Started
START
1
Install batteries.
Slide open
as shown
Attention: See Reference CD-ROM for complete User’s Manual
+
Insert AAA
battery.
(a) Push cover DOWN into
grooves to slide easily.
a
Insert AAA
battery.
+
a
BELL
DIA
DIA
Push BELL
key
to switch between
Bell and Diaphragm Mode.
Green LEDs show Mode.
BELL
ZOOM
DIA
ZOOM
Diaphragm
Recommended starting level 5-7,
then adjust to personal preference.
6
Push
Acoustic Mode - for non-augmented sound.
ZOOM
key to switch between:
Acoustic - Pre-set Volume, Blue LED OFF.
Zoom - Adjustable Volume. Blue LED ON.
Symbol Mnemonic:
a Bell Curve
looks like a Diaphragm
Bell
BELL
DIA
ZOOM
7
Sync -
LISTENING
VOLUME
CONTROL
behind keys
5
Select Mode - Bell or Diaphragm
BELL
Eartips
face
FORWARD
Suggested key control
Forefinger
for Keys
DIA
ZOOM
active when Blue LED ON
Apply light but firm
pressure.
Left hand
Thumb
for Volume
VOLUME CONTROL
Acoustic Mode utilizes electronic signal processing to provide
pre-set sound characteristics similar to a conventional acoustic
stethoscope, but with enhanced signal quality.
Zoom Mode provides signal processing augmentation with
power boost and Adjustable Volume to “zoom in” on details.
See Over
for
Quick
Reference
Listening with the ds32
S1 / S2 LED for cardiac cycle timing.
Push
key to activate.
Red LED flashes on S1,S2, S1+S2.
Push
again to de-activate.
DIA
POWER OFF
Device turns off after 120 secs
or HOLD
> LEDs > RELEASE
closing, check step (a).
4
BELL
ZOOM
Do NOT Force. If not
Adjust Volume
Rhythm :ds32
b
Daniel Smith
USE
3
Power On
PUSH & HOLD
key
until ALL LEDs light up,
then RELEASE key.
b
(b) Slide closed.
FEATURES
2
NOTE POLARITY. Push springs to seat batteries properly. Align cover & close.
Hold Probe steady
to reduce artifact.
The EmD Diaphragm detects signals in the sub-sonic
frequency range, to reproduce quiet low-frequency heart
murmurs. Patient chest wall motion, or unsteady
examiner hand motion, can induce large-amplitude subsonic vibrations. This can overload the detector and
produce signal artifact or cutout. It is then helpful to hold
the Probe so that the fingers holding the Probe also touch
the patient chest wall (such as the left edge of the thumb
and the fingertips in the above figure.) The Probe and
chest wall then move in unison, with a consistent, light
diaphragm pressure.
© 2004 Thinklabs inc. Printed in USA.
Sync - Probe location influences detection as follows:
• Mitral/Apex - S1 usually detected over S2.
• Tricuspid
- S1 / S2 / Both possible.
• Other areas - S1 usually detected over S2.
See CD User’s Manual for details on the use of Sync.
www.thinklabsmedical.com Call (303)521-5023 or [email protected] for assistance.
Thinklabs
Quick Reference
Rhythm :ds32
See Over for Getting Started guide
Display
Sync Indicator (Red)
Flashes on S1 / S2
Select Bell or Diaphragm
Green LEDs show selection
Sync Indicator LED - S1/S2 Cardiac Timing
Push key to activate/deactivate
(See Over and CD-ROM for details)
Diaphragm Mode (Green)
Control Panel
Low Battery (Red)
Change Batteries
Bell Mode (Green)
Rhythm :ds32
Volume Control
behind Control Panel
(active when Blue LED is On)
BELL
DIA
ZOOM
Zoom Mode (Blue)
LED On - Volume is Adjustable
LED Off - Volume is Pre-Set
HIGH
RESOLUTION
Tips and Troubleshooting
Tips for Best Sound Quality
•Apply Probe with light, steady contact, not excessive pressure. (Step 5, See Over).
•The ds32 works best with direct skin contact. Avoid using through clothing.
•Experiment to find a preferred Volume level that optimizes clarity.
•Load the Reference CD into a computer and READ the User’s Manual.
The Manual contain USEFUL TIPS for obtaining best results.
Troubleshooting
• No Power: (a) Check batteries are inserted correctly. (Step 1, See Over).
(b) Batteries need replacing.
• No Sound: (a) Increase Volume setting.
(b) Check headphone fit (See Over).
• Unexpected interference sounds:
(a) Radio station or electromagnetic pickup: Change position/location.
(b) Continuous Buzzing: Diaphragm loose - tighten Diaphragm Ring.
(c) Other noises: Possible dust, lint or moisture inside Probe Turn off device. In dust-free environment, unscrew Diaphragm ring.
Wipe inside surface of diaphragm and sensor with an alcohol swab.
Do not touch brass sensor plate or diaphragm with fingers.
Allow to dry/evaporate naturally, then close unit.
• Problem unsolved? Contact Thinklabs. See Over for contact information.
© 2004 Thinklabs inc. ds32umqr v1.1 Printed in USA.
Power On
Push+Hold
until all LEDs light
then Release
Power Off
Shuts off after 120 seconds OR
Push+Hold
until all LEDs light
then Release
Zoom - Select Pre-Set or Adjustable Volume
Push key to alternate between augmented Zoom mode
and pre-set non-augmented Acoustic modes:
Mode
Zoom
Blue LED Function
ON
Augmented ADJUSTABLE Volume
to “zoom in” by increasing Volume.
Acoustic OFF
non-augmented PRE-SET Volume
similar to acoustic stethoscope.
See Reference CD-ROM for complete User’s Manual
Thinklabs