1
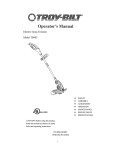
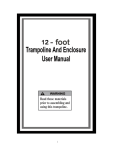
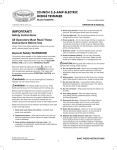
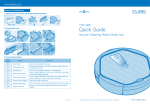
Read these instructions
before operating cleaner
ProSpec RD4DC (Dirt Cup)
Record and retain
Model ProSpec RD4DC Serial No.______________
(Located on bottom of cleaner)
Purchased From ______________________________
Important Safeguards
When using an electrical appliance, always follow
basic precautions, including the following:
READ ALL INSTRUCTIONS BEFORE USING THIS APPLIANCE
Warning:
User’s Manual
ENGLISH ➜ pp. 1-6
ESPAÑOL ➜ pág 7-10
FRANÇAIS ➜ p. 11-14
Index
Assembling Cleaner ..........................2-3
How To Use
Cleaner Description ..........................3
If You Have a Problem ..........................6
Important Safeguards ..........................1
Maintenance
Authorized Service............................6
Emptying Dirt Cup ............................4
Lubrication ........................................6
Replacing Agitator Brushes..........5-6
Replacing Belt ..................................5
DOUBLE INSULATED: When servicing,
use only identical replacement parts.
This cleaner meets Occupational Safety
and Health Act (OSHA-29 CFR 1910
Subpart S) requirements.
To reduce the risk of fire, electric shock, or injury:
• Do not use outdoors or on wet surfaces.
• This appliance is provided with double insulation. Use only identical replacement
parts. See instructions for servicing of double-insulated appliances.
• Close supervision is necessary when any appliance is used by or near children.
Do not allow vacuum cleaner to be used as a toy or to run unattended at any time.
• Keep hair, loose clothing, fingers, feet and all parts of body away from openings,
rotating agitator and any other moving parts. Do not operate cleaner in bare feet or
when wearing open toe shoes or sandals.
• Do not pick up anything that is burning or smoking, such as cigarettes, matches, or
hot ashes.
• Do not use to pick up flammable or combustible liquids such as gasoline or fine
wood sandings or use in areas where they may be present.
• Avoid picking up hard, sharp objects with the cleaner. They may damage the cleaner.
• Do not use without dust bag or dirt cup in place. Shake outer bag and empty dirt cup
frequently when picking up very fine materials such as powder.
• Use extra care when cleaning on stairs.
• Do not put any object into openings. Do not use with any opening blocked; keep
free of dust, lint, hair, and anything that may reduce air flow.
• Do not pull or carry by cord, use cord as a handle, close door on cord or pull cord
around sharp edges or corners. Do not run appliance over cord. Keep cord away
from heated surfaces.
• Always disconnect cord from electrical outlet before servicing the cleaner.
• Unplug cleaner when not in use. Turn off all controls before unplugging.
• Do not unplug by pulling on cord. To unplug, grasp the plug, not the cord. Never
handle plug or appliance with wet hands.
• The use of an extension cord is not recommended. If an extension cord is absolutely
necessary, use at least a 16 gauge 3-wire cord which has a 3-prong grounding type
plug and a 3-pole receptacle that accepts the machine plug.
• Do not use with damaged cord or plug. If appliance is not working as it should, has
been dropped, damaged, left outdoors, or dropped into water, take it to a Triple S
Authorized Dealer.
• Use vacuum cleaner only for its intended use as described in this user’s manual.
Use only attachments recommended by Triple S; others may cause
hazards.
Save these instructions!.
© 1988, 1990, 2004
1. Assembling cleaner
Carton contents
1-1
A
C
B
D
Remove all parts from carton and identify each item shown.
A. Upper handle section
B. Lower handle section
C. Cleaner main body and hood assembly
D. Dirt cup assembly
Step 1 Assemble handle
1-2
1-3
H
E
D
F
A
C
G
B
Lower handle assembly
Upper handle assembly
Remove nut, lock washer, bolt and plate (A) from handle
bail (B). Also remove nut, lock washer and bolt from top of
lower handle section.
Insert cord (C) extending from bail through straight lower
handle section, starting at end with large and small holes.
Push lower handle section down into bail. Large hole should
line up with hole in bail.
Reposition plate at back of handle, inserting projection on
plate into small hole and aligning notches on plate with
matching areas on handle bail. Insert bolt through plate;
reassemble lock washer and nut. Tighten nut securely with
screwdriver.
Slide channel (D) of dirt cup assembly (E) over lower
handle section.
2
Pull out receptacle (F) from bottom of upper handle
section.
Connect receptacle to plug (G) extending from top of
lower handle section.
With cord storage hook (H) toward front of cleaner,
slide handle sections together. Align holes.
Insert bolt through square hole on back of handle and
secure with nut through lockwasher. Tighten nut with
screwdriver.
1-4
Please record the serial number,
located on the bottom of the
cleaner, on the front page of
User’s Manual.
1-5
A
D
E
C
E
B
Attach dirt cup assembly to cleaner
The dirt cup assembly is connected
at the rear of the cleaner.
Lower handle to operation position
by depressing handle release lever
(A).
There are two projections (B) on the
metal connector at the bottom of the
dirt cup assembly. These should be
placed firmly inside the grooved
plate (C) at the rear of cleaner.
Slide lock lever (E) to the left and
pivot metal connector fully forward.
When you release the lock lever, it
will move to the right. Push lever to
fit completely over the bag lock (D)
(Fig. 1-4).
Attach the spring on the top of the
dirt cup assembly to the spring hook
located on the back of the handle.
Plug cord into electrical outlet and
push switch down to turn cleaner
“ON”, making sure cleaner operates.
Turn cleaner “OFF”, unplug and loop
cord around cord storage hooks.
2. How to use
Cleaner description
2-1
The assembled cleaner will look like the
drawing.
7
6
8
9
5
4
10
11
3
2
1
12
13
1. Hood
2. Carpet height adjustment lever:
adjusts nozzle to carpet pile height;
LOW, NORMAL, HIGH and SHAG
3. Handle bail/carrying handle
4. Dirt cup
5. Cloth bag
6. Cord storage hook: loop cord over
hook for storage
7. ON-OFF switch: push switch down
to turn cleaner ON; push switch up
to turn cleaner OFF
8. Spring hook: place spring on hook
to support bag
9. Bag closure clip
10. Handle
11. Latches: located on both sides of
dirt cup to lock dirt cup into position
12. Handle release lever: step on lever
to lower handle to operating and low
positions
13. Furniture guard: helps prevent
cleaner from marking furniture
Continued ➜
3
Operate cleaner only at voltage
specified on data plate on bottom of
cleaner.
WARNING: Electrical shock could
occur if used outdoors or on wet
surfaces.
To reduce the risk of electric shock,
this appliance has a polarized plug
(one blade is wider than the other).
This plug will fit in a polarized outlet
only one way. If the plug does not fit
fully in the outlet, reverse the plug. If
it still does not fit, contact a qualified
electrician to install the proper outlet. Do not change the plug in any
way.
Carpet height
adjustment
Edge cleaning
It is necessary to raise and lower the
nozzle for various carpet pile
heights.
For best results, the lever is conveniently adjusted by hand.
Select the adjustment for the carpet
pile height by using the chart below
as a guide.
A passageway on the cleaner bottom plate improves the cleaning of
carpet near baseboards and solid
furniture. Slowly guide either side of
cleaner along edge of carpet.
Disconnect cleaner from electrical
outlet before attempting to service
it in any manner.
LOWEST POSITION (lever completely forward) - for short pile
and indoor-outdoor type carpet
NORMAL POSITION (one notch
down) - for carpet with normal pile
height and for removing loose dirt
from hard surface floors
HIGH POSITION (two notches
down) - for carpet with normal pile
height but thicker density
HIGHEST POSITION (lever completely down) - for very long or
very thick pile carpet
Note: If the cleaner is difficult to
push, move lever to next higher setting. This will decrease the belt load
and pushing effort.
3. Maintenance
The dirt cup
The dirt picked up by the cleaner is
deposited into the dirt cup. When
empty, the cup can be cleaned with
a damp cloth or rinsed with water.
Be sure cup is dry before using.
Emptying dirt cup
Frequently check the dirt level in the
dirt cup. It is recommended that
you empty cup when dirt level
reaches “Full Line” on back of
cup (Fig. 3-1). If more dirt is allowed
to accumulate, your cleaner may not
operate effectively and spillage may
occur when cup is removed.
Peak performance of your cleaner
can be maintained by turning the
cleaner OFF, unhooking bag spring,
shaking the bag, and emptying the
dirt cup frequently before it
becomes full.
How to empty
3-2
Turn cleaner OFF and disconnect
from electrical outlet.
Place handle in operating position
and unhook spring from handle.
While holding bag closure clip,
shake bag vigorously to release dirt
accumulated in bag.
Rehook spring and place handle in
upright position. Allow a few seconds for dirt to settle in cup.
RIGHT
3-1
A
A
WRONG
While supporting bottom of cup,
release the two latches (A) by
pulling them outward.
Remove cup and empty it.
Reposition cup into support at bottom of bag and snap latches into
position.
To prevent leaking, dirt cup must be
positioned flat against dirt tube as
shown.
Power cord
To reduce twisting of the power
cord, start coiling cord at connection
to cleaner. Store coiled cord on cord
storage hook.
4
Agitator belt
3-3
A
3-4
B
When to replace
Disconnect cleaner from electrical outlet
before checking or replacing belt.
To check the belt, remove bottom
plate (see following section). If belt is
stretched, cut or broken, or if the agitator brushes are being replaced,
replace belt.
C
How to replace
Turn cleaner over. Remove bottom
plate by releasing latches (A).
What to buy
When replacing belt, ask for part
No. 44783.
3-5
Agitator brushes
D
Release worn belt from pulley.
Lift out agitator, remove old belt and
place new belt in groove of agitator.
Replace agitator. On one end of agitator roll there is a raised metal plate
(B). Make sure that this end is
placed in slotted side of cleaner (C).
3-6
Disconnect cleaner from electrical
outlet before checking or replacing brushes.
When to replace
A
Place belt on pulley (D). Side of
belt nearer cleaner should be in
line with ribs on bottom of
cleaner.
To replace bottom plate, place metal
knobs on front end of plate in wire
holders. Check to see that latches
(A) are pushed back and will not be
covered by plate. Place plate in
position and latch securely.
3-7
To check condition of brushes,
move edge of a card across agitator
opening while turning agitator by
hand. Replace brushes if they do
not touch edge of card.
Note: The agitator belt should be
replaced each time the brush roll is
replaced.
What to buy
When purchasing new brushes, ask
for part No. 48445001.
3-8
How to replace
Disconnect cleaner from electrical
outlet.
1. Remove bottom plate, belt and
agitator.
2. Turn end plates of agitator (A) in
opposite directions until one end
plate comes off.
3-9
C
B
3. Then pry out end section (B) as
shown.
A
4. Remove opposite end plate and
shaft by pulling straight out. Pry
out remaining end section.
5. Pull brushes (C) out of agitator
slots, using pliers if necessary.
Slide new brushes completely into
channels.
5
3-11
3-10
E
F
G
D
6. To reassemble, replace last end
section removed, then end plate
and shaft. Replace remaining end
section and end plate. Be sure
end sections are assembled with
locator (D) lined up with slot in
agitator.
Note: Should you accidentally displace the bearing during disassembly,
reassemble as shown.
Place new belt in groove on agitator.
Replace agitator bottom plate as
directed when replacing belt.
If you have a
problem
Problem: Cleaner hard to push
If a minor problem occurs, it usually can
be solved quite easily when the cause is
found by using the check list below.
Problem: Cleaner won’t run
Possible cause
Possible solution
•
•
•
•
•
•
Not firmly plugged in
Plug unit in firmly
No voltage in wall plug
Check fuse or breaker
Blown fuse/tripped breaker
Replace fuse/reset breaker
Problem: Cleaner won’t pick up
Possible cause
Possible solution
• Broken or worn belt
• Replace belt
• Agitator brushes worn
• Replace brushes
• Dirt cup full
• Empty dirt cup
• Incorrect carpet height setting
• Lower carpet height setting
• Bag dirty
• Unhook and shake bag
6
Possible cause
Possible solution
•
•
•
•
Incorrect carpet height setting
Raise carpet height setting
Belt on backwards
Position belt correctly
Lubrication
The motor is equipped with bearings which contain sufficient lubrication for the life of the motor. The
addition of lubricant could cause
damage. Do not add lubricant to
motor bearings.
The agitator is equipped with two
ball bearings that should be lubricated periodically by a Triple S
Authorized Dealer.
Service
To obtain approved Triple S service
and genuine Triple S parts, contact
a Triple S Authorized Dealer.
Always identify your cleaner by the
complete model number when
requesting information or ordering
parts. (The model number appears
on the bottom of the cleaner.)
Servicing of
double-insulated
appliances
This vacuum cleaner is double insulated. In a double-insulated appliance, two systems of insulation are
provided instead of grounding. No
grounding means is provided on a
double-insulated appliance, nor
should a means for grounding be
added. Servicing a double-insulated
appliance requires extreme care and
knowledge of the system, and
should be done only by qualified
service personnel. Replacement
parts must be identical to those
parts being replaced. A doubleinsulated appliance is marked with
the words “DOUBLE-INSULATION”
or “DOUBLE INSULATED”. The symbol
may also be marked on the
appliance.
7