1
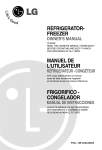
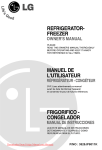
HOUSEHOLDHOUSEHOLDFREEZER BOX
GB 388
Instruction Manual
Contents
Introduction...................................................................................................................................Page 3
General Notes……………………………………………………………………………………….…….Page 3
Special safety information for this unit…………………………………………………………………..Page 3
Unpacking the appliance…………………………………………………………………………..…..…Page 5
Overview of the appliance……………….……………………………………………….………..……..Page 5
Installation…………….……...…………………………………..……………………………...………...Page 5
Reverse the door opening...…………………………………..………………..…………….……….....Page 6
Startup / Operation………....…………………………………..……………………………..…….……Page 7
Tips for Energy saving……………...….………………..……………………...……………..………..Page 10
Cleaning….....…………………………………………………..……………………………..……..…..Page 10
Repairs…………………………………………………………………………………………………....Page 11
Troubleshooting………………………………………………………………….……...…………...….Page 11
Technical Data……………...…………………………………..……………………………..…………Page 12
Disposal….…………………..…………...…………………....……….……………………..……..…..Page 13
2
Introduction
Introduction
Thank you for choosing our product. We hope you will enjoy using the appliance.
Symbols in the
these Instructions for Use
Important information for your safety is specially marked. It is essential to comply with these instructions in order to avoid accidents and prevent damage to the machine:
WARNING:
This warns you of dangers to your health and indicates possible injury risks.
CAU
CAUTION:
This refers to possible hazards to the machine or other objects.
NOTE:
NOTE: This highlights tips and information.
General Notes
Read the operating instructions carefully before putting the appliance into operation and keep the instructions including the warranty and the receipt. If you give this device to other people, please also
pass on the operating instructions.
• The appliance is designed exclusively for private use and for the envisaged purpose. This appliance is not fit for commercial use.
• The appliance is only to be used as described in the user manual. Do not use the appliance for any
other purpose. Any other use is not intended and can result in damages or personal injuries.
• Do not use it outdoors. Keep it away from sources of heat, direct sunlight and humidity.
• When cleaning, for user maintenance work or with disruption, switch off the appliance and always
pull out the plug from the socket (pull the plug itself, not the lead).
• The device and the mains lead have to be checked regularly for signs of damage. If damage is
found the device must not be used.
• For safety reasons, alterations or modifications of the device are prohibited.
• In order to ensure your children’s safety, please keep all packaging (plastic bags, boxes, polystyrene etc.) out of their reach.
WARNING:
WARNING:
Do not allow small children to play with the foil. There is a danger of suffocation!
Special safety information for this unit
• This unit is intended to be used in household and similar applications such as
-
staff kitchen areas in shops, offices and other working environments;
-
farm houses and by clients in hotels, motels and other residential type environments;
-
bed and breakfast type environments;
3
-
catering and similar non-retail applications.
WARNING:
• Keep ventilation openings, in the appliance enclosure or in the built-in structure,
clear of obstruction.
• Do not use mechanical devices or other means to accelerate the defrosting process.
• Do not damage the refrigerant circuit.
• Do not use electrical appliances inside the food storage compartments of the appliance.
• Do not store explosive substances such as aerosol containers with flammable
propellant in the appliance.
• This appliance can be used by children aged from 8 years and above and persons
with reduced physical, sensory or mental capabilities or lack of experience and
knowledge if they have been given supervision or instruction concerning use of the
appliance in a safe way and understand the hazards involved.
• Children shall not play with the appliance.
• Cleaning and user maintenance shall not be made by children unless they are
older 8 years and supervised.
• Do not try to repair the appliance on your own. Always contact an authorized technician. To avoid the exposure to danger, always have faulty cable be replaced only
by the manufacturer, by our customer service or by qualified person and with a
cable of the same type.
• Use the provided collection points of electrical equipment for the disposal of the
appliance.
Coolant
WARNING:
The coolant circuit of this device contains the refrigerant Isobutane (R600a), a natural gas that is
flammable and of high environmental compatibility. Make sure no parts of the coolant circuit get damaged during transport and installation of the device.
If the coolant circuit is damaged:
• It is imperative to avoid any open flames or ignition source.
• Thoroughly air the room in which the device is installed.
4
Unpacking the appliance
1. Remove the appliance from its packaging.
2. The device and parts of the interior are protected for transport. Remove all adhesive tapes from the
unit door. You may remove adhesive residue with a cleaning solvent. Also remove any adhesive
tapes and packaging materials from the inside of the device.
3. To prevent hazards, check the appliance for any transport damage.
4. In case of damage, do not put the device into operation. Contact your distributor.
NOTE:
NOTE:
Production residue or dust may have collected on the appliance. We recommend cleaning the appliance according to chapter “Cleaning”.
Overview of the appliance
NOTE:
NOTE:
The drawing can deviate from the original device.
1
Adjustable thermostat
2
Compressor
3
Device door
4
Fixed grid shelf
Delivery scope
1 x ice-cube tray
Installation
Conditions for the installation location
• Sufficient ventilation around the device is necessary in order for the heat to dissipate properly and
to guarantee efficient cooling operation at low power consumption. For this purpose, leave sufficient space around the device.
-
minimum distance of 7,5 cm between rear side and wall;
-
at least 10 cm on both sides;
-
and on top of the device 10 cm.
-
Leave proper space in front of the device in order to open the door at an angle of 160°.
5
• Only install at a location with an ambient temperature suitable for the climate class of the device.
For information on the climate class, please refer to chapter “Technical data” or to the rating label
located in the interior or on the rear side of the device.
• Place the device on a steady and safe surface. If the device is not horizontally leveled, adjust the
feet accordingly.
• Install the device for the wall socket to be freely accessible.
• Avoid the installation:
-
near heaters, next to a stove, direct sunlight or any other heat sources;
-
at locations with high humidity (e.g. outdoors, bathroom), as metal parts would be susceptible
to corrosion under such circumstances;
-
near volatile or flammable materials (e.g. gas, fuel, alcohol, paint, etc.) and in rooms which
may have poor air circulation (e.g. garages).
Electrical connection
connection
WARNING
For your personal safety:
• Do not use an extension cord or an adapter plug.
• Do not, under any circumstances cut or remove the earthing connection from the power cord.
CAUTION:
In case you disconnect the device or in case of power failure: Wait for 5 minutes before restarting the
device.
• Make sure that the mains voltage to be used matches that of the device. You can find this information on the rating label of the device.
• Connect the device to a duly installed protective contact socket.
• Let replace the contact socket by an authorized specialist if this is not suitable for the power plug.
• The connection should be easily accessible in order to can pull the plug from the socket in case of
emergency.
Reverse the door opening
If required, the door opening can be moved from the right (supplied condition) to the left side.
WARNING:
When replacing the door stop, the device must be disconnected from the power supply. Always unplug
the device first.
NOTE:
NOTE:
You need: screw wrench no. 8, Phillips screwdriver as well as a thin-blade screwdriver.
6
1
Blind plug
2
Hinge cover
3
Screws
4
Upper door hinge
5
Lower door hinge
6
Screws
7
Foot
8
Separate foot
9
Blind plug
1. Use a flat thin-blade screwdriver to remove the blind plug (1) and the hinge cover (2).
2. Tilt the device slightly backwards and block it in this position.
3. Dismount the upper door hinge (4) by unscrewing the screws (3).
4. Open the door a little and take it carefully from the lower door hinge (5). Shift the blind plug (9) at
the other device side. Place the door on a padded surface to prevent it from scratches.
5. Dismount the lower door hinge (5) incl. foot (7) by unscrewing the screws (6).
6. Screw the separate foot (8) off.
7. Transfer the lower hinge (5) incl. foot (7) at the opposite device side and fix it with the screws (6).
8. Screw the separate foot (8) at the corresponding opposite side in again.
9. Replace the device in the upright position again. Insert the device door on the hinge pin of the lower door hinge (5) and fix the door at the allocated position.
10. Attach the upper door hinge (4) by using the screws (3) at the corresponding opposite device side.
11. Put the blind cap (1), which has been removed at the beginning, to the uncovered hole at the opposite side. Clip the hinge cover (2) on again.
12. Check if the door is arranged vertical as well as horizontal, so that a smooth opening and closing of
the door is ensured.
Startup / Operation
Prior to first use
CAUTION:
After transport, the device should be left standing for 4 hours in order for the oil to be collected in the
compressor. Nonobservance could cause damage to the compressor and hence result in failure of the
device. This would void your warranty claim.
• Clean the interior of the device including all accessory parts located inside. Please consider the
instructions that we have included for you in the chapter on “Cleaning”.
7
Turning on
Turn on the device by connecting the plug to a wall socket and turning the temperature control, which
is located at the device back side. Please also refer to chapter "Settings”.
Settings
Turn the temperature control clockwise. The Settings 1 MIN – 5 MAX regulate the inside temperature.
Setting 1 (or MIN)
=
lowest setting (warmest inside temperature)
Setting 5 (or MAX)
=
highest setting (coldest inside temperature)
Turning the temperature control clockwise will lower the inside temperature. Please keep in mind that
the temperature changes with the ambient temperature (of the location), with the frequency of opening
the door and the amount of food in the device.
During initial operation, turn the temperature control to the highest setting first, until the device has
reached the desired operating temperature. Afterwards it is recommended to turn the control back to a
medium setting; correcting the temperature at a later point would then be easier.
Storing food
The
freezer allows you to store frozen food at a temperature of -18°C or below (from a middle
temperature control setting) for several months, to produce ice cubes and to freeze fresh good.
The temperature of the device is automatically controlled by the temperature control.
Due to external influences such as room temperature, placements, frequency of opening the door and
the amount of food the temperature in the freezer can be influenced.
Freezing
• 24 hours before freezing we recommend turning the temperature control to the max. setting and to
keep this setting even after freezing for a few hours.
The device is not compromised if the setting will not revert to a normal operating temperature (temperature control in middle setting) after the freezing process, but for economic reasons you should
possibly avoid it.
• Place fresh food to be frozen in the upper compartment. In order for that to be always possible,
frozen food items need to be rearranged frequently.
• Fresh food should be frozen as fast as possible to the core. Therefore during freezing operation,
the temperature of fresh food should be lowered as fast as possible in order to keep formation of
ice crystals as little as possible and not to damage the food structure.
• If the freezing process is too slow, ice crystals build up and the food quality might get affected.
• Even frozen food should be stored in the lower compartments, in order to keep the upper compartment available for fresh food.
• Frozen food should be kept in contact with the bottom of the compartment.
• Keep a space between the single items for air circulation.
8
Storing frozen food
• Packed frozen merchandise should be stored in a 4-star-freezer compartment in accordance with
the manufacturer’s data. Make sure the food items do not defrost after purchase and to store them
as fast as possible in the freezer.
• It is possible to store food for longer periods of time, up to three months. This period might vary, so
please observe the storage information on the packaging of the merchandise.
NOTE:
NOTE:
Make sure that the temperature in the freezer does not rise above -18°C.
Moreover the device should be defrosted regularly. A thick layer of ice on the wall deteriorates the
cooling effect and the power consumption increases.
Safety precautions
• Do not store sizzling drinks in this device, such as mineral water, beer, sparkling wine, coke etc.
(risk of explosion).
• Once products have been defrosted halfway or completely, they should be consumed as soon as
possible and should not be frozen again, except they have been processed to a ready meal.
• In case of power failure, do not open the door. If the failure does not take longer than 12 hours, the
food will not be affected.
• Do not store bottles or cans. These can break when the contents freeze – or even explode, if they
contain carbonated drinks.
• Do not eat food that is still frozen. Do not allow children to eat ice cream directly from the freezer.
The cold can cause injuries in the oral cavity.
• Touching metal parts inside the device can cause symptoms similar to burns if the skin is very sensitive.
• Do not touch frozen food with moist or wet hands; they could freeze to the items.
Defrosting
To achieve better cooling and to save energy, defrost the freezer regularly. To start the defrosting
process disconnect the plug. Remove the food items and keep covered at a cool location. When the
ice has melted, pour the condensate away and dry the interior of the device. You may then restart the
device by connecting the plug and turning the temperature control.
CAUTION:
Never use metal objects (e.g. knives) for removing ice from the vaporizer. The vaporizer could be
damaged. A defect vaporizer could cause serious damages.
NOTE:
In order to speed up the defrosting process you may put a bowl of warm water (about 50°C) into the
freezer chamber.
9
Operating noise
Type of sound
Mumbling
Cause / solution
Caused by the compressor during its operation.
This is stronger when it turns on or off.
Normal
Liquid sounds
Caused by the circulation of the refrigerant in the device.
noise
Click sounds
The temperature control turns the compressor on or off.
Disturbing noises
Vibration of shelves or cooling coils – check if those are
securely fastened.
Turning off
Disconnect the plug in order to turn off the de
device.
If the device will not be operated for a longer period of time:
• Remove the entire food from the device.
• Disconnect the plug or turn off / unscrew the fuse.
• Thoroughly clean the device (see “Cleaning”).
• Keep the door open in order to prevent bad odors.
Tips for Energy
Energy saving
saving
• Disconnect the plug if you do not use the device.
• Do not install the device near stoves, heaters or other heat sources. In case of higher ambient
temperatures, the compressor will run more frequently and longer.
• Ensure sufficient ventilation at the bottom and rear side of the device. Never block any ventilation
openings.
• Allow warm dishes to cool down before putting them in the device.
• Do not open the door longer than necessary.
• Make sure that the temperature in the device does not rise above -18°C.
• The freezer should be defrosted regularly.
• Make sure the door sealing is in good order for the door to close properly.
Cleaning
For hygienic reasons, clean the interior and accessory parts regularly.
WARNING:
• Always turn off the device or rather disconnect the plug or turn off / unscrew the fuse before cleaning and user maintenance.
• Do not use steam cleaners for cleaning the device; moisture could enter electrical components.
Risk of electric shock! Hot steam could damage the plastic parts. The device must be dry before
restarting operation.
10
CAUTION:
• Do not use a wire brush or any abrasive items.
• Do not use any acidic or abrasive detergents.
• Essential oils and organic solvents, such as the juice of lemon or orange skin, butanoic acid or
cleaning agents containing acetic acid can damage plastic parts. Prevent contact of any part with
such substances.
• Do not bend the cooling coils.
Please do as follows:
• Remove all food and keep covered at a cool location.
• Use warm water and a mild detergent for cleaning the interior (including rear side and bottom).
• After everything was thoroughly dried, you can restart the operation.
Repairs
A wrong or improperly performed repair brings danger to the user.
Repairs to electrical appliances must only be carried out by an authorized specialist. A damaged power cord must be changed only by a qualified electrician.
Troubleshooting
Befor
Before
ore you contact an autho
authorized specialist
The following problems can be solved by you by checking for the possible cause.
Problem
The device is not
working properly
or at all.
Possible cause
Solution
Is the unit not connected to mains pow-
Insert the plug properly in the contact
er?
socket. Check the fuse.
Is the temperature control properly set?
Check the temperature setting.
Is the place unqualified?
Check the ambient temperature.
Do food items prevent the door from
Arrange the food or shelves and/or drawers
closing properly?
properly.
Are the ventilation openings clear of
Unblock the ventilation openings, install the
obstruction?
device freely.
Loud noise during
Does the device not stand vertical or
operation.
horizontal?
Water on the bottom.
Adjust the feet accordingly.
Liquid flow sounds in the cooling circuit are
normal.
Is the temperature control set properly?
Check the temperature setting.
Water on the outer
On days of high humidity, condensation might occur on the outer surface of the
surface.
device. This is no malfunction; you may simply wipe the water off.
11
NOTE:
If a problem still persists after following the steps above, please contact your distributor or an authorized technician.
Technical Data
Technical data of household refrigerators
refrigerators according to:
EU Directive (EU) 1060/2010
1060/2010
Brand
Bomann
Model
GB 388
Category
8
1)
Energy
Energy efficiency class 2)
A++
A+++ (highest efficiency) to G (lowest efficiency)
Consumption data
Annual energy consumption 3)
kWh
Net capacity total
Start rating
l
117
30
4
4)
Frost-free
-
Temperature rinse time
h
Freezing capacity
kg/24h
Climate class 5)
12
3
N-ST
Noise level
dB(A) re 1pW
Design
40
Free standing
Measures / weights
Height
cm
51,0
Width
cm
43,9
Depth
cm
47,0
Net weight
kg
16,0
Electrical connection
Compressor
70 W
Connection voltage
220-240 V~, 50 Hz
Protection class
I
1) Category: 1 = Refrigerator with one or more fresh-food storage compartments, 2 = Refrigerator-cellar, Cellar and Wine storage appliances, 3 = Refrigerator-chiller and Refrigerator with a 0-star compartment, 4 = Refrigerator with a one-star compartment, 5 = Refrigerator with a two-star compartment, 6 = Refrigerator with a three-star compartment , 7 = Refrigeratorfreezer, 8 = Upright freezer, 9 = Chest freezer, 10 = Multi-use and other refrigerating appliances
2) A+++ (highest efficiency) to G (lowest efficiency).
3) Annual energy consumption „XYZ“ kWh per year based on standard test results for 24 h.
Actual energy consumption will depend on how the appliance is used and where is located.
4) *
= compartment: a frozen-food storage compartment in which the temperature is not warmer than -6°C.
12
**
= compartment: a frozen-food storage compartment in which the temperature is not warmer than -12°C.
***
= compartment: a frozen-food storage compartment in which the temperature is not warmer than -18°C.
*(***) = food freezer compartment in which the temperature is not warmer than -18°C and a min. freezing capacity in 24 h.
5) Climate class SN: ambient temperature of +10°C up to +32°C.
Climate class N: ambient temperature of +16°C up to +32°C.
Climate class ST: ambient temperature of +16°C up to +38°C.
Climate class T: ambient temperature of +16°C up to +43°C.
The right to make technical and design modifications in the course of continuous product development
remains reserved.
All device-specific data of the energy label have been determined by the manufacturer under laboratory conditions in accordance with pan-European standardized measuring methods. These are regulated by ISO EN 15502.
15502 The actual energy consumption depends on the usage and might therefore also
be above the values determined by the manufacturer under standard conditions.
An expert knows these relations and will execute the tests with special measurement instruments in
accordance with the regulations in place.
This device has been tested according to all relevant current CE guidelines, such as electromagnetic
compatibility and low voltage directives, and has been constructed in accordance with the latest safety
regulations
Disposal
Meaning of the “Dustbin” Symbol
Protect our environment; do not dispose of electrical equipment in the domestic waste.
Please return any electrical equipment that you will no longer use to the collection points provided for
their disposal.
This helps avoid the potential effects of incorrect disposal on the environment and human health.
This will contribute to the recycling and other forms of reutilization of electrical and electronic equipment.
Information concerning where the equipment can be disposed of can be obtained from your local authority.
WARNING:
Remove or disable any existing snap and bolt locks, if you take the device out of operation or dispose
it.
13
www.bomann.de
14
Stand 02/14
C. Bomann GmbH
GmbH