1
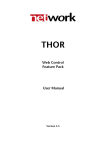
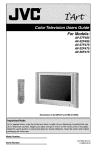
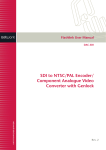
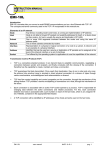
THOR
Configurable Control GUI
Feature Pack
User Manual
Version 3.5
THOR FP – Configurable Control GUI
Version 3.5
Network Electronics ASA
Thorøya
P.O. Box 1020
Sandefjord, Norway
Phone: +47 33 48 99 99
Fax: +47 33 48 99 98
E-mail: [email protected]
www.network-electronics.com
Service Phone: +47 90 60 99 99
Revision history
Current revision of this document is the uppermost in the table below.
Revision Replaces
3.5
3.0
2.9
2.0
1.95
1
0
3.0
2.9
2.0
1.95
1
0
-
Date
27/06/05
24/11/04
25/02/04
01/06/02
05/04/02
25/09/01
02/02/01
Change description
Updated to reflect SW release 3.5
Updated to reflect SW release 3.0
Updated to reflect SW release 2.9
Updated to reflect SW release 2.00
Updated to reflect SW release 1.95
Updated and expanded to include User Guidance
Initial Revision
2
THOR FP – Configurable Control GUI
Version 3.5
Contents
Revision history............................................................................... 2
1 Feature Pack - Introduction.......................................................... 4
2 Installation................................................................................... 5
3 Configurable Control GUI............................................................ 6
3.1 Open GUI ....................................................................................................6
3.2 Control GUI Editor.......................................................................................7
3.2.1 Control GUI Editor Menu bar
8
3.2.2 Input Button
9
3.2.3 Output Button
9
3.2.4 Input to Output Button
10
3.2.5 Group Input Button
10
3.2.6 Group Output Button
11
3.2.7 Group Input to Output Button
11
3.2.8 Salvo Button
12
3.2.9 Salvo Panel Button
12
3.2.10 Control Input and Output with Take
13
3.2.11 Matrix View Button
13
3.3 Control GUIs and 3rd party HTML editors .................................................14
3
THOR FP – Configurable Control GUI
Version 3.5
1 Feature Pack - Introduction
This document describes how to install and use Configurable Control GUI
Feature Pack of the THOR – Router Management System, Version 3.5.
Configurable Control GUI
- Custom creatable Control GUIs for control and monitoring purpose.
- GUIs can be created with THOR Virtual Editor or with other HTML
editors, such as Microsoft FrontPage.
- GUIs stored as HTM files, for use with Internet Explorer or other WEB
browsers.
4
THOR FP – Configurable Control GUI
Version 3.5
2 Installation
If you received this Feature Pack together with your THOR Main Package, you
may skip this Chapter, because then you install both Main Package and
Feature Pack(s) all together in one operation.
However, if you purchased this Feature Pack separately, installation of this
Feature Pack is simply a matter of entering the correct Product Key in the
Product Key Manager of THOR.
Each Feature Pack purchased separately comes with a unique Product Key.
In order to add this to your existing system, use the Product Key Manager that
you will find under the Help pull down menu. The following view appears:
Figure 1:
Product Key Manager
In this view, just add the new Feature Pack Product Key, and press Add.
It is also possible to select an installed Feature Pack, and remove it, by pressing
Delete.
The number of active Feature Packs is listed in the Software Status view.
Press Done when finished.
Note:
THOR Configurable Control GUI will not work unless “Microsoft
Internet Explorer 5.0”, or higher, is installed on your computer.
5
THOR FP – Configurable Control GUI
Version 3.5
3 Configurable Control GUI
You may create your own control and monitoring views with a graphical
editor. These views are called Control GUIs and the files are stored as web
compatible files, using Microsoft ActiveX Technology. This technology makes
it perfect to put your GUIs on a web server. Together with LAN Multi User
Feature Pack, it allows you to control your router via your local network and
web interface.
Note:
The WEB interface will only work on Microsoft Windows platforms.
3.1 Open GUI
To open, edit or view GUIs in THOR, use either file menu (Control ->
Configurable Control GUI) or toolbar button “Configurable Control GUI”.
Figure 2:
Virtual View Main view
The following functions are available in the Virtual View dialog:
- New GUI
Opens the Virtual View Editor with an empty Virtual View. Here you can
add components, configure them and make your own view. Virtual View
Editor is described in chapter 3.2.
- Modify GUI
Opens the Virtual View Editor with the selected Virtual View. You can then
edit your view, change position, configuration etc. Virtual View Editor is
described in chapter 3.2.
- Delete GUI
Use this to delete the selected Virtual View.
- Desktop
Use this to create a shortcut to the selected Virtual View on the desktop. It
is very useful when you want a quick way to open any Virtual View.
6
THOR FP – Configurable Control GUI
-
Version 3.5
View GUI
Open the selected Virtual View and you may start controlling the system.
Done
Exit the Virtual View dialog.
Figure 3:
Control GUI (example)
3.2 Control GUI Editor
The THOR Control GUI Editor is a program used to create GUIs. The program
applies drag and drop function to create the GUIs.
Figure 4:
Control GUI editor
7
THOR FP – Configurable Control GUI
Version 3.5
3.2.1 Control GUI Editor Menu bar
Figure 5:
Virtual View editor menu bar
Input Button (Large)
Input Button (Small)
Output Button (Large)
Output Button (Small)
Input to Output Button
Group Input Button
Group Output Button
Group Input to Output Button
Salvo Button
Salvo Panel Button
Control Input and Output with Take
Matrix View Button
To add a router function to the page, just press the symbol. A control function
will then be added to the virtual page. You may place the symbol where you
want it on the page.
For each symbol that is applied to the Virtual View, the property of the
assigned control function has to be determined. Double clicking on the
control symbol does this.
When a Virtual View has been created, save the view. The Virtual View that has
just been created may now be opened, and used, in THOR – Router
Management System.
8
THOR FP – Configurable Control GUI
Version 3.5
3.2.2 Input Button
Select router and source name to associate with the Input Button. It is possible
to marry Audio and Video enabling the “Married, if possible” option.
Figure 6:
Input Button property page
If you have a router system with more than one router, you may want your
input buttons to work with all of them. Note: This is only possible with the
router input buttons; router output buttons are unique for each router output.
By selecting Active with all VikinX routers in the above dialog, your input
buttons stay active for all routers, independent of which router’s output
button has been pressed. This means that you may have only one set of input
buttons that work for any of the routers in your system. This saves you space
in your Virtual View with more than one router.
3.2.3 Output Button
Select router and destination for the Output Button.
Figure 7:
Output Button property page
9
THOR FP – Configurable Control GUI
Version 3.5
3.2.4 Input to Output Button
Select router, source and destination for the Input to Output Button. It is
possible to make Audio/Video following by enabling the “Audio/Video
follows” option.
Figure 8:
Input to Output Button property page
3.2.5 Group Input Button
Select group switching view and input group for the Group Input Button.
Figure 9:
Group Input Button property page
10
THOR FP – Configurable Control GUI
Version 3.5
3.2.6 Group Output Button
Select group switching view and output group for the Group Output Button.
Figure 10:
Group Output Button property page
3.2.7 Group Input to Output Button
Select group switching view, input group and output group for the Group
Input to Output Button.
Figure 11:
Group Input to Output Button property page
11
THOR FP – Configurable Control GUI
Version 3.5
3.2.8 Salvo Button
Select Salvo to associate with this Salvo Button. It is possible to give the Salvo
Button a specific name.
Figure 12:
Salvo Button property page
It is also possible to select a button colour, different from the default colour.
This option is available under the Color tab.
3.2.9 Salvo Panel Button
Select all salvos to include in the Salvo Panel. It is possible to give the Salvo
Panel a specific name.
Figure 13:
Salvo Panel Button property page
12
THOR FP – Configurable Control GUI
Version 3.5
3.2.10 Control Input and Output with Take
This control has no property page. It only works in combination with Input
buttons (see Chapter 3.2.2) and Output buttons (see Chapter 3.2.3) in your
Virtual View. During operation, you first select a router output, and then an
input, and use the Take button execute the switch.
Figure 14:
Control Input and Output with Take
3.2.11 Matrix View Button
Select which Matrix View to view in the Matrix View component.
Figure 15:
Matrix View Button property page
13
THOR FP – Configurable Control GUI
Version 3.5
3.3 Control GUIs and 3rd party HTML editors
If you want to create a more customized Control GUI page, you may use other
HTML editors, such as Microsoft FrontPage, or Adobe GO live.
How to create Virtual View with Microsoft FrontPage
-
Step 1.
Open Microsoft FrontPage, and create, or open a WEB page.
Step 2.
How to insert the THOR Virtual View component depends on which
version of FrontPage you use.
- FrontPage 2000.
Select menu “Insert”, “Advanced”, and “ActiveX”. The dialog “Insert
ActiveX Control” will pop up.
Figure 16:
MS-FrontPage insert ActiveX Control
The next step is to press “Customize”. A new dialog box will pop up and you
scroll down until you find the components:
- Network.GroupOutput
- Network.GroupInput
- Network.MatrixView
- Network.OutputButton
- Network.InputButton
- Network.SalvoButton
- Network.SalvoGroup
14
THOR FP – Configurable Control GUI
Figure 17:
Version 3.5
ActiveX Control configuration
Select all of them, and press “OK”.
You will now find the THOR ActiveX control in the dialog “Insert ActiveX
Controls”. In order to insert the THOR Control GUI component into the page,
you select one of the network items and press “Ok”. The component will now
appear on your WEB page. You may configure the component by double
pressing on the component in the WEB page.
Note:
You must store the web page in the THOR configuration folder in
order to use it together with other THOR Control GUIs.
15