1
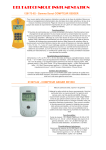
GEIGER COUNTER
RADEX RD1503
CONTENTS
Precautions to be taken before use
Presentation of the Radex Geiger Counter
Information on radioactivity
Threshold levels of radioactivity
Calculation of average doses
Layout of the Radex Geiger Counter
LCDscreen
Summary
Positioning of batteries
How to use the menu
How to change the measurement units
Alert threshold
Settings
After sales service
Information
Potential faults
Instructions for use
How to carry out measures correctly
Effects of radioactivity
Natural irradiation
Artificial irradiation
Contamination and concentration
The units
Technical features
Common radioactive objects
Guarantee
2
3
4
4
5
5
6
7
9
11
12
13
14
15
17
17
17
18
20
21
21
22
23
24
25
26
29
PRECAUTIONS TO BE TAKEN BEFORE USE
> Regularly check that the batteries are in good working order. If the
screen indicates nothing or 0 or 1 µRem/h, you need to change the
batteries. Remove them from the counter if it is unused for a long
period of time.
> Do not open the casing, the detection tube is under high voltage
> The counter is not water proof and must therefore not be used in rain
or placed in water. If water happens to seep into the counter, you
must switch it off, wipe it with a soft piece of fabric and put it in a
warm and dry place to dry out the inside of the counter.
> Do not knock or drop the counter and keep from dust and humidity.
> Do not allow aggressive chemical substances like acids, alkali, solvents etc…to drop on the counter and avoid places where these
substances can be found.
> Do not wipe with abrasives
> Do not place the counter in a micro wave oven and do not place it
near an ionizer or ozone generator which has been switched on.
> Do not expose the counter to direct sun or fluorescent light for any
length of time.
> Do not allow foreign bodies to penetrate the counter through its openings.
> The accuracy of the counter is compatible with domestic use. In the
event of extremely abnormal detection, call a specialised organisation.
> If the counter has been stored in a cold place, leave it at room temperature for at least one hour to avoid condensation.
> Do not use the counter otherwise than in the stipulated environment.
3
PRESENTATION OF THE RADEX GEIGER COUNTER
The Radex Geiger counter RD1503 is a particularly sensitive detector
of Beta* particles, and X* and Gamma rays (called ionizing rays). It
measures the Beta* particles and ionizations created by X* and Gamma
rays in 10 second cycles to indicate the 'quantity of energy' transmitted
to matter over a certain amount of time. However, the Geiger counters
cannot identify the different radioactive elements.
The measurement units which are used are micro Rems per hour
(µRem/h) or micro sieverts per hour (µSv/h). They correspond to the
dose received by the human body over a period of one hour.
INFORMATION ON RADIOACTIVITY
Matter is made up of atoms. Each atom consists of a nucleus which is
surrounded by neutrons which gravitate around it like satellites.
Radioactive substances spontaneously produce Gamma or X and/or
Beta particles or sometimes Alpha particles.
Beta particles are electrons. Because of their charge, they react very
strongly to matter. They can travel from a few centimetres to a few
metres through the air. A sheet of aluminium can stop them.
Alpha particles are helium nuclei (2 protons and 2 neutrons). They can
travel a few centimetres through the air. A sheet of paper can stop them.
Gamma rays are electromagnetic rays formed during physical phenomena which take place within the nucleus of the atom. Gamma rays can
produce ions directly or indirectly (ions are atoms or molecules with an
electric charge which is not nil) while they travel through matter. They
can travel dozens of metres through the air. A thick quantity of lead and
concrete can significantly reduce their impact.
* : Tested by the LCIE
4
X rays are similar to Gamma rays but are created during physical phenomena happening at the level of the electronic procession of the
atom. They are used in medicine and can rarely be found in nature.
THRESHOLD LEVELS OF RADIOACTIVITY
There is no threshold under which radioactivity is harmless. Any dose,
even very slight, causes a health hazard. The greater the dose is, the
greater the risk of cancer or genetic anomaly. The relation between the
risk and the dose is considered to be linear. Indeed, the International
commission on Radiological protection (ICRP) proposed in 1990 that
the equivalent of the maximum dose should be of one millisievert per
year, that is to say 11.4µRem/h on average. This norm concerns doses
other than those due to medical examinations or natural radioactivity.
The former norm which is still occasionally used was of 5millisieverts
per year but it included all of these different types of radiation.
The ICRP estimates that each millisievert is responsible for 60 extra
cancers (50 of which are lethal) and 13 genetic anomalies per million
persons.
CALCULATION OF AVERAGE DOSES
You must take into account the radiation levels corresponding to the
places you are usually in and the amount of time you usually spend
there in order to calculate an average dose.
Example:
Dwelling: 20µRem/h, 12 hours a day
Work place: 30µRem/h, 8 hours a day.
Other places: 10µRem/h, 4 hours a day.
Average dose = (20x12) + (30x8) + (10x4) = 520 µRem for 24 hours.
Therefore 520 ÷ 24 = 21.6 µRem/h
5
LAYOUT OF THE RADEX
6
1. Liquid crystal display (LCD)
2. 'Menu' button with its icon displayed on the screen. The button has
three functions: 'menu', 'choose', 'change'.
3. The 'cursor' button with its icon displayed shift on the screen. This
button will be used in the menu as a cursor.
4. The' ON/OFF' button. The button has 4 functions. It enables you
to: switch the counter on, light up the LCD, backtrack in the menu,
switch the counter off.
5. Battery compartment
6. Geiger Muller tube
The icons indicate the function of each button to the user, making
it thus very easy to use. The icons will be described in detail
below.
7
LCD SCREEN
1. Icon showing state of batteries :
- Fully charged batteries
- Run down batteries
- Replacement of batteries needed
2. Units :
-micro Sievert per hour
-micro Roentgen per hour
3. Icon showing the sound alarm threshold levels.
With µSv/h :
-0,30 µSv/h
-0,60 µSv/h
-1,20 µSv/h
With µRem/h :
-30 µRem/h;
-60 µRem/h;
-120 µRem/h.
Or
-Alarm is disactivated
4. Icon showing sound alarm
- Sound alarm activated (high or low level)
- Sound alarm is disactivated
8
5. Backlight icon :
- Backlighr on
- Backlight off
6. Functions of 'ON/OFF' button (see page 6)
7. Measurement results (µSv/h or µRem/h)
8. Functions of the 'CURSOR' button (see page 6)
9. Functions of the 'MENU' button (seepage 6)
10. The icon showing the number of measurement cycles carried out:
- corresponds to the first short measurement cycle
- corresponds to the second short measurement cycle
- corresponds to the third short measurement cycle
- corresponds to one measurement cycle
- corresponds to two measurement cycles
- corresponds to three measurement cycles
- correspond to four or more measurement cycles.
The display of the square in the centre of the screen means that ionizing rays have been detected.
11. Indication of recorded particles
9
SUMMARY
1
2
3
Positioning of batteries
Place two or one 'AAA' battery in the battery compartment. The polarity of the
contacts (+ or -) are indicated
in the compartment.
Switching the counter on
and off.
To switch the counter on,
press on the big button. The
message 'RD1503' will then
appear on the screen. To
switch the detector off, press
on the same button for a long
time.
SCREEN
“RD1503”
Results
The first measurements (dose
debit) will be displayed
within ten seconds.
10
4
5
Enter the menu
Press on the ' Menu' button.
The contents of the menu will
appear. If not modified , the
following features apply:
Measurement units - µSv/h
Alert level -0.30 µSv/h
Audio -low
Lighting -Off
Choice of menu
The movements of the cursor
in the menu are done with the
'Cursor' button. The selection
of choices is done with the
'Menu' button.
CURSOR
6
11
Leaving the menu.
To leave the menu use the
'OFF' button.
To switch the counter off
press on the 'OFF' button until
messages on the screen are no
longer displayed.
INSTALLATION OF BATTERIES
2
1
3
1. Remove the lid of the battery compartment (1),
2. Insert two 'AAA' battery in the battery compartment (3)
3. Replace the lid on the battery compartment.
NB :
1. To carry out long measurements we recommend use of two batte
ries. For short measurements you can use only one battery.
2. Do not use an old battery with a new one.
3. Remove the batteries if you do not need to use the counter for a
long time.
12
HOW TO USE THE MENU.
The menu enables the user to make certain choices. Measurements
are established on entering the menu and re-established on quitting
the menu.
To enter the main menu, press on the 'MENU' button.
The word 'Menu' and a reference number will appear.
A cursor will appear in front of the first item in the menu.
To choose an item, press on the 'CHOISIR' button.
To move on to another item on the menu, use the button to move the
cursor.
To quit the menu use the 'RETOUR' button.
All the choices made in the menu are saved after the counter has been
switched off.
13
CHANGING THE MEASUREMENT UNITS
You can
choose between µ Sv/h
and µ Rem/h.
1. Place the cursor on 'UNITES'. Press on the 'choisir' button and
screen number 2 will appear.
2. Select the measurement unit with the cursor and the symbol
Validate with the 'CHANGER' button.
3. To return to the main menu, press on the 'RETOUR' button.
14
ALARM THRESHOLDS
The 'Alarme' section enables you to choose between three levels of
alert. If the dose debit exceeds the threshold value, a sound signal
will be heard. The measurement unit will correspond to the one previously selected.
1. Place the cursor in front of the word 'ALARME'. Press on the
Button 'CHOISIR'. The screen number 2 will appear.
2. Place the cursor in front of the alarm threshold you wish to select.
Press on the button 'CHOISIR' to validate the chosen unit.
The symbol will appear in front of the threshold you have selected.
3. To return to the main menu press on the 'RETOUR' button.
If no threshold has been selected a 'beep' will be heard each time
an ionizing ray passes through the tube. This is the mode used when
looking for a source of radio activity.
15
ADJUSTMENTS
The 'REGLAGE' section enables you to make adjustments to the
sound alarm and the lighting.
Adjustments to the lighting
1. Place the curser in 'REGLAGE' and press on the button 'CHOISIR'.
Screen number 2 will appear.
2. Select 'ECLAIRAGE' with the cursor. Validate with the 'CHOISIR'
button. Screen number 2 will appear.
3. Select 'ON' or 'OFF' button depending on whether you want to
have your LCD lit up or not. Validate with the button 'CHANGER'.
4. To return to the main menu, press twice on the button 'RETOUR'.
The lighting of the LCD is activated by pressing the big button if the
function 'ECLAIRAGE' enables you to (that is to say, if you have previously selected 'ON'). The lighting is activated for approximately 3
seconds. To prolong use of lighting, you must press the big button
several times. The lighting enables you to see the LCD in the dark. In
day time the use of lighting is not necessary.
Please note that the use of lighting greatly reduces the autonomy of
the counter.
16
Adjustments to the sound alarm
1. Place the cursor on 'REGLAGE', press the button 'CHOISIR'.
Screen number 2 will appear.
2. Select 'AUDIO' with the cursor and the symbol. Validate with the
button 'CHOISIR'. Screen number two will appear.
3. Select 'HAUT', 'BAS', 'SILENCE' with the cursor.
Validate with the button 'CHANGER'.
4. To return to the main menu, press twice on the button 'RETOUR'.
17
AFTER SALES SERVICE
The 'SAV' section indicates the telephone number of our after sales
service in France
1. Place the cursor on 'SAV'. Press on the button 'CHOISIR'.
2. To return to the main menu press on the button 'RETOUR'.
INFORMATION
The section 'INFOS' indicates the Web site of NanoSense where you
will find information and links on radioactivity.
1. Place the cursor on 'INFOS'. Press on the button 'CHOISIR'
2. To return to the main menu press on the button 'RETOUR'.
POSSIBLE FAULTS
Possible fault
Possible cause of
breakdown
No display on screen
when counter is switched on.
Message
on LCD
Batteries have not
been or are incorrectly positioned.
Batteries running low
or empty.
Corrective action
Insert the batteries
correctly. Check
polarities (+/-)
Replace the batteries.
18
HOW TO USE YOUR COUNTER
Switching the counter on
To switch the counter on, press the big button, the screen will display
'RD1503'.
Measuresments
The counter starts to count the ionizing rays as soon
as it is switched on. During the measurement cycles,
each ionisation is recorded and accompanied by an
icon and a short sound signal (if the sound option has
been activated and the threshold level option deactivated).
The display of the icon on the LCD is proportional
to the dose. 10 seconds after switching the counter
on, the first result of the short measurement cycle
and an icon appears:
-Corresponds to a first short measurement cycle
-Corresponds to a second short measurement cycle
-Corresponds to a third short measurement cycle
The second and third short measurement cycles average out with the
previous cycles.
* The short measurement cycle lasts 10 seconds. It is meant to
rapidly provide you with a first result. A more reliable result will be
obtained after a first measurement cycle of 40 seconds indication, a
first numerical result will indicate the quantity of ionizing rays detectedand the side of a square will appear :
19
- Corresponds to one measurement cycle
- Corresponds to two measurement cycles
- Corresponds to three measurement cycles
- Corresponds to four measurement cycles.
- The first measurement result displayed is equivalent to the average
value of 4 short cycles.
- The second result displayed is equivalent to the average value of
two measurement cycles.
- The third result is equivalent to three measurement cycles and all
the following results are equivalent to the average of the 4 preceding results.
In order to calculate the average, the counter analyzes the variations
of the raw values in relation to the results of the previous measurements. If the acceleration exceeds a predetermined value, the last raw
result will be given instead of the average. For example, if the result
of three measurements averages at 0.20µSv/h and the raw value of the
fourth cycle is 0.80µSv/h, the result of the fourth measurement will
not represent an average of the 4 previous cycles and so, 0.80µSv/h
and the icon will appear. This function will enable you to quickly
detect rapid changes in the level of radiation.
Switching the counter off
To switch the counter off, press on the big button 'OFF' and keep button pressed down until all messages disappear from the screen.
20
HOW TO CARRY OUT MEASURES CORRECTLY ?
Because of the statistical nature of radioactivity, the average value of at
least 5 measures carried out under the same conditions can be considered to be of interest, especially in the case of low levels.
The ambient atmosphere is subject to significant fluctuations from one
measurement cycle to another. First, measure the level of radiation
which provides 'the background noise'. You can then analyze actual
objects: position the left side of the counter which has openings close
to the object which is potentially emitting ß or γ rays. If the measurement exceeds the 'background noise' level, the object is radioactive and
the Radex Geiger counter will enable you to estimate the dose debit
when in contact with or at a distance from the object. If the measurement is equal to that of the 'background noise you can, on the basis of
a first analysis, consider that the object is not radioactive. It is however
possible that it contains radioactive elements emitting ß or γ rays but in
too feeble an intensity to emerge from the 'background noise'. These
elements are generally radiotoxic if ingested.
In the event of radioactive contamination of liquids, the measurement
of the dose is carried out above the uncovered surface of the liquid.
The liquid must not come into contact with the surface of the counter
and must not penetrate it. It is recommended that a polythene bag be
used, but not more than one layer, to protect the counter.
To detect an occasional source of radiation, it is best to rely on the
sound signals emitted by the counter.
It is possible to distinguish ß from γ rays by using a filter. A measurement taken without a filter, is the sum of ß + γ rays. With a filter, like
a sheet of aluminium (foil paper), the measurement is of the γ rays only.
The difference is thus the quantity of ß rays.
21
EFFECTS OF RADIOACTIVITY
The ionization of the molecules in the human body can cause disorders
capable of causing cancerous tumours and genetic mutations likely to
create hereditary abnormalities.
Parts of the body most sensitive to radiation (in decreasing order)
1) The reproductive glands of both sexes (hereditary abnormality)
2) Breasts (cancer)
3) Red bone marrow (leukaemia)
4) Lungs
5) Thyroid gland
6) Bones
7) Muscle tissue
8) Skin
NATURAL IRRADIATION
Sedimentary soil : 4µRem/h on average (according to the region)
Granitic soil :
20 times more than sedimentary soil (radioactivity of 8000Bq/kg)
Radon :
This gas is a product of uranium which migrates
through the soil and stagnates in dwellings. It
emits Alpha particles and some Gamma rays.
Cosmic rays* :
3.4µRem/h at sea level (10.3 to 3000m)
The human body : 2.3 to 17.7 µRem/h (linked with ingestion and
inhalation)
Water and food :
5,7 µRem/h (non contaminated products)
ARTIFICIAL IRRADIATION
Medical :
11.4 µRem/h average/year (x rays, radiotherapy)
22
T.V screen :
Nuclear tests :
0,11 µRem/h
51.3 µRem in 50 years (average diluted atmospheric fallout)
Etc ............
* Cosmic rays are reduced by the atmosphere, their effects are thus
increased with altitude. The level can reach 300µRem/h in an plane at
an altitude of 10 000 m, especially near the North or South Pole.
7 .5 2
7 .9 8
9 .9 2
7 .9 8
7 .9 8
1 5
1 0 .9 4
0 ,7 0
9 .9 1
1 0 .9 4
1 4
1 3
1 1 .9 7
1 0 .9 4
7 .5 2
1 5
9 .9 2
9
1 3
1 2
8 .4 3
1 9 .8 3
I R Average
R A D I A T I natural
O N N A T radiation
U R E L L E levels
M O Y E per
N N E
region
in
micro
Rem/h
P A R R E G IO N (e n m ic r o R e m /h )
23
CONTAMINATION AND CONCENTRATION
The following diagram illustrates in a simple way how radioactive elements are propagated and how they can be concentrated in food.
Beware, game such as migrant birds (ducks, woodcocks.) can be
radioactive as most of them come from Eastern Europe where numerous contaminated zones are to be found.
24
UNITS
UNITS
EQUIVALENT
DEFINITION
Curie (Ci) or
Becquerel (Bq)
1 Curie = 37 billion
Becquerels
1 Becquerel = 27 picocuries
Measures the number
of disintegration per
second (ACTIVITY)
Roentgen (R)
1 Roentgen = 2,58.10-4
C/Kg
Measures the energy in
the air (DOSE)
Rad (Reontgen 1 Gray = 100 Rad (1
absorbed dose) or joule/Kg)
Gray (Gy)
1 Rad = 0,01 Gy
Measures the energy
received per mass unit
(ABSORBED DOSE)
Rem (Rad
1 Rem = 10 milli Sievert Effect of the radiations
Equivalent Man) (mSv)
on the human body
or Sievert (Sv)
1 Sv = 100 Rem ~ 100 R (EQUIVALENT OF
EFFICIENT DOSE)
25
TECHNICAL FEATURES
Ionizing radiations detected :
Measurement cycle :
Measurement units :
Sensor :
Display :
Measurement range in µRem/h :
Measurement range in µSv/h :
Alarm thresholds :
- in µRem/h
- in µSv/h
Energy of the detected X and . rays :
Energy of the detected ß particles :
Runs on :
Range of temperature for the storage :
Range of temperature for the use :
Range of humidity :
Autonomy :
Weight (without batteries)
X Rays, Gamma rays and
Bêta particles (X, ß and γ)
40 seconds +/- 0.5s
µRem/h or µSv/h
Geiger-Müller tube
3 digits + cycle symbols
on LCD
5 to 999 µRem/h
0,05 to 9,99 µSv/h
30, 60, 120
0,3; 0,6, 1,2
0,1 to 1,25 MeV
350 keV to 1,5 MeV
1 or 2 AAA batteries
+5°C to + 40°C
-20°C to + 50°C
Less than 80%RH at 25°C
550 hours
90g
26
COMMON RADIOACTIVE OBJECTS
Alarm clocks and watches
Twenty years ago the hands of an alarm clock or watch were luminescent.
The substance used were usually Radium or other radioactive substances.
Measurements taken next to the face of an alarm clock or watch can reach
600µRem/h. It is best to avoid wearing such a watch.
Gas lamp incandescent mantles
When camping you might have used gas lamps. A mantle is adapted to the
lamp and once heated by the gas, it will emit light by incandescence.
Levels of irradiation:
Levels measured vary from 15 to 360 µRem/h when in direct contact. At distances exceeding 50 cm, rays are no longer detected.
You can protect yourself from radiations by keeping at a distance of
more than 50 cm. from a mantle. Avoid putting a mantle in your pocket.
Lightning conductors
Fifty years after Benjamin Franklin discovered the lightning conductor in
1760, a Hungarian thought of placing a radioactive source at the tip of a
lightning conductor. He thought that the radioactivity would ionize the air
around the tip of the lightning conductor and make it conductive and that
thunder bolts would in consequence be directed there.
Although the efficiency of this process was uncertain, it was patented
and commercialized in 1932.
It is thought that approximately 30 000 radioactive lightning conductors still
stand on our roofs in France. In 1983 a decree forbade the use of radioactive
elements in the manufacture of lightning conductors, leaving a period of 4
years for manufacturers to comply. In 1986 a new decree also forbade the
import and sale of such lightning conductors.
The risks
The radionuclides used are extremely radiotoxic and the period of radioactivity lasts for a very long time. The sources remain radioactive for years,
sometimes thousands of years. For example, the radioactive period of
27
Americium 241 is of 433 years. This is the amount of time it takes for
radioactivity to be reduced by half. It can be calculated that for a source of 30
million Becquerels in 1987, there will be 15 million in 2420; 7.5 million in
2863 and 3.7 million in 3296 etc…
The radioactive period of Radium 226 is much longer: 16000 years. The rate
at which it diminishes is thus much slower. Radioactive sources used in lightning conductors are thus going to remain dangerous for generations. It is
important to look after their removal and place of storage to limit risks of dispersion.
Helita
Franklin France
Duval Messien
28
GUARANTEE
The counter is guaranteed against all manufacturing faults and
material defects within the limits of the following terms:
- The guarantee is strictly limited to the exchange or repair of parts which
have been found faulty after examination and control in our factory, to the
exclusion of any other form of indemnity.
- The period of guarantee is of one year starting on the date of purchase.
- The guarantee for spare parts and labour is valid on the condition that the
counter has been used correctly and in compliance with the instructions
given by the manufacturer
- The guarantee does not cover deteriorations or accidents due to negligence
or modifications or attempts to modify the counter in any way.
- The guarantee does not cover incidents due to fortuitous or unavoidable
major events unconnected with the manufacturer, or deterioration due to
normal' wear and tear' of the counter.
- The guarantee ceases to be valid if the buyer has opened or attempted to open
the casing.
- The guarantee only covers counters which have been sent back to the
retailer with a copy of the invoice.
- The cost of sending the counter to the retailer must be covered by the
buyer.
- Time spent repairing the counter while under guarantee does not prolong the
period of guarantee.
- The terms of the present guarantee do not prevent the buyer from
benefiting from the advantages of the legal guarantee (Article 1641 and following of the Code civil) afforded in the event of hidden faults and defects.
Before sending the counter back, check that the batteries have been correctly
inserted: this is the most common problem.