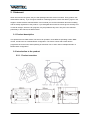
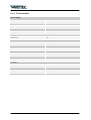
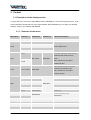
1
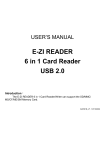
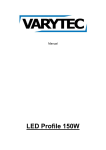
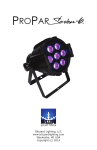
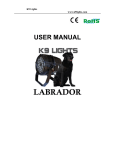
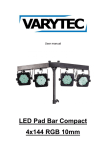
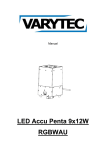
Manual
LED PAD 7
7x10W 6in1 RGBWA+UV
Table of contents
1.
2.
3.
Safety instructions ............................................................................................................................ 3
1.1.
FOR SAFE AND EFFICIENT OPERATION ............................................................................ 3
1.2.
Additional Information for safety .............................................................................................. 4
Statement ......................................................................................................................................... 5
2.1.
Product description .................................................................................................................. 5
2.2.
Introduction to the product ....................................................................................................... 5
2.2.1.
Product overview ............................................................................................................. 5
2.2.2.
Technical data ................................................................................................................. 6
Control .............................................................................................................................................. 7
3.1.
Description of the display section ............................................................................................ 7
3.1.1.
3.2.
4.
Structure of the menu ...................................................................................................... 7
DMX Chart ............................................................................................................................... 8
3.2.1.
Mode 1 (1 channel) .......................................................................................................... 8
3.2.2.
Mode 2 (6 channels) ........................................................................................................ 8
3.2.3.
Mode 3 (7 channels) ........................................................................................................ 8
3.2.4.
Mode 4 (10 channels) ...................................................................................................... 8
IR remote ........................................................................................................................................ 10
2 / 12
1. Safety instructions
•
This device is suitable for indoor use (not outdoors) only.
•
All modifications to the device will void the warranty.
•
Repairs are to carry out by skilled personnel only.
•
Use only fuses of the same type and original parts as spare parts.
•
Protect the unit from rain and humidity to avoid fire and electric shocks.
•
Make sure to unplug the power supply before opening the housing.
1.1. FOR SAFE AND EFFICIENT OPERATION
Be careful with heat and extreme temperature
Avoid exposing it to direct rays of the sun or near a heating appliance.
Not put it in a temperature bellow 32°F /0°C, or exceeding 104°F /40°C.
Keep away from humidity, water and dust
Do not place the set in a location with high humidity or lots of dust.
Containers with water should not be placed on the set.
Keep away from sources of hum and noise
Such as transformer motor, tuner, TV set and amplifier.
To avoid placing on un-stable location
Select a level and stable location to avoid vibration.
Do not use chemicals or volatile liquids for cleaning
Use a clean dry cloth to wipe off the dust, or a wet soft cloth for stubborn dirt.
If out of work, contact sales agency immediately
Any troubles arose, remove the power plug soon, and contact with an engineer for repairing,
do not open the cabinet by yourself, it might result a danger of electric shock.
Take care with the power cable
Never pull the power cable to remove the plug from the receptacle, be sure to hold the plug.
When not using the device for an extended period of time, be sure to disconnect the plug
from the receptacle.
3 / 12
Important:
Damages caused by the disregard of this user manual are not subject to
warranty. The dealer will not accept liability for any resulting defects or problems. Make sure
the electrical connection
ion is carried out by qualified personnel. All electrical and mechanical
connections have to be carried out according to the European safety standards.
1.2. Additional Information for safety
Exessive temperature
Ta=40°C
Please do not use the device if the temperature exceeds 40°C/104°F.
Drop safety
If you install the device the mounting bracket has the ability to carry the tenfold
load of the weight of the device. Always use a corresponding safety to safe the
device additional. While working at the device
device the place below has to be vacated.
Beware of electrical shock
Make sure the electrical connection is carried out by qualified personnel. Before
you plug in the device make sure that the power supply system has the right
voltage and also a crowbar. Every
Every device has to be grounded. Unplug the power
supply if you want to change a lamp or you have to open the device. You also have
to accomplish this action if there is a thunderstorm or high humidity.
Fire risk
Make sure that the fuse functioned. It is
is never allowed to bridge it. If you have to
exchange it only use fuses of the same type.
It is not allowed cover fans and air in and outlets.
Make sure that there is a distance between the device and all objects in an area of
0.5m.
Don’t put or mount anything
an
on the lens.
4 / 12
2. Statement
When we send out the goods, they are well packaged and also at best condition. Every product was
tested before delivery. If you recognize mistakes or damages please contact the delivery agent or the
supplier. Please read this manual faithful. In this manual you can find information about the handling
and the safety regulations of this product. If you disregard this manual we cannot give a warranty for it.
Technical changes, which are for progress, may be possible at any time. They are not mentioned
particularly in this manual, but affixed extra.
2.1. Product description
This product has one DMX mode. The fixture can operate in three different operating modes: DMX
control, sound-active or in Master/Slave configuration. The fixture comes with several built-in
programs that can be used, while operating as a dimmer unit or when used in multiples linked in a
Master/slave configuration.
2.2. Introduction to the product
2.2.1. Product overview
5 / 12
2.2.2. Technical data
Power supply
Voltage
100-240V, 50/60 Hz
Max. Power
70W
Light source
Lamp type
7 pHs. 6in1 LED
Wattage
10W
Connections
DMX in/out
XLR
Functions
Dimmer
0-100%
Strobe
Yes
Operation
Sound-to-light
Yes
Automatic
Yes
Master/Slave
Yes
DMX
1/6/7/10 channels
Hardware
Protection class
IP20
Skill
Indoor
Weight
1,2kg
Material
Plastic
6 / 12
3. Control
3.1. Description of the display section
To get to the menu you have to press MENU. With UP/DOWN you can scroll through the menu. If you
have reached the desired point of menu press ENTER. With UP/DOWN you can make your desired
settings. Conform your settings with ENTER.
3.1.1. Structure of the menu
Main Menu
Submenu 1
Addr
A001-A512
Submenu 2
Submenu 3
Function description
Set the DMX address
1Ch
6Ch
Chnd
Set the DMX mode.
7Ch
10Ch
Select the automatic mode, set the
AUT1
speed and the strobe for auto
Auto
SP 1-SP 9
St00-St99
mode...
St00 = Strobe off, St1-St99 =
AUT2
Strobe slow-fast
Select a preset color and set the
CoLo
CoL1-CoL51
strobe fort he selected color.
St00-St99
St00 = Strobe off, St1-St99 =
Strobe slow-fast
rEd
r000-r255
Dimmer red
GrEE
g000-g255
Dimmer green
bLUE
b000-b255
StAt
SoUn
Dimmer blue
St00-St99
ÛhIE
U000-U255
Dimmer white
AnbE
A00-A255
Dimmer amber
PUrP
P000-P255
Dimmer UV
SoU1
Set the sensitivity of the
SEn0-Sen9
SoU2
microphone.
SLAv
SLA
The device acts as slave..
rEno
ON/OFF
(Close/Open IR remote control
tEnP
Cuxx
Shows the current temperature.
Uer
XXX
Shows the software version.
7 / 12
3.2. DMX Chart
3.2.1. Mode 1 (1 channel)
Channel
Value from
Value to
Function
1
0
255
Select a preset color
3.2.2. Mode 2 (6 channels)
Channel
Value from
Value to
Function
1
0
255
Dimmer red 0-100%
2
0
255
Dimmer green 0-100%
3
0
255
Dimmer blue 0-100%
4
0
255
Dimmer white 0-100%
5
0
255
Dimmer amber 0-100%
6
0
255
Dimmer UV 0-100%
3.2.3. Mode 3 (7 channels)
Channel
Value from
Value to
Function
1
0
255
Dimmer 0-100%
2
0
255
Dimmer red 0-100%
3
0
255
Dimmer green 0-100%
4
0
255
Dimmer blue 0-100%
5
0
255
Dimmer white 0-100%
6
0
255
Dimmer amber 0-100%
7
0
255
Dimmer UV 0-100%
3.2.4. Mode 4 (10 channels)
Channel
Value from
Value to
Function
1
0
255
Dimmer 0-100%
2
0
255
Dimmer red 0-100%
3
0
255
Dimmer green 0-100%
4
0
255
Dimmer blue 0-100%
5
0
255
Dimmer white 0-100%
6
0
255
Dimmer amber 0-100%
7
0
255
Dimmer UV 0-100%
8 / 12
8
0
50
Dimmer
51
101
Auto-Mode 1
102
152
Auto-Mode 2
153
203
Sound-Mode 1
204
255
Sound-Mode 2
0
255
Adjust speed slow-fast (if channel 8 is set on value
51-152)
9
0
255
Adjust sound sensitivity (if channel 8 is set on value
153-255) 0-29 = close, 30-255 = low-high
10
0
9
No function
10
255
Strobe slow-fast
9 / 12
4. IR remote
Power On/Off
EDMX button, to control DMX address when press this
button. It is channel mode when double click.
Master/Slave
Auto-Mode 1/2
Speed adjust
Sound mode 1/2
You can choose the desired program or number.
Strobe
You can use these
number buttons to
adjust number
settings in any program mode.
Choose a color.
10 / 12
11 / 12
Importer:
B & K Braun GmbH
Industriestraße 2
D-76307 Karlsbad
www.bkbraun.com
[email protected]
12 / 12