1
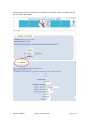
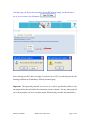
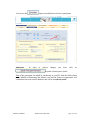
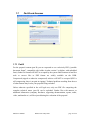
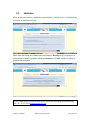
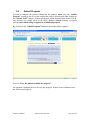
Electronic Proposal Submission Service - EPSS preparation and submission guide - Release Date: 30 June 2008 Table of Contents 1 EPSS Preparation –User’s Guide ............................................................................. 3 1.1. Using PIC in EPSS.............................................................................................. 4 1.2. The first step: getting a user ID and password .................................................... 5 1.3. Login ................................................................................................................... 8 1.3.1 Initial Login ....................................................................................................... 8 1.3.2 Subsequent Logins ............................................................................................. 8 1.4. General ................................................................................................................ 9 1.5. Proposal Setup .................................................................................................. 11 1.6. Part A ................................................................................................................ 15 1.7. Part B and Annexes ........................................................................................... 19 1.7.1 Part B ........................................................................................................ 19 1.7.2 Annexes............................................................................................................ 22 1.8. Validation .......................................................................................................... 24 1.9. Submit Proposal ................................................................................................ 25 1.10. The History ................................................................................................... 28 2 EPSS Checklist ......................................................................................................... 29 3 Note for Macintosh users .......................................................................................... 29 EPSS help desk Phone: +32 2 23 33 760 Email: [email protected] EPSS User Manual Released on 5 May 2008 page 2 of 29 1 EPSS Preparation –User’s Guide The EPSS (Electronic Proposal Submission Service) allows Proposers to create their proposal completely on-line without downloading or saving anything on their local personal computer. The EPSS service is available via the Internet as a Web based application. The System requirements are: A connection to the Internet A screen with a 1024x768 resolution and small fonts. On-screen text size: Users should not use the font scaling option that is available with some browsers to enlarge the font size when viewing 'A forms', as this may lead to corrupted view of the forms. Internet Explorer 6.0 and above or Netscape Navigator 7.0 and above or Mozilla Firefox 1.0 and above or Opera 7.0 and above or Mac OS X Mozilla Firefox browser for Apple Macintosh users (Mac OS 9 is not supported and Safari neither) see Note on p.22 Note: the EPSS web application is best viewed with using: - Internet Explorer 6.0 (and above) - or Mozilla Firefox 1.0 (and above). EPSS User Manual Released on 5 May 2008 page 3 of 29 1.1. Using PIC in EPSS The PIC or Participant Identification Code is a unique code for identifying the participant in any stage alongside the R&D funding management process of the programmes managed by the Commission's Research DGs. Participants will not have to submit their legal and financial information (and supporting documents) each time they submit a proposal or negotiate a grant agreement, but they should just introduce their PIC. All organizations which already signed an FP7 contract with the Commission should have received a PIC, which has been communicated to all contact points for FP7 grant agreements known to the Commission. Find out within your organization who are contact points for FP7 grant agreements; they will be able to tell you what your PIC is. If you cannot find any contact point within your organization, ask the URF help desk to put you in contact with them. If your organization does not have a PIC yet, then we suggest you to get one by registering your organization in our Unique Registration Facility or URF at the following link: http://ec.europa.eu/research/participants/urf/ For more information about Unique Registration Facility including support please visit the corresponding section of CORDIS: http://cordis.europa.eu/fp7/urf _en.html After registration, the new PIC will only be active in EPSS after 48h, therefore we suggest you to make sure that you start your self registration well before the deadline of the chosen call. Once ready, you should type your PIC when asked in EPSS. Part of the legal data associated to that PIC will then be shown in order for you to verify that the PIC you are using is indeed the right one. Should you think there are errors in the data shown that might affect the eligibility of your proposal you can always remove the PIC and fill in all requested data manually as usual. Important: Applicants are able to prepare and submit their proposal (use EPSS) without the possession or without the introduction of PIC. The default format of PIC is a 9 digits numeric code without separator or special characters. In EPSS the proposal co-ordinator (who is responsible for the overall coordination between partners) can introduce a PIC or clear a PIC for a participant. Providing the PIC implies that the proposal co-ordinator has access to this information from its own organisation or through the proposal partners' organisations. EPSS User Manual Released on 5 May 2008 page 4 of 29 1.2. The first step: getting a user ID and password Access to the EPSS is specific to calls and to the corresponding subscheme. You have to first make your choose for which call for proposals and for which subscheme you want to apply. Access is provided via the respective CORDIS call page (see http://cordis.europa.eu/fp7/dc/index.cfm ). After selecting the call, you will arrive to the call page. On the call page, go to the Electronic Proposal Submission Service (EPSS) section; choose the sub-scheme you want to apply for from the dropdown list and press "Go". You will than arrive at the EPSS start page. Click on "Register", fill in the registration form and submit it. The EPSS will send you coordinator and partners’ usernames and passwords by e-mail. Important notice: The EPSS registration email, which contains the access codes to prepare and submit the proposal, will be sent to the email address you define during the registration. This email will be sent from [email protected]. Prior to the registration you should check that this domain (epss-fp7.org) is accepted by the email server of your organization. If you do not receive this email, please check your SPAM in case it ends up there. In any case you can always contact the EPSS Helpdesk to assist you if you have not received the EPSS codes. Note: If you have a PIC number you can already use it here. Once you obtain the EPSS account you will be still able to stop working with a PIC number if you decide so. EPSS User Manual Released on 5 May 2008 page 5 of 29 If you enter your PIC, and wish to see what the associated PIC data is you may click on the 'View PIC data' button. EPSS User Manual Released on 5 May 2008 page 6 of 29 If at that stage you object the correctness of your PIC-data or simply you decide not to use it, you can clear it by clicking the . After clearing your PIC-data (or simply if you don’t have a PIC) you should proceed with entering valid data to all mandatory fields by manual typing. Important: The login and password you receive by e-mail is specifically linked to only one proposal (for the call and for the instrument you have chosen). For any other proposal you want to prepare you have to register again, following the procedure described above. EPSS User Manual Released on 5 May 2008 page 7 of 29 1.3. Login 1.3.1 Initial Login As a coordinator you must use the login and password that has been sent to you by e-mail to access the EPSS. Go to https://www.epss-fp7.org Introduce the Coordinator User ID Enter the Coordinator Password Change the Coordinator Password Enter the Other participant Password Change the Other participant Password Distribute the 'Other participant' username and the modified 'Other participant' password to your other participants –if any. 1.3.2 Subsequent Logins Go to https://www.epss-fp7.org Introduce the –Coordinator or Other participant- User ID Enter the –modified Coordinator or Other participant- Password Note: By entering the proposal as another participant, you can only access your A2 Form for editing. Other participants can view all proposal information but only edit A2 forms. Tip : Reduce typing errors: Write logins and passwords in a text program and copy/paste them into the fields. This prevents mis-typing errors. EPSS User Manual Released on 5 May 2008 page 8 of 29 1.4. General Now, you may prepare the proposal. By clicking on the “General” Tab, you can find information about: The selected call The selected sub-scheme The proposal’s status The proposal number (if this has been submitted) The Coordinator’s Name (as registered) The proposal Title (as registered) EPSS User Manual Released on 5 May 2008 page 9 of 29 Tip : Please check the call and sub-scheme identification first. If you have selected the wrong call and the wrong sub-scheme, you will have to register again. The EPSS operator cannot change the registration information and transfer data from one registration to another. Note: If the co-ordinator details change, you do not need to register again; co-ordinator information is taken from the A2 forms. If you wish to modify the Title of the proposal you will have to do it in the forms. The title appearing in this page is taken from the registration data and cannot be changed. This does not affect the submitted proposal, because what is evaluated is the content of the forms and the Part B. Go to “Proposal setup”. EPSS User Manual Released on 5 May 2008 page 10 of 29 1.5. Proposal Setup In the proposal setup section you define the number of other participants that participate in your project. Note: The first participant is always the co-ordinator. Make sure that the co-ordinator e-mail address is correct. You can include multiple email addresses, you must separate them with a semi-colon “;”. Tip : The e-mail addresses introduced in this section are used by EPSS to send automatic e-mail confirmation once the proposal is submitted/transferred for evaluation. Please check that they are complete and accurate. To add another participant to the proposal, you may provide the relevant participant's PIC number and must provide a participant short name and e-mail address. If a PIC is provided then the corresponding data will be retrieved from the database once the corresponding A2 form is opened EPSS User Manual Released on 5 May 2008 page 11 of 29 Important: You shall make sure that the responsible participant opens the corresponding A.2 form in order to finish validation. The associated PIC-data set is only inherited once the A.2 form opened. The same validation step is mandatory if the PIC number is deleted or modified. These validation steps are necessary to avoid unintended changes in the administrative data. If for some reason you decide to change or re-introduce a PIC, please always make sure that you not only click on the 'Update Participant information' and then click on 'Accept' but afterwards you make sure that the corresponding A.2 form is opened to finish verification and have the PIC data inherited. If you add a new participant without providing a PIC number, then the following information is also requested by filling manually - mandatory fields marked with red asterisk: The legal status of organization The Method of determining the Indirect Cost Click "Add Participant" Once a participant is added, the system automatically creates an A2 form and either an A3.1 form or extra rows in the A3/A4 form depending on the exact call. Those forms are accessible via the A2-Link, A3-Link buttons, but they can also be found after clicking in the “Part A” Tab. EPSS User Manual Released on 5 May 2008 page 12 of 29 You can use the Important: button to modify data related to a participant: In order to enforce changes you must click on to update a Participant’s details. Note: If the participant was added by introducing its own PIC, then the fields related to the 'Method of determining the indirect costs' and the 'Status of organization' will contain data retrieved from the database and will be in read-only mode. EPSS User Manual Released on 5 May 2008 page 13 of 29 Rejection of the retrieved PIC-data If you object the accuracy of the retrieved information then you can decide to remove it by clicking on the button. If the PIC-data is cleared, than all associated information will be erased from the A.2 and A.3 forms and have to be re-entered manually again. EPSS User Manual Released on 5 May 2008 page 14 of 29 1.6. Part A This section concerns with the administrative forms of the proposal or Part A. The Proposers need to fill the A forms appropriately and save them on the EPSS server. Also, each form can be downloaded as a PDF file to your computer's hard disk. Check the relevant fields and click on “download” to receive PDF copies of the 'Part A' forms. Depending on the type of call (strictly call- and sub-scheme-specific), Part A shows the overview of forms A1, A2, A3.1 and the summary A3.2 (certain subschema also have an A4 form or don’t have the A3.1/A3.2 forms). Click on the links on the screen that are listed under “Form name” to access the forms. EPSS User Manual Released on 5 May 2008 page 15 of 29 Note: If a participant has been added with the use of PIC, then a set of fields on the A2 form will already be pre-filled with information as retrieved from the database. Only some of these fields are editable. For a participant for whom a PIC has been provided, the first time that the A2 or A3.1 form is opened the following screen shows up: Important! You must make sure that the responsible participant opens the corresponding A.2 form in order to finish validation. The associated PIC-data set is only inherited once the A.2 form opened. The same validation step is mandatory if the PIC number is deleted or modified. These validation steps are necessary to avoid unintended changes in the administrative data. If for some reason you decide to change or re-introduce a PIC, please always make sure that you not only click on the 'Update Participant information' and then click on 'Accept' but afterwards you make sure that the corresponding A.2 form is opened to finish verification and have the PIC data inherited.. EPSS User Manual Released on 5 May 2008 page 16 of 29 When filling the form please pay particular attention to the verification: Fill the fields with data. All fields on the forms are mandatory. (“-“ or “0” are the values that designate the “none” or “Non applicable” value) Press the “Validate” button at the bottom of the form: The validation is looking for formal errors in the forms. If it finds errors, it indicates which fields are wrongly filled. If all the necessary fields are filled you will find “no validation errors” at the bottom of the form. EPSS User Manual Released on 5 May 2008 page 17 of 29 Do not forget to save the form by pressing the “Save Form” button, or your changes will be discarded! Note: The “Save Form” button performs form validation as well. Please make sure, you fill out all forms for which you are responsible. For forms with spreadsheets, the total amounts are automatically calculated by the system when the “Validate” button is pressed. Obviously the appropriate fields need to be completed first. Tip During form preparation save early and often. Saving will also validate the form. Pay attention to the time-out of the system: editing a form is not considered as an action of the user, only saving or validating actions will reset the time-out. EPSS User Manual Released on 5 May 2008 page 18 of 29 1.7. Part B and Annexes 1.7.1 Part B For the proposal content (part B) you are requested to use exclusively PDF (“portable document format”, compatible with Adobe Acrobat version 5 or higher, with embedded fonts). Other file formats will NOT be accepted by the system. Both commercial and free tools to convert files to PDF format are widely available on the WEB. Compressed (zipped or otherwise compressed) archives will NOT be accepted (PDF is self-compressing; there is no gain in zipping). Technical problems resulting from the use of other formats may lead to your proposal being excluded. Unless otherwise specified in the call legal text, only one PDF file comprising the complete technical annex (part B) can be uploaded. Further files with annexes or additional information (company brochures, supporting documentation, reports, audio, video, multimedia etc.) will be rejected during the evaluation of the proposal. EPSS User Manual Released on 5 May 2008 page 19 of 29 There are some calls though (i.e. calls for the Marie Curie funds) that request two separate Part B files namely Section 1 and Section 2. If this is the case, then all instructions remain the same with the only difference that the user will have to provide 2 separate files. Format and naming convention applies for these files. Tip Do not use special characters in the file name. The system will prevent you from uploading such files. Using only PDF format for submission of part B Why? This format for text documents is supported by the vast majority of computer platforms. The advantage of saving as a PDF file is that the contents are "locked" and the original formatting (margins, page breaks, etc.) will always be maintained when the file is printed. In addition, unlike many common document formats, there are almost no viruses associated with PDF files. Allowing proposers to submit in any possible format would require the Commission to maintain an arsenal of software in different versions - and even then readability could not be guaranteed in 100% of the cases. How? The possibility of converting a text file into PDF is integrated into some word processors. In case this is not implemented in the word processor you are using, you can download special conversion software (commercial software or downloadable freeware) from the web. Conversion into PDF is the last step in preparing a document for submission; since PDF documents are "locked", they cannot be edited like normal text files. The format of part B of a proposal (the description of the content of the proposal) for the specific call is specified in the so called “Part B Template” file. By clicking on the link “Download Part B Templates” the proposer downloads the template file (RTF format) and uses it as a guide to structure the proposal Part B section appropriately. Open the template Part B RTF file and edit it. Save the file, convert it to PDF and then add it to the proposal. The Part B filename should not contain any special characters or spaces. It can only contain Latin letters (a-z), digits (0-9), the underscore (_), the dash (-) and the dot (.) character. EPSS User Manual Released on 5 May 2008 page 20 of 29 Part B checklist: - Part B is in PDF format (compatible with Adobe Acrobat version 5 or higher, with embedded fonts) - Filename ends in .pdf - Filename does not contain any special characters or spaces - The PDF Part B must not be encrypted and the parameter that prevents printing must not be selected - The proposal contains no unnecessary coloured or high resolution pictures. It will be printed in Black and White at 300dpi for evaluation. Once the Part B file is created, use the “Browse” button to locate the part B file. Click on “Upload Proposal File” to upload the Part B file to the proposal. EPSS User Manual Released on 5 May 2008 page 21 of 29 1.7.2 Annexes For the majority of instruments and project types in FP7, part A and part B form the complete proposal, so it might be that this section does not appear for your case. For some particular actions, additional annexes can be required. In this case, you can use the Annex Upload section to locate and upload them. You should not annex any other files unless this is specifically requested in the Call Text. For the Annex content the only supported format is PDF. The Annex filename should not contain any special characters or spaces. It can only contain Latin letters (a-z), digits (0-9), the underscore (_), the dash (-) and the dot (.) character. The Annex filename must be different from the Part B filename. Note: In case of uploading annexes to the EPSS, please make sure that the name of the annex file is NOT identical with the name of your part B file! Note: Before being saved to the EPSS database, the Part B and Annex files are checked for viruses. If files are found to be infected they are rejected by the system and the user is warned. Tip Upload your proposal early in the process and press the “submit” button and all buttons that follow in the subsequent pages. Doing this ensures that an interim version of the proposal text (the part B) is already present on the system. Remember that the system allows multiple uploads of the proposal text and this facility should be used to avoid the call closure rush. Tip In some rare instances, the proposal may be altered while in transit on the Internet. To check that the uploaded file has been received unaltered, perform a download of the part B. Tip Practice the conversion of the file to the PDF format. The conversion may take an extended period of time if the page layout is complex or contains graphics. There is no point is creating a PDF document with a resolution higher than 300 DPI and in black and white. Nuances of grey may be reproduced but should be avoided for legibility purposes. EPSS User Manual Released on 5 May 2008 page 22 of 29 Upon successful upload of a file the following screen appears: If the proposal is ready you should click on “Submit NOW” in order to submit it. If not, then click on “Submit LATER” or any other of the Tabs in order to continue with its preparation. EPSS User Manual Released on 5 May 2008 page 23 of 29 1.8. Validation Click on this tab in order to validate the entire proposal. Possible errors are indicated and can easily be found and resolved. Please note that during the validation process Errors or Warnings may be reported. It is still possible to submit a proposal, which has Warnings; it is NOT possible to submit a proposal that has Errors. If you cannot locate validation errors please contact the EPSS help desk immediately on +32 2 23 33 760 or [email protected]. EPSS User Manual Released on 5 May 2008 page 24 of 29 1.9. Submit Proposal In order to complete the proposal submission the proposer must select the “Submit Proposal” section (in fact it is to this section that a user is also directed when clicking on the “Submit NOW” button). Without submission, all the uploaded data (Forms, Part B, and Annexes) are simply saved in the EPSS database without forming a proposal package and without being recognized as a submitted proposal. By clicking on the “Submit Proposal” button the screen that follows appears: Press on “Press this button to submit the proposal”. An automatic validation check will verify the proposal. If there are no validation errors, the following will appear: EPSS User Manual Released on 5 May 2008 page 25 of 29 If you receive this screen, the proposal is successfully submitted. The proposal can be modified and submitted up until the closure of the call. Each subsequent submission overwrites the previously submitted version (earlier versions are not archived). If there are blocking validation errors you’ll not be able to submit the proposal and get a screen like the following: EPSS User Manual Released on 5 May 2008 page 26 of 29 If there are “Warning” types of validation errors, then you can see proceed with the submission by supplying some relevant comments and click on the “Submit NOW” button: Tip Simply uploading a new Part B file or modifying the A forms is not sufficient; the “submit” button (as well as the buttons on the pages that follow) need to be pressed in order for the changes to be registered in the proposal package. Pressing the “submit” button is similar to putting the envelope in the mailbox. Proposals or modifications that have not been submitted before the deadline are not transferred for evaluation. EPSS User Manual Released on 5 May 2008 page 27 of 29 1.10. The History By clicking on the “History” Tab, the record of all the actions performed while using the EPSS system appears. Thus it is possible for the coordinator to check when for example Partner 2 updated his A2 form. An example of the history record before proposal submission: And after the submission: EPSS User Manual Released on 5 May 2008 page 28 of 29 2 EPSS Checklist I. Choose the call and Sub-scheme for which you want to apply (http://cordis.europa.eu/fp7/dc/index.cfm ) II. Via the respective CORDIS call page, register with EPSS in order to obtain a login and password well in advance of the call III. Use the provided username and password to prepare and submit the proposal (https://www.epss-fp7.org/epss) IV. Proposal Setup – Enter Participants, V. Fill in the Part A Forms and save the forms, VI. Upload the Part B file (and annexes, if required). VII. Validate the proposal. VIII. SUBMIT THE PROPOSAL! 3 Note for Macintosh users The Safari browser is NOT supported. Better results can be obtained using the Mozilla Firefox Browser (you can download it from http://www.mozilla.org/download.html). It handles the files without their pathname. The Mac OS 9 is not supported. EPSS User Manual Released on 5 May 2008 page 29 of 29