1
Installation Manual
Premier 412/816/832
Issue 10
Premier 412/816/832 Installation Manual
Operating the Alarm System
5. Operating the Alarm System
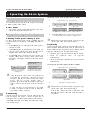
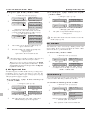
³ To Away arm the alarm system proceed as follows:
Introduction
Before attempting to operate the alarm system ensure you
have familiarised yourself with all the arming and disarming
methods covered in this section.
Access Codes
x
1
1
2
If you make a mistake whilst entering your Access code,
simply enter the correct Access code.
Arming & Disarming the Alarm System
Checking if the System is Ready to Arm
To help prevent faults during arming, a Ready light has
been provided on each keypad. The Ready light works as
follows:
x
If the Ready light is on steady then the alarm system is
ready to be armed.
x
If the Ready light is flashing then the alarm system has
bypassed zones and/or Force Armable zones that are
violated, check these zones before proceeding.
x
If the Ready light is off then one or more zones are
violated, either secure or bypass these zones before
proceeding. The keypads will display the zones that are
violated:
Zone 01 Active
Front Door
1
2
3
Zones
4
5
6
7
8
Alarm
Armed
Service
Ready
Active zones are indicated by
the relevant zone lights on
LED Keypads
Zone 04 Active
Patio Doors
Active zones are scrolled
in sequence on LCD keypads
If any unbypassed zones that are not enabled for
“Force Arming” are violated at the end of the exit
delay this is termed an exit error and the alarm system
will go into fail set state (internal alarm). If
programmed by the installer the external bell will also
sound. Enter a valid user Access code to silence this
alarm.
A zone will only be armed when ALL associated
partitions are armed but will be disarmed when ANY
associated partition is disarmed.
Away Arming
The Away arming mode is normally used when leaving the
premises. When the system is armed in this mode all
detection zones assigned to your partition(s) will be armed.
The Ready light must be on steady before the alarm system
can be Away armed.
INS159
Enter Access code ????
3
Zones
4
5
6
7
8
Armed
Ready
YES to Arm?
MENU for Options
Press y
Press a
1
3
2
Alarm
Service
2
3
Zones
4
5
6
7
8
Alarm
Armed
Service
Ready
Please Exit....
17:30.21 28/04
The Armed light will flash and the exit tone will sound.
Leave the premises, when the system has armed the
exit tone will stop. The system is now Away armed.
If the Quick Arm feature is enabled (see page 41) you
can omit step 1 from the above procedure.
Stay Arming
The Stay arming mode is normally used when the premises
will be occupied. When the system is armed in this mode all
Interior detection zones assigned to your partition(s) will be
bypassed. Before Stay arming check the following:
x
Secure or bypass any perimeter zones that are violated.
x
Ensure no perimeter zones are bypassed
unintentionally.
x
Ensure no perimeter Force Armable zones are violated
unintentionally.
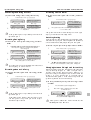
³ To Stay arm the alarm system proceed as follows:
1
Enter Access code ????
1
2
3
Zones
4
5
6
7
8
Armed
Ready
YES to Arm?
MENU for Options
Press s
1
3
2
Alarm
Service
2
3
Zones
4
5
6
7
8
Alarm
Armed
Service
Ready
Premier 816
17:30.21 28/04
The alarm system will arm immediately and the Armed
light will flash.
The system is now Stay armed.
If the Quick Arm feature is enabled (see page 41) you
can omit step 1 from the above procedure.
If the system is fitted with a Premier RKP16 Plus then
the Stay light will also illuminate when the system is
Stay armed.
71
Operating the Alarm System
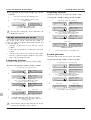
Cancelling the Arming Process
³ To cancel the arming process during the exit delay:
1
Enter Access code ????
1
2
3
Zones
4
5
6
7
8
Armed
Ready
MENU for Options
NO to Disarm?
2
3
Zones
4
5
6
7
8
Alarm
Armed
Service
Ready
Premier 816
17:30.21 28/04
Arming has been cancelled and the alarm system is
now disarmed.
If the system only has one partition you will not have
to perform step 2.
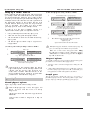
Disarming During Entry
³ To
disarm the alarm system during entry, proceed as
follows:
1
Enter the premises via the designated entry point,
the entry tone will sound. Proceed directly to the
remote keypad.
1
2
3
4
5
6
7
8
Alarm
Armed
Service
Ready
Enter Your Code
08:30.59 28/04
Enter Access code ????
1
3
2
Zones
2
3
Zones
4
5
6
7
8
Alarm
Armed
Service
Ready
If a valid Access code is not entered before the end of
the entry delay, an alarm will occur.
Disarming when not in Entry
³ To
disarm the alarm system when not in entry, proceed
as follows:
Enter Access code ????
1
2
72
3
Zones
4
5
6
7
8
Alarm
Armed
Service
Ready
Press d
1
3
2
2
3
Zones
4
5
6
7
³ To
disarm the alarm system after an alarm, proceed as
follows:
1
MENU for Options
NO to Disarm?
Press n
8
Alarm
Armed
Service
Ready
Premier 816
17:30.21 28/04
The Armed light will turn off. The alarm system is now
disarmed.
If the system only has one partition you will not have
to perform step 2.
If the Quick Disarm feature is enabled (see page 41)
and the system is Stay armed you can omit step 1
from the above procedure.
Enter Access code ????
1
2
2
3
Zones
4
5
6
7
8
Alarm
Armed
Service
Ready
Master Bedroom
1... 21:10.56 28
Zone 05 Active
Master Bedroom
The system is disarmed and the keypads display the
source of the alarm.
The system must now be reset before you can arm again,
see page 75 for details on resetting alarms.
Auto Stay Arming
If your installer has enabled the Auto Stay feature the system
will automatically Stay arm if the entry/exit zone (front door)
is not activated whilst attempting to Away arm the system.
³ To auto Stay arm your alarm system proceed as follows:
1
Enter Access code ????
1
2
Premier 816
08:31.12 28/04
The entry tone will stop and the Armed light will turn off.
The alarm system is now disarmed.
1
Disarming after an Alarm
Press n
Press d
1
3
2
Alarm
Service
Premier 412/816/832 Installation Manual
2
3
Zones
4
5
6
7
8
Alarm
Armed
Service
Ready
Press y
Press a
1
2
3
Zones
4
5
6
7
YES to Arm?
MENU for Options
8
Alarm
Armed
Service
Ready
Please Exit....
17:30.21 28/04
The Armed light will flash and the exit tone will sound.
3
Do NOT leave the premises during the exit delay. At
the end of the exit delay the alarm system will Stay arm.
Changing between Delayed and Instant Stay
When Stay arming the system the delayed zones (front door
etc) are normally delayed, i.e., when a delayed zone is
violated it will start the entry delay timer. However, it is
possible to change the delayed zones to instant when the
system is in a Stay armed mode. If a delayed zone is
violated when the system is in the “Instant Stay” mode the
system will generate an alarm immediately.
³ To
change from Delayed Stay to Instant Stay, proceed
as follows:
1
2
Ensure that the system is Stay armed.
Press and hold the s key until you hear the
confirmation tone.
1
3
2
3
Zones
4
5
6
7
8
Alarm
Armed
Service
Ready
INSTANT STAY
17:30.21 28/04
The Armed light will flash quickly.
The system is Instant Stay armed.
If the system is fitted with a Premier RKP16 Plus the
Instant light will also illuminate.
INS159
Premier 412/816/832 Installation Manual
³ To change from Instant Stay to Delayed Stay, proceed
as follows:
1
2
Ensure that the system is Instant Stay armed.
Press and hold the s key until you hear the
confirmation tone.
1
3
2
3
Zones
4
5
6
7
DELAYED STAY
17:38.21 28/04
8
Alarm
Armed
Service
Ready
The Armed light will flash slowly.
The system is Delayed Stay armed.
If your system is fitted with a Premier RKP16 Plus the
Instant light will go off.
Operating the Alarm System
Stay Arming Partitions
This option allows you to Stay arm one or more partitions.
³ To Stay Arm selected partitions, proceed as follows:
1
2
Away Arming Partitions
This option allows you to Away arm one or more partitions.
³ To Away arm selected partitions, proceed as follows:
1
Enter Access code ????
1
2
3
4
5
6
7
8
Alarm
Armed
Service
Ready
2
3
Zones
4
5
6
7
8
Alarm
Armed
Service
Ready
YES to Arm?
Area > **.. <
The Ready light will flash quickly.
Press 1 - 4 to select/deselect partitions,
e.g. Press 2 to select Partition 2.
3
1
2
3
Zones
4
5
6
7
8
Alarm
Armed
Service
Ready
YES to Arm?
Area > *2.. <
Partition 2 is now selected.
4
Press a
1
2
3
Zones
4
5
6
7
Press y
8
Alarm
Armed
Service
Ready
3
Zones
4
5
7
8
Armed
Ready
YES to Arm?
MENU for Options
Press A
2
3
Zones
4
5
6
7
8
Alarm
Armed
Service
Ready
YES to Arm?
Area > **.. <
The Ready light will flash quickly.
Press 1 - 4 to select/deselect partitions,
e.g. Press 1 to select Partition 1.
1
2
3
Zones
4
5
6
7
8
Alarm
Armed
Service
Ready
YES to Arm?
Area > 1*.. <
Partition 1 is now selected.
4
Press s
1
5
6
Alarm
3
2
3
Zones
4
5
6
7
Premier 816
17:30.21 28/04
8
Alarm
Armed
Service
Ready
The selected partition(s) will arm immediately and the
Armed light will flash.
The selected partition(s) is now Stay armed.
Disarming Partitions
This option allows you to disarm one or more partitions.
³ To disarm selected partitions, proceed as follows:
1
Enter Access code ????
1
2
3
Zones
4
5
6
7
8
Armed
Ready
MENU for Options
NO to Disarm?
Press A
2
3
Zones
4
5
6
7
8
Alarm
Armed
Service
Ready
NO to Disarm?
Area > **.. <
The Ready light will flash quickly.
Press 1 - 4 to select/deselect partitions,
e.g. Press 2 to select Partition 2.
3
1
2
3
Zones
4
5
6
7
8
Alarm
Armed
Service
Ready
NO to Disarm?
Area > *2.. <
Partition 2 is now selected for disarm.
4
Press d
1
5
2
Alarm
Service
1
YES to Arm?
MENU for Options
Press A
1
2
3
Zones
4
5
6
7
Press n
8
Alarm
Armed
Service
Ready
Premier 816
17:30.21 28/04
The selected partitions are disarmed.
Please Exit....
17:30.21 28/04
The Armed light will flash and the exit tone will sound.
5
2
Zones
2
Service
1
Arming and Disarming Partitions
This section covers arming and disarming partitions. In
order to use these procedures the following requirements
must be configured:
x
The alarm system must be split into one or more
partitions.
x
Your Access code must be assigned to more than one
partition.
x
The keypad that you use to operate the alarm system
must be assigned to multiple partitions OR your Access
code is enabled for Global Access.
Enter Access code ????
1
Leave the area being armed, when the partition has
armed the exit tone will stop. The selected partition(s) is
now Away armed.
If the Quick Arm feature is enabled (see page 41) you
can omit step 1 from the above procedure.
INS159
73
Operating the Alarm System
Changing to another Partition
Normally the remote keypad that you use will be assigned to
a particular partition and therefore the zone and status lights
will indicate information relevant to the assigned partition.
However, you can temporarily switch the remote keypad to a
different partition so that the zone and status lights indicate
the information relevant to the partition that you have
selected. Whilst in this mode you can also use your Access
code to arm/disarm the partition you have selected
(providing you have access to the selected partition).
In order to use the cross partitioning feature, it is
recommended that the system is configured as follows:
x
Cross partitioning must be enabled (see page 37).
x
The user must be assigned to multiple partitions.
x
The user should be set for “Local Partition Access Only”,
see page 66.
x
The remote keypads should only be assigned to a
single partition.
³ To change to another partition, proceed as follows:
1
Press A
1
2
2
3
Zones
4
5
6
7
8
Alarm
Armed
Service
Ready
AREA ARMED >....
17:35.34 28/04
Enter partition 1 - 4,
e.g. Press 2 to select Partition 2.
1
2
3
Zones
4
5
6
7
8
Alarm
Armed
Service
Ready
Premier 816
17:35.38 28/04
The remote keypad will now indicate information
relevant to the selected partition.
After changing to the selected partition, the remote
keypad will only remain in the selected partition for 10
seconds after the last key press. However if an
Access code is entered whilst the remote is in this
mode, the remote keypad will remain in the selected
partition for 1 minute after the last key press.
Bypassing Zones
Premier 412/816/832 Installation Manual
³ To manually bypass zones, proceed as follows:
1
Enter Access code ????
1
2
2
3
7
8
YES to Arm?
MENU for Options
Press B
2
3
Zones
4
5
6
7
8
Alarm
Armed
Service
Ready
Bypass Zone> 00
*NONE BYPASSED*
The Ready light will flash quickly.
Enter the zone number ??,
e.g. Enter 02 to select Zone 2.
1
6
Ready
3
5
5
Armed
1
4
Zones
4
Alarm
Service
2
3
Zones
4
5
6
7
8
Alarm
Armed
Service
Ready
Bypass Zone> 02
Zone 02 Bypassed
The selected zone is now bypassed. Repeat step 3 to
bypass additional zones.
Once the selected zones have been bypassed press:
y/a to Away arm
s to Stay arm
N to return to the normal disarmed state
If the Quick Bypass feature is enabled (see page 41)
you can omit step 1 from the above procedure.
When one or more zones are bypassed the Ready
light will flash and if the system is fitted with a Premier
RKP8/16 Plus or LCD remote keypad then the Bypass
light will also illuminate.
Unbypassing Zones
To manually unbypass zones, perform the manual bypass
procedure on a zone that is already bypassed.
x
24 hour zones cannot be unbypassed if they are still
violated.
x
If the “Reinstate Bypassed Zones on Disarm” option is
enabled (see page 37) all zones will automatically be
unbypassed each time the system is disarmed.
Group Bypass
The Group Bypass feature allows you to bypass a
predefined group of zones. The alarm system has up to four
groups, see page 29 on programming bypass groups.
Manually Bypassing Zones
Bypassing a zone prevents it from causing an alarm.
74
After manually bypassing a zone, the bypass will
remain in place until the zone is manually
unbypassed.
The bypass mode will time-out if no key is pressed for
60 seconds.
24 hour zones cannot be unbypassed if they are
violated.
INS159
Premier 412/816/832 Installation Manual
³ To Bypass a group of zones, proceed as follows:
1
Enter Access code ????
1
2
2
3
Zones
4
5
6
7
8
Alarm
Armed
Service
Ready
YES to Arm?
MENU for Options
Enter bypass group 1 - 4 followed by B
1
2
3
Zones
4
5
6
7
8
Alarm
Armed
Service
Ready
Bypass Zone> 00
Zone 03 Bypassed
Operating the Alarm System
³ To Quick Bypass a group of zones and Stay arm,
proceed as follows:
1
1
2
3
1
2
3
Zones
4
5
6
7
8
Alarm
Armed
Service
Ready
Bypass Zone> 05
Zone 03 Bypassed
Bypass Zone> 05
Zone 04 Bypassed
Bypass Zone> 05
Zone 05 Bypassed
4
The selected zone is now bypassed. Repeat step 3 to
bypass additional zones.
5
Once the selected zones have been bypassed press:
y/a to Away arm
s to Stay arm
N to return to the normal disarmed state
If the Quick Bypass feature is enabled (see page 41)
you can omit step 1 from the above procedure.
When one or more zones are bypassed the Ready
light will flash and if the system is fitted with a Premier
RKP8/16 Plus or LCD remote keypad then the Bypass
light will also illuminate.
3
³
To Quick Bypass a group of zones and Away arm,
proceed as follows:
1
Enter bypass group 1 - 4
1
2
3
Zones
4
5
6
7
8
Armed
Service
Ready
Press a
1
3
2
Alarm
2
3
Zones
4
5
6
7
Premier 816
19:30.56 28/04
Press y
8
Alarm
Armed
Service
Ready
Please Exit....
19:30.56 28/04
4
5
6
7
Premier 816
19:30.56 28/04
8
Armed
Ready
Press s
2
3
Zones
4
5
6
7
8
Alarm
Armed
Service
Ready
Premier 816
19:30.56 28/04
The alarm system will arm immediately and the Armed
and Ready lights will flash.
The system is Stay armed with the selected group of
zones bypassed.
The Quick Arm feature must be enabled to use this
feature (see page 41).
This function is used to reset any standing alarms and
service faults. It is also used to reset detectors with a latched
alarm indication, e.g., Smoke Detectors.
³ To Reset Alarms, proceed as follows:
1
Enter Access code ????
1
2
3
2
3
Zones
4
5
6
7
8
Alarm
Armed
Service
Ready
YES to Arm?
MENU for Options
Press N0
Press R
Zones
Premier 816
17:30.21 28/04
1
2
3
4
5
6
7
8
Alarm
Armed
Service
Ready
The keypad will bleep and the alarm system will reset
all latching detectors and attempt to clear any standing
Alarms or Service Faults.
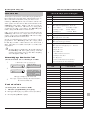
Last Alarm Log
The control panel has a memory that stores the zones that
caused an alarm when the system was last armed.
³ To view the alarm memory, proceed as follows:
1
Enter Access code ????
1
2
The Armed and Ready lights will flash and the exit tone
will sound.
2
3
Zones
4
5
6
7
8
Alarm
Armed
Service
Ready
YES to Arm?
MENU for Options
Press N1
1
2
3
Zones
4
5
6
7
8
Alarm
Armed
Service
Ready
Last Alarm From:
Zone 03
Last Alarm From:
Zone 04
When the exit tone stops, the system is Away armed
with the selected group of zones bypassed.
The keypad will display the zones that caused an alarm
when the system was last armed.
3
INS159
3
Reset Alarms
Quick Bypass and Arm
The Quick Bypass and Arm feature allows you to Bypass a
predefined group of zones and Away or Stay arm the
system. The alarm system has up to four groups, see page
29 on programming bypass groups.
2
Alarm
Service
1
Bypass Zone> 00
Zone 04 Bypassed
The keypad will display the bypassed zones.
If required, zones can be added or removed from the
group by entering the required zone number ??,
e.g. Enter 05 to add Zone 5.
Enter bypass group 1 - 4
Zones
Press N to return to the normal disarmed state.
75
Premier 412/816/832 Installation Manual
Operating the Alarm System
Service Faults
The response to a Service Fault condition is programmed by
the installer but is normally limited to the keypad buzzer. To
silence the Service Fault alarm, enter your Access code.
A flashing Service light indicates a new fault condition. The
alarm system cannot be armed whilst a new fault exists. The
Service light will remain flashing until the new fault is
acknowledged, after which it will revert to a steady yellow
and the alarm system can be armed. The Service light will
remain steady until all faults have been cleared.
After a new Service Fault has been acknowledged the
Service light will revert to steady yellow and the alarm
system can be armed. The Service light will remain steady
yellow until all faults have been cleared.
AC Fail and Telephone Line Fault can each have a delay
programmed. The Service light will turn steady yellow
immediately on either of these faults but no Service Fault
Alarm (transmission or audible alarm) will occur unless the
delay expires.
If your installer has disabled AC fail acknowledgement
the Service light will flash “rapidly” during an AC fail
condition. The system can be armed without requiring
acknowledgement of this fault.
Acknowledging a New Service Fault
³ New service faults can be acknowledged as follows:
1
Enter Access code ????
1
2
3
Zones
4
5
6
7
8
Armed
Alarm
2
Service
Ready
YES to Arm?
MENU for Options
Press N2
1
2
3
Zones
4
5
6
7
8
Alarm
Armed
Service
Ready
1
2
3
4
5
6
7
8
AC Fail
Telephone Line Fault
2-Wire Smoke Alarm
Box Tamper & Auxiliary Input:
Press ) to view type, lights 1 - 5 indicate:
1 = Box Tamper
4 = Auxiliary Tamper *
2 = Auxiliary Tamper
5 = Bell Tamper *
3 = Auxiliary PA
* = UK Bell Module
Date or Time Lost
Zone Tamper/Trouble
Press to view zone number
Keypad Tamper/Removed
Press to view keypad number
Equipment Faults
Press to view fault type, lights 1 - 8 indicate:
1 = Output 1 Fault
2 = Output 2 Fault
3 = Siren/Bell Fault
4 = 2-Wire Smoke Sensor Fault
5 = Auxiliary Fuse Failed
6 = Battery Fault
7 = Service Timer/Zone Soak Test Failed
8 = Com1 Fault or Fail To Communicate
Service Faults Displayed on LCD Keypads
LCD
Fault Condition
&)
System Faults:Press Menu/Reset
&+"2)1
Line Fault
Press Menu/Reset
*,(")/*_:`
The keypad will display all Service Faults.
3
Service Faults Displayed on LED Keypads
Light
Fault Condition
Press N or R to acknowledge the fault and return to
the normal disarmed state.
View Service Faults
³ Standing faults can be viewed as follows:
1. Press the key followed by the key.
2. The keypad will display any Service Faults (see tables).
3. On completion press the key.
,5Z25*-"/
25*-"/
25&)&/6*-"/
"))*-"/
25)/*
1"Z&*",00
*-"/,+"F89
*-"/"6-!F9
21-2192)1
21-21:2)1
&/"+2)1
*,(""+Y2)1
25Y20"2)1
11"/62)1
"/3& "".2&/"!
,*02)1
76
AC Fail
Telephone Line Fault
2-Wire Smoke Alarm
Box Tamper
Auxiliary Tamper (Aux Input)
Auxiliary Tamper (UK Bell Module)
Bell Tamper (UK Bell Module)
Auxiliary PA (Aux Input)
Date or Time Lost
Zone Tamper/Trouble
Keypad Tamper/Removed
Output 1 Fault
Output 2 Fault
Siren/Bell Fault
2-Wire Smoke Sensor Fault
Auxiliary Fuse Failed
Battery Fault
Service Timer/Zone Soak Test Failed
Com1 Fault or Fail To Communicate
INS159
Premier 412/816/832 Installation Manual
Anti-code Reset
³ To perform an Anti-code Reset, proceed as follows:
Enter Access code ????
1
2
3
Zones
4
5
6
7
8
Armed
Alarm
2
Service
Ready
2
3
Zones
4
5
6
7
8
Alarm
Armed
Service
Ready
1
2
3
Zones
4
5
6
7
Armed
Ready
1
2
3
Zones
4
5
6
7
8
Alarm
Armed
Service
Ready
1
2
3
Zones
4
5
6
7
The keypad will display a
randomly generated 4digit Code.
8
Alarm
Armed
Service
Ready
2
Enter Access code ????
3
Contact the ARC to obtain a Anti-code Reset number.
Enter the Anti-code Reset number given to you by the
ARC ????.
If the code is accepted, the keypad will sound an
acceptance tone and the system will reset and return to
the normal disarmed state.
Toggle Chime On and Off
When a zone is enabled for Chime the keypad will generate
a Chime tone every time the zone is violated. This function
allows you to turn the Chime feature on and off.
3
Zones
4
5
6
7
Ready
Enter Access code ????
1
2
3
Zones
4
5
6
7
8
Alarm
Armed
Service
Ready
3
Zones
4
5
6
7
Press C
Zones
Premier 816
17:30.21 28/04
2
3
4
5
6
7
8
Alarm
Armed
Service
Ready
If Chime was off, it will turn on and the keypad will
sound the Chime tone. If Chime was on, it will turn off
and the keypad will sound the acceptance tone.
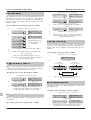
Change User Code
All users of the alarm system can change their own Access
code number.
³ To change your Access code, proceed as follows:
INS159
8
Alarm
Armed
Service
Ready
Code : ******
Enter new code ????
If the code is 4 or 5 digits press the a/y key to
accept.
2
3
Zones
4
5
6
7
8
Alarm
Armed
Service
Ready
Code : ****
Re-enter new code ????
The keypad will sound an acceptance tone if the new
Access code was accepted. If you hear an error tone
(low), please repeat from step 1.
View Log (LCD Only)
The control panel has an Event Log, which stores all system
activity i.e., users entering their codes to arm and disarm the
system, alarm events, faults etc. Each event is time and date
stamped.
³ To view the Event Log, proceed as follows:
1
Enter Access code ????
YES to Arm?
MENU for Options
2
3
Enter N6
Event Type
(showing Zone Text)
Event Type
(Alarm Type & Zone No)
Bedroom 1 PA
1... 13:15.56 28
PA Aud 02 Alm
13:15.56 28/04
Partitions
Time
Day
Time
Day/Month
Press A to toggle
information displayed
4
Press U to scroll up and down through the log.
Press N to when finished.
YES to Arm?
MENU for Options
Enter N4
1
3
2
YES to Arm?
MENU for Options
Enter N5
2
³ To toggle Chime on and off, proceed as follows:
1
8
Armed
1
4
5
2
Alarm
Service
1
Quote Code> 4855
Enter Reply>????
8
Alarm
Service
3
4
YES to Arm?
MENU for Options
Press N3
1
1
1
This feature is normally used in the UK where users are not
permitted to reset the panel following a communicated
alarm. However, the user can reset the panel after entering a
unique remote reset number, which is supplied by their
installer or ARC.
1
Operating the Alarm System
Abort Communications
This option aborts any communications to the Alarm
Receiving Centre.
³ To Abort Communications, proceed as follows:
1
Enter Access code ????
1
2
3
Zones
4
5
6
7
8
Alarm
Armed
Service
Ready
2
Enter N7
1
3
YES to Arm?
MENU for Options
2
3
Zones
4
5
6
7
8
Alarm
Armed
Service
Ready
Premier 816
17:30.21 28/04
The keypad will bleep and the alarm system will abort
all communications to the Alarm Receiving Centre.
77
Premier 412/816/832 Installation Manual
Specifications
6. Specifications
Onboard Communicator
Protocols:
Control Panel
Power Supply
Maximum Current Rating
16.5VAC, 25VA transformer:
16.5VAC, 40VA transformer:
Frequency
1 ADC
1.5ADC
50/60hz PSU Type A
Ripple:
5%
Standby Battery
Maximum Capacity:
Recharge Time is dependent
on Battery Charge Jumper
position:
17Ah (See Safety Note 3, 4 & 5)
300mA position
7AH = 24hr
17AH = 56hr
750mA position
7AH = 10hr
17AH = 24hr
10.5V
9.5V
Low Voltage Alarm:
Deep Discharge Cut-off:
EN50131-6:1997
Maximum PSU current for each output = 1amp
Maximum ripple = 0.6V
For input voltages between 90% & 110% the output voltage shall
be between 11V & 14V
Electrical
Current Consumption
Quiescent Current:
Alarm:
Fuses
Mains (Factory Fit 230VAC
Transformer):
Mains (Factory Fit 115VAC
Transformer):
Battery:
Auxiliary:
Siren:
Data:
Zones
Number:
EOL Resistor Value:
Panel Outputs
O/P 1 - Supervised:
O/P 2 - Supervised:
O/P 3 - 8:
Siren Output (Supervised)
Speaker Mode:
Bell Mode:
2-Wire Smoke Detectors:
78
<50mA
<150mA
125mA, 250V, 20mm
(See Safety Notes 1 & 2)
250mA, 250V, 20mm
(See Safety Notes 1 & 2)
2.5A PTC
900mA PTC
900mA PTC
900mA PTC
Dialling Formats:
REN:
Approval:
Pulse Format, Express Format,
Fast Format, Contact ID, SIA
Level 2/3, Pager and Mobile
Phone
Pulse or DTMF
1
CTR21, DPT-TE-001
EN50136-1-1 & EN50136-2-3
The inbuilt communicator complies with the requirements of
EN50136-2-3 , EN50136-1-1 and are suitable for use in systems
designed for use with ATS levels 1 or 2 and environmental class
1 or 2 – i.e. systems using notification options up to and including
2B. With the PSTN functioning normally, the ATS will comply with
the required performance levels subject to the ARC being
suitably equipped.
These units may be used for Downloading, Remote
Servicing or SMS text messaging purposes in systems at ALL
security grades.
Environmental
Operating Temperature:
Maximum Humidity:
EMC Environment:
-10qC to +55qC
+14qF to +131qF
95% non-condensing
Residential/Commercial/Light
Industrial or Industrial
Physical
Dimensions:
Small Plastic Enclosure 282mm
x 225mm x 80mm
Large Plastic Enclosure 305mm
x 405mm x 100mm
Small Metal Enclosure 305mm
x 310mm x 85mm x 2mm steel
Large Metal Enclosure 305mm
x 405mm x 100mm x 2mm steel
Weight
Small Plastic Enclosure 1.78kg
Large Plastic Enclosure 2.6kg
Small Metal Enclosure 5kg
Large Metal Enclosure 5.8kg
8
3K3
1A switched to 0V
1A switched to 0V
100mA switched to 0V
Minimum load 4:
1A switched to 0V
ESL429CT
System Sensor 2100TS
INS159