1
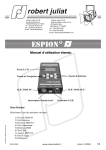
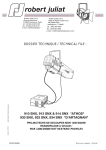
2
Enhanced user's manual
for V1.04 Firmware
L.C.D. screen
Navigation keys
Selection keys
XLR "DMX IN"
XLR "DMX OUT"
On/Off switch
U.S.B plug
Introduction
ManEtendu_vGB_ESPION2_280905.indd
ESPION 2 is made with a USB connexion, it allows it a direct link to a Windows XP Computer.
It also provide power to the ESPION 2 when connected, and so, do not use it own batteries.
The main On/Off switch select where the power come from (batteries or USB).
For the USB connexion, a little software is under working, for the moment it gives you the opportunity to
drive the ESPION 2 DMX frame (Cue sheet, DMX in/DMX out information, manual pots).
We need to have your feed back about it, that's why, for download the software package, we ask you to
give us your name, address, and ESPION 2 serial number.
Feel free to give us your request : [email protected]
DN30754700
www.robertjuliat.fr
Version 5 - 28/09/05
1/10
2
Main Menu
Select one of the following operations
1) View DMX input
2) Rig Check
3) Send DMX Output
4) Test Fixture
5) Regenerate DMX
6) Cable Test
7) Input Analyze
8) Test Line Out
9) Setup
Key
Menu
Enter
Next
Prev
Up
Down
Function
No function
Select current operation
Next menu item
Previous menu item
Next menu item
Previous menu item
1 - View DMX input
This operation will show the DMX input values. If the DMX is not present, the input screen will show:
"no DMX on input".
If it detects a valid DMX, the ESPION 2 will show the DMX values in five different modes:
• 8 bar charts are shown on the bottom line
• 16 bar charts are shown on the bottom line
• 24 bar charts are shown on the bottom line
• 2 decimal values are shown (0-255) on the bottom line
The top line shows the first and last DMX address examined.
In the Decimal and Percentage modes, a little sign ("d" or "%") appears at the end of the top line.
2/10
www.robertjuliat.fr
Version 5 - 23/05/05
ManEtendu_vGB_ESPION2_230505.indd
• 3 percentage values are shown (0-99, FF) FF means 100%, on the bottom line
2
Key
Menu
Enter
Next
Prev
Up
Down
Function
Back to main menu
Select next view mode
Next channel page (page is the number
of channels shown)
Previous channel page
(page is the number of channels shown)
Next channel
Previous channel
2 - Rig Check
This operation sends out one DMX channel with an adjustable value. It can be used for quickly stepping
through the DMX channels (RigCheck).
The Display shows the current channel and selected level.
Key
Menu
Enter
Next
Prev
Up
Down
Function
Back to main menu
Toggle level. If the level is a value above zero,
the level will become zero. Otherwise the level
will become 100% (255)
Next channel. Hold for quick stepping
Previous channel. Hold for quick stepping
Adjust the level up. Hold for quick adjustment
Adjust the level down. Hold for quick adjustment
3 - Send DMX Output
ManEtendu_vGB_ESPION2_230505.indd
This operation can be used to send out a full DMX's scene, an empty, an existing one or a capture of the
DMX input. This DMX scene can also be stored.
The screen shows the following options:
• Edit
• Clear, set all channels to 0
• Capture, take a DMX input snapshot
• Memory A-J
• Store A-J
Version 5 - 23/05/05
www.robertjuliat.fr
3/10
2
Key
Menu
Enter
Next
Prev
Up
Down
Function
Back to main menu
Select the current option and go to the Edit menu
Next option
Previous option
Next option
Previous option
3.1 - Edit DMX scene
Here is the place where you can prepare a memory to record, or just prepare a light balance.
Key
Menu
Enter
Next
Prev
Up
Down
Function
Back to previous menu
Toggle level. If the level is a value above zero,
the level will become zero. Otherwise the level
will become 100% (255)
Next channel. Hold for quick stepping
Previous channel. Hold for quick stepping
Adjust the level up. Hold for quick adjustment
Adjust the level down. Hold for quick adjustment
3.2 - Store memory
When you have captured, edited, modified or made the light balance you needed, you can store it in one
of the ten memories available (A to J).
To store the selected memory press ENTER, if you don’t want to store, press MENU.
4/10
www.robertjuliat.fr
Version 5 - 23/05/05
ManEtendu_vGB_ESPION2_230505.indd
Between two Lighting desk light balance, you have to Capture the DMX in before record your new
memory.
2
4 - Test Fixture
With this operation, it is easy to control a fixture (multi channel unit like a moving head).
The display's top line shows the current manufacturer and the bottom line shows the current fixture type.
Key
Menu
Enter
Next
Prev
Up
Down
Function
Back to main menu
Select current Manufacturer/Fixture and go to
the next menu (channel select, 4.1)
Next fixture type of the same manufacturer
Previous fixture type of the same manufacturer
Next Manufacturer
Previous Manufacturer
4.1 - Fixture Channel select
You just have to select the Fixture's address.
When it's done, the DMX output sends the default values of the selected fixture type.
The default values are:
• Dimmer at full
• Shutter is open
• Color is white
• No Gobo / no Effect
• Pan / Tilt 50% / 50%
It is now easy to step through the fixtures on a DMX line to quickly check them. Like what the RigCheck
is for dimmer channels.
Key
Menu
Enter
Next
Prev
ManEtendu_vGB_ESPION2_230505.indd
Up
Down
Version 5 - 23/05/05
Function
Back to fixture select menu (4)
Lock the start address and go to the fixture
control menu (4.2)
Next fixture. Start address is adjusted by the
number of channels used by the fixture
Previous fixture. Start address is adjusted by
the number of channels used by the fixture
Increment the start address by 1
Decrement the start address by 1
www.robertjuliat.fr
5/10
2
4.2 - Fixture Control
In this menu you can select the fixture operation.
• Control (parameters)
• Run Macro
• Multiple Fixtures
Key
Menu
Enter
Next
Prev
Up
Down
Function
Back to channel select menu (4.1)
Select the current option and goto the Edit menu
Next option
Previous option
Next option
Previous option
4.3 - Fixture Parameter Control
In this menu you can adjust Fixture's parameters.
The top line gives the parameter name and the bottom line gives the channel number and value
(in decimal).
Key
Menu
Enter
Next
Prev
Up
Down
Function
Back to fixture control menu (4.2)
Set parameter to default value
Next parameter
Previous parameter
Adjust value up
Adjust value down
4.4 - Fixture Run Macro
Key
Menu
Enter
Next
Prev
Up
Down
6/10
Function
Back to fixture control menu (4.2)
Run selected macro
Next macro
Previous macro
Next macro
Previous macro
www.robertjuliat.fr
Version 5 - 23/05/05
ManEtendu_vGB_ESPION2_230505.indd
For easier control, some Macro can be executed (if some are present in the library for the library for this
fixture’s type). A macro is a multi-step sequence that can be used for Lamp On / Reset events.
2
4.5 Multiple fixtures
You can control at the same time identical fixtures with a different DMX address. The top line gives the
number of fixtures to control. The bottom line gives the DMX Channel step between two fixtures.
(ex : Align=20 : the first fixture start at channel 1, the second at channel 21,…).
Key
Menu
Enter
Next
Prev
Up
Down
Function
Back to previous menu
Set parameter to default value
Increment the DMX Channel step
Increment the DMX Channel step
Increment the fixture number
Decrement the fixture number
5 - Regenerate DMX
This operation is used to regenerate the DMX from the input to the output. Errors are removed and the
frame rate can be adjusted. Also a softpatch can be set.
DMX in and out are terminated by a 120 Ohms resistor.
Options are:
• Activate, start the regenerator and softpatch
• Edit Patch
• Clear Patch, set the softpatch 1 to 1
5.1 - Regenerate Active
ManEtendu_vGB_ESPION2_230505.indd
The display shows the DMX input status and output frame rate.
This function will help you to connect some old DMX devices, which may have a lower processor.
Key
Menu
Enter
Next
Prev
Up
Down
Version 5 - 23/05/05
Function
Back to previous menu
Adjust frame rate up. Maximum of 40 Hz
Adjust frame rate down. Minimum of 25 Hz
www.robertjuliat.fr
7/10
2
5.2 - Edit soft patch
The display shows the selected output channels and the connected input channels.
Key
Menu
Enter
Next
Prev
Up
Down
Function
Back to previous menu
Store the settings and go back to previous menu
Select the next output channel
Select the previous output channel
Change the connected input channel up
Change the connected input channel down
To activate the Softpach, you have to run the Regenerate function.
6 - Cable Test
Connect a cable between input and output. The cable test will check the cable (except pin 1 continuity).
The display will indicate the cable status.
• Cable pin 2 & 3 inverted.
• Pin 2 open / pin 3 open.
• Pin 2 / 3 connected to pin 1.
• Pin 2 & 3 connected together.
8/10
www.robertjuliat.fr
Version 5 - 23/05/05
ManEtendu_vGB_ESPION2_230505.indd
Press MENU go back the Main menu.
2
7 - Input Test
This operation shows the DMX input information.
• DMX status and channel count.
• Start code.
• Rate in (Hz), shows minimum and maximum value.
• Frame in (mS), shows minimum and maximum value.
• Break length (μS) , shows minimum and maximum value.
• Mark After Break length (μS) , shows minimum and maximum value.
Key
Menu
Enter
Next
Prev
Up
Down
Function
Back to main menu
Reset minimum and maximum values
Next option
Prev option
Next option
Prev option
8 - Output Test
Check if the DMX output is terminated / open or is overloaded / short-circuited.
Press MENU to go back the main menu.
9 Dip-Switch
ManEtendu_vGB_ESPION2_230505.indd
This tool is made to help you to configure the old dimmers rack using dip switch to set the DMX address
(1, 2, 4, 8, 16, .., 128, 256).
You just have to indicate the address you want to reach, the ESPION 2 will give you the switches to put on.
Key
Menu
Enter
Next
Prev
Up
Down
Version 5 - 23/05/05
Function
Back to main menu
Address up
Address down
Address up
Address down
www.robertjuliat.fr
9/10
2
10 Setup
In this menu you can adjust operational values.
Options are:
• "Battery", gives information (%) about battery’s life.
• "Language", (French / English).
• "BacklOff", gives the time after the backlight will go off (10sec-10min).
• "BacklLev", you can choose the backlight level (25% to full).
• "DMX BOOST", you can regenerate the DMX from the input to the output while using
the functions 1, 2 and 4 (diagram 1, below).
• "ESPION 2 v#.##" shows the actually ESPION 2 software version.
Function
Back to main menu
Store value
Next option
Prev option
Adjust value up
Adjust value down
1. DMX BOOST OPTION EXAMPLE
10/10
www.robertjuliat.fr
Version 5 - 23/05/05
ManEtendu_vGB_ESPION2_230505.indd
Key
Menu
Enter
Next
Prev
Up
Down