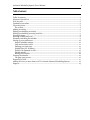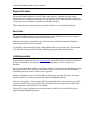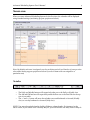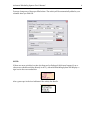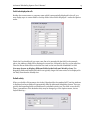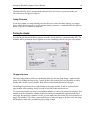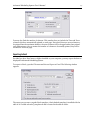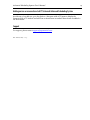
1
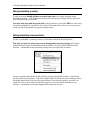
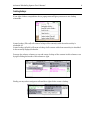
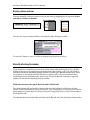
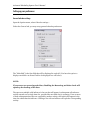
Advanced Scheduling
System
v.2.4
Another efficient and affordable ACT! Add-On by
http://www.exponenciel.com
Advanced Scheduling System User’s Manual
Table of contents
Table of contents............................................................................................................................. 2
Purpose of the add-on .................................................................................................................... 3
How it works ................................................................................................................................... 3
Installation procedure .................................................................................................................... 3
The main screen.............................................................................................................................. 4
The toolbar.................................................................................................................................. 4
Adding an activity ........................................................................................................................... 5
Editing/rescheduling an activity.................................................................................................... 7
Editing/rescheduling recurring activities...................................................................................... 7
Creating lookups.............................................................................................................................8
Resizing columns and rows ............................................................................................................ 9
Manually refreshing the calendar .................................................................................................. 9
Setting up your preferences ......................................................................................................... 10
General calendar settings ......................................................................................................... 10
Cells and activities colors ..........................................................................................................11
Defining your time slots ........................................................................................................... 13
Weekly Days Off - Holidays...................................................................................................... 14
Fields to be displayed in cells................................................................................................... 15
Default activity.......................................................................................................................... 15
Settings File location ................................................................................................................ 16
Printing the calendar .................................................................................................................... 16
The page setup screen .............................................................................................................. 16
Exporting to Excel .........................................................................................................................17
Adding an icon or a menu item to ACT! to launch Advanced Scheduling System..................... 19
Support.......................................................................................................................................... 19
2
Advanced Scheduling System User’s Manual
3
Purpose of the add-on
Advanced Scheduling System is an ACT! add-on that creates a calendar in a table format,
allowing the user to easily spot open time slots, schedule and reschedule activities. It does not
replace your ACT! calendar and activities are still created in ACT!. Advanced Scheduling System
is a new easy-to-use interface to visualize and schedule activities.
This visually attractive calendar may be exported to Excel for easy printing and sharing.
How it works
Advanced Scheduling System is very simple. Based on user-defined activity slots, it creates a
calendar in a table format in which each cell is a time slot.
Whenever an activity is scheduled in one of the time slots, activity information is displayed
indicating that the time slot is occupied.
To schedule or edit an existing activity, simply double-click one of the time slots. The standard
ACT! Schedule Activity window will open with the appropriate fields already filled in.
Installation procedure
Download the program file from our download page and double-click it to start the installation.
Follow the instructions and once the installation is completed, run ACT! and open your
database.
An icon should have been added to your Contact toolbar to launch Advanced Scheduling System
directly from within ACT!. If the icon installation failed, you will have to instruct Advanced
Scheduling System to create it. Here is how to proceed:
While your database is open, click the Windows Start button, go under Programs, locate the
Exponenciel ACT! Add-Ons group and click Advanced Scheduling System.
Then go to the Options | Integrate with ACT! menu and add icons or menu items to your ACT!
screens as needed. This way, you will be able to quickly launch the program from within ACT!.
When prompted, accept that ACT! be re-started.
When ACT! re-starts, whatever icons or menu items you asked to be created will be there to
launch Advanced Scheduling System.
Advanced Scheduling System User’s Manual
4
The main screen
When you start Advanced Scheduling System for the first time, the calendar will be displayed
using standard settings (see Setting up your preferences below).
Note: By default, each user is assigned a row for each time period (see Number of rows per time
slots under Setting up your preferences below if you don't want each row assigned to a
particular user)
The toolbar
o
o
o
The Daily and Weekly buttons will respectively take you to the Daily or Weekly view
The AM and PM buttons will respectively make the first row or the first PM row the top
row of your table.
The << and >> button will move the calendar one week backward or forward (Weekly
view) or one day backward or forward (Daily view).
NOTE: You may also switch views by double-clicking a column header. For instance, in the
above screen, if you double-click "Tuesday May 18", you will switch to the Daily view for May 18.
Advanced Scheduling System User’s Manual
5
The Jump to drop-down list also allows to quickly jump to a specific date:
The Filter… button opens the Filter Calendar window which allows selecting the users you want
to display in your calendar as well as the type and priority of the activities.
Adding an activity
To create a new activity, simply double-click an empty time slot or right-click an empty
time slot and choose Schedule in the popup menu. The standard ACT! Schedule activity window
will pop up.
The information is already pre-filled:
o the type is set as per your default activity settings (see Defining a default activity below)
o the date is the date of the slot you double-clicked
o the time is the time of the slot you double-clicked
o the duration is the time slot duration as defined in the Calendar settings window
o The with field is set to the currently active contact in ACT
o The regarding field is per your default activity settings (see Defining a default activity
below)
o The priority is per your default activity settings (see Defining a default activity below)
Advanced Scheduling System User’s Manual
You may change any of these pre-filled values. The activity will be automatically added to your
calendar when you click OK.
NOTE:
If there are more activities in a time slot than can be displayed (which may happen if you or
other users schedule activities directly in ACT!), Advanced Scheduling System will display a +
sign icon in the overcrowded slot.
Also a green spot in the icon indicates if the activity has details.
6
Advanced Scheduling System User’s Manual
7
Editing/rescheduling an activity
To edit an activity, double-click an occupied time slot or do a right-click and choose
Reschedule activity…. ACT! Schedule activity window will pop up. Changes will be reflected in
your calendar when you click OK.
You may also drag-and-drop activities: to drag-and-drop, press the CTRL key, then select
an activity and drag it to another slot. If you drop it on another user's slot in "one row per user"
mode, you will be prompted to accept the change of user.
Editing/rescheduling recurring activities
To edit or reschedule a recurring activity, use the same methods as described above.
The only exception is when you want to change the recurring settings (any change
under the Recurring tab of the Schedule activity window). For this, use the Edit Recurring
Settings… command from the menu that pops up when you right-click an activity.
If you use another method, like double-clicking, using the Reschedule activity… command or
the View/Edit Activity Details… and make changes under the Recurring tab, all changes will be
discarded unless the activity is the first open instance of the recurring activity. As there is no
visual way to know if an instance is the first open one, you should use the Edit Recurring
Settings… command to be sure the changes will be taken into account.
Advanced Scheduling System User’s Manual
8
Creating lookups
If you right-click an occupied time slot, a popup menu will give you access to two lookup
commands.
Create Lookup (This cell) will create a lookup of the contact(s) with whom the activity is
scheduled for.
Create Lookup (All cells) will create a lookup of all contacts with whom an activity is scheduled
in the currently displayed calendar.
You may also select a column or a row and create a lookup of the contacts in this column or row
by right-clicking the header of this column or right.
Finally you may select contiguous cells and do a right-click to create a lookup.
Advanced Scheduling System User’s Manual
9
Resizing columns and rows
You may manually resize any column or row at any time by dragging the cell separator in the
column or in the row header.
You may also reset a column width or row height by right-clicking its header.
To reset all columns or rows (or both) see Settings your preferences below.
Manually refreshing the calendar
If you schedule or reschedule activities from within Advanced Scheduling System (by doubleclicking a time slot or by using the popup menu when right-clicking a cell), you don't need to
refresh the Advanced Scheduling System calendar: the table gets updated automatically. But if
you schedule or reschedule activities directly from within ACT! or if you are multiple users
scheduling activities simultaneously, then use the File|Quick Refresh command to regularly
update your Advanced Scheduling System calendar.
Difference between the Quick Refresh and Full Refresh
The Quick Refresh will just look for activities that have been added or edited since the last
refresh. The Full Refresh will refresh all activities. I you change data in a contact record (like the
phone number), a Quick Refresh will not pick up the change unless the activity has been edited.
A Full Refresh will.
The calendar may be automatically refreshed (Quick Refresh only). See Calendar settings below.
Advanced Scheduling System User’s Manual
10
Setting up your preferences
General calendar settings
Open the Options menu, select Calendar settings….
Under the General tab, you may set up general calendar preferences.
The "Main field" is the first field that will be displayed in each cell. (You have the option to
display extra fields: see Extra Fields to be displayed in a cell below).
NOTE:
If you never use recurring activities, disabling the Recurring activities check will
speed up the loading of the data.
The span over multiple cells indicator is the text that will appear in subsequent cells when an
activity extends over a single time slot, provided the next time slot(s) are empty. If one or more
of these subsequent time slots are occupied by another activity, this activity will appear in the
time slot rather than the indicator. Clicking a slot with an indicator will open the corresponding
activity.
Advanced Scheduling System User’s Manual
Cells and activities colors
Under the Colors tab, you have the option to change the default colors.
You may define colors specific to each user by selecting Color according to user. Click the
Define… button to assign a color to each specific user.
11
Advanced Scheduling System User’s Manual
12
Number of rows per time slot
Under the Cells tab, you may define how many rows you want per time slots. By default each
user is assigned a row. But if you do not assign activities to a specific user when creating them,
you may choose to select the Rows per slot option (*).
If you do not choose One row per user, activities will be displayed one below the other: they are
automatically sorted by user name.
One row per user
3 rows per slot
In this case, the option of assigning a color to
each user allows visual identification of the user
(*) Some businesses will not assign the activity to a particular user (a technician for example ) until the day before the activity: they
create a user called "Unassigned" and schedule all activities with "Unassigned". Then the day before, each activity is reviewed and
rescheduled with a technician. If you use this method, choose the "Rows per slot" option and enter the number of users in the
textbox next to it.
Advanced Scheduling System User’s Manual
13
Cell sizes
Under the Cells tab, you may define a standard width and height for your cells. Daily and Weekly
views may have different size settings.
Auto-refresh
Under the Auto-refresh tab, you may setup Advanced Scheduling System auto-refresh feature.
See Manually refreshing the calendar above on why you might want the calendar to be
refreshed.
Depending on your database and hardware, refreshing may take more or less time and be more
or less demanding on your system. We recommend that you leave the prompt checkbox checked
until you know how it affects the use of the program. When you are confident that refreshing can
be handled in the background without your knowledge, remove the checkbox.
Defining your time slots
To define your own time slots, go to the Options menu and choose Time slots… You may define
up to 32 time slots.
To add a time slot, check the unchecked checkbox below the last checked time slot.
To remove the last time slot, uncheck it.
Each time slot can have a different duration. Make sure though that time slots do not overlap.
Advanced Scheduling System User’s Manual
14
Weekly Days Off - Holidays
You may want your Weekly Days Off to not appear in the Calendar. For this, go to the Options
menu, select Days Off… Then check the days that you want to hide.
You may also maintain a list of your company holidays. If a day defined as a holiday is to appear
in the Calendar, its background color will be set to the inactive time slot color.
To add a date, choose Holidays… under the Options menu. Then simply select the date in the
dropdown calendar then press Add. You will be prompted to enter a description. The description
will appear in your calendar as the title of the column (in lieu of the date).
Advanced Scheduling System User’s Manual
15
Fields to be displayed in cells
Besides the contact name or company name which is automatically displayed in the cell, you
may display up to 6 contact fields or activity fields. Select Fields Displayed… under the Options
menu.
Check the Line checkbox if you want a new line to be started with the field. In the example
above, the Address 1 field will be displayed on a new line, followed by the City on the same line.
Then the Phone field will be on the next line. And on the next line the Scheduled For field.
You may choose to display different fields in the Daily and Weekly views. The
Regarding fields and Details field which are typically longer are better suited to be displayed in
the Daily view than the Weekly view.
Default activity
When you double-click an empty slot in the Calendar table, the standard ACT! activity windows
is displayed and most fields are automatically filled by Advanced Scheduling System. The type,
priority and regarding fields are filled based on a default activity (see The main screen above).
These 3 parameters of the default activity may be changed: go to the Options menu, choose
Default activity….
Advanced Scheduling System User’s Manual
16
The Scheduled For user is automatically selected if you are in one-row-per-user mode (see
The Cells tab of the Options window).
Settings File location
If you are working on a network and you want all users to share the same settings, you simply
have to share the settings file. For this, use the Settings Location… command under the Options
menu. To point to a common settings file.
Printing the calendar
To print the Advanced Scheduling System calendar, choose the Print command under File. The
calendar will be printed the way it appears on screen, including colors if you use a color printer.
The page setup screen
The Page setup window which you can display either by choosing Page Setup… under the File
menu or by clicking the Page setup… button of the Print window gives you the ability to add a
header and a footer to your calendar. Both will be centered and repeated on all pages.
The &[Page] keyword serves as a placeholder for the page number. It will be replaced by the
page number when printing. It may be used in both the header and the footer.
To control page breaks, you may set a maximum number of rows to be printed on one page. This
number does not include the column header row which is automatically repeated at the top of
each page. By specifying a number of rows, you can make sure that a time slot is not printed on 2
pages. For instance, if you have 4 users and choose to limit each page to 40 data rows, each page
will display 10 time slots, provided the page is high enough.
Advanced Scheduling System User’s Manual
17
You may also limit the number of columns. This number does not include the Time and Users
columns which are automatically printed on each page. Note that if there are more columns to
be printed than the maximum number, the extra columns will be dropped rather than printed
on a different page. Also no matter the number of columns to be actually printed, they will be
shrinked to fit on one page.
Exporting to Excel
Provided you have Excel 2000 or higher installed on your computer, you may export the data as
displayed in Advanced Scheduling System.
To export to Excel, open the File menu and choose Export to Excel. The following window
appears.
The export process uses a regular Excel template. A basic default template is installed with the
add-on: it is called advsched_template.xlt and is located in the add-on folder.
Advanced Scheduling System User’s Manual
18
You may open this template with Excel, modify it to your liking then save it under a name of
your choice, so that the formatting is saved ready for the next export. You may have as many
templates as you want and they may be located anywhere on your computer's hard drive or on a
network.
Before you press the OK button to start the exporting process, you may choose from a variety of
options. Note that these options will be saved and associated with your template name, so that
the next time you pick a template the same options will be restored.
The options are the following:
o You may include any of the 2 fixed columns or row (date and time). If you already
included them in your Excel template, you will want to uncheck these 2 boxes.
o Export background colors will make the background of the Excel cells the same color as
in your Advanced Scheduling System table.
o Export activity colors will color activities using the same color as in the table.
o Add borders around data cell will add a border around each cell or around each activity.
It may be useful if you choose the Export color scheme or Include extra fields options.
o Export cell sizes will make your Excel document use the same row or column widths as
in the table.
o Include extra fields allows to export the extra fields that you set to display in your cells. If
not checked, it will only export the primary field. Note that if you choose this option, the
processing time will more than likely greatly increase.
Here is an example of output to Excel.
Advanced Scheduling System User’s Manual
Adding an icon or a menu item to ACT! to launch Advanced Scheduling System
As with any of our add-ons, go to the Options | Integrate with ACT! menu to display the
Integrate with ACT! window and add icons or menu items as needed. Menu items are added to
the Tools menu.
Support
For support, please contact [email protected].
Rev. June 26, 2004 – v.2.3
19