1
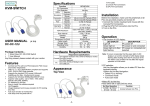
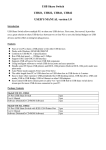
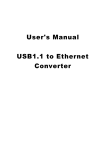
User Manual
USB 2.0 4-Port Hub
Safety Instructions
Always read the safety instructions carefully
Keep this User’s Manual for future reference
Keep this equipment away from humidity
Lay this equipment on a reliable flat surface before setting it up
If any of the following situation arises, get the equipment checked by a service
technician:
o The equipment has been exposed to moisture
o The equipment has been dropped and damaged
o The equipment has obvious sign of breakage
o The equipment is not working properly or you cannot get it to work
according to User’s Manual
Introduction
The USB 2.0 High Speed 4-port hub allows you to add multiple high performance
USB 2.0 peripheral devices to your PC. Moreover, this product is fully backwards
compatible with the USB Revision 1.1 products, which means your previous USB 1.1
devices can continue to function as usual. The USB 2.0 high-speed hub is fully
compliant with the USB 2.0 specification and permits you to connect up to a
maximum of 127 USB devices to your PC through daisy-chain.
Features:
1. Compliant with Universal Serial Bus Specification Revision 2.0 (Data Rate 1.5/
12/ 480 Mbps) and USB 1.1.
2. Supports both OHCI and UHCI.
3. Supports Self-power mode only
4. Include one(1) upstream and four(4) downstream USB ports.
5. One (1) Red LED indicator for Power On LED, and four (4) Green LED
indicators for downstream port status.
6. Supports Plug & Play specification.
7. Over-current detection and protection with LED status indicators
8. Stackable one by one.
1
9. Connects up to a maximum of 127 USB devices through cascading multiple hubs
System Requirements
IBM Compatible Pentium-233 MHz or faster & MAC PCs
64 MB RAM or more
PC or MAC with available USB 2.0 port
OS support: Win98SE/Win ME /Win 2000/Win XP & Mac 10.1 up.
Package Contents
USB 2.0 4-Port Hub
USB 2.0 Cable
A Switching Power Adapter
User Manual
Specification
Ports
Four downstream ports and one upstream port
Compliance
FCC regulations for home or office use CE emissions
Power
Storage Temperature
Self Power : 5V /2.5A
Adapter: Input :100~240v 50Hz-60Hz
Output : 5V /2.5A
-10~85℃
Working Temperature
0~40℃
Supported O.S.:
Functions
O.S.
USB 2.0 4-Port Hub
USB 1.1
USB 2.0
Win 98SE
Build-in O.S.
Follow system driver
Win ME
Build-in O.S.
Follow system driver
Win 2000
Build-in O.S.
Follow system driver
Win XP
Build-in O.S.
Follow system driver
MAC
Build-in O.S.
Follow system driver
Remark:
If you connect this hub to PC or Mac, which system ( USB port, PCI card or hub )
2
is version 2.0, it will ask for the system’s USB 2.0 driver
Software Installation
After you connecting this hub to PC by a USB 2.0 cable, the system will detect the
device and install the required drivers automatically.
Windows System
After completing the installation of the USB 2.0 4-Port Hub, go to My Computer and
right click to select Properties. Then click the Device Manager tab and select
Universal Serial Bus Controllers to find General Purpose USB 2.0 Hub.
Highlight that then go to the Property icon and check the Device Status, make sure it
read, “This device is working properly.”
Macintosh System
After completing the installation of the USB 2.0 4-Port Hub, open Apple System
Profiler and click “Devices and Volumes” to view the names of attached USB 2.0
devices. Verify that the device has been detected by locating its name in the Apple
System Profiler.
Hardware Installation
1. Plug the included AC power adapter into the power jack at the rear of the USB 2.0
4-Port Hub and an electrical outlet.
2. Plug the B-type connector into the upstream port
3. Plug the A-type connector into a computer or USB 2.0 Hub downstream port
4. Connect USB 2.0 devices or Hubs to the 4 Port Hub’s downstream 1 ~ 4 ports.
Front View
Rear View
Cover
Power
LED (Red)
Status LED
(Green)
Upstream
Port
Downstream
Port
3
Power Jack
LED Indicators
The 4 Port iStack USB 2.0 Hub is equipped with LED indicators:
LED Indicator (red):
The indicator lights up red when the USB 2.0 Hub is receiving power from its
external power source.
LED Indicator (green):
Each port has one status LED.
ready to use.
When the LED is on the downstream port means it is
Over-Current Status:
When the current limit exceeded
happen, the over protection will
disconnect power from the
related port by turning off the
green LED.
A pop-up USB 2.0 Hub Current
Limit Exceeded window will
appear. Please click Reset to
resume work or you can reset the
hub by unplugging the USB 2.0
cable and plugging it back.
Using the USB Hub Stand
There are 4 ways to set up this USB 2.0 Hub stand. Either vertically, horizontally,
fastening magnetically or fastening with screws. Furthermore, it is stackable with
USB 2.0 7-Port Hub as well.
Stand and Magnet
4
Magnet
Stand
Screws
U-shaped metal
A. Vertically
Figure 2
Figure 1
Track
Bottom
Track
Long
Top Cover
Clipper
Track
Track
Clipper
Short
Stopper
1. Push the USB 2.0 Hub from A all the way
down until you meet the stopper. (Refer to
2. Push the USB 2.0 Hub all the way in
until you hear a click. There is a track
on both the top and the bottom so you
can put it either way depending on your
Figure 1)
situation. (Refer to Figure 2)
B. Horizontally
Figure 3
Stand Bottom
Stand-off
Stand-off
Stopper
1. Have the bottom of the stand facing up
and push the stand to the bottom of the hub
between the stand-off. Make sure you here
a click. You could push the stand in from
the left or the right. (Refer to Figure 3)
Stand-off
5
C. Fastening Magnetically
You can secure the USB 2.0 Hub on the computer table or steel frame.
Figure 4
Screw
Figure 5
Magnet
Magnet
U-shaped
Metal
Screw
Magnet
Hub
Bottom
Stand
Bottom
Stand
Bottom
Magnet
U-shaped metal
1. Please follow these figures in order and
use the screw that comes with the hub.
2. Fasten the magnet on the stand, and place
the stand in the hub and attach the stand to
(Refer to Figure 4)
the desk or steel frame. (Refer to Figure 5)
Note: To eliminate data loss, do not place disks next to or on this device.
6
D. Fastening with Screws
Figure 6
44 mm
Screw
1. Secure the stand to the desk and fasten the
screws on both side of the stand.
* Package doesn’t include screws for the desk.
2. Slide the USB 2.0 Hub into the stand. Do the
same for both vertically and horizontally
placed hubs. (Refer to Figure 6)
Desk
1. USB 2.0 4-Port Hubs also can be stacked together
with our USB 2.0 7-Port Hub, therefore, you can use
both the seven and four port hubs together for your
convenience.
2. When you slide in the hubs in a stack face them in
Figure 7
the same direction. (Refer to Figure 7)
3. Slide the hubs inward until you hear a click.
* Do not stack hubs in opposite directions.
Certificate
FCC– Certificate
This equipment has been tested and found to comply with Part 15 of the FCC Rules. Operation is
subject to the following two conditions:
(1) This device may not cause harmful interference
(2) This device must accept any interference received. Including interference that may cause undesired
operation.
CE – Certificate
This equipment is in compliance with the requirements of the following regulations:
EN 55 022: CLASS B
7
DISCLAIMER
Information in this document is subject to change without notice. The manufacturer
does not make any representations or warranties (implied or otherwise) regarding the
accuracy and completeness of this document and shall in no event be liable for any
loss of profit or any commercial damage, including but not limited to special,
incidental, consequential, or other damage.
No part of this document may be reproduced or transmitted in any form by any means,
electronic or mechanical, including photocopying, recording or information recording
and retrieval systems without the express written permission of the manufacturer.
8