1
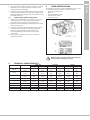
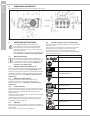
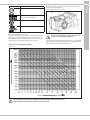
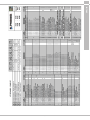
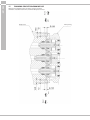
Menu Serie KT-WK KT24 - KT28 -KT30 - KT32 - KT36- KT40 WK155 - WK6 - WK8 Manuale uso e manutenzione Use and Maintenance Manual Manuel d'utilisation et d'entretien Betriebs- und Wartungsanleitung Manual de Uso y mantenimiento Manual de uso e manutenção Руководство по эксплуатации и техническому обслуживанию 使用和保养手册 1 INTRODUCTION........................................................................................................................................................................ 20 2 DESCRIPTION OF SYMBOLS..................................................................................................................................................... 20 3SAFETY ................................................................................................................................................................................. 20 3.1 3.2 3.3 3.4 3.5 General safety warnings................................................................................................................................................................... 20 Essential safety in the high pressure system............................................................................................................................. 20 Safety during work............................................................................................................................................................................. 20 Rules of conduct for the use of lances........................................................................................................................................ 20 Safety during system maintenance.............................................................................................................................................. 21 4 PUMP IDENTIFICATION............................................................................................................................................................ 21 5 TECHNICAL CHARACTERISTICS............................................................................................................................................... 21 6 DIMENSIONS AND WEIGHT...................................................................................................................................................... 22 7 OPERATING INSTRUCTIONS..................................................................................................................................................... 22 7.1 Water temperature............................................................................................................................................................................. 22 7.2 Maximum pressure and flow rate................................................................................................................................................. 22 7.3 Minimum rotating speed................................................................................................................................................................. 22 7.4 Sound emission................................................................................................................................................................................... 22 7.5Vibration................................................................................................................................................................................................. 22 7.6 Brands and types of oils recommended..................................................................................................................................... 22 8 PORTS AND CONNECTIONS..................................................................................................................................................... 24 9 PUMP INSTALLATION............................................................................................................................................................... 24 9.1Installation............................................................................................................................................................................................. 24 9.2 Rotation direction............................................................................................................................................................................... 24 9.3 Version change.................................................................................................................................................................................... 24 9.4 Hydraulic connections...................................................................................................................................................................... 24 9.5 Pump supply......................................................................................................................................................................................... 25 9.6 Suction line........................................................................................................................................................................................... 25 9.7Filtration................................................................................................................................................................................................. 25 9.8 Outlet line.............................................................................................................................................................................................. 26 9.9 Calculation of the internal diameter of the duct pipes......................................................................................................... 26 9.10V-belt transmission............................................................................................................................................................................ 27 9.11Transmission definition.................................................................................................................................................................... 27 9.12Definition of static pull to apply on belts................................................................................................................................... 29 9.13Transmission of power from the second PTO........................................................................................................................... 29 10 START-UP AND OPERATION..................................................................................................................................................... 29 10.1Preliminary checks.............................................................................................................................................................................. 29 10.2Start-up................................................................................................................................................................................................... 30 11 PREVENTIVE MAINTENANCE................................................................................................................................................... 30 12 PUMP STORAGE........................................................................................................................................................................ 30 12.1Long-term inactivity.......................................................................................................................................................................... 30 12.2Method for filling pump with anti-corrosion emulsion or anti-freeze solution........................................................... 30 13 PRECAUTIONS AGAINST FROST............................................................................................................................................... 30 14 GUARANTEE CONDITIONS....................................................................................................................................................... 30 15 OPERATING FAULTS AND THEIR POSSIBLE CAUSES............................................................................................................... 31 16 EXPLODED DRAWING AND PARTS LIST................................................................................................................................... 32 17 FLUSHING CIRCUIT DIAGRAM OF USE..................................................................................................................................... 34 18 DECLARATION OF INCORPORATION....................................................................................................................................... 35 19 ENGLISH Table of Contents ENGLISH 1 INTRODUCTION 5. The ends of high pressure pipes must be sheathed and secured in a solid structure, to prevent dangerous whiplash in case of bursting or broken connections. 6. Appropriate protective casing must be provided in pump transmission systems (couplings, pulleys and belts, auxiliary power outlets). This manual describes the instructions for use and maintenance of KT-WK LOW-PRESSURE version pumps and should be carefully read and understood before using the pump. Proper pump operation and duration depend on the correct use and maintenance. Interpump Group disclaims any responsibility for damage caused by negligence or failure to observe the standards described in this manual. Upon receipt, verify that the pump is intact and complete. Report any faults before installing and starting the pump. 2 3.3 The room or area within which the high pressure system operates must be clearly marked and prohibited to unauthorised personnel and, wherever possible, restricted or fenced. Personnel authorised to access this area should first be instructed how to operate within this area and informed of the risks arising from high pressure system defects or malfunctions. Before starting the system, the Operator is required to verify that: 1. The high pressure system is properly powered, see chapter 9 par. 9.5. 2. The pump suction filters are perfectly clean; it is appropriate to include a device indicating the clogging level on all devices. 3. Electrical parts are adequately protected and in perfect condition. 4. The high pressure pipes do not show signs of abrasion and the fittings are in perfect order. Any fault or reasonable doubt that may arise before or during operation should be promptly reported and verified by qualified personnel. In these cases, pressure should be immediately cleared and the high pressure system stopped. DESCRIPTION OF SYMBOLS Read the contents of this manual carefully before each operation. Warning Sign Read the contents of this manual carefully before each operation. Danger Sign Danger of electrocution. Danger Sign Wear a protective mask. Danger Sign Wear protective goggles. Danger Sign Put on protective gloves before each operation. 3.4 Danger Sign Wear appropriate footwear 3 SAFETY 3.1 General safety warnings Rules of conduct for the use of lances 1. The operator must always place his safety and security first, as well as that of others that may be directly affected by his/her actions, or any other assessments or interests. The operator's work must be dictated by common sense and responsibility. 2. The operator must always wear a helmet with a protective visor, waterproof gear and wear boots that are appropriate for use and can ensure a good grip on wet floors. Improper use of pumps and high pressure systems as well as non-compliance with installation and maintenance standards can cause serious damage to people and/or property. Anyone assembling or using high pressure systems must possess the necessary competence to do so, knowing the characteristics of the components that will assemble/use and take all precautions necessary to ensure maximum safety in all conditions of use. In the interest of safety, both for the Installer and the Operator, no reasonably applicable precaution should be omitted. 3.2 Safety during work Note: appropriate clothing will protect against sprays of water but not from direct impact with jets of water or very close sprays. Additional protections may therefore be necessary in certain circumstances. 3. It is generally best to organise personnel into teams of at least two people capable of giving mutual and immediate assistance in case of necessity and of taking turns during long and demanding operations. 4. The work area jet range must be absolutely prohibited to and free from objects that, inadvertently under a pressure jet, can be damaged and/or create dangerous situations. 5. The water jet must always and only be pointed in the direction of the work area, including during preliminary tests or checks. 6. The operator must always pay attention to the trajectory of debris removed by the water jet. Where necessary, suitable guards must be provided by the Operator to protect anything that could become accidentally exposed. 7. The operator should not be distracted for any reason during work. Workers needing to access the operating area must wait for the Operator to stop work on his/her own initiative, after which they should immediately make their presence known. Essential safety in the high pressure system 1. The pressure line must always be provided with a safety valve. 2. High pressure system components, particularly for systems that operate primarily outside, must be adequately protected from rain, frost and heat. 3. The electrical control system must be adequately protected against sprays of water and must meet specific regulations in force. 4. The high pressure pipes must be properly sized for maximum operating pressure of the system and always and only used within the operating pressure range specified by the Manufacturer of the pipe itself. The same rules should be observed for all other auxiliary systems affected by high pressure. 20 3.5 PUMP IDENTIFICATION Each pump has its own Serial No. XX.XXX.XXX see pos. and an identification label, see pos in Fig. 1 that shows: - Pump model and version - Max revs - Absorbed power HP - kW - Flow rate l/min - Gpm - Pressure bar- PSI Safety during system maintenance 1. High pressure system maintenance must be carried out in the time intervals set by the manufacturer who is responsible for the whole group according to law. 2. Maintenance should always be performed by trained and authorised personnel. 3. Assembly and disassembly of the pump and the various components must only be carried out by authorised personnel, using appropriate equipment in order to prevent damage to components, in particular to connections. 4. Always only use original spare parts to ensure total reliability and safety. Fig. 1 Model, version and serial number must always be indicated when ordering spare parts 5 TECHNICAL CHARACTERISTICS Model KT 24 KT 28 KT 30 KT 32 KT 36 KT 40 WK155 WK 6 WK 8 Rpm 1450 1750 1450 1750 1450 1750 1450 1450 1580 1450 1000 1000 1000 Flow rate l/min Gpm 51.1 13.50 61.7 16.30 69.6 18.40 84.0 22.20 79.9 21.10 96.4 25.50 91.0 24.0 115.1 30.40 125.4 33.10 142.1 37.50 55.0 14.50 62.0 16.40 80.0 21.10 Pressure bar 250 200 200 175 175 140 150 120 125 100 150 100 100 21 Power psi 3625 2900 2900 2538 2538 2030 2175 1740 1813 1450 2175 1450 1450 kW 24.4 23.6 26.6 28.0 26.7 25.8 26.0 26.4 29.9 27.1 15.74 11.84 15.3 HP 33.2 32.1 36.2 38.2 36.3 35.1 35.4 35.9 40.7 36.9 21.4 16.1 20.8 ENGLISH 4 8. It is important for safety that all team members are always fully aware of each other's intentions in order to avoid dangerous misunderstandings. 9. The high pressure system must not be started up and run under pressure without all team members in position and without the Operator having already directed his/her lance toward the work area. ENGLISH 6 DIMENSIONS AND WEIGHT For Standard Version pump dimensions and weight, refer to Fig. 2. Dry weight 35 kg. 7 Fig. 2 7.6 OPERATING INSTRUCTIONS The KT LOW-PRESSURE version pumps have been designed to operate in environments with atmospheres that are not potentially explosive, with filtered water (see par. 9.7) and at a maximum temperature of 40°C. Other liquids can be used only upon formal approval by the Technical or Customer Service Departments. 7.1 Manufacturer Water temperature The maximum permissible water temperature is 40°C. However, the pump can be used with water up to a temperature of 60°C, but only for short periods. In this case, it is best to consult the Technical or Customer Service Departments. 7.2 Maximum pressure and flow rate BP Energol HLP 220 CASTROL HYSPIN VG 220 CASTROL MAGNA 220 Falcon CL220 Minimum rotating speed Any rotating speed other than that indicated in the performance table (see chapter 5) must be expressly formally authorised by our Technical or Customer Service Departments. 7.4 ELF POLYTELIS 220 REDUCTELF SP 220 Sound emission NUTO 220 TERESSO 220 The sound pressure detection test was performed according to Directive 2000/14 of the European Parliament and Council (Machinery Directive) and EN-ISO 3744-1995 with class 1 instrumentation. A final detection of sound pressure must be performed on the complete machine/system. Should the operator be located at a distance of less than 1 metre, he will have to use appropriate hearing protection according to current regulations. 7.5 Lubricant AGIP ACER220 Aral Degol BG 220 The rated specifications stated in our catalogue are the max. that can be obtained by the pump. Independently of the power used, the maximum pressure and rpm indicated in the specification label can never be exceeded unless upon prior formal authorisation by our Technical or Customer Service Departments. 7.3 Brands and types of oils recommended The pump is supplied with oil suitable for room temperatures from 0°C to 30°C. Some types of recommended oil are indicated in the table below, these oils have additives to increase corrosion resistance and fatigue resistance (DIN 51517 part 2). Alternatively you can also use Automotive Gear SAE 85W-90 oil for gearing lubrication. FINA CIRKAN 220 RENOLIN 212 RENOLIN DTA 220 Vibration The detection of this value shall be carried out only with the pump set up on the plant and at the performance declared by the customer. Values must be in accordance with regulations. Mobil DTE Oil BB 22 The oil check and change must be carried out as indicated in the table in Fig. 14 chapter 11. The quantity required is ~ 2 litres. Lubricant Shell Tellus Öl C 220 Wintershall Ersolon 220 Wintershall Wiolan CN 220 RANDO HD 220 TOTAL Cortis 220 Check the oil level and top up if necessary Using the oil dipstick pos. , Fig. 3. The correct checking of the oil level is made with the pump not running, at room temperature. The oil change must be made with the pump at working temperature, removing: the oil dipstick, pos. , and then the plug pos. , Fig. 3. Fig. 3 In any case the oil must be changed at least once a year, as it is degraded by oxidation. For a room temperature other than between 0°C - 30°C, follow the instructions in the following diagram, considering that oil must have a minimum viscosity of 180 cSt. Viscosity ν Viscosity / Room Temperature diagram mm2/s = cSt Ambient temp. (°C) The used oil must be placed in a suitable container and disposed of in special centres. It absolutely should not be discarded into the environment. 23 ENGLISH Manufacturer ENGLISH 8 PORTS AND CONNECTIONS - Hydraulics by flange, for proper application consult with our Technical or Customer Service Departments. -V-belts. - Cardan-shaft (comply with manufacturer's Max. recommended working angles). - Flexible joint. The KT LOW-PRESSURE version pumps (see Fig. 4) are equipped with: 2 “IN“ inlet ports 1” 14 Gas. Line connection to any of the two ports is indifferent for proper pump functioning. The unused ports must be hermetically closed. 2 “OUT“ outlet ports 1” Gas. 9.2 Rotation direction The rotation direction is indicated by an arrow located on the casing near the drive shaft. From a position facing the pump head, the rotation direction will be as in Fig. 5. LH SIDE clockwise Fig. 4 9 PUMP INSTALLATION 9.1 Installation RH SIDE anticlockwise Fig. 5 The pump must be fixed horizontally using the M12x1.5 threaded support feet. Tighten the screws with a torque of 80 Nm. The base must be perfectly flat and rigid enough as not to allow bending or misalignment on the pump coupling axis/ transmission due to torque transmitted during operation. The unit cannot be fixed rigidly to the floor but must interposed with vibration dampers. For special applications contact the Technical or Customer Service Departments. An M12 threaded stud is present on the pump casing, to which an eyebolt can be applied to facilitate installation, as per the figure below. 9.3 Version change 9.4 Hydraulic connections The pump version is defined as right when: Observing the pump facing the head side, the pump shaft must have a PTO shank on the right side. The pump version is defined as left when: Observing the pump facing the head side, the pump shaft must have a PTO shank on the left side. Note. The version shown in Fig. 5 is right. The version can only be modified by trained and authorised personnel and carefully following the instructions below: 1. Separate the hydraulic part from the mechanical part as indicated in chapter 2 par. 2.2.1 of the Repair manual. 2. Turn the mechanical part 180° and reposition the rear casing cover in such a way that the oil dipstick is turned upward. Reposition the lifting bracket and relative hole closing plugs in the upper part of the casing. Finally, properly reposition the specification label in its housing on the casing. Make sure that the lower casing draining holes in correspondence with the pistons are open and not closed from the plastic plugs provided for the previous version. 3. Unite the hydraulic part to the mechanical part as indicated in chapter 2 par. 2.2.5 Repair manual. Replace the oil filling hole closing service plug (red) positioned on the rear casing cover. Check the correct quantity with the oil dipstick. The oil dipstick must always be reachable, even when the unit is assembled. In order to isolate the system from vibrations produced by the pump, it is advisable to make the first section of the duct adjacent to the pump (both suction and outlet) with flexible piping. The consistency of the suction section must be such as to prevent deformations caused by vacuums produced by the pump. The pump shaft (PTO) should not be rigidly connected to the propulsion unit. The following types of transmission are recommended: 24 Pump supply 3. Completely airtight and constructed to ensure sealing over time. 4. Prevent that pump stopping causes emptying, even partial. 5. Do not use 3 or 4-way hydraulic fittings, adapters, swivel joints, etc. as they could jeopardise pump performance. 6. Do not install Venturi tubes or injectors for detergent suction. 7. Avoid use of base valves or other types of unidirectional valves. 8. Do not recirculate by-pass valve discharge directly into suction. 9. Provide for proper guards inside the tank to prevent that water flow from the bypass and the tank supply line can create vortexes or turbulence near the pump supply pipe port. 10. Make sure the suction line is thoroughly clean inside before connecting it to the pump. A positive head of at least 0.2 metres is required for the best volumetric efficiency. For negative prevalence contact our Technical or Customer Service Departments. 9.6 Suction line For a smooth operation of the pump, the suction line should have the following characteristics: 1. Minimum internal diameter as indicated in the graph in par. 9.9 and in any case equal to or exceeding that of the pump head. Localised restrictions should be avoided along the run of the duct, as these can cause load losses resulting in cavitation. Avoid 90° elbow bends, connections with other piping, constrictions, counterslopes, inverted U- curves and T-connections. 2. With a layout that is set in such a way to prevent cavitation. 9.7 Filtration 1 filter must be installed on the pump suction line, positioned as indicated in Fig. 6 and Fig. 6/a. With a manually activated control valve 1 2 3 4 5 Inlet Supply tank Filter 1 Plunger pump Pressure gauge Safety valve Manual control valve Bypass Fig. 6 With a pneumatically activated control valve 1 2 3 4 5 Inlet Supply tank Filter 1 Plunger pump Pressure gauge Safety valve Pneumatic control valve Bypass Fig. 6/a 25 ENGLISH 9.5 ENGLISH 9.9 The filter must be installed as close as possible to the pump, it must be easily inspected and must have the following characteristics: 1. Minimum flow rate at least 3 times the nominal flow rate of the pump. 2. Inlet/outlet port diameters no smaller than the inlet port diameter of the pump. 3. Filtration grade between 200 and 360 µm. For smooth pump operation, regular filter cleaning is necessary, planned according to the actual use of the pump in relation to the quality of water used and actual clogging conditions. 9.8 Calculation of the internal diameter of the duct pipes To determine the internal diameter of the duct, refer to the following diagram: Suction duct With a flow rate of ~ 142 l/min and a water velocity of 0.5 m/sec. The graph line joining the two scales meets the central scale showing the diameters, corresponding to a value of ~ 70 mm. Outlet duct With a flow rate of ~ 142 l/min and a water velocity of 5.5 m/sec. The graph line joining the two scales meets the central scale showing the diameters, corresponding to a value of ~ 24 mm. Optimal speeds: - Suction: ≤ 0.5 m/sec. - Outlet: ≤ 5.5 m/sec. Outlet line For the correct laying of the outlet line, the following installation rules must be followed: 1. The internal diameter of the pipe must be sufficient to ensure correct fluid velocity, see graph in par. 9.9. 2. The first section of the line connected to the pump outlet must be a flexible hose, in order to isolate the vibrations produced by the pump of the rest of the system. 3. Use high pressure pipes and fittings to ensure high safety margins in all operating conditions. 4. The outlet line must always be provided with a Max. pressure valve. 5. Use pressure gauges suitable to withstand pulsating loads typical of the plunger pumps. 6. During the design stage, keep in mind the line load losses which result in a drop in pressure during use with respect to the pressure measured on the pump. 7. For those applications where pulses produced by the pump on the outlet line may prove harmful or unwanted, install a pulsation dampener of sufficient size. The graph does not take into account pipe resistance, valves, load loss produced by the length of the ducts, the viscosity of the liquid pumped or the temperature itself. If necessary, contact our Technical or Customer Service Departments. 26 V-belt transmission ENGLISH 9.10 The pump can be controlled by a V-belt system. For these pump models, we recommend use of 3 XPB belts (16.5x13 serrated). Use an XPC profile only for long durations. Both the characteristics and transmissible power of each belt can be verified in the diagram in Fig. 7, in relation to the number of rpm normally declared by the manufacturer. Minimum duct pulley diameter (on pump shaft): ≥ 160 mm. The radial load on the shaft must not exceed 4500 N (value necessary for Layout definition). The transmission is considered adequate if the load is applied to a maximum distance a = 50 mm from the shaft shoulder (P.T.O) as shown in Fig. 10. For dimensions differing from those specified above, contact our Technical or Customer Service Departments. Fig. 7 9.11 Transmission definition To prevent irregular radial loads on the shaft and the relative bearing, follow these directions: a) Use pulleys with V-belts with the size of the groove required/recommended by the manufacturer of belt used. In the absence of directions, follow Fig. 8 and the table in Fig. 9. Break corners Single groove Multiple groove Fig. 8 27 ENGLISH Dimensions (in mm) Belt section as per DIN 7753 part 1 and B.S. 3790 DIN symbol symbol B.S./ISO XPB/SPB SPB XPC/SPC SPC Belt section as per DIN 2215 and B.S. 3790 DIN symbol symbol B.S./ISO 17 B 22 C Pitch width bw 14.0 19.0 18.9 19.5 26.3 27.3 8.0 12.0 Increased grooving depth e f tmin 23 ± 0.4 14.5 ± 0.8 22.5 31 ± 0.5 20.0 ± 1.0 31.5 α dw from 140 to 190 from 224 to 315 > 190 > 315 from 112 to 190 from 180 to 315 > 190 > 315 ± 1° 29 52 75 98 121 144 167 190 213 236 259 282 ± 30’ 40 71 102 133 164 195 226 257 288 319 350 381 Increased grooving width b1 ≈ α = 34° α = 38° c Distance between grooving 34° by primitive diameter narrow-section V-belts 38° DIN 7753 part 1 α 34° by primitive diameter classic section V-belts 38° DIN 2215 Tolerance for α = 34°-38° Pulleys for b2 by grooving number z b2 = (z-1) e + 2 f dw 1 2 3 4 5 6 7 8 9 10 11 12 Minimum pulley diameter must be respected. Do not use laminated V-belts. Fig. 9 b) Use high performance belts – for example XPB instead of SPB – as a lower quantity of belts for the same transmitted power may be necessary and a consequent shorter resulting distance compared to the shaft shoulder (P.T.O) “a“ of Fig. 10. Shaft shoulder (P.T.O.) Fig. 10 c) Pull the belts according to manufacturer instructions. Excessive pulling can cause reduced bearing life and wear out the pulley prematurely. Pulling depends on different variables as indicated in point 9.12. d) Belt length has a natural tolerance ≥ ±0.75%. For this reason, the 3 belts must be purchased as a pair. e) Follow the direction of the belt pull as shown in Fig. 10 for other needs, contact our Technical or Customer Service Departments. f ) Take care of the alignment of the driving pulley and driven pulley grooves. 28 Definition of static pull to apply on belts Note1. Unless otherwise stated by the supplier of the belts, control of proper pull and its relative re-tensioning should be performed after no less than 30 minutes of motion necessary for the normal adjustment of the belts. Best performance and durability will be achieved with proper tensioning. Note2. In case of necessity or for routine maintenance, never replace a single belt but the complete set. Static pull depends on: a) The wheelbase between the two pulleys (belt length). b) The load due to static pull of the belt. c) The number of belts. d) The winding angle of the smallest pulley. e) Average speed. f )Etc. Values of the static pull to be applied can be obtained from the diagram in Fig. 11 for belts with a XPB profile in relation to the wheelbase. 9.13 Transmission of power from the second PTO te = Belt bend mm Upon request, the KT LOW-PRESSURE version pumps can be supplied with auxiliary PTO on the side opposite of the drive (Transmission of power from the second PTO). Transmission can be carried out: • By means of the V-belts. • By means of the joint. By means of the V-Belts, withdrawable Max Torque is: 20 Nm which corresponds to: 4.1 HP at 1450 rpm; 5.0 HP at 1750 rpm. By means of the joint, withdrawable Max Torque is: 40 Nm which corresponds to: 8.2 HP at 1450 rpm; 10 HP at 1750 rpm. By means of the V-belt, the transmission is considered suitable if: belt pull is applied at a max distance of 18 mm with from the bend shaft shoulder (see Fig. 13). Min diameter of pulley to be used = Ø 100 mm. With transmission by means of the joint, pay particular attention to perfect alignment so that no transverse forces are generated on the pump shaft. Lf= Wheelbase mm Fig. 11 Conclusion: with a wheelbase of 600 mm and with a dynamometer, loading the belt branch with 75 N as indicated in Fig. 12, a "te" bend of approximately 10.8 mm is obtained. Fig. 13 For applications differing from those specified above, contact our Technical or Customer Service Departments. Lf = Wheelbase te = Belt bend Fe = 75 N Dynamometer load 10 START-UP AND OPERATION 10.1 Preliminary checks Before start-up, ensure that: The suction line is connected and pressurised (see par. 9.4 - 9.5 - 9.6) the pump must never run dry. 1. The suction line ensures a hermetic seal over time. 2. Any shut-off valves between the supply source and the pump are fully open. The outlet line during is free discharge, to permit air present in the pump head to come out quickly and therefore favour fast priming. 3. All suction and outlet fittings and connections are properly tightened. 4. The coupling tolerances on the pump/transmission axis (half-joint misalignment, Cardan joint tilt, belt pulling, etc.) remain within limits required by the transmission manufacturer. Fig. 12 29 ENGLISH 9.12 ENGLISH 12.2 5. Oil in the pump casing is at level, verified with a dipstick (pos. Fig. 14) and exceptionally with a level indicator (pos. Fig. 14). Method for filling pump with anti-corrosion emulsion or antifreeze solution using an external diaphragm pump based on the layout shown in par. 9.7 in Fig. 6 and Fig. 6/a: • In place of the service tank, use a suitable container containing the solution to be pumped. • Close the filter drainage, if open. • Make sure that the hoses to be used are clean inside and spread grease on their connections. • Connect the high pressure exhaust pipe to the pump. • Connect the suction pipe to the diaphragm pump. • Connect the suction pipe between the pump head and the diaphragm pump. • Fill the service container with solution/emulsion. • Insert the free ends of the suction pipes and the high pressure exhaust pipe inside the container. • Switch on the diaphragm pump. • Pump the emulsion until it exits from the high pressure exhaust pipe. • Continue pumping for at least another minute. • Stop the pump and remove the previously connected pipes. • Clean, grease and plug the connections on the pump head. The characteristics of the emulsion can be strengthened if necessary by adding, for example, Shell Donax. Fig. 14 In case of prolonged storage or long-term inactivity, check proper functioning of the suction and outlet valves. 10.2 Start-up 1. At first start-up, verify that the rotation direction and the supply pressure are correct. 2. Start-up the pump without any load. 3. Check that the supply pressure is correct. 4. Check that the rotation rpm during operation does not exceed the nominal rpm of the pump. 5. Let the pump run for a period of no less than 3 minutes, before putting it under pressure. 6. Before each pump stop, reset pressure by means of the control valve or with any relieving devices and reduce to a minimum rpm (activation with combustion motors). 11 13 14 GUARANTEE CONDITIONS The guarantee period and conditions are contained in the purchase agreement. The guarantee will in any case be invalidated if: a) The pump is used for purposes other than for those agreed upon. b) The pump is fitted with an electric or combustion motor with performance exceeding those indicated in the table. c) Safety devices are decalibrated or disconnected. d) The pump is used with accessories or parts not supplied by Interpump Group. e) Damage has been caused by: 1) improper use 2) failure to follow maintenance instructions 3) any use different from that described in the operating instructions 4) lack of sufficient flow rate 5) defective installation 6) improper positioning or sizing of pipes 7) unauthorised design modifications 8)cavitation. PREVENTIVE MAINTENANCE PREVENTIVE MAINTENANCE Every 500 hours Every 1000 hours Check oil level Change oil Check / Replace*: Valves Valve seats Valve springs Valve guides Check / Replace*: H.P. seals L.P. seals Fig. 15 * To replace, follow instructions contained in the Repair manual. 12.1 PRECAUTIONS AGAINST FROST Follow the instructions in Chapter 12 in areas and times of the year at risk of frost (see point 12.2). In the presence of ice, do not run the pump for any reason until the circuit has been fully defrosted, in order to avoid serious damage to the pump. For pump reliability and efficiency, comply with maintenance intervals as shown in the table. 12 Method for filling pump with anti-corrosion emulsion or anti-freeze solution PUMP STORAGE Long-term inactivity If the pump is started for the first time after a long period from the date of shipment, before operation check the oil level, inspect the valves as specified in chapter 10, then follow described start-up procedures. 30 OPERATING FAULTS AND THEIR POSSIBLE CAUSES ENGLISH 15 The pump does not produce any noise upon start-up: - The pump is not primed and is running dry. - No suction water. - Valves are blocked. - The outlet line is closed and does not allow air present in the pump head to come out. The pump pulsates irregularly: - Air suction. - Insufficient supply. - Bends, elbow bends, fittings along the suction line are choking the passage of liquid. - The suction filter is dirty or too small. - The booster pump, where installed, is supplying insufficient pressure or flow rate. - The pump is not primed for insufficient head or the outlet is closed during priming. - The pump is not primed due to valve jamming. - Worn valves. - Worn pressure seals. - Imperfect functioning of the pressure control valve. - Problems on the transmission. The pump does not supply the nominal flow rate/ excessive noise: - Insufficient supply (see various causes as above). - The number of rpms is less than the nominal rate; - Excessive leakage of the pressure control valve. - Worn valves. - Excessive leakage of the pressure seals. - Cavitation due to: 1) Improper sizing of suction ducts/undersized diameters. 2) Insufficient flow rate. 3) High water temperature. The pressure supplied by the pump is insufficient: - Use (nozzle) is or has become higher than the capacity of the pump. - The number of rpms is insufficient. - Excessive leakage of the pressure seals. - Imperfect functioning of the pressure control valve. - Worn valves. The pump is overheated: - The pump is working in pressure excess or the number of rpms is higher than the nominal rate. - Oil in the pump casing is not at level or not the recommended type as detailed in chapter 7 (see point 7.6). - Excess belt tension or joint or pulley alignment is incorrect. - Excessive pump tilt during operation. Vibrations and shock to pipes: - Air suction. - Imperfect functioning of the pressure control valve. - Valve malfunction. - Non-uniformity in the transmission motion. 31 ENGLISH 16 EXPLODED DRAWING AND PARTS LIST 32 33 ENGLISH FLUSHING CIRCUIT DIAGRAM OF USE Inlet Outlet Adhere to the following values for proper system operation: minimum circuit flow rate 4 l/min, maximum fluid pressure 6 bar Pump casing Inlet Pump head Outlet ENGLISH 17 34 DECLARATION OF INCORPORATION DECLARATION OF INCORPORATION (In accordance with Annex II of European Directive 2006/42/EC) The manufacturer INTERPUMP GROUP S.p.A. - Via E. Fermi, 25 - 42049 - S. ILARIO D'ENZA - Italy DECLARES that the product identified and described as follows: Name: Pump Type: Reciprocating plunger pump for high pressure water Trademark: INTERPUMP GROUP Model: KT24-KT28-KT30-KT32-KT36-KT40-WK155-WK6-WK8 Series Is found to comply with the Machinery Directive 2006/42/EC Standards applied: UNI EN ISO 12100:2010 - UNI EN 809:2000 The pump identified above meets all the essential safety and health protection requirements as listed in section 1 of Annex I of the Machinery Directive: 1.1.2 - 1.1.3 - 1.1.5 - 1.3.1 - 1.3.2 - 1.3.3 - 1.3.4 - 1.5.4 - 1.5.5 - 1.6.1 - 1.7.1 - 1.7.2 - 1.7.4 - 1.7.4.1 - 1.7.4.2 and the relevant technical documentation has been compiled in accordance with Annex VII B. In addition, the manufacturer undertakes to make available, following a reasoned request, a copy of the relevant technical pump documentation in the manner and terms to be defined. The pump should not be put into service until the plant to which the pump is to be incorporated has been declared in accordance with the provisions of the relevant directives and/or standards. Person authorized to compile the technical file Person authorized to draw up the declaration: Reggio Emilia - December 2012 Name: Maurizio Novelli Address: INTERPUMP GROUP S.p.a. - Via E. Fermi, 25 42049 - S- ILARIO D'ENZA (RE) - Italy CEO Ing. Paolo Marinsek Signed: 35 ENGLISH 18 Copyright di queste istruzioni operative è di proprietà di Interpump Group. Le istruzioni contengono descrizioni tecniche ed illustrazioni che non possono essere elettronicamente copiate e neppure riprodotte interamente od in parte né passate a terzi in qualsiasi forma e comunque senza l’autorizzazione scritta dalla proprietà. I trasgressori saranno perseguiti a norma di legge con azioni appropriate. Copyright of these operating instructions is property of Interpump Group. The instructions contain technical descriptions and illustrations which may not be entirely or in part copied or reproduced electronically or passed to third parties in any form and in any case without written permission from the owner. Violators will be prosecuted according to law with appropriate legal action. D'après les lois de Copyright, ces instructions d'utilisation appartiennent à Interpump Group. Les instructions contiennent des descriptions techniques et des illustrations qui ne peuvent être ni copiées ni reproduites par procédé électronique, dans leur intégralité ou en partie, ni confiées à des tiers sous quelque forme que ce soit, en l'absence de l'autorisation écrite du propriétaire. Les transgresseurs seront poursuivis et punis par la loi. Copyright-Inhaber dieser Betriebsanleitung ist Interpump Group. Die Anleitung enthält technische Beschreibungen und Abbildungen, die nur mit vorheriger schriftlicher Genehmigung des Copyright-Inhabers elektronisch kopiert, zur Gänze oder teilweise reproduziert oder in jeglicher Form an Dritte weitergegeben werden dürfen. Bei Verstößen drohen Rechtsfolgen. El copyright de estas instrucciones operativas es propiedad de Interpump Group. Las instrucciones contienen descripciones técnicas e ilustraciones que no pueden ser copiadas electrónicamente ni reproducidas de modo parcial o total, así como pasadas a terceras partes de cualquier forma y sin la autorización por escrito de la propiedad. Los infractores serán procesados de acuerdo a la ley con las medidas adecuadas. Os direitos autorais destas instruções operacionais são de propriedade da Interpump Group. Авторские права на данные инструкции по эксплуатации принадлежат компании Interpump Group. Инструкции содержат технические описания и иллюстрации, которые не подлежат электронному копированию, а также не могут целиком или частично воспроизводиться или передаваться третьим лицам в любой форме без письменного разрешения владельца. Нарушители будут преследоваться по закону с применением соответствующих санкций. 这些操作说明的版权由Interpump集团拥有。 这些操作说明的版权由INTERPUMP集团拥有。未经本集团的书面许可,手册内含的技术说明和插图不得进行全部或部分电子复制或转载,也不得以任何形式转给第三方。违者将 依法追究法律责任。 I dati contenuti nel presente documento possono subire variazioni senza preavviso. The data contained in this document may change without notice. Les données contenues dans le présent document peuvent subir des variations sans préavis. Änderungen an den in vorliegendem Dokument enthaltenen Daten ohne Vorankündigung vorbehalten. Los datos contenidos en el presente documento pueden sufrir variaciones sin previo aviso. Os dados contidos no presente documento podem estar sujeitos a alterações, sem aviso prévio. Данные, содержащиеся в этом документе, могут быть изменены без предварительного уведомления. 本文件所载资料如有变更,恕不另行通知。 42049 S.Ilario—Reggio Emilia (Italy) Tel. +39-0522-904311 Fax +39-0522-904444 E-mail : [email protected] http://www.interpumpgroup.it Cod. 70981403/2- Cod.IE 2860000146/2 - 12/02/2014 - 2125 As instruções contêm descrições técnicas e ilustrações que não podem ser eletronicamente copiadas ou reproduzidas inteiramente ou em parte, nem repassar a terceiros de qualquer forma sem autorização por escrito da proprietária. Os infratores serão processados de acordo com a lei, com as ações apropriadas.