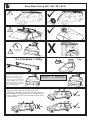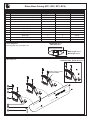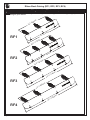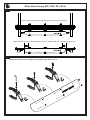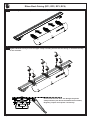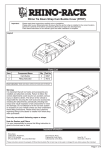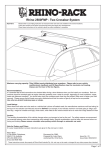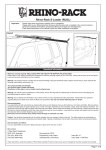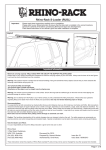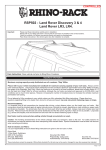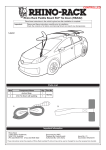
1
Rhino-Rack Fairing (RF1, RF2, RF3, RF4)
Important: Please read these instructions carefully prior to installation.
Please refer to your fitting instruction to ensure that the fairing is installed in the correct locations.
Check the contents of kit before commencing fitment and report any discrepancies.
Place these instructions in the vehicle’s glove box after installation is complete.
Layout
Important Information
Recommendations:
It is essential that all bolt connections be checked after driving a short distance when you first install your cross bars. Bolt
connections should be checked again at regular intervals (probably once a week is enough, depending on road conditions,
usage, loads and distances travelled). You should also check the cross bars each time they are re-fitted. Make sure to fasten
your load securely. Please ensure that all loads are evenly distributed and that the centre of gravity is kept as low as possible.
Use only non-stretch fastening ropes or straps. Do not use fairing as a tie off point. Always lash around crossbar
Sensitivity to cross winds, behaviour in curves and braking. The handling characteristics of the vehicle, changes when you
transport a load on the roof. For safety reasons, we recommend you exercise extreme care when transporting wind-resisting
loads; special consideration must be taken into account when braking.
Please remove cross bars when putting vehicle through an automatic car wash. Clean fairing with smooth cloth using
water or mild washing liquid. Damage to plastic may occur if the washing liquid is too strong or concentrated. Raise
fairing slightly when cleaning the vehicle roof.
Rhino Rack do not take responsibility for damage to vehicle paintwork caused by this product. The best materials
have been selected to minimise the impact of the contact between automotive grade rubber and the paintwork. It is the
responsibility of the end user to determine the suitability of this product with their vehicle.
Note for Dealers and Fitters:
It is your responsibility to ensure instructions are given to the end user or client.
Rhino-Rack
3 Pike Street, Rydalmere, NSW 2116, Australia.
(Ph) (02) 9638 4744 (Fax) (02) 9638 4822
Document No: R286
Prepared By: Andy Wana
Authorised By: Chris Murty
Issue No: 01
Issue Date: 15/5/2013
These instructions remain the property of Rhino-Rack Australia Pty Ltd and may not be used or changed for any other purpose than intended.
Page 1 of 6
Rhino-Rack Fairing (RF1, RF2, RF3, RF4)
ü
ü
!
!
!
X
km/h
2 x Crossbars = 5.0kg
When these roof racks are to be
used on a vehicle that is driven off
sealed roads, the manufacturer
maximum roof load rating (to be
found in the vehicles User Manual)
should be halved. Do not forget to
subtract 7.5kg from your maximum
carrying capacity due to the weight
of the crossbars and legs.
60kg load rating
(Urban road)
WARNING! Important Load Carrying Instructions
With utility vehicles, the cabin and the canopy move
independently. Roofracks and vehicle can be damaged if the
item transported is rigidly fixed at points on both the cabin and
canopy. Instead, rigidly fix to either the cabin roofracks or the
canopy roofracks.
X
NO
Page 2 of 6
? kg
=
30kg load rating
(Off road - 60kg / 2)
ü
YES
ü
YES
Rhino-Rack Fairing (RF1, RF2, RF3, RF4)
Parts List
Item
Component Name
Qty (RF1)
Qty (RF2, RF3, RF4)
Part No.
1
M6 x 35mm Button Head Screw (Black)
6
8
2
M6 Flat Washer (Black)
6
8
W003-BLK
3
Upper Clamp Assembly
3
4
M627, M628
4
Bottom Clamp Assembly
3
4
M530
M632
5
Rubber Bumper
3
4
6a
Fairing RF1 (32”)
1
-
6b
Fairing RF2 (38”)
-
1
6c
Fairing RF3 (44”)
-
1
6d
Fairing RF4 (50”)
-
1
7
Button Clip
6
8
CA1141
8
4mm Allen Key
1
1
H001
9
Fitting Instruction
1
1
R286
Tools Required:
Security Allen key, provided in kit.
MAX width 90mm
MIN width N/A
MAX height 33mm
MIN height 22mm
RF1 Parts List
Additional RF2, RF3 & RF4 Parts
Upper clamp comes
pre-assembled
1
2
3
4
7
5
6
8
Page 3 of 6
Rhino-Rack Fairing (RF1, RF2, RF3, RF4)
Fitting instructions (RF1 shown here)
1
Measure the distance between your rails and your crossbar legs before selecting the appropriate
fairing for your vehicle.
mm
26”
60
/6
mm
13
”/ 8
32
RF1
mm
5”
30.
75
/7
m
38”
RF2
/
m
965
m
5” /
35.
m
903
mm
44”
RF3
/
8
111
m
43”
/
0m
109
m
50”
RF4
Page 4 of 6
/
0m
127
Rhino-Rack Fairing (RF1, RF2, RF3, RF4)
2 Make sure that there are sufficient clearances for the fitment of the fairing.
Ensure that the fairing clears the roof rails on the roof of your vehicle
Make sure that the upper clamp assembly does not interfere with the crossbar legs as shown
3 Assemble fairing as shown, only insert one bolt assembly for the moment so it’ll be
easy to mount onto the crossbar. Do not tighten fully, keep it loose.
Page 5 of 6
Rhino-Rack Fairing (RF1, RF2, RF3, RF4)
4
Mount fairing onto crossbar (Rhino Aero shown here).
5
Tighten M6 bolts evenly across the upper clamp assembly. Ensure that the fairing is mounted centrally
on the crossbar.
Ensure that the load does not damage the plastic
clamp brackets (sits above the dotted line as shown).
Regularly inspect and replace if necessary.
Page 6 of 6