1
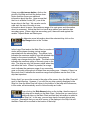
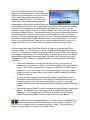
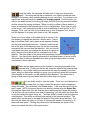
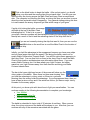
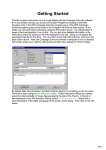
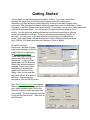
Getting Started This file helps you get started playing the game Jutland. If you have just finished installing the game, then the Jutland main program should be running soon. Otherwise, you should start the main program by clicking on the Main Program entry in the -RKQ7LOOHU6RIWZDUH Simulations Jutland program entry (from the Start Menu, select Programs, -RKQ7LOOHU6RIWZDUHand thenJutland). If you prefer, you can print these instructions using the Print button above. You will get about 6 pages of text and graphics if you do this. You can get more detailed information in the instructions below by clicking on the links displayed in the text. Doing so will display the associated help file for this topic. You can return to this help information by clicking on the Back button above. Note: the Jutland software is designed to run on displays with screen areas up to 1280 by 1024 pixels and with color settings of 16-bit or higher. By default, after the introduction, the Main Program begins by prompting you for the name of the file to open using the File Selection Dialog. These instructions will get you started using #00 Getting Started.scn. In the list of files displayed by the File Selection Dialog, this should already be selected. Notice that a short description of the battle will appear at the bottom of the dialog. Also you can see that this battle will last 30 minutes of real-time. After reading this information, click on the OK button. Next, the A/I Selection Dialog will appear. Since you are going to play as the British side, select Automatic with FOW in the German A/I group on the right hand side of the dialog. This will cause the computer to play as the German side. Then click on the OK button. In the lower left-hand corner of the screen, you will see the Jump Chart which displays the overall situation. The blue dots represent British ships. The red dots represent the German ships that you can currently see, although there may be others outside of your range of visibility. The red rectangle indicates how much of the overall situation is visible on your Main Chart, which is the larger display on the screen. Click on an area of the Jump Chart that contains British ships and notice that the Main Chart scrolls to display that area. In this example, you can see that there are 4 British ships sailing in formation, with the lead ship being the flagship. In general, you will use the flagships to control your formations during the battle. Click on one of the ships on the Main Chart and notice that more detailed information about that ship appears on the left hand side in the Ship List. In this example, you see the Lion. Because it is a flagship, its name is displayed in yellow. The flag of the Royal Navy is shown in one corner. The Lion is currently sailing at 27 knots, or nautical miles per hour, and it is heading in a South-East (SE) direction. Its current status is 100% representing the fact that it is undamaged by battle. And the torpedo icon below the status value indicates that this ship is equipped with torpedoes. Using your right mouse button, click on the picture of the ship and hold the button down. Notice that this shows you additional information about the ship. Here we see that the Lion is a Battle Cruiser (BC), one of the larger ships in the fleet. We can also see its crew size, the size of the ship in tons, information about its armor, the maximum range of its main guns, and information about its armament. Notice that the Lion has 8 large caliber guns and also has secondary guns. When a ship has secondary guns, these are used against the smaller Torpedo Boats and Destroyers. To determine more information about the selected ship, click on the Ship Range button in the Toolbar. In the Jump Chart and on the Main Chart, a number of circles will be drawn showing various ranges associated with the selected ship. The yellow circle indicates the maximum visibility from the selected ship, based on the current conditions. This maximum visibility can change during the battle. The black circle indicates the maximum range of the main guns on the ship. The ship can only fire at enemy ships when they are within this circle. When it is present, an orange circle indicates the maximum range of any secondary guns on the ship, although not all ships have secondary guns. Likewise, if there is a blue circle, then it indicates the maximum range that torpedoes can be fired, if the ship has torpedoes. Notice that if you move the mouse to the edge of the screen, then the Main Chart will scroll in that direction. However, if you click on any ship currently displayed in the Ship List, then the Main Chart will return to the location of that ship and furthermore, in this mode, will automatically scroll to follow the ship as it sails. If you click on the Ship Names button on the toolbar, then the name of each ship will be drawn on the Main Chart. Notice that you can click on additional ships on the Main Chart and that their information is added to the Ship List. In this way, you can keep track of several ships at any one time. Remember that you can click on any of the displays in the Ship List and the Main Chart will be scrolled to the location of that ship. Turn off the Ship Names and Ship Range features at this point and then click on the Jump Chart near an enemy ship, one of the red dots. Notice that German ships are displayed in orange on the Main Chart. If you click on an enemy ship, only certain information will be displayed about that ship in the Ship List since we are playing with Fog-of-War. In particular, you will only have general information about the ship’s status such as No Damage, Light Damage, and so on. In this example we see a Light Cruiser (CL), which is larger than a Destroyer (DD), but not as large as a Battle Cruiser. The binoculars icon in the picture indicates that the ship is currently spotted. Likewise, when you see this icon appear in one of your ship pictures, it means that the enemy can see your ship. The cross appearing below the binoculars indicates that this ship has a target and is firing its main guns. If you find one of your ships that doesn’t have this icon, then it means the ship is either out of range of the enemy or its view of the enemy ships is blocked by another ship. Continue using the Jump Chart, Main Chart, and Ship List to get an idea of the current situation. You will see that you have a few Battle Cruisers and some Light Cruisers. You have encountered some enemy Light Cruisers, but that there may be more enemy ships beyond your current visibility. In particular, you should be aware that the Germans probably have some Battle Cruisers of their own and may have Torpedo Boats (TB). When you engage the enemy, you should follow a few basic principles: You should maneuver your ships so that they can fire on the enemy. In general you should face your ships so that the broadside of the ships face the enemy. This results in the maximum firepower. However, you should avoid getting too close to the enemy as the resulting damage to your own ships by doing so can be excessive and you can make yourself vulnerable to torpedo attacks by doing so. You should avoid using your Light Cruisers to fight enemy Battle Cruisers. The superior firepower and armor of the Battle Cruisers will make this a very uneven match and your Light Cruisers will suffer as a result. Your Light Cruisers should engage the enemy Light Cruisers and any Torpedo Boats that appear. You should use your Battle Cruisers to engage any enemy Battle Cruisers that appear. The Battle Cruiser is the largest ship in the fleet other than the Battleship. It is the largest ship you have in this battle and it will only be threatened by enemy Battle Cruisers or any enemy Torpedo Boats. The Main Chart has an adjustable scale. You can zoom-out the Main Chart display by pressing the button marked with a minus (-) sign. Likewise, you can zoom-in by using the button marked with a plus (+) sign. There are 4 zoom levels in the game that you can use on the Main Chart. During the battle, the computer will take care of firing your ships at the enemy. Your main task will be to maneuver your ships to cause the most damage to the enemy, while avoiding damage to your own ships. You perform most maneuvers using two functions: turning and changing speed. On the toolbar, you will see two basic buttons for turning your ships, the first for turning counterclockwise and the second for turning clockwise. When you click on either of these buttons, it issues a command to the selected ship to turn in that direction. Each time you click on the button, it will command the ship to turn an additional 2 naval points, or 22 ½ degrees. Thus, you can click on the button twice to turn 45 degrees, four times to turn 90 degrees, or as many as 8 times to turn 180 degrees. Select one of your ships on the chart and click on one of the turn buttons to change the direction it should sail in. Notice that on the Main Chart, that a green arrow appears showing you the new commanded direction. However, based on the size of the ship, it will take some time for the ship to actually accomplish the turn and face that direction. Also you should understand that when you change the direction of a group of ships, that you should issue the turn command only to the flagship. The other ships in the group will automatically follow the flagship through the turn. You should avoid issuing commands to individual ships in a group as this will cause them to become Detached from their group and require that you issue commands for them separately. There are two basic buttons on the toolbar for changing the speed of the selected ship. Clicking on the first will cause the speed of the selected ship to increase by 1 knot while clicking on the second will lower the speed by one knot. Again, when you have ships sailing in a group, you should only issue this command to the flagship in that group, not the individual ships behind it. Also notice that a group of ships cannot go any faster than the slowest ship in the group. You are finally ready to start the battle. There is a row of buttons on the toolbar that you use to control the speed of what is happening during the battle. The red button is the Pause button. It will stop the action until you start it again. NOTE: the pause function can also be invoked using the Space Bar. Pressing the Space Bar once will stop the action while pressing it again will restart it. If at any time you get confused over what is happening, you can press the Space Bar to stop the action and figure things out. The black button is used to start the game at normal speed. This will be actual real-time relative to the historical situation. The green button can be used to increase the speed of the action above real-time. You can click this button as many as 10 times to increase the speed of the action to 10 times real-time speed. Clicking the yellow button will decrease the speed of the action and cancel the effect of the green button. Click on the black button to begin the battle. After a short period, you should notice your ships and the enemy ships firing at each other. You will even see the shots they fire moving across the Main Chart and Jump Chart as small black dots. The computer is controlling this firing, so during this time you are free to move about the chart and watch what is happening. Your general strategy during this time is to sail towards the enemy ships and get them within range of your guns. If a ship is hit during the battle, a message will flash at the top of the Main Chart indicating that hit. If the hit is on one of your ships, then two numbers will be displayed showing the percentage damage to the ship as a result of the hit and the remaining status of the ship after the hit. If you are not currently viewing the ship that was hit, then you can use the Last Hit button on the scroll bar to scroll the Main Chart to the location of that ship. Initially, you hold the advantage in the engagement because you have more ships and you have larger ships than the enemy. But during the battle, watch out for enemy Battle Cruisers and Torpedo Boats. You will first notice these appearing in the Jump Chart. You can then click on them in the Jump Chart to scroll the Main Chart to their location and determine more information about them. If you see enemy Battle Cruisers, don’t let them attack your Light Cruisers, but rather maneuver your Light Cruisers away from their direction and bring your Battle Cruisers towards them. The bar in the lower right-hand corner of the screen will show you the victory status of the battle. When there is a blue area showing, then you hold the advantage in victory points or if there is a red area showing, then the enemy holds the advantage. If your flag appears there, then you have at least a minor victory and if the entire bar is blue, you have a major victory. Likewise for the enemy player. At this point, you know quite a bit about how to fight your naval battles. You can continue reading in the following documentation to complete your knowledge: User Manual Main Program Help File Scenario Editor Help File The battle is scheduled to last a total of 30 minutes of real-time. When you are done, the victory outcome of the battle will be shown to you. After that, you can continue with any of the scenarios associated with the game.