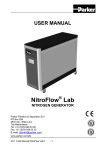
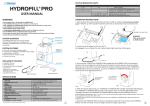
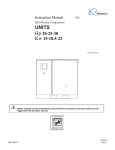
1
User’s Manual Hydrogen Generator HyGen PD-0100-0050 RevisionB.fm Table of contents_____________________________________ 1. Introduction 3 2. Safety 4 3. Description of the generator 5 4. Installation 11 5. Disassembly and transport 18 6. Use 19 7. Maintenance 29 8. Troubleshooting 35 © 2010 – 2011 Proton Energy Systems, Inc. d/b/a Proton OnSite All rights not expressly granted herein are reserved. Information in this document is provided in connection with Proton Energy Systems Inc. d/b/a Proton OnSite (“Proton”) products and services. No license, express or implied, by estoppel or otherwise, to any intellectual property rights is granted by this document. Except as provided in Proton Terms and Conditions of Sale for such products and services, Proton assumes no liability whatsoever, and Proton disclaims any express or implied warranty, whether written or oral, relating to sale and/or use of Proton products or services including liability or warranties relating to fitness for a particular purpose, merchantability, or infringement of any patent, copyright or other intellectual property right. Proton products are not intended for use in medical, life saving, or life sustaining applications. Proton may make changes to specifications and product descriptions at any time, without notice. This document as well as any software, processes or procedures described in it is furnished under license and may only be used or copied in accordance with the terms of the license. The information in this document is furnished for informational use only, is subject to change without notice, and should not be construed as a commitment by Proton. Proton assumes no responsibility or liability for any errors or inaccuracies that may appear in this document or any software that may be provided in association with this document. Except as permitted by such license, no part of this document may be reproduced, stored in a retrieval system, or transmitted in any form or by any means without the express written consent of Proton. ® Proton, Proton OnSite, Proton Energy Systems, the Proton design, StableFlow, StableFlow Hydrogen Control System and design, HOGEN, and FuelGen are trademarks of Proton Energy Systems, Inc. Any other brands and/or names used herein are the property of their respective owners. 2 PD-0100-0050 RevisionB.fm 1. Introduction_________________________ This document is intended for the User of a HyGen Series Hydrogen Generator and provides all information regarding installation, use and maintenance. The intended use of the generator is to provide a source (as an alternative to cylinders) of ultrapure hydrogen gas for powering one or more gas chromatographs. The generator models in this series are listed below: HyGen 200 part no. 54-0100-0005, HyGen 400 part no. 54-0100-0006, HyGen 600 part no. 54-0100-0007. The cTUVus mark guarantees that these generators comply with IEC/UL/CSA 61010-1, Safety Requirements for electrical equipment for measurement, control and laboratory use. This product has been tested to the requirements of CAN/CSA-C22.2 No. 61010-1, second edition, including Amendment 1, or a later version of the same standard incorporating the same level of testing requirements. The margin of the text contains the following symbols, indicating: Compulsory safety standards to be observed Electrical hazard Recommendations and important information When performing installation and maintenance operations, it is presumed that the manual user is experienced in the use of pneumatic components, and in particular is aware of all safety aspects linked to the use of hydrogen. It is strongly recommended that all safety warnings are carefully read (para. 2.1.) before carrying out any operation on the generator. 3 PD-0100-0050 RevisionB.fm 2. Safety______________________________ The unit must be installed and used according to the instructions in this booklet. Furthermore, use of the unit must be limited to that described in Chapter 1 Introduction. Failure to observe the foregoing will render the guarantee null and void and release PROTON ONSITE. (“PROTON”) from all liability for direct or indirect damage or physical injury. The user is responsible for asking local authorities if there are local safety regulations that are stricter than what is described in this manual. 2.1. Warnings________________________________________ Hydrogen is an extremely flammable gas that forms EXPLOSIVE MIXTURES WITH AIR. If not aware of all safety aspects linked to the use of this gas, consult the relative safety datasheet Place the generators FAR AWAY FROM HIGH HEAT, IGNITION SOURCES AND FLAMES The generator must operate with all covers installed: this guarantees the correct circulation of air and prevents the formation of gas pockets Place the generators in an environment PROTECTED AGAINST RAIN AND WIND NEVER OPEN the generator while it is connected to the electrical mains: RISK OF FATAL INJURY BY ELECTROCUTION In the event of faults that cannot be resolved based on one of the procedures in the TROUBLESHOOTING chapter, contact exclusively PROTON Technical Service. Repairs and inspections must be carried out exclusively by QUALIFIED PERSONNEL If the generator will not to be used for a prolonged period of time, it must be adequately depressurized (see par. 6.6. and par. 6.7.). In addition, in order to maintain hydrated the cell stack, the water should not be drained, as normally required for transportation (see par. 5.1.) 4 PD-0100-0050 RevisionB.fm It is the Customer’s responsibility to consult with the local authority having jurisdiction (AHJ) regarding local code requirements for installation and operation of this equipment. 2.2. Safety devices____________________________________ MAXIMUM PRESSURE: Maximum operating pressure that can be set is 8 bar. There are two points of pressure control: • One is a pressure sensor, via the control system, which shuts down the generator when pressure values exceed 0.5 bar of the set value; • The other is a safety relief valve, independent from the control system, which limits pressure to 9 bar. HYDROGEN-OXYGEN MIXTURE: The formation of potentially hazardous hydrogen-oxygen mixture inside the generator is prevented by a forced ventilation system. If the ventilation system fails to operate, a dedicated sensor makes the generator stop. Any significant gas leaks are also indicated by the control system. 2.3. Technical Service_________________________________ PROTON Technical Service can be contacted as follows: Proton OnSite 10 Technology Drive Wallingford, CT 06492 203-949-8697 203-678-2000 [email protected] www.protononsite.com 3. Description of the generator____________ 3.1. Equipment supplied_______________________________ Unless otherwise agreed upon, the supply of a HyGen series hydrogen generator includes: • 5 Hydrogen generator PD-0100-0050 RevisionB.fm • • • • 3.2. User manual Certificate of conformity to safety directives Cable for the electrical mains Connection kit Technical specifications____________________________ 3.2.1. Hydrogen Capacity (*) HyGen 200 up to 0.200 Nl/min up to 0.200 slpm HyGen 400 up to 0.400 Nl/min up to 0.400 slpm HyGen 600 up to 0.600 Nl/min up to 0.600 slpm Pressure Settable from 2 to 8 bar Settable from 30 to 116 psi (*) flow measurement at 20°C and 1 atmosphere 3.2.2. Deionized water requirements Capacity HyGen 200 HyGen 400 HyGen 600 Temperature Maximum Pressure (in case of external deionized water supply line) Quality Required resistivity Preferred resistivity up to 12 ml/h up to 24 ml/h up to 36 ml/h from 5°C to 35°C 1.4 bar up to 0.4 fl oz/h up to 0.8 fl oz/h up to 1.2 fl oz/h from 41° to 95°F 20 psi >1 MΩ cm @25°C >10 MΩ cm @25°C ASTM Type II ASTM Type I 3.2.3. Electrical requirements Supply voltage Maximum power consumption HyGen 200 HyGen 400 HyGen 600 6 110/240 Vac; 50/60Hz 110 W 180 W 250 W PD-0100-0050 RevisionB.fm 3.2.4. Pneumatic connections Hydrogen output Hydrogen vent Optional deionized water inlet from external line G 1/8” female quick coupling for plastic pipe diameter 4mm Hose connection ¼” 3.2.5. Electrical connections Power supply CAN bus IN, CAN bus OUT IEC320 RJ45 3.2.6. Dimensions Width Depth Height (with support base) Weight (generator only) Weight (with support base) Protection rating 38 cm 53 cm 47 cm 29 kg 31 kg IP20 15” 21” 18.5” 64 lbs 68 lbs 3.2.7. Environmental requirements Installation site Minimum ventilation Maximum inclination Relative humidity Use temperature Storage and transport temperature indoors, classified non-hazardous 4 Nm3/h 150 SCFH ± 1° up to 90%, no condensation from 5°C to 35°C from 41° to 95° from 5°C to 40°C from 41° to 104° 3.2.8. Noise Noise level at 1 meter 7 < 50 dB(A) PD-0100-0050 RevisionB.fm 3.3. Generator components____________________________ 3.3.1. Front view A. CPU generator control unit with integrated user interface touch screen; B. FRONT PANEL removal for maintenance operations; C. LED WARNING LIGHT indicates the operating condition of the generator (see also par. 6.3.) D. BASE for supporting the generator on a level surface FIGURE 3.3.1: Front view 8 PD-0100-0050 RevisionB.fm 3.3.2 Rear view E. AUXILIARY WATER INLET: hose connection for connecting an optional deionized water line (1/4” hose barb) F. H2 DELIVERY: coupling for connecting the hydrogen product line (G1/8 female) G. SILENCER for venting at ambient pressure H. H2 VENT: coupling for connecting the hydrogen vent line (Quick disconnect for 4 mm tube) I. CAN BUS OUT J. CAN BUS address (DIP switch) K. CAN BUS IN: connector for connecting the CPU L. EXT CMD (for optional equipment) M. CONNECTOR for electric power supply cable (IEC 320/C13) ; includes housing for main FUSE N. ON-OFF SWITCH O. IDENTIFICATION LABEL: states the model, serial number (SN) and electrical specifications P. VENTILATION GRILLE FIGURE 3.3.2: Rear view 9 PD-0100-0050 RevisionB.fm 3.3.3. Internal view Q. R. S. DEIONIZED WATER TANK DEIONIZED WATER DRAIN: quick coupling for drain tube DRYER: metal cylinder containing molecular sieves for drying the gas FIGURE 3.3.3. Internal view 10 PD-0100-0050 RevisionB.fm 4. Installation__________________________ 4.1. Installation area requirements______________________ 4.1.1. Environment The area where the generator is installed must meet the requirements listed under para. 3.2.7. Environmental requirements In particular, check if ventilation is adequate. Do not install the generator into a closed cabinet with insufficient ventilation. 4.1.2. Mating surface The surface where you plan to install the generator must be level (maximum incline ± 1°) 4.2. Installation procedure_____________________________ 4.2.1. Step 1: Remove the packaging • • • • Open the packaging from the top Remove the box containing the accessories Lift the generator by grasping its side handles (two people are needed for this operation) and set it momentarily on a flat surface Remove the support base and place it on the desk where you plan to install the generator. It is recommended storing the packaging to ensure adequate protection if the generator is transported in the future. 4.2.2. Step 2: Position the generator • Position the generator on its support base or above another generator of the same series (two people are needed for this operation). Ensure a clearance of at least 20cm at the rear of the generator. There must be no potential sources of sparks in this clearance at the rear of the generator, such as: flames, electrical contacts, hot surfaces, moving parts that can generate sparks, etc. To not decrease ventilation efficiency, also ensure a clearance of at least 20cm at the front of the generator 11 PD-0100-0050 RevisionB.fm If positioned vertically with other generators of the same series, the HyGen hydrogen generator must be at the top. For the correct installation of a "stack" of generators, consult the dedicated User's Manual 4.2.3. Step 3: Fill the deionized water tank • Remove the front panel FIGURE 4.2.3.1. Removal of the front panel • • Locate the deionized water tank inside the generator, at the top right Disconnect the tank by means of the quick coupling at the bottom of the tank • FIGURE 4.2.3.2. Filling tank quick coupling disconnection Remove the tank 12 PD-0100-0050 RevisionB.fm • • Unscrew the cap, fill the tank with the type of deionized water required to para. 3.2.2. Deionized water requirements and refit the cap Put the tank back in place, reconnect the quick coupling Check that water flows from the filling tank to the internal tank; otherwise squeeze the tube to force air bubble to exit Reposition the front panel If the required type of water is not used, the performance of the generator may • • no longer be ensured and it may lead to permanent damage to the generator AUXILIARY WATER INLET OPTION To connect an optional external deionized water supply line, follow these directions: • Disconnect the quick coupling from the tank and connect it to the AUXILIARY WATER INLET coupling (side inside the generator) FIGURE 4.2.3.3. Auxiliary water inlet coupling inside generator 13 PD-0100-0050 RevisionB.fm • Connect the deionized water line to the AUXILIARY WATER INLET coupling (outside the generator). ATTENTION: maximum pressure = 1.4 bar (20 psi) FIGURE 4.2.3.4. Auxiliary water inlet coupling outside generator If an external container of water is used to periodically fill the internal HyGen deionized water tank, it is recommended that an Ionic Exchange Resin Bag be added to the external container in order to maintain the purity of the deionized water after the initial seal of the container has been broken. 4.2.4. Step 4: Connect the DRYER vessel • • • • Remove the DRYER vessel from the accessories box of the packaging Remove the two caps [A] from the DRYER vessel and store them Connect the DRYER vessel in its seat (snap-on quick couplings) Put the front panel back on FIGURE 4.2.4 14 PD-0100-0050 RevisionB.fm 4.2.5. Step 5: Connect the hydrogen line • • Locate the coupling H2 DELIVERY at the rear of the generator Connect the line The hydrogen line must be able to withstand a pressure of at least 9 bar Downstream to the H2 DELIVERY outlet, the customer must install a manual three-way valve (*) and, downstream to the valve, a check valve (*). This combination will avoid return of pressure from the line to the generator and allow the depressurisation and purging of the generator hydrogen line when necessary (example for Dryer desiccant replacement - see para. 7.3. Drier replacement) (*) May not be included in the equipment supplied, may be ordered separately 4.2.6. Step 6: Connect the electrical mains • • • Check that the mains specifications correspond to the data on the generator nameplate Ensure that the POWER key is set to OFF Make the electrical connection using the cable supplied with the generator Make sure that the off button on the rear of the generator is easily accessible. For safety purposes, the following instructions must be strictly observed. The electrical installation must comply with current standards, in particular regarding the protection line / ground wire. • 15 Recommendations for correct installation: Do not use extension leads, adaptors or multiple sockets; if necessary, replace the cable supplied with one that is longer. In case the standard supplied cable is not suitable, it is the Customer’s responsibility to obtain a power cable conforming to the local plug configurations. PD-0100-0050 RevisionB.fm • • Always connect the protection wire / ground wire; The mains socket must be located in an easily accessible position. If a failure in gas supply (due to a power failure, activation of an electrical safety device, or generator fault), even temporary, is not admissible, a pneumatic panel should be developed, to enable provisional activation of a reserve gas source (totally or partially automatic). 4.2.7. Step 7: Connect the vent line The VENT outlet is a vent for automatically depressurizing the generation module in the case of production shutdown or alarm. Vented hydrogen may be wet or moisture may be present. • Locate the H2VENT outlet at the rear of the generator • Connect the vent line to the quick disconnect fitting. VENT line must be directed to an exhaust hood or non-pressurized H2 vent stack, away from ignition sources and far away from the suction of the fans The vent line must never be clogged or subjected to the risk of freezing 4.2.8. Step 8: Connect the CPU • • Position the CPU where it will be used, e.g. above the generator, using the supplied support Connect the Ethernet cable to the rear of the CPU (top connector) FIGURE 4.2.8.1. Ethernet cable connection to CPU 16 PD-0100-0050 RevisionB.fm • Connect the Ethernet cable to the rear of the generator (CAN BUS IN connector) FIGURE 4.2.8.2. Ethernet cable connection to generator Additional information about the communication connections can be found in the Stack User’s Manual. 4.3. Packaging disposal________________________________ It is recommended to store the original packaging to ensure adequate protection for the purifier when moved in the future. 17 PD-0100-0050 RevisionB.fm 5. Disassembly and transport_____________ 5.1. Disassembly_____________________________________ • • • • • • • • • • • 5.2. Stop the generator (see par. 6.6.) Wait for depressurization and for the circulation pump to stop (1 minute) Switch off the generator (see par. 6.7.) Disconnect the electric power cable Disconnect the Ethernet cable connected to the CPU Close the valves downstream of the generator and detach the pneumatic connections Remove the front panel Empty the deionized water tank and re-place it in the unit Drain the water from the generation module using the supplied hose, connecting it to the drain coupling (see para. 3.3.3. Internal view) Remove the Dryer hose and close its couplings using the two original caps Put the front panel back on Transport________________________________________ Use the original packaging, if available; otherwise use a pallet of adequate dimensions to hold the generator, affixing instructions in visible locations, such as: THIS WAY UP, FRAGILE. Take the necessary precautions so that the generator is never exposed to temperatures lower than 5°C during transport and storage: risk of the deionized water freezing inside the electrolytic cell, will result in permanent damage to the generator. 18 PD-0100-0050 RevisionB.fm 6. Use________________________________ 6.1. Operator interface________________________________ TOUCH SCREEN The CPU screen enables the user to interact with the generator, i.e. give specific commands or display and set parameters. The table shows the function of the various keys on the screen: Key Function 19 CPU Access to CPU menu PREVIOUS Go to previous page NEXT Go to following page ALARM Access to list of alarms WARNING Access to list of warnings RESET Reset of alarms and warnings MAINTENANCE Go to maintenance request description MENU Access to different menus ESC Exit from menu PD-0100-0050 RevisionB.fm Key START STOP INCREASE DECREASE ADD DELETE OK Do not press on the touch screen with sharp objects 20 Function Start the production of gas Stop the production of gas Decrease the value Increase the value Add one digit Delete last digit Confirms modified value PD-0100-0050 RevisionB.fm 6.2. Menus__________________________________________ The following chart shows the accessible menus for the operator: 21 PD-0100-0050 RevisionB.fm 6.3. LED warning light_________________________________ In addition to the information on the CPU screen, a LED warning light on the front panel (see par. 3.3.1. Front view) indicates the operating condition of the generator. The LED is yellow in the READY TO START condition. The LED is green in the PRODUCTION condition. The LED is flashing red in case of an error condition (see par. 8.4. List of errors). 6.4. Generator start-up________________________________ To switch on the generator, put the start button on the rear of the generator in position I: the CPU screen lights up. After the LOGO page is shortly displayed, the GENERATORS LIST page appears Press on the generator of interest. The READY TO START page appears 22 PD-0100-0050 RevisionB.fm 6.5. Hydrogen production______________________________ To start production, press the START operation key If initiating from start-up, the generator initially carries out a SET-UP preparation cycle lasting about 1 minute After the set-up, the generator starts to pressurize the generation module, showing the following page After few minutes, the generation module has reached the set-point pressure and the product valve will open. From this point, the dryer and the hydrogen line connected to the generator starts to pressurize. Depending on individual customer plumbing and process usage, it may take several minutes for operating pressure to be realized WARNING: on first start-up, the internal pneumatic circuit may contain residual air. For this reason, the line should be vented with the gas (for approx. 40 minutes) before employing the hydrogen for the application utility 23 PD-0100-0050 RevisionB.fm 6.6. Stopping the generator____________________________ At any time during production the generator can be stopped by pressing the STOP key. The generator will immediately start to depressurize the generation module, showing the following page When depressurization is completed, after approximately 15 seconds, the READY TO START page appears 6.7. Generator shutdown______________________________ After stopping the generator (see par. 6.6.), wait for the circulation pump to stop (approx. 1 minute), then put the main switch on the rear of the generator in position O Avoid turning off the generator directly, without first stopping it as described in par. 6.6.. 24 PD-0100-0050 RevisionB.fm 6.8. Parameter display_________________________________ 6.8.1. Hydrogen pressure display At any moment, during production, it is possible to read the hydrogen pressure in the line 6.9. Parameter settings________________________________ Modification of system parameters may greatly affect the operation of the system. Ensure parameter to be modified is fully understood prior to proceeding with the change. 6.9.1. Hydrogen delivery pressure settings To set the operating pressure to the required value, proceed as follows. Press on the pressure value: 25 PD-0100-0050 RevisionB.fm The following page appears: Press the displayed value. To modify the value, use the INCREASE or DECREASE keys To set the required value, press the OK key To exit this menu, press the ESC key 6.9.2. Adjustment of the display contrast To increase the legibility of the LCD display, press the CPU key 26 PD-0100-0050 RevisionB.fm The following page appears: Press LCD CONTRAST Adjust to the desired value. To exit this menu, press the ESC key 6.9.3. Selecting measuring units The CPU allows the selection of different measuring units for temperature and pressure. To perform the selection, press the CPU key 27 PD-0100-0050 RevisionB.fm The following page appears: Press MEASURE UNIT. Select the desired measuring unit for pressure Or go to the next page using the NEXT key Select the desired measuring unit for temperature To exit this menu, press the ESC key 28 PD-0100-0050 RevisionB.fm 7. Maintenance_________________________ The maintenance operations required on hydrogen generators of the HyGen series are minimum. para. 7.2. Maintenance schedule lists these operations and the recommended frequency 7.1. Maintenance counters display_______________________ Press the MENU key Then press MAINTENANCE: The following maintenance counters are displayed: • • 29 WORKING TIME indicates the total working hours of the generator PRODUCED H2 indicates the total volume (in liters) of hydrogen produced by the generator PD-0100-0050 RevisionB.fm To display other counters, press the NEXT key The following maintenance counters are displayed: • • PUMP LIFETIME indicates the residual working hours before recommended replacement of the pump. DESICCANT AUTONOMY indicates an estimation of the residual percentage of active desiccant before maintenance is required (see par. 7.3. Dryer replacement) When one of these counters reaches zero, a WARNING will be display to recommend the related maintenance intervention. 7.2. Maintenance schedule_____________________________ To maintain generator efficiency and reduce the risks of faults, strictly observe the recommended maintenance schedule. 30 PD-0100-0050 RevisionB.fm The following table specifies the frequency of the recommended maintenance operations. Maintenance Operation Dryer Replacement Operator User / technical assistance Ionic exchange resin bag replacement Water circulation pump replacement User / technical assistance Operation Frequency Refer to the dryer_life_time counter Every 6 months Technical assistance Every 2 years If a correct maintenance schedule is not followed, the performance of the generator may no longer be ensured and it may lead to permanent generator damage. 7.3. Dryer replacement________________________________ MATERIAL NECESSARY: - A dryer recharge TIME NECESSARY -About 15 minutes It is recommended to wear gloves, safety glasses or goggles and dust mask. Avoid contact of the desiccant with moist skin and eyes. • • • 31 Turn off the generator according to the procedures indicated in par. 6.6. Stopping the generator and par. 6.7. Generator shutdown Remove the front panel Depressurize the hydrogen line downstream of the generator PD-0100-0050 RevisionB.fm • Remove the DRYER hose by pressing on the two quick couplings • loosen the cap • • empty the old dryer material from the dryer vessel open the new dryer package 32 PD-0100-0050 RevisionB.fm • Pour the contents of the dryer recharge into the dryer vessel (if necessary, aided by a funnel); if used, ensure the funnel is completely dry. • • Install the cap Reposition the dryer vessel • Reset the DESICCANT AUTONOMY counter to the value 100% (see para. 7.1. Maintenance counters display) To avoid exposing the dryer to humidity in the ambient air, open the recharge cartridge only at the time of transfer and close the dryer vessel as soon as recharging is complete. The spent desiccant has not been in contact with toxic chemicals; therefore it should not be considered as hazardous waste: discard it in full compliance with applicable government regulations 33 PD-0100-0050 RevisionB.fm 7.4. Ionic exchange resin bag replacement________________ MATERIAL NECESSARY: - Ionic exchange resin bag replacement TIME NECESSARY: -5 minutes • • • • Remove the front panel Disconnect the tube from the coupling on the bottom of the deionized water filler tank Remove the tank Locate the black plastic pull tab on the resin bag cap • Pull up to remove the spent ion exchange resin bag and cap Minimize the amount of direct handling of the resin bag in order to minimize the • • amount of contamination prior to insertion into the deionized water tank Replace with a new ion exchange resin bag assembly, reseat the cap in place Reposition the deionized water tank 34 PD-0100-0050 RevisionB.fm • • 7.5. Reconnect the tube onto the bottom of the tank Reassemble the front panel Consumables list__________________________________ The following table summarizes the consumable parts available at PROTON Description HyGen DRYER RECHARGE PACKAGE IONIC EXCHANGE RESIN BAG WATER CIRCULATION PUMP MAIN FUSE Code KT-0500-0023 KT-0200-0014 54-0500-0149 08-0301-0010 8. Troubleshooting______________________ 8.1. Alarms__________________________________________ The generator informs about a malfunction or the necessity of intervention in two different ways: warning or error. WARNING It indicates a condition that may require the intervention of the operator, but gas production is not shut down. In WARNING status: • An acoustic signal is emitted; • The following page is displayed ERROR It indicates a condition that prevents continuation of gas generation. The generator shuts down production and depressurizes the generation module. 35 PD-0100-0050 RevisionB.fm In ERROR status: • • • 8.2. An acoustic signal is emitted; The LED on the front panel is intermittent red; The following page is displayed Reset and identification of an alarm__________________ To shut off the acoustic signal, press the alarm page (WARNING yellow page or ERROR red page) WARNING To visualize a warning message, press on the WARNING symbol The following page will appear To find the active warning, scroll down the pages using the NEXT key 36 PD-0100-0050 RevisionB.fm Active warnings are those highlighted; once the warning has been identified, follow the instructions in the following chapter. ERROR To visualize an error message, press on the ERROR symbol The following page will appear: To find the active error, scroll down the pages using the NEXT key Active errors are those highlighted; once the error has been identified, follow the instructions in the following chapter. To reset the alarm, press the RESET key 37 PD-0100-0050 RevisionB.fm List of warnings___________________________________ 8.3. Warning Identification W-00 W-01 Cause Data loss: the memory has lost the set up values of the parameters and has restored the default values Water shortage W-02 W-03 Water system feeding error Expiring desiccant W-04 Pump maintenance required 8.4. Resolution Contact service in order to set the correct values of the parameters Refill deionized water filling tank Contact service Recommended to replace desiccant, the reset counter to 100% Recommended to replace circulation pump (contact service) List of errors_____________________________________ Alarm Indication E-00 type error Cause Generator not identified E-01 cell voltage high Voltage to electrolyzer over the maximum threshold Voltage to electrolyzer below Contact service the minimum threshold Deionized water quality below Check deionized water requirement quality; drain water from generator; refill using water with higher resistivity Water level below minimum Refill fill tank threshold Pressure in the line is higher Check pressure in the line than set-point Leakage in the generation Contact service module Set-point pressure not Check for leakage in the line reached E-02 cell voltage low E-03 poor water resistivity E-04 water tank level empty E-05 high pressure E-06 system leak detected E-07 product leak detected 38 Resolution Assign a number to the generator (see Stack user’s manual) Contact service PD-0100-0050 RevisionB.fm Alarm Indication E-08 failed pressure transducer E-09 system high temperature E-10 water resistivity sensor failed E-11 temperature low E-12 temperature sensor failed E-13 fan error E-14 pump error E-16 microprocessor fault E-17 invalid level sensor state E-18 water reserve over E-20 cell thermal switch failure E-21 electronic box temperature high E-22 current generator temperature high E-23 vent error E-24 safety circuit malfunctioning E-26 electronic box temperature E-27 current generator temperature E-28 max current E-29 CAN communication fault 39 Cause No signal from pressure transducer Water temperature in generation module above max threshold No signal from resistivity sensor Water temperature in generation module below minimum threshold No signal from temperature sensor Internal ventilation failure Circulation pump is not powered No communication with the control board microprocessor Level sensor failure Proper water level is not restored Cell thermal switch disconnected Electronic box temperature above threshold Current generator temperature above threshold Generation module is not able to depressurize Invalid status of safety sensors No signal from electronic box temperature sensor No signal from current generator temperature sensor Cell current above threshold CPU cannot communicate with the generator Resolution Contact service Check if environment temperature is within specifications Contact service Check if environmental temperature is within specifications Contact service Check if the rear fan is obstructed; contact service Contact service Contact service Contact service Refill fill tank Contact service Contact service Contact service Check if vent line is obstructed Contact service Contact service Contact service Contact service Check connection within generator and CPU. PD-0100-0050 RevisionB.fm Proton OnSite 10 Technology Drive Wallingford, CT 06492 203-949-8697 203-678-2000 www.protononsite.com 40