1
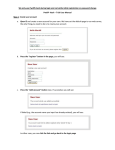
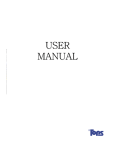
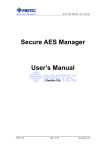
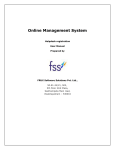
Only use PwdIP-Hash during login; do not use it for the initial registration or password change
PwdIP- Hash – Trial User Manual
Step 1: Create user account
a. Open IE and create a new account for your own. We have set the default page to our web server,
the only thing you need to do is to create your account.
b. Press the “register” button in the page, you will see:
c. Press the “Add Account” button now. If successful, you will see:
If failed, (e.g. the account name you input has already existed), you will see:
In either case, you can click the link and go back to the login page
Only use PwdIP-Hash during login; do not use it for the initial registration or password change
Step 2: Login in the account using PwdIP-Hash plug-in
a. Use the account you just created to login, this step we’d like you to experience the plugin
program (see the red X icon in the toolbar):
b. Type your account name
c. We use PwdIP-Hash to protect the password entry.
Click the input area of the password so that it will get the focus. Then press F2, you will see that
the icon in the toolbar will change to green check mark:
d. The green check mark means that the plugin is ready to accept your input password and will
encrypted it. Now you can input your password and click the “login” button. If successful, you
will see:
Only use PwdIP-Hash during login; do not use it for the initial registration or password change
Otherwise, you will see an error page, and you can go back to login page again.
Step 3: Change Password
We only use PwdIP-Hash during login and not in the initial registration or password change stages.
If you log in successfully in step 2, you can change your password now.
a. Press the “changepwd” button in the login successful page (as shown above), you will see:
b. Now change your password to anything you want, and then press the “change password”
button. If successful, you will see:
c. Logout
Only use PwdIP-Hash during login; do not use it for the initial registration or password change
Step 4: Login in the account using PwdIP-Hash standalone application - “PwdIPHash.exe”
In this step we want you to experience the standalone program.
a. Navigate back to login page. You can find an executable file named “PwdIPHash.exe” in the
desktop. Double click to run it, you will see:
b. You can input the URL (domain name) in the text field or select an existing one from the list (the
program can detect the existing valid URLs of IE).
In our experiment, since we only test it in our web server, you just need to select it from the
dropdown list (make sure that the login page is in the IE, otherwise it cannot be shown in the
list), just like this:
c. After selection, input the password in the password field:
Only use PwdIP-Hash during login; do not use it for the initial registration or password change
d. Then the long button named “Create Password and Copy to ClipBoard” is enabled. Press it and
if successful, you will get:
e. Click “OK” button of the message box, then the generated encrypted password has been stored
in the clip board. You can paste it into the password field in the login page:
d. Then press the “login” button (of course you should input the account name):
Only use PwdIP-Hash during login; do not use it for the initial registration or password change
If successful, you can see the login successful page again.