1
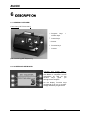
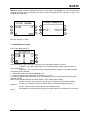
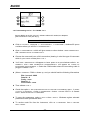
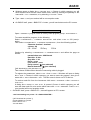
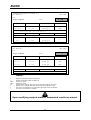
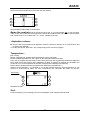
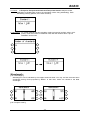
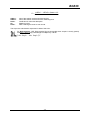
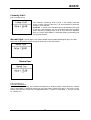
BASIC
70VB0358
70VB0370
User’s manual
Ref. 0NVBAU
Manual version: 1.19
SYSTEME QUALITE CERTIFIE
SECOMAM, a NOVA ANANLYTICS Company,
91, Avenue des Pins d’Alep
30319 ALES FRANCE
Tel: +33 4 66 54 35 60
Fax: +33 4 66 54 35 69
E-mail: [email protected]
URL: www.secomam.fr
BASIC
SUMMARY
1 REMARKS......................................................................................................................................................... 5
2 WARRANTY ..................................................................................................................................................... 7
3 INFORMATION................................................................................................................................................ 9
4 PRECAUTIONS OF USE ............................................................................................................................... 11
5 PRELUDE ........................................................................................................................................................ 13
6 DESCRIPTION................................................................................................................................................ 15
6.1 GENERAL OVERVIEW
6.2 SCREEN AND KEYBOARD
6.3 DISPLAY DESIGN
15
15
17
7 SET-UP ............................................................................................................................................................. 19
7.1 GENERAL SET-UP
7.2 LANGUAGE SET-UP
7.3 DATE AND CLOCK SET-UP
7.4 PUMP SET-UP
7.5 PRINTER SET-UP
7.6 TRACEABILITY SET-UP
19
20
21
21
23
24
7.6.1 Downloading to a PC : F1 « BASIC –PC »
7.6.2 Downloading to a printer : F2 « BASIC-PRINTER »
7.6.3 KINETICAL REPORT
7.7 QUALITY CONTROL SET-UP
25
26
28
28
8 PROGRAMMATION ..................................................................................................................................... 33
8.1 PROGRAM KEYS
8.2 RECOMMANDATION FOR DAILY ANALYSIS
8.3 ERROR MESSAGES
8.4 SAMPLE NUMBERING
33
41
43
45
9 MAINTENANCE............................................................................................................................................. 47
9.1 TECHNICAL CHARACTERISTICS
47
10 MEMO............................................................................................................................................................ 49
11 GLOSSARY ................................................................................................................................................... 53
-3-
BASIC
1 REMARKS
The Automatic aspiration system kit is manufactured by SECOMAM.
The information contained in this document may be the object of patents or patent applications by
SECOMAM. The possession of this document does not confer any license to such patents.
The following names are SECOMAM’s registered trademarks throughout the world.
SECOMAM
BASIC
This manual is updated periodically. The updates are included in the new editions.
All information supplied in this edition of the manual may be amended before the products described
herein are available.
All reproduction rights reserved.
Reference
0NVBAU
Date of last
modification
Version
07/12/04
1.19
Date of document.
Writer
JM
-5-
Controller
Approving
BASIC
2 WARRANTY
The new equipment and material sold by SECOMAM is guaranteed against any manufacturing defects
for one year (unless otherwise stated by SECOMAM) with effect:
− From the technical acceptance of the equipment in the factory by the buyer or his designee,
− or failing this :
* For Metropolitan France: from the date on the delivery note.
* For other destinations: from the date of factory shipment certified by air waybill,
consignment note or bill of lading.
The SECOMAM company guarantee applies exclusively to defectiveness arising from a design fault or
from a concealed defect. It is strictly limited to the free dispatching of replacement parts (except for
consumable items) or to the repairing of the equipment in our workshops within a deadline of 10
working days (shipping delay not included).
By express agreement, the following are strictly excluded from our guarantee:
− All damages, notably for staff costs, loss of earnings, business trouble, etc
− Any breakdown due to an incorrect use of the equipment (non adapted mains, fall, attempt at
transformation, etc) or to a lack of maintenance by the user or to poor storage conditions.
− Any breakdown due to the use of parts not supplied by SECOMAM, on SECOMAM equipment
− Any breakdown due to the transporting of the equipment in packaging which is not its original
packaging
− The lamps, the cells and generally any item which appears in the "accessories" section on the
price list.
Our customers are kindly asked to apply for our consent before returning any instrument for repair. No
return of materials may be accepted without the prior written consent of our Sales Management which
will precise the terms of such return.
If the above consent is given, articles shall be returned in their original packaging on a prepaid basis to
the following address:
SECOMAM - 91 avenue des Pins d’Alep – 30100 ALES FRANCE
We reserve the right to reship all instruments received collect failing such consent.
Whatever method and conditions of transport are chosen for the shipment of the equipment to be
repaired under guarantee, in the original packaging, the corresponding costs and the insurance costs
will be payable by the customer.
Any damage connected to the return transport of the equipment falls within the framework of the
guarantee on the express condition that the customer has sent his complaint within forty-eight hours
by registered letter with acknowledgement of receipt to the carrier. A copy of the letter should be sent
to SECOMAM.
For equipment with a guaranty card, this is only applicable if the card delivered with the equipment is
returned to SECOMAM duly completed.
-7-
BASIC
SOFTWARE GUARANTEE
The software is guaranteed by the designer or the distributor of the software under the conditions
specified in the literature accompanying the aforementioned software packages.
Under no circumstances whatsoever will SECOMAM supply any type of guarantee for software
packages.
By express agreement, all damages, notably for staff costs, lost of earnings; business trouble, etc are
strictly excluded from our guarantee.
The customer is informed that the software cannot be guaranteed exempt from defects or bugs.
TRADE SECRET AND PROPERTY RIGHTS
This document is protected by a SECOMAM copyright (c) 2003 and the copying rights are explicitly
reserved. The software supplied with the equipment or referenced contains trade secrets and
confidential information which are SECOMAM's property. It is legally protected by the international
copyright (c) laws.
SECOMAM grants a license to use its software to the user. This may not be disclosed, used or
duplicated with the intention to save it, without SECOMAM's written permission. The beneficiary must
attach a copy of this document to all authorized partial or total reproductions.
-8-
BASIC
3 INFORMATION
The SECOMAM equipment has been designed, manufactured, tested and inspected according to the
ISO 9001 standards.
If the unit is not immediately installed, it should be stored in a dry and clean area. The storage
temperature should be between 10 and 35°C.
SECOMAM equipment is carefully inspected before it is packed. As soon as you receive your
equipment, check the condition of the packaging and if you notice any problems, notify your carrier
within 48 hours. Then consult the packing list and check that everything is in order. Finally, if you
discover that something is missing, or if the goods are damaged immediately notify SECOMAM.
IMPORTANT:
In order to benefit from SECOMAM’s service (application notes, SECOMAM information, technical
assistance, etc.) immediately complete the attached guarantee card and return it to the following
address:
SECOMAM
Service PRODUIT
91 Avenue des Pins d’Alep
30319 ALES Cedex
FRANCE
Tel: +33 4 66 54 35 60
Fax: +33 4 66 54 35 69
E-mail: [email protected]
Service Department: +33 4 66 54 35 63
Technical support: +33 1 39 35 42 12
-9-
BASIC
4 PRECAUTIONS OF USE
Always make sure that the instrument is connected on the good voltage.
(Between 100 – 240V 50-60Hz)
Always disconnect the mains plug before starting any work inside the
instrument.
When dangerous substances for health and environment are used, the
laboratory or site rules, where the instrument is installed must be
followed.
Take all the necessary precautions, during the use the instrument, to
protect the operator from eventual liquids leaks or spills or possible
radiations (protective gloves, anti radiation glasses , protected clothes,
etc)
All operations made inside the instrument, must be done by SECOMAM or by
SECOMAM’s authorized technicians.
- 11 -
BASIC
5 PRELUDE
The BASIC was designed within the framework of In Vitro Diagnostic to cover the need of
semi-automatization in clinical biochemistry analysis.
It includes the principal functions required by this kind of analysis such as:
- Wavelength range 340-700 nm,
- Peltier thermostated cell holder
- Calculation method adapted to enzymatic reading of results and parameters
- Quality control management
- Partial management of laboratory practice
BASIC complies with the requirements in CE marking of medical devices for In Vitro
Diagnostics (98/79/EEC)
- 13 -
BASIC
6 DESCRIPTION
6.1 GENERAL OVERVIEW
Front view :{ XE "Front view" }
← Program
keys
number keys.
↑ Control keys.
2
1
+
3
→ Screen.
4
↓ Function keys.
5
°
Cursors.
{ XE "Screen" }{ XE "Keyboard" }
6.2 SCREEN AND KEYBOARD
Function and screen keys :
Thanks to these keys, working
with BASIC is simplified. Screen
instructions as well as the
function
keys
guide
you
throughout the analysis.
On the display, Function keys
correspond to an icon or a value.
Simply validate by a light stroke.
- 15 -
BASIC
• Cursor keys : Use these keys to have access to
other functions of the keyboard such as :
- elevator mouvement : BASIC test
methods on the primary and
secondary positions, next screen
display,
- right arrow for double rinse
{ XE "Cursor" }{ XE "Program keys" }
Program keys : each program key can contain two test methods : on the primary position and the
secondary position (secondary position are M1 to M47). These program keys are preassigned to give
you an idea of the program capacity and calculation method the instrument is capable of. You can
modify any given test method at any time, experiment your own parameters, place it at a different key
than the original and call it just by one stroke. Before modifying, it is recommended to print the existing
test method.
Number keys : otherwise indicated on the display, numbers are to be entered by way of program keys
(date, hour, sample values, sample numbers, ...).
{ XE "Number keys" }
- 16 -
BASIC
• BASIC’s software control keys :
Validate an operation
Quit active screen
Reach software configuration screen
Erase & correct data
6.3 DISPLAY DESIGN
Test name
Programmed
temperature
Calculating method
Concentration value,
measuring unit
Absorbance value
(blank value
deducted)
Name of sample measured
(standard, sample X ...)
When using cuvette by cuvette method, you will see :
While for pumping aspiration :
- 17 -
BASIC
7 SET-UP
7.1 GENERAL SET-UP
{ XE "General set-up" }
Step-by-step set-up of BASIC is done through the « CONF »key
CLOCK
Use (F1) to (F5) keys to modify
the values. Abort modification
with ESC key, register with VAL
key.
STAND-BY
Access to a sub-menu
allowing to choose the
duration before starting the
stand-by (screen saver)
CONF
PRINTER
DATA FILES
Access
to
set-up
menu for the printer
Access to : -Patient
identification –Patient
report –Data archiving
to PC or Printer –
Memory reset.
- 19 -
BASIC
PROGRAM
PUMP
Access to program
modification.
Access to pump setup menu
QUALITY CONTROL
Confirm (F1) or skipping (F4) the
quality control function. Display (F3)
values and dates of previous control.
NOTE :
CONFIGURATION screen is active when you see an elevator in
the middle of the screen. Use upward and downward cursor
keys to activate and have access to the next display screen.{
XE "Elevator" }
7.2 LANGUAGE SET-UP
This would be the first configuration to check upon starting the instrument. Successively press
« CONF », « downward cursor key », (F1) « Language set-up » then (F3) « English ». { XE "Language
set-up" }
- 20 -
BASIC
7.3 DATE AND CLOCK SET-UP
D+1
T+1
M+1
M+1
Y+1
Use the corresponding function key to increment date and time. Then « VAL » to { XE "Date set-up" }{
XE "clock set-up" }store, « ESC » to return to previous display.
7.4 PUMP SET-UP
{ XE "Pump set-up" }
Access to pump functions & set-up : debit , dead volume,
aspiration volume.
For your convenience, these volumes are factory
preadjusted.
(Note : upon changing pump and tubings , you have to
readjust setting).
Press (F3) « PUMP SET-UP » , you will obtain :
Press (F5) « NO » for manual cuvette by cuvette operation (recommended to use on highlycontaminant tests).
By answering (F2) « YES », you obtain three choices :
- 21 -
BASIC
Pump rate (calibration) :
Prepare ahead :
• four test tubes with 2000 µl of distilled water each,
• one test tube with 1000 µl of distilled water to use as standard.
• One graduated pipette (vol. up to 1000 µl)
To adjust pump volume, you need to: { XE "Pump calibration" }
• Return to « CONFIGURATION ».
• Go to menu « PUMP ».
• Use pump « YES ».
• Exit from « CONFIGURATION » (ESC twice).
• Rince twice consecutively (using right cursor button) to fill the tube with water.
Then :
• Again return to « CONFIGURATION »,« PUMP »,« YES ».,« PUMP RATE »
• Introduce the first tube containing 2000 µl of distilled water to the aspiration noozle.
• Press (F3) « SUCK » and « VALidate » the message of 1000 µl. The pump should have aspirated
1000 µl. Compare the remaining volume with the volume of standard tube. Or better yet, aspirate
the remaining distilled water with the pipette and verify the volume. If the remaining volume is more
(or less) than 1000 µl, « DELete» the message of 1000 µl on display and enter the real volume
sucked by the pump using the number keys (calculation example : initial volume of 2000 µl –
remaining volume = new volume to program). Introduce the second tube containing 2000 µl of
distilled water.
• Press (F3) « SUCK » and « VALidate ». The remaining volume should be 1000 µl, same as the
volume of standard tube (or verify again with the pipette). If another adjustment is to be done,
repeat this process untill the instrument aspirated the right 1000 µl volume.
Always validate at the end of process by (F6) «OK». (To keep previous volume, press « ESC »).
Delay :
Is the frequency (in seconds) to program for sample introduction following one reading.
You can work faster by shortening pump aspiration delay when you are more familiar with the system.
- 22 -
BASIC
beginning of the dead volume
Dead volume
Sample
Joint
Flow through cell
Dead volume :
Dead volume is needed to avoid contamination of samples.
It is represented by a certain volume of air. Dead volume is
influenced by the length of aspiration tube. It is
recommended to program dead volume in such a way that
the end of the aspirated sample remains approximately 2
cm on top of the cell tip (see drawing).
{ XE "Dead volume" }
Upon selecting F3 Dead Volume, you will get a choice of 6
volumes.
.{ XE "Volume" }
200 µl is the factory preprogrammed volume:
7.5 PRINTER SET-UP
{ XE "Printer set-up" }
Select « PRINTER OPTION » by pressing F3.
Printer should be an 80 column or has an 80 column set-up.
When using a printer, select (F2)« YES », (F1) « TYPE » , enter the type of printer.
A selection of 4 printers are proposed : a KYOLINE, CITIZEN IDP562S, HEWLETT PACKARD and
EPSON. Choose one. Next, check the type of port « connection » either serial RS232C or Parallel.
Connect IDP or KYOLINE printer using its serial printer cable to BASIC’s serial RS232C port.
- 23 -
BASIC
Warning : never connect a serial printer with a 25-pin cable to the parallel port. This will do serious
damage to BASIC and the instrument will emit a continuous beeping noise. This type of error is not
covered by the warranty.
Exit from set-up by « ESC ».
7.6 TRACEABILITY SET-UP
{ XE "Trace-ability set-up" }
Data identification, filing, report etc. are given in this (F6) TRACE-ABILITY function :
F1 BASIC - PC : this function allows you to download data (patient reports) to the PC
(see chapter 5.6.1)
F2 BASIC – PRT : use this function to download data to a printer. Two types of printed
documents can be obtained :
• global daily report of all patients (enter Nr 0) or
• patient by patient report (selectable : example Nr 114, 121).
You can print previous day’s result (if it is not crushed/erased yet) by reprogramming the date (see
CONFIG, DATE).
Note :For two samples bearing the same number, only the latest will be edited.
F3 INIT is used to clear result memory. Be sure to save/print results before deleting.
F4 YES : by choosing this function, BASIC will report kinetical reading points per
segment.
F5 NO : by this function, BASIC will give brief kinetical report.
F6 ORDER is to select the printing order of a given patient, for example Nr 114 first then
Nr 121.
- 24 -
BASIC
7.6.1 Downloading to a PC : F1 « BASIC –PC »
Connect BASIC to the PC using ref : 0X6807 cable and if needed, an adaptator.
{ XE "Download to a PC (Win 95)" }
FOR WINDOWS 95
♦
♦
♦
♦
♦
♦
♦
♦
♦
Click on « START », PROGRAM », « ACCESSORIES », « HYPERTERM », windows 95 opens
a window where you will find « HYPERTRM.EXE ».
Open « HYPERTRM.EXE » which will give access to other window « NEW CONNECTION »
and « DESCRIPTION OF A CONNECTION ».
Choose the name and icone of this connection (bearing in mind the type of instrument
which is your source of data) then « OK ».
You’ll see « DESCRIPTION » disappear to leave space to a new windows called « TEL
NUMBER », also « NEW CONNECTION HYPERTERMINAL » will appear as « NAME OF
INSTRUMENT-HYPERTERMINAL ». Select the COM number where the connecting cable is
plugged. Validate « OK ».
When « PROPERTY COMx » shows up, and you should feed the following informations
:
Bits / second : 9600
Data bit : 8
Parity : none
Stop bit : 1
Flux control : none
Then validate « OK ».
Check that option « ADD LINE MODIFICATION AT THE END OF ENTERING LINES », in menu
« FILES », « PROPERTY » index « PARAMETERS » button « CONFIG ASCII » at framed
level « ASCII RECEPTION » is activated.
To save the parameters, select « FILES » then « SAVE ». Windows register selected
parameters under predefined name.
To receive result file from the instrument, click on « TRANSFER » then « CAPTURE
TEXT » menu.
- 25 -
BASIC
♦
Windows opens a dialog box « CAPTURE TEXT ». Choose in which repertory you will
save the data result file also under which name, either by entering the pathway or the
name with « .TXT » extension, or by selecting « FOLLOW » icone.
♦
Type « start », and your terminal will be on reception mode.
♦
On BASIC itself, press « BASIC-PC » button, you will see its data on the PC screen.
FOR WINDOWS 3.x
Open « TERMINAL » program which is usually under program group « ACCESSORIES ».
To create acquisition program, do the following :
Select « PARAMETERS », « TERMINAL EMULATION » and select « DEC VT 100 (AINSI) »
option.
Then select « PARAMETERS », « TERMINAL PARAMETERS », then the following options :
Character terminal : terminal
column : 80
CR > CR/LF
⌧ Entry
Exit
Continue by selecting « PARAMETERS » « COMMUNICATION » and define the page as
follows :
transmission rate : 9600 bauds
Data bits : 8 bits
Stop bits : 1 bit
Parity : none
Flux control : none
Parity control : (non selected)
Beared detection : (non selected)
{ XE "Download to a PC (Windows 3.x)" }
Then choose COM number where the connecting cable is plugged.
To register the parameters, select « FILE » then « SAVE ». Windows will open a dialog
box « SAVE ». Choose in which repertory you want to save the program, also give a
name with « .TRM » then enter « OK ». That file name is shown on PC’s title bar.
To receive result file from the instrument click menu « TRANSFER » then « RECEIPT A
».
A dialog box « RECEIPT A TEXT FILE » is opened. Choose in which repertory you will
save the data result file, also under which name with « .TXT » extension. Press « OK »,
your terminal will be on reception mode.
• On BASIC itself, press « BASIC-PC », data will appear on PC’s screen.
TEXT FILE
7.6.2 Downloading to a printer : F2 « BASIC-PRINTER »
{ XE "Download to a printer" }
Connect BASIC to a printer.
Press « BASIC-PRT ».
You will obtain :
- 26 -
BASIC
M
M
M
M
M
M
M
M
1
47;E;
47;E;
47;E;
47;E;
47;E;
47;E;
47;E;
47;E;
2
0
1
2
3
4
5
6
7
3
0.0;%;
210.4;%;
-0.0;%;
-0.0;%;
9.9;%;
9.9;%;
9.8;%;
9.8;%;
4
29/08/1997;08H17;
29/08/1997;08H19;
29/08/1997;08H19;
29/08/1997;08H20;
29/08/1997;08H20;
29/08/1997;08H20;
29/08/1997;08H21;
29/08/1997;08H22;
Column 1 : Sample number + characteristics :
B = Reagent blank,
S = Standard,
E = Sample,
C = Control,
b = Blank of reagent blank,
s = Standard blank,
e = Sample blank,
c = control blank.
Column 2 : Sample number.
Colonne 3 : Concentration value and unit.
Column 4 : Date and time.
Column 5 : Status :
-:
>:
<:
L:
−:
B:
Q:
! :
-:
No problem,
Result superior to normal value,
Result inferior to normal value,
result superior to linearity limit,
negative concentration value
Blank value superior to linearity limit,
Control non performed,
Control badly performed,
Control normal.
Memory initialisation{ XE "Memory initialisation" }
To erase the results stored in memory, press « init ».
- 27 -
5
-;?
L;?
;?
;?
;?
;?
;?
;?
BASIC
7.6.3 KINETICAL REPORT
On methods using KINETICS, you have a choice of having a short one line final reading report by
choosing F5 « NO » or segment per segment reading through F4 « YES ».
7.7 QUALITY CONTROL SET-UP
Each Quality Control runned is memorized automatically.
F4« NO » gives you the choice not to run QC.
F3« DISPLAY » allows to display on screen as graph the values and dates of previous control (only
after at least two controls of the same analysis method have been made). Printout of QC can be
obtained after programming TRACE-ABILITY function, YES.
{ XE "Quality control set-up" }
Upon validating (F1) « YES » , you will be reminded to run
Quality Control later on upon running a test method (CHECK
ANALYSIS) and flags will be given according to the
« MAXIMUM & MINIMUM TOLERANCE VALUES » entered.
Q preceding result indicates that QC was not performed.
Note : Upon using a test method for the first time in the day,
you will be suggested to run a control. However, once QC is
done for the day, no need to run another one, hence F6
« NO ».
- 28 -
BASIC
This control can be done at a regular interval, defined in days :
To do so, return to « PROGRAMMING », F1« MODIFY », select the corresponding analysis method,
and validate till you obtain the following display :
{ XE "Control frequency" }
Enter the frequency (in days) and validate . This procedure determines QC periodicity. Control can be
done daily, for 31 days.
- 29 -
BASIC
This way, daily/periodically, the instrument memorizes analysis results & quality controls.
Status of control
Use upward/downward
arrows to visualize
controls .
Chronological filing of
control
Printing control results
Exemple of print-out (analysis comprising one quality control per day :
SECOMAM - Polyphotometer UV-Vis BASIC V1.11
Date : 04/06/1997
Hour : 09H25
User :
Analysis : ALBUMIN
Sample
37°C
Abs.
Reagent
Bl.
Concentration
0.000
0.00
g/l
Standard
0.100
1.00
g/l
Control
0.150
1.50
g/l
OK
Control
Normal
- Le
value:
Status
OK
05/06/97
38.00
à
54.00 g/l
S. #
1
0.150
1.50
g/l
<
S. #
2
0.300
3.00
g/l
<
Std.
#
3
0.700
7.00
g/l
<
Std.
#
4
1.300
13.00
g/l
<
Std.
#
5
1.250
12.50
g/l
<
- 30 -
BASIC
SECOMAM - Polyphotometer UV-Vis BASIC V1.11
Date : 05/06/1997
Hour : 09H26
User :
Analysis : ALBUMIN
Sample
Abs.
Reagent
Bl.
Contrôle
C o n t r o l
N o r m a l
2nd day
37°C
Concentration
0.000
0.00
2.100
21.00
P b
L e
v a l u e
:
Status
g/l
g/l
PB
0 6 / 0 6 / 9 7
3 8 . 0 0
à
5 4 . 0 0
S. #
1
0.100
1.00
S. #
2
1.600
16.00
g / l
<
g/l
<
g/l
SECOMAM - Polyphotometer UV-Vis BASIC V1.11
Date : 06/06/1997
Hour : 09H27
User :
Analysis : ALBUMIN
Sample
Reagent
Abs.
Bl.
3rd day
37°C
Concentration
Status
0.000
0.00
g/l
Control
0.990
9.90
g/l
PB
Control
0.990
9.90
g/l
PB
C o n t r o l
N o r m a l
P b
L e
v a l u e :
0 7 / 0 6 / 9 7
3 8 . 0 0
à
5 4 . 0 0
g / l
Status :
>
<
PB
OK
Q
!
L
:
:
:
:
:
:
:
−
:
Sample concentration superior to upper limit.
Sample concentration inferior to lower limit..
Problem on control.
satisfactory control.
Appears next to analysis result when control is programmed but not runned.
Appears next to analysis result when the control is out of tolerance range.
The result in concentration is no longer within the linearity limit of the analysis.
The result in concentration is negative.
Upon modifying analysis method, memorized results are erased.
- 31 -
BASIC
8 PROGRAMMATION
Through configuration, select « PROGRAMMING » to modify a preset analysis method or to create a
new one.
Programmable parameters are :
− suction volume,
− temperature,
− unit
− accuracy,
− calculation mode,
− analysis mode
− time (lag time, interval time and number of intervals),
− wavelength,
− linearity limit,
− normal range (high/low)
− check frequency,
−
previous results & standard control will be crushed upon saving a new method.
Note : At any case, arbitrary values are labeled by small arrows on the right or the left side of the
value.
{ XE "Program keys" }
8.1 PROGRAM KEYS
To program an analysis test, simply return to set-up procedure : « CONFIGURATION », then
« PROGRAM », PROGRAMMING : F1« MODIFY » :
Next you will obtain the « ANALYSIS » selector panel : simply press ↑ or ↓ or cursor key for access to
program keyboard.
Primary position
Secondary position
- 33 -
BASIC
Select one of the program key to place the new test method.
ADJUSTMENTS RELATED TO ANALYSIS
Name the analysis
method should be done first. It is recommended not to use the same
name as the one found in the primary position. DELete test method name and replace. Choose letters
and numbers with F1 to F6 keys and ↑ or ↓ cursor. Validate at the end.
Aspiration volume :
800 µl is the recommended pump aspiration volume. However a selection of six volumes from 500
to 1500 µl are available.
To modify the volume, press the F key corresponding to the volume to program.
Temperature :
{XE "Temp"}
BASIC is equiped with a Peltier-effect temperature control cell-holder.
Recommended temperature to use is given by the test method technical sheet.
Use F key to program the temperature. Note :during warm-up, the programmed temperature digits will
blink, rather fast at first, slowing down afterwards. It takes 15 minutes to stabilize the cell-holder and
cuvette to 37°C Once temperature is reached, the digits will be displayed permanently.
Peltier-effect is deactivated when programmed at XX (Room temperature/F1)
Note on work organization : it is adviced to run all test methods using the same temperature in one
session to avoid warm-up delay. For your convenience, the cell-holder will remain on the last
Room temp
temperature used.
Unit :
Choose measuring unit according to the recommendation of the reagent technical sheet.
- 34 -
BASIC
{ XE "Unit" }
Result resolution (decimals) : Concentration result is given by the number of decimals
programmed.
{ XE "Result resolution" }
Calculation mode :
{ XE "Calcul mode" }
A choice of three calculation modes are proposed :
F1 Factor : in Kinetic mode, enzymatic factor (coefficient) value is used instead of calibration factor.
Enter factor value indicated on the reagent technical sheet (DELete, then enter numbers). Results will
be calculated using this factor.
- 35 -
BASIC
F2 Linear : In End-point, End-point with blank and Two-points-kinetics analysis modes,
calibration is needed (which means, the calculation is done using standard(s)). Enter
standard(s) value(s) (DELete, then enter numbers).
F3 Non-linear : E.I.A tube methods use this calculation mode (polynomial, log/logit, spline, multipoints). Enter the number of standards used, then the values of each. Up to 6
standards can be used.
Wavelength :
{ XE "Wavelength" }
Wavelength to use is indicated by the reagent technical sheet. You may not find the exact same
wavelength among those proposed by BASIC. In that case, select one closest to the ideal
wavelength .
{ XE "Analysis mode" }
- 36 -
BASIC
Analysis mode :
End point without
blank serum
Kinetics with
standards
End point with
blank serum
Bichromatism
Enzymes kinetics
.F1. End-point analysis mode :
When using this mode, reading is done at the final absorbance (optical density) point (at the
end of the reaction process). Zero is adjusted using reagent alone (reagent blank) or
distilled water.
F2. End point with
blank:
A number of
environments, in particular biological ones, may be the object of
spectral interferences at
the wavelength selected for the dosage. This is the case for
colored molecules (haemoglobin, bilirubin, ...) These interferences which are independent of the
parameter to be measured, will be eliminated by measuring the sample alone or with a reagent which
does not trigger a coloring effect. : this is called a sample/serum blank.
When there is only one reagent and such a reagent may add a parasitical color to the wavelength of
the reading, it is deducted from such reading; this is referred to as reagent blank.
End point with serum blank: : {XE "End point with serum blank "}
Conc. Std = (abs. Std – Abs. reagent Blank) x coef. Calibr.
End point without serum blank:.{ XE "End point without blank serum" }
Conc. Std. = [(Abs. Std.- Abs. Serum Blank ) - (Abs. Blank - Abs Blank blank) ]Coef .
"Enzyme kinetics"} : Called also zero order kinetics. This
F3 Enzyme kinetics{XE
method
calculates
the
evolution of a sample, in Absorbance, against a time period
defined in a certain number of intervals. BASIC computes the straight regression line which will
average the means of the points.
BASIC allows you to select the duration of analysis reading as well as the number of intervals to be
measured. Also lag time between each intervals should be indicated.
slope =
N:
ψX :
ψY :
ψXY :
2
ψX :
( N x ∑ XY ) − ( ∑ X x
(N x
∑X
2
∑ Y ) x 60
) − ( ∑ X )2
Total number of point of the kinetic curve (nb of segments x segment time).
1+2+3+...+N x (N+1) /2
total of absorbances at points 1, 2, 3, ... N=A+A2+A3+...+AN
(A1 x 1)+(A2 x 2)+(A3 x 3)+...+(AN x N)
1+4+9+...+N2 = N(N+1)(2N+1) /6
The slope thus calculated is expressed in delta of Abs./min.
F4 Kinetics with standards{XE "Kinetics with standards"} : Called also two-point kinetics or
first order kinetics. This analysis method allows to perform measurements of Concentration
in Kinetics mode. That is, to calculate the absorbance variation of a solution within the time
and to multiply the differences of Absorbance by a coefficient or to compare to a standard
measured with the same measuring conditions.
Thus, global waiting time of measurement should be indicated. Then BASIC requires confirmation on
the time consumed between the two point reading.
- 37 -
BASIC
R=
ABS t1 :
ABS t2 :
factor :
tm :
60/tm :
( ABS t1 − ABS t2) x factor x 60
tm
Abs of the solution at the end of the lag time.
Abs of the solution at the end of the measuring time.
Coefficient of molecular absorption.
Measuring time.
Ratio reducing the result to one minute.
The slope thus calculated is expressed in delta of Abs./min.
F5 Bichromatism : {XE "Bichromatism"}is recommended when sample is cloudy (turbid).
Reading is done using 2 wavelengths multiplied by a factor.
(Abs. Smpl
λ1
− Abs. Smpl.λ 2 ) F
- 38 -
BASIC
For both KINETIC modes, enter Lag time (the waiting time before reaction starts), number of intervals
and time segments of each interval. Indicate also whether it is an increasing/decreasing type of
reaction.
5
10
- 39 -
BASIC
Linearity limit :
{ XE "Linearity limit" }
The maximum measuring limit is given in the reagent technical
sheet. If result is beyond this limit, it is recommended to dilute the
sample or rerun the test.
CAUTION : in hyper-active samples having decreasing kinetic-type
of reaction, total substrate can be consumed before first measure
starts. (Shown by reading result close to zero, below the depletion
limit). It is user’s responsibility to interprete reading result taking into
account this element.
Normal high : Normal High & Low values border the acceptable pathological range. It is also
called the usual expected values. Flags will be shown on abnormal result.
{ XE "Normal high" }
Normal low:
{ XE "Normal low" }
CHECK FREQUENCY:
At the end of programming, you are asked the frequency of analysis quality control checking : whether
daily or periodically. A signal will remind you to do the quality control every day or once every x days.
Result of the QC can be found at « CONFIGURATION », « QUALITY CONTROL », and you can ask
for « DISPLAY ».
- 40 -
BASIC
8.2 RECOMMANDATION FOR DAILY ANALYSIS
Zero measurement will be asked at the beginning of each day.
SAMPLE ASPIRATION :
Introduce tube to the noozle upon
instructed by display. Audio beeper
indicates aspiration. Remove tube as
soon as aspiration ceased. Resume
with next sample simply by introducing
the tube.
In case of aspiration detector failure,
use F1 button to start aspiration.
MODIFICATION OF STANDARD VALUE :
Standard concentration value can be modified during analysis.
SINGLE STANDARD : use F3 « MODIFY ».{XE "Single standard"} Enter new standard value.
MULTI-STANDARDS : { XE "Multi-standard" }
Confirm whether standard values to use are as programmed
(« OK ») or remeasurement are to be done (« Repeat »).
- 41 -
BASIC
If you confirm the latter, you will see :
Modification of each standard value can be done through the
corresponding F button.
If the values on display are correct, validate.
Otherwise modify using numerical keys, then
validate.
Start with reagent blank reading. This will be deducted automatically
from other readings :
Measuring results will be displayed as :
The standards will be called one after another to establish standard curve to calculate sample values.
- 42 -
BASIC
As soon as the standards are read , the curve will be displayed. Absorbance values of standards are
also displayed.
By validating F6 « OK », the values are stored in memory.
8.3 ERROR MESSAGES
{ XE "Error messages" }
Sample absorbance value is superior to 2,5 (above the reading limit
of BASIC) : in this case the software will show « -,--- ». Check any
possible manipulation errors : the sample not prepared correctly or
the cleanlinest of the cuvette.
The result in Concentration is superior or inferior to
the normal (high or low) value. In this case, a sign
« < » or « > » will be displayed following the result.
Negative Concentration value will be indicated by the
sign −.
The result in Concentration is no longer in the linearity limit of the
analysis : another sign « < » shows up in front of the result (in this
case the result is also beyond the normal high or low range).
Non executed quality control procedure will be signaled by « Q».
During decreasing kinetics method, if the difference of Optical
Density between the initial O.D. at T0 and at T1 (end of the latent
time) is superior to the depletion limit, the software does not display
any result.
- 43 -
BASIC
If the initial O.D. value of the blank is superior or inferior to the limit ,
a warning sign appears following the concentration result.
If the Quality Control value is beyond the specified limit, the sign
« ! » appears in front of the Concentration result.
In case of Peltier failure Tsign appears instead of the temperature
programmed.
PATIENT REPORT & PRINT-OUT
PATIENT REPORT :
Daily analysis are memorized automatically by BASIC and indicated at the bottom of the result display
as a blinking line. User is recommended to empty the memory at the end his working session.
This can be done by :
transferring all data to print ( see chapter 5.6.2.) or
downloading all data to file on a PC ( see chapter 5.6.1.) or
selecting particular data to print (see chapters 5.6.2 & 5.6.3.). In this case, remember to
use patient number as selection criteria. Note : the latest of sample bearing identical number will be
reported.
{XE "Print out"}
When quality control is programmed, error messages will be given on « status » column.
SECOMAM - Polyphotometer UV-Vis BASIC V1.11
Date : 04/06/1997
Hour : 09H24
User :
Analysis : ALBUMIN
Sample
Regeant
Bl.
37°C
Abs.
Concentration
0.000
0.00
g/l
Standard
1.000
1.00
g/l
Control
0.900
0.90
g/l
- 44 -
Status
PB
BASIC
SECOMAM - Polyphotometer UV-Vis BASIC V1.11
Date : 04/06/1997
Hour : 09H24
User :
Analysis : ALBUMIN
Sample
Reagent
Bl.
37°C
Abs.
Concentration
0.000
0.00
Status
g/l
Std
1.000
1.00
g/l
Control
0.600
0.60
g/l
PB
Control
0.990
0.99
g/l
PB
Control
0.990
0.99
g/l
PB
S. #
0.500
0.50
g/l
<
S. #
0.500
0.50
g/l
<
S. #
1.200
1.20
g/l
<
Std. #
2.000
2.00
g/l
<
When everything goes well OK will be indicated:
SECOMAM - Polyphotometer UV-Vis BASIC V1.11
Date : 04/06/1997
Hour : 09H24
User :
Analysis : ALBUMIN
37°C
Standard
Abs.
Concentration
Bl. Reagent
0.000
0.00
g/l
Sample
1.000
1.00
g/l
Control
1.500
1.50
g/l
Status
OK
8.4 SAMPLE NUMBERING
Sample numbers will be incremented automatically. However you can assign another number through
F2 key. Example : Sample # 3 is to be modified. Press F2, and you will see Sample Nr.1 on the
screen. Press Delete and replace by the number you want using number keys.
- 45 -
BASIC
9 MAINTENANCE
9.1 TECHNICAL CHARACTERISTICS
{ XE "Technical characteristics" }
PARAMETERS IN MEMORY
94
READING MODE
SIMPLE ABSORBANCE
END POINT WITH SERUM BLANK
END POINT WITHOUT SERUM BLANK
REAL KINETICS
KINETIC TWO POINTS
BICHROMATISM
CALIBRATION
LINEAR / NON LINEAR
6 STANDARDS
LIGHT SOURCE
HALOGEN LAMP
MONOCHROMATOR
HOLOGRAPHIC GRATING
DETECTOR
SILICIUM DIODE ARRAY
SAMPLE COMPARTMENT
DRY TEMPERATURE PELTIER SYSTEM
OPERATING TEMPERATURE
AMBIENT - 25 - 30 - 37°C
TYPE OF CUVETTE
FLOW-THROUGH µCUVETTE 30 µl
10 mm OPTICAL PATH
ASPIRATION VOLUME
PROGRAMMABLE, 500 to 1500µl
QUALITY CONTROL
MANAGEMENT OF QC RESULTS/MONTHS
POWER REQUIREMENTS
110 / 220V
INTERFACE
SERIAL RS232C AND PARALLEL
CERTIFICATION AND
APPROVALS
ISO 9001 AFAQ N°1995/4102 - CE - EMC
LANGUAGES
MULTILINGUAL
- 47 -
BASIC
10 MEMO
BASIC
- 49 -
Note down the analysis names you have modified.
SUBSTRATES
ENZYMES
M1
M2
M3
M23
M24
..................................
.....................................
.....................................
..................................
.....................................
M4
M5
M6
M25
M26
..................................
.....................................
.....................................
..................................
.....................................
M7
M8
M9
M27
M28
..................................
.....................................
.....................................
..................................
.....................................
M10
M11
M12
M29
M30
..................................
.....................................
.....................................
..................................
.....................................
M13
M14
M15
M31
M32
..................................
.....................................
.....................................
..................................
.....................................
M16
M17
M18
M33
M34
..................................
.....................................
.....................................
..................................
.....................................
M19
M20
M21
..................................
.....................................
.....................................
M22
..................................
Note down the analysis names you have modified.
SUBSTRATES
ENZYMES
Albumin
Alcohol
Ammonia
Acid Phosphat.
Alk. Phosphat.
..................................
.....................................
.....................................
..................................
.....................................
Anti Thrombin
Bicarbonate
Bilirubin
Amylase
Apo-A1
..................................
.....................................
.....................................
..................................
.....................................
Calcium
Chloride
Cholesterol
Apo-B
Asat / GOT
..................................
.....................................
.....................................
..................................
.....................................
HDL Choles.
LDL Choles.
Creatinine
Alat / GPT
Ck. NAC
..................................
.....................................
.....................................
..................................
.....................................
Glucose
Iron
Magnesium
Gamma GT
LDH
..................................
.....................................
.....................................
..................................
.....................................
RBC Magnesium
Phos. Lipids
Phosphorus
Lipase
Nucleotidase
..................................
.....................................
.....................................
..................................
.....................................
T. Protein
Triglycerides
Urea
..................................
.....................................
.....................................
Uric Acid
..................................
BASIC
11 GLOSSARY
A
Analysis mode
M
30
Memory initialisation
Multi-standard
B
Bichromatism
N
32
Normal high
Normal low
Number keys
C
Calcul mode
clock set-up
Control frequency
Cursor
29
15
23
10
Print out
Printer set-up
Printer set-up
Program keys
Pump calibration
Pump set-up
15
17
19
20
21
Quality control set-up
22
R
14
31
31
31
37
Result resolution
29
S
Screen
Single standard
F
Front view
38
17
17
10, 27
16
15
Q
E
Elevator
End point with serum blank
End point without blank serum
Enzyme kinetics
Error messages
34
34
10
P
D
Date set-up
Dead volume
Download to a PC (Win 95)
Download to a PC (Windows 3.x)
Download to a printer
21
35
9
35
9
T
G
General set-up
Technical characteristics
Temp
Trace-ability set-up
13
K
Keyboard
Kinetics with standards
U
9
32
Unit
29
V
L
Language set-up
Linearity limit
41
28
18
Volume
14
34
W
Wavelength 30
- 53 -
17