1
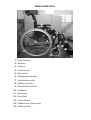
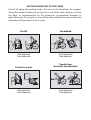
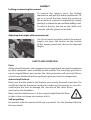
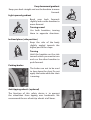
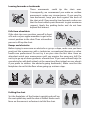
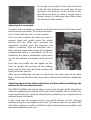
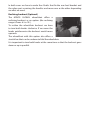
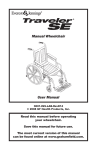
MINOS GLOBAL ALU
User Manual
Think Global
Introduction
Thank you for choosing a MINOS wheelchair. Our company is young but we
have broad experience in the sector. The wheelchair you have just bought is
the product of that experience. We are sure that the quality, durability and
design of the chair will not disappoint you.
Please read this manual for the use and maintenance of the chair carefully. If
you have any questions, please ask your distributor who recommended the
purchase of the wheelchair.
Quality Standards
Minos wheelchairs comply with the Medical Devices Directive 93/42/EEC
(2007) and with the ISO 7176 standard.
IMPORTANT INFORMATION
BEFORE USING THE WHEELCHAIR
Serial number
Each chair comes with a sticker containing the serial number on the packaging
box and the sideframe. The serial number identifies the date of production,
batch and other relevant information about the wheelchair.
Opening the chair
Push down on the tubes supporting the seat
upholstery, taking care not to pinch your fingers
between the tube and the side frame.
Ensure that the seat tubes are supported on their
housing.
The tie bar
The function of the tie bar is to keep the sideframe
parallel when folding and unfolding the chair. It
also keeps the chair in folded position.
Fitting the footrest
Fit each footrest perpendicular to the sideframe in the
hole shown in the photo. Once fitted, turn it 90° until
it is fastened in position. To remove the footrest, press
the lever, turn each footrest 90° outwards and pull
them out.
Tyre pressure
Make sure that the tyres have the pressure
recommended on the tyre wall. It is marked on the tyre
itself. The recommended pressure is approximately 2.5 bar.
The parking brake
Check that the brakes work correctly.
The brake is applied by pushing the lever forwards. To release the brake, pull
the lever backwards. The brake spring will keep it separated from the wheel.
We recommend you always apply the brakes when getting in or out of the
wheelchair.
WARNING: The parking brakes are not to be used to slow down
the chair. Do not apply the brake while the chair is moving.
WHEELCHAIR PARTS
6
7
5
1. Push-handles.
2. Backrest.
3. Armrest.
4. Armrest pad.
5. Rear wheel.
6. Aluminium handrim.
7. Quick-release axle.
8. Folding crossbar.
9. Detachable footrests.
10. Footplate.
11. Heel strap.
12. Front fork.
13. Caster wheel.
14. Padded seat with pocket.
15. Parking brake.
GETTING IN AND OUT OF THE CHAIR
First of all apply the parking brake. Do not use the footplates for support.
Swing the armrest backwards and get in or out of the chair sideways or from
the front, as recommended by the technician, occupational therapist or
physiotherapist. Do not get in or out of the chair without the supervision of an
attendant until you learn to do it easily.
The WC
The bathtub
Side approach
Front approach
Front approach
Side approach
Transfer to a chair
Transfer from
the bed to the wheelchair
Side approach
Front approach
Front approach
Side approach
ARMREST
Folding or removing the armrest
To remove the armrest, press the locking
mechanism and pull the armrest backwards. To
get in or out of the chair, leave the armrest in
this position or remove it completely by simply
turning it to release the pin and then pulling it out.
To release the pin, the tab on the shaft must
coincide with the groove in the hole.
Adjusting the height of the armrest pad
You do not need any tool to adjust the armrest
height, just press the button on the outside
of the armrest panel and choose the required
height.
SAFETY AND OPERATION
Parts
All the wheelchair parts and components are original and must not be replaced
by other spareparts parts available on the market. The use of any part that is
not an original Minos part renders the chair guarantee null and void. Please
consult your distributor before replacing spare parts and/or components.
Armrest and footrest
Make sure that the armrest and footrest are securely fastened in position. Do
not lift the chair by the armrest or footrest under any circumstances, since this
could injure the user or damage the structure of the chair. Never
stand up on the footplates.
Make sure that the footrest is at the correct height from the floor
so that it does not come into contact with it.
Self-propelling
For models with the standard 600 mm rear wheel. Use the handrim fitted to
the rear wheels.
Easy downward gradient
Keep your back straight and use the handrim to move
forward.
Light upward gradient
Bend your back forwards
slightly and use the handrim to
move forward.
Turning round
Use both handrims, turning
them in opposite directions.
Inclined plane (side position)
Keep the side of the body
slightly angled towards the
higher part of the slope.
Turning
Hold the handrim on the side
towards which you want to turn
and use the other handrim to
push forward.
Parking brakes
The brakes are not to be used
to slow down the chair. Do not
apply the brake while the chair
is moving.
Anti-tipping wheels (optional)
The function of this safety device is to prevent
the wheelchair from tipping over backwards. We
recommend the use of anti-tip wheels at all times.
Leaning forwards or backwards
These movements could tip the chair over.
Consequently, we recommend you make no sudden
movements under any circumstances. If you need to
lean backwards, keep your back against the back of
the chair at all. If you need to lean forwards, make sure
that the front wheels point forwards to give maximum
support. Apply the parking brake and do not lean
beyond the armrest.
Falls from wheelchair
If the chair tips over, position yourself in front
of it and use your upper members to get in the
correct position in the chair. Then ask another
person to lift up the chair.
Ramps and obstacles
90º
Before trying to overcome an obstacle or go up a slope, make sure you have
practised the manoeuvre with a technician, occupational therapist or other
health-care professional. Do not try it on your own the first time. Have an
attendant watch your manoeuvres until you acquire the necessary skill. Do
not try to go up or down gradients of more than 10 per cent without help. Go
over obstacles with both wheels at the same time (front wheels or rear wheels
if you prefer to address the obstacle going backwards). Make sure that the
footplates do not hit the floor when going up or down steps.
Folding the chair
Set the footplates of the footrest upright and pull up
the seat upholstery until the chair is folded. Never exert
force on the armrests or footrests to fold the chair.
Tyres
Make sure that the tyres have the pressure recommended on the tyre wall.
Correct tyre pressure is essential for the manoeuvrability of the chair. The
correct pressure also affects the performance of the parking brake.
Street use
Make sure at all times that your manoeuvres can be seen by passers-by,
especially by vehicles if you have to cross the road. Cross the road at the
appropriate place.
FOLDING AND UNFOLDING THE CHAIR FOR CAR TRANSPORT
To transport the wheelchair in the car, choose one of the following two
options:
• Place the folded chair in the area between the rear seats and the backrests
of the front seats.
• Place the folded chair in the car boot. If you prefer, you can remove the
footrests and rear wheels with the quick-release axle.
CONTROLS AND MAINTENANCE
REPAIRS AND SPARE PARTS
For repairs and spare parts, consult your distributor and they will advise you
on the best option for your requirements.
RECYCLING AND PACKAGING
The cardboard in which the wheelchair is packaged is 100%
recyclable. Please dispose of it in a rubbish container especially
for cardboard.
MINOS GLOBAL WHEELCHAIR MODELS
MINOS GLOBAL ALU
Self-propelled
Ajusting the parking brake
Adjust the brake according to the type of tyre,
solid or pneumatic. Loosen the two clamp
bolts, adjust the section for the brake shoe to
work on the tyre and
tighten the bolts.
The gap between the
tyre and the brake shoe should be maximum 6 mm.
Adjusting the front fork
The front fork has 3 holes where the caster wheel can
be positioned according to the required front seat
height. The front fork can also be adjusted in angle.
The down axle of the front fork must always
be at 90º angle with the floor. A template
is provided with each chair to check the
perpendicularity.
Use a 5 mm allen key and undo the bolt half
a turn (see picture). Then we need a second 5
mm allen key to complete the adjustment. As
you can see in the picture we have to undo
the bolt at the
back and turn
the allen key at
the outside of
the frame until
with the help
of the template
we can measure a 90º angle. The cylinder
that makes the adjustment possible has a
red mark to remember the right position for
our configuration. See the picture on the
right for the right adjustment of the standard
configuration with a 24” wheel at the rear
wheel bracket and a 8” caster wheel. As you can
see the caster wheel is in the lower hole of the
front fork.
Position of the rear wheel in the wheel
bracket
The rear wheel bracket has multiple positions
where the rear wheel can be fixed. The picture
on the left shows the fixation hole for the
standard configuration. With this standard
configuration the seat height at the front of the
wheelchair is 50 cm, and 47 cm at the back.
The seat angle can be varied by fixing the rear
wheel in a different hole of the wheel bracket.
In such a case we have to make sure that the
angle of the down axle of the front fork is at 90º.
To change the position in the wheel bracket
of the QR axle bushing we need two 24 mm
wrenches (see picture). In the outside of the
side frame we have to place a washer and a
Grower washer. For the inner part of the frame
we only need a flat washer.
Adjusting the seat depth
To adjust the seat depth we need to undo the 4 bolts that fix the rear wheel
bracket to the side frame. To do that we have to
use a 5 mm allen key and a 10 mm wrench.
Once we have undone the bolts we have to
remove them and gently move the wheel
bracket and the nylon part receiving the
wheelchair handles until the required seat
depth is achieved. Then we introduce the 4
bolts and have them done again. The standard
configuration offers a seat depth of 42 cm.
Following the above mentioned instructions
we can also achieve seat depths of 44,5 and 47
cm.
Each time we modify the seat depth we also
have to modify the position of the parking
brake and of the nylon part that receives the
front part of the armrest.
After each modification we have to check that the down axle of the front
fork is at 90º with the floor. We may need to adjust the front fork as explained
before.
Adjusting the position of the wheelchair handles without modifying the
position of the rear wheel bracket
The MINOS GLOBAL wheelchair allows to move the handles of the wheelchair
without modifying the position of the rear wheel bracket. This is useful if we
need to exchange the standard sling backrest upholstery for a rigid backrest
without losing seat depth.
In the same way the postion of the rear wheel bracket can be changed
without losing the seat depth of the chair. This means that we can adjust the
wheel base distance so that we find the right balance between stability and
manoeuvrability for each user.
In both cases we have to undo the 4 bolts that fix the rear heel bracket and
the nylon part receiving the handles and move one or the other depending
on what we need.
Reclining backrest (Optional)
The MINOS GLOBAL wheelchair offers a
reclining backrest as an option (the reclining
range is from -6º to 10º).
To recline the wheelchair backrest we have
to turn both knobs clockwise. If we move the
knobs anticlosewise the backrest would move
upwards.
The wheelchair with this option also offers a
stretch bar that can be undone to fold the wheelchair.
It is important to turn both knobs at the same time so that the backrest goes
down or up in parallel.
MINOS GLOBAL Transit
(Attendant-propelled)
Important Remark for the Attendant person:
When not pushing the chair, please apply the parking brake at all times! Never
leave the person/chair unattended.
Dimensions and general information
Minos Global
Minos Global Transit
Seat width
36, 40, 44, 48, 51 cm
36, 40, 44, 48, 51 cm
Seat height
42-50 cm adjust.
50 cm
Seat depth
42, 44,5 and 47 cm adjust.
42, 44,5 and 47 cm adjust.
Backrest height
47 cm
47 cm
Armrest height
18-26,5 cm adjust.
18-26,5 cm adjust.
Total width
Seat width + 20 cm
Seat width + 15 cm
Total height
93 cm
93 cm
Total length
Seat depth + 62 cm
Seat depth + 55,5 cm
Folded width
32,5 cm
26,5 cm
Weight
16,3 kg *
16,5 kg *
Transport weight
9,8 kg **
13,9 kg ***
Max. user’s weight
140 kg
140 kg
* Weight without legrests. It can vary depending on accessories and options.
** Weight without legrests, armrests and rear wheels.
*** Weight without legrests and armrests.
Lifetime Guarantee
for the crossbar and side
frames.
Distributed by: