1
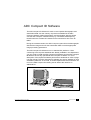
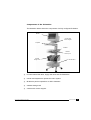
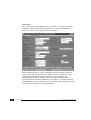
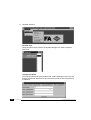
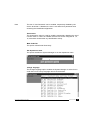
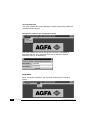
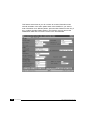
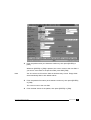
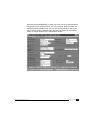
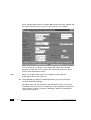
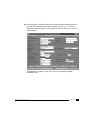
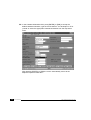
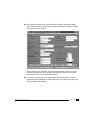
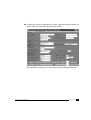
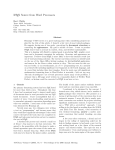
ADC COMPACT ID SOFTWARE AND ID TABLET USER MANUAL TABLE OF CONTENTS SAFETY INFORMATION 1 Safety information - ID Station console 1 Safety information - ID Station tablet 4 Technical requirements ADC Compact ID Software PC Configuration 6 6 ADC COMPACT ID SOFTWARE 7 WORKING WITH THE ID STATION 9 Safety precautions General description of the ADC Compact ID Station Functions and features of the ID Station 9 10 10 Components of the ID Station 11 Switching the ID Station on and off 12 Starting the ADC Compact ID Software 12 Exiting the ADC Compact ID programme 14 ADC Compact ID Software and ID Tablet 2201A GB 199805 i Working with the menu system 15 Selecting items from a menu 15 Filling in information in an entry screen 17 Function keys 18 Standby Screen 20 File Menu 21 Configuration Menu 22 Operator options in the Configuration menu 23 System Manager options in the Configuration menu 27 Change User option in the Configuration menu Help Menu ii 2201A GB 199805 17 Online help 30 30 Inserting and removing a cassette 33 Identifying a cassette 34 Clearing information 54 Recalling a patient 55 New Patient 56 Identifying a cassette with data from the history list 57 Link 60 Hold/Unhold 64 Destination Rerouting 65 Reading a cassette 66 Erasing an image plate 71 ADC Compact ID Software and ID Tablet Safety information Safety information - ID Station console General Warnings ■ There are no user serviceable parts on the console. ■ Pay attention when working near the pedestal: the foot projects slightly and could be tripped on. ■ When rolling the pedestal away from its position, take care not to pull or put any strain on the power lead. ■ The pedestal shelves should not be used as a footrest! ■ If the shelves are re-positioned at a different height, the locking clips should be re-inserted. ■ If the user prefers to install a monitor other than the one provided/sold by Agfa, he should ensure that it is locked to the top shelf of the pedestal at all times, according to the method described in the manual. See drawing supplied with the console. ■ When moving the pedestal, take care to ensure that it remains stable at all times. In particular, the following considerations should be kept in mind: the nature of the floor and any floor-coverings, carpets, etc.; any obstructions such as cables; and any slopes to be negotiated. ■ Only attach appliances with line voltage equal to that of the ID Station. Installation of the equipment The following instructions should be observed for safe installation of the equipment. ■ Install the tie-wraps that are delivered with the pedestal crosswise over the foot of the monitor to ensure that it is securely fixed. ADC Compact ID Software and ID Tablet 2201A GB 199805 1 ■ Tighten the tie-wraps firmly. ■ The tie-wraps may be released by the use of a simple screwdriver. Monitor requirements ■ It is not necessary for the user to buy the monitor offered by Agfa. He may use/buy his own monitor. If he does, it should comply with certain criteria to ensure that it can safely be used in combination with the pedestal with regard to stability and securing method. (Agfa monitors are fully compliant.) ■ The maximum size of monitor is 17 inches. ■ The foot of the monitor should be such that it may be properly secured to the pedestal with the tie-wraps provided. It is the user’s responsibility to ensure this. Compliance The equipment (both tablet and pedestal) is approved to the following standards: ■ UL1950, Third Edition ■ CAN/CSA 22.2 No. 950-95, Third Edition (cUL) ■ EN60950 (TÜV) ■ GS (TÜV) The equipment complies with all applicable European Directives and bears the CE mark. Cleaning Pull the power plug out of the equipment prior to cleaning the equipment. 2 2201A GB 199805 ADC Compact ID Software and ID Tablet Disposal When its service life is over, do not dispose of the ID station without consideration of local waste disposal regulations. Please consult your local sales organisation. ADC Compact ID Software and ID Tablet 2201A GB 199805 3 Safety information - ID Station tablet Tablet technical data ■ Working voltage (input): 100-230 V ac ■ Frequency: 50-60 Hz ■ Max. rated current: 5 A (with appliance outlets loaded to the maximum) ■ Classification: Class I (earthed) ■ Operating conditions: temp.: 15 to 30 °C, RH: 15% to 75% ■ Fuses: Europe: North America: 5 Amp Slow/Träge/Temporisé/250 V 5 Amp Slow/Träge/Temporisé/125 V min The equipment is suited for continuous operation. Power outlets The equipment is provided with 2 power outlets (1 for a PC and 1 for a monitor). ■ Output voltage is equal to input voltage ■ Maximum current (outlet 1 + outlet 2): 4 A total ■ Frequency: 50-60 Hz When connecting equipment to these outlets, take care not to exceed the maximum total current of 4A. 4 2201A GB 199805 ADC Compact ID Software and ID Tablet Replacement of fuses Before replacing the fuses, remove the power plug from the lead. The following important reminder is marked on a label on the equipment: ‘For continued protection against a risk of fire, replace fuse with same type and rating.’ The fuse type is ■ for Europe: 5 Amp Slow/250 V ■ for North America: 5 Amp Slow/ 125 V min Compliance The equipment is approved to the following standards: ■ UL1950, Third Edition ■ CAN/CSA 22.2 No. 950-95, Third Edition (cUL) ■ EN60950 (TÜV) ■ GS (TÜV) The equipment complies with all applicable European Directives and bears the CE mark. Cleaning Pull the power plug out of the equipment prior to cleaning the equipment. Disposal When its service life is over, do not dispose of the ID station without consideration of local waste disposal regulations. Please consult your local sales organisation. ADC Compact ID Software and ID Tablet 2201A GB 199805 5 Technical requirements ADC Compact ID Software PC Configuration 6 ■ Pentium 200 Mhz MMX ■ 64 MB RAM (total) ■ 2 MB video RAM ■ 1 CD ROM ■ 1.6 GB hard disk ■ Multimedia ■ 10/100 Base T ethernet ■ 17 inch monitor ■ Windows 95, Windows NT , Unix ■ ID Tablet 2201A GB 199805 ADC Compact ID Software and ID Tablet ADC Compact ID Software The ADC Compact ID Software is used to record patient demographic and examination data onto the memory chip that is embedded in the ADC Compact cassette. Patient demographic and examination data are written onto the ADC Compact cassette memory by contactless radiofrequency transfer when the cassette is inserted into the transmission slot of the ID tablet. During the cassette readout, the ADC Compact system links the demographic data with the image and uses the examination data to set the appropriate image processing parameters. The ADC Compact ID Software runs on standard PC platforms. If PCs conforming to the required standards are already available in the department, you only need to install the ADC Compact ID Software and the ADC Compact ID tablet to have a fully operational ADC Compact ID Station. For a full description of the required hardware performance standards we refer to page 6 of this manual. The ADC Compact ID software can also be installed on Unix workstation platforms. As a result, in smaller departments the ID software can run on the ADC Compact Processing server without the need for an additional PC. ADC Compact ID Software and ID Tablet 2201A GB 199805 7 Agfa also offers a fully configured ADC Compact ID station including the PC, the ID Software, the ID tablet and the console with storage racks, ready for use. 8 2201A GB 199805 ADC Compact ID Software and ID Tablet Working with the ID Station Safety precautions The ID Station complies with the UL544 standard for ‘Non Patient Care Medical Equipment’. This means that, although it is absolutely safe, patients may not come into direct contact with the equipment. Therefore the ID Station must be placed outside a radius of 1.5 m around the patient. There are no user-serviceable parts inside the ID Station. Perform no other operations on the ID Station than the ones described in this manual. ADC Compact ID Software and ID Tablet 2201A GB 199805 9 General description of the ADC Compact ID Station Functions and features of the ID Station With the ID Station you can record patient demographics and examination data required to obtain an optimally processed image onto the memory chip which is embedded in the ADC Cassette. You have only to insert the cassette into the transmission slot of the ADC Compact ID tablet. You can then perform the various operations using the interactive menus of the ADC Compact ID Software. Besides identifying a cassette, you can also perform the following operations with the ID Station: ■ Read information from a previously identified cassette. ■ Command the erasure of the image plate inside the ADC Cassette in the next Digitizer cycle. ■ Create and use a patient list. You can transfer data from the patient list directly onto the cassette and from the identification screen to the patient list, eliminating the need to retype any information. ■ Using the ADC Rislink Toolkit, the ADC Compact ID Software can be integrated into your RIS, permitting rapid and error-free communication of patient data from the RIS system. As there is no physical link between the ID Station and the Digitizer, you can easily employ multiple ID Stations to serve one Digitizer. 10 2201A GB 199805 ADC Compact ID Software and ID Tablet Components of the ID Station The illustration below shows the components of a fully configured ID Station. Monitor Console with monitor support Keyboard ID tablet Cassette insertion port Cassette storage racks PC and disk drive ■ PC with internal disk drive, floppy disk drive and CD-ROM drive ■ monitor and keyboard to operate the menu system ■ ID tablet to perform operations on ADC Cassettes ■ cassette storage rack ■ console with monitor support. ADC Compact ID Software and ID Tablet 2201A GB 199805 11 Switching the ID Station on and off The ADC Compact ID Software is an extremely user-friendly Windows-based application. The assumption is that the user is thoroughly familiar with the look and feel of the graphical user interface (GUI) used in the industrystandard Microsoft Windows operating systems and in Windows-based applications, as this graphical user interface is the most intuitive way for people to interact with a computer. A principal goal of the GUI in Microsoft Windows is to establish visually and functionally consistent communication between the user and the application, i.e. consistent keyboard commands and consistent menus for identical actions. Such consistency helps ensure that a user who can use one Windows-based application can use them all. We therefore assume that the user of the ADC Compact ID Software is fully conversant with windows and window arrangements, sizing, scrolling and splitting controls, menus and dialog boxes, toolbars and rulers, shortcut and access keys, GUI messages and status indicators, and the like. The default Graphic User Interface (GUI) can be re-configured. An Agfa Service technician or the hospital’s System Manager can configure the following GUI elements on request: Note ■ Whether a specific field is present or not ■ Specifying the location of fields ■ Specifying the font size Starting the ADC Compact ID Software To start the ADC Compact ID Software from the Windows main desktop screen, you can proceed in the following ways. You either 12 ■ Start the programme by clicking the Windows Start button and then click the ID Software programme in the menu ■ Have the ADC Compact ID Software started each time Windows starts ■ Start the ADC Compact ID Software by using the Windows Run command ■ Click the ADC Compact ID Software icon on the desktop 2201A GB 199805 ADC Compact ID Software and ID Tablet The ADC Compact ID Software first runs an internal test procedure, then displays the ID Startup screen, an example of which is shown below. After prompting the user to enter the user name and password, the ADC Compact ID programme is ready for use. Note The ADC Compact ID Software is supplied virus-free on CD. However, it is always advisable to install a virus protection programme. ADC Compact ID Software and ID Tablet 2201A GB 199805 13 Exiting the ADC Compact ID programme In order to exit the ADC Compact ID application from the Standby screen or from the Identification screen, proceed as follows: ■ Click the File menu and then click Exit. ■ Or click the Close button at the far right of the title bar. The system then returns the following screen window asking for confirmation. 14 2201A GB 199805 ADC Compact ID Software and ID Tablet Working with the menu system Selecting items from a menu The ADC Compact ID application has a menu-driven, or interactive, user interface. It consists of drop-down menu screens, cascading menu screens and entry screens. You can open drop-down menus by selecting and clicking the menu name. The cascading menus or submenus are accessed by selecting the menu commands that have a right-pointing triangle, as is shown in the Configuration menu below. The entry fields or text boxes in the entry screens are accessed by using the [TAB] key (or Shift [TAB] key for moving back) until the item of your choice appears highlighted on the menu screen. Then [ENTER] is pressed to activate the item. Entry screens sometimes feature drop-down list boxes, showing a list of items the user can select. Clicking the drop-down arrow opens the list box to show the available options. The option is selected by moving the pointer and clicking the relevant item. ADC Compact ID Software and ID Tablet 2201A GB 199805 15 For example, if you have to fill in the sex in the patient field of the main identification screen, you simply click the drop-down arrow, which will open the available options, drag the pointer to your relevant choice and release the mouse button. An example of the ‘Sex’ drop-down list box in the main identification screen is shown below. Alternatively you can also enter the first letter, or digit, of the item of your choice to highlight it, then press [ENTER]. So, in order to select ‘Female’ in the Sex entry field in the above identification screen, you can simply type the letter ‘F’. In this manual the term 'Select' is used to designate the combined activity of highlighting an item and pressing [ENTER] to activate it. Note 16 The number of items in a list may depend on the specific configuration of your ADC System. 2201A GB 199805 ADC Compact ID Software and ID Tablet Filling in information in an entry screen The ADC Compact ID application provides the following text editing features for entering or editing text within an entry field: ■ Press the [TAB] respectively Shift [TAB] keys to move the cursor to within the highlighted field. ■ Press [DEL] to remove the character over which the cursor is positioned. ■ Typed characters either overwrite those over which the cursor is positioned or are inserted, depending on whether the [INSERT] key has been pressed. Press [INSERT] to toggle between insert and overwrite mode. ■ You can press [ENTER] at any time while editing the highlighted fields, to accept what is in the field and move to the next one for editing. ■ Empty fields are filled automatically with default values. Online help In a number of cases there is a hint message in the bottom of the screen, telling you what to do to fill in the current screen correctly. ADC Compact ID Software and ID Tablet 2201A GB 199805 17 Function keys In the 'Identification' entry screen, you can use and configure function keys to shortcut the identification procedure. Up to 10 Function keys (F1 to F10) can be configured using the configuration tool. 18 2201A GB 199805 ADC Compact ID Software and ID Tablet The table below is a sample list of a number of available functions and the function keys they could have been assigned to, together with their description (the name of the key) and what happens when you press the relevant key. These functions are displayed in the bottommost toolbar of the identification entry screen. Key Description Function F1 Write Enters the information from the current fill-in screen into the cassette at the moment it is pressed. F2 Clear Clears the highlighted field. F3 Recall Recalls 15 previous data of the Patient group, User Info fields and Comment field. When recalling an item, the previously identified information of the last identification is called back and is used for the subsequent identification. F4 New Patient Clears all the patient data fields in the Patient group. F5 Add Patient Adds all the patient information to the patient list and saves the list. F6 Link Initiates a link between two cassettes. F7 History Copies patient information from a list with the last identified patients directly to the identification screen after selection. F8 Re-route Re-routs images that have been autorouted by default to certain hardcopy, review, archive or processing destinations, to another destination. F9 RIS Provides access to the RIS system. F10 Cancel Brings you back to the previous menu or entry screen and eventually to the main Standby screen. Also other functions, which will be described later in this manual, like ‘Internal worklist’, ‘Hold’, ‘Full Leg/Full Spine’, ‘Build Study’, and so on can be customized into a function key. ADC Compact ID Software and ID Tablet 2201A GB 199805 19 Standby Screen After having started the ADC Compact ID application from the Windows main desktop screen, the system returns a Startup screen prompting you to enter your user name and password. User names and passwords differ, depending on whether you log in as a User, a System manager or Service. The User and System passwords are configurable. After entering your user name and password, the system displays the following screen, featuring three active drop-down menus, ‘File’, ‘Configuration’ and ‘Help’. The ‘Mode’ and ‘Perform’ menus cannot be accessed from the Standby screen. They are only active in the Identification screen proper. 20 2201A GB 199805 ADC Compact ID Software and ID Tablet File Menu The functions in the File Menu of the Standby screen, viz. Read cassette, Erase cassette, Patient List and Exit as displayed in the screen below, can be accessed from the identification screen proper and will be discussed in a further section of this manual. ADC Compact ID Software and ID Tablet 2201A GB 199805 21 Configuration Menu When moving the pointer to ‘Configuration’ in the Standby screen, as a User, the drop-down menu unfolds two active options : ‘Operator’ and ‘Change user’, as is shown in the sample screen dump below. The System Manager and Service options within this menu are inactive and can only be accessed by the System Manager, respectively Agfa service personnel. 22 2201A GB 199805 ADC Compact ID Software and ID Tablet Operator options in the Configuration menu By selecting the ‘Operator’ option within the Configuration menu, a cascading menu, as is shown below, can be accessed featuring various options: ■ Hold status ■ Sound ■ Automatic text selection ■ Reset window size ■ Always to front ■ Destination rerouting The Destination rerouting option can only be accessed when the ADC Compact Autorouting Software has been installed. ADC Compact ID Software and ID Tablet 2201A GB 199805 23 Hold status The ‘Hold’ status can be toggled ON or OFF. When it is set ON, the system displays the ‘Hold’ indication on the status line of the main identification screen, as shown in the sample screen dump below. When destinations are on ‘Hold’, the default routing of images to hardcopy units, archive and review stations is halted. In order to override the ‘Hold’ function and re-initiate the sending procedure, you must press the [PROCEED] button in the Preview screen, provided the ADC Compact Preview Software has been installed on your system. If you fail to press the [PROCEED] button in the Preview screen, the system will automatically, after a set time-out, re-initiate the sending procedure. 24 2201A GB 199805 ADC Compact ID Software and ID Tablet When pressing [CANCEL] the default routing of images is discontinued. It can only be re-activated from the Processing Station. The sending of images to their default destinations can be put ‘on hold’: ■ by interactively toggling the Hold/Unhold option in the Perform menu of the Main identification screen or ■ by pressing a function key that has previously been configured as a Hold/Unhold button ■ the service technician might also assign the ‘Hold’ attribute to certain examinations by default, for example bed-side thorax, by altering the cpf file. This ‘Hold’ attribute can be overridden using the Hold/unhold toggle in the Perform menu of the identification screen or by pressing the Hold function button, if any. Sound The Sound item in the Operator menu enables respectively disables the beep sound option. In the dialog box as displayed below you can select the sound device, i.e. sound card respectively motherboard. Automatic text selection When the Automatic text selection option is on, the data of the entry field selected is highlighted. When new characters are keyboarded, the highlighted text is automatically deleted and replaced with the newly entered characters. This feature only affects editable fields. Reset window size Selecting the Reset window size option sets the active window size to default. ADC Compact ID Software and ID Tablet 2201A GB 199805 25 Always to front The Always to front option is only relevant in case the ADC Compact Preview Software has been installed on your system. It is a toggle option which enables the user to set the Identification Standby screen always in front of the Preview screen. ■ 26 2201A GB 199805 With the Always to front option ON, the identification screen remains in front of the Preview screen, or comes to the front whenever an identification procedure is performed. ADC Compact ID Software and ID Tablet ■ When the Always to front option is OFF, the Identification screen is put behind the Preview screen and remains there until any identification action is performed. System Manager options in the Configuration menu Having logged in as System Manager, the System Manager option within the Configuration menu, as shown below, can be accessed featuring the following options: ■ Set time zone ■ Change passwords ■ Screensaver ■ Make fields RO ■ Set department name ■ Change language ADC Compact ID Software and ID Tablet 2201A GB 199805 27 ■ Cassette detection Set time zone Using the Set time zone option the System Manager can set the system's time zone. Change passwords The Change passwords option enables the System Manager to set User and System passwords. Whenever a new password is entered, the old password is asked for. 28 2201A GB 199805 ADC Compact ID Software and ID Tablet Note The use of ‘User Password’ can be enabled, respectively disabled by the service technician. If disabled, the user is not asked for a password when accessing the Identification application. Screensaver The Screensaver option is used for enabling respectively disabling the use of a screen saver. In case it is enabled, the time-out can be configured to 1, 5, 15, 30 and 60 minutes after any identification activity. Make fields RO This option makes fields ‘Read-Only’. Set department name This option enables the System Manager to set the department name. Change language The Change language option enables the System Manager to select from a scroll-down list a country language other than the default. ADC Compact ID Software and ID Tablet 2201A GB 199805 29 Cassette detection This option enables the System Manager to enable respectively disable the cassette detection feature. Change User option in the Configuration menu This option enables the user to change the User level. The password associated with the newly requested user level is asked for. Entered characters show up as asterisks (*). Help Menu When clicking the Help Menu, the drop-down list displays the following options. 30 2201A GB 199805 ADC Compact ID Software and ID Tablet Info This file contains a full description of the configuration of the ID Station, listing the following items: ■ Info on Configuration ID Station Name Locale Date format Link option RIS-Link option Auto-Routing option Full leg/Spine option Screen saver via password ■ ON/OFF ON/OFF ON/OFF ON/OFF ON/OFF Info on Hardware Processor type ■ Info on System Operating version system ■ Info on Network PC hostname ip-address subnetmask default router AE-title CPF host URL Port number ■ Info on RIS RIS enabled RIS .exe path RIS data file path RIS locale Remove risfile ADC Compact ID Software and ID Tablet Yes/No ON/OFF 2201A GB 199805 31 Version When selecting this menu item the ID Station's name and version number is shown. 32 2201A GB 199805 ADC Compact ID Software and ID Tablet Inserting and removing a cassette When you want to identify a cassette, or when the ADC Compact ID application prompts for insertion of a cassette, insert the cassette in the slot of the ADC Compact ID tablet so that the ID Station can access the RF-tag memory chip embedded in the cassette. To do so, proceed as follows: Caution 1 Orient the cassette with the labels facing up (tube side down) as shown in the illustration below. 2 Gently insert the cassette. 3 Leave the cassette in this position to perform the operation of your choice. If you decide not to perform any operation on the cassette, press [CANCEL], then withdraw the cassette from the ID tablet slot. ADC Compact ID Software and ID Tablet 2201A GB 199805 33 Identifying a cassette Identifying a cassette consists in keying in the required information like patient demographics, examination data, image features, destinations, etc. Proceed as follows to identify a cassette: 1 Insert a cassette in the cassette slot of the ADC Compact ID tablet. The ID Station returns the 'Identification' entry screen: ■ Note 34 In case of a first identification after start-up, the upper patient field in the screen is blank and in the 'Patient Name' field the pointer will be blinking, as in the sample screen below: The format and layout of the Identification screen in your application might differ from the one displayed above, as they are fully configurable. Also the number of displayed fields can be configured. 2201A GB 199805 ADC Compact ID Software and ID Tablet The default entries in the lower part of the screens are configured by your application engineer during installation of the system. They are linked to the Radiologist, Examination type and Examination Subtype. You can manually override these settings, e.g. to process a specific examination which was not performed in the usual way. The default settings themselves can only be modified by a trained application engineer. ■ If it is not the first identification after start-up, the patient name field will be highlighted. All fields in the Identification screen will contain the information stored on the previous cassette's memory chip, as you can see from the sample screen below. ADC Compact ID Software and ID Tablet 2201A GB 199805 35 This feature saves time as you do not have to re-enter information when several cassettes of the same patient have to be identified. If you want to enter information for a different patient, press the New Patient function key, if any, or select the New Patient option in the Perform menu to remove the identification data and to move the cursor to the first data field. 36 2201A GB 199805 ADC Compact ID Software and ID Tablet 2 Fill in the patient name (33 characters maximum), then press [ENTER] or [TAB]. Whenever [ENTER] or [TAB] is pressed, the cursor moves to the next field. If you want to move back to the previous field, press Shift [TAB]. Note You do not have to fill in all the fields in this data entry screen. Empty fields are automatically filled in with default values. 3 Fill in the patient's first name (20 characters maximum), then press [ENTER] or [TAB]. The cursor moves to the next field. 4 Fill in the date of birth of the patient, then press [ENTER] or [TAB]. ADC Compact ID Software and ID Tablet 2201A GB 199805 37 5 Fill in the patient ID code (15 characters maximum), then press [ENTER] or [TAB]. The cursor moves to the next field. 6 Select the patient's sex in the drop-down list box, then press [ENTER] or [TAB]. The cursor moves to the next field. 7 Enter the patient's accession number, press [ENTER] or [TAB]. The patient's accession number is the RIS identification code that is used for extracting the current examination information from the Radiology Information System (RIS) or in the Hospital Information System (HIS). If you want more information on how to connect your ADC Compact system with your RIS or HIS, refer to your local Agfa representative or consult the ADC Compact Rislink Toolkit manual. 38 2201A GB 199805 ADC Compact ID Software and ID Tablet After having pressed [ENTER] or [TAB], the cursor moves to the next field in the sample screen as shown below, the User Info field. User Info fields are optional information fields which you may not want to include or which you can configure, assign a different name and place anywhere in the ‘Patient’, ‘Study’ or ‘Image’ sections of the Identification screen. ADC Compact ID Software and ID Tablet 2201A GB 199805 39 When selecting New Patient, the Patient Name field turns blank, together with the User Info field (in point of case, the bed number in the hospital). This concludes the completion of the patient data. After having pressed [ENTER] or [TAB], the cursor moves to the 'Radiologist' field in the ‘Study’ section of the Identification screen. Note Filling in the 'Date of birth' field is not mandatory. Empty fields are automatically filled in with 'unknown'. 8 Press [ENTER] or [TAB] in the Radiologist field if you want to select the currently displayed radiologist. Otherwise, press the first character of the radiologist's name, or press the downward arrow in the list box to display the list of radiologists. A drop-down menu appears, showing a number of radiologists. Select the radiologist in charge of the exposure. 40 2201A GB 199805 ADC Compact ID Software and ID Tablet By selecting a specific radiologist you automatically select default parameters adapted to, or preferred by, this radiologist. After pressing [ENTER] or [TAB], the cursor moves to the Examination field. 9 In the Examination field, press the first character of the examination type, or select the examination type from the drop-down list box that is displayed when clicking the downward arrow. The system returns a screen similar to the sample screen below. 10 Press the [ENTER] or [TAB] key to move to the Sub-Examination field. ADC Compact ID Software and ID Tablet 2201A GB 199805 41 11 Press [ENTER] or [TAB] if you want to select the currently displayed SubExamination type. You can also type the first character of the SubExamination name, e.g. ‘s’ for ‘skull’. You can also make your selection by clicking the downward arrow of the drop-down list box listing all the examination sub-types that are associated with the Examination type you selected in the previous step, as shown in the sample screen below. By selecting the examination sub-type you automatically set default parameters for the following fields in the Image section of the Identification screen, viz. patient position, cassette orientation and exposure class. You will have to modify these parameters only in exceptional circumstances. After pressing the [ENTER] or [TAB] key for the selection of the examination sub-type, the cursor automatically moves to the 'Department' field in the Image section of the Identification screen. 12 Press [ENTER] or [TAB] to confirm the currently displayed Department or type the Department name you want to select. The cursor automatically moves to the next field, the Patient Position. 42 2201A GB 199805 ADC Compact ID Software and ID Tablet 13 Press [ENTER] or [TAB] to select the currently displayed Patient Position or type the first character of the Patient Position acronym, e.g. ‘p’ for PA, or select the Patient Position from the drop-down list box, using your mouse or the arrow keys. Type [ENTER] or [TAB] to move the cursor to the following Cassette Orientation field. ADC Compact ID Software and ID Tablet 2201A GB 199805 43 14 In the Cassette Orientation field, press [ENTER] or [TAB] to accept the default cassette orientation, type the first character L for ‘landscape’ or P for ‘portrait’ or select the appropriate cassette orientation from the drop-down menu. After pressing [ENTER] or [TAB] the cursor automatically moves to the adjacent Exposure Class field. 44 2201A GB 199805 ADC Compact ID Software and ID Tablet 15 In the Exposure Class field, press [ENTER] or [TAB] to accept the default value, type the desired speed class or select the exposure class by scrolling down the drop-down list box. After confirming your selection, the cursor automatically moves to the User Info field, provided you have configured and placed a User Info field within the Image section of your Identification screen. 16 Fill in any comments (up to 40 alphanumeric characters) that you want to append and press [ENTER] or [TAB]. With each new patient you identify, the User Info field will be cleared. ADC Compact ID Software and ID Tablet 2201A GB 199805 45 17 After pressing [ENTER] or [TAB], the cursor moves to the Hardcopy Unit field in the Destinations section of your Identification screen. Type the destination name or select the Hardcopy Unit destination from the scroll-down list, as shown. Press [ENTER] or [TAB]. The cursor moves to the adjacent Number of Copies field. When ‘None’ is selected as a Hardcopy Unit destination, the next two fields, viz. The Number of Copies field and the Film Format field remain blank. Note 46 2201A GB 199805 ADC Compact ID Software and ID Tablet 18 To select the number of hardcopies you want, enter the number of copies you want or select a number from the drop-down list box. Press [ENTER] or [TAB]. The cursor moves to the Processing Station field. ADC Compact ID Software and ID Tablet 2201A GB 199805 47 19 In the Processing Station field, enter the Processing Station name or select the destination from the drop-down list box, as shown. Select 'none' if you don't want to send the image to the Processing Station. Press [ENTER] or [TAB] to confirm your choice and to move the cursor to the next field, the Film Format field. 48 2201A GB 199805 ADC Compact ID Software and ID Tablet 20 Enter the desired film format or select the format from the drop-down list box, as shown in the sample screen below. Only the film formats that are supported by the previously selected Hardcopy Unit destination are displayed in the Film Format field. If you select Drystar 3000 as your Hardcopy Unit destination, for example, your options are limited to 11 x 14’ and 14 x 17’ film formats, and when selecting Drystar 2000, the only available choice is 8 x 10’. ADC Compact ID Software and ID Tablet 2201A GB 199805 49 Press [ENTER] or [TAB]. The cursor moves to the Archive Station destinations field. 21 If an archiving system is connected to your ADC Compact system, select the Archive Station destination of your choice by entering its name or by selecting it from the drop-down list box. 50 2201A GB 199805 ADC Compact ID Software and ID Tablet Select ‘none’ if you do not want to send the image to the Archive Station. Press [ENTER] or [TAB] to move to the Send destination field. 22 If you have any Review Stations connected to your ADC Compact system, select the Review Station you want the image to be sent to, by entering its name or by selecting it from the drop-down list, as shown in the example below. Select ‘none’ if you do not want to send the image to the Review Station. Press [ENTER] or [TAB]. ADC Compact ID Software and ID Tablet 2201A GB 199805 51 23 Press the Write Function key to record all identification data onto the cassette memory chip. If no such Write Function key has been configured, select Write in the Perform drop-down menu, as shown in the sample screen below. After you have written the identification data to the memory chip in the cassette the application returns the following message: 52 2201A GB 199805 ADC Compact ID Software and ID Tablet 24 Remove the cassette from the cassette slot in the ADC Compact ID tablet and place it into the input buffer of the Digitizer. After you have removed the cassette, the ID Station returns to the main Standby screen. ADC Compact ID Software and ID Tablet 2201A GB 199805 53 Clearing information By selecting the Clear option in the Perform menu, as shown in the sample screen below, you can clear any information contained in the field selected in the Identification screen. This command can be shortcut using a Function key. In the sample screen below the configured Clear Function key is [F2 Clear]. 54 2201A GB 199805 ADC Compact ID Software and ID Tablet Recalling a patient The Recall function can only be used in the Patient Identification fields, Comment field and User Info fields of the Identification screen. In order to recall some previous recorded information, proceed as folows: 1 Move the cursor to one of the patient identification fields, the Comment field or the User Info fields. 2 Press the Recall Function key, if you previously configured the Recall function into a Function key button, or select Recall from the Perform menu in the Identification screen, as shown below. Each time Recall is selected, the previously identified data of the last identifications is called back and used for the next identification procedure. ADC Compact ID Software and ID Tablet 2201A GB 199805 55 New Patient The New Patient function clears all patient data fields in the Patient Identification section of the Identification screen. In order to initiate the New Patient function, proceed as follows: 56 1 Press the New Patient Function key (F4 in the sample screen below), provided you previously configured the New Patient function button, or select the New Patient option in the Perform menu of the Identification screen. 2 Enter new patient data by either typing the data in or by using the Recall function or the patient data contained in the History list, as described in the next section of this manual. 2201A GB 199805 ADC Compact ID Software and ID Tablet Identifying a cassette with data from the history list The ADC Compact ID application stores a history list with the last identification data. You can identify an ADC Compact cassette directly with patient information from this history list. In order to use the information stored in the patient history list when identifying a cassette, proceed as follows: 1 Insert a cassette into the slot of the ADC Compact ID tablet. Click in the window of the Standby screen or press any key. The system returns the main identification screen. 2 Select Show History from the File menu or History from the Perform menu. ADC Compact ID Software and ID Tablet 2201A GB 199805 57 You can also press the History function key, provided you have previously configured a function key to that effect. 58 2201A GB 199805 ADC Compact ID Software and ID Tablet The ID Station returns the history list, similar to the sample screen below: 3 Select the patient of your choice, then press the Transfer Item button. The ADC Compact ID application copies the selected patient data from the list and moves it to the main Identification screen. If you want to remove a patient from the History list, click the Clear Item button. The Clear All button is used to remove all patient files from the History list. 4 Press the Close button. The selected patient is displayed in the main Identification screen. Fill in the remaining fields or press the Write Function key straight away if you wish to use the History List values already displayed. 5 Remove the cassette. ADC Compact ID Software and ID Tablet 2201A GB 199805 59 Link The link option in the ADC Compact ID Software allows for the printing of two cassettes on one single film. The film layout is determined by the layout of the first cassette in the Link sequence. The use of the Link feature is confined to 2/0 layouts (two images on one film). In order to ‘link’ two cassettes onto one film, proceed as follows: 60 1 Insert a cassette in the transmission slot of the ADC Compact ID tablet. 2 Identify the cassette by entering all appropriate names and parameters, as described in this manual on pages 31 and following. 3 If you want the Link feature to be effective for a whole sequence of cassettes, select Link Mode in the Mode menu. The Link status is then indicated as [LINK] in the status bar at the bottom of the Identification screen. 2201A GB 199805 ADC Compact ID Software and ID Tablet 4 In case you want a ‘once-only’ linking of two cassettes and the selected Mode is Normal Mode, you can Link two cassettes by selecting the Link option in the Perform menu, as shown. ADC Compact ID Software and ID Tablet 2201A GB 199805 61 5 62 2201A GB 199805 After having identified the first cassette in the sequence, press the Function key or select the Write option in the Perform menu. The system then requests you to remove the first cassette, returning the following prompt. ADC Compact ID Software and ID Tablet 6 Remove the first cassette from the ID tablet and insert the second cassette in the cassette slot of the ADC Compact ID tablet. The system returns the Identification screen for identifying the second cassette. Enter the data that are relevant for the second cassette and press the Write button or select Write in the Perform menu. During the identification of the second cassette, the patient demographic data and all other data except Sub-examination, patient position, cassette orientation, exposure class and user info can for obvious reasons not be altered. Neither can the destinations, as these have been determined during the identification of the first cassette. The ADC Compact ID application writes all data to the memory chip embedded in the second cassette and returns to the Standby screen. ADC Compact ID Software and ID Tablet 2201A GB 199805 63 Hold/Unhold For a detailed description of the Hold/Unhold function, we refer to the treatment of the Hold function and Hold status in the description of the Configuration menu of the Standby screen, on page 24 of this manual. 64 2201A GB 199805 ADC Compact ID Software and ID Tablet Destination Rerouting The Destination Rerouting option can only be accessed when the ADC Compact Autorouting Software has been installed on your system. For a full description of the ADC Compact Autorouting Software, we refer to the relevant manual. ADC Compact ID Software and ID Tablet 2201A GB 199805 65 Reading a cassette The 'Read' function enables you to look at the data that was previously entered into the memory chip on the cassette. This is a read only-function. You cannot edit any information from the 'Read' screen. If you wish to edit information, you have to run the 'Identification' procedure again. You can read an ADC Compact Cassette using the following procedure: 1 66 2201A GB 199805 Select the Read option from the File menu in the Standby screen as shown in the sample screen below. ADC Compact ID Software and ID Tablet or Select the Read option from the File menu in the Identification screen proper. ADC Compact ID Software and ID Tablet 2201A GB 199805 67 The following screen is returned: 2 68 2201A GB 199805 Insert the cassette you want to read into the ID tablet and press the Read button. If you want to quit the Reading procedure press the Exit button. ADC Compact ID Software and ID Tablet The data that is stored in the memory chip on the cassette is displayed on the screen, as in the sample screen below. The cassette status is shown in the upper cassette status bar. If the Cassette status is 'exposed' then the cassette has been identified but not cycled through the Digitizer. ADC Compact ID Software and ID Tablet 2201A GB 199805 69 The lower part of the screen displays additional initialization information, the number of cycles the plate has made since it was initialized, the type of image plate, the acquisition date, and so on. 70 3 Press [EXIT] to return to the identification screen. 4 Remove the cassette from the ID tablet slot. 2201A GB 199805 ADC Compact ID Software and ID Tablet Erasing an image plate A cassette that has not been used for three days should be erased before being used again. Caution An accidental or exceptional X-ray overdose excites the phosphor crystals in deeper layers of the image plate. The deeper layers then still retain a latent image after erasure. This image is called a 'ghost image'. This ghost image is caused by rebouncing, cosmic radiation and intrinsic radioactive elements in the phosphor. To remove the ghost image from an image plate you must select the Standard Erasure mode when passing the cassette in the Digitizer. For more details about the Digitizer Erasure modes, we refer to the ADC Compact Digitizer Manual. The procedure to erase a cassette is twofold. First you must identify the cassette in the ADC Compact ID Station using the Erase function. Secondly, you must insert the cassette into the ADC Compact Digitizer. The Digitizer automatically recognizes this cassette and clears the image plate by exposing it to a powerful source. Proceed as follows to erase a cassette: 1 Select 'Erase' from the File menu of the Standby screen. 2 You are prompted to insert the cassette into the ID tablet slot. Insert the cassette you want to erase into the ID tablet slot. ADC Compact ID Software and ID Tablet 2201A GB 199805 71 The application returns a warning message, similar to the one displayed below: 3 Click O.K. if you wish to erase the cassette, otherwise select Cancel. 4 Remove the cassette from the ID tablet and place it in the input feed buffer of the ADC Compact Digitizer. The plate of a cassette which is identified as Erase, will not be scanned by the Digitizer, and there will be no data transmission to the printer or to the Processing Station. Instead, the Digitizer will erase the image plate. 72 2201A GB 199805 ADC Compact ID Software and ID Tablet Printed in Belgium Published by Agfa-Gevaert N.V., B-2640 Mortsel-Belgium 2201A GB 199805