1
SPE-DEX® Oil & Grease Machine User’s Manual
1000/3000XL Extractors
Automated Solid Phase Extractor Systems
45 Northwestern Drive, Salem, NH 03079
(800) 997-2997
(603) 893-3663
Copyright © 2007
This document is protected by all applicable copyright laws. Duplication of this manual is
prohibited, without the express written permission of Horizon Technology, Inc.
®
SPE-DEX is a registered trademark of Horizon Technology, Inc.
Teflon™ is a registered trademark of DuPont Company.
Empore™ is a registered trademark of 3M Corporation.
Speedisk® is a registered trademark of J.T. Baker
Rev. B
Pg. 2
Table of Contents
1.0 Introduction ................................................................................................................. 5
2.0 Product Safety Notice.................................................................................................. 6
3.0 Oil & Grease Machine Overview ................................................................................. 8
3.1 SPE-DEX® 3000 Controller ................................................................................... 8
3.2 SPE-DEX® Oil & Grease Machines ....................................................................... 10
4.0 Installation ................................................................................................................... 13
4.1 Unpacking the System .......................................................................................... 13
4.2 Installing the Oil & Grease Machines .................................................................... 14
5.0 Operation .................................................................................................................... 19
5.1 Solid Phase Extraction and the Oil & Grease Machines-Theory of Operation ...... 19
5.2 The Extraction Cycle............................................................................................. 20
5.3 Verify System Installations and Operation ............................................................ 23
5.4 Running a Purge ................................................................................................... 25
5.5 Loading the SPE Disk ........................................................................................... 27
5.6 Procedure for Preparing the Extractor to Run a Practice Water Sample .............. 30
6.0 Programming the Controller ........................................................................................ 33
6.1 Creating a Method Using the “Learn” Mode.......................................................... 33
6.2 Creating a New Method ........................................................................................ 35
6.3 Special Function Keys .......................................................................................... 38
7.0 Maintenance................................................................................................................ 41
7.1 Start-Up and Shut-Down Procedures.................................................................... 41
7.2 Freeing the Elute Check Valve Assembly ............................................................. 42
7.3 Cleaning the water Inlet Valve Assembly.............................................................. 43
7.4 Replacement of Solvent Rod Shafts and O-rings ................................................. 44
7.5 Sample Bottle Gaskets Seals ............................................................................... 45
7.6 Installing an Inlet Solvent Filter ............................................................................. 46
7.7 Adjusting the Water Sample Holder Arm .............................................................. 47
7.8 Replacing the Disk Holder Cup O-ring .................................................................. 48
7.9 Uploading New Software Version ......................................................................... 49
7.10 Assembly of the Dual Diaphragm Oil-Free Vacuum Pump ................................. 50
7.11 Installing a Dry Trap............................................................................................ 51
Rev. B
Pg. 3
7.12 Cleaning and Replacing the Elute Check Valve.................................................. 52
8.0 Troubleshooting........................................................................................................... 54
Appendix A – Factory Programmed Methods and Method Worksheet.............................. 60
Appendix B – Sample Bottle Measuring Scale .................................................................. 63
Appendix C – Parts List..................................................................................................... 64
Appendix D – Warranty ..................................................................................................... 67
Rev. B
Pg. 4
1.0 Introduction
The SPE-DEX® Oil & Grease Machines (1000XL and 3000XL Extractor Systems) are specifically
designed to handle the extraction of Oil & Grease from aqueous samples. Capable of using 47, 50
(JT Baker), and 90-mm SPE disks, the easy-to-use workstations set new standards for both speed
of sample extraction and reproducibility of results.
The SPE-DEX® Oil & Grease Machines allow testing facilities to:
•
Reduce laboratory costs.
•
Reduce manpower requirements for testing.
•
Process more samples per hour.
•
Provide more reliable results by reducing testing variability.
•
Improve operator safety by reducing exposure to solvents.
•
Provide an increased level of productivity to the laboratory.
The SPE-DEX® Oil & Grease Machines operate with the SPE-DEX® 3000 Controller. The Controller
is pre-programmed with ten (10) optimized methods to handle a full range of Oil and Grease
samples and disk configurations. These factory-preset methods can be used, or twenty (20) new
methods can be created and modified. Creating custom methods allows optimizing the operating
parameters to meet your own unique requirements and/or to take advantage of new SPE disk
technology as it becomes available.
The SPE-DEX® Oil & Grease Machines consist of two main components, the Controller and the
Extractor unit.
The Controller
The Controller provides operating power and programming logic for up to three extractor stations. If
the Controller is operating the 1000XL, Station #1 is used; if operating the 3000XL, all three stations
are used. The use of the same Controller provides an easy upgrade from the 1000XL to the
3000XL Extractor.
Weight: 5 lbs.
Dimensions: 7” W x 10” D x 5 1/2” H
Power: 120VAC / 12VDC
The Extractor
The SPE-DEX® 1000XL Oil & Grease Machine is a fully automated Extractor System, which
consists of a single extractor station. The SPE-DEX® 3000XL Oil & Grease Machine is a fully
automated Extractor System, which consists of three stations. The operator simply loads the SPE
disk, a collection vessel, and the water sample. The System automatically introduces all solvents,
introduces the water sample, rinses the sample bottle, and extracts the oil and grease from the disk.
The solvent vapor exhaust fan allows bench top operation. Studies confirmed the internal exhaust
fan reduced the exposure of hexane vapor to levels below OSHA requirements.
SPE-DEX® 1000XL: Weight: 20 lbs
Dimensions: 7” W x 15” D x 21 1/2” H
SPE-DEX® 3000XL: Weight: 45 lbs
Dimensions: 18” W x 15” D x 21 1/2” H
Rev. B
Pg. 5
2.0 Product Safety Notice
This Safety Notice has been provided to inform and guide the operator in safe practices to
avoid injury, and is intended to cover general safety requirements for a laboratory. Each
laboratory is responsible for implementing and communicating its unique safety
requirements and program to all workers.
Personal Protective Equipment:
1) Eye protection in the form of safety glasses or goggles is mandatory when operating the
Extractors. If solvent liquids or vapors enter the eyes, follow the appropriate first aid
procedures set forth in the laboratory’s safety manual.
2) Lab coats must be provided for protection and convenience. They should be worn at all
times when operating the Extractors.
3) Protection of the hands when working with solvents or any hazardous material is essential.
Wear gloves selected on the basis of the hazard.
Equipment Safety:
1) The SPE-DEX® Oil & Grease Machines are designed to only use n-Hexane and Methanol.
The use of any other solvent will destroy critical valve seals and components, and void all
warranties.
2) The SPE-DEX® Oil & Grease Machines have been designed for bench top operation or fume
hood operation. If installed on a bench top, the extractors require venting into a local
exhaust device to avoid the discharge of potentially toxic vapors and fumes into the
laboratory atmosphere. The equipment must be set-up and operated in a well-ventilated
area.
3) Do not work with a volatile solvent without adequate ventilation from chemical fume hoods
or other protective devices.
4) The only solvent bottles that should be used with the SPE-DEX® Oil & Grease Machines are
the 2.5 L Plastic-coated safety bottles originally shipped with the System (Horizon Part
Number (P/N 27-0042). The solvent bottles are pressurized to deliver solvent to the
Extractor units. The use of any other glass bottles could lead to an explosion. All solvent
bottles must have a label identifying the solvent it contains. All solvent bottles must also
have the safety label identifying them as Plastic-coated safety bottles.
5) The only Waste Water Recovery Container that should be used with the SPE-DEX® Oil &
Grease Machines is the 5 gallon safety coated recovery bottle (P/N 180-0005-01) or
equivalent. High vacuum is pulled on this recovery bottle; an inferior bottle could implode
causing severe injury. The 5 gallon Waste Water Recovery Container must have a label
identifying it as a safety coated container.
6) During the Purge and Rinse cycle solvent is sprayed from the opening on the Water Inlet
Valve. Be sure a sample bottle is in position before pressing the PURGE or START key to
avoid solvent being sprayed into the atmosphere and possibly causing injury to laboratory
workers.
Rev. B
Pg. 6
Chemical Safety:
1) Organic solvents can pose inhalation, skin, and ingestion hazards with potential chronic
health effects. N-Hexane is extremely flammable, which could cause fire and/or explosion
hazards. All solvents must be handled using appropriate personal protection equipment and
in a properly operating fume hood to eliminate inhalation hazards. Refer to the Material
Safety Data Sheet for the specific chemical for handling and safety instructions.
2) MSDS (Material Safety Data Sheets) are the source for chemical hazard information
including basic information on the manufacturer or distributor, identification of the chemical,
the product's hazardous ingredients, physical data, fire and explosion data, toxicity
information, protection information, and more. The laboratory is responsible for having a
MSDS for every chemical or substance being used. It is also the laboratory’s responsibility
to make the MSDS available and accessible to all employees and to provide training in the
safe handling of hazardous chemicals. MSDS can be obtained from the vendor.
3) All hazardous solvents and chemicals must be disposed in accordance with appropriate
Federal, State and local regulations.
4) The SPE-DEX® Oil & Grease Machines require the use of a pressure source to deliver
solvents to the system and for the operation of the Water Inlet Valve. The recommended
source is nitrogen gas. The operator must be aware of the potential hazards of reactivity and
toxicity, as well as asphyxiation, of even the referred to "harmless" gases such as nitrogen.
The large amount of potential energy resulting from compression of the gas makes the
cylinder a potential rocket or fragmentation bomb if dropped. To prevent this, secure the gas
cylinder to avoid tipping.
If you have any questions please call Horizon Technology at 800-997-2997.
(Inside NH 603-893-3663).
Rev. B
Pg. 7
3.0 Oil & Grease Machine Overview
3.1 SPE-DEX® 3000 Controller
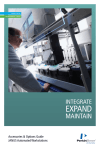
Figures 3-1 and 3-2 identify the major components of the Controller unit.
• LCD Display
The LCD displays all System parameters and operating status.
• Keypad
The user interface for method programming and system inputs. The “letter”
keys change functionality based on the programming level.
• Power Switch
Turns the System On / Off.
• Power Input
Connects the Controller to a 120 VAC power source via the 12V supply.
• Comm Port
Allows software uploads via flash memory.
• Extractor Cable
Connects the Controller to the Extractor unit.
LCD Display
Keypad
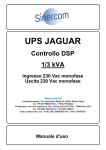
Figure 3-1: Front of Controller
Power Switch
Extractor Cable
Comm Port
Power Input
Figure 3-2: Back of Controller
Rev. B
Pg. 8
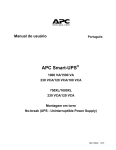
SPE-DEX® 3000 Controller Keypad
• STATUS
Allows viewing of the current operational state of the three-extractor stations
simultaneously. The Status page will indicate the method currently loaded into
each station, and the operating status of each station. This key is also used to
access control over each extractor station.
• LEARN
Allows the operator to teach each station optimal SPE conditions in real time.
Once a method is “learned” by the Controller, it is stored in memory and can be
used on any extractor station.
• METHODS
Displays the methods section of the Controller memory. Methods are stored in a
non-volatile memory. Methods 1 – 20 can be modified for optimal conditions.
Method 21 – 30 are factory preset and cannot be modified.
• AUXILIARY 1 Displays the total number of hours the liquid sensors have been heated and the
total number of water samples processed on each station.
• AUXILIARY 2 Allows access to diagnostics, default parameters, and uploading new software
revisions.
• A-E
Special function keys with changeable functions. Functions will change based
on the programming level being accessed. The LCD displays the functionality of
each key.
Figure 3-3: Controller Keypad
Rev. B
Pg. 9
3.2 SPE-DEX® Oil & Grease Machines
Figures 3-4 and 3-7 identify the major components of the Oil & Grease Extractor Systems.
•
Sample Bottle
The original sample bottle is used on the extractor system. Bottle sizes
from 33 x 400-mm to 89 x 400-mm openings can be used.
• Water Sample
Inlet Valve
The Assembly that opens to allow the water sample to be
dispensed into the Disk Holder Assembly.
• Water Sample
Holder Arm
Holds the water sample bottle and sample inlet valve in place during
the extraction process.
• Liquid Sensor/
Prewet Arm
Houses the liquid sensor and the two Prewet dispensing
lines.
• Disk Holder
Assembly
Holds the SPE disks and required prefilters/filter aid. Available in two
sizes, 47 mm and 90 mm diameter.
• Disk Holder
Platform
Holds the SPE Disk Holder Assembly.
•
Collection Vessel Collects the solvent extract.
• Controller Cable
Port
Connects the Extractor to the Controller and provides both power
and program communication.
• Solvent Inlet Lines Fittings to connect the solvent delivery lines.
Fittings
•
Waste Line Fittings Fittings to connect solvent to waste and water to waste lines.
• Solvent Vapor
Exhaust
Holds the Vapor Exhaust Hose to the Extractor.
Rev. B
Pg. 10
Sample Bottle
Water Sample Inlet Valve
Water Sample Holder Arm
Sample Inlet Tube
Liquid Sensor/Prewet Arm
Disk Holder Assembly
Disk Holder Platform
Collection Vessel
Collection Vessel Adapter Taper and Clip
Figure 3-4: Front Components of SPE-DEX® 3000XL Oil & Grease Machine
Water Sample Holder Arm
Liquid Sensor/Prewet Arm
Disk Holder Assembly
Disk Holder Platform
Collection Vessel
Collection Vessel Adapter Taper and Clip
Figure 3-5: Front Components of SPE-DEX® 1000XL Oil & Grease Machine
Rev. B
Pg. 11
Controller Cable Port
Solvent Inlet Lines
Solvent Bottle Gas Lines
Solvent Vapor Exhaust
Pressurized Gas Inlet
Solvent Waste Line
Water Waste Line
Figure 3-6: Back Components of SPE-DEX® 3000XL Oil & Grease Machine
Controller Cable Port
Solvent Vapor Exhaust
Solvent Inlet Lines
Solvent Bottle Gas Lines
Pressurized Gas Inlet
Solvent Waste Line
Waste Water Line
®
Figure 3-7: Back Components of SPE-DEX 1000XL Oil & Grease Machine
Rev. B
Pg. 12
4.0 Installation
4.1 Unpacking the System
Use the checklist below to ensure that all of the Extractor components have been received.
Check the Controller kit for the following items:
®
SPE-DEX 3000 Controller
P/N 50-0412
12-Volt AC Power Supply and Power Cord
User's Guide
Check the Extractor kit for the following items:
SPE-DEX® 3000XL Extractor or SPE-DEX® 1000XL Extractor
Water Sample Inlet Valves; three (3) for 3000XL System, or one
(1) for 1000XL System P/N 50-0471
Disk Holder Assemblies; 47-mm and/or 90-mm, JT Baker
Speedisk® Adapter
Sensor Arm Clips; various sizes if using the 50-mm JT Baker
Speedisk®
2.5 Liter Safety Coated Solvent Bottles; total of four (4) for
3000XL System or (2) for 1000XL System
Solvent Delivery Kit
Water and Solvent Waste Lines
Black Air Line
10’ of Solvent Vapor Exhaust Hose (longer lengths are available)
5-gallon Safety Coated Water Waste Recovery Bottle
Water Waste Recovery Assembly
Solvent Recovery Vacuum Assembly
Vacuum Supply Line Assembly
Collection Vessel Retaining Clip(s), Blue
19/22 Adapter for 40 ml VOA Vessel
125 ml, 19/22 Taper Erlenmeyer Flask
P/N 27-0042
P/N 50-0486-(01)
P/N 50-0485
P/N 50-0484
P/N 14-0404
P/N 180-0005-01
P/N 50-0051-03
P/N 50-0043-03
P/N 50-0211-02
P/N 22-0687
P/N 160-0001
P/N 27-0476
The following items are also required to complete the installation. (Supplied by the customer)
A gas supply (dry N2) capable of minimum 60 psi (maximum 80 psi)
A vacuum source capable of 24-26" Hg (10" Hg at 1 CFM), PN: 50-0583
Cap Adapters - contact Horizon Technology for the proper cap adapter to use
Additional 19/22 Collection Vessel with 40-ml vials or 125 ml size Erlenmeyer flask
Solvents to perform the proper chemistry
5L n-Hexane (85% purity or greater, 99.0% min. sat. C6 isomers, residue less than 1 mg/L).
5L Methanol (ACS grade, residue less than 1 mg/L).
SPE extraction disks, 47, 50, 90-mm size. Prefilters and 3M Filter Aid 400 are also
recommended for handling dirty samples.
Accessories:
Dry Trap for the Vacuum Source (not supplied)
P/N 50-0572
Rev. B
Pg. 13
4.2 Installing the Oil & Grease Machines
The SPE-DEX® Oil & Grease Machines are equipped with an internal solvent vapor exhaust fan,
permitting bench top operation. Ten feet of solvent vapor exhaust hose is the standard length
shipped with the system, but lengths of 15 and 20 feet are available. Therefore, position the
Extractor System close to a suitable vent.
A workspace of at least five (5) feet wide will be required to accommodate the System along with
safety coated Solvent Delivery Bottles, safety coated Liquid Recovery Bottles (both solvent and
water), a compressed gas source (dry nitrogen), and a vacuum
source.
Step 1)
Place the Extractor unit in the area where it will be used.
Position the unit at an angle to allow easy access to the
rear connection fittings from the left side.
Step 2)
Locate the 2.5-Liter safety coated Solvent Bottles (two for
the 1000XL, four for the 3000XL). Place these bottles
on the left side of the Extractor. Locate the bag with Figure 4-1: Solvent Bottles
P/N 50-0486-(01) containing the turquoise colored
Bottle Cap Assemblies. Connected to the end of the
solvent dip tube on the Bottle Cap Assemblies is a 10 μm
solvent filter (Figure 4-2 and 4-3). This filter will filter the
solvents and protect the solvent valves from particulate
that may be present in the solvents. To keep the solvent
dip tube/filter clean, place the caps on the solvent bottles.
Do not tighten at this time.
Note: Do not leave or place solvent lines in a dirty area. Dust and
particulate can get into the lines and end up in the solenoid valves
resulting in damage.
Step 3)
Figure 4-2: Bottle Cap
Assembly with solvent filter
Solvent Bottle labels have been provided with the User’s
Manual. For the 3000XL Extractor, label two bottles
Prewet #1 and Prewet #2, and label two bottles Rinse #1
and Rinse #2. For the 1000XL Extractor, label one bottle
Prewet #1/Rinse #2 and label the second bottle Prewet
#2/Rinse #1. Warning labels to use the safety-coated
bottles provided have also been included with the
manual. Place a warning label on each safety coated
solvent bottle.
Caution: These solvent bottles will be pressurized in order to
deliver the solvents. For safety reasons, only use the Safety
Coated Bottles provided with the system.
Figure 4-3: Solvent Filter
Rev. B
Pg. 14
Step 4)
Fill the Prewet #1 and Rinse #2 safety coated solvent bottles with n-Hexane (85%
purity, 99.0% min. saturated C6 isomers, and residue less than 1 mg/L). Securely attach
the turquoise caps to the bottles.
Step 5)
Fill the Prewet #2 and Rinse #1 safety coated solvent bottles with Methanol (ACS
grade, residue less than 1 mg/L). Securely attach the turquoise caps to the bottles.
Step 6)
3000XL Extractor: Connect the fitting from the Prewet #1 (n-Hexane) bottle to the top,
most left, bulkhead fitting labeled PW1 on the
back of the Extractor. Refer to Figure 4-4.
Repeat this operation for the Prewet #2 bottle
(Methanol); use the next fitting labeled PW2.
Connect Rinse #1 (methanol bottle) and Rinse
#2 (Hexane bottle) to the fittings labeled RIN1
and RIN2, respectively. Using a wrench, make
sure the fittings are snug, but do not overtighten.
1000XL Extractor: Connect the fitting from the
Prewet #1/Rinse #2 (n-Hexane) bottle to the top,
left, bulkhead fitting. Connect the fitting from the
Figure 4-4: 3000XL Extractor
Prewet #2/Rinse #1 bottle (Methanol) to the top,
Connections
right, bulkhead fitting. Using a wrench, make
sure the fittings are snug, but do not over-tighten (Figure 4-5).
Step 7)
Attached to each Solvent Bottle Delivery Line is a black gas line. Gently connect each
gas line to the plastic fitting directly below the solvent line on the back of the extractor.
These fittings are labeled for the corresponding solvent
bottle.
Step 8)
Locate the bag containing two pieces of tubing; one blue
and one clear (P/N 50-0485). Attach the fitting on the blue
tubing to the fitting marked Water Waste. This is the fitting
on the bottom, right of the unit. Attach the fitting on the
clear tubing to the fitting marked Solvent Waste. This is
the middle fitting on the bottom of the unit. Keep the other
plastic fittings in this bag for later use.
Step 9)
Locate the bag containing the single piece of black tubing
(P/N 50-0484). Attach one end of the tubing to the fitting
marked Gas on the back of the unit. This is the bottom, left
fitting. Attach the other end of the gas tubing to a
pressurized gas source (nitrogen gas recommended)
capable of delivering a minimum of 60 psi.
Hexane
Methanol
Figure 4-5: 1000XL
Extractor Connections
Rev. B
Pg. 15
Step 10)
Locate the Solvent Vapor Exhaust Hose. The standard length provided with the system
is 10 feet. To help with the attachment of the Exhaust Hose, pull the right side of the
extractor unit forward. The Duct Hose fitting is threaded to securely hold the Duct Hose
in place. Center the Exhaust Hose on the Exhaust Port and thread the hose on. Extend
the length of the hose to the appropriate hood or vent.
Step 11)
Locate the Solvent Recovery Vacuum Assembly (50-0043-03) and a 2.5L safety coated
Solvent Recovery Bottle. Inspect the inside of the bottle cap to ensure the Teflon washer
is securely in place. Screw the assembly onto the bottle and place the bottle on the right
side of the extractor. Place the warning label along with the label identifying the bottle on
the Solvent Recovery Bottle. This bottle can also be placed on the floor below the
extractor.
Step 12)
Locate the clear Solvent Waste line attached to the Extractor from Step 8. If desired, cut
the line to the necessary length. Using one of the barb fittings located in the original
bag, firmly press the barb fitting into the end of the line. Once the barb fitting is firmly
secured, attach the barb fitting to one of the three lower elbow fittings on the Solvent
Recovery Vacuum Assembly (Figure 4-6). Counterrotate the tubing several times before making the
connection, such that, as the tubing returns to its
relaxed state, the tubing will rotate clockwise, assuring
a secure fit.
Step 13)
Locate the safety coated 5-gallon Water Waste Bottle
(P/N 180-0005-01) and place the bottle next to the
safety coated Solvent Recovery Waste Bottle. Locate
the Water Waste Recovery Assembly (50-0051-03) and
place on the opening of the 5-gallon bottle. Place the
warning label and the label identifying the bottle on the
Waste Recovery Bottle.
Step 14)
Figure 4-6: Solvent Waste
Recovery Assembly
Locate the blue Water Waste line attached to the Extractor from Step 8. If desired cut
the line to the necessary length. Using one of the barb fittings located in the original
bag, firmly press the barb fitting into the end of the line. Once the barb fitting is firmly
secured, attach the barb fitting to one of the three lower elbow fittings on the safety
coated Water Waste Recovery Assembly (Refer to Figure
4-7). As with the Solvent line, first counter-rotate the tubing
several times before making the connection. This will
assure the tubing is firmly attached to the elbow fitting.
Caution: A high vacuum is applied to the 5-gallon Water Waste
Bottle. Only the heavy walled, safety coated bottle provided with
the system should be used. The danger of implosions can occur
if other containers are used.
Step 15)
Based on the location of the vacuum pump/source, position
both the safety coated Solvent and Water Waste Recovery
Bottles between the vacuum pump/source and the Extractor
unit.
Figure 4-7: Water Waste
Recovery Assembly
Rev. B
Pg. 16
Step16)
Locate the package labeled P/N 50-0211-02. This package contains a short piece of
smaller O.D. tubing with fittings attached. Gently connect one end of the tubing to the
very top elbow fitting on the Solvent Recovery Assembly mounted on the Solvent
Recovery Bottle (Figure 4-6). Using a t-fitting, connect the other end of the tubing to the
very top elbow fitting on the Water Waste Recovery Assembly. Refer to Figure 4-7.
Step 17)
From the same bag as Step 16 (P/N 50-0211-02), locate the larger O.D. tubing. Gently
connect the end with the fitting to the end of the t-fitting on the top of the Water Waste
Recovery Assembly. The other end has no fitting and needs to be connected to the
vacuum pump / source. Refer to Figure 4-7.
Step 18)
It is highly recommended that a Dry Trap (P/N 50-0572) be installed to protect the
vacuum pump/source from solvent vapors and moisture (Refer to Section 7.11 for
instructions on installing a Dry Trap). With the Dry Trap bowl facing down; note the
arrow with the letter ‘N’ on the top. Insert the two blue tubings provided into the orange
quick disconnects on the brass fittings of the Dry Trap. Verify that they are securely in
place and will not easily slip out. Align the arrow with the letter ‘N’ so that it points
toward the vacuum pump/source in the direction of the flow. Install the Dry Trap
between the vacuum source and Water Waste Recovery Bottle. Cut the BEV-A-LINE
tubing that goes from the vacuum pump to the Water Waste Recovery Bottle. Insert the
ends of the cut line into the blue tubing on the Dry Trap. Use a tie wrap on both ends to
hold the tubing securely in place. Attach the plug cap provided to the bottom of the Dry
Trap bowl (black end). If liquid accumulates in the bowl, drain by removing the plug cap.
Note: Due to the many different types of fittings found on vacuum pumps the user must provide the
necessary fittings to complete this connection.
Step 19)
At the regulated main gas supply, turn on the gas source, and slowly increase the gas
pressure to 5-psi. Verify all solvent lines to ensure that there are no leaks. If no leaks
are found, slowly increase the gas pressure to 60-psi minimum (80-psi maximum).
Step 20)
Connect the power cord to the 12V AC Power Adapter. Attach the 12V cable to the
backside of the Controller. The connector is notched and must be keyed into position.
Next, attach the power cord to the 120V outlet.
Step 21)
Connect the Extractor cable from the Controller to the top connector on the back of the
Extractor unit. The cable connector is keyed, so carefully rotate the collar, while gently
pushing the cable into the socket. Once the key is mated, secure the cable by screwing
on the outside collar ring.
Step 22)
Turn the Controller power switch on. The switch is located on the back of the Controller.
The unit will perform an internal diagnostic test, will give a series of beeps, and display
the main screen. The Extractor fan will start working once the controller is switched on.
Step 23)
Turn the vacuum pump on and verify that the Water Waste Recovery Assembly is
securely in place. If the vacuum pump has an air bleed control regulator, set the
vacuum level to the maximum level. A vacuum level of between -24 to -26” Hg is
recommended to achieve the best flow rates.
Rev. B
Pg. 17
Note: It is strongly recommended to have a vacuum gauge on the main vacuum in order to monitor
the vacuum level and ensure that the proper vacuum is being maintained.
This completes the installation of the SPE-DEX® Oil & Grease Machine. The vacuum
pump/source, power, and pressurized gas source should be turned off when the Extractor is not in
use.
Rev. B
Pg. 18
5.0 Operation
5.1 Solid Phase Extraction and the Oil & Grease Machines
Theory of Operation
®
The SPE-DEX 1000XL and 3000XL Series Extractor Systems automate the extraction of Oil &
Grease from aqueous samples by using Solid Phase Extraction (SPE) disks. Pressurized gas is
used to deliver the solvents to the Extractors and to actuate the Water Sample Inlet Valves.
Vacuum is used to remove all liquids, solvents, and the water sample from the Extractors. When a
method calls for a specific solvent, the appropriate solenoid valve opens, allowing the pressurized
solvent to be dispensed as a Prewet or a Rinse Solvent. The Prewet solvents are dispensed
directly into the Disk Holder via the Prewet Arm, where the Liquid Sensor is located, while the Rinse
solvents are sprayed directly into the sample bottle and allowed to drip into the Disk Holder via the
Down Tube.
The Prewet steps prepare the SPE disk to receive the water sample. The first Prewet solvent (nhexane) cleans the disk. The second Prewet solvent (methanol) conditions the disk material to
receive sample. The disk is not allowed to go dry prior to receiving the water sample, as this will
adversely affect recoveries. Vacuum is used to pull all waste solvents from the Disk Holder
Assembly into the safety coated Waste Solvent Recovery Bottle. This occurs automatically after
the programmed disk soak times have elapsed. This automated feature minimizes operator
handling of solvents and/or exposure to solvent vapors. The collected solvent waste can then be
disposed of properly.
Once the disk has been conditioned, the Extractor will automatically actuate the Water Sample Inlet
Valve and deliver the water sample to the disk. The Liquid Level Sensor will then detect the
presence of the water, and after a short sensor equilibration period (20 seconds), the water waste
vacuum valve will open and filter the water through the disk and out to water waste. It is during this
filtration process that the Oil & Grease in the sample gets retained onto the SPE disk. All of the
water waste is collected in a separate safety coated 5-gallon Water Waste Bottle. When the water
sample has been completely filtered, the sensor will be exposed to air and undergo a change in
temperature (warms up). The extractor station will then advance into the Air Dry step for the
programmed duration. Consistent vacuum times are critically important to achieve high recoveries.
This is due to the partial volatility of some of the lighter molecular weight hydrocarbons. At the
completion of the Air Dry time, the vacuum will automatically shut off.
®
Once the Oil & Grease has been retained on the SPE disk, the SPE-DEX Oil & Grease Machine
will automatically spray solvent into the bottle, washing off any residual sample left on the bottle
walls. The solvent is allowed to drip into the Disk Holder and onto the SPE disk. In order to ensure
high and consistent recoveries, the first solvent used to rinse the bottle and the disk is Methanol.
Since Methanol is a water-soluble solvent, it removes residual water trapped within the pore spaces
of the disk (and prefilter). The Methanol rinse is then pulled into the collection vessel. The next
series of rinses are with n-Hexane, which is used to extract the Oil & Grease from the disk. These
multiple rinses of n-Hexane enhance recoveries by thoroughly extracting the Oil & Grease from the
SPE disk.
Rev. B
Pg. 19
SPE disks offer significant benefits over other forms of extraction techniques, such as Liquid/Liquid
Extractions. Several of the benefits include, reduced solvent usage, no emulsions are formed,
faster extractions times are possible, solvent exposure to workers is reduced, and the analysis is
operator independent. Automation achieves higher and more consistent recoveries by controlling all
critical extraction times and vacuum parameters.
5.2 The Extraction Cycle
To successfully extract Oil & Grease from samples, the SPE-DEX® automated Oil & Grease
Machines perform four major steps:
Step 1:
Step 2:
Step 3:
Step 4:
Prewet of the SPE disk with solvents
Introduction of the water sample to the SPE disk
Solvent rinses of the sample bottle
Extract of the Oil & Grease from the SPE disk
Step 1: Prewet of the SPE Disk with Solvents
Prewet / Conditioning Solvent: The extractor performs two prewet steps using n-Hexane as the
first prewet solvent and Methanol as the second prewet solvent. The n-Hexane prewet solvent
removes manufacturing and handling impurities from the SPE disk. Removing any impurities
ensures that the SPE disk will not contribute any background contamination. The Methanol prewet
is the conditioning solvent that activates the sorbent packing within the SPE disk. Once the packing
is activated, the SPE disk must not go dry until the completion of the water sample filtration cycle.
The Liquid Sensor / Prewet Arm is used to deliver Prewet solvents into the Disk Holder Assembly.
Using timed sequences; the desired volume of solvent is delivered into the Disk Holder. Based on
the size of the SPE disk used and the use of prefilters, solvent dispense, solvent soak and air dry
times for each prewet solvent can be optimized.
Prewet Solvent Dispense Time: The prewet solvent is dispensed for the duration of time
specified in the method program. Solvent dispense times depend on the type of disk, disk size, and
prefilter used. The volume of solvent dispensed is dependent on the solvent bottle pressure and
solvent dispense time.
Prewet Solvent Saturate Time: During the saturate time, vacuum pulls the solvent into the disk
packing to thoroughly permeate the disk before the soak time.
Prewet Solvent Soak Time: The solvent remains on the disk and soaks the disk for the time
specified in the method to allow for the solvent to thoroughly clean the disk from impurities or to
activate the sorbent packing.
Prewet Solvent Air Dry Time: An Air Dry time can be specified after each prewet soak time. The
Air Dry time completely drains the solvent from the disk. Different solvents permeate the disks at
different rates and disks also vary in permeability. The second prewet solvent (Methanol), which
activates the disk sorbent packing, has an Air Dry time of 0 sec so that the disk is left wet and ready
to receive the water sample.
Rev. B
Pg. 20
For proper chemistry to be obtained it is essential that during the activation (conditioning) of the
SPE sorbent material (Prewet # 2, Methanol), the Prewet Air Dry step does not allow the SPE disk
to go dry.
Step 2: Introduction of the Sample to the SPE disk
Process Sample Step: After the conditioning of the SPE disk by the last prewet step (Methanol),
the Water Sample Inlet Valve opens automatically, introducing the sample onto the SPE disk.
During the process sample step, the analytes of interest (Oil & Grease) are trapped onto the
sorbent material of the SPE disk. The “cleanliness” (amount of suspended solids and viscosity) of
the sample, and the amount of surface area of the SPE disk used, control the rate of filtration.
“Clean” samples will flow faster than “dirty” samples, and 90 mm disks, having a greater surface
area, will typically have greater flow rates than 47 mm disks. Sample introduction rate is dependent
upon the filtration rate. As more water is drained to waste using vacuum, additional sample flows
into the Disk Holder Assembly.
The Liquid Sensor on the prewet arm detects the presence or absence of the water sample. At the
start of the sample-processing step, the Sample Inlet Valve opens to deliver the sample into the
Disk Holder Assembly. There is a 20 seconds delay to equilibrate the sensor before the water to
waste valve opens to drain the sample to the waste. When there is sample in the Disk Holder
Assembly, the sensor remains submerged (cool) and the vacuum continues pulling the sample
through the SPE disk and out to the Waste Water Bottle. When the water sample is completed, the
sensor is no longer submerged and the sensor begins to heat up. If the liquid sensor is not cooled
by additional sample, the run will advance to the air-dry step.
Air Dry Step: This step removes water from the SPE disk. The disk is "Air Dried" for the number
of minutes specified in the method. In this process, the vacuum physically draws air from the
laboratory through the disk. The actual duration of this process depends on a number of factors
e.g. the disk being used, if a prefilter is used, and how “clean” or “dirty” the sample is.
Step 3: Solvent Rinse of the Sample Bottle
This step uses two solvents to rinse the sample bottle, and wash the Extractor's water sample path.
Multiple rinses are used to ensure thorough washing of all surfaces. The rinse solvents drain onto
the SPE disk where the extraction occurs and then are eluted into the collection vessel. The
Extractors automatically performs the rinsing without operator intervention.
Water Soluble Rinse Solvent: The water-soluble solvent (Methanol) is used as the first rinse for
each method. This solvent removes the residual water from the sample bottle and the SPE disk.
The water-soluble solvent is left to soak on the disk for a period of time before being pulled (or
eluted) by vacuum into the sample collection vessel. The actual duration of the elution process
depends on a number of factors e.g. the disk being used, if a prefilter is used, how clean or dirty the
sample is, etc. Removing residual water from the sample bottle walls and disk, allows the
subsequent n-Hexane solvent rinses to properly extract the Oil & Grease off the disk.
Extracting Rinse Solvent: The extracting rinse solvent (n-Hexane) extracts the Oil & Grease from
the sample bottle walls, all surfaces of the water sample path, and the disk. The extraction solvent
is left to soak on the disk for a period of time before being pulled (or eluted) by vacuum into the
sample collection vessel.
Rev. B
Pg. 21
Step 4: Extraction of the SPE Disk
The n-hexane rinses release the analytes from the SPE disk, allowing them to pass into the
collection vessel. A series of rinse steps are applied to the SPE disk to achieve high and consistent
Oil & Grease recoveries.
Rinse Solvent Dispense Time: The rinse solvent is dispensed for the duration of time specified in
the method program. Solvent dispense times depend on the type of disk, prefilter, and disk size
used. The volume of rinse solvent dispensed is dependent on the solvent bottle pressure and
solvent dispense time.
Rinse Solvent Soak Time: After the sample bottle has been rinsed, the solvents are introduced to
the SPE disk and allowed to soak. The program allows for a variable soaking time for each rinse
solvent introduced to the SPE disk. The solvent soak time can be adjusted to maximize the
extraction efficiency and optimize recoveries.
Rinse Solvent Air Dry Time: During the Air Dry of the Rinse Steps, the extraction solvent is pulled
into the collection vessel along with the Oil & Grease.
Additional Features:
The SPE-DEX® 3000 Controller has additional features that allow for flexibility and increased ease
of use.
Purge Key:
The Purge Cycle is used predominantly for three reasons:
1) To remove any air in the solvent lines during the initial system installation.
2) To confirm that during the initial system installation, that all of the solvent solenoid
valves are functioning properly.
3) Verify system operation on a regular basis.
There is a distinct and important difference between a “Purge Cycle” and a “normal” method run.
When the PURGE key is pressed, all Soak times will be automatically set to 0 seconds, and the
Sample Processing and Air Dry time will be skipped. Therefore, as only the Prewet and Rinse
solvents will be dispensed, it is very important to remember that no water sample is to be used
when the PURGE key is pressed – only an empty sample bottle to contain the Rinse solvents
and a collection vessel to collect the rinses.
Drain Keys:
The Controller drain keys allow the user to drain liquids from the Disk Holder Assembly,
independent from running a method, with the press of a key. There are three drain functions:
Sample, Solvent, and Elute. Selecting the Drain key followed by the Sample key will drain any
liquid in the Disk Holder Assembly to the safety coated Water Waste Bottle. Selecting the Drain
key followed by the Solvent key will drain any liquid in the Disk Holder Assembly to the safety
coated Solvent Waste Bottle. And, selecting the Drain key followed by the Elute key will elute any
liquid in the Disk Holder Assembly into the collection vessel.
Rev. B
Pg. 22
Pause and Resume Key:
The Pause key allows the user to interrupt the method on any one station without interrupting the
method on the other two stations. The Resume key starts the method from where it was interrupted.
Counter:
The Controller has the capability of counting the total number of samples processed on each station
and the total number of hours that the liquid sensors are heated. Pressing the Auxilliary 1 key on
the Controller can access this information.
5.3 Verify System Installations and Operation
Step 1)
Turn the vacuum pump on and adjust the main vacuum between -24 to -26" Hg.
Step 2)
Turn on the pressurized gas source and slowly increase the pressure to 60 - 80 psi.
Verify that they are no liquid or gas leaks.
Step 3)
Remove the back panel of the Extractor by removing the screws along the outer edges.
Locate the two pressure regulators at the base of the system. The first regulator on the
left, when facing the back of the system, is the extractor pressure. Verify that the
pressure is set at 50 psi. Adjust the pressure, if necessary, by pulling back on the
regulator knob to unlock it and then set the pressure. Make sure to lock the regulator
setting by pushing down on the knob. The second pressure regulator, located on the
right when facing the back of the unit, is the solvent bottles pressure for delivering both
the Prewet and Rinse solvents to the Extractor. Verify that this regulator is set at 15 psi.
Adjust the pressure if necessary and lock the knob.
Step 4)
Turn the Controller on.
Step 5)
The SPE-DEX® Oil & Grease Machines use a single HPLC grade Check Valve
Assembly. This assembly is used to prevent solvents and water sample from dripping
into the collection vessel during the Soak Steps and Process Sample Step, or while the
system is paused. While this Check Valve prevents leaks, the highly polished surfaces
can cause the internal components to stick, if not used routinely.
To confirm that the Check Valve is free, securely attach a sample collection vessel onto
the tapered adapter on the bottom side of the Extractor platform (see Figures 3-4 and 35). Attach the collection vessel by giving a lifting and twisting motion to secure the
vessel and ensure a vacuum tight seal. Use the blue clip to hold the collection vessel in
place. Using the Controller keypad, go to the Status screen and select STA #1 (key A for
Station #1). Note: Facing the front of the extractor, Station #1 is on the left, Station
#2 is in the middle, and Station #3 is on the right. Now, select Drain (key E) and then
Elute (key C). This key sequence will activate the Sample Collect vacuum valve for 30
seconds. The vacuum pull can be felt by placing a finger over the Check Valve Opening
(Figure 5-1) or by pouring water into the platform opening; the water will be pulled
(eluted) into the collection vessel. Press STOP (key E) to end this test. Remove the
collection vessel from the Extractor. Verify the check valve on every station.
Rev. B
Pg. 23
If the vacuum is not pulling, then the Check Valve Assembly needs to be freed. Follow
the instructions in Steps 5.1 to 5.3 below for the
procedure on how to free the check valve.
Step 5.1) In the center of the platform, below the drain hole,
is the Sample Collect Check Valve (Figure 5-1).
Step 5.2) Using the Check Valve Release Tool (Figure 5-2)
provided with the System, (P/N 02-0725) gently
insert the needle end straight down into the
opening. Gently tap the head several times to free
the Check Valve Ball. This will move the Check Figure 5-1: Check Valve
Opening
Valve Ball off of the seat assembly. An internal
spring will gently push the ball back into the sealing
position.
Step 5.3) Repeat Step 5) to confirm a vacuum pull through the
Check Valve Assembly.
Note: Do not use a metal or hard material to push on the ball, as this
could permanently damage the check valve ball surface.
Figure 5-2: Check Valve
Release Tool
Step 6)
The Disk Holder Assembly is made up of three parts,
the Base or Cup, the Collar, and the Aluminum Locking
Cup
Ring (see Figure 5-3). Load an empty 47 mm Disk
Holder Cup (no SPE disk, or Collar, no Aluminum ring)
into each Extractor station. Firmly press the Disk
Holder Cup down to the lowest position into the center
Collar Locking
hole on the Extractor’s Disk Holder Platform. Verify that
Ring
this is a snug fit. A loose fitting Disk Holder Cup will
result in poor vacuum, which will affect the performance of
Figure 5-3: Disk Holder
the system. Place the screen in the cup.
Assembly
Step 7)
Lift the Liquid Sensor / Prewet Arm up and lower it into the
Disk Holder Cup. Move the Sensor Arm to the backside of the
Cup. See Figure 5-4.
Step 8)
Attach a collection vessel onto the bottom taper of each station,
giving a lifting and twisting motion to secure the vessel and
ensure a vacuum tight seal. If using a VOA vial and adapter,
make sure that they are screwed together firmly. Do this by
holding the cap, not the glass piece, when attaching the adapter
to the vial. If the glass adapter is allowed to rotate within the cap,
this could lead to the Teflon seal in the adapter to be cored,
which would cause the integrity of the vacuum seal to be lost.
Use the blue retaining clip to secure the collection vessel.
Figure 5-4: Disk Holder
Cup & Prewet Arm
Rev. B
Pg. 24
Preparing and loading the sample bottle properly is critical to the
successful operation of the SPE-DEX® Oil & Grease Machines. Cap
adapters of various sizes are available for different bottle sizes. Contact
Horizon Technology if custom cap adapters are needed. The Following will
explain the proper procedure for loading the sample bottle. Use an empty
bottle.
Step 9)
Lower the Water Sample Holder Arm.
Step 10)
The Water Sample Inlet Valve Assembly will fit a 33 x 400 mm
Boston Round Bottle. For larger sized bottles, use the Figure 5-5: Sample
appropriate Cap Adapter. If the bottle to be used requires an Bottle and Inlet Valve
adapter, attach the larger cap adapter to the bottle, and then
attach the Water Sample Inlet Valve to the adapter.
Step 11)
Orient the aluminum shaft of the Water Sample Inlet Valve such
that it points toward the system.
Step 12)
Invert the bottle and load the Water Sample Inlet Valve
Assembly and bottle onto the Sample Holder Arm. Help guide
the Water Sample Inlet Valve shaft onto the actuator key.
Firmly press the valve in place. Refer to Figures 5-5 and 5-6.
5.4 Running a Purge Method
Figure 5-6: Loaded
Sample Bottle and Inlet
Valve
Purging the Extractor Stations is necessary to remove any air from both the Prewet and Rinse lines
and completely fill the lines with solvent. Purging also flushes the water sample pathway for the
Extractor Stations. In addition, this sequence is useful for verifying that the system is installed and
operating properly. The Purge cycle performs much like an actual extraction method by introducing
the selected Prewet and Rinse solvents. The shortened times of a Purge cycle however, are not
adequate to process a sample. All soak times are automatically set to zero and the Process
Sample and Air-Dry steps are skipped
The Controller is pre-programmed with Method 30 for purging the extractor stations. Alternatively,
the DRAIN and PURGE functions can be used. These functions skip the Sample-Processing step,
thereby decreasing the time required to purge the system. Method 30 is factory preset and cannot
be modified. As more experience is gained with the system, Methods 1 – 20 can be created and
modified by the operator. If desired, any of these methods (1 – 20) can be created and used as a
Purge Method. See Appendix A for a complete listing of Method 30 parameters.
Once the Purge Method is started, the following sequence of events will occur. These steps will be
displayed on the LCD.
1)
Prewet #1 (n-Hexane) will be dispensed into the Disk Holder Cup for One (1) second.
2) The Solvent to Waste vacuum valve will open for five (5) seconds and pull the n-Hexane into the
safety coated Solvent Recovery Waste Bottle.
3)
Prewet #2 (Methanol) will be dispensed into the Disk Holder Cup for one (1) second.
4)
The Solvent to Waste vacuum valve will open for five (5) seconds and pull the Methanol into
the safety coated Solvent Recovery Waste Bottle.
5)
The Water Inlet Valve will open even though no water sample is present.
Rev. B
Pg. 25
Note: When using Controller Programmed Method 30, before each extractor station will advance
into the Rinse Step, the liquid sensors will confirm that no water sample is present. A fixed timer of
45 seconds is used to confirm the presence, or absence of a water sample. Once the sensor
performs this test and confirms no water is present, the station will advance to the Rinse Step. This
Water Processing Step is skipped if using the Purge Function (D key).
6)
Rinse #1 (n-Hexane) is sprayed into the sample bottle for three (3) seconds.
7)
The Sample Collect vacuum valve will open for five (5) seconds and pull the solvent into the
collection vessel.
8)
Rinse #2 (Methanol) will be sprayed into the sample
bottle three (3) seconds.
9)
The Sample Collect vacuum valve will open for 15
seconds and pull the solvent into the collection vessel.
Follow the instructions below for running a Purge method:
Step 1)
Press the STATUS key until the status of all three
stations is displayed. Refer to Figure 5-7.
Step 2)
Press the A (STA #1) key to select Station #1.
Step 3)
Press the E (DRAIN) key. Refer to Figure 5-8 for the
Drain Function Screen.
Step 4)
Press the D (PURGE) key.
Step 5)
The LCD will display “Warning: Process Starting.
Ready to start?” If Station #1 is ready to start,
press A (YES). The purge method will begin on
Station #1.
Figure 5-7: Status Screen
Repeat Steps 1-5 for all stations. Purge each station a
minimum of 3 times to ensure that all air has been removed
from the lines and that the system has been properly Figure 5-8: Drain Function Screen
installed.
Until experience is gained with the system, it is suggested to purge one station at a time to
understand and confirm proper operation. As more experience and confidence is gained, all three
stations can be purged simultaneously.
While the purge method is running, verify that both prewet solvents (Hexane and Methanol) are
delivered into the Disk Holder Cup. Hexane will dispense from the first (or upper) tubing on the
Liquid Sensor/Prewet Arm and Methanol will dispense from the second (or lower) tubing. The rinses
(both Hexane and Methanol) will spray into the empty bottle. Carefully observe the solvent rinse
spray. The spray should hit the center of the base of the bottle, and uniformly wash down the inside
walls. If the spray is not uniform, contact Horizon Technology, Inc.
Step 6)
Once the Purge is complete, remove the collection vessel, the Water Sample Inlet Valve
and sample bottle, and the Disk Holder Cup.
Note: It is recommended to run one Purge Method everyday before running actual samples to
verify system operation.
Rev. B
Pg. 26
Note: Until all of the air has been removed from the rinse solvent lines, minimal and inconsistent
volumes of solvent will be collected.
5.5 Loading the SPE Disk
Step 1)
Place the metal SPE disk support screen (1.450”) into the center of the 47 mm Disk
Holder Cup. If using the 90 mm Disk Holder Cup, use the larger (3.150”) diameter
support screen.
Step 2)
Place the SPE disk on the support screen.
Step 3)
Place the Disk Collar with the groove side facing up into the Disk Holder Cup. Firmly
screw the Aluminum Locking Ring onto the Disk Holder Cup. Check to ensure the Collar
tightly holds the disk in place.
3M disks. Due to the highly porous nature of the 3M Empore ™ Oil and Grease disk, a
red gasket is required for an airtight seal. Failure to use the gasket may dramatically
increase sample-processing time and compromise recoveries. Follow the assembly
instructions below when using 3M Empore ™ Oil and Grease disk.
Step 4)
Load the Disk Holder Assembly onto the first station on the Disk Holder Platform and
press down firmly to ensure a tight seal.
Step 5)
Lift the Liquid Sensor / Prewet Arm up and lower it into the Disk Holder Assembly. Note
the position of the sensor tip. It should be a few mm off the surface of the disk. If the tip
is touching the disk, use one of the Sensor Arm clips to raise the height of the sensor. If
using a 47-mm disk, move the Arm to the backside of the Cup.
Using the Disk Holder Assemblies with 3M Empore™ Disks:
The red gaskets are only used with the 3M Empore™ Oil & Grease disks to provide a good tight
seal and optimize sample flow rates.
Step 1) Place the support screen in the center of the Disk Holder Cup.
Figure 5-9: 90 mm Disk Holder Cup
Figure 5-10: 47 mm Disk Holder Cup
Step 2) Place the red gasket over the screen as shown in Figure 5-11 below. The flat side of the
gasket is face down on the screen and the side with the recessed center is face up to
accommodate the disk.
Rev. B
Pg. 27
Figure 5-11: Disk Holder Cup with gasket
Step 3) Insert the 3M Empore™ Oil & Grease disk in the recessed center of the gasket. Adjust the
disk around its circumference so that it sits properly in the center of the gasket.
Figure 5-12: Disk Holder Cup with 3M Empore™ O&G disk.
Step 4) If using a 90 mm disk, place the grooved side of the Collar (see Figure 5-13) face down in
the Cup, such that the grooved side sits on the gasket. The side with the lip is face up in the Disk
Holder Cup.
Grooved side
faces down on
disk
Side with lip
Figure 5-13: The 90 mm Disk Holder Collar
Step 5) If using a 47 mm disk, place the thin edge or lip side of the Collar (see Figure 5-14) face
down in the Cup, such that it sits on the gasket. The side with the flat edge is face up in the Disk
Holder Cup.
Thin edged side
faces down on
the disk
Flat edged side
faces up in the
Cup
Figure 5-14: 47 mm Disk Holder Collar
Rev. B
Pg. 28
Step 6) Once the screen, gasket, disk, and Collar are in place, the Aluminum Locking Ring is
tightly screwed onto the assembly (see Figures 5-15 and 5-16).
Figure 5-15: Disk Holder Assembly with
Riser in Place
Figure 5-16: Disk Holder Assembly
ready for use
The red gasket is only used with the 3M Empore™ Oil & Grease disks to provide a good tight seal
and optimize sample flow rate. If using other disks, the red gasket is not used. The support screen
is placed in the center recess of the Disk Holder Cup, and the disk is then placed over the support
screen. The Collar would now be flipped over and inserted with the opposite side (of that shown
above in Steps 4 and 5) face down on the disk. That is, the grooved side of the 90 mm Collar would
be face up and the side with the lip would face down, holding the disk in place. For the 47 mm
Collar, the flat side would now be placed face down on the disk.
Instructions if using the JT Baker Speedisk ®:
Step 1)
Use the white circular adapter for the JT Baker disk. Press
the narrow end with the black o-ring down firmly into the
Disk Holder Platform opening (Refer to Figures 5-17 & 518).
Step 2)
Firmly press the Speedisk® into the center hole of the
adapter.
Step 3)
Use the Liquid Sensor Arm Clip to properly position the tip of Adapter Kit
the sensor so that it does not touch the surface of the disk.
Simply lift the Liquid Sensor Arm and snap the clip onto the stainless steel stem. Lift and
move the Sensor Arm into the Speedisk®. Visually confirm that the sensor tip does not
touch the surface of the disk (Refer to Figure 5-18).
Step 4)
Remove the Sample Inlet Tube from the Water Sample
Inlet Valve. The Inlet Tube is pressed into the bottom of
the Valve. Grab with a twisting motion to pull the Inlet
Tube out. Locate the shorter Inlet Tube, and install this
on the Valve. Remember to reinstall the longer Inlet
Tube if the 47 or 90 mm Disk Holder Assemblies are to
be used.
Figure 5-17: JT Baker
Sensor clip
Speedisk
adapter
Note: Only the manual Speedisk® can be used with the Oil &
Grease Machines.
Figure 5-18: Using the Baker
Speedisk®
Rev. B
Pg. 29
5.6 Procedure for Preparing the Extractor to Run a Practice
Water Sample
®
In order to gain familiarity with running the SPE-DEX Oil & Grease Machines with a water
sample, it is recommended to begin by using practice Method 1. This practice method will allow
you to observe and understand the operation of the Extractor System. It is recommended to use a
47 mm Disk Holder Assembly for the practice method.
If not already programmed, program Method 1 with the parameters given below. Refer to Chapter
6.0 for programming the controller.
Method 1: PW – Methanol
dispense
saturate
soak
drain
Air Dry
5 sec
1 sec
10 sec
0 sec
10 sec
Rin #1 - Methanol
rinse
soak
elute
3 sec
1 sec
5 sec
Rin #2 - Methanol
rinse
soak
elute
3 sec
1 sec
10 sec
Loading a method to the extractor stations
Power up the controller using the switch located at the back. The Controller will go through a
system initialization. This takes a few seconds. When complete, the Horizon Technology logo will
appear on screen along with the software version.
Step 1)
Press the STATUS key to display the status of all three stations. See Figure 5-7.
Step 2)
Press one of the following keys to select the desired station to be run: A (STA #1) key to
select Station #1, B (STA #2) key to select Station #2, and C (STA #3) key to select
Station #3. If using the 1000XL Oil & Grease Machine, select A for Station # 1.
Step 3)
Press the B (METH +) key to increment the method #, or press the C (METH -) key to
decrease the method #. Holding the key down will allow you to rapidly scroll to the
desired method.
Step 4)
Load a 47 mm Disk Holder Cup, with the support screen, onto the extractor. A disk is not
necessary as this is only a practice method. Attach a collection vessel (40 ml VOA vial) to
the extractor and use the blue retaining clip to hold it in place.
When using a method designed for a 90 mm disk, a 125 ml collection vessel is used to collect
the extract. A 40 ml VOA will not be sufficient to hold the greater volume of rinse solvents used.
Rev. B
Pg. 30
Loading a Full Sample Bottle
®
The SPE-DEX Oil & Grease Machines are designed for use with a wide variety of 1L sample
bottles. Several sizes of cap adapters are available that allow the various sample bottles to fit the
Water Sample Inlet Valve. The standard Water Sample Inlet Valve is designed for bottles with a 33
x 400 mm thread. Refer to Appendix B for the sample bottle measuring scale, and Appendix C for
the parts list for the cap adapters available.
The following steps detail the method for loading a full sample bottle onto the Extractor.
Step 1)
Lower the Water Sample Holder Arm.
Step 2)
Fill a sample bottle with approximately 250 to 500 ml of water. A full liter can be used,
but it will take longer to process.
Step 3)
Take the Water Sample Inlet Valve and visually ensure the ball valve is closed and that
the bottle gasket is in place. Carefully thread the Water Sample Inlet Valve onto the
sample bottle. Tighten the valve only with moderate force. Over tightening could create
leaks if the valve body is distorted or the threads stripped. If using a larger bottle, firmly
attach the appropriate size cap adapter to the bottle, and then attach the Water Sample
Inlet Valve to the cap adapter.
Step 4)
Position the sample bottle/Inlet Valve so that the aluminum shaft
of the Inlet Valve points in the direction of the extractor. With the
left hand firmly grasping the bottle, place the right index finger
over the (left) opening of the Solvent Rod Rinse Port. Refer to
Figure 5-19.
Step 5)
Invert the sample bottle and load it onto the Sample Holder Arm.
Guide the Water Sample Inlet Valve stem onto the actuator key
and firmly press the valve in place. Refer to Figures 5-6.
Step 6)
Verify that the main vacuum pump is on and set between -24“Hg
and -26“Hg.
Step 7)
Verify that the main gas source is on and set between 60-80
psi.
Step 8)
Press the START key on the controller. The LCD will display
“Warning: Process starting, ready to start?” Press the YES key. The extraction
sequence programmed as Method 1 will begin.
Figure 5-19: Water
Sample Inlet Valve
Rinse Port
Observe the station for the following steps:
1)
Methanol Prewet solvent dispenses into the Disk Holder Assembly.
2)
After a 10 sec soak, the Water Sample Inlet Valve will open and deliver the water sample
into the Disk Holder Assembly.
3)
There will be a 20 sec delay for the sensor to equilibrate before the Water to Waste Valve
opens to drain the water sample to the safety coated Water Waste Recovery Bottle.
4)
Once the water from the bottle has been completely drained to the waste, the extractor will
proceed to the 10 sec Air Dry step.
5)
Two methanol rinse steps will follow the Air Dry step. During the rinse steps, observe that
the rinse spray hits the center of the base of the bottle. The pressure of the rinse spray
should be sufficient to wash the sides of the bottle.
Rev. B
Pg. 31
6)
The rinses will elute into the collection vessel.
7)
At the end of the last rinse, the Water Sample Inlet Valve will close and the station will return
to idle.
When the station has finished processing the sample, remove the Water Sample Inlet Valve
Assembly, the Disk Holder Assembly, and the collection vessel. The collection vessel contains
actual solvent; therefore take the appropriate measures for disposing solvents.
Rev. B
Pg. 32
6.0 Programming the Controller
®
The SPE-DEX 3000 Controller can store thirty (30) Oil & Grease extraction methods. Methods 1
through 20 can be created and modified by the user. Methods 21 through 30 are Factory Preset
Methods that cannot be modified. See the chart in Appendix A for a listing of the Factory Preset
Methods parameters.
The Factory Preset Methods serve three purposes:
1) To provide a series of proven methods designed to handle a full range of Oil & Grease samples
using a variety of disks.
2) To allow a faster System startup by using proven methods that can not be modified, vs. spending
time creating new methods that might not be optimal to recoveries, and
3) To provide common “benchmark” methods to allow the operator to troubleshoot the System and
ensure proper operation. Oil & Grease samples can range from very clean to very dirty; the
preset methods were programmed with this in mind. Method 30 is a Purge method.
New methods can be created to handle unique samples and/or optimize the extraction parameters.
6.1 Creating a Method Using the “LEARN” Mode
The easiest way to understand how to create new methods is to use the LEARN Mode. The
LEARN Mode is a simple and fast way to create an analytical extraction method by observing the
volume of solvent being delivered. The times calculated during the LEARN Mode are then
automatically entered and stored into that method number. This procedure allows optimal methods
to be created based on specific disks and/or unusual sample conditions that might be encountered.
The LEARN Mode must be used with an empty sample bottle. Follow the steps below to run the
LEARN Mode. If desired, the LEARN Mode can be canceled at any time during the LEARN
sequence.
Step 1)
Turn the controller on.
Step 2)
Load a Disk Holder Assembly with disk onto an extractor station. Follow the instructions
in Section 5.5 for loading an SPE disk.
Step 3)
Verify that the ball valve of the Water Sample Inlet Valve is closed. Carefully thread the
Inlet Valve onto an empty sample bottle and load onto the extractor Water Sample Holder
Arm.
Step 4)
Load a collection vessel onto the bottom taper of the extractor, giving a lifting and twisting
motion then secure the vessel with the blue clip.
Step 5)
Turn the vacuum pump on and adjust the main vacuum to -24" to -26” Hg.
Step 6)
Turn on the pressurized gas source and adjust to 60-80 psi.
Step 7)
On the Controller, press the LEARN key.
Rev. B
Pg. 33
Step 8)
The LCD will display the three stations, and the methods currently loaded into each
station. Select the station to be used by pressing the A (STA #1), B (STA #2), or C (STA
#3) keys. Refer to Figure 6-1.
NOTE: If a factory preset method is currently loaded into a
station that you wish to use, the Controller will beep,
indicating that the method can not be modified; only methods
1 – 20 can be modified, or learned. Press the STATUS key,
followed by key A, B, or C keys and select a method from 1 to
20. Press the LEARN key to return to the LEARN Mode.
Step 9)
Once the desired station has been selected, the
LCD will display the action that will be performed, Figure: 6-1: 3000 Controller in
i.e. Dispense Hexane, and will indicate that the LEARN mode
system is paused. The letter keys will change
function and indicate the available actions that can be performed.
Step 10) Press the A key to Resume the operation. N-Hexane will begin dispensing into the Disk
Holder Assembly. Carefully observe the n-Hexane, and press the A key again to Pause
the operation. As the n-Hexane is dispensing, the elapsed time is displayed. Once the
Pause key is pressed, the B and C keys can be pressed to increase or decrease the time
of solvent dispensing, which relates to the volume of n-Hexane dispensed. If necessary,
the operation can be resumed to continue this sequence. When satisfied with the amount
of solvent dispensed, press the E key to advance to the next step.
Step 11) The next step is to Saturate Hexane into the SPE disk. This action allows a small
amount of n-Hexane to be pulled into the pore spaces of the SPE disk. Typically only a
1-second saturation time is needed. Press the A key to Resume, followed by pressing
the A key to Pause the operation. As previously mentioned, pressing the B or C keys
allow you to increase or decrease the times. Press the E key to advance to the next step.
Step 12) The next step is to Soak Hexane into the disk. This step is to ensure the disk is cleaned
from any manufacturing impurities. Soak Hexane times are typically 1 min to 1:30 min. It
is possible to Pause the system, and press the B key to quickly advance the timer to the
desired time. Press the E key to advance to the next step.
Step 13) The next step is to Drain Hexane from the disk. This step will open the solvent waste
vacuum valve and pull the n-Hexane through the disk and out to the safety coated
Solvent Waste Recovery Bottle. Typical times for this operation are 1 min to 1:30 min.
Use the Pause key to pause the system, and use the B key to quickly advance the timer
to the desired time. Press the E key to advance to the next step.
Step 14) Repeat Steps 9 through 13 using Methanol. The times for Dispense Methanol, Saturate
Methanol, and Soak Methanol, must be entered. Refer to the Factory Preset Methods
chart on in Appendix A for an indication of the typical times used.
Rev. B
Pg. 34
NOTE: The final step, Drain Methanol, requires a time of 0 (zero) seconds. This is critical to
ensure the disk remains active for trapping the Oil & Grease from the sample during the filtration
process. If a time is entered and the disk is allowed to dry go before the introduction of the water
sample, recovery values may fall out of tolerance for EPA Method 1664 QC requirements.
Step 15) The next step is to Air Dry the disk. This is the amount of time desired for keeping the
vacuum on and pulling air through the disk to remove residual water from the disk. Refer
to the methods chart in Appendix A, and press the B key to quickly advance the timer.
Press the E key to advance to the next step.
NOTE: As excessive volumes of air passing through the disk can adversely affect final recoveries,
the total time for this operation should be limited to a maximum of 10 minutes. If longer times are
required, due to the dirty nature of the sample, recovery studies should be conducted to ensure
adequate recoveries.
Step 16) The next step is to Rinse the sample bottle with solvent. The letter keys will change
function to select n-Hexane (B key) or to select Methanol (C key) Press the desired key.
Step 17) The letter keys will again change function and appear as they did during the initial Prewet
learning sequence. Follow the instructions on the LCD using the Factory Preset Methods
chart in Appendix A as a guide. Enter values for Rinse, Soak, and Elute.
Step 18) When all the rinses and the final Elution steps are complete, press the E key (DONE) to
exit the LEARN Mode.
Step 19) Press the METHOD key, and use the A or B key to scroll to the method number that was
LEARNED. The time parameters were saved and are now displayed in the method. This
method can now be loaded to any of the extractor stations and used. It is also possible to
change any of the automatic times calculated during the Learn Mode.
6.2 Creating a New Method
The Controller allows the operator to create 20 new analytical methods. Once an understanding of
the requirements for optimal recoveries has been gained, it will no longer be necessary for a
learned method to be used. The operator will become familiar with amounts of solvents delivered,
and rinse times needed and it will only be necessary to use the Create Method option. When
creating a method no solvents are actually delivered or sprayed, only the times are entered. The
steps below detail how to create a new method.
To help create new methods, use the Methods Worksheet in Appendix A. Based on the SPE disk
and prefilters that will be used, we recommend using the Factory Preset Methods chart as a guide
to get an idea of the times required.
Step 1)
Press the METHOD key on the right hand side on the controller. Method 1 is always
displayed when the METHOD key is pressed.
Step 2)
The screen will display the first page of Method 1 (Prewet page). Use the A (NEXT)
and B (PREV) keys to scroll up or down through the method numbers.
Step 3)
Press the E key to edit the method.
Step 4)
The cursor will highlight the first line of the method, the Dispense Hexane time for the
first Prewet solvent. Use the C (ADJ +) and the D key (ADJ -) to increase or decrease
Rev. B
Pg. 35
the desired time for dispensing the n-Hexane. Holding the keys down will quickly
advance or decrease the times. Set the time so that sufficient n-Hexane solvent is
delivered to thoroughly cover the disk and prefilters, if used. The maximum time that
can be entered is 30 seconds.
Step 5)
Once a time has been entered, press the A (STEP +) key to advance to the next line.
Step 6)
The Saturate Hexane command allows a small amount of the n-Hexane to be pulled
into the pore spaces of the disk to optimize the soaking and washing of the disk.
Typical times for this step would be 1 to 2 seconds. Longer times could pull too much
n-Hexane through the disk, not leaving enough behind for proper soaking and cleaning.
The maximum time that can be entered is 10 seconds.
Step 7)
Press the A (STEP +) key to advance to the next line.
Step 8)
The Soak Hexane command allows the SPE disk to be cleaned from manufacturing
impurities by soaking. Typical soak times range from 1 minute to 1 minute and 30
seconds. The maximum time that can be entered is 5 minutes.
Step 9)
Press the A (STEP +) key to advance to the next line.
Step 10)
The Drain Hexane command pulls n-Hexane completely through the disk and into the
Waste Solvent Collection Bottle. Typical times are 1 minute to 1 minute and 30
seconds. The maximum time that can be entered is 5 minutes.
Press the A (STEP +) key to advance to the next line.
Step 11)
Step 12)
The Dispense Methanol command will cover the SPE disk with Methanol. Use the C
(ADJ +) and the D key (ADJ -) to increase or decrease the desired time for dispensing
the Methanol solvent. Holding the keys down will quickly advance or decrease the
times. Visually ensure a sufficient volume of Methanol is dispensed in order to cover
the disk and prefilters thoroughly.
Step 13)
Press the A (STEP +) key to advance to the next line.
Step 14)
The Saturate Methanol command allows a small amount of the Methanol to be pulled
into the pore spaces of the SPE disk to soak and activate the sorbent bed inside of the
SPE disk. Typical times are between 1 and 2 seconds. Pulling too much Methanol
through the SPE disk may allow the SPE disk to prematurely dry, reducing recoveries.
The maximum time that can be entered is 10 seconds.
Step 15)
Press the A (STEP +) key to advance to the next line.
Step 16)
The Soak Methanol command activates the sorbent material within the SPE disk
preparing it for the sample. Typical soak times range from 1 minute to 1 minute and 30
seconds. The maximum time that can be entered is 5 minutes.
Step 17)
Press the A (STEP +) key to advance to the next line.
Step 18)
The Drain Methanol step removes the solvent from the disk. Warning: It is critical that
the Methanol is not removed from the disk. Therefore, set a Drain time of 0 seconds.
Step 19)
Press the A (STEP +) key to advance to the next line.
Step 20)
The Air Dry step uses vacuum to dry the disk by removing excess water from within the
pore spaces of the SPE disk. This step follows the Sample Processing step. Air Dry
times longer than 10 minutes should not be used due to the volatile nature of some
Rev. B
Pg. 36
components of Oil and Grease. Set the Air Dry time so that residual water is sufficiently
removed from the disk allowing for the n-Hexane (extraction solvent) to effectively
extract the oil and grease from the disk. The maximum time that can be entered is 90
minutes.
Step 21)
Press the A (STEP +) key to advance to the next line.
Step 22)
The screen will advance to page 2 for the selection of the rinse solvents. Use the C
(ADJ +) key to select the desired option. The choices are as follows:
No Rinse
Manual
Hexane
Methanol
Selecting the No Rinse option will result in no rinse solvent delivery for that step.
Selecting the Manual option will cause the system to be interrupted at that rinse step.
The controller will display a message indicating that the station needs attention. This is
used if the operator wants to perform a manual rinse by adding the rinse solvent to the
bottle, manually rinsing the bottle by shaking, and then pouring the solvent into the Disk
Holder Assembly.
Step 23)
Select Methanol as the first rinse. Input a Rinse time. A rinse time of 2 seconds is
recommended if using a 47 or 50 mm SPE disk and 5 seconds if using a 90 mm SPE
disk. The maximum Rinse time that can be entered is 10 seconds.
Step 23)
Press the A (STEP +) key to advance to the next line.
Step 24)
The Soak time allows the disk to sit in the solvent for the specified time. A short soak
time of 5 seconds is recommended. The maximum soak time that can be entered is 10
minutes.
Step 25)
Press the A (STEP +) key to advance to the next line.
Step 26)
The Elute time allows the rinse solvent to elute into the collection vessel. Enter Zero
(0) seconds for the Elute Time of the first rinse.
Step 27)
Press the A (STEP +) key to advance to the next line.
Step 28)
Select Methanol as the second rinse. Input a Rinse time. A rinse time of 2 seconds is
recommended if using a 47 or 50 mm SPE disk and 5 seconds if using a 90 mm SPE
disk. The maximum Rinse time that can be entered is 10 seconds.
Step 29)
Press the A (STEP +) key to advance to the next line.
Step 30)
Enter a Soak time for the second Methanol rinse. A short soak time of 5 seconds is
recommended. The maximum soak time that can be entered is 10 minutes.
Step 31)
Press the A (STEP +) key to advance to the next line.
Step 32)
Enter the Elute time for the second rinse step. This time is based on the SPE disk
used and if a prefilter is used. This should be sufficient to pull all of the Methanol and
residual water off of the disk and into the collection vessel.
Step 33)
Select Hexane as the third rinse solvent. Input a Rinse time of 2 seconds for a 47 or
50 mm SPE disk or 5 seconds if using a 90 mm SPE disk. The maximum rinse time that
can be entered is 10 seconds.
Step 34)
Press the A (STEP +) key to advance to the next line.
Step 35)
A Soak time for the n-Hexane follows. Enter a soak time for the disk. The maximum
soak time that can be entered is 10 minutes.
Rev. B
Pg. 37
Step 36)
Press the A (STEP +) key to advance to the next line.
Step 37)
The Elute time is the next step. Enter a time based on the SPE disk used.
Step 38)
Continue this process of entering Rinse, Soak, and Elute times for all the rinses to be
programmed.
Note: The n-Hexane rinse steps will remove or extract the Oil and Grease from the disk and pull it
into the collection vessel. It is recommended to make the final Elute time the longest to ensure that
all of the solvent is pulled into the collection vessel.
Step 39)
Save the method created by selecting the E (Save) key. The method can now be
downloaded to the Station of choice and used for the extraction of Oil & Grease
samples.
6.3 Special Function Keys
AUXILIARY 1: This screen displays two functions: 1) the total number of hours that the liquid
sensors have been heated, and 2) the total number of samples that have been processed on
each station (see Figure 6-2). The Controller must be powered up for the hours counter to
operate. The total hours that each sensor
has been heated will help determine
longevity of the sensors and their useful
operating lifetimes.
The number of
samples processed is determined only
when the specific station is in the Process
Sample Step, and the liquid sensor has
been immersed within the water sample
for a minimum of two minutes. If these two
conditions are met, the sample counter will
increment by one.
Figure 6-2: Auxiliary 1 Screen – System
If a sensor needs to be replaced, the
Counters
counters can be reset to zero, or the current
values can be retained. Remember, if the counters are not reset, the operating hours for the
liquid sensor will not be accurate.
The values for both the hours and the samples processed can be reset or cleared by
switching the controller off; disconnecting the Controller connector plug from the Extractor,
and then selecting the A key to CLEAR the values. The microprocessor updates this screen
on a longer time window; therefore, it may be necessary to press the CLEAR key several
times. Alternatively, the sensor hours and number of samples processed can be reset by
disconnecting the sensor lead to the circuit board connector (inside extractor) and then using
the A key to CLEAR the memory.
AUXILIARY 2: The initial screen will verify the operating configuration of the Extractor i.e. a fully
automated extractor is connected to the Controller. The LCD will display:
Aux. Summary Screen
Rinse Type: Auto
Sample Type: Auto
Rev. B
Pg. 38
At the bottom of the screen, the letter function keys will display the testing functions that are
available. The information listed below provides a detailed explanation of each function.
WARNING: Read this section carefully before initiating any test, as several operations are
irreversible and can erase vital system information, making the Controller non-functional.
DIAG (A key)
Runs a complete diagnostics on the System.
DEFAULT (B key) Reloads the Factory Preset Methods.
UPLOAD (E key)
Uploads the System software into the Controller.
This function will allow the latest version of software code to be uploaded
into the Controller. A PC with a serial port and Null Modem cable are
required. If this function is to be performed, see Section 7.9, or contact
Horizon Technology, Inc.
Press the DIAG (A key) to access the Test Screen. The following function keys will be displayed:
EEPROM (A key)
This function will test the Controller EEPROM chip. This test will also
erase all information for Methods #1 - #20. Only the Factory Preset
Methods will remain. Press YES (A key) to begin the test, or press NO
(E key) to return to the main Diagnostic screen.
RELAY (B key)
This function will test the System Relay Drivers. At the completion of this
test, the LCD will turn off. Press the E key to turn the LCD back on.
CAUTION: This test will activate all of the solvent valves. Therefore, either turn off the
pressurized gas and vent the solvent bottles, or make sure all receptacles, i.e.
sample bottles, Disk Holder Assemblies, and Collection Vessels, are in place
before running this test.
A2D (C key)
This function will display all of the
A2D values for the sensors. The
A2D 0 line displays the output
signal from the sensor for Station
1. The A2D 1 line displays the
output signal from the sensor for
Station 2. And, the A2D 2 line
displays the output signal from the
sensor for Station 3. The remaining
lines are for future outputs. (Figure
6- 3).
Figure 6-3: A2D Screen
Rev. B
Pg. 39
KEYPAD (D key)
This function allows testing of the keypad. Once this test has been
initiated, the keys must be pressed in the order requested by the LCD
before being able to exit from this test. The keys pressed are displayed
and confirmed on the LCD.
FACTORY (A key)
This function provides a convenient way of clearing all Method times
and solvent parameters from Methods #1 - #20. All times and variables
will automatically be reset to zero. When future software revisions are
introduced, this function will allow new Factory settings to be
downloaded into the Controller. Press the A key for YES, press the E
key for NO.
Warning: Only perform this operation if new software is to be uploaded. In order to prepare the
Controller to receive new code, the code presently running the Controller is first erased, making the
Controller inoperable.
Rev. B
Pg. 40
7.0 Maintenance
The following information is designed to assist with the general maintenance and replacement of
standard components on the Oil & Grease Extractor Systems. If any questions arise, contact
Horizon Technology, Inc. for assistance.
7.1 Start-up and Shut-down Procedures
Start-up Procedure
Activate the Power Switch, which is located on the back of the SPE-DEX® 3000 Controller, and
allow the Liquid Sensor to stabilize for a period of between 3 to 5 minutes.
1) Verify that the safety coated Solvent Bottles are filled with clean contamination free
solvents and that their caps are securely fastened. Ensure the solvent lines are not kinked
or crimped.
2) Empty both safety coated waste bottles if necessary (Water and Solvent).
3) Turn on the pressure source (nitrogen gas) and slowly increase the pressure to 60-80 psi.
Inspect the solvent delivery lines for any liquid leaks.
4) Turn on the vacuum pump source. Hold the Waste Water Recovery Assembly onto the 5gallon safety coated bottle until sufficient vacuum is created to securely hold it in place.
5) Free the Elute Check Valves with the Check Valve Tool. Refer to Section 7.2.
6) Load an empty Disk Holder Cup, with the Support Screen in place, onto the platform, for
each station.
7) Lift and move the Liquid Sensor / Prewet Arm into the Disk Holder Cup.
8) Attach a collection vessel to each sample station.
9) Lower the Water Sample Holder Arm.
10) Rinse the Water Inlet Valve by actuating it under warm running water. Check for freedom of
rotation. If the valve is tight and does not freely rotate adjust the four hex head locking
screws by turning each one counterclockwise one-quarter turn at a time until the valve
moves freely.
11) Make sure that the Bottle Gasket in the Sample Inlet Valve is orientated such that the tan
side is facing down and the white side is visible. Replace if the gasket is worn or damaged.
Attach an empty sample bottle to the Water Inlet Valve. Make sure the valve is closed.
Load the sample bottle and Water Sample Inlet Valve assembly onto the Holder Arm.
12) Purge each station.
Gas Pressure: Adjust the gas source pressure in increments, checking for leaks as the pressure is
increased, to a minimum of 60 psi and a maximum of 80 psi.
Vacuum Level: The main vacuum source gauge should read at least -24"Hg. Check that there are
no kinks or crimps in the vacuum lines.
Run the purge Method twice: Purge all extractor stations to remove any air in the solvent lines
and to ensure all is working before beginning with the extraction of samples. Follow the instructions
in Section 5.4, of the manual for running a purge method.
The Extractor is now ready for the extraction of samples.
Rev. B
Pg. 41
Shutdown Procedure
Follow the instructions below for shutting down the system at the end of the extraction day.
Attach a collection vessel to each station.
Pour water into the platform cavity and then run the Solvent Drain function by selecting the following
keys: Status, STA#1 (key A), DRAIN (key E), SOLVENT (key B). This process will remove any
methanol left in the solvent waste lines. Repeat for the elute check valve by selecting the DRAIN
and then ELUTE keys. Repeat for the water waste valve by selecting DRAIN and SAMPLE.
1) Disconnect the vacuum pump line from the Water Waste Recovery Bottle. Let the Vacuum
Pump run for 2 to 3 minutes to allow it to vent. Switch off the vacuum pump and reconnect the
vacuum line to the Water Waste Bottle.
2) Turn off the gas supply.
3) Switch the Controller off.
4) Flush the Water Sample Inlet valve by actuating it under warm running water. Wash the valve
with a non-surfactant detergent if necessary; make sure to rinse it thoroughly. Do not use an
abrasive brush for scrubbing.
5) Leave the Water Sample Inlet Valve in the half open position to allow the water to drain.
7.2 Freeing the Elute Check Valve Assembly
The SPE-DEX® Oil & Grease Machines use a single HPLC grade Check Valve Assembly per
extractor station. This assembly is used to prevent solvent or the water sample from dripping into
the collection vessel during the Soak Steps, Process Sample Step or while the system is paused.
This assembly also drains the rinses into the collection vessel. While this Check Valve prevents
leaks, the highly polished surfaces can cause the internal components to stick, if not used routinely.
To free a sticky check valve, follow the directions below:
Step 1)
Step 2)
Step 3)
Remove the Disk Holder Assembly from the Disk Holder Platform.
Locate the center opening where the solvent extract is pulled into the collection
vessel. See Figure 7-1.
Insert the Check Valve Release Tool (Figure 7-2) provided with the System, (P/N 020725) straight down into the opening. Gently, push downward and release. This will
move the Check Valve Ball off of the seat assembly. An internal spring will gently
push the ball back into the sealing position. Repeat this procedure several times to
free up the Check Valve Ball.
Check Valve
Opening
Figure 7-1: Platform Check
Valve Opening
Figure 7-2: Check Valve
Tool
Rev. B
Pg. 42
Note: Do not use a metal or hard material to push on the ball, as this could permanently damage
the check valve ball surface. If using a tie wrap or thin piece of Teflon tubing, do not push further
than 1/16 to 1/8 of an inch as this could permanently damage the check valve spring.
7.3 Cleaning the Water Sample Inlet Valve
Assembly
The Water Sample Inlet Valve, P/N 50-0471 (Figure 7-3) is the delivery
mechanism by which the sample is dispensed onto the Solid Phase
Extraction (SPE) disk. An air actuator automatically controls the opening
and closing of the ball valve design.
The Water Sample Inlet Valve should be cleaned under warm tap water after
every sample. Occasionally, it may be necessary to clean the Water Figure 7-3: Water
Sample Inlet Valve more thoroughly, for example, after a sample with high Sample Inlet Valve
particulates or if leaks are observed through the Water Inlet Valve when in
its closed position.
Step 1)
Remove the four (4) screws from the bottom of the valve housing using a 9/64” Allen
wrench, (Figure 7-4).
Step 2)
Separate the two halves of the housings and
remove the Ball Valve Assembly.
Step 3)
Remove the two (2)-sealing gaskets (PN: 02-0680)
on the top and bottom of the Ball Valve core. The
entire assembly can now be cleaned using tap water
(Figure 7-5).
Warning: Do Not Use Acetone to clean these parts. The use of
Acetone will deteriorate these parts and void all warranties.
Step 4)
Reinstall the two gaskets making sure the notched
side of the gasket faces the ball valve. If the gaskets
look worn or if sample leaking is a problem, replace
with new gaskets.
Figure 7-4: Inside the Water
Inlet Valve
Gasket, PN: 02-0680
Step 5)
Place the ball valve assembly into the top portion of
the valve housing, and press into place. See Figure
7-4.
Step 6)
Position the bottom portion of the valve housing into
Ball Valve
position over the ball valve and squeeze the
Figure 7-5: Ball Valve and
housing together.
Step 7)
Secure the assembly with the four screws.
Step 8)
Rotate the valve with your hand, and if necessary, loosen the screws. The ball
should rotate freely, and not bind up when trying to open and close the valve. If not
tightened sufficiently leaks can occur resulting in sample overflows.
gasket sealing
Rev. B
Pg. 43
7.4 Replacement of Solvent Rod Shaft(s) and O-rings
The Water Inlet Valve has two Solvent Rod Shafts, one located on each side at the bottom of the
Inlet Valve. The Solvent Rod Shaft on the right side of the Inlet Valve
Actuator Shaft
(see Figure 7-6) is used as the solvent port to deliver rinse solvents to
the sample bottle, and sits in the Rinse Port opening on the Sample
Bottle Holder Arm. The Solvent Rod Shaft on the left side of the Inlet
Valve serves to balance and stabilize the valve on the Holder Arm.
The o-rings on the Solvent Rod Shafts will wear over time and with
exposure to solvents. When this happens the Solvent Rod Shaft will
not give a tight snug fit into the Rinse Port opening on the Sample
Holder Arm. During the rinse steps solvent will leak from the Holder
Arm opening below the Inlet Valve.
Solvent Rod
Shaft & O-ring
(Rinse Opening)
Confirm Proper O-Ring Sealing
Step 1)
Lower the Water Sample Holder Arm.
Step 2)
Hold the Water Sample Inlet Valve, such that the
aluminum Actuator Shaft points toward you. See Figure
7-7.
Step 3)
Slowly lower the Water Sample Inlet Valve, such that the
Solvent Rod Shaft can be inserted into the Solvent Rinse
Port.
Step 4)
The o-ring should have a snug fit once inside the Rinse
Port. If the fit is snug, the o-ring seal should be leak tight. If
the fit is loose, or the Water Sample Inlet Valve can be
removed without lifting the Holder Arm, then the o-ring
needs to be reversed or replaced. Proceed to Step 5).
Figure 7-6: Water Inlet
Valve
Reversing / Replacing the Solvent Rod Shaft
Step 5)
If there is not a snug fit when the Solvent Rod Shaft is in
the Rinse Port, then the first action is to reverse the
Solvent Rod Shaft.
Step 6)
Firmly grab the bottom of the Solvent Rod Shaft and pull it straight out of the Water
Sample Inlet Valve body. There is an upper o-ring
on the Shaft, so sufficient force will be needed to
pull this o-ring out of the Water Sample Inlet Valve
body.
Step 7)
Reverse the Solvent Rod Shaft, and press the end
that formerly sealed into the Holder Arm, into the
Water Sample Inlet Valve body. Press the Shaft
Figure 7-7: Positioning
the Water Inlet Valve
Figure 7-8: Removing the
Solvent Rod Shaft
Rev. B
Pg. 44
completely into the Inlet Valve. Follow Steps 2) – 4) to confirm a proper o-ring seal.
If reversing the Shaft does not provide a proper seal, then the Shaft can be replaced
with the other Shaft (left) on the Inlet Valve.
Step 8)
Eventually the o-rings will wear to a point that a proper seal cannot be achieved. If
Steps 2) – 4) confirm that all Solvent Rod Shaft o-rings are not sealing properly, then
replace the o-rings (PN: 30-0544).
Step 9)
Solvent Rod Shafts will also eventually wear and require replacement. Replace
Solvent Rod Shafts that are worn or damaged (PN: 50-0667 for four, PN: 50-0667-01
for two).
Caution: Failure to replace worn Solvent Rod Shafts or worn o-rings, could allow Rinse
Solvent to be sprayed from the Assembly.
7.5 Sample Bottle Gasket Seals
Please follow the instructions below when replacing the Sample Bottle Gaskets Seal on the Water
Sample Inlet Valves. The Sample Bottle Gasket is designed to provide a leak tight seal between
the Sample Bottle or the Bottle Cap Adapter, and the Water Sample Inlet Valve. A worn or
damaged seal could result in leaks between the surfaces. When leaks do occur, the sample will
overflow the Disk Holder Assembly during the sample-processing step.
Inspect the Sample Bottle Gasket Seal
Step 1)
Remove the Sample Bottle Gasket from the Water Sample Inlet Valve. This is the
circular gasket that sits inside the opening of the Inlet Valve where the sample bottle
threads onto (Figure 7-9). Carefully remove the gasket using your fingers, or with a
small object which will not damage the face of the gasket (Figure 7-10).
Step 2)
Inspect the gasket for any surface deformation. Inspect both sides of the gasket.
One side of the gasket is a light tan color, and the other side is white. If the tan side
looks deformed, or is pealing off from the gasket, discard the gasket and replace with
a new one (P/N 02-0560).
Install the Sample Bottle Gasket Seal
Step 3)
Insert the gasket with the tan side facing DOWN onto
the Inlet Valve. Gently press the gasket into position.
Step 4)
Periodically inspect the top surface of the gasket and
replace if worn, or if leaks occur.
Bottle Gasket, PN 02-0560
Figure 7-9: Sample Bottle
Gasket Seal
Figure 7-10: Removing
the Gasket Seal
Rev. B
Pg. 45
7.6 Installing an Inlet Solvent Filter
The solenoid valves inside the extractor are susceptible to leaking if fine particulate matter from the
solvents or solvent bottles gets into these valves. If these small particles of matter are not
prevented from entering the valve, they could cause impressions to be made when the diaphragm
inside the valves close on them. One of the characteristics of PTFE, which the valves are made of,
is its ability to retain "memory". When the valves open and close again, the particle may well be
freed, but an impression of the foreign body is left behind in the PTFE. This impression prevents an
adequate seal to be formed when the valves close again allowing for the possibility of solvent
leakage to occur.
There is one solenoid valve for each Prewet solvent and one for each Rinse solvent. If one of the
Prewet solenoids is leaking, solvent will constantly dispense from one of the lines on the Liquid
Sensor/Prewet Arm. Indication of a Rinse Solvent solenoid valve leak occurs when a constant leak
is observed from the rinse opening on the Sample Holder Arm. The Prewet or rinse leaks are
observed once the solvent bottles have been pressurized.
To reduce the chances of damage to the solenoid valves, an inlet solvent filter is placed in the
solvent bottles at the end of each solvent delivery line.
Installing an Inlet Solvent Filter
Locate one of the Inlet Solvent Filters (PN: 40-012-HT). This is a metallic cylinder of approximately
11/2 inches in length and 1/2 inch in diameter. Refer to Figure 7-11.
Make sure that the small stem on the Inlet Solvent Filter has a
plastic ferrule attached to it. Unscrew the solvent draw-up line
from the solvent bottle cap and remove.
1. Cut the plastic solvent draw-up line to a length of eleven
inches. While holding the plastic solvent draw-up line
with a piece of 3M Scotch Brite (for providing a good
grip), slide the ferrule cover of the Inlet Solvent Filter
inside the end of the solvent draw-up line and press it in
as far as it will go. It may be necessary to expand the
end of the line to allow the Inlet Solvent Filter stem to
enter the solvent line and become firmly attached. If the Figure 7-11: Inlet Solvent Filters
solvent draw-up line needs to be expanded then insert a
pair of needle nose pliers into the opening of the line. Gently expand the opening just
enough to allow the stem to fit.
Note: Damage to the tubing may occur if over expanded. If this occurs, use a sharp, clean razor
blade to cut the end of the draw-up line off, and re-expand the opening.
2. Screw the solvent draw-up line to the solvent bottle cap and insert the end of the solvent line
into the solvent bottle. Cap the solvent bottle tightly.
3. Repeat the procedure for every solvent bottle.
Other steps to take:
•
•
Purchase GC/HPLC grade Solvents or Better. (See Specific Method Requirements.)
Filter solvents prior to use.
Rev. B
Pg. 46
•
•
Rinse the solvent delivery bottle with some solvent before using.
When refilling the solvent bottles do not let the filters come into contact with a dirty surface.
Place them on a clean paper towel. If the solvent lines are disconnected from the extractor,
place them on a clean surface protecting them from dirt and dust.
Note: Horizon Technology, Inc. will not be responsible for damage to valves that have not been
protected by the Inlet Solvent Filters even during the normal warranty period.
7.7 Adjusting the Water Sample Holder Arm
The Water Sample Holder Arm may become misaligned from the
weight of the sample bottles. Refer to Figure 7-12. When this
happens, the bottle with the attached Inlet Valve does not sit in a
stable position on the Holder Arm. This can cause problems with
opening the Water Inlet Valve to deliver sample to the Disk Holder
Assembly. It can also cause the solvent rinse to leak from the
Solvent Rod or the rinse spray to be off to the side instead of hitting
the center of the base of the bottle.
To adjust the Sample Holder Arm:
1. Remove sample bottle from the Holder Arm.
2. To view the Allen Screws located below the hinge, lift the
Holder Arm to place it in its closed position. The Allen Screws
can be adjusted to position the Holder Arm at a 90-degree
angle with the front panel of the Extractor.
Figure 7-12: Misaligned
Sample Holder Arm
3. Lower the Holder Arm back down to its open position. Place
a block, or anything that can be used to measure a right
angle, on the Holder Arm. Refer to Figure 7-13.
4. Using a 5/64 “ Allen Wrench, adjust the two screws until the
side of the block is positioned such that it is completely
touching and aligned with the front panel of the Extractor.
(Figures 7-14), i.e. the Holder Arm is level.
Block
Figure 7-13: Block on
Sample Holder Arm
Rev. B
Pg. 47
5. Figure 7-15 shows the correct alignment of the Sample Holder Arm.
Periodically inspect the alignment of
the Sample Holder Arm and adjust if
necessary.
Block
Figure 7-14: Block sitting
at right angle
Figure 7-15: Correct
Alignment of Holder Arm
7.8 Replacing the Disk Holder Cup O-ring
The stem of the Disk Holder Cup has an o-ring (PN: 30-0452-01) to allow a snug tight fit in the
platform opening of the Extractor. This is a wearable item that will need replacement after extended
use. When the o-ring is worn it no longer forms a tight seal and
will fit loosely into the platform opening. This will reduce the
flow rate of the sample and can result in the insufficient drying
of the disk during the Air Dry step. If the disk is not sufficiently
dried, the extra water will decrease the extraction efficiency
and thus negatively impact recoveries.
To remove the o-ring from the Disk Holder Stem, use small
O-ring
nose pliers. Carefully grip the o-ring with the pliers and pull it
off. Be careful not to score or damage the PTFE base. To
replace the o-ring, use the pliers to carefully stretch the o-ring
enough to be able to place it on the stem. To avoid damage to
the o-ring, do not overextend when using the pliers.
Figure 7-16: Disk Holder ORing
Rev. B
Pg. 48
7.9 Uploading New Software Version
Please follow the instructions below when uploading new software into the Controller. Windows 98
is required for this upload process. Call Horizon Technology if additional technical assistance is
needed.
The most current version software for the SPE-DEX® 3000 Controller is 1.08. When the Controller
is first powered up, the initial startup screen (with the Horizon Technology logo) will display what
version is currently in the Controller. The changes from the earlier version are as follows:
• To optimize the flow characteristics of the J.T. Baker manual Speedisk, the Factory Preset
methods #24 and 25 have a 10 second “Air Dry Time” after the methanol prewets. The
second methanol rinse has been removed from these methods.
•
The Factory Preset method times (methods #21 through #24 and #26 through #30) for
dispensing the hexane and methanol prewets have been reduced by approximately 2
seconds.
•
To avoid inadvertently erasing the code, which would cause the controller to become
inoperable, a lengthy sequence of keys must be pressed before the operating code can be
erased. The commands are displayed on the screen, and only by following these steps can
the code be erased.
•
New sets of counters have been added to the Aux 1 screen. The Aux 1 screen will display
the total number of hours that the liquid sensors have been operated, plus a counter will
display the total number of samples that have been processed.
Warning: In order for the new software to be uploaded, the current operation software is erased
from the EEPROM. If this occurs, and you do not have a copy of the original or the latest software,
contact Horizon Technology, Inc.
1. Determine the current version software running in the Controller. Press the
Auxiliary 2 key, followed by pressing the E key (UPLOAD). The current version will
be displayed. If a newer version is available, obtain the latest software version from
Horizon Technology.
2. The new software will have 2 files, the Upload.exe file and the Superc.bin file.
3. Create a new directory on the PC named “Upload”.
4. Copy the 2 software files to the Upload directory.
5. Attach a Null Modem cable from the serial port on the PC to the Comm Port on the
backside of the Controller.
6. On the PC; select Windows START, followed by RUN. Type in this command:
C:\UPLOAD\UPLOAD.EXE SUPERC.BIN 1 38400 1024 (for COM 1) OR
C:\UPLOAD\UPLOAD.EXE SUPERC.BIN 2 38400 1024 (for COM 2)
7. Press the A (YES) key on the Controller. The LCD will turn off, and the Controller
will erase the current software version from the EEPROM. The Controller is now
ready to receive the new software.
8. Press ENTER on the PC. This will initiate the upload process. The upload process
will be displayed on the monitor. When the upload is complete, the Controller will
reinitialize and reboot.
9. The current software version will be displayed on the main startup screen when the
Controller is rebooted.
Rev. B
Pg. 49
7.10 Assembly of the Dual Diaphragm Oil-Free Vacuum Pump
The dual diaphragm oil-free vacuum pump offers several advantages over other vacuum pumps.
The most noticeable advantage is seen when using 90-mm SPE Disks. The dual diaphragm pump
is capable of maintaining adequate vacuum levels under the increased draw from a 90-mm disk in
an air dry step. This translates to a minimal drop in vacuum levels when several extractors are
running simultaneously. The SPE disk is allowed to dry more thoroughly, yielding less water in the
final extract, and therefore a better extraction. Unlike the rotary vane vacuum pumps, the dual
diaphragm pump is not susceptible to seizing from the condensation of water and solvent vapors
from the extraction.
Vacuum
Gauge
“T” Fitting
“L” Fitting
Bleed Valve
Figure 1: Dual diaphragm Vacuum Pump with Gauge and Bleed Valve
Installing the Dual Diaphragm Oil-Free Vacuum Pump.
1)
2)
3)
4)
5)
6)
7)
8)
Remove the two orange plugs located on the discharge side of the vacuum pump
Thread the 2 mufflers onto these ports
Remove the single orange plug located on the intake side of the pump
Thread the copper portion of the assembly into the vacuum pump. See Figure 1.
Connect the gauge to the “L” fitting of the assembly.
Connect the bleed valve to the “T” fitting on the assembly. The bleed valve is used to adjust
the vacuum level.
Connect the tubing from the water recovery bottle to the pump.
(Refer to the installation chapter of the User’s Manual for installation to the water recovery
bottle of the Extractor System).
Set the pump vacuum level at 25” Hg (vacuum gauge reading) using the bleed valve to
increase or decrease the level.
Note: It is recommended that all vacuum pumps have a Dry Trap installed (HT P/N 500572 or equivalent) to prevent moisture from entering the pump. (See Tech Tip
T35 “Installing a Dry Trap”).
Rev. B
Pg. 50
7.11 Installing a Dry Trap
A Dry Trap (Figure 7-18) is used for two separate applications for the Horizon Systems. The
following instructions will explain installation for both applications.
Installing a Dry Trap for the use with the Extractor System's Vacuum Pump
In order to extend the life of the Vacuum Pump and maintain the warranty, it is highly recommeded
that a Dry Trap (PN: 50-0572) be installed to capture solvent vapors, or moisture that could be
pulled through the vacuum pump. With the Dry Trap bowl
facing down, note the arrow with the letter ‘N’ on the top. Refer
to Figure 7-19. Insert the two blue tubing provided into the
orange quick disconnects on the brass fittings of the Dry Trap.
Verify that they are securely in place. Align the arrow with the
letter ‘N’ so that it points toward the vacuum pump/source in
the direction of the flow. Install the Dry Trap between the
vacuum source and Water Waste Recovery Bottle. Cut the
BEV-A-LINE tubing that goes from the vacuum pump to the Figure 7-18: Dry Trap
Water Waste Recovery Bottle. Insert the ends of the cut line into
the blue tubings on the Dry Trap. Use a tie wrap on both ends to
hold the tubing securely in place. Attach the plug cap provided to the bottom of the Dry Trap bowl
(black end). If liquid accumulates in the bowl, drain by removing the plug cap.
Installing a Dry Trap for use with the Speed-VAP® Air Source
In order to extend the life of the Speed-Vap® and maintain its warranty, a Dry Trap is
recommended to capture moisture, or particles that could be
forced into the Speed-Vap® . It is important to align the trap
correctly for proper performance. Note the N and the arrow
direction on the top of the trap. Orient the arrow on the trap so
it faces away from the air source (or in the direction of the
flow). Install the Dry Trap between the Air Source and SpeedVap® by cutting the tubing and inserting into the fittings.
Figure 7-19: Top View of Dry
Trap
Rev. B
Pg. 51
7.12 Cleaning and Replacing the Elute Check Valve
The Elute Check Valve Assembly (Figure 7-20) elutes the rinses into the collection vessel. The
Check Valve Assembly components include a spring, a ceramic ball that sits on the spring, the seat,
and a washer (Figure 7-21).
Check valve assembly
mounted on extractor
adapter stem
Vacuum
opening
Check Valve
Assembly
Figure 7-20: Check Valve Assembly
Top Cover
spring
ball
seat
washer
Figure 7-21: Check Valve Components
When not in use, the check valve ball can stick preventing the elution of solvents into the collection
vessel. Prior to beginning an extraction, free the Check Valve by following the instruction in Section
7.2 of the manual.
Dirt or debris can enter the Check Valve and get lodged between the ball and the seat. When this
happens, an open pathway is created that allows all liquids to drip through the Check Valve and into
the collection vessel during other steps in the extraction process. To clean the Check Valve follow
the instructions below.
1) Attach a 125 ml collection vessel to the extractor station with the leaking Check Valve.
2) Insert a Disk Holder Cup with the support screen into the platform opening.
3) Fill the Disk Holder Cup with warm water.
4) Go to the Status screen of the Controller and select the extraction station.
5) Use the Drain key followed by the Elute key to drain the water into the collection vessel.
Continue this process by flush lots of water through the Check Valve, remembering to empty
the collection vessel as it fills. This should clear the Check Valve of dirt and debris.
6) If the Check Valve continues to leak, disassemble it to clean the internal components.
Remove the three screws at the bottom of the Check Valve. These screws hold the Check
Valve Assembly into the Collection Vessel Adapter Taper (Figure 7-20). Note the opening
toward the back. This is the vacuum opening, which supplies vacuum to the collection
vessel. The vacuum opening is aligned with the vacuum opening on the Collection Vessel
Adapter Taper.
7) Once the screws have been removed, try pulling the Check Valve Assembly out from the
Adapter Taper. The Check Valve Assembly may be stuck and difficult to remove. In this
situation, use a flat edged blade and gently ease the Check Valve Assembly out by placing
the blade between the Check Valve base and the Adapter Taper. Be careful not to score or
damage the Teflon Adapter Taper.
Rev. B
Pg. 52
8) Remove the top cover of the assembly. Be careful not to lose any of the components.
Remove the internal components of the assembly. Note the order of the components and
the orientation of the seat. Clean the components and verify that the spring is in good
condition.
9) Reassemble the Check Valve and insert it back into the Adapter Taper of the extractor.
Make sure to align the small vacuum opening on the Check Valve Assembly with the
vacuum opening on the Adapter Taper. If the vacuum openings are not correctly aligned, no
vacuum will be supplied to the collection vessel and therefore the solvent rinses will not
elute.
10) Test the Check Valve by pouring some water into the Disk Holder Cup and observe if it
leaks the from the bottom luer. If the leak persists replace the Check Valve with a new one.
Rev. B
Pg. 53
8.0 Troubleshooting
The SPE-DEX® Oil & Grease Machines are engineered to perform in a demanding environment.
This system is a mixture of electrical, mechanical, and pneumatic subsystems. Unfamiliarity with
the operation of the system, especially with new system start-ups, can be intimidating. Before
calling for assistance, attempt to rectify any issues by referring to the trouble shooting tips below.
This will assist a Horizon Technology technical representative in pinpointing the problem quickly.
No matter what the problem is, remember that opening the cover of either the Controller or the
Extractors voids the warranty unless instructed to do so by a Horizon Technology technical
representative.
Product quality, reliable operation, and customer satisfaction are important to us. If the problems
cannot be resolved, please contact a Horizon Technology technical representative without delay.
Trouble Shooting Tips:
®
1. The SPE-DEX 3000 Controller is not responding
•
Switch the Controller off. The on/off switch is located on the back of the Controller.
•
Verify that the Controller is plugged into an outlet.
•
Switch the Controller on ("1" depressed).
•
If nothing is displayed on the screen, verify the connection of the power source to the
back of the Extractor.
•
A continuous beeping sound is an indication that a key may be stuck.
®
2. The SPE-DEX 3000 Extractor is not responding
•
Check the connector from the Extractor to the Controller. Make sure it is securely
connected at both ends.
Note: Remember to turn the Controller off before connecting or disconnecting the cables.
3. Prewet solvents are not dispensed
•
Verify that the solvent bottles are filled and that the solvent pickup tubes in the
solvent bottle are long enough.
•
Verify that the gas tank is on and the gauge at the source is set between 60 –80 psi.
•
Check for any air leaks. Verify that the solvent bottle caps are sealed and don’t have
any cracks or damage. Also verify that the gas lines from the solvent bottles to the
extractor are securely connected and that the gas lines are not crimped or kinked.
Check for any punctured or damaged gas lines. A hissing sound is an indication of
a leak.
•
Check for crimped or pinched solvent lines that could prevent solvent flow. Also
verify all solvent line connections.
•
Check for liquid leaks.
•
Remove the back panel of the extractor and verify that the pressure regulator on the
right (when facing back of unit) is set at 15 psi.
Rev. B
Pg. 54
4. Prewet solvent overflows
•
Verify the dispense time programmed for the controller method.
•
With the unit sitting idle and solvent bottles pressured, does solvent leak from the
Prewet Arm? This would indicate a stuck open prewet valve.
•
For a stuck open prewet valve, program a method with only the prewet solvent that
is leaking and run the method several times to flush the valve. The solvent bottle
pressure can be increased incrementally by adjusting the pressure gauge inside the
extractor. Do not raise the pressure above 30 psi.
•
Always use the solvent filters, provided with the system, at the end of the lines in the
solvent delivery bottles. This will extend the life of the valves (refer to Section 4.2).
5. Prewet solvents do not drain
•
Verify that the main vacuum source is on and the gauge set at - 24" Hg to -26” Hg.
•
Verify that the manifold plugs on the Solvent Waste and Water Waste Recovery
Bottles are securely sealed and not losing vacuum. Make sure the fittings on the
manifold plugs are tight and that all lines are connected to the Waste Bottles are
secure.
•
Examine the solvent to waste line for any crimps or damage that may impede the
flow.
6. Continuous drain or leak of solvent to the waste
•
Verify the drain time programmed in the method if using a method other than
Methods 21 through 30.
•
With unit sitting idle and vacuum on, fill the platform opening for the Disk Holder
Assembly with water. Does the water drain and to which waste bottle (solvent waste
or water waste)?
•
Flush the stuck open drain valve with water using either the DRAIN and SOLVENT
functions or the DRAIN and SAMPLE functions of the controller.
7. Water Inlet Valve does not open to dispense sample
•
Verify that the main gas source is on and set at between 60 – 80 psi.
•
Manually turn the aluminum shaft to open and close the Water Inlet Valve. If it feels
tight and is difficult to turn, the o-ring for the aluminum shaft may be damaged or the
gaskets on the ball valve need replacement. The four hex screws at the bottom of
the valve housing can also be loosened. Do not loosen too much as this can result
in sample overflows (refer to Section 7.3).
•
Verify that the Water Sample Holder Arm, onto which the sample bottle and Inlet
Valve rest, is not touching the metal actuator key and preventing it from turning. The
Holder Arm may drop over time with the weight of the bottle. Adjust the hinge arm
so that it makes a 90-degree angle with the sheet metal by adjusting the bottom set
screws (refer to Section 7.7).
Rev. B
Pg. 55
•
The metal (rectangular) actuator key, onto which the shaft of the inlet valve is
placed, turns with pressure. The pressure gauge for this is located inside the back
panel of the extractor. Verify that the left gauge (when facing the back of the
extractor) is set at 50 psi.
8. Sample overflows Disk Holder Assembly
•
Sample overflows can only occur if there is an air leak into the bottle allowing the
sample to be displaced even when the Disk Holder Assembly is filled to the opening
of the down tube.
•
Examine the gasket on the Water Inlet valve. This is the gasket that forms a seal
between the sample bottle and Inlet Valve or, if using a cap adapter, between the
cap adapter and Inlet Valve. Verify that it is correctly in place with the white side
face up and that it is not worn or damaged.
•
The two halves of the Water Inlet Valve assembly should be tight enough so that
sample does not overflow. If too tight, the Water Inlet Valve will not open. Also verify
that the down tube that drains the sample into the Disk Holder Assembly is snug in
place.
•
If using a cap adapter to accommodate for a wide mouth bottle, use a gasket to form
a seal between the cap and the lip of the bottle. This is one area of the cap adapter
where an air leak into the bottle can occur. Do not over tighten the cap adapter as
this can cause the cap to flare out or crack and the threading can be stripped. The
other area on the cap adapter that an air leak can occur is between the cap adapter
opening/connection to the Water Inlet Valve. Again, do not over tighten and strip the
threading but verify that it is tight enough to form a good seal. Always use the gasket
seal on the Water Inlet Valve.
9. Sample is not draining to waste or draining very slowly
•
Verify that the vacuum pump is on and working. The main vacuum pump gauge
should be set between –24” Hg to –36” Hg.
•
The vacuum pump requirement is –13” Hg at 1 CFM.
•
If running a dirty sample the disk may be clogged. Use 90 mm disks for dirty
samples and split the sample in two if necessary. Consider using prefilters or Filter
Aid™.
•
Verify that the manifold plugs on the waste bottles are securely in place and that all
waste lines (water to waste and solvent to waste) are free of kinks and securely
connected.
•
The Disk Holder Assembly components need to be tight to form a good seal. If the
components are not tight, air will flow through the parts when vacuum is pulling thus
reducing efficiency. Always use the red gaskets with the 3M Disks refer to section
5.5).
•
Dirt may be trapped in the Water to Waste Valve. Flush the valve by filling a Disk
Holder Cup with warm water and using the Drain and then Sample keys for the
station in question.
Rev. B
Pg. 56
•
The Water-to-Waste Valve requires air pressure to open. Verify that gas is being
supplied to the valve. Pull the black gas line off the valve fitting and using the
DRAIN and SAMPLE functions on the controller activate the valve. Air should come
hissing out of the gas line.
10. Continuous water to waste drain
•
This usually is a result of dirt trapped in the valve and keeping it stuck open. Fill the
Disk Holder Assembly with warm to hot water and use the DRAIN and SAMPLE
functions of the controller. Continue filling and draining the Disk Holder Assembly.
•
If after the sample has completely filtered through the disk, the unit remains in
sample processing and does not advance to the next step (rinse), verify the sensor
response in the A2D screen of the controller.
11. No rinse spray into the bottle
•
A gas source is required to spray solvent rinses into the sample bottle. Check the
main gas source and make sure the tank is not empty and that the pressure is set at
between 60-80 psi.
•
Verify that there is sufficient solvent in the bottles.
•
Crimps or kinks in the solvent delivery lines will impede the flow of solvents. Examine
the rinse solvent delivery lines and ensure that no kinks are present. Kinks usually
appear at the fittings on either the solvent bottles or the connection to the extractor.
Straighten the kinks if possible and replace any damaged lines.
•
Examine the caps of the solvent rinse bottles for any cracks or damage that may
result in loss of pressure. A gas leak can usually be detected by a hissing sound.
Also examine the black gas lines to the solvent bottle caps for damage.
•
The Water Inlet Valves have an opening through which the rinses are sprayed. The
rinse opening is the dark spec located on the Inlet valve, at the end that connects to
the bottle or cap adapter. Make sure that there is no blockage of the opening, and
that the stainless steel tubing in this opening is not missing. The dark spec is
indicative that the stainless steel tubing is present. If the rinse opening is blocked
with debris or if the stainless steel tubing is missing, the rinse spray may be week
and/or off center. The valves can be sonicated in a bath to dislodge the debris from
the rinse opening. Alternatively, a fine needle-like tool commonly used for gas
chromatography instruments can be used to clear the opening.
12. Rinse leak from rinse port
•
The solvent rod o-rings are susceptible to damage with prolonged exposure to the
solvents. If a rinse leak is occurring during the rinse spray step, the solvent rod oring needs to be replaced. The solvent rods can be pulled out of the Water Inlet
Valve and flipped over to use the other end with the o-ring. There are two solvent
rods on the Water Inlet Valve. The one to the right (when Water Inlet Valve shaft is
pointing away from you) is used to introduce the rinses into the bottle and the one on
the left of the Water Inlet Valve is used for balance. The two can also be
interchanged. Also examine the solvent rod and make sure it is not damaged.
Rev. B
Pg. 57
•
A leak from the rinse port when the extractor is sitting idle and the bottles are
pressurized is an indication of a stuck solenoid valve. Care must be taken to avoid
dust or particles from getting into the solvent delivery lines so that they don’t end up
in the valves, which could cause damage. When disconnecting the lines from the
extractor always place them on a clean surface and wrap the open ends to prevent
dirt from getting in. Always use the solvent filters at the end of the pick up lines in
the solvent bottles (refer to section 4.2).
13. No Elution into collection vessel
•
As part of the daily start up procedure (Section 7.1), free the sample collect check
valves using the check valve tool (PN: 02-0725). The check valves can stick when
the unit is not in use.
•
The check valve requires a minimum vacuum level of – 13“Hg to open. Verify that
the vacuum does not drop below this level when the system is in operation and
pulling vacuum.
•
If the collection vessel does not make a good vacuum tight seal with the Adapter
Taper, vacuum will be lost and the rinses will not elute into the collection vessel, or
partial and weak elution may be observed. When attaching the collection vessel to
the Adapter Taper use a lifting and twisting motion to secure it in place.
•
VOA vials may have imperfections at the rim of the opening that could result in a
poor seal between the rim and the cap of the glass joint adapter. Use a different
VOA vial if it looks suspect. Always attach the glass joint adapter to the VOA vial by
using the turquoise cap and verify that the base of the glass joint is sitting on the
cap. Do not screw it on by twisting the glass joint adapter. Any cracks in the cap or
damage to the PTFE seal will cause a vacuum leak. If the collection vessel is not
under vacuum, the check valve will not open to elute the rinse solvents.
•
If the Check Valve Assembly has been replaced, verify that it was correctly installed,
with the vacuum opening on the check valve aligned with the vacuum opening on the
Adapter taper (refer to Section 7.12).
•
If no elution is observed and the disk is dry, the rinses may not have been sprayed.
Program a method into the Controller that will have only two rinses (one methanol
and one hexane). Run the method and observe if the rinses are sprayed into the
bottle. If the rinses were sprayed into the bottle, one of the waste drain valves may
be stuck open and the rinses are drained to waste. Pour some water into the
platform opening for the Disk Holder, have the vacuum pump on, and the unit in idle.
If one of the waste valves is stuck open, the water in the platform opening will drain
to waste. Observe to which waste bottle the water is drained.
14. High Background
•
Background can be introduced from impurities in the solvents, disks, glassware, or
the Extractor itself.
•
Take approximately 30 ml of each the methanol and hexane solvents directly from
the solvent delivery bottles. Pour into pre-weighed aluminum pans and evaporate to
dryness. There should be a total of 4 aluminum pans, two for the prewet solvents
and two for the rinse solvents. Record the weights after evaporation and calculate
the difference to determine if any background is being introduced from the solvents.
Values should be below 1.0 mg.
Rev. B
Pg. 58
•
Program a short method with only prewet hexane (no prewet methanol or rinses) and
set all other parameters to zero. Set the dispense time so that approximately 30 ml
of solvent will be collected. No soak or drain time is needed. Place a clean
collection vessel under the prewet hexane delivery line on the Prewet/Sensor Arm.
Start the short method and collect the solvent. Pour the solvent into a pre-weighed
aluminum pan and evaporate. Repeat for the prewet methanol, this time changing
the method so that only prewet methanol will be delivered. Determine if any
background is introduced from the extractor.
•
Program a short method with only the hexane rinse solvent and set all other
parameters to zero. Set the dispense time so that approximately 30 ml of solvent is
collected. Set the soak time to zero and drain time to 10 sec. Use the 90 mm Disk
Holder Assembly with no disk. Place a clean collection vessel onto the adapter stem
and run the short method. Pour the rinse solvent into a pre-weighed pan and
evaporate. Determine if any background is present. Repeat with the methanol rinse
solvent.
•
Run non-acidified reagent water blank with the disk and method normally used at the
lab. Evaporate the collected hexane portion and determine if any background is
coming from the disk.
Rev. B
Pg. 59
Appendix A
Factory Programmed Methods
And
Method Worksheet
Rev. B
Pg. 60
Method 21
Method 22
Method 23
Method 24 Method 25 Method 26 Method 27
disk/manufacturer
Pacific/3M
Baker FA
47 mm
Pacific/W/
CPI/PR/FA
47 mm
Baker
size (mm)
Pacific/W/
CPI/PF
47 mm
50 mm
50 mm
Pacific/3M Pacific/W/
CPI
90 mm
90 mm
Method 28
Method 29
Method 30
Pacific/W/
CPI/PF
90 mm
Pacific/W/CPI/
PF/FA
90 mm
Purge
no disk
PW Hexane
Dispense
Saturate
Soak
Drain
6 sec
1 sec
1 min
1 min
6 sec
1 sec
1 min
1 min
6 sec
1 sec
1 min
1 min
4 sec
1 sec
1 min
1 min
4 sec
1 sec
1 min
1 min
12 sec
2 sec
1 min
1 min
10 sec
1 sec
1 min
1 min
10 sec
1 sec
1 min
1 min
10 sec
1 sec
1 min
1 min
1 sec
0 sec
0 sec
5 sec
PW Methanol
Dispense
Saturate
Soak
Drain
6 sec
1 sec
1 min
0 sec
6 sec
1 sec
1 min
0 sec
6 sec
1 sec
1 min
0 sec
4 sec
1 sec
1 min
10sec
4 sec
1 sec
1 min
10sec
12 sec
1 sec
1 min
0 sec
10 sec
1 sec
1 min
0 sec
10 sec
1 sec
1 min
0 sec
10 sec
1 sec
1 min
0 sec
1 sec
0 sec
0 sec
5 sec
5 min
8 min
8 min
5 min
8 min
8 min
5 min
8 min
8 min
0 sec
4 sec
30 sec
45 sec
4 sec
30 sec
1 min
5 sec
5 sec
0 sec
5 sec
5 sec
0 sec
5 sec
5 sec
0 sec
5 sec
5 sec
0 sec
hexane = 3 sec
0 sec
5 sec
2 sec
5 sec
0 sec
5 sec
1 min
2 min
5 sec
30 sec
1 min
5 sec
45 sec
1 min
5 sec
1 min
1 min
methanol = 3 sec
0 sec
15 sec
CODE
Air Dry
Rin #1 - Methanol
Rinse
Soak
Elute
2 sec
5 sec
0 sec
2 sec
5 sec
0 sec
2 sec
5 sec
0 sec
Rin #2 - Methanol
Rinse
Soak
Elute
2 sec
30 sec
45 sec
2 sec
30 sec
1 min
2 sec
30 sec
1 min 30 sec
Rin #3 - Hexane
Rinse
Soak
Elute
2 sec
5 sec
0 sec
2 sec
5 sec
0 sec
2 sec
5 sec
0 sec
2 sec
30 sec
30 sec
2 sec
1 min
1 min
5 sec
5 sec
0 sec
5 sec
5 sec
0 sec
5 sec
5 sec
0 sec
5 sec
5 sec
0 sec
Rinse
Soak
Elute
2 sec
30 sec
30 sec
2 sec
1 min
1 min
2 sec
1 min 30 sec
1 min 30 sec
2 sec
5 sec
0 sec
2 sec
5 sec
0 sec
5 sec
1 min
1 min
5 sec
30 sec
1 min
5 sec
45 sec
1 min
5 sec
1 min
1 min
Rinse
Soak
Elute
2 sec
5 sec
0 sec
2 sec
5 sec
0 sec
2 sec
5 sec
0 sec
2 sec
30 sec
30 sec
2 sec
1 min
1 min
5 sec
5 sec
0 sec
5 sec
5 sec
0 sec
5 sec
5 sec
0 sec
5 sec
5 sec
0 sec
CPI = CPI
Rin #6 - Hexane
Rinse
Soak
Elute
2 sec
30 sec
30 sec
2 sec
1 min
1 min
2 sec
1 min 30 sec
1 min 30 sec
4 sec
1 min
1 min
4 sec
1 min
2 min
5 sec
1 min
2 min
5 sec
30 sec
1 min
5 sec
45 sec
1 min
5 sec
1 min
1 min
FA = FilterAid400
Rin #7 - Hexane
Rinse
Soak
Elute
4 sec
1 min
1 min
4 sec
1 min
2 min
4 sec
2 min
4 min
8 sec
1 min
5 min
8 sec
1 min
3 min
8 sec
1 min
4 min
8 sec
1 min
5 min
Rin #4 - Hexane
Rin #5 - Hexane
3M = 3M
W = Whatman
PF = prefilter
8 Commerce Drive
Atkinson, NH 03811
Telephone: 603-893-3663
Telefax: 603-893-4994
Method Worksheet
Method number:
LCD Screen Page 1
HEXANE:
Dispense:
Saturate:
Soak:
Drain:
______ sec
______ sec
______ sec
______ sec
METHANOL:
Dispense:
Saturate:
Soak:
Drain:
______ sec
______ sec
______ sec
__0___ sec
AIR DRY: ______ min
LCD Screen Page 2
Step / Type
Rinse:
Soak:
Elute:
1 ________
___ sec
___ sec
___ sec
2 ________
___ sec
___ sec
___ sec
3 ________
___ sec
___ sec
___ sec
4 ________
___ sec
___ sec
___ sec
5 ________
___ sec
___ sec
___ sec
6 ________
___ sec
___ sec
___ sec
7 ________
___ sec
___ sec
___ sec
8 ________
___ sec
___ sec
___ sec
9 ________
___ sec
___ sec
___ sec
10 ________
___ sec
___ sec
___ sec
The choices for the Step / Type of solvent rinse are as follows:
No Rinse
Hexane
Methanol
Name:
Phone:
Company:
62
Appendix B
Sample Bottle Measuring Scale
Place the opening of the sample bottle over the measuring scale to determine the proper size Bottle
Cap Adapter
63
Appendix C
Parts List
SPE-DEX® Oil & Grease Machine Fully Automated
The following items are necessary to run the SPE-DEX® Oil & Grease Machine:
1) Water Sample Inlet Valves – (3) for 1000XL and (3) for 3000XL
2) Liquid Handling Kit
3) Safety Coated Solvent and Water Recovery Assembly (including a 5 gallon wastewater
recovery bottle)
4) 10’ of Solvent Exhaust Hose
5)
The Choice of (2) SPE Disk Holder Assemblies; 47 mm or 90 mm.
Part Number
Description
SPE Disk Holder Assemblies
The Disk Holder Assembly allows the use of the SPE disk, Prefilters, and FilterAid 400
50-0808
Handles 47 mm disks for SPE-DEX® 3000XL Series Extractors
50-0810
Handles 90 mm disks for SPE-DEX® 3000XL Series Extractors
165-00JT Handles 50 mm JT Baker SpeedisksTM for SPE-DEX® 3000XL Extractors
Bottle Cap Adapters for SPE-DEX® 3000XL Series Extractors
The Water Sample Inlet Valves for the SPE-DEX® 3000 Series Extractors are designed to fit a 33 x
400mm Boston Round Bottle. If a larger sample bottle will be used, select the bottle cap adapter
that will fit your sample bottles. See the Sample Bottle Measuring Scale to determine the sample
bottles size presently being used. For custom bottle adapters, contact Horizon Technology. Note:
the ICHEM 33 x 430 Bottle is not compatible with the Water Inlet Valve of the SPE-DEX® 3000XL
150-0005-01
150-0006-01
150-0009-01
150-0010-01
150-0012-01
150-0014-01
150-0015-01
150-0025
70 x 400 adapter for 1 L jar
89 x 400 adapter for 1 L jar
53 x 400 adapter for 1 L wide mouth bottle
58 x 400 adapter for 1 L French Square
48 x 400 adapter
63 x 400 adapter
83 x 400 adapter
33 x 430 adapter
64
Part Number
Description
Collection Vessels
02-0216-5Teflon Washer/Vial Adapter (5/pkg)
160-0003 19/22 to 24/40 Adapter for Erlenmeyer Flask
160-0001 19/22 adapter for 40 ml VOA vessel
160-0008 40 ml VOA vial (72/cs)
27-0476
125 ml Erlenmeyer Flask
27-0834
Separatory Funnel, 19/22, 125 ml
SPE Disks
1664-47-HT
1664-90-HT
40-005-HT
40-006-HT
40-009-HT
47-005-HT
47-0008-HT
50-019-HT
50-017-HT
50-018-HT
Pacific Brand, 47 mm
Pacific Brand, 90 mm
Whatman SPE Disk 47 mm DFP for Oil & Grease (12/box)
Whatman SPE Disk 47 mm DFP for Oil & Grease (48/box)
Whatman SPE Disk 90 mm DFP for Oil & Grease
3M EmporeTM Disks Oil & Grease 47mm Disks (20/box)
3M EmporeTM Disks Oil & Grease 90mm Disks (10/box)
JT Baker SpeediskTM Oil & Grease Disks 50 mm (20/box)
CPI Nu-Phase™ SPE Disks Oil & Grease Disks, 47mm (20/box)
CPI Nu-Phase™ SPE Disks Oil & Grease Disks, 90mm (10/box)
Accessories
30-0544
50-0471
14-0404-10
14-0404-15
14-0404-20
30-0452-01
02-0792-01
02-0793
Solvent Rod o-rings
Water Sample Inlet Valves
10’ of Solvent Exhaust Duct Hose
15’ of Solvent Exhaust Duct Hose
20’ of Solvent Exhaust Duct Hose
O-ring for J.T. Baker Adapter (1000/3000XL)
47 mm gasket for 3M disks, used with 47mm Disk Holders
90 mm gaskets for 3M disks, used with 90 mm Disk Holders
SpeedVAP - Solvent Evaporation System
200-1000
SpeedVAP™ II 9000 - Solvent Evaporation System
01-0284
Locator Rack for 9 – 70mm aluminum pans-Used with 47-mm Extracts
01-0284-01 Locator Rack for 5 - 105mm aluminum pans-Used with 90-mm Extracts
50-002-HT
70mm Oil and Grease Aluminum Weighing Pans (100/box)
50-002-02-HT 105mm Oil and Grease Aluminum Weighing Pans (100/box)
50-001-HT
Oil and Grease Transfer Pipettes (500/box)
50-0572
Dry Trap
Solvent Trap - Solvent Recovery System
200-2000
Solvent Trap – Solvent Recovery System
65
Standards and Supplies
40-001-HT
40-003-HT
40-007-HT
40-010-HT
50-003-HT
3M FilterAid 400 (1.5 Kg bottle)
Whatman GMF-150 47mm Prefilters, 2 micron (40/box)
Whatman BS2000 42.5mm Prefilters (32/box)
Whatman 90mm Prefilters (16/box
Oil & Grease Standard Kit (4 x 30 ml vials) (8 mg/ml)
Vacuum Requirements
50-0583
50-0572
Dual Diaphragm, Oil-less Vacuum Pump (24-26” Hg, 3.6 SCFM)
Dry Trap
Please Contact the Parts & Consumables Department at Horizon for a Parts Numbers and current
pricing, or visit our website at www.horizontechinc.com.
66
Appendix D
Warranty
Limited Warranty
Horizon Technology, Inc. (“Horizon”) warrantees the SPE-DEX® Oil & Grease Machines (Product)
against defects in material or workmanship as follows:
1. LABOR: For a period of one (1) year from the date of purchase, if this Product is
determined to be defective, Horizon will repair the Product, and will cover all labor
charges. The Product must be returned to Horizon, prepaid, for repair. Horizon will pay
the return shipping charges.
2. PARTS: Horizon will supply, at no charge, new replacement parts for a period of one (1)
year. Horizon will send the replacement parts directly to the customer site, for customer
installation. If the customer does not wish to install these parts, the Product must be
returned to Horizon. To obtain warranty service, the Product must be delivered prepaid,
in the original packaging. If needed, new packaging is available from Horizon.
To obtain warranty service, the Product must be delivered prepaid, in the original packaging. If
needed new packaging is available from Horizon.
This warranty does not cover customer installation, or set up adjustments and / or Product
optimization. The warranty also does not cover cosmetic damage or damage due to acts of nature,
accident, misuse, abuse, negligence, or modifications of, or to any part of the Product. This
warranty does not cover damage due to improper operation or maintenance, or attempted repair of
any electrical components.
No other warranties are expressed or implied.
For service assistance or resolution of a service problem, or for product information or operation,
call:
Horizon Technology, Inc.
1-(800)-997-2997
1-(603)-893-3663
Or write to:
Horizon Technology, Inc.
45 Northwestern Drive
Salem, NH 03079
EMAIL: [email protected]
Website: www.horizontechinc.com
67