1
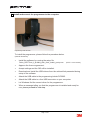
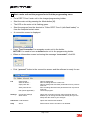
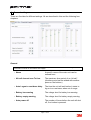
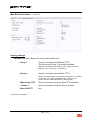
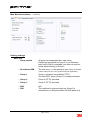
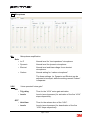
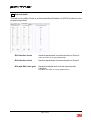
FP3652 Rev.D
Peltor DECT-Com II
Programming Manual
Page 1 of 22
Software License
SOFTWARE LICENSE AGREEMENT FOR PELTOR™ DECT-Com II™
VERSION 1.4 (DECT-Com II)
PLEASE READ THIS SOFTWARE LICENSE AGREEMENT (“LICENSE”) CAREFULLY BEFORE USING THE SOFTWARE. BY USING THE SOFTWARE, YOU ARE AGREEING
TO BE BOUND BY THE TERMS OF THIS LICENSE. IF YOU ARE ACCESSING THE SOFTWARE ELECTRONICALLY, SIGNIFY YOUR AGREEMENT TO BE BOUND BY THE
TERMS OF THIS LICENSE BY CLICKING THE “AGREE/ACCEPT” BUTTON. IF YOU DO NOT AGREE TO THE TERMS OF THIS LICENSE, DO NOT USE THE SOFTWARE AND
CLICK “DISAGREE/DECLINE”.
1. General. The software, documentation and any fonts accompanying this License whether on disk, in read only memory, on any other media or in any other form (collectively the
“Peltor Software”) are licensed, not sold, to you by 3M (“3M”) for use only under the terms of this License, and 3M reserves all rights not expressly granted to you. The rights granted
herein are limited to 3M and its licensors’ intellectual property rights in the Peltor Software and do not include any other patents or intellectual property rights. You own the media on
which the Peltor Software is recorded but 3M and/or 3M’s licensor(s) retain ownership of the Peltor Software itself.
Title and intellectual property rights in and to any content displayed by or accessed through the Peltor Software belongs to the respective content owner. Such content may be protected
by copyright or other intellectual property laws and treaties, and may be subject to terms of use of the third party providing such content. This License does not grant you any rights to
use such content.
2. Permitted License Uses and Restrictions.
A. This License allows you, during the term of this License, to install and use one copy of the Peltor Software on each computer owned or controlled by you for programming Peltor
DECT-Com II only. To do so, you may place the Peltor Software on your internal network so that multiple computers owned or controlled by you may access and use the Peltor Software
at the same time for programming Peltor DECT-Com II units purposes only. You may make one copy of the Peltor Software in machine-readable form for backup purposes only;
provided that the backup copy must include all copyright or other proprietary notices contained on the original. In addition to the restrictions stated above, the 3M proprietary libraries
included with the Peltor Software are only licensed: (i) for use with the Peltor Software; and (ii) for your personal use or internal business use in connection with Peltor DECT-Com II
headsets. You may not use the Peltor Software for any other purpose, nor may you link, compile or otherwise combine the Peltor Software with your own programs, modify, rent, lease,
lend, sublicense or otherwise redistribute the Peltor software, in whole or in part.
B. Except as and only to the extent expressly permitted by this License, by applicable licensing terms governing use of the Open-Sourced Components, or by applicable law, you may
not copy, decompile, reverse engineer, disassemble, modify, create derivative works of, incorporate into or compile in combination with your own programs, rent, lease, lend, sublicense
or otherwise redistribute the Peltor Software.
3. Consent to Use of Data. You agree that 3M and its subsidiaries may collect and use technical and related information, including but not limited to technical information about your
computer, system and application software, and peripherals, that is gathered periodically to facilitate the provision of software updates, product support and other services to you (if any)
related to the Peltor Software, and to verify compliance with the terms of this License. 3M may use this information, as long as it is in a form that does not personally identify you, to
improve our products or to provide services or technologies to you.
4. Term of License. The term of this License shall commence upon your installation or use of the Peltor Software and will terminate automatically without notice from 3M upon the next
commercial release of the Peltor Software. Your rights under this License will also terminate automatically without notice from 3M if you fail to comply with any term(s) of this License.
Upon the termination of this License, you shall cease all use of the Peltor Software and destroy all copies, full or partial, of the Peltor Software.
5. Support and Maintenance. 3M is not obligated to provide any maintenance, technical or other support for the Peltor Software, or any updates to you for the Peltor Software.
6. Disclaimer of Warranties. YOU EXPRESSLY ACKNOWLEDGE AND AGREE THAT USE OF THE PELTOR SOFTWARE IS AT YOUR SOLE RISK AND THAT THE ENTIRE RISK
AS TO SATISFACTORY QUALITY, PERFORMANCE, ACCURACY AND EFFORT IS WITH YOU. TO THE MAXIMUM EXTENT PERMITTED BY APPLICABLE LAW, THE PELTOR
SOFTWARE IS PROVIDED “AS IS”, WITH ALL FAULTS AND WITHOUT WARRANTY OF ANY KIND, AND 3M AND 3M LICENSORS (COLLECTIVELY REFERRED TO AS “3M” FOR
THE PURPOSES OF SECTIONS 6 AND 7) HEREBY DISCLAIM ALL WARRANTIES AND CONDITIONS, EITHER EXPRESSED, IMPLIED OR STATUTORY, INCLUDING, BUT NOT
LIMITED TO, THE IMPLIED WARRANTIES AND/OR CONDITIONS OF MERCHANTABILITY, OF SATISFACTORY QUALITY, OF FITNESS FOR A PARTICULAR PURPOSE, OF
ACCURACY AND OF NON-INFRINGEMENT OF THIRD PARTY RIGHTS, ALL WITH REGARD TO THE PELTOR SOFTWARE. 3M DOES NOT WARRANT AGAINST
INTERFERENCE WITH YOUR ENJOYMENT OF THE PELTOR SOFTWARE, THAT THE FUNCTIONS CONTAINED IN THE PELTOR SOFTWARE WILL MEET YOUR
REQUIREMENTS, THAT THE OPERATION OF THE PELTOR SOFTWARE WILL BE UNINTERRUPTED OR ERROR-FREE, OR THAT DEFECTS IN THE PELTOR SOFTWARE
WILL BE CORRECTED. NO ORAL OR WRITTEN INFORMATION OR ADVICE GIVEN BY 3M OR A 3M AUTHORIZED REPRESENTATIVE SHALL CREATE A WARRANTY.
SHOULD THE PELTOR SOFTWARE PROVE DEFECTIVE, YOU ASSUME THE ENTIRE COST OF ALL NECESSARY SERVICING, REPAIR OR CORRECTION. SOME
JURISDICTIONS DO NOT ALLOW THE EXCLUSION OF IMPLIED WARRANTIES OR LIMITATIONS ON APPLICABLE STATUTORY RIGHTS OF A CONSUMER, SO THE ABOVE
EXCLUSION AND LIMITATIONS MAY NOT APPLY TO YOU.
7. Limitation of Liability. TO THE EXTENT NOT PROHIBITED BY LAW, IN NO EVENT SHALL 3M BE LIABLE FOR PERSONAL INJURY, OR ANY INCIDENTAL, SPECIAL,
INDIRECT OR CONSEQUENTIAL DAMAGES WHATSOEVER, INCLUDING, WITHOUT LIMITATION, DAMAGES FOR LOSS OF PROFITS, LOSS OF DATA, BUSINESS
INTERRUPTION OR ANY OTHER COMMERCIAL DAMAGES OR LOSSES, ARISING OUT OF OR RELATED TO YOUR USE OR INABILITY TO USE THE PELTOR SOFTWARE,
HOWEVER CAUSED, REGARDLESS OF THE THEORY OF LIABILITY (CONTRACT, TORT OR OTHERWISE) AND EVEN IF 3M HAS BEEN ADVISED OF THE POSSIBILITY OF
SUCH DAMAGES. SOME JURISDICTIONS DO NOT ALLOW THE EXCLUSION OR LIMITATION OF LIABILITY FOR PERSONAL INJURY, OR OF INCIDENTAL OR
CONSEQUENTIAL DAMAGES, SO THE ABOVE EXCLUSIONS OR LIMITATIONS MAY NOT APPLY TO YOU. In no event shall 3M’s total liability to you for all damages (other than as
may be required by applicable law in cases involving personal injury) exceed the amount of fifty dollars ($50.00). The foregoing limitations will apply even if the above stated remedy fails
of its essential purpose.
8. Export Control. You may not use or otherwise export or re-export the Peltor Software except as authorized by United States law and the laws of the jurisdiction in which the Peltor
Software was obtained. In particular, but without limitation, the Peltor Software may not be exported or re-exported (a) into any U.S. embargoed countries or (b) to anyone on the U.S.
Treasury Department’s list of Specially Designated Nationals or the U.S. Department of Commerce Denied Person’s List or Entity List. By using the Peltor Software, you represent and
warrant that you are not located in any such country or on any such list. You also agree that you will not use these products for any purposes prohibited by United States law, including,
without limitation, the development, design, manufacture or production of missiles or nuclear, chemical or biological weapons. You certify that this Peltor Software will only be used for
programming Peltor DECT-Com II, and will not be rented, sold, leased, sublicensed, assigned, or otherwise transferred. Further, you certify that you will not transfer or export any
product, process or service that is a direct product of this Peltor Software.
9. Government End Users. If the Peltor Software is supplied to the United States Government, the Peltor Software are “Commercial Items”, as that term is defined at 48 C.F.R. §2.101,
consisting of “Commercial Computer Software” and “Commercial Computer Software Documentation”, as such terms are used in 48 C.F.R. §12.212 or 48 C.F.R. §227.7202, as
applicable. Consistent with 48 C.F.R. §12.212 or 48 C.F.R. §227.7202-1 through 227.7202-4, as applicable, the Commercial Computer Software and Commercial Computer Software
Documentation are being licensed to U.S. Government end users (a) only as Commercial Items and (b) with only those rights as are granted to all other end users pursuant to the terms
and conditions herein. Unpublished-rights reserved under the copyright laws of the United States.
10. Controlling Law and Severability. This License will be governed by and construed in accordance with the laws of the State of Minnesota. This License shall not be governed by the
United Nations Convention on Contracts for the International Sale of Goods, the application of which is expressly excluded. If for any reason a court of competent jurisdiction finds any
provision, or portion thereof, to be unenforceable, the remainder of this License shall continue in full force and effect.
11. Complete Agreement. This License constitutes the entire agreement between the parties with respect to the use of the Peltor Software licensed hereunder and supersedes all prior
or contemporaneous understandings regarding such subject matter. No amendment to or modification of this License will be binding unless in writing and signed by 3M. The parties
hereto confirm that they have requested that this License and all related documents be drafted in English.
12. Third Party Acknowledgements.
Portions of the Peltor Software utilize or include third party software and other copyrighted material. Acknowledgements, licensing terms and additional disclaimers for such material are
contained in the documentation for the Peltor Software or may accompany such material, and your use of such material is governed by their respective terms.
Page 2 of 22
Peltor DECT-Com II – Programming Manual
Peltor™ DECT-Com II™ is a short range, full duplex, wireless communication system
using DECT-technology. It gives up to nine users the possibility to simultaneously speak
in full duplex conference and, in addition to that, a large number of participants as
listeners, with quick break-in possibility.
The DECT-Com II system is available in two frequency versions; 1.8 GHz for use in
most all countries*) and a special 1.9 GHz version for North America.
By using a cable, an external communication radio, telephone or other audio source can
also be connected to the DECT-Com II system.
For details about the use of the DECT-Com II system, please study the user’s
instructions before programming the equipment!
The user’s manual is available on the 3M Peltor Communications web page
http://peltorcomms.3m.com/
*)
NOTICE!
The programming dealer should inform the user of the responsibility to
obtain any necessary licences for using the communication radio in the
DECT-Com II and for any possibly connected radio equipment!
Page 3 of 22
1. The DECT-Com II Programming Kit (DC2093)
Hardware:
• Peltor DECT-Com II charger/programmer (DC2065).
• Programming cable (DC2091).
Software:
• Drivers for USB interface (for Windows XP and Windows Vista).
• Dealer software (Install shield).
• Programming guide.
The software can be obtained from the 3M Peltor Communications web page.
Please see below!
2. Download the Peltor Dealer Software
•
Latest software updates will be found on the 3M Peltor Communications web
page http://peltorcomms.3m.com/dealer/
For access to Peltor Communications Extranet you need your password.
•
Save the setup file to your computer.
“Peltor_DECTCom_II_#.#.#.#_(with_flash_loader)_setup.exe”
•
When the installation is completed a shortcut to “Peltor DECT-Com II (with
flash loader)” will appear under “Peltor DECT-Com”under the Windows START
button.
Page 4 of 22
3. Install and connect the programmer to the computer.
Programming holder DC2065
To install the programmer, please follow the procedure below.
(Valid for Windows)
•
Install the software by running the setup file
Peltor_DECTCom_II_#.#.#.#_(with_flash_loader)_setup.exe
(#.#.#.# = version number)
•
Approve the licence agreement.
•
Accept settings and the SW will be installed.
•
Download and install the USB drivers from the advised link presented during
setup of the software.
•
Attach the USB cable to the programming holder DC2065.
•
Attach the USB cable to a free USB connector on your computer.
•
Let Windows find the correct driver for the programmer.
•
When a message telling you that the programmer is installed and ready for
use, please proceed to next step.
Page 5 of 22
4. Start a main unit and the program for to find the programming menu
•
Put a DECT-Com II main unit in the charger/programming holder.
•
Start the main unit by pressing the Mode-button [M].
•
The LED on the main unit is flashing green.
•
Start the program from the shortcut to “Peltor DECT-Com II (with flash loader)” or
from the computer’s start menu.
•
A connection screen is displayed.
•
Press “Test Connection” to recognise a main unit in the holder.
NOTICE! You need to have a started main unit in the programming holder.
•
When an information screen is showing the message “connected”, click OK.
•
Click “proceed” button in the connection screen and the software is ready for use.
File
Open full file…
Save full file as…
Open patch file…
Save patch file as…
Exit (Close application)
Settings
Connection settings
Work online
Open a settings file.
Save a settings file from a main unit.
Open a settings file with fewer parameters from a previous
main unit.
Save a settings file with fewer parameters from a previous
main unit.
Leave the program.
Opens the connection window, also showed at start up.
Enables you to change sound levels directly and you can
easily hear the result of your changes.
Advanced Load firmware
Opens the load firmware window.
Help
Shows which version and when it is released.
About.
Page 6 of 22
5. Connect a DECT-Com II main unit to the computer
• Place a DECT-Com II main unit in the Programming holder and start the unit by
pressing the mode-button [M] and the LED on the main unit is lit.
• Start the program “Peltor DECT-Com II (with flash loader)”
Follow the steps in chapter 4.
•
Press “Read all” button.
• The status of the connection, SW version and S/N of the main unit is shown at
the bottom of the window.
Page 7 of 22
6. Main unit settings
When a DECT-Com II main unit is connected, a memory reading should be done.
•
Click on “Read all” to read all settings from the main unit.
“Name” shows the specific name given to a main unit.
“Now editing” shows the type of main unit mounted in the programming
holder.
“Running as” shows the actual state of the main unit.
•
Click on “Write all” to write all settings to the main unit.
Notice: A restart of the unit is recommended after writing information into it.
•
Mark “Force restart after write” to activate an automatic restart after writing.
•
Click on “Reset all settings – keep subscriptions” to perform a factory reset
with the old subscriptions still left in the unit.
•
Click on “Reset all settings – Remove subscriptions” to remove old
subscriptions and reset to factory settings.
•
Mark “Filter ON after reset” to activate the subscription filter after a factory
reset.
Data from any reading can be stored in a file
o Use “File“ and “Save full file as…” or “File“ and “Save patch file as…” to save
the data.
o Name and save the file.
Page 8 of 22
7. Load new firmware into the main unit
• Go to Advanced / Load Firmware.
• Click “Select” to choose the firmware file you want to program into the main unit
(*.bsx).
• Click on “Start loader” button.
• Turn off the unit by pressing the mode button [M] until the LED is turned off and
then click “OK”.
• Turn on the unit and keep the [M] button pressed. Click “OK” while still pressing
the [M] button.
• Release [M] button when the progress bar has started to run.
Page 9 of 22
• A message “Load of Firmware succeeded!” will appear if the programming
was finished without any failure.
• After a successful Firmware load a “Reset to factory settings” is needed.
If you have an already configured system:
If you have more DECT-Com II systems running close to each other, the option “Filter
ON after reset” is recommended to avoid mixing the systems.
• Mark “Filter ON after reset” to activate the subscription filter after a factory
reset.
• Click on “Reset all settings – keep subscriptions” to perform a factory reset
with the old subscriptions still left in the unit.
If you have a new system, which never has been configured, or if you want to
reconfigure the system:
If you have more DECT-Com II systems running close to each other, the option “Filter
ON after reset” is recommended to avoid mixing the systems.
• Mark “Filter ON after reset” to activate the subscription filter after a factory
reset.
• Click on “Reset all settings – Remove subscriptions” to remove old
subscriptions and reset to factory settings.
Page 10 of 22
8. General settings
There are five tabs for different settings. All are described in this and the following four
chapters.
General
When the cursor is placed over the settings squares, the default values and other settings
information is shown on the bottom of the page.
• Name
A specific name of the main unit can be
entered here.
• All-call channel max Tx time
The maximum time period of an “all-call”.
(Another period can be added with another
press on the buttons.)
• Auto Logon to next base delay
The time the unit will wait before it starts to
log on to a new base, when out of range.
• Battery low warning
The voltage level for battery low warning.
• Battery empty warning
The voltage level for battery empty warning.
• Auto power off
The number of hours before the unit will shut
off, if no button is pressed.
Page 11 of 22
General settings (continued)
Headphones Volume
• Volume boost enabled
+6 dB added in all speaker volume steps
(for instance when ear plugs are used inside an
attenuating headset with DECT-Com II).
• Volume
The levels of the different volume steps.
Headphones AGC
• Enabled
Automatic Gain Control for the headphones.
• Parameters
Values for AGC level, AGC attack time and
AGC decay time.
Page 12 of 22
9. Man Machine Interface
General
• LED indication enabled
Light Emitting Diode on or off.
• Enable Voices
The guide voice on or off.
• Lock Buttons
Locks all settings, except for the ON/OFF
function
• Auto Talk
“Talk mode” is automatically entered when
starting the unit.
Notice: Only active on Group 1 with maximum 9
units!
Timing
• Double click delay
The maximum time between two keystrokes
for a “double click”.
• Long key time
The minimum time to press a button for a
“long click”.
Continued on next page...
Page 13 of 22
Man Machine Interface (... continued)
Routing settings
Portable unit (also a Base unit running as Portable unit)
• Group 1
Group 1 activated (controlled by PTT1).
The first group (Group 1) is always activated.
(Maximum 9 simultaneous speakers, plus a large number of
listeners, when only group 1 is activated.)
• Group 2
Group 2 activated (controlled by PTT2).
(Notice: The total number of simultaneous speakers on the base
is reduced by 1 to max. 8 speakers totally, shared in both
groups, but with additional listeners in both groups.)
• Momentary PTT2
Return to the previous group after PTT2 activation.
• + Group 1
Direct the speech in Group 2 also to Group 1.
• Base RA2 PTT
N/A
Continued on next page...
Page 14 of 22
Man Machine Interface (... continued)
Routing settings
Portable (also a Base unit running as Portable)
• Group 3
Group 3 activated (controlled by PTT3).
The third group, for either DECT or external
equipment.
(Notice: If all the three groups are enabled, the total number of
simultaneous speakers is reduced to max. 7 speakers totally
shared in all groups, but with possibility for additional listeners in
all of them.
• Momentary PTT3
Return to the previous group after PTT3 activation.
• + Group 1
Direct the speech in Group 3 also to Group 1.
• Base RA3 PTT
Direct the audio from Group3/PTT3 to the external
audio output on an Extension base unit DC2#15.
(Common for all users in the DECT conference.)
• Local RA3 PTT
Direct the audio from Group 3/PTT3 to the external
output 3 to a personal unit on an Extension Base
DC2#15, working as Portable.
Continued on next page...
Page 15 of 22
Man Machine Interface (... continued)
Routing settings
Base unit
• Group locked
• No sidetone/GM
All groups are separated from each other.
Equipment connected to Group 3 on an Extension
base unit DC2#15 is available, but calls can only be
heard when listening to Group 3.
The side tone, i.e. the speaker’s own voice, is muted.
(This is mainly for use in the ground mechanic application.)
• Group 1
Group 1 activated (controlled by PTT1).
The first DECT group (Group 1) is always activated.
• Group 2
Group 2 (PTT2) activated.
• Group 3
Group 3 (PTT3) activated.
• RA2
N/A
• RA3
The interface for external audio on Group 3 is
activated (on an Extension Base DC2#15 base unit).
Page 16 of 22
10. Microphone
Mic
Microphone amplification
Gain
•
Lo Z
Normal level for “low impedance” microphone
•
Dynamic
Normal level for dynamic microphone
•
Electret
Normal level and bias voltage for an electret
microphone.
•
Carbon
Normal setting for “carbon microphone”
The three settings; Lo, Dynamic and Electret can be
adjusted to be equal, while the setting named “Carbon”
is separate.
VOX
Voice operated “noise gate”
ON
• Trig delay
Time for the “VOX” noise gate activation.
• Levels
Levels (sound pressure) for activation of the five “VOX”
steps respectively.
OFF
• Hold time
• Levels
Time for the release time of the “VOX”.
Levels (sound pressure) for deactivation of the five
“VOX” steps respectively.
Page 17 of 22
11. External Audio
This tab is only visible if there is an Extension Base/Portable unit (DC2#15) placed in the
programming holder.
RA2 interface levels
Interface parameters for external audio on Group 2.
(This connection is not yet implemented.)
RA3 interface levels
Interface parameters for external audio on Group3.
RA2 and RA3 noise gate
Squelch threshold level for both external audio
interfaces.
(The RA2 connection is not yet implemented.)
Page 18 of 22
12. Logging
All devices
This list shows all the units which have been connected to the actual
computer.
Bases and Portables
Base
(This alternative will only be shown if a unit running as Base is placed in the programming holder.)
• Filter ON
Tick this box if the Base unit shall only accept
connection with Portable units in the “Subscribed
Portables in the main unit” list.
• Trusted Portables to be programmed
Click on the wanted Portable unit in the “All devices”
list and drag it to the “Trusted Portables to be
programmed” list.
(This action can be repeated to log more units.)
If the box “All access allowed” is marked, or if you
double click in the “Access” column, the unit(s) will be
allowed to connect to the base.
Press “Write All” to move the unit(s) to the
“Subscribed Portables in the main unit” list.
Continued on next page...
Page 19 of 22
Logging (... continued)
All devices
This list shows all the units which have been connected to the actual
computer.
Bases and Portables
Portable
(This alternative will only be shown if a unit running as Portable is placed in the programming
holder.)
• Filter ON
Tick this box if the Portable shall only accept
connection with Base units in the “Subscribed
Bases...” list.
Trusted Bases to be programmed
Click on a wanted Base unit in the “All devices” list
and drag it to the “Trusted Bases...” list.
(This action can be repeated to log more units.)
If the box “All access allowed” is marked, or if you
double click in the “Access” column, the unit(s) will be
allowed to connect to the Portable.
Press “Write All” to move the unit(s) to the
“Subscribed Bases...” list.
Page 20 of 22
13. Information bar
In the bottom part of the screen window there is an information bar.
It displays special information, default value, min value, max value, unit and value
step size.
When the cursor is placed over the settings squares, the default values and other
settings information is shown on the bottom of the page.
Page 21 of 22
PELTOR™ DECT-Com II™
Charger / Programming Holder
DC2065
Charger / Programming holder for charging and/or programming the main units DC2811,
DC2812, DC 2815, DC2911, DC2912 and DC2915.
Charging a standard battery pack, DC2033, takes approx. 12 hours. Charging is
indicated with a red LED, when the LED turns green, charging is finished. A blinking
red/green LED indicates that the charger unit is detecting/analysing a newly inserted
battery. Note! There is only possible to charge battery pack DC2033 in this charger.
For programming a main unit, connect the programming holder with the included USB
cable to the computer. Please follow the instructions in this DECT-Com II programming
manual for programming your main units.
Included in the package is also a universal mains adaptor with connectors for EU, UK
and US. Choose your appropriate mains connector and mount it on the mains adapter.
TECHNICAL DATA
Mains adapter
Input
100 – 240 V≈, 50/60 Hz, 400 mA
Output
9.0 V
1.0 A
Charger / Programming holder
Input
9 – 15 V DC
Charge time of a DC2033
Up to ~12 hours
Charging temperature interval
5°C to 45°C
USB interface
USB 2.0
Page 22 of 22