1
SERVICING
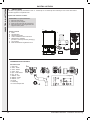
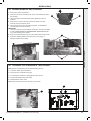
50 User control PCB replacement
Note. Fit the earth strap provided with the PCB to your
wrist and a suitable earth on the boiler chassis.
1. Refer to Frame 39.
2. Remove the main PCB, refer to Frame 49.
3. Unclip the PCB and lift to clear the mounting posts.
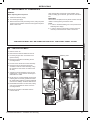
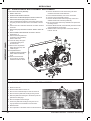
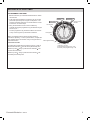
4. Fit the new PCB ensuring the 3 potentiometer
spindles line up with the control knobs which must
be in a vertical position.
5. Reassemble in reverse order.
6. Check operation of the boiler. Refer to Frames 28 &
29.
3
4
servicing
PCB
Potentiometer spindle
Control Knobs (to be in vertical position)
30
off
e
max
reset
min
preheat
min
max
mode
20 19 18 1
7
22
21
23
burner
preheat
16
15
0
I
status
24
14 13 12 1
1
3
2
1
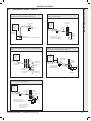
51 Replacing the Mechanical Timer
Exclusive
10
9
8
7
6
5
4
1. Refer to Frame 39.
4
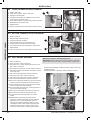
2. Swing the boiler lower front panel into the service
position. Refer to Frame 33.
3. Remove the 4 fixing screws.
4. Disconnect the 4 push on connectors.
5. Remove programmer.
6. Re-fit 4 push on connectors to new programmer.
7. Fit programmer and retain with 4 screws previously
removed.
2
8. Replace the lower front panel.
9. Check operation of the boiler. Refer to Frames 28 &
29.
Note. To program refer to user guide at rear of this
book.
Procombi Exclusive - Installation and Servicing
43