1
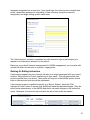
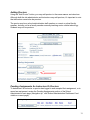
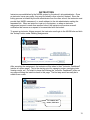
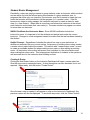
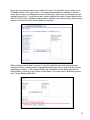
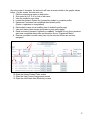
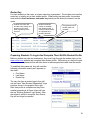
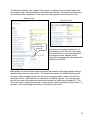
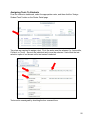
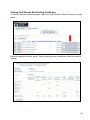
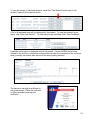
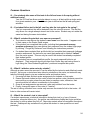
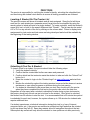
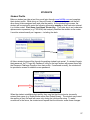
ONLINE USER'S MANUAL
Version 3.0
September 2010
TABLE OF CONTENTS
TESTING POLICIES......................................................................................... 3
OVERVIEW OF USER ROLES ........................................................................ 4
Primary Site Administrator ..................................................................................................4
Instructor.............................................................................................................................4
Proctors ..............................................................................................................................5
Students .............................................................................................................................5
USER LOGIN - GENERAL ............................................................................... 6
School Staff Login...............................................................................................................6
Student Login .....................................................................................................................7
PRIMARY SITE ADMINISTRATOR ................................................................. 8
Adding Instructors...............................................................................................................9
Retiring Or Editing Instructors...........................................................................................10
Adding Proctors ................................................................................................................11
Pending Assignments As Instructors Or Proctors .............................................................11
Assisting Instructors..........................................................................................................12
Site Administrator With Proctor Role ................................................................................12
INSTRUCTORS .............................................................................................. 13
Student Roster Management............................................................................................14
Roster Key........................................................................................................................18
Preparing Students To Login And Complete Their NA3SA Student Profile ......................18
Assigning Tests To Students ............................................................................................20
Viewing Test Results And Printing Certificates.................................................................22
Common Questions ..........................................................................................................24
PROCTORS.................................................................................................... 25
Locating A Student On The Proctor List ...........................................................................25
Unlocking A Test For A Student .......................................................................................25
Helpful Hints .....................................................................................................................26
STUDENTS..................................................................................................... 27
Student Profile ..................................................................................................................27
Starting A Test ..................................................................................................................29
Example Test Screen .......................................................................................................30
Viewing Test Results ........................................................................................................32
1
TESTING POLICIES
The Automotive Youth Educational Systems (AYES), the National Automotive Technicians Education
Foundation (NATEF) and SkillsUSA have partnered to offer the National Automotive Student Skills
Standards Assessment (NA3SA) tests for use by schools to evaluate students nearing completion of their
automotive studies. The NA3SA tests are developed and delivered by the National Institute for
Automotive Service Excellence (ASE).
For the NA3SA tests to effectively measure the student’s knowledge, they must be uniformly and
securely administered. Therefore, both the instructors who schedule the tests and the proctors who
administer them must strictly follow all program procedures.
Testing Dates and Times – The NA3SA tests may be administered during the published testing window
only. During the testing window, tests can be scheduled for any time of the day that a proctor is available
for supervision.
Testing Environment – The NA3SA tests may be offered on any computer that meets the minimum
technical and security requirements. The computer must be located in a computer lab or other
appropriate testing location that provides for monitoring by the proctor, reasonable shielding from others,
freedom from distractions, and comfort for the examinee.
Proctors – The proctor may be a school administrative staff member or current or retired faculty
member, but may not be a faculty member currently teaching motor vehicle technology. Students may
not be proctors.
Proctor’s Responsibility – The proctor is responsible for verifying the student’s identity, enabling the
computer-based test for the student, and providing general oversight of the student during the testing
session. This includes ensuring that there is no cheating of any kind, including giving or receiving help,
using books or notes, etc.
Accommodations - Students with special needs (i.e. students with Individual Education Plans) may
receive reasonable accommodations for their special needs provided that those accommodations do not
compromise test integrity.
Retests – Retests for completed NA3SA tests are not allowed during the same testing window. Students
who are unsuccessful in achieving a passing grade, or those who wish to improve their score, may not
reattempt the same exam until a later testing window.
Instructor Level Access – Instructors are given unique password access to the testing platform for
registering students and monitoring their progress. Instructors may not share their access information
with students and must take reasonable precautions to safeguard their password at all times. Instructors
are not allowed to view the tests at any time.
Cancellation of Scores – ASE reserves the right to cancel any test score and/or bar participation in the
NA3SA testing program if ASE has reason to question the validity of a test score. Misconduct during the
testing session, multiple test attempts by one student in a test window, and prior access by instructors to
test forms can all compromise test validity.
Good And Reasonable Effort – ASE considers each school participating in the NA3SA tests to be an
active partner in the test delivery process. As such, ASE expects all school staff involved in the testing
program to exercise good and reasonable effort to maintain the integrity of the testing program.
User Name – All non-student users must use a valid email address as their NA3SA username.
3
OVERVIEW OF USER ROLES
Each user in the NA3SA system is assigned one or more roles, with each role having
specific responsibilities and capabilities. These roles are somewhat hierarchical and include
a Primary Site Administrator, Instructor, Proctor, and Student.
Primary Site Administrator
The Primary Site Administrator may be an instructor or other staff person who will serve as
the NA3SA system coordinator for the school.
The site administrator role possesses the following abilities and responsibilities:
1. Add and remove instructors to/from the school
2. Add and remove proctors to/from the school
3. Reset instructor’s and proctor’s password
4. View and edit the school’s profile data
5. Monitor the progress of all testing
6. Help the instructor manage class rosters, assign tests, and review test results
7. Download student test results (csv file format)
A Site Administrator may be assigned to more than one school. For school systems that
have a central coordinator for the NA3SA tests, these features allow one person to manage
and monitor multiple schools.
Assignment as a site administrator can only be made through the NA3SA help desk.
Certain fields in the site administrator's profile can be self-edited. Fields that cannot be
edited by the Site Administrator can only be changed by the NA3SA help desk (e.g. first and
last name). NA3SA help desk phone number: 1-800-362-0544.
Instructor
The instructor role possess the following abilities and responsibilities:
1. Verify and edit own profile
2. Build and maintain class rosters
3. Add existing students to a class roster
4. Add new students to a class roster
5. Remove student names from their own class roster
6. Reset student passwords
7. Assign tests to students
8. View student test results
9. Create proctors
10. Print test results and certificates
Instructors are established by the school's Primary Site Administrator. Where appropriate,
the instructor may be associated with more than one school.
4
Proctors
Proctors are responsible for enabling and monitoring the tests for the students. Proctors are
established by either the Instructor or the Site Administrator. The proctor may be a school
administrative staff member or current or retired faculty member, but may not be a faculty
member currently teaching motor vehicle technology. Students may not be proctors. Where
appropriate, proctors may be associated with more than one school.
The proctor role possess the following abilities and responsibilities:
1. Verify a student's identity
2. Enable the assigned test one at a time
3. Re-set a test if the student should become disconnected from the system while
testing
4. Monitor the test session to ensure all testing policies are followed
Students
The student role can be assigned to any student currently enrolled in the automotive
program. Student users are initially established by an instructor by placing the student's
name on one or more class rosters. This process creates a unique roster key to be used by
the student during their first login as a means to confirm a link to the instructor's roster.
Student responsibilities include:
1. Login prior to test date and complete their student profile
2. Take tests assigned to them by their instructor
3. View test results on the NA3SA system
5
USER LOGIN - GENERAL
All users of the National Automotive Student Skills Standards Assessment (NA3SA) will
login through the NA3SA.com home page. Two login buttons are provided, one for school
staff, the other for students. Login page: www.NA3SA.com
School Staff Login
School Site Administrators, Instructors, and Proctors will
sign in through the School Staff Login portal by entering
their user name and password as indicated.
The user name and password are sent to school staff via
email when they are established as a user in the system.
Upon initial login, users are asked to change their
password. User name and passwords can be self-edited
at anytime through the user's profile. The user can also
create a password recovery question and answer in their
profile to help them re-set their password in the future if it
is forgotten or misplaced.
• Passwords must be at least six characters long
and contain two non-alpha characters.
• User names must be a valid email address.
6
Student Login
Students logging in for the first time will use the New
Student Registration portal provided in the lower half of
the Student Login screen. In addition to entering their
first and last name, they must enter the Roster Key
provided by one of their instructors. A student must first
appear on an instructor's roster before the student can
establish their profile in the NA3SA system.
Upon the first login, the student must complete their
student profile and create a permanent user name and
password. The student can also create a password
recovery question and answer in their profile to help
them re-set their password in the future if it is forgotten or
misplaced. Future student logins will be accomplished
through the Existing Students portal.
• Passwords must be at least six characters long
and contain two non-alpha characters.
7
PRIMARY SITE ADMINISTRATOR
Each school must have someone identified as the Primary Site Administrator to participate
with the NA3SA. This person is initially identified by the school on the NA3SA order form.
Changes can be made as necessary by contacting the NA3SA help desk.
When the site administrator is established or updated, they will receive an email notifying
them of the assignment. This notification contains the school name for which the
assignment is being made. If they are a new user to the system, their user name and
password will also be sent via email. The new site administrator should login to the system
as soon as practical and update their password to something of their choosing. At this time
the site administrator can also create a password recovery question and answer should they
misplace or forget their password in the future.
An individual user may be established as a site administrator for more than one school.
This allows a group of schools (e.g. a school district) to utilize a central coordinator if
desired. For those site administrators who are associated with more than one school, they
are given a "Select School" button at the top of the page for moving from one school to
another. Care must be taken to ensure that the correct school is selected before making
any changes. If the site administrator is not associated with more than one school, the
"Select School" button will not be displayed.
This button not
shown if user is
associated with
only one school.
Indicates which
school is currently
selected
8
Adding Instructors
The site administrator's first step should be to maintain the school's list of participating
automotive instructors. New instructors can be added, and instructors who are no longer
with the school can be disassociated from the school.
To add a new instructor to the school, the following information is needed:
1. First and last name
2. Email address (this will be their username)
3. Telephone number
To determine if the instructor is already in the system, click "Add Instructor", enter the
instructor's email address into the "User Name" box under the label "Select Existing User",
and then select "Find User".
If the instructor is already in the system, a profile box will be displayed with additional
information you can use to verify his/her identity. If this is correct, click "Select This User".
An email will be automatically sent to the instructor requesting that they accept this
assignment to your school.
If the instructor is not already in the system, select "Create New User" and enter the
required information. When ready, click "Create User" at the bottom of the screen. Two
emails will automatically be sent to the instructor. The first email provides them with a
temporary password and login instructions. The second email notifies them of the
9
requested assignment as an instructor. Upon initial login, the instructor can complete their
profile, update their password to something of their choosing, accept the instructor
assignment, and begin setting up their class roster.
The "Add Instructor" process is completed once the instructor logs in and accepts your
request to be listed as an instructor for the school.
Based on your school's internal arrangements for NA3SA management, you may also add
yourself as either an instructor or a proctor, if appropriate.
Retiring Or Editing Instructors
If an instructor appears on your instructor list who is no longer associated with your school,
click the "Retire Instructor" button located next to their name. This will disassociate their
instructor profile from your school. Their profile will stay live in the NA3SA system and all
links to other schools and roles will be maintained.
If an instructor's name is spelled incorrectly (e.g. Bob vs. Robert), select the "Edit
Instructor's Profile" button to access their profile and make the required changes. Only the
school's site administrator, or the NA3SA help desk, can make changes to the instructor's
name. Otherwise, the instructor can maintain the rest of their profile as needed.
10
Adding Proctors
Using the "Add Proctor" button, you may add proctors in the same manner as instructors.
Although both the site administrator and instructors may add proctors, it's important to note
that instructors cannot also be proctors.
The proctor may be a school administrative staff member or current or retired faculty
member, but may not be a faculty member currently teaching motor vehicle technology.
Students may not be proctors.
Pending Assignments As Instructors Or Proctors
To determine if an instructor or proctor has logged in and accepted their assignment, or to
cancel an assignment, review the Pending Assignments section of the School
Administrator's main page (Navigation tip: click School Administration Dashboard if not
visible on current page).
11
Assisting Instructors
As the school's site administrator, you also have all the functions an instructor has. This
feature allows you to assist the instructor with any of their responsibilities such as managing
class rosters, assigning tests, and reviewing testing progress. To access this feature, click
the "Assist Instructor" button for the instructor you wish to help. This essentially allows you
to act on their behalf and perform any of the functions that are associated with that
instructor.
Site Administrator With Proctor Role
Site administrators who also have a proctor role can switch between those two roles by
selecting either the "School Administration" or the “Proctor Dashboard" buttons. To enable
tests for students, the user must be on the Proctor screen. For details on the Proctor
capabilities and procedures, please refer to the Proctor section of this manual.
For Site Admins who are
also Proctors, click here
to switch to the Proctor
screen to launch tests.
12
INSTRUCTORS
Instructors are established in the NA3SA system by the school's site administrator. Once
an instructor has a user profile, they may be linked to other schools if desired. Since the
linking process is initiated by the site administrator from the other school, the instructor must
provide their NA3SA username (i.e. email address) to the site administrator making the
requested link. When an instructor is set up in the system, or when an instructor
assignment request is made from another school, the instructor will receive an email
notification that serves as a request to be associated with that school.
To accept an instructor linkage request, the instructor must login to the NA3SA site and click
the "Accept" button under Pending Assignments.
After accepting the assignment, the instructor will be taken to their "Instructor Dashboard"
(similar to a home page). This is the starting point for managing rosters, assigning tests,
viewing results, etc. It's helpful to know that clicking the "Instructor Dashboard" button on
any page will bring the instructor back to this page. The first step would normally be to
create a new roster.
To create a new
roster, click here.
13
Student Roster Management
Essentially, rosters are simply a means to group students under an instructor within a school
and are active for both the fall and spring test windows of a given academic year. In
programs that utilize only one instructor, the instructor may find it easiest to create just one
roster that contains all the students in his/her program (i.e. a master roster). If the list
becomes too large to easily manage, the instructor may want to create a roster for each
class (i.e. class rosters). When there is more than one automotive instructor at the school,
each instructor would create their own roster(s). The same student may appear on rosters
for more than one instructor.
NA3SA Certificate And Instructor Name - Since NA3SA certificates include the
instructor’s name, it is important to list the students and assign tests under the correct
instructor. Changes to a test assignment cannot be made once the test has been started by
the student.
Helpful Concept – Regardless of whether the school has one or more instructors, or
whether an instructor has one or more rosters, the process of building class rosters creates
a master school roster behind the scenes. This school-wide "master school roster" is used
to create an available student list when creating a new roster or when editing an existing
roster. All instructors in the school will access, and contribute to, the school-wide roster
when making their class roster. This helps prevent duplication of students in the system as
well as saves time for the instructor when building a roster.
Creating A Roster
Clicking the Add Roster button on the Instructor Dashboard will open a create roster box.
Give the new roster a meaningful name. A short description can also be added, but is not
required. When ready, click the button "Create Roster".
Once the new roster is created, it will appear in a list on the Instructor's Dashboard. Any
previous rosters will also be displayed. To work with any roster, click the "Select" button.
14
To add students to the roster, click the "Add/Create New Student(s)" button.
When the very first roster for the school is created, all students will need to be entered onto
the roster using the New Student option at the bottom of the Add Student screen. Clicking
the New Student button as shown below will expand the Add Student box to provide a
means to enter new student names.
Click "New
Student" button to
expand the box.
Students name will
appear here as they
are added.
Enter student's name, then click
"Add New Student To Roster"
15
Every time an instructor adds a new student to a roster, the student's name is place on an
"Available Student" list for the school. If a student has already been entered on another
roster, by the same or a different instructor at that school, their name should appear on the
available student list. To add that student, simply highlight the student's name and click the
"Add To Roster" button. Multiple students can be selected at the same time by holding down
the shift or control key while clicking additional students.
When adding a new student to a roster, if someone with the same last name has been
added previously, a warning will be displayed prompting the user to verify that they are not
duplicating a student. In the example below, the new student that is being entered now,
Robert Baker, is already in the system as Bob Baker. Of course if this is a different person,
click “Create Additional Student”.
16
Once the roster is complete, the instructor will have a screen similar to the graphic shown
below. On this screen, the instructor can:
1. Edit the roster/course name or description
2. Sort roster list A-Z, Z-A, by first or last name
3. View the student's user name
4. Locate the student's Roster Key (needed by student to complete profile)
5. Determine if a student has completed their student profile
(Status = registered or unregistered)
6. Edit student's name (via a modified view of student's profile page)
7. View test results (also access certificates via test results page)
8. Reset a student's password (defaults to: na3sa1). Available for only those students
who have completed their profile and therefore show a "Registered Status"
9. Remove a student from the roster (can only be removed if there are no tests
assigned)
10. Open the Assign Student Tests screen
11. Open the View Current Assignments screen
12. Open the Add/Create New Student(s) screen
17
Roster Key
For each student on the roster, a unique roster key is generated. The student must use this
roster key to initially set up their student profile. When setting up their profile, the student
must enter the first, last name, and roster key exactly as the instructor entered it on the
roster.
Student must enter first
and last name exactly as it
appears on the roster
when registering for the
first time.
Student needs this
number to establish
their student profile. It
must be entered exactly
as it appears here –
including the dash.
Unregistered means
student profile not
complete.
Preparing Students To Login And Complete Their NA3SA Student Profile
Before a student can take an assessment, they must login through the student login on the
www.na3sa.com website and complete their student profile. While doing so, they will create
a user name and password that will allow them to take assigned tests and view the results.
To establish their password, they will need the
following information exactly as it appears on
the roster:
• First Name
• Last Name
• Roster Key
The very first time a student logs in they will
use the lower "New Student Registration" login
portal as shown in the graphic to the right.
After their profile is complete and they have
created a password, all future logins will use
the top "Existing Students" login portal. After
the student's profile is complete, their Roster
Key will no longer be needed.
18
The following "Student View" graphic shows what is collected from the student when they
set up their profile. Required fields are identified with asterisks. Students should have only
one student profile, regardless of how many times they appear on an instructor's roster.
Student View
Instructor View
School or
state issued
student ID
Instructors can access a limited view of
the student's profile from the roster page
that allows them to correct the spelling of
the student's name, add/edit school
issued ID and relationship information with
SkillsUSA and AYES.
Many states and school districts have requested that certain student demographic data be
reported along with the score results. To facilitate this request, the NA3SA student profile
contains a free-from data field that can be used to capture a state or school issued ID for
the student (Note: SSN data are not collected in the NA3SA system). By using this field,
schools can export the assessment results and include the locally issued student ID. This
ID can be used to index these records to other student records maintained by the school. In
this way, student identifying information is controlled by the school.
19
Assigning Tests To Students
From the instructor dashboard, select the appropriate roster, and then click the “Assign
Student Tests” button on the Roster Detail page.
Two steps are required to assign a test. First, the series must be selected (i.e. Automobile,
Collision, or Truck). Second, the individual test(s) must be selected. Notice that the test
selection option is not shown until a test series is selected.
Tests can be unassigned by checking the box a second time.
20
For every test series that is selected, the $15 test fee will be deducted from the school’s
account. If tests are assigned to a student in two test series (e.g. Automobile and Collision
series), two student test fees will be deducted. The school must have an adequate account
balance to schedule all participating students.
Test Abbreviations
Automobile
SS = Suspension and Steering
BR = Brakes
EE = Electrical/Electronic Systems
EP = Engine Performance
ER = Engine Repair
AT = Automatic Transmission/Transaxle
MD = Manual Drive Train and Axles
AC = Heating and Air Conditioning
Collision & Refinish
PR = Painting and Refinishing
SR = Structural Analysis and Damage Repair
NS = Non-Structural Analysis and Damage Repair
ME = Mechanical and Electrical
Truck
DE = Diesel Engines
TE = Electrical/Electronic Systems
TB = Brakes (Available 2011)
TS = Suspension & Steering (Available 2011)
Once tests are assigned, the student may be directed to the proctored testing location any
time during the published testing windows – fall or spring. The details of scheduling (e.g.
which tests to take, date, time, and location) are determined at the school level.
Test Fees
The test fee allows for a single attempt at any or all tests in a series for the given academic
year. Therefore, some of the tests can be taken in the fall, and others taken in the spring,
with no additional charge.
If a student never starts any of the assigned tests, because of transferring out of the
program for example, the unused credit will be posted back to the school's account after all
test assignments have been unassigned. This can be done at any time by the instructor
who originally assigned the test. Once the student has started any of the assigned tests,
the test credit cannot be refunded.
Retests
Although the $15 test fee allows a single attempt at any or all tests in a series, for an
additional test fee, the instructor may purchase a retest for all tests that were attempted in
the fall.
21
Viewing Test Results And Printing Certificates
To view the instructor summary report, select the "View Instructor Report" button for a given
roster.
Below is a sample instructor report. Data on the report are updated each time the report is
opened.
22
To view the scores of individual students, select the "Test Results" button next to the
student's name on the instructor roster.
A list of all assigned tests will be displayed for the student. To view the student's score
report, click "View Test Results". To view and print the certificate, click "View Certificate".
A detailed score report is displayed and can be printed. If a new NA3SA test is being
offered for the first time, results will not be posted until after the completion of the cut score
study (normally two weeks after the end of the spring testing window).
The instructor can print a certificate for
every test passed. Either the instructor
or school principal must sign the
certificate.
23
Common Questions
Q. – Can students take some of the tests in the fall and some in the spring without
additional costs?
Yes, the $15 test fee allows a single attempt on any or all tests within a single series
for a given academic year. An academic year is defined as the fall and spring test
windows.
Q. – If a student fails a test in the fall, can they take the test again in the spring?
Yes, but a second test fee will be deducted from the school's account. The test fee
only allows for a single attempt at each test in the series. Student may not retake the
same test during the same test window.
Q. – What if a student forgets their user name or password?
• The instructor can recover the student's user name from the roster. It appears next
to their name on the Roster Detail screen.
• If the student has completed their profile, including their password recovery
question and answer, they can retrieve their password from the student login page
by clicking "I Forgot My Password" and following the instructions provided.
• If a student has completed their profile but did not complete their password challenge
question and answer, the instructor can reset their password to a default "na3sa1"
from the roster screen. This can only be used if the student has already completed
their student profile.
• If the student has not completed their profile, the reset password button is not
displayed. Their instructor should give them their Roster Key and instruct them to
login using the "New Student Registration" portal and complete their profile.
Q. – What if I added an extra roster by mistake?
Although a roster cannot be removed, it can be edited by the instructor and effectively made
inactive. As long as no tests have been taken by students on the roster, an instructor may
take the following steps to give an undesired roster and inactive status:
1. Un-assign all tests and test series assignments for students on that roster.
2. Ensure that each student on this roster is listed on another roster (students cannot be
removed from a roster unless they are listed on another roster; otherwise, their
record would be left without a connection to the school).
3. Once all test assignments are removed, retire each student from that roster.
4. Finally, change the name of the roster to "Inactive".
The act of retiring a student from a roster only removes the student's link to that roster. All
links to other rosters will remain intact.
Q. – What if the student's test is interrupted?
If a student experiences a technical interruption during their test (e.g. loss of Internet
connection, computer failure, etc.), the proctor can reauthorize student test login and allow
the student to pick up where they left off. Same day restarts allow full navigation throughout
the test. Subsequent day restarts will only allow the student to view questions not seen
previously.
24
PROCTORS
The proctor is responsible for verifying the student's identity, unlocking the scheduled test,
and monitoring the student's test session to ensure all testing procedures are followed.
Locating A Student On The Proctor List
The proctor's screen will show all students and all tests assigned. Since the list will show
each test for each student as a separate record, large lists can be simplified by using the
search option to isolate all tests for a single student. To locate a student, enter the student's
name (first, last, or both) in the search fields and click "Search". The list can also be sorted
A-Z or Z-A on any column of the list by clicking on the column label. Filters to display tests
assignments by test series and test name are being developed and should be available by
the beginning of the testing window.
Unlocking A Test For A Student
To launch a test for a student, the proctor should take the following steps:
1. Verify the student's identity.
2. Confirm that the student has his/her user name and password.
3. Confirm which test the instructor wants the student to take and click the ”Unlock Test”
button for it.
4. Direct the student to login via the “Student Login” at www.na3sa.com and start their
test.
5. Monitor the student throughout the testing session to ensure he/she does not receive
assistance or open other programs or windows during the test session.
6. If a student is scheduled to take more than one test, they should notify the proctor
when they have completed the first test so the proctor can unlock the next one.
Regardless of how many tests a student is scheduled to take during a given test session,
the proctor should only unlock one test at a time for the student. Once a test is unlocked,
the student has 30 minutes to start the test. It is recommended that a 60 minute time period
is scheduled for each test; however, the system allows up to 120 minutes for students who
require additional time.
If a student experiences a technical interruption during their test (e.g. loss of Internet,
computer failure, etc.), the proctor can reauthorize student test login and allow the student
to pick up where they left off. Same day restarts allow full navigation throughout the test.
Subsequent day restarts will only allow the student to view questions not seen previously.
25
Helpful Hints
Helpful Hints
•
•
•
•
•
Time To Start – Students have 30 minutes to start the test once it is unlocked.
Time To Test – Sixty minutes is the recommended testing time. However, the
computer delivery system will allow 120 minutes if additional time is needed
(experience shows that most students require approximately 30 minutes to complete
the test).
Monitor Students – Students must be monitored by the proctor throughout the entire
test session.
Restarts – If a student experiences a technical interruption during their test (e.g. loss
of Internet connection, computer failure, etc.), the proctor can reauthorize student test
login and allow the student to pick up where they left off. Same day restarts allow full
navigation throughout the test. Subsequent day restarts will only allow the student to
view questions not seen previously.
Student Profile/Password – If a student has not previously set up their student
profile (i.e. established a user name and password), they must do so prior to starting
the test. To do this, they will enter their first name, last name, and their unique
Roster Key in the lower half of the student login screen. If necessary, the proctor can
locate the student's Roster Key next to their name on the proctor screen.
26
STUDENTS
Student Profile
Before a student can take a test, they must login through www.NA3SA.com and complete
their student profile. While doing so, they will create a user name and password that will
allow them to take assigned tests and view the results. At the student login screen, the
student will be required to enter the following information exactly as their instructor entered
it on his/her roster: First Name, Last Name, Roster Key. The roster key is a six character
alphanumeric expression (e.g. F2D-9HW) that uniquely identifies the student on the roster.
It must be entered exactly as it appears – including the dash.
All future student logins will be through the existing student login portal. If a student forgets
their password, the "I Forgot My Password" utility on the login screen will present them with
the Password Challenge Question from their profile. If answered correctly, the student will
be provided a screen to establish a new password.
When the student establishes their profile, they may find that the instructor incorrectly
entered their name (e.g. Bobby Bower rather than Robert Bower). The student may correct
the spelling of their first and last name only during the initial profile setup. To make
corrections in the future, the student must request that the instructor make those changes.
27
The following graphic shows which data are collected from the student when they manage
their profile. Required fields are identified with asterisks. Students should have only one
student profile, regardless of how instructors have them listed on their roster.
28
Starting A Test
When a student signs in, their home page will contain a "Student Dashboard" that is used to
navigate among different features of the system. Clicking the "My Exams" button will take
the student to a page similar to the one shown below. All tests that have been assigned by
the instructor will be listed. When the proctor has unlocked a test, the student has 30
minutes to login and begin their test. When the student is ready to begin their test, the
student will click the "Start" button next to the unlocked test.
Upon starting the test, the first screen the student will see is the Confidentiality Agreement.
Students must agree to the terms of this statement to participate with the NA3SA tests.
29
Example Test Screen
Below is a typical layout that demonstrates how the test questions are presented. The top
header displays the student's name on the left, and a clock indicating how much time
remains for the test on the right. The name of the current test is centered just below the
header.
To select an answer, click the button next to the desired choice. To change the selected
answer to something different, simply click on another option to change the response.
Use the navigation bar below the question to move throughout the test.
• To flag a question as a reminder to come back for a review, simply click the "Flag for
Review" button
• To move to the next or previous question, click "Next" or "Previous"
The navigation bar also displays the sequence number of the current question and how
many questions are on the test.
After answering the last question, or when clicking the "Review Test" button, the student is
taken to the test summary screen.
30
The summary screen shows the status of each question – answered, not answered, or
flagged for review. By hovering the cursor over the question icon, the first few words of the
question are displayed. To return to the question, click on the question number. Once all
flagged items have been reviewed and all questions have been answered, click "Submit
Test for Scoring".
When the test is submitted for scoring, the student is automatically logged out and returned
to the login screen. The student can log back in to view their results or to start another test.
31
Viewing Test Results
To view test results, login and select "View Test Results".
The resulting report will appear similar to the sample shown below.
32