1
218.FM Page 14 Thursday, March 18, 1999 9:57 AM
Selecting voltage and frequency
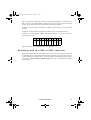
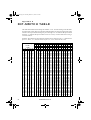
The RoboScan Pro 218 must be rewired if the voltage and frequency settings do not match
the local AC power supply. The factory settings are printed on the label on the front of the
fixture. The following table shows the available settings.
Model
Selectable
Voltages
Selectable
Frequencies
RoboScan Pro 218 EU
220 V / 230 V / 245 V
50 Hz
RoboScan Pro 218 US
100 V / 110 V / 120 V
50 Hz / 60 Hz
RoboScan Pro 218
US Arcstream
100 V / 110 V / 120 V
60 Hz
WA R N I N G !
Disconnect the fixture from AC power before proceeding.
1.
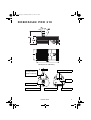
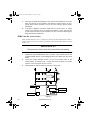
Unscrew the 8 screws, labelled 'A' and 'B' in figure 1, that secure the casing
over the lamp housing and remove the casing.
ROBOSCAN PRO 218 US
2. Locate the ballast at the rear-left corner (see figure 1) and move the
GREY wire, labelled 'F', to either the 50 Hz or the 60 Hz terminal to select
the local frequency.
3.
Similarly, locate the transformer at the rear-right corner of the unit, and
move the BROWN wire, labelled 'V', to either the 100 V, 110 V, or 120 V
terminal to select the local AC voltage.
4.
Reassemble the unit before connecting to AC power.
ROBOSCAN PRO 218 EU
2. Locate the ballast at the rear-left corner (see figure 1) and move the
GREY wire, labelled 'V', to either the 220 V, 230 V, or 245 V terminal to
select the local AC voltage.
3.
Locate the transformer at the rear-right corner of the unit and move the
BROWN wire, also labelled 'V', to either the 225 V or 240 V terminal to
select the local AC voltage.
4.
Reassemble the unit before connecting to AC power.
RO BO SCAN PRO 218 US A RC STREA M
2. Locate the transformer at the rear-right corner (see figure 1), and move
the BROWN wire, labelled 'V', to either the 100 V, 110 V, or the 120 V terminal to select the local AC voltage.
3.
Reassemble the unit before connecting to AC power.
Maintenance
14