1
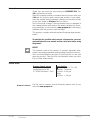
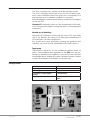
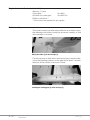
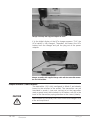
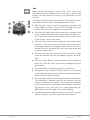
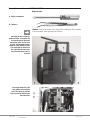
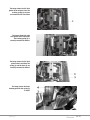
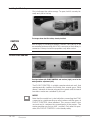
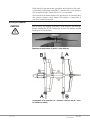
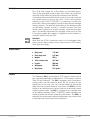
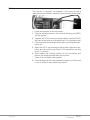
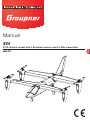
Manual X44 9944.RTF EN VTOL Electric model with 4 Brushless motors and 2,4 GHz transmitter 2 - 20 9944.RTF_jh_V1 Index Introduction ........................................................................... 4 Service Centre ....................................................................... 4 Intended use ......................................................................... 5 Package content ................................................................... 5 Symbols explication ............................................................... 6 Safety notes .......................................................................... 6 Required tools and adhesives (not included) .......................... 8 Suggested accessories (not included).................................... 8 Model assembly .................................................................... 8 Installing the LiPo battery ...................................................... 9 Graupner 6 channel 2,4 GHz transmitter ............................. 10 Transmitter translation from MODE II to MODE I................... 12 Installing the LiPo battery ..................................................... 14 The X 44 FLIGHT CONTROL ............................................... 14 Installing the propellers ........................................................ 15 First flight ............................................................................. 17 Technical Data ..................................................................... 17 Features .............................................................................. 17 Replacement parts (not included) ........................................ 18 Binding ................................................................................ 19 Notes on environmental protection ...................................... 20 Care and maintenance ........................................................ 20 Warranty certificate .............................................................. 20 Declaration of conformity ..................................................... 21 9944.RTF_jh_V1 3- 20 Introduction Thank you very much for purchasing the GRAUPNER X44. This X44 is extremely versatile. Read this manual carefully to achieve the best results with your X 44 and first of all to safely control your models. If you experience any trouble during operation, take the instructions to help or ask your dealer or Graupner Service Centre. Due to technical changes, the information may be changed in this manual without prior notice. Be always updated by checking periodically on our website, www.graupner.de to be always uptodate with the products and firmwares. This product complies with national and European legal requirements. To maintain this condition and to ensure safe operation, you must read and follow this user manual and the safety notes before using the product! NOTICE This manual is part of this product. It contains important information concerning operation and handling. Keep these instructions for future reference and give it to third person in case you gave the product. Take this into consideration when you pass it on to other future owner. Service Centre Graupner Central Service Graupner/SJ GmbH Henriettenstasse 96 D-73230 Kirchheim / Teck Graupner in Internet 4 - 20 Servicehotline (+49) (0)7021/722-130 Monday - Thursday 9:15 am - 5:00 pm Friday 9:15 am - 1:00 pm For the service centres outside Germany please refer to our web site www.graupner.de 9944.RTF_jh_V1 Intended use The X44 is a ready to fly, remote-controlled airplane model. The X44 is designed exclusively to be used as a battery-powered, radio controlled model, any other use is not allowed. For any improper use no warranty or liability is accepted. Read through this entire manual before you attempt to program or use the X44. Graupner/SJ constantly works on the development of all products; we reserve the right to change the item, its technology and equipment. Intended use of the battery Graupner LiPo batteries should only be used in RC. Any other use is not allowed. Any other use is improper mistreatment of LiPo batteries can cause explosions, fire, smoke and cause poisoning. Ignoring the guidance and warnings can result in poor performance and other defects. Target group The product is not a toy. It is not suitable for children under 14 years. The installation and operation of the X44 must be performed by experienced modellers. If you do not have sufficient knowledge about dealing with radio-controlled models, please contact an experienced modeller or a model club. Package content 9944.RTF_jh_V1 1. X 44 model 6. Manual 2. Rudder (with adhesive) 7. Battery 3. Landing gear set 8. Charger with connection cables 4. Propellers set with propeller adapters 9. 8x AA batteries 5. Spare propellers set 10.Graupner 6 channel 2,4 GHz transmitter 5- 20 Symbols explication ! Always follow the information marked with the CAUTION or WARNING symbol. The signal word WARNING indicates the potential for serious injury, the signal word CAUTION indicates possibility of lighter injuries. The signal word NOTE indicates potential malfunctions. ATTENTION indicates potential damages to objects. Safety notes CAUTION ! 6 - 20 General These safety instructions are intended not only to protect the product, but also for your own and other people’s safety. Therefore please read this section very carefully before using the product! Do not carelessly leave the packaging material lying around, since it might become a dangerous toy for children. Persons, including children, with reduced physical, sensory or mental capabilities, or lack of experience or knowledge, or not capable to use safely the speed controller must not use the speed controller without supervision or instruction by a responsible person. Operation and use of radio-controlled models needs to be learnt! If you have never operated a model of this type before, start carefully and make yourself familiar with the model's reactions to the remote control commands. Proceed responsibly. The insurance is mandatory for all kinds of model operation. Always fly with a safe distance away from people and objects, never fly low over people or directly towards them! Never fly the model near power lines, industrial sites, residential areas, public roads, school yards or playgrounds etc. All model flyers must behave in such a way that public safety, especially other people and property, as well as orderly flying operations is not jeopardized or disrupted. Inform passers-by and spectators before the start of the dangers posed by your model and exhort them to keep a safe distance. Also observe the accompanying warnings of battery. 9944.RTF_jh_V1 Checklist before starting CAUTION ! Before every use, check the range and functioning. For this purpose switch on the transmitter and the receiving system. Check that all controls are in neutral position, function properly and turn down the correct side. When flying a model aircraft for the first time, it is advantageous if an experienced helper stands aside in the review and the first flights. Propellers powered by a motor represent a constant risk of injury. Do not touch them with any part of the body! A fast-rotating propeller can cut off a finger! Keep well out of the rotational plane of the propeller! A part of it or the entire propeller could broke and fly off at high speed, hitting you or third parties. This can cause serious injury. Make sure that no object gets in touch with a revolving propeller! The blockage of the propeller, for any object must be excluded. Check each time before the model itself and everything attached to it (e.g. propeller, tailplane etc.) is in good condition and undamaged. The model may be taken in operation only after removal of all defects. Radio interference caused by unknown sources can occur without warning! The model is then uncontrollable and completely unpredictable! Do not leave the radio control system unattended, to prevent operation by third parties. Electric motor should be activated only if there is nothing in the rotational plane of the propeller. Do not attempt to stop the spinning propeller. Power the electric motors only with the propeller installed. The attitude of the model must always be clearly visible throughout the flight, to ensure always a safely use and avoid problems. Familiarize yourself during the flight, if any malfunction / interference becomes noticeable, the landing must be initiated immediately for safety reasons. You always give way to other aircraft. Start and landing strips should be kept free of people and other obstacles. 9944.RTF_jh_V1 7- 20 Required tools and adhesives (not included) Allen key 1,5 mm Cyano glue * No.5821 Activator for cyano glue * No.953.150 Phillips screwdriver *. * These items are required for any repairs. Model assembly The model is ready to fly after a few adhesive or assembly steps, the following instructions should be observed carefully so that safe operation is ensured. Gluing the rudder (2) to the fuselage (1) For this purpose on both sides thin the enclosed contact adhesive to the bonding surfaces, let the glue dry for about 1 minute, then put off the rudder (2) and press firmly. Inserting the landing gear (3) in the fuselage (1) 8 - 20 9944.RTF_jh_V1 Installing the LiPo battery Safe use of the battery charger WARNING ! 9944.RTF_jh_V1 Persons, including children, with reduced physical, sensory or mental capabilities, or lack of experience or knowledge, or not capable to use safely the charger must not use the charger without supervision or instruction by a responsible person. The battery charger is made by three components: Battery charger BC-4S15D, AC/DC ADAPTER for 230 V net connector, Connection cable for 12 V battery as power source Use the charger only with the supplied AC / DC adapter at 230 V or with the connecting cable at 12V. Risk of fire! The connection socket for the battery is polarised, Never use force while inserting the connector . It must plug easily. Short-circuit and fire risk! Connect olways only one LiPo, never 2 or 3, risk of fire! The battery charger can be used only in dry spaces. The charger should always be supervised during charge and it should be used only in rooms fitted with a smoke detector. A damaged charger or power cord must not be used until they are repaired by the manufacturer, his customer service or a suitably qualified person. Electric shock risk! The charger is only suitable for LiPo batteries, it cannot charge other types of batteries (eg Nixx, LiFe, Pb). If you connect other type of batteries to the charger, both battery and charger can be damaged, risk of fire and explosions! A wet charger, even if re-dried, should no longer be used. Risk of electric shock! Due to safety and licensing reasons (CE), any unauthorized reconstruction and/or modification of the product is prohibited. Risk of electric shock! Protect the charger from dust, dirt, moisture and other foreign parts. It must be protected from vibration as well as excessive heat or cold. Do not cover the charger during charge, the aluminium body has a cooling function and must be free. Risk of fire! The charger and the battery to be charged must be placed on a non-combustible, heat-resistant and non-conducting surface during operation. Do not use the charger near easily flammable materials.Always disconnect the charger from the power supply when it is not in use. Read the safety instructions that came with each LiPo battery before charging , use for charging the included LiPo charger. 9- 20 Charger assembly with supplied adapter for 230 V If in the digital display of the LiPo-charger appears "FUL" the LiPo battery is fully charged. Thereafter, disconnect the LiPo battery from the charger and pull the plug out of the power adapter. Charger assembly with supplied charge cable with two crocodile connectors for 12 V batteries Graupner 6 channel 2,4 GHz transmitter The transmitter (10) is fully configured to Mode 2 and already bound to the receiver in the model. The transmitter can me translated in mode 1 (see next section) to let the transmitter work properly insert the included 8 x AA battery cells (9) in the back of the transmitter paying attention to the correct polarity. CAUTION ! 10 - 20 The included dry AA battery cells must never be recharged. Risk of fire and explosions! 9944.RTF_jh_V1 Note Make sure that the polarity is correct! The + and - signs in the transmitter and on the battery cells must match. If one or more battery cells are inserted incorrectly, the transmitter will not function. 9 5 4 6 3 1 8 2 7 The figure on the left shows the transmitter (10) whose functions are explained below with its operating elements 1 to 9. With the slide switch 1 on the transmitter, the green LED HIGH 2 lights up. Note, if the red LED LOW lights up, the 8 battery cells must be changed in the transmitter. With the stick 3 pitch and yaw functions are controlled in heli mode, in flight mode the motors speed and the rudder function. Please note, the function depends on the speed control of the motors, not on the rudder. If the stick 3 is pushed forward, the pitch or the motors speed increases. *If the stick is moved to the left, the model will turn in helicopter mode and in airplane mode to left. If the stick is moved to the left, the model will turn in helicopter mode and in airplane mode to left. With the stick 4 in helicopter mode Nick functions, in flight mode the elevator and the roll (aileron) function, are operated. With the switch 5 the 4 motor gondolas can be rotated of about 90°. With this switch you can also change from heli to plane mode. The switch 6 is not necessary and has no function. Through the slide switches 7 “Servo reverse”, the direction of servo rotation can be reversed, this is not normally required, please keep the default settings. The button 8 is required to bind the transmitter to the receiver. The transmitter is already bound to the receiver, then this button is therefore not required. The transmitter is already bound to the receiver, no binding is then required. If the binding went lost or in case you use a spare transmitter No. 9944.834 please bind again. See section Binding. The transmitter antenna 9 can be bent of about 45° upward. With this position, the prime properties are achieved. 9944.RTF_jh_V1 11- 20 Transmitter translation from MODE II to MODE I Required tools A - Philips screwdriver B - Tweezers Hinweis: First of all invert the connectors of altitude and throttle in the receiver, then proceed as follows. Unscrew the four screws (1) with the Philips screwdriver (A) and remove gently the lower transmitter cover and lay it on the left. The following images show the stick gimbal as seen. The mark right or left refer to the sight from the front side. Seen from the back side it is inverted. The image shows the right stick gimbal in the original state. The spring (3) and the lever (4) must be removed for the translation. 12 - 20 9944.RTF_jh_V1 The image shows the left stick gimbal in the original state. The braking spring (2) must be unscrewed for the translation The image shows the right stick gimbal after translation. The braking spring (2) is correctly mounted for mode I. The image shows the left stick gimbal after translation. The spring (3) and the lever (4) are correctly mounted for mode I. The image shows the lower hooking point for the spring (3) in detail. 9944.RTF_jh_V1 13- 20 Installing the LiPo battery First of all open the cabin canopy. To open, hold it securely laterally and pull to the top The image shows the LiPo battery already installed. CAUTION ! Risk of injury by rotating propellers, motors can start up in an uncontrolled manner when the XT-60 connector of the battery is connected. Always install the propellers only after review. The X 44 FLIGHT CONTROL Fuselage bottom with FLIGHT CONTROL and receiver (right), servo for the motor gondolas adjustment (left) The FLIGHT CONTROL is a highly complex electronic unit, that aerodynamically stabilizes the model over several gyros. Both aileron / elevator of the rear wing and the speed control of each brushless motor are controlled by this unit. NOTICE Note that the model has to be hold after connecting the XT-60 connector in a stable position on a flat surface until the gyros of FLIGHT CONTROL have initialized. This process takes a few seconds and is confirmed by several beeps of the motors. The motor gondolas run first on a 45 ° position. Only after this operation, the FLIGHT CONTROL is functionally ready. 14 - 20 9944.RTF_jh_V1 Note that the two rear motor gondolas are inclined in the vertical neutral position approximately 2° forward, this is not a defect but for optimal flight characteristics it is so required. Also note that all rudder deflections are factory set correctly and the control surfaces move when LiPo battery is connected, if you tilt or rotate the model. Installing the propellers CAUTION ! Risk of injury by rotating propellers when motors are running. Always unplug the XT-60 connector to the LiPo battery before working on the propellers. Tightening the prop adapter (4) with a 1,5 mm Allen key Arrangement of the propellers (A = clockwise rotation) and (B = counter-clockwise rotation) 9944.RTF_jh_V1 15- 20 Propellers rotation sense 1 = Clockwise motor propeller (.L) CAUTION ! 2 = Counter-clockwise motor propeller (.R) 1 2 4 3 4 = Counter-clockwise motor propeller (.R) 3 = Clockwise motor propeller (.L) Risk of injury from flying debris. Loose mounted propellers can come loose during operation. Always check whether the propellers are mounted properly. The centre of gravity The centre of gravity of the X44 is located 121-131 mm from the wing leading edge. If the recommended LiPo battery is used, the centre of gravity is automatically correctly adjusted. The centre of gravity can be tested for control by holding the model with two fingers in the centre of gravity under the wing. The model should be balanced and levelled. The sketch shows the model with vertical motors in this case the centre of gravity is at 121 mm measured from the wing leading edge. 16 - 20 9944.RTF_jh_V1 First flight First of all, fully charge the Li-Po battery as described above. Then fly the prepared model in light wind. Start the model first vertically in heli mode and practice hovering in low altitude. A trimming of the model after the first start is necessary over the trim sliders below or next to the sticks. Due to the excellent working of the FLIGHT CONTROL, a trimming is usually not necessary. Always land against the wind direction with enough battery capacity. For take-off and landing in the airplane mode an absolutely smooth runway is needed because the X44 wheels are insufficient on a grass runway. Note that the flight time is essentially dependent on the flight mode used, on the LiPo battery quality and capacity. A flight time of 3-6 minutes is normally reached with the X44. Attention! Note that the XT-60 connectors have to be unplugged after every use for safety reasons and to preserve the LiPo battery from deep discharge. Technical Data Features 9944.RTF_jh_V1 Wing area: 7,35 dm² Rear wing area: 9,15 dm² Weight: 855 g Total surface area: 16,5 dm² Length: 860 mm Wingspan: 695 mm Wing load: 51,8 g/dm² The Graupner X44 is an innovative VTOL electric model, which has very particular flight characteristics. VTOL means "Vertical Take Off and Landing“. The X44 is equipped with 4 brushless motors which can be rotated of about 90° by a switch on the transmitter, in this way you can convert before or during the flight from heli to plane model or vice versa. The X44 flies in heli mode as an helicopter and can be flown as an acrobatic plane model in plane mode. The X44 is is equipped as standard with an excellently working FLIGHT CONTROL which stabilizes the model on each axe in both, plane and heli modes. The X44 is a reproduction of the marine experimental plane, the construction of the plane has been many times patented. 17- 20 Replacement parts (not included) 18 - 20 No. Description 9944.1 Canopy cover 9944.2 Fuselage 9944.3 Wing 9944.4 Rear wing 9944.5 Landing gear set 9944.7 Motor gondola 9944.10 Rudder 9944.12 Propellers set 9944.29 Propeller adapter 9944.81 Brushless motor KV 1000 9944.82 ESC 12A 9944.83 Servo 9944.85 LiPo battery 4/1300 9944.141 HoTT decals sheet 9944.142 Marine decals sheet 9944.830 FLIGHT CONTROL 9944.833 Motor gondolas servo 9944.834 Transmitter 9944.835 Receiver 9944.RTF_jh_V1 Binding This process is required, for example, if you want to bind a spare transmitter. What is needed is the enclosed binding plug. 1. Insert the batteries in the transmitter. 2. Plug the binding jumper in the receiver binding port (BAT), see the picture. 3. Connect the XT-60 connector to the battery, now both LEDs will flash in the receiver, indicating that it is in binding mode. 4. Push and hold the binding button while switching the transmitter on. 5. When the LEDs stop flashing in the receiver, then the transmitter and the receiver are bound. This operation can take up to 10 seconds. 6. Then release the binding button on the transmitter and remove the binding jumper from the receiver. 7. Check if all functions work properly. 8. If the binding has not been followed properly or if the result is not as desired, then repeat the process. 9944.RTF_jh_V1 19- 20 Notes on environmental protection DISPOSAL NOTES This symbol on the product, user manual or packaging indicates that this product must not be disposed of with other household waste at the end of its life. It must be handed over to the applicable collection point for the recycling of electrical and electronic equipment. The materials are recyclable as marked. By recycling, material reusing or other forms of scrap usage you are making an important contribution to environmental protection. Batteries and accumulators must be removed from the device and disposed of at an appropriate collection point. Please inquire if necessary from the local authority for the appropriate disposal site. Care and maintenance P Notes on care The product does not need any maintenance, it works so as it is without any special care. In your own interests protect it from dust, dirt and moisture. Clean the product only with a dry cloth (do not use detergent!) lightly rub. Warranty certificate The Graupner, Henriettenstrassee 96, 73230 Kirchheim/Teck grants from the date of purchase of this product for a period of 24 months. The warranty applies only to the material or operational defects already existing when you purchased the item. Damage due to wear, overloading, incorrect accessories or improper handling are excluded from the guarantee. The legal rights and claims are not affected by this guarantee. Please check exactly defects before a claim or send the product, because we have to ask you to pay shipping costs if the item is free from defects. The warranty on batteries is limited to 6 months For this time we will only ensure that the battery fulfils its function, only batteries which can not be more charged and discharged any more can be replaced on warranty. This does not apply to batteries in which the charge and discharge notes were not observed. Batteries may only be series-connected or parallel-connected in exceptions since the cell capacity and charge can differ. The battery packs that we supply are therefore preferable.The present construction or user manual is for informational purposes only and may be changed without prior notice. The current version can be found on the Internet at www. graupner.de on the relevant product page. In addition, the company Graupner has no responsibility or liability for any errors or inaccuracies that may appear in construction or operation manuals. No liability can be accepted for printing errors. 20 - 20 9944.RTF_jh_V1 Declaration of conformity Graupner declares that the product is conform to CE norms. Brushless motor KV 1000 EN 61000-6-1: 2007; EN 61000-6-3: 2007/A1: 2011 ESC 12 A EN55014-1: 2006+A1: 2009 EN55014-2: 1997+A2: 2008 Servo EN 6100-6-3: 2007+A1: 2011 EN 6100-6-1: 2007 FLIGHT CONTROL EN55022: 2010 EN55024: 2010 Graupner 6 channel 2,4 GHz transmitter EN 62311 EN 60950-1+A11+A1+A12+A2 EN 301 489-1/-17 EN 300 328 Battery charger and adapter EN 60950-1:2006/A12:2011 EN 55022: 2006+A1:2007 EN 55024: 1998+A1: 2001+A2:2003 9944.RTF_jh_V1 21- 20 22 - 20 9944.RTF_jh_V1 9944.RTF_jh_V1 23- 20 9944.RTF_jh_V1