1
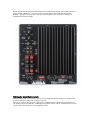
Red Mountain Subwoofers By TruAudio Powered subwoofers RM-15Sub, RM-12Sub and RM-10Sub Introduction TruAudio is proud to launch our first 100% USA built subwoofer in St. George UT. Since 1997, TruAudio has been designing and engineering some of the finest loudspeakers available. Because we came from the installation industry, each of our products is designed to adapt to the specific installation environment. Obviously, with our architectural products it’s a lot easier to make a speaker “disappear” but even our freestanding speakers look great and easily blend into the room’s décor. The Red Mountain powered subwoofers are some of the finest available today. It took over two years to design a speaker system that offers the best video sound reproduction in either 5.1, 6.1 7.1 and even 9.1. Model RM-12Sub, RM-10Sub These powered subwoofers in this series leaves nothing to be desired. After over 1 year of engineering and testing, the RM-12Sub and RM-10Sub are the last link needed to complete the TruAudio theater package. These subwoofers use a black anodized Aluminum woofer and a slot port design. All those fancy words really mean a specially designed woofer that will provide tons of bass at high volumes for extended periods of time. This is all driven by a huge, super powerful, A/B power amplifier build exclusively for this cabinet and driver array. The RM-12Sub features a 300 watt amp and the RM-10Sub features a 250 watt. All models are timbre matched to each other, as well as other TruAudio architectural speakers so combining different models in an AV system will not be a problem. Additional TruAudio speakers can be added to a system with the confidence that the speakers will remain balanced. Unpacking and Inspection The Red Mountain Subwoofers are packaged extremely well to make sure no damage occurs during shipping. Carefully open the box and remove the speaker. Inspect it immediately for any kind of damage. The speaker should have left our warehouse in perfect condition so any damage that has occurred probably happened in transit from our warehouse to your address. If for some reason damage has occurred, please contact your Dealer or TruAudio immediately. We recommend that you retain the packaging in case a need arises for you to transport your loudspeakers. The RM-12Sub and RM-10Sub besides the actual subwoofer cabinet and grill, should also come with: this instruction manual, a warranty card, and a power cord. Four, heavy-duty plastic feet come attached to the bottom of the cabinet. Caution; for NO reason should you open this subwoofer. This will void the warranty! To reduce the risk of electrical shock and fire, do not remove the amplifier panel from the back of the cabinet or do not remove the subwoofer from the front of the cabinet. There are NO fuses or serviceable parts. All service to this product MUST be done by a TruAudio Authorized repair center. Before installing the subwoofer, please read the following instructions: Always turn off the power of your receiver/preamp and the powered subwoofer. When turning your amplifier/receiver back on, make sure your volume is turned all the way down. Never expose this subwoofer to excessive cold, heat, humidity or direct sunlight. This device should never be used in, on or near water due to risk of fatal shock. DO NOT attempt to open or dismantle this subwoofer. These models should always have plenty of Air flow to reduce the chance of over heating. Subwoofer Placement This subwoofer is engineered, designed and built to reproduce low frequencies at and below 150Hz. Frequencies at this level are basically omni-directional. This makes it easy to find a good place for the sub; however, there are also several location options that can either give more or less bass. When placed near a wall, you will get louder, deeper bass. Placing the subwoofer in a corner will produce a high volume of bass output, while near only one wall will provide less bass. Placement away from any wall may not produce enough bass. Because even a slight change of how the unit sits will alter the bass output, we suggest trying your subwoofer in different locations. This will allows you to hear the difference of bass output and decide what is best for that particular room and the listener’s preference. Our suggestion is to place the subwoofer close to the pair of speakers it will be matched with. For example, if the subwoofer is to reproduce bass from the front two channels, then it should be located near the front two speakers. If it’s to reproduce bass from the rear effect channels, then the sub should be located near the rear speakers. Because the Red mountain series of subwoofers are ported from the front, they can be built-in to a wall, into cabinetry etc………NOTE; even though they are ported from the front, the amp panel is still located on the back of the subwoofer cabinet. They need to have proper ventilation for the amp to “breath”. If the subwoofer will be “built-in”, make sure there is enough space in the area behind it for proper air flow. Otherwise, you could over heat and damage the sub amplifier. One more NOTE; because of the acoustics of the sub installed into an enclosed area, we also suggest using some kind of sound dampening material in the space. This will prevent a hollow “boomy” sound coming from the area behind the subwoofer. We all know that one location or setting will NOT work for all installations. Above are only suggestions. Each installation of these products can be different and you must figure out what works best for that specific room and system. Make sure to talk with your client and find out their preference when it comes to bass output and loudness of the subwoofer. Input Connections of the Subwoofers: These subwoofers offer several different “input” connections so it should be compatible with almost all A/V equipment. The “Line Level” input connection is usually the best choice when connecting the subwoofer to a system that uses a Preamp/Processor and a separate Amplifier or a Receiver that features main channel preamp output or subwoofer outputs. The “Speaker Level” inputs are typically used when connecting the subwoofer to a receiver that offers no subwoofer outputs or preamp outputs. “Line-in” Line Level input Connections: To utilize this connect the switch on the back of the subwoofer must be set to “internal x-over”, this in a non LFE input. Connect a mono subwoofer output on your receiver/pre-amp to the input connection on the rear panel of your subwoofer. If for some reason you still need more subwoofer volume, first make sure the volume knob is turn all the way up. Then, if you still need more volume, attach a “Y” adapter cord to the subwoofer cable and then to both input jacks. This will give about another 3 to 6dB of subwoofer output. This connection should be made using a good quality RCA interconnect. Try to keep this cable as short as possible and also try to avoid running it close to other electrical equipment that could cause unwanted noise or hum. If the cable is being installed inside the wall cavity, make sure the subwoofer cable is kept away from electrical wire. “Speaker in” speaker cable input connections: To connect your subwoofer parallel with your two main speakers (main R & L) you will use these connection on the back the subwoofer amp panel. Locate the “Main Speakers” connections on the back of the receiver. Connect a good quality speaker cable from these connectors to the “Speaker In” on the back of the subwoofer (the black and red binding posts). Then also connect a good quality speaker cable from the same connectors on the back of the receiver to the main Right and Left speakers. Or if the receiver has a “main speaker B”, you can connect your main speaker to these connectors. “LFE in” input connection: If you have and are using a LFE input to this subwoofer, you need to make sure that the switch on the back of the subwoofer is set to “DIRECT”. This will bypass the crossover and use the LFE setting from your processor. This input should be connected to a low pass filtered LFE subwoofer output jack on your receiver/preamp. It is usually featured on the newer 5.1 surround sound receivers, preamps or processors. NOTE: Signals coming into this jack will not be affected when adjusting the “Low-Pass” level knob on the subwoofer amp panel. Adjusting subwoofer settings in your receiver/preamp: Read the instruction manual for your receiver/preamp to understand all settings available for subwoofer, low level, and internal crossover adjustments. Go to the “Setup Menu” in the receiver or preamp. Find the section for Subwoofer adjustments and make sure all the proper settings for subwoofer outputs are on and set to the correct level for that application. Different receivers and preamps will offer different types of features and setting for subwoofer output. Digital 5.1 home theater equipment; dedicates one channel to reproduce the special lowfrequency information contained in digitally encoded soundtracks. Go to your receiver’s menu and select subwoofer “yes”. Having it set this way will relive the amplifier of having to reproduce the difficult low bass signals that can drive the receiver into audio distortion. When using Dolby Pro Logic systems; first locate the subwoofer output. Most units will have a single sub out connection. Go to the receiver’s menu and set the center channel mode to Normal. This will divert any bass from the center channel to the subwoofer, resulting in maximum system bass output. Subwoofer Amplifier Controls After the subwoofer is connected to the receiver/preamp and all the setting are complete, now its time to adjust the subwoofer amplifier controls. This series of subwoofers provide a wide range of adjustments to optimize its performance in any listening area and with any combination of speaker systems. These adjustments are located on the back of the subwoofer on the amplifier panel. Volume knob: Adjusts the sound level of the subwoofer. This is used to give more or less volume to the overall sound of the subwoofer. Also use this adjust to match the volume of the subwoofer to other speakers in the system. When turning this up or down, it only affects the signal of the subwoofer inputs. It will not adjust the volume of your main speakers. A good starting point is to set the knob 1/3 the way up (10 o’clock). Low Pass Filter: This is a variable filter that controls the upper frequencies of the subwoofer. The RM series uses a filter that is continuously variable from 40 Hz to 140 Hz. If this is adjusted properly, it will help smooth the listening frequencies between the subwoofer and the main two speakers. NOTE: This must be set properly, please take the time to try different settings. Setting the filter too high will cause the bass from the main speakers to overlap the bass from the subwoofer and will cause a distorted bass sound. If the filter is set too low, there will seem to be missing frequencies between the bass from the subs and the main speakers. Remember this function is disabled if the switch is set to “DIRECT”. The crossover point will need to be adjusted through the A/V processor. Phase switch: This is used to select the polarity for the subwoofer and should be relative to your front speakers. It allows for cancellation of bass energy caused by the particular listening room or area. To set this: while sitting in the main listening seat/ chair, listen to a recording that has low frequency percussion instruments or music with a continuous bass line. Try it first in the “0” setting and then listening to the same music in the “180” setting. Then set the switch to the setting that reproduced the most bass. Furniture, wall coverings, subwoofer location all can affect this so if any of these things get changed or added, you will need to go through this process again. This setting is also very important to set correctly if you are using two subwoofers in one system. In the case of a two subwoofer system you need to have these set opposite of each other. For example Sub #1 will be set at “0°” and Sub #2 will be set at “180°”. Power Switch: This turns the AC power to the subwoofer either on or off. Final Adjustments Once all the speakers are wired and back in place, turn on the amplifier and/or receiver. Start at a minimal volume until you have a chance to hear the total output of the speakers. Use a movie or CD you are familiar with. Remember: the amount of bass you hear and the stereo-image quality will be affected by a number of different factors, including the rooms shape and size, wall coverings and furniture location. Listen to a variety of music selections to see the bass level. If there is too much bass, move the main two front speakers further away from any nearby walls. So obviously, if you wish to have more bass, move these same speakers closer to the wall. Most receivers and preamps will have adjustments for each speaker in their main menu. We suggest going into the “Speaker Setup” menu of the receiver or preamp and adjusting each speaker properly. Consult the instruction manual for this equipment to find out more about any and all adjustments that are offered. Cleaning the Subwoofer All RM series subwoofers feature lightly textured, durable paint finish. When needed, we suggest cleaning with a damp cloth with water only. Do not use any kind of abrasive cleaners or detergents. Featuers -Class AB -Woofer volume control -50Hz to 100Hz continuously adjustable low pass 12dB electronic crossover -Crossover on/off switch -Low and High level inputs, summed to mono signal -Low and High level all pass output -Phase inverter switch -Master power switch -Auto power on/off activated by input signal -4db boost @ 25Hz, 15Hz high pass RM-10sub Speaker type: Enclosure design: High-end Powered Subwoofer Front firing, front slot port, internally braced Driver: 10" black anodized aluminum cone, cast basket, long excursion, 2.5" 2-layer voice coil. Power, class A/B amp: Frequency Range, Lowpass: 300 watt into 4 ohms with internal amplifier 29 - 250 Hz. (+/-3 dB) Input Sensitivity, Low level: Input Sensitivity, High level: 65 mV @ 100 Hz. 2 V @ 100 Hz. Inputs: Outputs: Line level RCA, speaker level w/ banana plugs Line level RCA, speaker level w/ banana plugs Controls: Phase control 0 or 180, Low frequency adjustment Crossover bypass. Ampifier Protection: Cabinet: Output protection circuit with relay Real wood veneer, BUILT IN ST. GEORGE, UTAH Cabinet dimensions: 14 5/8" High (including feet) 14 1/8" Wide Grill: Available colors: 15 1/4" Deep (including grill and amp) MDF frame wrapped in black speaker cloth Black in stock Other color available with 3 week lead times RM-12sub Speaker type: High-end Powered Subwoofer Enclosure design: Driver: Front firing, front slot port, internally braced 12" black anodized aluminum cone, cast basket, Power, class A/B amp: long excursion, 2.5" 2-layer voice coil. 500 watt into 4 ohms with internal amplifier Frequency Range, Lowpass: Input Sensitivity, Low level: 24 - 250 Hz. (+/-3 dB) 65 mV @ 100 Hz. Input Sensitivity, High level: 2 V @ 100 Hz. Inputs: Line level RCA, speaker level w/ banana plugs Outputs: Controls: Line level RCA, speaker level w/ banana plugs Phase control 0 or 180, Low frequency adjustment Ampifier Protection: Crossover bypass. Output protection circuit with relay Cabinet: Cabinet dimensions: Real wood veneer, BUILT IN ST. GEORGE, UTAH 17 5/8" High (including feet) 17 1/8" Wide 18 3/4" Deep (including grill and amp) Grill: Available colors: MDF frame wrapped in black speaker cloth Black in stock Other color available with 3 week lead times RM-15sub Speaker type: Enclosure design: High-end Powered Subwoofer Front firing, sealed cabinet, internally braced Driver: 15" black anodized aluminum cone, cast basket, long excursion, 2.5" 2-layer voice coil. Power, class D, ICE: Frequency Range, Lowpass: 600 watt into 4 ohms with internal amplifier 20 - 220 Hz. (+/-3 dB) Frequency Range, LFE: Input Sensitivity, Low level: 20 - 230 Hz. (+/-3 dB) 150 mV @ 100 Hz. Input Sensitivity, High level: Inputs: 3.5 V @ 100 Hz. Line level RCA, speaker level w/ banana plugs Outputs: LFE line level RCA Line level RCA, speaker level banana plugs, LFE RCA Controls: Phase control 0 or 180, Low frequency adjustment Auto-on Ampifier Protection: Cabinet: Output protection circuit with relay Real wood veneer, BUILT IN ST. GEORGE, UTAH Cabinet dimensions: 17 3/4" High (including feet) 17 1/8" Wide Grill: Available colors: 18 1/4" Deep (including grill and amp) MDF frame wrapped in black speaker cloth Black in stock Other color available with 3 week lead times