1
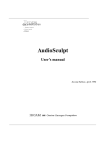
OWNER’S MANUAL
Precautions
Location
Using the unit in the following locations can result in a
malfunction.
• In direct sunlight
• Locations of extreme temperature or humidity
• Excessively dusty or dirty locations
• Locations of excessive vibration
• Close to magnetic fields
Power supply
Please connect the designated AC adapter to an AC outlet of the correct voltage. Do not connect it to an AC outlet of voltage other than that for which your unit is intended.
Interference with other electrical devices
Radios and televisions placed nearby may experience reception interference. Operate this unit at a suitable distance from radios and televisions.
Handling
To avoid breakage, do not apply excessive force to the
switches or controls.
THE FCC REGULATION WARNING (for
U.S.A.)
This equipment has been tested and found to comply
with the limits for a Class B digital device, pursuant to
Part 15 of the FCC Rules. These limits are designed to
provide reasonable protection against harmful interference in a residential installation. This equipment generates, uses, and can radiate radio frequency energy and, if
not installed and used in accordance with the instructions, may cause harmful interference to radio communications. However, there is no guarantee that interference will not occur in a particular installation. If this
equipment does cause harmful interference to radio or
television reception, which can be determined by turning the equipment off and on, the user is encouraged to
try to correct the interference by one or more of the following measures:
Reorient or relocate the receiving antenna.
Increase the separation between the equipment and receiver.
Connect the equipment into an outlet on a circuit different from that to which the receiver is connected.
Consult the dealer or an experienced radio/TV technician for help.
Unauthorized changes or modification to this system
can void the user’s authority to operate this equipment.
Care
If the exterior becomes dirty, wipe it with a clean, dry
cloth. Do not use liquid cleaners such as benzene or thinner, or cleaning compounds or flammable polishes.
Keep this manual
After reading this manual, please keep it for later reference.
Keeping foreign matter out of your
equipment
Never set any container with liquid in it near this equipment. If liquid gets into the equipment, it could cause a
breakdown, fire, or electrical shock.
Be careful not to let metal objects get into the equipment.
If something does slip into the equipment, unplug the
AC adapter from the wall outlet. Then contact your
nearest Korg dealer or the store where the equipment
was purchased.
CE mark for European Harmonized Standards
CE mark which is attached to our company’s products of
AC mains operated apparatus until December 31, 1996
means it conforms to EMC Directive (89/336/EEC) and
CE mark Directive (93/68/EEC).
And, CE mark which is attached after January 1, 1997
means it conforms to EMC Directive (89/336/EEC), CE
mark Directive (93/68/EEC) and Low Voltage Directive
(73/23/EEC).
Also, CE mark which is attached to our company’s products of Battery operated apparatus means it conforms to
EMC Directive (89/336/EEC) and CE mark Directive
(93/68/EEC).
IMPORTANT NOTICE TO CONSUMERS
This product has been manufactured according to strict
specifications and voltage requirements that are applicable in the country in which it is intended that this
product should be used. If you have purchased this
product via the internet, through mail order, and/or via
a telephone sale, you must verify that this product is intended to be used in the country in which you reside.
WARNING: Use of this product in any country other
than that for which it is intended could be dangerous
and could invalidate the manufacturer’s or distributor's
warranty.
Please also retain your receipt as proof of purchase otherwise your product may be disqualified from the
manufacturer’s or distributor's warranty.
Introduction
Thank you for purchasing the KP2 KAOSS PAD dynamic effect/controller. For trouble-free enjoyment of the KP2’s fullest potential, please read this manual carefully and use the product
correctly.
Parts of the KP2 and their functions
1
Top panel
1. [INPUT SELECT] switch
2. [PEAK] indicator
3. [INPUT VOLUME] knob
4. [FX DEPTH] knob
5. [PROGRAM/BPM] display
6. [PROGRAM/BPM] knob
7. [PROGRAM MEMORY 1–8] keys
8. [TAP/BPM] key
9. Touch pad
10. [PAD MOTION/MUTE] lever
11. [REC/STOP] key
12. [SAMPLE 1, 2] keys
13. [HOLD] key
2
5
3
6
7
4
8
9
10
12
11
13
Front panel
1. [PHONES VOLUME] knob
2. [PHONES] output jack
3. [MIC TRIM] knob
4. [MIC] input jack
Rear panel
1
3
2
4
6
1. [GROUND] connector
2. [PHONO IN] jacks
7
3. [LINE IN] jacks
8
4. [LINE OUT] jacks
5. [CONNECTION] switch
6. [MIDI IN], [MIDI OUT] connectors
7. DC 12V jack
8. [POWER] switch
4
3
2
1
5
1
Connections
Basic connections
Use these connections when you want to apply effects to the sound from a device connected to
the KP2’s input jacks, and output the processed sound from the Line Out jacks. The KP2 has
three types of input jacks. Use the jacks that are appropriate for your situation.
MIC4
MIC3
MIC2
MIC1
STEREO AUX RETURNS
MIC6
MIC5
TAPE
INPUT
AUX SEND
1
1
MAIN OUTS
TAPE
OUTPUT
L
MICRO SERIES 1402-VLZ
L
14-CHANNEL MIC/LINE MIXER
2
2
R
R
LEFT(1/MONO)
BAL
OR
UNBAL
BAL
OR
UNBAL
BAL
OR
UNBAL
BAL
OR
UNBAL
BAL
OR
UNBAL
BAL
OR
UNBAL
10
MONO
-15
PAN
R
LEVEL
+4
-10
LINE IN 13-14
PAN
PAN
NORMALLED
2
+20
LEFT
MAIN
MIX
AUX
RETURNS
RIGHT
+28
CLIP
+10
+7
ALT
3-4
+4
+2
+12
0
TAPE
U
-2
LOW
80Hz
-4
+15
-15
-7
PAN
PAN
ASSIGN
TO MAIN MIX
-10
-20
PHONO IN
L
LINE IN
L
R
1
L
R
MUTE
L
R
MUTE
R
L
6
5
R
L
9–10
MUTE
MUTE
A LT 3 – 4
A LT 3 – 4
L
R
7–8
MUTE
MUTE
A LT 3 – 4
A LT 3 – 4
A LT 3 – 4
L
R
4
MUTE
MUTE
A LT 3 – 4
L
R
3
2
NORMAL(AFL)
LEVEL SET(PFL)
R
13–14
MUTE
MUTE
A LT 3 – 4
A LT 3 – 4
L
R
11–12
SOLO
PHANTOM
A LT 3 – 4
A LT 3 – 4
CONTROL
ROOM /
dB
10
LINE OUT
DC12V
5
U
10
5
U
dB
dB
dB
SOLO
SOLO
10
5
U
SOLO
10
5
U
dB
dB
SOLO
10
5
U
SOLO
10
5
U
dB
dB
SOLO
10
SOLO
5
U
10
5
U
dB
dB
SOLO
10
5
U
SOLO
10
5
U
TURNTABLE
SOLO
Never press the touch pad with excessive
force, or place heavy objects on it. It may
crack or break if handled roughly. Press the
touch pad only with your finger, since rubbing or pressing the touch pad with a sharp
object will scratch it. To clean the touch pad,
wipe it lightly with a soft dry cloth. Do not
use solvents such as thinner, since this may
cause deformation.
RUDE SOLO LIGHT
POWER
PHONES
MAIN MIX
dB
dB
10
10
5
U
5
U
5
5
5
5
5
5
5
5
5
5
5
5
10
10
10
10
10
10
10
10
10
10
10
10
20
20
20
20
20
20
20
20
20
20
20
20
30
30
30
30
30
30
30
30
30
30
30
30
40
50
60
40
50
60
40
50
60
40
50
60
40
50
60
40
50
60
40
50
60
40
50
60
40
50
60
40
50
60
40
50
60
40
50
60
AC
AC ADAPTER
Care of the touch pad
-30
0dB=0dBu
MODE
MIXER, DJ MIXER
2
1
+20
EFXTO
MONITOR
AUX 1
SELECT
SOURCE
MID
2.5kHz
-12
LOW
80Hz
+15
PAN
PAN
U
U
PRE
POST
+15
U
MID
2.5kHz
+12
U
-15
+10
AUX 1 MASTER
2
EFX
EQ
HI
12kHz
-15
+15
U
-12
LOW
80Hz
+15
U
MON/
EFX
+15
U
HI
12kHz
-15
MID
2.5kHz
+12
U
-15
+15
U
2
EFX
EQ
U
+15
U
-12
LOW
80Hz
+15
PHONES
AUX
1
MON/
EFX
+15
EQ
HI
12kHz
-15
MID
2.5kHz
+12
U
-15
+15
U
2
EFX
+15
U
EQ
HI
12kHz
+15
U
-12
LOW
80Hz
U
AUX
1
MON/
EFX
+15
U
2
EFX
+15
U
-15
MID
2.5kHz
+12
+15
U
AUX
1
MON/
EFX
+15
EQ
HI
12kHz
+15
U
-15
LEVEL
+4
-10
LINE IN 11-12
U
U
2
EFX
+15
U
-12
LOW
80Hz
+15
-15
PAN
PAN
PAN
BAL
OR
UNBAL
R
LEVEL
+4
-10
LINE IN 9-10
AUX
1
MON/
EFX
+15
U
-15
MID
2.5kHz
+12
U
LOW
80Hz
+15
U
U
2
EFX
EQ
+15
U
-12
+12
U
-15
LINE IN 7-8
AUX
1
HI
12kHz
-15
MID
2.5kHz
-12
LOW
80Hz
+15
L
L
BAL
OR
UNBAL
R
LEVEL
+4
-10
60
MON/
EFX
+15
U
+15
U
MID
2.5kHz
+12
U
-15
+15
EQ
HI
12kHz
HI
12kHz
+15
U
-12
LOW
80Hz
+15
MONO
MONO
L
BAL
OR
UNBAL
R
AIN
TRIM
U
U
2
EFX
+15
U
EQ
U
-15
MID
2.5kHz
+12
U
-15
C
+10dB -40dB
AUX
1
MON/
EFX
U
2
EFX
+15
EQ
HI
12kHz
+15
U
-12
LOW
80Hz
MI
10
60
TRIM
U
+15
+15
U
2
EFX
+15
U
-15
MID
2.5kHz
+12
-10dGBV
AIN
U
10
+10dB -40dB
AUX
1
MON/
EFX
MON/
EFX
+15
EQ
HI
12kHz
+15
C
BAL
OR
UNBAL
LOW CUT
75Hz
18dB/OCT
LOW CUT
75Hz
18dB/OCT
-10dGBV
MI
U
60
TRIM
U
AUX
1
LINE IN 6
LINE IN 5
AIN
+10dB -40dB
TRIM
U
U
2
EFX
+15
+15
C
10
60
+10dB -40dB
AUX
1
MON/
EFX
+15
U
U
U
-15
MI
U
U
60
TRIM
U
U
-15
-12
CD PLAYER
AIN
+10dB -40dB
AUX
1
BAL/UNBAL
ALL BAL/UNBAL
RIGHT
MONO
L
C
10
60
TRIM
U
-10dGBV
-10dGBV
C AIN
MI
-10dGBV
MI
U
10
+10dB -40dB
LOW CUT
75Hz
18dB/OCT
LOW CUT
75Hz
18dB/OCT
LOW CUT
75Hz
18dB/OCT
LOW CUT
75Hz
18dB/OCT
-10dGBV
C AIN
MI
U
LINE IN 4
LINE IN 3
LINE IN 2
LINE IN 1
DJ mixer connections
To use the KP2 as an external effect processor, connect the effect send jack of your DJ mixer etc.
to the Line In jacks of the KP2, and connect the Line Out jacks of the KP2 to the effect return
jacks of your mixer.
When using a connection via the effect send/return jacks
Set theKP2’s Connection switch to FX LOOP. With this setting, the output signal from the KP2’s
Line Out jacks will consist only of the sound processed by the KP2, and will not include the
original sound that is being input to the KP2.
If you want to use the KP2’s FX/Depth knob to adjust the effect depth during use, set this
switch to the DIRECT position.
DIRECT
FX LOOP
CONNECTION
RETURN
LINE OUT
SEND
TURNTABLE
DJ MIXER
LINE OUT
LINE IN
TURNTABLE
MIDI connections
Use these connections when you want to connect MIDI devices to the KP2 and use it along with
sequence data.
OUTPUT
MIDI OUT
LINE IN
MIDI IN
KORG EM-1
3
Operation
1. Turning on the power
(1) Connect the KP2 to your other equipment as shown in the diagram, and connect
the AC adapter to an electrical outlet.
(2) Press the Power switch to turn it on. The
Program/BPM display will light.
To turn off the power, press the Power
switch once again to turn it off.
2. Inputting audio
turned to the far left, and the maximum effect will be applied if the knob is turned to
the far right.
About the Program/BPM display
This display shows the number of the currently selected program, the specified BPM,
and the point (position) at which you are
touching the touch pad.
While you are operating the touch pad:
The display will indicate the position at
which you are touching the pad (1.1–9.9; 5.5
is the center).
(1) Use the Input Select switch to select the
input jacks of the connected device to which
you want to apply an effect.
MIC: The effect will be applied to the mic
input.
PHONO: The effect will be applied to the
phono inputs.
LINE: The effect will be applied to the line
inputs.
When selecting programs: The display will
show the program number (00–99).
When setting the BPM: When you are
pressing the Tap/BPM key to set the BPM,
the display will indicate the BPM value. In
Auto BPM mode, three dots will light.
MIDI Edit mode: The display will show the
MIDI channel or control number, etc.
3. Adjusting the volume
5. Operating the touch pad
(1) Adjust the input level.
While outputting audio from the connected
device, use the Input Volume knob to adjust
the input level so that the peak indicator
does not light red.
If you are using the mic jack, adjust the
MIC Trim knob as appropriate for the sensitivity of the mic, so that the sound is not distorted.
(2) If you are using headphones, use the
Phones Volume knob to adjust the level.
(1) Control the sound by rubbing your finger across the touch pad or tapping it.
Use the included protective sheet.
(2) If you turn on the Hold key while operating the touch pad, the KP2 will hold the
effect sound as it was the moment before
you took your finger away from the pad.
4. Selecting a program
(1) The Program/BPM display will indicate
the number of the currently selected program.
Use the Program/BPM knob to select a program (00–99).
(2) Use the FX/Depth knob to adjust the
depth of the effect.
No effect will be applied if the knob is
4
Vertical position (1–9)
Horizontal position (1–9)
6. The Mute function
If you move the Pad Motion/Mute lever to
MUTE (toward yourself), the input signal,
sample sound, or synth/drum sound will
be silenced. When using delay or reverb,
this lets you output only the effect sound
(i.e., the delayed sound or reverberation).
transformer
By using the Pad Motion/Mute lever to rapidly
switch MUTE on/off, you can create rhythms
using a sustained input sound. This is a DJ technique known as “transformer.”
7. Pad motion
What is BPM?
The KP2 lets you record your touch pad operations, and move the the Pad Motion/
Mute lever to the PAD MOTION position to
play back these operations.
BPM (Beats Per Minute) is the tempo of the
song expressed as the number of beats (quarter
notes) that occur in one minute. A higher BPM
value means a faster tempo.
Recording
To set the BPM
Recording will begin when you hold the the
Pad Motion/Mute lever in the PAD MOTION position and touch the touch pad.
Even when you take your finger away from
the touch pad, this state will continue to be
recorded as part of your operation. This
means that you can also record operations
that include tapping on the touch pad. Recording will end when you move thethe
Pad Motion/Mute lever back to its original
position. Recording will also end when you
reach the maximum recording time (approximately 3.2 seconds).
If you know the BPM, press the Tap/BPM
key and use the Program/BPM knob to set
the value. The normal display will reappear
if ten seconds pass without any operation
being performed.
Playback
If you have recorded a pad motion, move
the the Pad Motion/Mute lever to the PAD
MOTION position, and the recorded motion will play back. As long as you leave the
the Pad Motion/Mute lever in the PAD
MOTION position, the same motion will be
played back repeatedly as long as you do
not touch the touch pad.
If you touch the touch pad during playback,
recording will begin. Recording will be reset if
you change programs.
The Hold key on/off state is not recorded as
part of the pad motion. Also, if you turn on the
Hold key and play back a pad motion, the motion
will be held at the point where you stopped playback.
8. Specifying the BPM
If you specify the BPM, you will be able to
apply effects in synchronization to the BPM
when an effect program from the “BPM FX/
PTN” group is selected. For details on the
effect parameter to which this effect will be
applied, refer to the effect program list
(☞separate sheet).
Tap Tempo function
If you do not know the BPM, press the Tap/
BPM key twice or more in rhythm with the
beat of the song. The beat will be detected,
and the BPM will appear in the Program/
BPM display.
Auto BPM function
If you press and hold down the Tap/BPM
key for an extended time, three dots will appear in the Program/BPM display, and the
beat of the audio input will be detected automatically. (Auto BPM mode)
While the Program/BPM display is blinking, the BPM is being detected.
Press the Tap/BPM key once again to end
automatic detection.
You can set the BPM in a range of 80–160.
MIDI Sync function
The BPM of the KP2 can be specified by
MIDI Timing Clock messages from an external MIDI device. Connect the [MIDI IN]
connector of the KP2 to the [MIDI OUT]
connector of the external MIDI device (such
as a sequencer) that is transmitting the timing clock messages.
This function does not synchronize sequence data with the KP2's rhythm pattern programs. If you want to synchronize to sequence
data, you will either have to insert a Touch Pad
On message into the beginning of each measure
of your sequence data, or touch the touch pad at
the beginning of each KP2 phrase to start the
pattern.
If you want the KP2 to receive Timing
Clock and Touch Pad On messages, go to MIDI
5
Edit mode (☞ p.8), and make “MIDI message
transmission/reception settings” (☞ p.8) so that
these messages will be received.
You can not use the Tap Tempo or Auto
BPM functions while the KP2 is receiving Timing Clock from an external MIDI device
9. Storing settings in the Program
Memory key
The current state of the KAOSS PAD can be
stored in one of the Program Memory 1–8
keys, so that it can be instantly recalled
whenever you want.
Stored contents
— Effect program
— On/off state of the Hold key and the held
position (coordinates)
— FX/Depth knob setting
— For the “BPM FX/PTN” group, the specified BPM value
— For the “SAMPLE/PLAY” group, the
Sample 1, 2 key used
Effect programs 60 and 90–99 do not store
the state of the Hold key.
To store settings
(1) Press the Program Memory 1–8 key that
you want to assign.
(2) Use the Program/BPM knob to select
the effect program that you want to assign.
If you want to store the setting of the Hold
key, select the program and then turn on the
Hold key and touch the touch pad to specify the
position. If you want to store other settings,
make them at this time.
(3) Press and hold down the Program
Memory 1–8 key you selected in step (1) for
approximately two seconds, and the settings will be stored.
When the settings have been stored, the
Program/BPM display will stop blinking.
To recall settings
(1) Press a Program Memory 1–8 key, and
the settings stored in that key will be recalled.
6
10. Sampling and playing back
a phrase
A phrase from the audio input can be recorded into one of the Sample 1, 2 keys.
Then when you have selected a program
from the “SAMPLE/PLAY” group (programs 90–99), you can play back the sample
while using the touch pad to control the
playback speed or reverse-playback. If you
have selected a program from other than the
“SAMPLE/PLAY” group, pressing the
Sample 1, 2 keys will play back the phrase
that was recorded in that key.
You can record for approximately six seconds in each of the two keys.
The recorded phrases will be lost when the
power is turned off. It is not possible to save the
recorded phrases.
Recording
(1) Press the Rec/Stop key, and the Rec/
Stop key LED will blink to indicate that you
are in record-ready mode.
(2) Press the Sample 1, 2 key into which you
want to record. At this time, you will not
hear the playback sound.
(3) When you press the Rec/Stop key, the
Rec/Stop key LED will light, and recording
will begin. Recording will stop when you
press the Rec/Stop key once again.
Recording will stop automatically when
you reach the maximum recording time.
For programs of other than the “SAMPLE/
PLAY” group, you can operate the touch pad
while you record, and the sound processed by the
effect will be recorded.
Auto recording (AUTO REC)
You can cause recording to begin automatically when audio is input. This is convenient when recording voice from a mic.
(1) In step (2) of the Recording procedure,
hold down the Sample 1, 2 key to which you
want to record, and press the Rec/Stop key.
The Rec/Stop key and Sample 1, 2 key
LEDs will blink simultaneously, indicating
that you are in record-ready mode.
(2) Recording will begin automatically
when audio is input. Recording will stop
when you press the Rec/Stop key once
again.
MIDI functions
Playback
MIDI stands for Musical Instrument Digital
Interface, and is a world-wide standard for exchanging a variety of performance-related information between electronic musical instruments
and computers.
The playback method will differ depending
on the effect program that you have selected.
For a program from the “SAMPLE/
PLAY” group
(1) Select a program from the “SAMPLE/
PLAY” group (90–99).
(2) Press the Sample 1, 2 key that you want
to play. The playback will not yet be output
at this time.
(3) When you touch the touch pad, the
sound will play back according to the position that you touch.
The way in which the phrase plays will depend on the program. (☞separate sheet: Effect program list)
(4) Use the FX Depth knob to adjust the
playback volume.
When the FX Depth knob is positioned in
the center, the playback sound and the input sound will be output in a 1:1 proportion. When the knob is at the maximum position, only the sample sound will be output
during playback, and you will not hear the
input sound.
For a program from other than the
“SAMPLE/PLAY” group
(1) Select a program from other than the
“SAMPLE/PLAY” group.
(2) Press a Sample 1, 2 key, and the recorded
phrase will play at normal speed. If you
continue pressing the key, the phrase will
play back as a loop.
To adjust the volume, continue pressing the
Sample 1, 2 key and use the FX Depth knob
to make adjustments.
You can apply effects to the playback by operating the touch pad while the sound plays
back.
If you press the Hold key while pressing the
Sample 1, 2 key, the playback will be held. Hold
will be cancelled when you press the Sample 1, 2
key once again.
What is MIDI?
MIDI connections
Commercially available MIDI cables are used
to transmit and receive MIDI messages. Connect these cables between the MIDI connectors of the KP2 and the MIDI connectors of
the external MIDI device with which you
want to transfer data.
MIDI IN connector: This connector receives MIDI messages from another MIDI
device. Connect it to the MIDI OUT connector of the external device.
MIDI OUT connector: This connector
transmits messages from the KP2. Connect
it to the MIDI IN connector of the external
device.
Using MIDI
In addition to using the KP2 as an effect processor, you can transmit MIDI messages
from the KP2 to use it as a realtime controller for a synthesizer or other external MIDI
device.
You can also connect the KP2 to a MIDI sequencer, and record the MIDI messages that
are transmitted when you operate the touch
pad. By playing back the recorded MIDI
messages you can reproduce your touch
pad operations.
About MIDI channels
In order to independently transmit information to multiple MIDI devices over a single
MIDI cable, MIDI uses sixteen channels (1–
16). If the transmitting device is set to MIDI
channel “1,” the MIDI messages will not be
received unless the receiving device is also
set to MIDI channel “1.”
7
About the MIDI implementation chart
The owner’s manual of each MIDI device includes a “MIDI implementation chart.” This
chart lets you check the types of MIDI message that can be transmitted or received.
When you use two (or more) MIDI devices together, compare their MIDI implementation
charts to see which types of MIDI message
they are able to transmit and receive between
themselves.
* Details on the MIDI functionality are provided
in the separate MIDI implementation. To obtain
the MIDI implementation, please contact Korg
distributor.
MIDI Edit mode
Hold down the Tap/BPM key and press the
Rec/Stop key. After approximately one second, you will enter MIDI Edit mode, and
the MIDI channel will be displayed blinking
in the Program/BPM display.
Setting the MIDI channel
In MIDI Edit mode, the Program/BPM display will show the MIDI channel. At this
time you can use the Program/BPM knob to
change the MIDI channel.
MIDI message transmission/
reception settings
Transmission and reception of each type of
MIDI message can be turned on/off by
pressing one of the keys listed below. Transmission and reception are enabled when the
corresponding LED is lit. Transmission and
reception are disabled when the LED is
dark.(☞p.9: Messages that can be transmitted
and received)
Some parameters can only be transmitted,
and others can only be received.
Changing the control number
By holding down one of the Program
Memory 3–8 keys and turning the Program/BPM knob, you can change the control number setting. Although it is possible
to select a control number that is already in
use, it is not possible to simultaneously turn
on transmission and reception for MIDI
8
messages of the same control number.
The MIDI messages transmitted and received
by the KP2 can be changed in the range of CC#1–
CC#31 and CC#64–CC#95.
To store the settings you modified
In MIDI Edit mode, press and hold the Rec/
Stop key for one second or longer, and the
MIDI settings you modified will be stored.
If you turn off the power without storing
the modified settings, they will revert to
their previous state.
To exit MIDI Edit mode
You will return to the normal state if you
touch the touch pad or leave the KP2 for ten
seconds without performing any operation.
Saving your settings
You can save the contents of program
memory and the control number settings of
MIDI edit mode by transmitting them as exclusive messages, and saving them on an
external MIDI device.
For details on the exclusive messages that
the KP2 can transmit and receive, refer to
the separate MIDI implementation.
Messages that can be transmitted and received
With the factory settings, the following MIDI messages can be transmitted and received.
Data operations transmitted MIDI messages transmitted
Touch pad X-axis
Effect control 1 (CC#12) *1, *2
ON/OFF key settings transmitted
Program Memory 4
Touch pad Y-axis
Modulation depth 1 (CC#1) Y=5–9
Modulation depth 2 (CC#2) Y=5–1
Program Memory 1
Program Memory 2
Touch pad X+Y-axis
Effect control 2 (CC#13) *1, *2
Effect depth 3 (CC#93) *1
Program Memory 5
Program Memory 3
Touch pad on/off
FX DEPTH
Effect depth 2 (CC#92) *1, *2
Effect depth 4 (CC# 94) *1, *2
Program Memory 6
Program Memory 7
MUTE
Program change
Effect depth 5 (CC# 95) *1, *2
Program change (00–99) *2
Program Memory 8
Hold
Data operations received
MIDI messages received
ON/OFF key settings received
Touch pad X-axis
Touch pad Y-axis
Effect control 1 (CC#12) *1, *2
Effect control 2 (CC#13) *1, *2
Program Memory 4
Program Memory 5
Touch pad on/off
FX DEPTH
Effect depth 2 (CC#92) *1, *2
Effect depth 4 (CC# 94) *1, *2
Program Memory 6
Program Memory 7
MUTE
Program change
Effect depth 5 (CC# 95) *1, *2
Program change (00–99) *2
Program Memory 8
Hold
BPM
Timing clock
Sample 1
*1: The MIDI messages transmitted and received can be changed in a range of CC#1–CC#31,
CC#64–CC#95, and PITCH BEND. ( ) is the factory setting.
*2: Ena/Dis and CC# settings are the same for both transmission and reception.
The control changes for touch pad Y-axis Y-5–9 and Y-5–1, and for touch pad X+Y axis can be transmitted but not received. For this reason when you record control changes into a sequencer, use MIDI Edit
mode to turn PROGRAM MEMORY 1–3 off, so that unnecessary MIDI messages are not transmitted.
Previously-specified control numbers cannot be specified again elsewhere.
Specifications
Number of programs: 100
Input: Mic input jack / monaural phone jack, Phono input jacks / RCA phono jacks, Line input
jacks / RCA phono jacks
Output: Line output jacks / RCA phono jacks, Headphone jack / stereo phone jack
MIDI: IN, OUT
Power supply: DC 12V, 700 mA
Included items: AC adapter, touch pad protection sheet
Weight: 1.1kg
Dimensions: 204(W) X 207(D) X 48(H)mm
— Appearance and specifications are subject to change without notice for improvement.
9
[Dynamic effect/controller]
KP2
MIDI Implementation Chart
Function
Basic
Channel:
Transmitted
Note
Number:
Recognized
Default
1–16
1–16
Changed
1–16
1–16
Default
Messages
Altered
Mode
2002.4.1
Remarks
Memorized
3
**************
True Voice
Velocity:
Note On
Note Off
Aftertouch:
Key’s
Channel
As control source
Pitch Bend
1– 31, 64–95
121
As control source
Reset All Controllers
Control
Change
Program
Change:
Variable Range
0–99
0–99
**************
0–99
System Exclusive
System
Common:
System
Real Time:
Aux
Messages:
Remarks
Song Position
Song Select
Tune Request
Clock
Commands
Local On/Off
All Notes Off
Active Sensing
System Reset
Transmitted/received when control numbers or pitch bend are selected,
and are enabled.
Transmitted/received when program changes are enabled.
Received when timing clock is enabled.
Mode 1: OMNI ON, POLY
Mode 3: OMNI OFF, POLY
Mode 2: OMNI ON, MONO
Mode 4: OMNI OFF, MONO
Consult your local Korg distributor for more information on MIDI Implementation.
Veuillez vous adresser à votre revendeur Korg pour une copie de l’équipement MIDI.
Weitere Informationen über die MIDI IMPLEMENTATION erhalten Sie bei Ihrem Korg-Vertrieb.
© 2002 KORG INC. KORG INC.
15-12, Shimotakaido 1-chome, Suginami-ku, Tokyo, Japan
: Yes
: No
No.
00
01
02
03
04
05
06
07
08
09
10
11
12
13
14
15
16
17
18
19
20
21
22
23
24
25
26
27
28
29
30
31
32
33
34
35
36
37
38
39
40
41
42
43
44
45
46
47
48
49
EFFECT GROUP
FILTER
MOD
DELAY
REVERB
SFX
EFFECT GROUP
BPM FX
BPM PTN
( BPM PATTERN )
SYNTH
VOCODER
SAMPLE/PLAY
X AXIS
TITLE
Tempo Delay
1/4Beat–1/2Beat–1/3Beat–3/4Beat
3 Band Tempo Delay
Low–Mid–Hi
Tempo Delay + Isolator
Low–Mid–Hi
Feedback Tempo Delay
1/4Beat–1/2Beat–3/4Beat–1Beat
Gate Reverb + Tempo Delay Low–Mid–Hi
BPM Filter
2Beat–1Beat–1/2Beat–1/4Beat
BPM Phaser
2Beat–1Beat–1/2Beat–1/4Beat
BPM Flanger
8Beat–4Beat–2Beat–1Beat
BPM Slice
1Beat–1/2Beat–1/4Beat–1/8Beat
BPM Step Phaser
Frequency
BPM Looper
1/4Beat–1/2Beat–1Beat–2Beat
BPM Rhythm Gate
Pattern 1–2–3–4
House
Pattern 1–2–3–4
Beat Box
Pattern 1–2–3–4
Tribal
Decay Time
Electro
Mod Depth
Octave Bass Synth
Pitch
5th Dimension Synth
Pattern 1–2, Resonance
Hard Sync Synth
Pitch
Bleep Synth
Pitch
Laser Sword
Pitch
Sci-Fi
Pitch
Ambient
Pitch
Pitch
Cosmic
Drop
Speed
Electric Bird
Pitch
Spacy
Pitch
Horror
Pitch
Twilight
Pitch
Siren
Speed
Saw OSC
Pitch
Sine OSC
Pitch
Voice OSC
Pitch
Pad Drum 1
Pitch
Pad Drum 2
Pitch
High Pitch
Pitch
Low Pitch
Pitch
Auto Tuning 12
Transpose (-12 – +12)
Auto Tuning Pentatonic
Transpose (-12 – +12)
Root and 5th
Pitch
Loop 1
Loop End Time
Reverse–Forward
Forward Reverse
Forward Reverse (High Speed)
Reverse–Forward
Scratch + Filter
Scratch
Loop 2
Loop Start Time
Forward Reverse + Delay Reverse–Forward
Scratch + BPM Delay
Scratch
Loop + Pan
L–R Pan
Forward Reverse + Pan
L–R Pan
Time Stretch
Slow–Fast Tempo
Informationen zu den Effektprogrammen
— Bei den Programmen 62–84 können Sie Klänge auch dann
erzeugen, wenn kein Audiosignal an den Eingangsbuchsen
anliegt, indem Sie einfach das Touch Pad bedienen.
— Der VOCODER der Programme 85–89 ist ein Effekt, der die
menschliche Stimme in eine roboterartige Stimme verwandelt.
Generell empfehlen wir, ein Mikrofon für die Eingabe einer
Stimme zu verwenden, wenn Sie diese Programme benutzen.
— 60. BPM LOOPER: Wenn BPM “59” oder weniger ist, ändert
sich 2BEAT zu 1BEAT.
— 88. Auto Tuning Pentatonic: Die Wirkung an der Position, an
der Sie zuerst das Touch Pad berührt haben, wird beibehalten, und
der Effekt wird durch Betätigung des Touch Pad nicht geändert.
No.
50
51
52
53
54
55
56
57
58
59
60
61
62
63
64
65
66
67
68
69
70
71
72
73
74
75
76
77
78
79
80
81
82
83
84
85
86
87
88
89
90
91
92
93
94
95
96
97
98
99
EFFECT PROGRAM LIST
LISTE DES PROGRAMMES D’EFFETS
Y AXIS
Resonance
—
Hi Level
Cutoff Frequency
Mid Level
Distortion
Resonance
Overdrive
Distortion
Overdrive
Resonance, Reverb
Depth
Frequency
Depth
Reverb
Cutoff Frequency
Depth
Resonance
Depth
Reverb
Delay Level, Feedback
Tone
Feedback
Feedback, Input Attenuation
Feedback
Delay Level
Feedback
Over Drive
Delay Level
Tone
Reverb Level
Reverb Time
Reverb Level
Reverb Level
Reverb Time
Reverb Level
Reverb Level
Over Drive
Reverb Level
Reverb Level
Feedback
FX Level
Cutoff Frequency
R Ch Pitch
Tremolo–Delay Balance
Delay Time
Depth
Ring–Delay Balance
Phaser–Tremolo Balance
FX Level
A propos des programmes d’effets
— Les programmes 62 à 84 permettent de produire des sons
simplement en touchant le panneau sensible, même si aucune
donnée audio n’est transmise par les bornes d’entrée.
— Le VOCODEUR des programmes 85 à 89 est un effet qui
transforme une voix humaine en une voix semblable à celle d’un
robot. En général, nous conseillons d'utiliser un micro pour entrer
des données de voix humaine en utilisant ces programmes.
— 60.BPM LOOPER: Si BPM est “59” ou inférieur, la position
2BEAT passera à 1BEAT.
— 88.Auto Tuning Pentatonic: L’effet à la position où le panneau
sensible au toucher a d’abord été pressé sera maintenu, et les
opérations au panneau ne modifieront pas l’effet.
X AXIS
TITLE
Low Pass Filter
Cutoff Frequency
3 Band Isolator
Low–Mid–Hi
Fuzz Distortion
Low–Mid
High/Low Pass Filter + PanHPF–LPF, L–R Pan
Multi Isolator
Low–Hi
Distortion + Isolator
Low–Mid–Hi
Manual Phaser
Frequency
Radio
Low–Mid
High Pass Filter + Distortion
Cutoff Frequency
Voice Filter
Vowel
Flanger
Delay Time
Vibrato
Speed
Phaser
Speed
Auto Pan
Speed
Pitch Shifter
Pitch
Flanger + Filter
Speed
Slicer
Speed
Step Phaser
Mod Step
LFO Wah
Speed
Harmonic Pitch Shifter Root–min3rd–Maj3rd–4th–5th
Tape Echo
Delay Time
Delay
Delay Time
Hi-Fi Delay
Delay Time
Delay Time
Feedback Delay
Multi Tap Delay
Tone
Special Echo
Delay Time
Ping Pong Delay
Delay Time
Talk Mod + Delay
Vowel
Filter + Delay
Cutoff Frequency
Dub Echo
Delay Time
Hall Reverb
Tone
Spring Reverb
Tone
Room Reverb
Tone
Gate Reverb
Tone
3 Band Hall Reverb
Low–Mid–Hi
3 Band Gate Reverb
Low–Mid–Hi
Delay + Reverb
Delay Time
Talk Mod + Reverb
Vowel
Filter + Reverb
Cutoff Frequency
3D Pan
L–R Pan
Reverse Delay
Delay Time
Step Modulation
Mod Depth
Ring Modulation + Filter Ring Frequency
Dual Pitch Shift
L Ch Pitch
Tremolo + Delay
Delay Time, Speed
Reverse + Pitch Shifter Pitch
Broken Modulation
Frequency
Ring + Delay
Delay Time
High Speed Modulation
Frequency
Aqua
Speed
About the effect programs
— With programs 62–84, you can produce sound simply by
operating the touch pad, even if no audio is being input
from the input jacks.
— The VOCODER of programs 85–89 is an effect that
changes a human voice into a robot-like character. In
general, we recommend that you use a mic to input a human
voice when using these programs.
— 60.BPM LOOPER: If the BPM is “59” or lower, 2BEAT
location will change to 1BEAT.
— 88.Auto Tuning Pentatonic: The effect at the position
where you first pressed the touch pad will be maintained,
and touch pad operations will not change the effect.
Y AXIS
Feedback
Feedback
Dry–Wet Balance
Feedback, Input Attenuation
Feedback
Resonance
Resonance
Feedback
Depth
Resonance
Cutoff Frequency
Cutoff Frequency
Delay Level
Delay Level
Mod Depth
Delay Level, Decay Time
Cutoff Frequency
Cutoff Frequency
Modulator Pitch
Cutoff Frequency
Modulation
Modulation
OSC Level, Delay Level
Cutoff Frequency
Pitch
Mod Depth
OSC Level, Reverb Level
Echo Feedback
Modulation
Echo Level
Cutoff Frequency
OSC Level
Formant
Snare–Tom Balance
Bass Drum–Snare Balance
2nd Voice Level
2nd Voice Level
—
—
1st–2nd Voice Balance
Playback Level
Playback Level
Playback Level
Cutoff Frequency
Playback Level
Delay Level
Delay Level
Loop End Time
Reverse–Forward
Playback Level