1
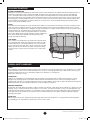
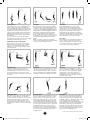
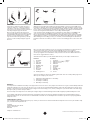
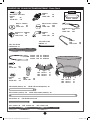
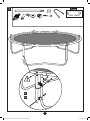
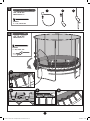
TP Genius Round 2
Trampoline with SurroundSafe
TP312 10ft TP Genius Round 2 Trampoline
TP313 12ft TP Genius Round 2 Trampoline
TP314 14ft TP Genius Round 2 Trampoline
Instructions for assembly maintenance and use.
Warnings!
Important! These instructions must be followed for safe assembly and use.
Please retain for future reference.
WARNING. Maximum single user weights / Age range
TP312
TP313
TP314
10ft TP Genius Round 2 Trampoline
12ft TP Genius Round 2 Trampoline
14ft TP Genius Round 2 Trampoline
- Maximum single user weight 105kg
- Maximum single user weight 130kg
- Maximum single user weight 135kg
- 6yrs+
- 6yrs+
- 6yrs+
TOY MUST BE ASSEMBLED BY AN ADULT BEFORE USE.
CHILDREN MUST NOT USE THE EQUIPMENT UNTIL PROPERLY INSTALLED.
WARNING: THIS PRODUCT CONTAINS SMALL PARTS AND IS NOT SUITABLE FOR CHILDREN UNDER 36
MONTHS. SMALL PARTS. CHOKING HAZARD.
REMOVE ALL PACKAGING BEFORE GIVING TO YOUR CHILDREN.
WARNING: ONLY FOR DOMESTIC USE. FOR OUTDOOR USE.
ADULT SUPERVISION IS REQUIRED.
TP312 313 314 Round 2 Trampoline IN5011 Issue-B 03 15.indd 1
26/03/2015 12:08
IMPORTANT, BEFORE YOU BEGIN, READ THIS MANUAL
Thank you for buying this Trampoline. The trampoline is designed and manufactured to provide you and your family
with many years of fun and exercise but, for your benefit and safety, please read this manual carefully and in full
before assembling and using your trampoline. Then, please retain this manual for future reference.
! WARNING !
Do not land on head or neck. Paralysis or death can result even if you land in the
middle of the trampoline mat (bed).
Do not land on knees.
To reduce the chance of landing on your head or neck, do not do somersaults
(flips).
Only one person at a time on the trampoline.
Multiple jumpers increase the chances of loss of control, collision, and falling off.
This can result in broken head, neck, back, or leg.
Warning!
l
Only one user. Collision hazard
l
Always close the net opening before practice
l
Practice with/without shoes (as decided by the manufacturer)
l
Do not use the mat when it is wet
l
Empty pockets and hands before practice
l
Always Jump in the middle of the mat
l
Do not exit the mat by a jump
l
Do not eat while jumping
l
Limit the time of continuous usage (make regular stops)
l
Regular maintenance is required.
Neglecting regular maintenance can lead to a risk for users;
l
Check all nuts and bolts for tightness and tighten when required;
l
Check that all spring-loaded (pit pin) joints are still intact and cannot become dislodged
during play
l
Check all coverings for bolts and sharp edges and replace when required;
l
Retain the maintenance instruction manual;
Inform about the hazard for outdoor trampolines in strong wind conditions and that outdoor
trampolines shall be equipped with a device to avoid displacement due to wind (e.g. steel bars in
the ground or loads like sand bag or water bags.
2
TP312 313 314 Round 2 Trampoline IN5011 Issue-B 03 15.indd 2
TP Genius Round 2 Trampoline with SurroundSafe
26/03/2015 12:08
YOUR NEW TRAMPOLINE
ASSEMBLY INFORMATION
Trampolines must be assembled by an adult. They must be erected exactly in accordance with the assembly instructions,
which follow. Enlisting the aid of a helper will make assembly easier. This trampoline does not require any additional
tools to assemble. Please take an inventory of all parts before assembly and ensure that all parts listed are included.
Also please take care during assembly as the manufacturing process can sometimes result in the occasional sharp edge
and small pieces of waste metalwork. The use of gloves to protect your hands from pinch points during assembly is also
recommended. Should there be any missing parts, the toy must not be used until replacement parts have been fitted.
Spares: Email: [email protected]
SITING
The trampoline must always be used in a well lit area. Under no circumstances should it be positioned on a hard surface
such as concrete or asphalt, unless the ground under the trampoline plus the recommended freespace area is covered
with a safety surface (please refer to diagram on page 16). Examples of suitable surfaces are grass, sand or a play surface
intended for this use. The trampoline must be placed on a level
surface. A minimum of 24ft of overhead clearance is required for
this product. Adequate horizontal clearance must be maintained
from objects and possible hazards including electric power
wiring, tree limbs and fencing.
HIGH WINDS
It is possible for the trampoline to be blown about by high wind.
If you anticipate high winds, the trampoline should be moved to
a sheltered location, or be disassembled, or the round outside
portion (top frame) should be tied to the ground using rope and
stakes. At least three tie-downs should be used. Do not simply
secure the legs to the ground, as they can pull out of the frame
sockets.
GENERAL SAFETY GUIDELINES
USAGE
This trampoline is designed and made for family outdoor domestic use only. The trampoline is not intended for use outside
of these guidelines. The user should be either barefoot, in socks, or wearing gymnastic shoes. Misuse can result in injury.
Inspect the trampoline before use and always replace worn, defective or missing parts.
Warning for domestic use only!
SUPERVISION
Children should always be supervised while they are playing on trampolines and should be instructed not to use the
trampoline in an inappropriate or hazardous manner. We recommend that they do not wear loose-fitting clothing or
jewellery that may catch or snag during play. Ensure that younger children do not walk or crawl underneath the trampoline
and keep the area around and underneath free from all solid objects at all times.
WEATHER CONDITIONS
Special care should be taken as weather conditions change. In particular, a wet trampoline mat (bed) is too slippery for safe
jumping. Gusty or severe winds can cause jumpers to lose control. To reduce the chance of injury, use the trampoline only
under appropriate weather conditions. In cold weather, tongues and lips can stick to metalwork at subzero temperatures.
In warmer and sunnier weather, parts can become hot, and the temperature should be regularly checked during play,
especially metal parts.
WATER PLAY
Many surfaces can become slippery during water play. Extra caution and supervision is required when combining water
(e.g. paddling pools, aqua slides etc.) with other forms of outdoor play.
3
TP312 313 314 Round 2 Trampoline IN5011 Issue-B 03 15.indd 3
TP Genius Round 2 Trampoline with SurroundSafe
26/03/2015 12:08
USING YOUR TRAMPOLINE - IMPORTANT SAFETY INFORMATION
BEFORE YOU BEGIN, REMEMBER
1.
2.
3.
4.
5.
6.
7.
Trampolines are rebounding devices which propel the user to unaccustomed heights, and into a variety of body
movements. Rebounding off the trampoline, striking the frame or springs, or improperly landing on the trampoline
may cause injury.
All purchasers and all persons using the trampoline must become familiar with the manufacturers recommendations
for the proper assembly, use and care of the trampoline. Each user must also be alert to his/her own limitations in
the execution of trampoline skills. Assembly instructions, selected precautions and suggestions for the care and
maintenance of the trampoline are included in this user’s manual to promote safe, enjoyable use of this equipment.
It is the responsibility of the owner to ensure that all users of this trampoline are adequately informed of all warnings
and safety instructions.
Never allow more than one (1) person on the trampoline at a time. Multiple jumpers increases the chance of
someone becoming injured. Jumpers may collide with one another, fall off the trampoline, fall on or through
the springs, or land incorrectly on the mat.
Always secure the trampoline against unauthorized and unsupervised use.
Inspect the trampoline before each use and replace any worn, defective, or missing parts.The following conditions
could represent potential hazards:
(1) Missing, improperly positioned, or insecurely attached frame padding,
(2) Punctures, frays, tears, or holes worn in the bed or frame padding,
(3) Deterioration in the stitching or fabric of the bed or frame padding,
(4) Ruptured springs,
(5) A bent or broken frame,
(6) A sagging bed, or sharp protrusions on the frame or suspension system.
Adult supervision of children - Children should always be supervised while they are playing on the trampoline
fitted with a Bounce Surround and should be instructed not to use it in an inappropriate or hazardous manner.
In particular be aware of:
Use trampoline surround only with mature, knowledgeable supervision
Do not attempt to jump over the barrier
Do not attempt to crawl under the barrier.
Do not intentionally rebound off the barrier.
Do not hang from, kick, cut or climb on the barrier.
Wear clothing free of drawstrings, hooks, loops or anything that could get caught in the barrier.
Do not attach anything to the barrier that is not a manufacturer-approved accessory or part of the surround system.
Enter and exit the surround only at the surround door or barrier opening designated for that purpose.
BOUNCING
1.
2.
3.
4.
5.
6.
7.
Always bounce in the centre of the bed. Bouncing near the edge of the bed can lead to injury and can also
stretch the springs.
Avoid bouncing too high. Stay low until you can control your bounce and land consistently in the middle of the bed.
Learn basic bounces and body positions thoroughly before trying more advanced skills. Attempting a
manoeuvre beyond present skill levels increases the chance of loss of control. A controlled jump is one where the
landing is in the same spot as the take off. Before learning a more difficult manoeuvre, the preceding one should be
performed consistently under control.
Do not attempt somersaults without proper instruction and supervision. Landing on your head or neck, even in the
middle of the trampoline mat increases the risk of a broken neck, which can result in paralysis or death.
To regain control and stop your jump, bend your knees sharply when you land.
Do not bounce for too long or when tired.
Do not use the trampoline when under the influence of alcohol or drugs.
4
TP312 313 314 Round 2 Trampoline IN5011 Issue-B 03 15.indd 4
TP Genius Round 2 Trampoline with SurroundSafe
26/03/2015 12:08
CARE AND MAINTENANCE OF YOUR TRAMPOLINE
GENERAL
Your trampoline is designed to stand outside all year round and generally requires very little maintenance. However, a little
care and forethought can add years to your trampoline’s life. Remember that the bed (mat) and frame pads are made of
synthetic materials and are easily damaged by cigarette ends, fireworks and bonfire debris.
l
Check all nuts and bolts for tightness and tighten when required.
l
Check that all spring-loaded (pit pin) joints are still intact and cannot become dislodged during play.
l
Check all coverings for bolts and sharp edges and replace when required.
l
Retain the maintenance instruction manual.
FRAME
Do not sit or stand on the frame or the frame pads while the trampoline is in use as this restricts the frames natural reflex
action. Oil or petroleum jelly applied where the springs hook into the frame will reduce squeaking and frame hole wear.
If surface rust appears it should be removed with either a wire brush or coarse sandpaper, and the area treated with a
non-toxic paint.
THE MAT
The mat (bed) will,over the years, be gradually weakened by the effects of ultra violet radiation. Therefore, the more it can be
protected from direct sunlight the longer it will last. A little mould or mildew should not harm the mat.
Do make sure that shoes are removed before bouncing and ensure that any other sharp objects such as belt buckles,
brooches and jewellery are removed too.
THE SPRINGS
Do not stand on the springs whilst the trampoline is in use. Try not to bounce on to the springs. They are not designed for
this sort of stress and can become stretched, misshapen and weakened. If you find you have any stretched springs, it is
important to replace them as soon as possible to avoid damage to the trampoline mat and avoid overloading and therefore
damaging the remaining good springs
FIRE RISKS AND DISPOSAL
Never allow toys to be placed or used near a fire. When it becomes necessary to dispose of your equipment, remove all
bolts and disassemble. Store out of the reach of children until it can be properly disposed of.
METHODS OF ACCIDENT PREVENTION
JUMPER’S ROLE IN PREVENTING ACCIDENTS
Education on the part of the user is a must for safety. Users must first learn a low controlled bounce and the basic landing
positions and combinations before proceeding to intermediate skills. Jumpers must understand why they have to master
“control” before they can start thinking about other moves. Understanding the proper progression of skills in jumping on a
trampoline must be the first lesson.
SUPERVISORS ROLE IN PREVENTING ACCIDENTS
It is the responsibility of the supervisors of trampoline users to provide knowledgeable and mature supervision. They need
to know and enforce all the rules and warnings set forth in this manual in order to minimize the likelihood of accidents and
injuries and to inform users of these rules. During periods of time when supervision is unavailable or inadequate, this may
require that the trampoline be disassembled, placed in a secure area, or otherwise secured against unauthorized use. It is
the responsibility of the supervisor to be sure that the users are fully aware of the safety guidelines which are printed on the
pads.
These instructions are issued in the interest of child safety, and we do ask you to follow our advice.
5
TP312 313 314 Round 2 Trampoline IN5011 Issue-B 03 15.indd 5
TP Genius Round 2 Trampoline with SurroundSafe
26/03/2015 12:08
Standing Bounce
Use the basic “feet to feet” standing bounce to
warm up and get the feel of the trampoline.
Try to keep the body straight. Your legs should
be slightly apart when landing on the bed and
together in the air with toes pointed. As you
jump up from the trampoline bed push down
hard on the balls of feet and toes, stretch your
body upwards and swing your arms forward
and upwards.
As you come down onto the bed bring your
arms down to your sides, part your legs slightly,
land with feet flat and flex your knees.
SEAT DROP
HALF TWIST
IMPORTANT: TO STOP YOUR BOUNCE
First, without bouncing, just sit in the middle
of the bed in the correct landing position. This
is with your legs together and straight out in
front of you. Lean slightly backwards with back
straight, arms beside and slightly behind you
with fingers together and pointing forward.
Next stand up and drop to the Seat Drop
position, without bouncing. Then try the move
from a little bounce. To bounce back onto your
feet lift hips forward and push up with your
hands.
Make sure that you drop to the Seat Drop
position in the middle of the bed and land back
on your feet in the middle of the bed.
STRADDLE JUMP
TUCK JUMP
PIKE JUMP
HANDS AND KNEES
BACK BOUNCING
BACK DROP
Bend your knees as your feet touch the bed.
Practice this move so that you are confident
that you can stop dead if you find you are
getting out of control or going away from the
centre of the bed.
Similar to the pike jump, but stretch your
legs apart as far as possible with the toes
pointed and try to touch the top of your feet in
the position at the top of the bounce, before
returning to land on your feet with your arms at
your sides.
Without bouncing, adopt the hands and knees
position as shown. Return to the standing
position and with a small bounce lift your hips
back and upwards and drop to the hands
and knees position. Hands and knees must
hit the bed at exactly the same time. Push up
slightly with your arms to return to the Standing
position.
Start as if doing just a standing bounce. At the
top of your bounce bring your knees to your
chest and briefly clasp your shins. Let go and
return to standing bounce with body straight
and arms at sides before landing on the bed.
As an introduction to the Back Drop and to get
the feel of where and how to bounce on your
back,try back bouncing. Without bouncing,
adopt the Back Drop position. Keep your chin
forward and head off the bed by continuing to
look forwards. With legs and hands up in the
air start regular bouncing motions by bringing
your knees up towards your chest to push your
body into the bed, then open your legs out
to lift off the bed. Tuck them in as you hit the
bed and open out to leave the bed. Work with
the bounce and you’ll find this an easy and
enjoyable move.
6
TP312 313 314 Round 2 Trampoline IN5011 Issue-B 03 15.indd 6
From a Standing Bounce, as you leave
the bed raise both arms and bring them
together above your head whilst looking in
the direction you wish to twist. This action will
help you twist your body round so that you
land facing the opposite direction, having
rotated through 180 degrees. The higher and
quicker you lift your arms the further you will
twist. Always twist in the same direction.
FULL TWIST
Performed as for the half twist but with more
effort so that you rotate through a full 360
degrees and land in the same position that
you took off from. Do not attempt a full twist
until you have perfected the half twist.
Start as if doing a standing bounce. At the
top of your bounce, bending your body at the
hips, raise your legs, keeping them straight
and together, to the horizontal position
and briefly touch your shins. Return to the
standing bounce before landing on the bed
with arms at your sides.
First without bouncing, adopt the Back Drop
position. Keep your chin forward and head
off the bed. Legs should point upwards and
forwards, at about 60 degrees from the surface
of the bed and arms at a similar angle.
From standing position with hardly any bounce,
keeping sight of the outside of the trampoline
all the time, kick both legs up and forward
lifting hips and aim to land in the centre of the
bed on the upper part of your back. Lift your
hips up and forward and bear down with your
legs to return to standing position.
TP Genius Round 2 Trampoline with SurroundSafe
26/03/2015 12:08
SWIVEL HIPS
Swivel Hips is really three simple moves put
together to make one: seat drop - half twist seat drop. To start off, try joining the last two
parts of the move together so that you land in a
seat drop facing the opposite direction.
Once you have got the last two parts of the
move together add on the first seat drop, reach
upwards and forwards from the first seat drop
and turn your hips and body. Your straight
legs can then follow through under your body
into the second seat drop facing the opposite
direction.
FRONT DROPS
Without bouncing, adopt the Front Drop position by lying flat on your front in the middle of the
bed with your head up, arms bent, palms downwards on the bed, with fingers nearly touching
each other just forward of your chin. Now adopt the hands and knees position and from a small
bounce, kick your legs backwards, and adopt the Front Drop position with your head and arms.
Practice bouncing from hands and knees to Front Drop and back again.
To do a front drop from standing position it is important to realise that you must DROP to the
centre of the bed. You must NOT dive forwards as this can be extremely uncomfortable.
Do your first Front Drop from standing without bouncing by lifting your hips and heels upwards
and backwards. It is better to move backwards when doing a Front Drop than to dive forwards.
When landing in the Front Drop position, your forearms, stomach and thighs should all hit the
bed at the same time. Push with your arms to return to the standing position in the centre of the
bed.
Once you have mastered all these moves you can start performing them one after the other to
create a routine. Start your routine with a few standing bounces to set your rhythm.
Try to perform each skill neatly, at a consistent height and always in the middle of the bed.
You can put together moves in whatever order you wish. Some are more difficult than others.
Here are two suggested basic routines.
Start with Routine A. Once you have mastered Routine A you are ready to start Routine B.
Routine A
1.
2.
3.
4.
5.
6.
7.
8.
9.
10.
Front Drop
To Feet
Tuck Jump
Half Twist
Straddle Jump
Seat Drop
To Feet
Pike Jump
Full Twist
Standing Bounce
Routine B
1.
2.
3.
4.
5.
6.
7.
8.
9.
10.
Seat Drop............................) Swivel
Half Twist to Seat Drop.....) Hips
Half Twist to feet
Half Twist
Tuck Jump
Front Drop
To Feet
Straddle Jump
Back Drop
To Feet
There are a number of other moves that fit together well. These are usually called progressions.
When you are ready try some of these:
1.
2.
3.
4.
Seat Drop to hands and knees to Front Drop.
Seat Drop to Front Drop.
Front Drop to Seat Drop.
Back Drop to Front Drop.
BEWARE OF.....
You may have noticed that the Knee Drop is missing from the list of moves. This is a very simple move which is no longer recommended by the British
Trampoline Federation, as it can cause the bouncer to lose control, bounce forward and fly head first off the side of the trampoline. It has also been
known to cause back injuries. Remember that if you happen to do a Knee Drop you are, in fact, isolating two of your bodies vital control and energy
absorption joints; your knees and your ankles.
There are many more trampoline moves that require a higher degree of skill and training and should be taught by a qualified trampoline coach.
It is not always realised that somersaults and moves involving full rotation in the air are potentially very dangerous if attempted without proper
training and supervision. For this reason we recommend that somersaults are not attempted unless under the supervision of a properly qualified
trampoline coach.
TRAMPOLINING AS A SPORT ...
If you would like to take up trampolining as a sport, contact your nearest Leisure Centre and ask about trampoline lessons. If they are unable to help
you, contact the British Gymnastics at:
Ford Hall
Lilleshall National Sports Centre
Newport, Shropshire
TF10 9NB
Telephone: 01952 820 330
7
TP312 313 314 Round 2 Trampoline IN5011 Issue-B 03 15.indd 7
TP Genius Round 2 Trampoline with SurroundSafe
26/03/2015 12:08
CONTENTS 10ft, 12ft AND 14ft TRAMPOLINE FRAME - Please Check
10ft FC9968
12ft FC9971
14ft FC9974
10ft FC8699
12ft FC8699
14ft FC8699
x1
x1
x1
x60
x72
x80
10ft
12ft
14ft
10ft FC2028
12ft FC4101
14ft FC2057
x3
x4
x4
10ft FC2069
12ft FC2056
14ft FC2056
x6
x8
x8
FC9966
FC9969
FC9972
x6
x8
x8
Tools
FC8681 x1
Allen Key x1
8
TP312 313 314 Round 2 Trampoline IN5011 Issue-B 03 15.indd 8
TP Genius Round 2 Trampoline with SurroundSafe
26/03/2015 12:08
CONTENTS 10ft, 12ft AND 14ft TRAMPOLINE FRAME - Please Check
10ft
12ft & 14ft
M6 x 85mm Allen Bolt
FA8007
10ft
12ft & 14ft
Tools
PM8469
x6
x8
x6
x8
13mm TP8162
M6 Dome Nut - FA8008
Washer - FA5094
10ft
12ft & 14ft
10ft
12ft & 14ft
x6
x8
Bolt Spacer - PM0050
10ft
12ft & 14ft
Foam Elastic Tie - FC2016
10ft
12ft & 14ft
PM8488
x6
x8
x18
x24
10ft
12ft & 14ft
x6
x8
PM8487
10ft, 12ft & 14ft
PM2080 x1
10ft, 12ft & 14ft
FB6046/6049 x1
x18
x24
10ft
12ft & 14ft
x6
x8
FC2080 10ft x6 1580mm
FC2081 12ft x8 1400mm
FC2082 14ft x8 1660mm
FA6840
10ft
12ft & 14ft
FA6394
10ft
12ft & 14ft
x6
x8
x6
x8
PM1985
10ft
12ft & 14ft
10ft FC2050 (450mm) x6
10ft FC2054 (1780mm) x6
10ft FC2034 x6
10ft FC9967 x6
10ft
12ft
14ft
DP7871
DP7872
DP7873
x1
x1
x1
x6
x8
10ft
12ft
14ft
TS3100
TS3101
TS3102
x1
x1
x1
12ft & 14ft FC2050 (450mm) x8
12ft & 14ft FC2054 (1780mm) x8
12ft & 14ft FC2034 x8
12ft FC9970 x8
14ft FC9973 x8
9
TP312 313 314 Round 2 Trampoline IN5011 Issue-B 03 15.indd 9
TP Genius Round 2 Trampoline with SurroundSafe
26/03/2015 12:08
Stage
1
FRAME ASSEMBLY
Lay Out Parts like this
Disposez les pièces de la manière
suivante
Disporre i componenti come
indicato
Coloque las piezas de este
modo
Befestigung des
Sprungtuches und
der Federn
Dispor os componentes
conforme indicado
10ft
12ft & 14ft
10
TP312 313 314 Round 2 Trampoline IN5011 Issue-B 03 15.indd 10
TP Genius Round 2 Trampoline with SurroundSafe
26/03/2015 12:08
Stage
2
Stage
3
FCxxxx
11
32
TP312 313 314 Round 2 Trampoline IN5011 Issue-B 03 15.indd 11
TP Genius Round 2 Trampoline with SurroundSafe
26/03/2015 12:08
Stage
4
x1
10ft FC8699
12ft FC8699
14ft FC8699
x60
x72
x80
1
2
4
3
5
12
TP312 313 314 Round 2 Trampoline IN5011 Issue-B 03 15.indd 12
TP Genius Round 2 Trampoline with SurroundSafe
26/03/2015 12:08
Stage
5
Tools
13mm TP8162
X6
X8
13
32
TP312 313 314 Round 2 Trampoline IN5011 Issue-B 03 15.indd 13
TP Genius Round 2 Trampoline with SurroundSafe
26/03/2015 12:08
Stage
6
10ft FC9967 x6
12ft FC9970 x8
14ft FC9973 x8
10ft
12ft & 14ft
x18
x24
3 ties
per pad
3 ties
per pad
14
TP312 313 314 Round 2 Trampoline IN5011 Issue-B 03 15.indd 14
TP Genius Round 2 Trampoline with SurroundSafe
26/03/2015 12:08
Stage
10ft x6
7
1
12ft & 14ft x8
8 FA6394 8 F6840
FC2080 10ft x6 1580mm
FC2081 12ft x8 1400mm
FC2082 14ft x8 1660mm
8 PM1985
Assembly Tip
Place surround on trampoline
frame/mat as shown
to help assemble surround
top rim and uprights.
1
1
1
2
2
2
x8
A
3
3
C3
F
B
3
3
3
4
4
4D
4
4
4
5
5
E5
5
5
5
6
6
6
15
TP312 313 314 Round 2 Trampoline IN5011 Issue-B 03 15.indd 15
TP Genius Round 2 Trampoline with SurroundSafe
26/03/2015 12:08
Stage
8
10ft FC2034 x6
12ft & 14ft FC2034 x8
A
B
FC2034
16
TP312 313 314 Round 2 Trampoline IN5011 Issue-B 03 15.indd 16
TP Genius Round 2 Trampoline with SurroundSafe
26/03/2015 12:08
Stage
9
10
1
2
3
10ft, 12ft & 14ft
FB6046/6049 x1
PM2080
1 - 10ft, 12ft & 14ft
Stage
10
10ft, 12ft & 14ft
FB6046/6049 x1
PM2080
1 - 8ft, 10ft & 12ft
A
C
A
B
B
C
D
17
TP312 313 314 Round 2 Trampoline IN5011 Issue-B 03 15.indd 17
TP Genius Round 2 Trampoline with SurroundSafe
26/03/2015 12:08
Stage
11
10ft
12ft
14ft
DP7871
DP7872
DP7873
x1
x1
x1
Stage
12
18
TP312 313 314 Round 2 Trampoline IN5011 Issue-B 03 15.indd 18
TP Genius Round 2 Trampoline with SurroundSafe
26/03/2015 12:08
Stage
13
Outside
Skirt
Underside
Skirt
Underside
Skirt
Pull surround around
the uprights
Repeat until all
hooks are fastened
19
TP312 313 314 Round 2 Trampoline IN5011 Issue-B 03 15.indd 19
Outside
Skirt
TP Genius Round 2 Trampoline with SurroundSafe
26/03/2015 12:08
Stage
14
20
TP312 313 314 Round 2 Trampoline IN5011 Issue-B 03 15.indd 20
TP Genius Round 2 Trampoline with SurroundSafe
26/03/2015 12:08
Recommended safe play area:
700cm
200cm
200cm
200cm
Recommended Free Space:
The Safe Play Area refers to the zone extending 200cm (2 metres) beyond the toy on all sides and 700cm (7 metres) above
the toy. The Safe Play Area must be free from all structures, landscaping, trees and branches, rocks, wires, sprinkler heads
and other similar obstacles to safe play. Children can be seriously injured running or colliding into such obstacles.
Trampoline dimensions:
10ft
12ft
Mat
371cm
Mat
315cm
Mat
254cm
Frame Dia
14ft/426cm
259cm
Frame Dia
12ft/365cm
259cm
Frame Dia
10ft/305cm
246cm
14ft
76cm
89cm
21
TP312 313 314 Round 2 Trampoline IN5011 Issue-B 03 15.indd 21
89cm
TP Genius Round 2 Trampoline with SurroundSafe
26/03/2015 12:08
22
TP312 313 314 Round 2 Trampoline IN5011 Issue-B 03 15.indd 22
TP Genius Round 2 Trampoline with SurroundSafe
26/03/2015 12:08
23
TP312 313 314 Round 2 Trampoline IN5011 Issue-B 03 15.indd 23
TP Genius Round 2 Trampoline with SurroundSafe
26/03/2015 12:08
Register your new TP product on line now at
www.tptoys.com/product registration
Thank you for purchasing this TP product. To find out all about your product guarantee and register
your purchase, please visit www.tptoys.com/productregistration
We want to give you the very best service. By registering your purchase now, we will be able to deal
with any guarantee issues very quickly and efficiently in the future. Thank you.
Designed in the UK by Robovision Ltd t/a TP Toys
Unit 11, Enterprise Way, Flitwick, Bedfordshire, MK45 5BX England
Made in China
www.tptoys.com
TP312 313 314 Round 2 Trampoline IN5011 Issue-B 03 15.indd 24
Instruction Part No: IN5011 Issue-B 03 14
Your TP Guarantee Number/Product Batch No is
26/03/2015 12:08