1
Do you want to enable large disk support ?
[Y] if you want to build a partition larger than 2GB.
[N] if you want to build a partition small than 2GB.
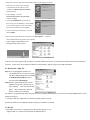
Step5 The next screen is [FDISK OPTIONS],
and type “5” to select disk. The screen
shown on right appears.
IMPORTANT:
You must type [5] in this screen to change the current fixed disk drive to build partition, the default fixed drive set by FDISK is your internal
hard disk, if YOU DON’T CHANGE THE FIXED DISK DRIVE TO THE USB2.0 HARD DISK, THE DATA OF YOUR INTERNAL
HARD DISK WILL BE DESTROYED.
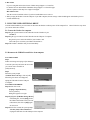
Step6 In the [Change Current Fixed Disk Drive], type the disk drive number that
Is assigned to the USB2.0 Hard Disk .
Step7 Back on the [FDISK OPTIONS] screen, you can now create or delete the
partition of the USB2.0 Hard Disk.
Step9 After you finish FDISK, go back to the Windows screen, unplug and plug in
USB2.0 Hard Disk again to activate these changes. Double click on
[My Computer] icon, the USB2.0 Hard Disk Drive that you already partitioned
should appear.
6.2 Partition under Windows 2000/XP
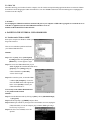
Step1 .To partition the USB2.0 Hard Disk
Drive under Windows 2000, please plug
in the USB2.0 Hard Disk , then click on
[Start], choose [Control Panel] in
[Settings],open [Administrative Tools] ,
double click [Computer Management].
A window appears as right.
Step2 Click on [Disk Management] on the
left part of this window, all connected
disk drives will be listed in the right
part. Find out the USB2.0 Hard Disk that
you add. On the right of disk # is the
status of the partitions of this disk drive. You can create a new or delete an
existing partition by right-clicking on this area.
Step3. Right-click on the right area of the USB2.0 Hard Disk Drive. Click on
[Create Partition....]
The ”Create partition wizard” will appear.
Step4. Following the instructions of the wizard to partition and format your USB2.0
Hard Disk Drive.
Now, you have built a partition in the USB2.0 Hard Disk Drive and can write data to it.