1
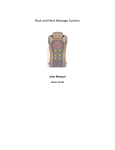
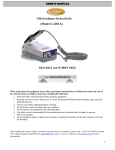
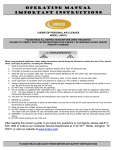
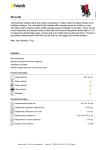
USER’S MANUAL
iRoboticsTM
Advanced Features with High Reliability
For household and commercial use
PLEASE READ AND SAVE THESE IMPORTANT SAFETY
INSTRUCTIONS
1
IMPORTANT SAFETY INSTRUCTIONS
Please Save these Instructions
When using an electrical appliance, basic precautions should always be followed, including the following:
Read all instructions before using this massage chair.
DANGER – To reduce the risk of electric shock:
1. Always unplug the power cord from the electrical outlet immediately after use and before cleaning.
WARNING – To reduce the risk of burns, fire, electric shock, or injury to persons:
1. The main power switch is marked with international symbols “O” and “I”. The switch in position “I” means that
system is turned on, and The switch in position “O” means that system is off.
2. An appliance should never be left unattended when plugged in. Unplug from outlet when not in use and before
putting on or taking off parts.
3. Close supervision is necessary when this appliance is used by, on, or near children, invalids, or disabled
persons. Keep children away from extended foot support (or other similar parts*).
4. Use this appliance only for its intended use as described in this manual. Do not use attachments not
recommended by the manufacturer.
5. Never operate this appliance if it has a damaged cord or plug, if it is not working properly, if it has been dropped
or damaged, or dropped into water. Return the appliance to a service center for examination and repair.
6. Keep the cord away from heated surfaces.
7. Do not use outdoors.
8. Do not operate where aerosol (spray) products are being used or where oxygen is being administered.
9. To disconnect, turn all controls to the off position, then remove plug from outlet.
10. Connect this appliance to a properly grounded outlet only. See Grounding Instructions.
11. Do not remove the back cushion and do not play with roller mechanism.
12. Do not remove the bottom seat and do not play with actuators.
13. Keep the cord out of heavy traffic area. To avoid fire hazard NEVER put the cord under rugs, near heat
generating devices.
14. Always check the volume before using the headphone.
15. Do not operate any equipment with a damaged parts .
16. Any other use not recommended by the manufacturer may cause electrical shock or injury to persons.
17. Do not touch or re-wire the wires connected to the master-box.
18. Do not attempt to repair or adjust any electrical or mechanical functions on this unit. Doing so will void the
warranty.
After reading this owner’s guide, if you have any questions or comments, please call +1-817-633-1080
or contact our technical support department at [email protected] or visit our website at www.luraco.com
for more information
2
FEATURES - OPERATIONS
“iRoboticsTM” Outstanding Features:
The Ultimate Message Chair-Extreme Luxury combined with High-Tech Innovation
•
•
•
•
•
•
•
•
•
•
•
Advanced, full-function massage system design
Ultra-soft leather-nests you in comfort
Integrated MP3 player/Flashcard reader with built-in speakers or headset options
Supports several music file formats
Ultra-clean sound with full audio frequency band
Stylish modern design
High reliability
Light weight
Self diagnostics with LED system status reporter
Innovative laptop holder (optional)
Researched, Developed and Manufactured in U.S.A
GROUNDING INSTRUCTIONS
This product must be grounded. If it should malfunction or breakdown, grounding provides a path of least resistance for
electric current to reduce the risk of electric shock. This product is equipped with a cord having an equipment-grounding
conductor and a grounding plug. The plug must be plugged into an appropriate outlet that is properly installed and
grounded in accordance with all local codes and ordinances.
DANGER - Improper connection of the equipment-grounding conductor can result in a risk of electric shock. Check with
a qualified electrician or serviceman if you are in doubt as to whether the product is properly grounded. Do not modify
the plug provided with the product - if it will not fit the outlet; have a proper outlet installed by a qualified electrician.
Followed by either instruction 1. or 2. below:
1. This product is for use on a nominal 120-V circuit, and has a grounding plug that looks like the plug illustrated in
sketch A in the Figure below. A temporary adapter that looks like the adapter illustrated in sketches B and C may be
used to connect this plug to a 2-pole receptacle as shown in sketch B if a properly grounded outlet is not available.
The temporary adapter should be used only until a properly grounded outlet (sketch A) can be installed by a
qualified electrician. The green colored rigid ear, lug, or the like extending from the adapter must be connected to a
permanent ground such as a properly grounded outlet box cover. Whenever the adapter is used, it must be held in
place by a metal screw.
2. This product is for use on a nominal 120-V circuit and has a grounding plug that looks like the plug illustrated in
sketch A in the Figure below. Make sure that the product is connected to an outlet having the same configuration as
the plug. No adapter should be used with this product.
GROUNDING INSTRUCTION
3
iRobotics Installation Instruction
1.
2.
3.
4.
5.
6.
7.
8.
Determine the surface of the base that you want to install the iRobotics, ensure that the surface is flat.
Locate a position to drill the holes with the dimensions as shown in Fig.1.
Lift the “chair back” rests on the chair seat. Lock the “chair back” into actuator lock as shown in Fig 2.
Lift the seat base to see the four holes on the massage chair base.
Place the chair base to match the four drills made on the base.
Install the screws and nuts to secure the chair frame to the base. Use a Hex key wrench to tighten the four screws.
Plug the power cord into the Masterbox.
Place the pillow and plug the head-phone as shown in figure 4.
29 cm
27.5 cm
Release plate
for releasing
the lock
M8 Screw, Drill
diameter 10 mm
Figure 1. Drill Instruction
Spring loaded lock
Figure 2. Lock Mechanism
3.5 mm
Stereo jack
Figure 3. Location of Headphone Jack
4
Figure 4. Laptop Holder Installation
5
Remote Control
B
A
C
D
F
E
I
G
H
J
N
K
O
L
M
T
P
R
Q
S
Figure 5: Remote Control Button Layout
Remote Control Instructions and Button Description
A.
POWER/STOP: Turn ON/OFF the massage system. After each 8 minute session the power turns off
automatically.
B.
SWEDISH: is a continues 8 minutes consisting of combination functions including Soft Kneading, Soft Tapping and Up/Down
functions.
C.
DEEP TISSUE: is a continues 8 minutes consisting of combination functions including Harder Kneading, Harder Tapping and
Up/Down functions
D.
KNEADING: Initial press starts kneading with full range of body function. The second press turns off the kneading.
6
E.
RANGE: iRobotics has four different range operations. By default, it has the FULL RANGE massage. First
press, it goes to UPPER BODY massage. Second press, it goes to SPOT massage, and third press, it goes to LOWER BODY
massage. The sequence will repeat.
F.
COMBO: Initial press starts with both kneading & tapping with full range of body function. The second press turns off both the
kneading & tapping.
G. TAPPING: Initial press starts Tapping with full range of body function. The second press turns off the Tapping.
H.
WIDTH: This function is active only when Tapping is turned ON. This adjusts the width of the rolling system for each press.
I.
SPEED: This function is active only when the system is either in COMBINATION mode or TAPPING mode. It has five different speed
profiles for tapping and each press of this button the profile changes in sequence.
J.
CALF: Turns ON/OFF Calf Massage
K.
HEIGHT: Foot Massage height adjustment. This UP button manually moves the roller system from bottom to top. As soon as the UP
button is released the roller system stops at desired position.
L.
This DOWN button manually moves the roller system from top to bottom. As soon as the DOWN button is released the roller system
stops at desired position.
M. SEAT: This button manually moves the seat forward or backward. As soon as this button is released the seat stops at desired
position.
N.
FEET: Turns ON/OFF Foot Massage.
O. RECLINE: This button manually reclines UP/DOWN the seat position up. As soon as this button is released the seat reclining stops
at desired position.
P.
When holding “FF” KEY (Hold Mode) during play or pause, the master starts fast forward playing the file. When "FF" KEY release is
detected, the master return to normal playing. When pressing and releasing “FF” KEY (push/release Mode) during play or pause, the
master searches the nextAAC/WMA/MP3 file in the order of sort of files being played or paused.
Q. When pressing “PLAY/PAUSE” key during play, the master stops playing the MP3 file temporarily. When receiving PLAY/PAUSE
key again, the master continues to play the file.
R.
When holding “FB” KEY (Hold Mode) during play or pause, the master starts reverse playing the file. When "FB" KEY release is
detected, the master return to normal playing. When pressing and releasing “FB” KEY (push/release Mode) during play or pause, the
master searches the nextAAC/WMA/MP3 file in the order of sort of files being played or paused.
S.
Pressing VOL - key decreases the volume of the song being played.
T.
Pressing VOL + key increases the volume of the song being played.
Massage profile and description
Massage Modes
Rolling Massage: Four circular rollers move up & down in rhythmic fashion from neck to lower back. It feels like a
massage therapist firmly moves the hand as shown in figure 4.
Kneading: The roller moves in circular motion on both sides of the spine which feels like pressing with the thumb in
circular motion like figure 1.
Tapping: The roller makes alternate strokes along the spinal cord which feels like Tapping the muscles with the
hand in alternate fashion as shown in figure 2.
Combination: Combination of both Kneading and Tapping is shown in Figure 3.
7
Figure 7: Depiction of different massage modes
iRobotics Specifications
Maximum user weight
Power Consumption
Recline Angle
Number of Massage Functions
Programmed Function
Automatic Timer Shut-Off
Full Length Travel
# of Auto-programs
Accessories
300lbs
90 Watts
50
4
2
10 Minutes
55 cm
2
Remote control, power cord,
laptop tray(optional)
8
Trouble Shooting/Self Diagnostics
The massage chair electronics is in state of art technology which supports self diagnostics feature to detect the individual failure
of each electrical component in the massage chair. The Masterbox has 3 different LED indications which show the user to
narrow down the failure, if any. From the figure 8 shown below, the user can find the LED location in the Masterbox.
Masterbox Power
Indication:
Green LED is normal
Mico switch (Red LED
Blinks) or motor failure
(continuous)
Remote control failure
Yellow LED will turn on
Figure 8: Failure Indications
Maintenance Instructions
This production does not require any lubrication for the mechanical parts in the system.
Use only leather care products for cleaning and maintaining the leather
9
Massage Chair Dimensions
Chair Frame Bottom Dimensions
14 in 3/4
12 in 3/4
11 in 3/8 (center to center)
10 in ¾ (center to center)
Front
Hole diameter is 0.5 in
Skirt Length with Cushion
6 in
Chair Base Frame (Side View and Dimensions)
4.5 in
12 in 3/4
10
Massage Chair Overall Dimensions
21.5”
43”
27.5”
Figure 10: Massage Chair Dimensions
WARRANTY INFORMATION
One (1) YEAR LIMITED WARRANTY
1. This Warranty applies only to the original purchaser of this product.
2. This Warranty applies ONLY to repair or replacement of any supplied or manufactured parts of this product. The warranty does not cover
normal wear, coating, dropped or abused unit.
3. Unless otherwise proscribed by law, The LURACO technologies, Inc. shall not be liable for any personal injury, property or any incidental or
consequential damages of any kind resulting from malfunctions, defects, misuse, improper installation or alteration of this product.
Important Service Instructions
If you need to send a unit to us for repair, please follow the steps below.
1. Carefully pack the item in its original carton or other suitable box to avoid damage in shipping.
2. Before packing your unit; be sure to enclose:
•
Your name with full shipping address and telephone number
•
A dated receipt for PROOF OF PURCHASE
•
Attach documentation detailing the problem you are having with your device.
11
THANK YOU FOR BUYING LURACO TECHNOLOGIES’ PRODUCTS
LURACO TECHNOLOGIES, INC.
1132 107TH STREET
ARLINGTON, TX 76011 - USA
TEL: +1-817-633-1080
FAX: +1-817-633-1085
WWW.LURACO.COM
12