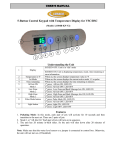
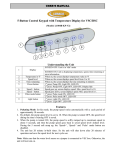
1
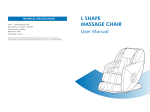
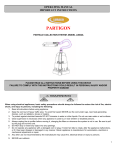
1
IMPORTANT SAFETY INSTRUCTIONS
When using an electrical appliance, basic precautions should always be followed, including the following:
Read all instructions before using (this appliance).
WARNING – To reduce the risk of burns, fire, electric shock, or injury to persons:
1. The main power switch is marked with international symbols “O” and “I”. The switch in position “I” means that
system is turned on, and The switch in position “O” means that system is off.
2. An appliance should never be left unattended when plugged in. Unplug from outlet when not in use and before
putting on or taking off parts.
3. Close supervision is necessary when this appliance is used by, on, or near children, invalids, or disabled
persons. Keep children away from extended foot support (or other similar parts*).
4. Use this appliance only for its intended use as described in this manual. Do not use attachments not
recommended by the manufacturer.
5. Never operate this appliance if it has a damaged cord or plug, if it is not working properly, if it has been dropped
or damaged, or dropped into water. Return the appliance to a service center for examination and repair.
6. Keep the cord away from heated surfaces.
7. Do not use outdoors.
8. Do not operate where aerosol (spray) products are being used or where oxygen is being administered.
9. To disconnect, turn all controls to the off position, then remove plug from outlet.
10. Connect this appliance to a properly grounded outlet only. See Grounding Instructions.
11. Do not remove the back cushion and do not play with roller mechanism.
12. Do not remove the bottom seat and do not play with actuators.
13. Keep the cord out of heavy traffic area. To avoid fire hazard NEVER put the cord under rugs, near heat
generating devices.
14. Always unplug the power cord from the electrical outlet immediately after use and before cleaning.
15. Always check the volume before using the headphone.
16. Do not operate any equipment with damaged parts.
17. Any other use not recommended by the manufacturer may cause electrical shock or injury to persons.
18. Do not touch or re-wire the wires connected to the master-box.
19. Do not attempt to repair or adjust any electrical or mechanical functions on this unit. Doing so will void the
warranty.
After reading this owner’s guide, if you have any questions or comments, please call +1-817-633-1080 or contact our
technical support department at [email protected] or visit our website at www.luraco.com for more information
GROUNDING INSTRUCTIONS
This product must be grounded. If it should malfunction or breakdown, grounding provides a path of least resistance for
electric current to reduce the risk of electric shock. This product is equipped with a cord having an equipment-grounding
conductor and a grounding plug. The plug must be plugged into an appropriate outlet that is properly installed and
grounded in accordance with all local codes and ordinances.
DANGER - Improper connection of the equipment-grounding conductor can result in a risk of electric shock. Check with
a qualified electrician or serviceman if you are in doubt as to whether the product is properly grounded. Do not modify
the plug provided with the product - if it will not fit the outlet; have a proper outlet installed by a qualified electrician.
Followed by either instruction 1. or 2. below:
1. This product is for use on a nominal 120V circuit, and has a grounding plug that looks like the plug illustrated in
sketch A in the Fig. 1 below. A temporary adapter that looks like the adapter illustrated in sketches B and C may be
used to connect this plug to a 2-pole receptacle as shown in sketch B if a properly grounded outlet is not available.
The temporary adapter should be used only until a properly grounded outlet (sketch A) can be installed by a
qualified electrician. The green colored rigid ear, lug, or the like extending from the adapter must be connected to a
permanent ground such as a properly grounded outlet box cover. Whenever the adapter is used, it must be held in
place by a metal screw.
2. This product is for use on a nominal 120V circuit, and has a grounding plug that looks like the plug illustrated in
sketch A in the Figure below. Make sure that the product is connected to an outlet having the same configuration as
the plug. No adapter should be used with this product.
2
Fig. 1: Grounding
MEDICAL WARNINGS
Not recommended for the following people
•
•
•
•
•
•
•
•
•
•
•
•
•
Patients with serious hyperostosis
Swollen lump and patient thrombosis
Patients with serious heart conditions
Pregnant Women
People that consume large amounts of alcohol
People with diabetes
People suffering from high fever
Patients with malignant tumors or malignant abscesses
People with distorted joints
People with serious skin conditions
People with spinal injuries
All people should consult a physician and exercise care when operating this system
Minors under 16 years or people unable to control his/her behavior, i.e. mental patients, people with paralysis, etc.
should not be allowed to operate the massage chair.
Do Not
•
•
•
•
Do not use any massage function on the head
Do not massage abdominal area or knee cap region
Do not allow children to play near the chair especially during operation
Do not leave mobility impaired or speech impaired people alone in chair
Additional Safety Precautions
•
•
•
•
•
•
•
•
•
•
•
•
Do not use more than 20 minutes per session
Do not place or stock this machine near damp places such as swimming pools or bathrooms
Do not press by force on the massage rollers
Do not stand on the chair or store heavy items on the chair
Do not use in the environment which is dusty, greasy or lacking oxygen
Do not place near steam oven, open fire, or heat
Wear suitable clothing, do not massage with bare skin
Do not place directly in the sun
Do not use electric blanket while using the massage chair
Do not use outdoors
Do not use while smoking
Place this machine horizontally with space over 80cm, enough for full recline mode. Place on level floor.
Do not operate near young children
Do not move the machine during operation
3
NOTE: Do not use this apparatus as a bed or fall asleep in the course of massage. Do not use more than 20 minutes with
recommended 15 minutes. Prolonged massaging may cause aches, muscle or nerve issues. (The preferred total duration of
massaging within the day should be 30 minutes total or less).
•
•
•
•
•
•
•
•
•
•
•
•
•
•
•
•
•
Caution for User
This device should not be used until grounded
For a softer massage, a dry towel can be placed on the chair (never use an electric blanket,) (note that a gentle
massage pad is included)
In the course of normal use, lift the back cushion regularly to check if there is any damage or crack in the fabric of
cushion part. Please stop using immediately even if there is minor damage, turn off the power cable. Send the cushion
in for repair to avoid possible electric shock.
Do not move the chair while in use
Do not place heavy objects on the armrest, foot cushion or back of the chair to avoid turning over the chair or damage to
the chair
Do not pull the fabric forcefully or stab it with sharp objects which can result in injury or damage to the chair
Do not move the chair on wooden floor, carpet or other easily damaged flooring
Children and pets should not be allowed to play around chair
Please be sure that no people, pets, or other objects are behind the chair or under the legs before reclining or lowering
the leg massager
Do not put your hands or head under the chair
When using the massage chair, ascertain that the footrest is in the lowest position
Do no use immediately after meals
Do not sit on the back cushions, armrest, or legs
Don’t use the massage chair when your body is wet or moist as it can result in electrical shock
Do not operate with more than one person
Don’t use when using head ornamentation as it can result in injury
Do not stumble over electrical wires or connections
Do Not Use the Chair under the Following Conditions
•
•
•
•
•
•
•
•
When the apparatus has been rinsed with water or fails to operate
Power cable is damaged
If you feel abnormal or extremely achy during the course of the massage, please stop using the massage chair
immediately and consult a doctor
Power failure occurs
When the massage chair malfunctions during the course of operation
Do not touch the inner parts of the chair as this can cause damage and electrical shock
Do not dismantle and remove inner parts, or repair the massage chair
Do not operate during a thunderstorm
Methods of Storage
•
•
•
•
•
Do not dismount the back of the chair
Keep the massage chair free of dust
Cover the chair with dust-free cloth to prevent dust from collecting
Do no store in a hot, humid, damp place or in direct sunlight or heat
Do not store in an overly cold place
Cleaning Methods
•
•
•
•
•
•
•
Before cleaning unplug from electrical source to avoid shock
Clean the cloth surface with neutral detergent or special mild detergent for cloth
Dust can be cleaned off with a damp cloth of mild detergent and air dry
Do not spray pesticide on device
Specified cleaner can be used on the leather, plastic, and dried with a cloth
DO NOT use a damp cloth on the electronic components which can cause shock and damage
The leather covers (headrest, seat cushion, foot cushion) can be removed for cleaning
4
iRobotics 6 Installation Parts
Pillow
Back Cushion
Controller
Controller Holder
Decorative Part
Seat Cushion
Armrest
Casing of Seat Frame
Foot Massager
Decorative Parts
Back Rest Cover
Movable Pulley
5
Massage Chair Dimensions
6
Space Requirement
INSTALLATION INSTRUCTION
Step 1: Unpack the two large packages
Take out the main body, seat frame casing, back cushion, seat cushion, pillow, controller supporter, leg massager, controller
and wireless controller of massage chair from the box carefully. In order to avoid damaging the system we suggest at least
two people to assist with assembly.
ATTENTION
Be sure no children, pet, or substance is
around chair for enough space for installation
7
Package 1: Main body, seat frame casing,
back cushion, pillow, controller, supporter,
foot massager.
Package 2: Left and right armrest, and left
and right seat casing.
Tool Box: This box is inside package 1. Box
with tools, user manual, DVD, power cords,
washers, and assembly handles/screws
and nuts.
Step 2: Assemble the moving wheels
Mother
board
cover
Insert wheel
Insert lock
Step 3: Assemble the casing of seat frame
Incline the chair main body forward to one side about 20 degrees (Fig. 3). Loosen the two screws of rubber pad at bottom of the
seat frame (Fig. 2). Remove completely screw at center. Finally align the bottom of seat frame casing with the rubber pad and
fasten the casing to the frame (Fig. 3).
Center
screw
Fig. 1: Three screws are on sections as indicated with red circle above.
Fig. 2: Use Screw driver to loosen and tighten
screws as shown.
8
Fig. 3: Once loosened, add casing and then
tighten screws to casing and frame.
Step 4: Assemble the backrest
Fix the back to the locked upright position
Lock
Step 5: Assemble the Armrests
1. Using tools provided, remove two nuts indicated in red circle (Fig. 4 and Fig. 5)
Fig. 4
Fig. 5
9
2. Align armrest to the perfect position with chair frame, and then match the couple axle between armrest and backrest. Finally,
once aligned tighten with provided tool as shown in (Fig. 6 and Fig. 7).
Tighten by hand the knob
screw handle as shown in
next photo.
Two armrest axis
Washer and nut
Install axis in the chute, use
the hex screw and washer to
tighten with tool provided
Fig. 6
Fig. 7
10
3. Connect the air pipes (Fig. 8) and power wire (Fig. 9) to chair body carefully and completely.
Fig. 8
Fig. 9
4. Repeat procedures 1. 2. and 3. for the armrest assembly on other side.
Step 6: Assemble cushion and pillow
1. Connect two air pipes of the back cushion as shown in Fig. 10 and Fig. 11. These two air pipes are for Head massage.
Back Cushion
Fig. 10
Fig. 11
2. Place the backrest cushion via Velcro. First remove Velcro covers (Fig. 12) and then line up Velcro to seat cushion (Fig. 13)
Fig. 12
Fig. 13
11
3. Fix the backrest cushion on the chair via the zipper and bottom Velcro on the seat (Fig. 14)
Fig. 14
Fig. 15
4. Put the pillow on the right position of backrest and secure (Fig. 15 and Fig. 16).
Fig. 16
Fig. 17
5. Finally connect the air pipes (Fig. 17). The color on air pipes should be matched.
6. Match the Velcro of foot massager windshield leather and seat leather Velcro (Fig. 18) and place seat cushion in proper
position.
Fig. 18
Fig. 19
Step 7: Install Controller
Place the controller on the handler as shown in Fig. 19.
12
OPERATION AFTER ASSEMBLY
Fig. 20
Fig. 21
Fig. 22
1.
2.
3.
4.
5.
6.
Connect two wires from Mother board to the Backrest (Fig. 20)
Plug the power cord to the machine (Fig. 21)
Connect the remote to the DB9 port on the back of chair as indicated by back label (Fig. 21)
Turn on the power switch on the back (Switch to I position)
Use the remote to choose the massage functions and enjoy the comfortable massage
For MP3 music player function, please insert an SD card with MP3 music files to the back of the remote (Fig. 22). SD
card is not included.
7. For earphone, please insert the earphone to the audio socket as indicated on the back panel of chair
For a more gentle massage, a gentle massage pad is included. Place the pad as shown in photo to
the massage chair back cushion (Fig. 23)
Gentle Massage Pad
Fig. 23
13
System Control
Understanding the Remote Control
1
12
2
3
13
4
5
6
7
0
8
9
10
11
Fig. 24
Remote Control Instructions and Button Description
0. Power/Stop:
This button starts/stops the massage system. The default mode is Japanese massage. The timer for each massage session is 20
minutes. When timer is up, the chair maintains its position to avoid sleep disruption. Pressing this button will put the chair back to its
initial position automatically.
1. Automatic Massage Modes
• Japanese Massage Mode: Also known as Shiatsu massage in traditional Japanese. This massage style covers entire body
applying varying pressure at different acupuncture points of the back. The mechanism performs slow kneading and tapping
combinations along with vibration
• Chinese Massage Mode: This mode covers entire body and emphasize on point based massage. The mechanism performs a
combination of slow tapping and kneading
• Swedish Massage Mode: This mode applies gentle massage throughout the body which helps in muscle relaxation and blood
circulation. The mechanism performs slow tapping and kneading along with vibration at regular intervals
• Envy Massage Mode: This massage style is a combination of all popular massage styles. The mechanism performs a combination
of soft and hard tapping, kneading, vibration and stretching
• Thai Massage Mode: This mode applies low intensity massage throughout the whole body at specific pressure points. This mode
also implements stretching to help release muscle strain
14
• Deep Tissue Massage mode: This massage mode is designed to relieve severe tension in the muscle and connecting tissues.
The
mechanism performs hard tapping, kneading, vibration, and stretching throughout the cycle
2. Manual Massage Modes:
• Kneading: Turns On/Off kneading function
• Tapping: Turns On/Off tapping function
• Width: This function is available only when Tapping is active. This adjusts the width of the robotic massage arm
• Combo: Turns On/Off both kneading & tapping functions simultaneously
3. Spot Massage Adjustment: Moves mechanism up/down to desired vertical position in manual spot massage mode
4. Massage Intensity Adjustment: Increases/Decreases intensity of entire massage system
5. Shoulder Position Adjustment: Engages mechanism to desired shoulder height
6. Vibration: Turns On/Off vibration mode
7. Zero Gravity: Turns On/Off Zero Gravity. Zero Gravity is a neutral body posture that reclines the body and elevates the feet above
the heart. It was developed by NASA, and has been scientifically proven to put a person into a heightened state of
relaxation and well-being
8. Foot & Calf Massage: Engages mechanism for the foot and calf massage
9. Back Incline/Recline Adjustment: Inclines/Reclines the back of massage chair
10. Foot Rest Position Adjustment: Adjusts the foot rest up and down
11. Zero Gravity Angle Adjustment: Adjusts the position of back and feet at the same time
12. MP3 Player Control: Play/Pause, Forward/Backward, and Volume up/down control
Massage profile and description
Rolling Massage: Four circular rollers move up & down in
rhythmic fashion from neck to lower back. It feels like a
massage therapist firmly moving the hand as shown in Fig. D
Kneading: The roller moves in circular motion on both sides
of the spine which feels like pressing with the thumb in
circular motion like Fig. A
Tapping: The roller makes alternate strokes along the spinal
cord which feels like Tapping the muscles with the hand in
alternate fashion as shown in Fig. B
Kneading and Tapping (Combo) is shown in Fig. C
Fig. A, B, C, D: Depiction of different massage modes
15
TROUBLESHOOTING OF MASSAGE CHAIR
Warning: Unplug the power cord before attempting any troubleshooting or service.
LURACO iRobotics 6 massage chairs come with advanced state of the art electronics and software technology which support
self diagnostic features to detect the individual failure of critical components in the massage system. The Master-box has
different LED indications which help the user to narrow down the failure trouble shooting, if any. From the Fig. 25 shown below,
the user can find the LED location in the back of massage chair.
Troubleshooting of massage chair
Fig. 25
LED Color/Function
Power ( Blue)
Remote Control (Yellow)
Up/Down Sensors (Red)
Overloaded (Red)
Meaning
Blue is good. This LED should be on continuously
If this yellow LED is on, it means that remote has a
technical issue
If this red LED is on, it means that vertical limit sensors are
having a problem
If this red LED is on, it means that at least 1 of the motors is
overloaded
16
Troubleshooting Guide
Problem/Issue
Does not work after powered up
Possible Cause
1. Power switch is not turned on
2. Bad connection between plug and
socket
3. Massage remote is not turned on
4. Have broken power wire or plug
5. Bad Fuse
6. Control unit not functioning properly
Trouble Shooting Method
1. Turn power switch (On the back) on
2. Connect power cord again
3. Press power button on remote
4. Request manufacturer or service
technician to replace power cord.
5. Replace fuse with exact
specifications
6. Contact manufacturer technician
Sounds like tapping or hum sounds
Sounds from air pump, motor, or other
mechanical parts
Normal phenomenon
Roller height changes
Rollers work alternately
Normal phenomenon
Maybe from over working the massage
chair
1. Cut down usage (no more than 20
minutes per session)
2. Contact Technical Support of the
manufacturer if it continues
1. Bad power connection
2. Auto program timer is up
1. Unplug and reinsert power cord to
the chair
2. Normal operation
Can not recline the chair
Obstruction-be sure that chair is
allowed enough room to fully recline
Stop chair operation, and move
obstruction
Can not restore position after
reclined
Problem on electro motion pole or plugins under bad connection.
Contact Technical Support of the
manufacturer
Remote control is hot or overheats
Long term work over recommended
usage
Use only 20 minutes per session
Abnormal overheating from power
wire or plug
1. System is overloaded
2. Other unknown causes
1. Cut down usage (no more than 20
minutes per session)
2. Call manufactures Technical Support
Department
Abnormal sounds suddenly while
working
Suddenly stops working
Attention
If problems are not from above reasons,
please turn off power supply and
contact the distributor or manufacturer
for assistance.
17
iRobotics 6 Specifications
Maximum user weight
Power Consumption
Recline Angle
Number of Massage Functions
Programmed Function
Automatic Timer Shut-Off
Full Length Travel
# of Auto-programs
Accessories
300 lbs
200 Watts (Max)
60 Degrees
12
6
20 Minutes
75 cm
6
Power cord
Maintenance Instructions
This product does not require any lubrication for the mechanical parts in the system.
Use only leather care products for cleaning and maintaining the leather
WARRANTY INFORMATION
ONE (1) YEAR LIMITED WARRANTY
1. This Warranty applies only to the original purchaser of this product.
2. This Warranty applies ONLY to repair or replacement of any supplied or manufactured parts of this
product. The warranty does not cover normal wear, coating, dropped or abused unit.
3. Unless otherwise proscribed by law, LURACO Technologies, Inc. shall not be liable for any personal
injury, property or any incidental or consequential damages of any kind resulting from malfunctions,
defects, misuse, improper installation or alteration of this product.
Important returning Instructions
If you need to send a unit to us for repair, please follow the steps below
1. Carefully pack the item in its original carton or other suitable box to avoid damage in shipping
2. Before packing your unit; be sure to enclose:
1. Your name with full shipping address and telephone number
2. A dated receipt for PROOF OF PURCHASE
3. Attach documentation detailing the problem you are having with your device
Disclaimers
Limited warranty and liability — Information in this document is believed to be accurate and reliable.
However, LURACO Technologies does not give any representations or warranties, expressed or implied,
as to the accuracy or completeness of such information and shall have no liability for the consequences
of use of such information.
18
In no event shall LURACO Technologies be liable for any indirect, incidental, punitive, special or
consequential damages (including - without limitation - lost profits, lost savings, business interruption,
costs related to the removal or replacement of any products or rework charges) whether or not such
damages are based on tort (including negligence), warranty, breach of contract or any other legal theory.
Notwithstanding any damages that customer might incur for any reason whatsoever, LURACO
Technologies aggregate and cumulative liability towards customer for the products described herein shall
be limited in accordance with the Terms and conditions of commercial sale of LURACO Technologies.
Right to make changes — LURACO Technologies reserves the right to make changes to information
published in this document, including without limitation specifications and product descriptions, at any
time and without notice. This document supersedes and replaces all information supplied prior to the
publication hereof.
Suitability for use — LURACO Technologies products are not designed, authorized or warranted to be
suitable for use in life support, life-critical or safety-critical systems or equipment, nor in applications
where failure or malfunction of a LURACO Technologies product can reasonably be expected to result in
personal injury, death or severe property or environmental damage. LURACO Technologies accepts no
liability for inclusion and/or use of LURACO Technologies products in such equipment or applications
and therefore such inclusion and/or use is at the customer’s own risk.
19
THANK YOU FOR BUYING LURACO TECHNOLOGIES’ PRODUCTS
LURACO TECHNOLOGIES, INC.
1132 107TH STREET
ARLINGTON, TX 76011, USA.
TEL: +1-817-633-1080
FAX: +1-817-633-1085
WWW.LURACO.COM
20