1
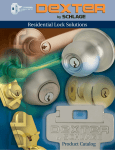
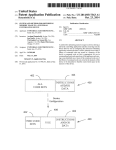
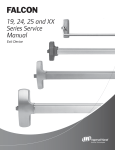
Rf)CK ISLAND ARMORY
1911A1/1911A2
PISTOL
Owner'. Manual
ROCK ISLAND ARMORY
OWNER / USER'S MANUAL
ROCK ISLAND ARMORY
1911Al / 1911A2
PISTOL
SAFETY, INSTRUCTION AND PARTS MANUAL
As a responsible owner of this firearm, you must read the
instructions and warnings in this manual carefully. Before using
this firearm, make sure you thoroughly understand all warnings
and instructions.
This manual must always be in the firearm's carrying case
wherever the owner/user
brings it or when it transfers
ownership. A copy of this manual is available upon request
from:
TWIN PINES, INC.
No.4 Liwayway Street
San Juan, Metro Manila
Philippines
Tel. (632) 727-5252
Fax (632) 727-5270
2
This firearm is basically the same in form, parts and function as
the US Colt Government Model 1911A 1 semi-automatic pistol.
Designed by John Moses Browning, the 1911A 1 is a standard singlecolumn magazine-fed pistol while the 1911A2 is double column.
SPECIFICATIONS
Model
Caliber
Action
1911A1 / 1911A2
45 ACP/9MM/ .38 Super/ .40S&W
Semi-Automatic,
Recoil Operated
8 rounds /13 rounds - Cal. 45
9 rounds/I7 rounds-CaI.9MM/.38Super
15 rounds - Cal. 40 S & W
Magazine capacity
Overall
length
,
Overall height
Weight (empty)
Weight (loaded)
Barrel length
Trigger pull ..,
Sights
.."
mm
33 mm / 40 mm
''.. 222
..'''''.''
Overall width
'''
Rifling
No. of grooves
Finish
".."
140 mm
1.11 kg/ 1.14 kg
1.29 kg /1.43 kg
127 mm /5"
1.81 to 2.95 kg. Ave.
"."'.".."...
''
"
''..''.
"...".."
"..,
Fixed
'"
"
front and rear
Right hand twist,
one turn in 400 mm
6
Blued or Parkerized
SAFETY INSTRUCTIONS
Firearms can cause serious injury and death. Always think of
firearms as dangerous weapons and it is your responsibility to
handle guns safely.
Always treat gun as though it were loaded.
Always keep the muzzle pointed in a safe direction.
Even ifthere are safety features incorporated in your firearm,
do not rely on these mechanical features alone.
Safe gun handling is your responsibility. Accidents happen
when you violate the basic rules of safe gun handling and
common sense.
3
BASIC RULES IN HANDLING
A FIREARM
1. Never point the gun at anyone or anything you don't intend
to shoot.
2. Understand
handling it.
fully
the operation
of the firearm
before
3. Always keep your gun pointed in a safe direction.
4. Treat every fire ann as if it were loaded.
5. Do not insert your index finger in the trigger guard unless
you are ready to shoot.
6. Always check the gun for live ammunition when you pick it
up (with index finger outside the trigger guard), hand to or
receive from another person.
7. If you must carry a loaded firearm, always make sure the
muzzle is pointed in a safe direction.
8. Do not load and cock your firearm unless you are ready to
shoot.
9. Be sure of your target and what is beyond that target in case
you miss.
4
10. As safety precaution, wear eye and ear protectors
shooting indoors or out.
when
11. Make sure you have a safe backstop behind your target to
avoid dangerous ricochets.
12. Do not shoot directly ata hard surface or at water.
13. Do not use or experiment with unfamiliar ammo that have
pressure levels exceeding industry stanoards. Untested
loads can damage your firearm and cause ~jury to you and
bystanders.
14. If your gun fails to fire when the hammer falls, keep the gun
pointed in a safe direction, remove your finger from the
trigger and outside the trigger guard away from the ejection
port, wait 10 seconds before inspecting it.
15. Do not drink alcoholic beverages or take prohibited
when handling a firearm.
drugs
16. Never leave a pistol cocked and ready to fire.
17. Thinkbeforeyoushoot.
5
SAFETY FEATURES
1. TRIGGER GUARD - this is the metal loop around the trigger
to protect it from damage and to help prevent accidental
discharge.
2. SLIDE LOCK SAFETY - also known as thumb safety lock
because the thumb is used to apply or disengage this safety
which can happen when the hammer is fully cocked. When
up and engaged, it blocks the sear and hammer so the gun
cannot fire. This safety also prevents rearward movement of
the slide.
3. GRIP SAFETY - this safety prevents rearward trav~l of the
trigger. The gun can only be fired if the grip safety is firmly
pressed in when grasped by the hand to then allow trigger
movement.
4. DISCONNECfOR
SAFETY - this safety device prevents a
round from being fired before it is in the chamber with slide
and barrel locked. The disconnector enables the pistol to fire
only when fully locked and trigger is released.
5. HALF-COCKED POSITION - the half-cocked notch in the
hammer allows it to be locked in a half-cocked position. This
happens in situations of unintentional hammer release or
follow through caused by sear bounce.
6. INERTIA FIRING PIN - the firing pin, designed
than its housing, is held to the rear by a spring
protrude to hit a cartridge primer when a
hammer blow overcomes the spring force and
the spring.
6
to be shorter
and can only
fully cocked
the inertia of
AMMUNITION
This firearm is chambered for cartridge in the round nose
configuration (Note: Use of wadcutter may require extra
adjustment of the barrel feed ramp by a competent gunsmith).
Use factory loaded cartridges manufactured in accordance with
industry standards. Always examine your ammo particularly on
and around the primer before loading the magazine.
Look for dents, scratches, improper crimping, loose case mouths
and other signs of damage.
LOADING
Do not load live ammunition into your firearm until you are
ready to use it. Keep the muzzle pointing in a safe direction, well
clear of your body when loading and unloading.
LOADING THE MAGAZINE: Grasp magazine in one hand and
place a round on the magazine follower with the base of shell first
and push down. Let the cartidge slide under the feed lips until
base of cartridge touches the flat edge of the magazine. Place next
round on top of previous round, press down again and into back.
Repeat until the magazine is loaded to its rated capacity. Do not
exceed capacity.
7
1911A 1 MODEL
PARTS ILL USTRATION
8
9
LOADING
THE PISTOL
Keep pistol pointed in a safe direction and keep your index
finger outside the trigger guard when doing this procedure.
When pistol is clear and empty of shells or cartridges, insert the
loaded magazine into the magazine well with bullets pointing
forward. Push the magazine firmly home until magazine catch is
heard to click ensuring it is locked in place.
When you are ready to shoot, grip and pull the slide at its
serrated finger grips rearward to fully cock the hammer.
Releasing the slide effects the feeding of the first cartridge of the
magazine into the chamber.
YOU ARE NOW LOADED, COCKED AND READY TO FIRE.
Push up the safety lock with your thumb into the SAFE position.
When you are ready to shoot, push the safety lock down with
your thumb into the FIRE position, make sure your target is in
your sights, put your index finger on the trigger and squeeze the
trigger. Do not pull on the trigger as this cause your aim to go bad
with the unnecessary jerking motion.
After the first round is fired, ease off on your finger on the trigger
to release it making it ready for you to fire the next round.
Repeating this sequence will eventually empty the magazine
and when that happens, the slide will remain at the rear of the
frame with the slide stop holding it back at the rear.
Keep in mind that the pistol is still loaded and point the muzzle
in a safe direction and take your finger off the trigger and
outside the trigger guard.
10
UNLOADING
THE FIREARM
Place your free hand under the magazine to prevent it from
falling and press magazine catch to' release and eject the
magazine. Check the chamber for an unejected shell or unfired
cartridge and remove such from the chamber. Press the slide stop
down to allow it to move forward to its normal position. The
pistol is now unloaded.
MAINTENANCE
Keeping your firearm clean and properly lubricated will extend
its serviceable life. Proper and efficient functioning depends on
how you take care of the precision mechanisms of your firearm.
PARTS LIST
1. Barrel
2. Barrel Bushing
3. Barrel Link
4. Barrel Link Pin
5. Disconnector
6. Ejector
7. Ejector Pin
8. Extractor
9. Firing Pin
11. Firing Pin Spring
12.Firing Pin Stop
13. Front Sight
14. Grip Safety
15. Hammer
16. Hammer Pin
17. Hammer Strut
18. Hammer Strut Pin
Notes:
. 19. Magazine Box
. 20. Magazine Catch
21. Magazine Catch Lock
22. Magazine Catch5prinlt
.23. Magazine Follower
. 24. Magazine Spring
25. Main Spring
26. Main Spring Cap
27. Main Spring Cap Pin
28. Main Spring Housing
29. Main Spring Housing Pin
30. Main Spring Housing Pin
Retainer
32. Plunger Spring
34. Plunger Tube
35. Rear Sight
36. Frame
37. Recoil Spring
38. Recoil Spring Guide
39. Recoil Spring Plug
40. Safety Lock
41. Safety Lock Plunger
42. Sear
43. Sear Pin
44. Sear Spring
45. Slide
46. Slide Stop
47. Slide Stop Plunger
. 48. Grip Set
. 49. Grip Screws
SO.Grip Screw Bushing
. S 1. Trigger Assembly
1. Parts marked with asterisk should be specified
if
1911Al or 1911A2
2. Specifications subject to change without prior notice
11
FIELD STRIPPING:
DISASSEMBLY
1. Press the magazine release and remove the magazine. Pull
the slide back and check the chamber to ensure that the pistol
is unloaded and safe to handle.
2. Press the recoil spring plug with your thumb and rotate the
barrel bushing clockwise.
3. Slowly allow the plug and recoil spring assembly to move
fo'rward. Do not remove yet as this will keep the recoil spring
guide in place.
4. Pull slide back until the lug on the slide stop is opposite the
disassembly notch and push rounded end of pin of slide stop
found at right side of frame. Push inward and through the
frame to disengage slide stop from slide and frame.
5. Pull the slide forward on its guide rails in the frame. The
barrel, barrel bushing, recoil spring, recoil spring guide and
recoil spring plug will come out with it.
6. Remove the recoil spring guide and plUg from the slide.
7. Rotate the barrel bushing to the left as iar as it will go and pull
it ou tto the front.
8. Tilt the barrel link forward to remove the barrel through the
front of the slide.
9. Remove the firing pin by pressing it with a pin while pushing
the firing pin stop downwards at the same time and out of the
slide.
10. Pry the extractor with a pin by its groove out of the slide.
12
FRAME DISASSEMBLY
1. Remove the grip panels by unscrewing the grip screws with a
properly sized screwdriver to avoid damage on screwheads.
2. Cock the hammer. Hold the thumbpiece of the safety lock
firmly and pull it out slowly by twisting it back and forth
until it is out of the frame.
3. Carefully lower the hammer by grasping the grip safety and
squeezing the trigger white holding on to hammer to ease it
down.
4. Using the pivot stud of the safety lock, force the hammer pin
out of the frame. The hammer and the hammer strut attached
to it can now be removed.
5. Use the end of the hammer strut to push the mainspring
housing pin out of the right side of the frame.
6. Remove the mainspring housing assembly down off its
grooves in the &ame.
7. Remove the grip safety and sear spring rearward &om the
frame.
8. Use the hammer strut again to push the sear pin &oril right to
left removing it out of the &ame. The sear and disconnector,
both mounted on the sear pin can now be removed &om the
frame.
9. Push the magazine release partially and rotate the magazine
release lock one quarter turn &om right to left with properly
sized screw driver to remove the magazine release assembly
&om the frame.
10. Remove the trigger assembly &om its recess cuts in the &ame.
11. Push the combination slide and safety lock plungers and the
spring between them out to the rear of the plunger tube.
12. The mainspring
housing assembly is dismantled
by
forcing the main spring down with a punch and push
the main spring cap pin out of its hole in the mainspring
housing. The main spring cap, main spring housing pin
retainer can now be removed frQm the housing.
13
REASSEMBLY
1.
2.
3.
4.
5.
14
To reassemble
the pistol the reverse procedure
of
disassembly is usually followed.
Please be guided by the additional instructions for proper
assembly.
Mount the barrel and slide assembly on to the frame by
holding both slide and frame bottom side up. Barrel link
must be tilted to the front as far as it can go and make sure the
barrel link pin is flush in its seat. You can now slide the frame
forward into the slide rails.
Disconnector and sear are to be assembled together and must
be in the proper position. This can be done by first mounting
the sear over the disconnector with the curved section
inward and lugs pointing downward.
Mount the parts
together into the frame by inserting the rounded head of the
disconnector in its hole in the frame so that the flat face of its
lower end rests against the trigger stirrup. PartiaIly press the
trigger so the holes of the two parts will line up with that of
the frame. Holding them this way, insert the sear pin from the
left side of the frame making sure it passes through both
disconnector and sear.
When placing back the sear spring, make sure that the lower
end is caught in the slot located at the bottom of the frame
handle. The upper end of the left-hand leaf must rest against
the sear. While
retaining
this
position,
slide the
mainspring
housing up in its grooves until its end is
projecting only about one-eight of an inch below the edge of
the bottom of the frame.
Cock the hammer to replace the safety lock.
After replacing the hammer, grip safety and safety lock, cock
the hammer. Make sure the hammer strut rests on the main
spring cap. Then, push the mainspring housing up into the
frame to its final position and retain the assembly by driving
in the mainspring housing pin.
BASIC MAINTENANCE OF YOUR FIREARM
Clean your firearm after firing:
Remove the barrel and slide assembly from frame.
Use a bore brush dipped in a gun cleaning solvent to scrub barrel
bore and chamber and remove all lead residue.
Clean the slide's breech face area. Use an old toothbrush with
solvent to remove residue from powder and primers.
Also clean the insides of the slide and barrel locking lugs, frame
and slide rails, extractor & firing pin.
After
brushing, clean up with a clean dry cloth and wipe all parts
.~ and surfaces
clean of solvent. Immediately apply some gun oil to
preserve and lubricate the moving parts.
If you are going to store your firearm for an indefinite period of
time, apply a thicker film of oil with a lubricant that is acid-free.
Coat the external parts and surfaces with anti-rust oil or gun
grease to prevent rusting. To use firearm again from this condition,
clean thoroughly and wipe dry again. Check all functions before
loading. Moisture and humidity are factors that cause rust and
corrOSIOn.
~
Store your firearm in very dry conditions with very low humidity.
Avoid leather as this holds moisture. Oil coated plastic bags are
better.
5
ROCK ISLAND AlUleBY
PISTOLS
are assembled by:
TWIN PINES, INC.
Manila,Philippines
15
ROCK lSLAND