1
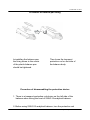
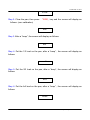
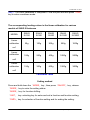
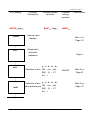
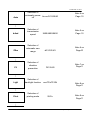
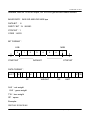
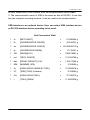
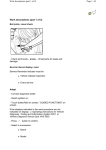
Contents
Balance-pan fixing
---------------------------------------------------
1
Protection device
---------------------------------------------------
1
Installation mode
---------------------------------------------------
2
Description of keys
---------------------------------------------------
2
Operation of weight
single point calibration
---------------------------------------------------
4
Operation of weight linear --------------------------------------------------calibration
5
Setting method
---------------------------------------------------
7
RS-232 serial interface
---------------------------------------------------
11
Operation instruction of
USB interface
---------------------------------------------------
13
Unit conversion table
---------------------------------------------------
14
JADEVER SCALE
Procedure of balance-pan fixing
In installing the balance pan,
the fixing screw in the center
of the plastic balance pan
should be tightened.
Then loose the transport
protection rod on the side of
the balance body.
Procedure of disassembling the protection device
1. There is a transport protection rod device on the left side of the
balance when facing the front of SNUG III analytical balance.
2. Before using SNUG III analytical balance, turn the protection rod
SNUG III
1
http://www.jadever.com.tw
JADEVER SCALE
counterclockwise to loose it and then release.
3. Before transporting SNUG III analytical balance, press the
protection rod inward and turn it clockwise to tighten.
Installation mode
1. When conducting the weight calibration of the product, pay attention to the
environment and avoid wind and vibration.
2. Usage of unsuitable cells or wrong connection of the wire may bring danger.
Description of keys
ON/OFF
ZERO
SNUG III
Key to power on and power off the balance.
Key for zeroing, which will function only within ±2% of the maximum
weighing capacity; when in TARE mode, if the tare weight is smaller
than ±2% of the maximum weighing capacity, the tare can be
cancelled and it can be zeroed; if the tare weight is greater than ±2%
of the maximum weighing capacity, the tare can be cancelled.
2
http://www.jadever.com.tw
JADEVER SCALE
TARE
Key for deducting the weight; to deduct the weight of articles on the
balance.
MODE Key for mode shifting. The mode shifts in the sequence of weighing,
counting, percentage and printing time.
UNIT
SMPL
Weighing unit shifting key (13 kinds of units)
In the weighing mode, it is the key for Backlight switch (valid only
when Light is set to ON or OFF); in counting and percentage modes,
it is the key for sampling, press it continuously, you can select from
five sampling numbers- 20, 50, 100, 200 and 500.(Capable of
automatic averaging ).
Weighing:
Press 「ON/OFF」key, the screen will fully display and count down. One minute
later, the screen will display
0.00 X , and the weighing can begin. If backlight
is needed, please press 「SMPL」key.
Counting:
Press 「MODE」after the balance is powered on, the screen will display
XXXX pcs, , then press「SMLP」key, the screen will display SE 0pcs .
Continuously press「TARE」key to select from the five sampling numbers -20, 50,
100, 200 and 500. After the selection, put the articles to be sampled on the
balance pan, press「SMLP」key and you can begin counting when a beep is
heard.
Percentage:
Press 「MODE」key after the balance is powered on, the screen will display
XXXX % , ,then press「SMLP」key, the screen will display SE 0 % .
Continuously press「TARE」key to select from the five sampling numbers -20, 50,
100, 200 and 500. After the selection, put the articles to be sampled on the
balance pan, press「SMLP」key and you can begin calculating percentage when
SNUG III
3
http://www.jadever.com.tw
JADEVER SCALE
a beep is heard.
Print time setting:
Press 「MODE」key after the balance is powered on, the screen will display time
XXXX T ,then continuously press 「UNIT」key to shift to month XX.XX D and
year XXXX Y. Press 「TARE」key to select the setting position , press 「SMPL」
key to modify and press 「MODE」key to exit.
Notes: 1. The minimum sample weight ≥9 resolution. (For example, the sample
weight for 600g shall not be smaller than 0.09g.)
2. When the weight is unstable, the unit flashes.
3. The balance will warm up for five minutes after it is powered on.
4. When the weight is greater than full load + 9e, Err 5 will display.
Operation of weight single
point calibration
Step1: Please first power off the machine, press and hold down 「MODE」key ,
then press 「ON/OFF」 to power on the machine, release 「MODE」 key and
the screen will display as follows:
Count
Step 2: Press 「MODE」key once again and the screen will display as follows:
CAL
Step 3: Press 「UNIT」key to begin the zero calibration, please do not put any
article on the pan, the screen will display as follows:
SNUG III
4
http://www.jadever.com.tw
JADEVER SCALE
ZEro
Please wait for a while until the
screen displays
on1
Step 4: Press「TARE」key to select the calibration point, on1 is 1/3 load and on2
is 2/3 load and on3 is full load. Put the corresponding weight on the pan after
selection, wait for the “beep”, and the screen will display as follows:
PASS
Step 5: The single point calibration is now completed, clear the pan. Press
「MODE」key and then press「SMPL」key to enter countdown mode.
Operation of weight linear
calibration
Step1: Please first power off the machine, press and hold down 「ZERO」and
「TARE」keys, then press 「ON/OFF」 to power on the machine, release
「ZERO」and 「TARE」 keys and the screen will display as follows:
SNUG III
5
http://www.jadever.com.tw
JADEVER SCALE
L-CAL
Step 2: Clear the pan, then press 「TARE」key and the screen will display as
follows: (zero calibration)
on0
Step 3: After a “beep”, the screen will display as follows:
on1
Step 4: Put the 1/3 load on the pan, after a “beep” , the screen will display as
follows:
on2
Step 5: Put the 2/3 load on the pan, after a “beep”, the screen will display as
follows:
on3
Step 6: Put the full load on the pan, after a “beep” , the screen will display as
follows:
PASS
SNUG III
6
http://www.jadever.com.tw
JADEVER SCALE
Step 7: The linear calibration is completed. Clear the pan and then press「TARE」
key to enter countdown mode.
The corresponding loading values in the linear calibration for various
models of SNUG III balances
MODEL
Linear
calibration
SNUG
III-150
SNUG
III-300
SNUG
III-600
SNUG
III-1500
SNUG
III-3000
50g
100g
200g
500g
1000g
100g
200g
400g
1000g
2000g
150g
300g
600g
1500g
3000g
on1
Linear
calibration
on2
Linear
calibration
on3
Calibration Table
Setting method
Press and hold down the「MODE」key , then press「ON/OFF」key, release
「MODE」key to enter the setting status:
「MODE」key: for function shifting.
「UNIT」 key: selecting key for enter and exit a function and function setting;
「SMPL」key: for selection of function setting and for ending the setting.
SNUG III
7
http://www.jadever.com.tw
JADEVER SCALE
LCD display
Function
Description
「MODE」key:
Count
Function setting
selection
Function
setting
selection
「UNIT」 key:
「SMPL」
internal value
displays
View content
Note 1 on
Page 10
↓
CAL
Single point
automatic
calibration
Page 4
↓
unit
g、ct、lb、oz、dr、
Selection of unit GN 、 ozt 、 dwt 、
MM 、 tl.j 、 tl.T 、
tl.H、t
ON/OFF
Note 2 on
Page10
↓
InitU
g、ct、lb、oz、dr、
Selection of unit
GN 、 ozt 、 dwt 、
when powering on
MM 、 tl.j 、 tl.T 、
tl.H、t
Note 3 on
Page 10
↓
SNUG III
8
http://www.jadever.com.tw
JADEVER SCALE
Auto
Selection of
automatic power
Au-no/5/15/30/60
off
Note 4 on
Page 10
↓
bAud
Selection of
transmission
speed
ZEro
Selection of
automatic zero
range
2400/4800/9600
Note 5 on
Page 10
d0/1/2/3/4/5
Note 6 on
Page10
Fil1/2/4/8
Note 7 on
Page11
↓
Fil
Selection of
vibration
prevention
↓
LigH
Selection of
backlight function
onoFF/oFF/ON
Selection of
printing mode
St/Co
Note 8 on
Page11
↓
Print
Note 9 on
Page11
↓
SNUG III
9
http://www.jadever.com.tw
JADEVER SCALE
Pr Fu
External
equipment
PC/ SH-24
Note 10 on
Page11
1. When the Count is displayed on the screen, press「UNIT」key, you can
see the present internal value. Press 「UNIT」key again and then press「MODE」
key to return to the display of Count .
2. When
unit
is displayed on the screen, press「UNIT」key to enter the
mode of selection of unit . The screen will display on g or
oFF g ,whereas
“on ” represents the use of this unit and “ oFF ”is represents the disuse of this
unit. Press 「SMPL」key to shift between ON and OFF 【set “on” for the units to
be used and “oFF” for the units not to be used】. Press 「UNIT」key, you can
select from the thirteen units. When the selection is completed , press 「MODE」
again to return to the display of unit
.
3. When InitU is displayed on the screen, press「UNIT」key to enter the
mode of selection of unit when powering on. InitU xx X represents the
selection of this unit for use when powering on. Press「UNIT」 key to shift among
the units until the desired unit is selected. Then, press「MODE」key to return to
the display of
InitU
.
4. When
Auto
is displayed on the screen, press「UNIT」key to enter the
mode of selection of automatic power off. The screen displays XXX
X
represents the selection of automatic power off. Press「UNIT」key to shift until
the desired automatic power off is selected. Then, press「MODE」key to return to
the display of
Auto . 『Au-no-means not to select automatic power off, while
5-means 5 minutes, 15- 15 minutes, 30- 30minutes and 60- 60 minutes』
(Automatic power off is not executive at unstable state).
5. When
bAud is displayed on the screen, press「UNIT」key to enter the
mode of selection of setting the RS-232 transmission speed. The screen
displays XXXX
.X represents the RS-232 transmission speed. Press 「UNIT」
to shift until the desired RS-232 transmission speed is selected. Press「MODE」
key again to return to the display of bAud
.『2400, 4800, 9600』
6.When ZEro
is displayed on the screen, press「UNIT」key to enter the
mode of selection of automatic zeroing range. The screen displays dX X
represents the automatic zeroing range. Press 「UNIT」key to shift until the
SNUG III
10
http://www.jadever.com.tw
JADEVER SCALE
desired automatic zeroing range is selected. Press「MODE」key again to return
to display of
ZEro 。
『d0, 1, 2, 3 , 4, 5』( the higher the value, the larger the
automatic zeroing range is ).
7. When
FiL
is displayed on the screen, press「UNIT」key to enter the
mode of selection of the vibration prevention. The display of FiL X
X
represents the vibration prevention grade. Press 「UNIT」key to shift until the
desired vibration prevention grade is selected. Press「MODE」key again to return
to the display of
FiL 。
『FiL1, 2, 4, 8』 ( the higher the value, the higher the
vibration prevention grade is ).
8. When
LigH is displayed on the screen, press「UNIT」key to enter the
mode of selection of backlight function setting. The screen displays XXXX
X
represents the backlight function setting. Press 「UNIT」 key to shift until the
desired backlight function is selected. Press「MODE」key again to return to the
display of
LigH 。
『onoFF-is automatic backlight, oFF-is without backlight
and ON- is backlight』.
9. When Print
is displayed on the screen, press「UNIT」key to enter the
mode of selection of printing method. The screen displays
Pr-XX
X
represents the printing method. Press 「UNIT」key to shift until the desired
printing method is selected. Press「MODE」key again to return to the display of
Print
. 『Pr-Co-is continuous printing and Pr-St –stable printing』
10. When Pr Fu
is displayed on the screen, press「UNIT」key to enter the
mode of selection of external equipment. The screen displays XXXX
X
represents the external equipment. Press 「UNIT」key to shift until the desired
external equipment is selected. Press「MODE」key again to return to the display
of
Pr Fu . 『-PC—is to connect to the computer and SH-24 –is to connect to
the dotted micro-printer』
11. If it is not to enter the mode of function setting, press「SMPL」key to end the
function setting and return to normal weighing mode. Press 「MODE」key
continuously to shift between the function setting options in rotation.
RS-232 serial interface
The 9PIN connector at the right back of SNUG III balance is a RS-232 standard
SNUG III
11
http://www.jadever.com.tw
JADEVER SCALE
interface, with No. 2PIN for output, No. 5PIN for ground and others useless.
BAUD RATE:2400 OR 4800 OR 9600 bps
DATA BIT: 8
PARITY BIT:N﹝NONE﹞
STOP BIT:1
CODE:ASCII
BIT FORMAT:
LSB
0
MSB
1
2
START BIT
3
4
5
6
7
DATA BIT
STOP BIT
DATA FORMAT:
N/G/T . W .
:
+/SP
LF CR
WEIGHT
SP
UNIT
N.W:net weight
G.W:gross weight
T.W:tare weight
SP:space
Example:
2007-04-10 08:32:46
SNUG III
12
http://www.jadever.com.tw
JADEVER SCALE
T. W.: +
0.00g
N.W.: +499.98g
G.W.: +499.98g
Computer program:10 OPEN〝COM1:9600,N,8,1,RS,DS,LF〞AS #1
(BASICA) 20 INPUT #1,A$
30 PRINT A$
40 GOTO 20
50 END
Operation instruction of USB interface
Precautions for using USB device:
1. This USB interface device can only communicate with computer.
2. The computer should be installed with the driver of the USB interface
equipment which can be downloaded from the company’s website.
3. After the driver is installed, the communication between this device and the
computer behaves as a serial communication, and the serial transmission rate
should be set correspondingly.
The operation of USB interface equipment is as follows:
1. Use USB line to connect the electronic balance and the computer. Turn on the
electronic balance. If USB driver is not installed on the computer, prompt
information will be displayed on the computer to prompt you that a new
hardware is found and its driver is needed to be installed.
2. After the driver is installed, use the hyper terminal of the computer to test if
there is data transmission. Procedures for opening the computer hyper terminal
is: “start”
“all programs”
“accessory”
“communication”
“hyper
terminal”. Enter the name, click confirm, select COM3 or COM4 口 and click
confirm. Select the corresponding serial transmission rate (If the balance is set
SNUG III
13
http://www.jadever.com.tw
JADEVER SCALE
at 9600, select 9600), click confirm, then the communication can be made.
3. The communication mode of USB is the same as that of RS-232. If user has
his own computer receiving terminal, it can be used for the communication.
USB interface is an optional device. User can select USB interface device
or RS-232 interface device according to his need.
Unit Conversion Table
1
ct
[MET.CARAT]
=
0.1999694 g
1
lb
[AVORIRDUPOIS POUND]
=
453.59237 g
1
oz
[AVORIRDUPOIS OUNCE]
= 28.349523125 g
1
dr
[AVOIRDUPOIS DRAM]
=
1.7718451 g
1
GN
[GRAIN](U.K)
=
0.06479891 g
1
ozt
[TROY OUNCE]
=
31.1034768 g
1
dwt
[PENNY WEIGHT] (U.K)
=
1.55517384 g
1
MM
[MOMME] (JPN)
=
3.749996 g
1
tl.j
[HONG KONG JEWELRY TAEL]
=
37.4290018 g
1
tl.T
[TAEL](TWN) (Vietnam)
=
37.49995 g
1
tl.H
[HONG KONG TAEL]
=
37.799375 g
1
t
[TOLA] (INDIA)
=
11.6638038 g
SNUG III
14
http://www.jadever.com.tw