1
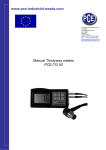
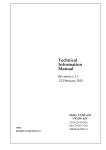
1.Application
Ultrasonic
Thickness Gauge
UM6500
All right reserved 2013
Used for measuring thickness and
corrosion of pressure vessels,
chemical equipment, boilers, oil
storage tanks, etc. It applicable to
the industries of petroleum,
shipbuilding, power station, and
machine manufacturing.
Materials measured: 11 types of
materials, including steel, cast
iron, aluminum, red copper, brass,
zinc, quartz glass, polyethylene,
PVC, gray cast iron, nodular cast
iron .
High resolution measurement.
Capture the value of the minimum
thickness.
Status indicator of the coupling
and low battery.
Autopower off function to
3.DESCRIPTIONS
3-1
3-2
Thanks for choosing our
moisture meters!
For your easy to master this
instrument as soon as
possible, please read
following instructions
carefully and always keep
this meter within easy reach.
mm
3-4
3-5
3-6
3-7
3-8
3-9
3-3
3-11
inch
ULTRASONIC
THICKNESS GAUGE
CODE
CAL
mm
Inch
3-12
3-13
UM6500
3-14
3-10
3-1 sensor socket
3-2 low battery
3-3 mm indicator
3-4 inch indicator
3-5 Coupling indicator
3-6 Material selection key
conserve battery life.
Humanized shape design,
compact and portable, Can be
used in harsh environment.
2.Specifications
Display:
4 digits LCD with backlight.
Operating principle:
ULTRASONIC
Measuring range :
1.0~200mm(in #45 Steel).
0.05~8inch
Resolution: 0.1mm;
Accuracy: ±(0.5%H+0.1)mm
Depends on materials and
conditions
Units:
Metric/Imperial unit selectable.
Power supply:
4x1.5 AAA size (UM-4) battery
3-7 Power key
3-8 Calibration key
3-9 mm/inch key
3-10 Test block
3-11 Ultrasonic sensor
3-12 Plus key
3-13 Minus key
3-14 sensor plug
4.MATERIAL SELECTION
4.1 Press the power key 3-7 to
turn on the unit.
4.2 Press the Material Selection
key 3-6 and the code `cdxx`
will showed on display. `cd`
is the abbreviation for `code`
and `xx` is one number
among 01~11. The `cdxx`material relationship refer to
follow Table(next page).
Power supply:
4x1.5 AAA size (UM-4) battery
Low battery indicator
Operating conditions:
0-+45℃(32℉-104℉)
≤90%RH
Dimensions:
Main Unit: 140mm×60mm×34mm
Net Weight :180g
Standard Delivery:
Main Unit .................... 1
8mm Probe ................. 1
Coupling Oil ................ 1
User Manual ............... 1
Carrying Case ............. 1
4.3 Press the key 3-12 or
key 3-13 to select the
material code to
measure and then press
the Material Selection
key 3-6 to confirm, the
display will show `0`. If
you select a material
code but do not confirm
the selection key, the
code will automatically
change to `0` after
several seconds. In such
case, the meter will still
reserve the material
code before exiting.
4.4 It is unnecessary to
select the material code
once the material code is
confirmed (automatically
stored to the memory of
the meter) unless the
measured material is
different from that before.
4.6 To browse the material
code selected, it only
press the Select key 3-6.
To exit browsing, repress
the Select key 3-6 again or
wait till the code
automatically change to
`0` after several seconds
or the meter will
automatically return
to
measurement state if
measuring.
5.CALIBRATION
5.1 Drop a little oil on the 5
mm standard block 3-10 .
5.2 Press the Calibration key 38, the `CAL` be shown on
the Display.
`CAL is the
abbreviation of calibration.
5.3 Put the sensor 3-11 on the
standard block. The coupling
symbol 3-5 is on if coupling
well. `5.0` mm (or `0.197`
inch) and `CAL` will be
shown on the Display in turn.
When steady, press CAL key
3-8 to confirm and then the
unit return to the state of
measurement.
5.4 The calibration result will
be auto-saved to the unit
once confirmation. It is
unnecessary to calibrate
often unless you suspect the
accuracy of measurement.
6.MEASURING PROCEDURE
6.1 Press the power key 3-7 to
turn on the unit.
6.2 Press the mm/inch key 3-9
to select the right
measurement unit.
6.3 Press the Sensor 3-11 onto
the material surface based
on the material code
selected is right. Be sure that
coupling is well and the
symbol 3-5 is on. The
reading on display is the
measurement value.
6.4 The reading is held till a new
measurement value is
coming. The last value is held
8.Notes
8.1 When big difference
occurred ,please check as
below:
8.1.1If the material code is
correct;
8.1.2Re-calibration;
8.1.3There are air hole,
Non-smooth inside
material.
8.2 please don't pull the wire
of sensor often to avoid
the wire broken or with
bad contact ion.
8.3 Keep the sensor clean
when finished testing.
8.4 Only can calibration on
standard calibrate
block,other test block will
result in big error or wrong
value in our calibration
method 5.
8.5 Don’t repair by yourself.
Non-authrised repair method
not only cause of the error
measurement, but also lose
the warranty right.
Reference materials table
CODE
Material
cd01
Steel
cd02
Cast Iron
cd03
Aluminum
cd04
Red copper
cd05
Brass
cd06
cd07
Zinc
Quartz glass
cd08
Polyethylene
cd09
cd010
PVC
Gray cast iron
cd011
Nodular cast iron
on the display till the
power is off.
6.5 2 modes to turn off the
power.
Manual off at any time by
pressing the power key or
Auto power off after about
1 minutes from last key
operation.
7. BATTERY REPLACEMENT
7.1 When the battery symbol
appears on the display, it
is time to replace the
batteries.
7.2 Slide the Battery Cover
away from the instrument
and remove the batteries.
7.3 Install batteries paying
careful attention to polarity.