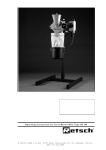
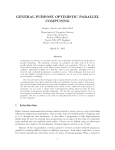
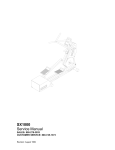
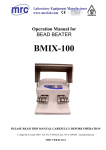
1
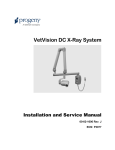
TORREY HILLS
MIXING EQUIPMENT
USER MANUAL
6370 LUSK BLVD, SUITE F-111
SAN DIEGO, CA 92121
(858) 558-6666
ND4L
Planetary Ball Mill Manual
Content
I.
Introduction
(3)
II.
Operation Procedures
(8)
III.
Power Setting
(9)
IV.
Description of VFD (Variable-Frequency Drive)
(10)
V.
Common Failures, Repairs and Maintenance of Planetary Ball Mill
(22)
VI.
Wiring Diagram of Planetary Ball Mill
(24)
VII.
Appendix
(24)
ND4L Planetary Ball Mill
Manual
I. Introduction
1. Purpose
ND4L planetary ball mills grind or mix solid particles of different granularities
and materials, suspensions, and pastes with both dry and wet grinding methods. If a
vacuum milling tank is used, it will be possible to grind and mix samples in vacuum or
inert gasses. Through the use of this machine by many of the scientific research
institutions and enterprises, it has been proved that the ND series planetary ball mills
manufactured by Torrey Hills Technologies, LLC have the capability of grinding
materials up to the nano level, in some cases up to about 30 nanometers (0.03 µm). They
are widely applied in such fields as geology, metallurgy, soil, building materials,
chemical industry, light industry, medicine, electronics, porcelain, battery, environmental
protection, and so on.
Along with innovations in science and technologies and the wide application of
nano materials, mechanical alloying (MA) discovered in 1980s endows ND series
planetary ball mills with new missions. The basic process of mechanical alloying is that
the powder or particles of several different metallic and non-metallic elements are
repeatedly mixed, crashed and cold welded in ball mill, gradually refined to nano level,
and form a nucleus of alloy in solid state. This has made substances that are difficult to
alloy using traditional melting processes be mechanically alloyed in the milling process.
Torrey Hills planetary ball mills have been utilized to make many kinds of alloy powders,
such as nano crystalline hard alloy, Nd60Fe20Al10CO10 non-crystalline alloy powder, and
Al2O3/Al compound powder.
2. Operational Principles
ND4L planetary ball mill consists of a revolving sun wheel and four rotating
milling jars. Materials are ground by the large centrifugal force generated during
revolution and rotation. Thus, the jars containing the grinding media rotate about two
separate parallel axes. A planetary arm is centered at a point about which it revolves at a
certain velocity. The jars rotate in the opposite direction with a different velocity. The
drive ratio of revolution and rotation is 1:-2 (one circle of revolution will make two
circles of rotation in the opposite direction). Inside the jars, the milling balls and the
materials being processed impact with each other under the laws of eccentricity to break
up, grind and mix the testing samples.
3|Page
Torrey Hills Technologies
3. Unique Features
A. ND4L planetary gear drive is manufactured with self-lubricating reinforced
plastics, which ensures mechanical strength and reduces noises at the same time.
B. Operation at regular intervals: To prevent the property and quality of the
milling materials being affected by overheating, this machine could automatically
work in the mode of “operation-shutdown-reoperation”.
C. Automatic direction reversal helps to avoid agglomerates.
4. Technical Parameters
Model: ND4L
Matching milling jars:
Capacity (capacity of individual jars): 50ml, 100ml, 250ml, 500ml
Material: Stainless steel, stainless steel with vacuum seal, agate, alumina 99.5%,
nylon, Teflon, tungsten carbide, zirconia
Type: standard jars, stainless steel vacuum jars, jars with stainless steel vacuum
cover (used on agate, nylon, alumina jars etc. to pump vacuum).
Maximum charge of milling jar: Three fourths of the jar volume (including
milling balls).
Feed size: <10mm (depending on feed material and instrument configuration/settings)
Milling results: Up to 0.1 µm
Rated rotating speed: Revolution (sun wheel) 260 turns / min ± 10%; rotation (milling
jars): 525 turns/min ± 10%.
Operation modes: ND4L planetary ball mill is controlled with VFD and has a total of five
operation modes:
1. Normal operation with shutdown at non-fixed time;
2. Normal operation with shutdown at fixed time;
3. Automatic direction reversal operation with shutdown at fixed time;
4. Operation at regular intervals with shutdown at fixed time;
5. Direction reversal operation and operation at intervals with shutdown at fixed
time.
4|Page
Torrey Hills Technologies
Speed control: Frequency converter: 0~50/60 Hz; resolution: 1 Hz; speed control in terms
of frequency: 0~50/60 Hz.
Manual adjustments can be made at any time,
Machine programming capability:
0.1~100 hours fixed time operation;
0.1~50 hours fixed time automatic direction reversal operation
0.1~100 hours fixed time operation at regular intervals
0~100 times of repeat operation.
Power: Single-phase, 220V, alternating current (AC) 4A, 1.5KW
Net weight of ball mill: 330lb/150kg.
5|Page
Torrey Hills Technologies
5. Structure Sketch:
Figure 1
6|Page
Torrey Hills Technologies
1. Safety switch
11. Motor
2. Control panel
12. Machine base
3. Main pulley
13. Backcover
4. Bridging gear
14. Fixture
5. Fixed gear
15. Ball milling jar
6. Protection cover
16. Beam
7. Planetary gear
17. VFD
8. Belt
18. Security screw
9. Sun wheel
19. Hand wheel
10. Small pulley
20. Cooling fan
Please see figure 2 for planetary ball mill working mechanism.
Figure 2
1. Bridging Gear
2. Planetary Gear
3. Fixed Gear
7|Page
Torrey Hills Technologies
II. Operation Procedures
1. Examination
Upon opening of the container, check for damages to the planetary ball mill, the
power packet, and the milling jars during transportation. Also check whether the machine
is missing accessories.
2. Reading the instructions
Read the User’s Manual carefully. Carry out non-load test running of the ball mill
as per the steps described in the Manual, and check whether the operation of the VFD and
ball mill is normal.
3. Loading Jars
It’s now OK to load jars if the procedures above are completed.
a. Loading milling jars
To enhance the efficiency of ball milling, milling balls of different sizes
are loaded into the jars, with bigger balls for breaking up coarse milling materials,
and small ones for grinding them out to the required fineness.
The following table shows the recommended ball charges for each milling jar of
various sizes (reference only).
Jar Volume (ml)
Ball
(Pcs)
Φ6
Φ 10
Φ 20
50
100
250
500
1000
50
8
100
16
280
40
500
100
2
1000
200
3
Note: The optimal ball charge recommendations are based on empirical data
obtained by users processing milling materials of different natures to reach
different required finenesses
b. Loading milling materials
The filling level of the jar is important for successful grinding. Generally a
jar filling should not exceed two thirds of the jar volume. The remaining third of
the volume is necessary for the free movement of balls. The actual grinding result
depends on mill speed, ball size, material, and grinding time. You will be able to
find the best combination after a few tries.
4. Mounting Milling Jars
Immediately after milling jars are filled, users can install jars inside the jar
fixture. It is possible to install 4 milling jars at the same time, or 2 milling jars
8|Page
Torrey Hills Technologies
symmetrically. It’s not allowed to install only 1 or 3 milling jars. After
installation, tighten circular shaped hand wheel bolt and lock nut in succession to
prevent milling jars from loosening in the process of ball milling.
After the installation of milling jars, put on the protection cover so that the ball
mill can operate normally. While the mill is running, any occurrence of unusual
noises should raise an alert and the machine needs to be shut down immediately.
After the mill is shut down, users should check whether the milling jars have
come loose and needed to be re-tightened.
When milling is completed, loosen the lock nut and the circular shaped hand
wheel. Pour the testing samples together with the milling balls onto the sieve
(accessory of this machine) to separate the balls from the milled materials.
Before the next milling, please check whether the jar fixtures have been loosened.
If they are, users must re-tighten the screws to avoid any accident.
III. Power Setting
1. Motor: Three-phase, 380V. Please see the wiring diagram of this electrical appliance
as shown in figure 5 for details. The wiring of this machine has already been
conducted before it leaves the factory, so it shall not be changed at random.
2.
Transmission system: speed regulation by VFD. The scope of frequency variation is
between 0-50/60 Hz.
3. Rated rotating speed: Revolution (sun wheel) 0-260 RPM; rotation (milling jars): 0525 RPM. The RFD displays the speed of rotation.
9|Page
Torrey Hills Technologies
IV. Description of the VFD
I. Technical Indexes of Frequency Converter
1. Model: ND4L
2. Input: Single phase, 220V ± 10%, 50/60Hz;
3. Output: Voltage single phase 0-220V, frequency 0-50/60HZ, rated current 4A,
power 1.5KW, allowed overload 150% for 1 minute;
4. Data display: Frequency, rotating direction, rotating speed, voltage, current,
error codes, status
5. Requirements on ambient environment: The machine must be used indoors.
The altitude of room where planetary ball mill is installed shall be below 1000
meters and free of corrosive gases, dust and direct sun shine. Ambient
temperature should be between -10 - 40°C, preferably lower than 20°C to avoid
overheating. Humidity of the room should be between 20 - 90% (without water
condensation). Vibration should be below 0.6G
6. Function code for the frequency converter:
Function
Cd01
Cd02
Cd03
Cd04
Cd05
Cd06
Cd07
Cd08
Cd09
Cd10
Cd11
Function Description
Number of poles for motor
Operating mode
Note: “0” indicates unidirectional operation, and
“1” indicates direction reversal operation.
Timing control
Note: “0” indicates non-fixed time (continuous),
and “1” indicates fixed time.
Setting time for operation at regular intervals
(minutes).
Maximum frequency (Hz)
Minimum frequency (Hz)
Accelerating time (seconds)
(Time taken to increase from 0.5Hz to 50Hz)
Decelerating time (seconds)
(Time taken to decrease from 50Hz to 0.5Hz)
Set Scope
Default
Value
02~14
04
0,1
0
0,1
0
1~300.0
5
0.01~50
42
0~50
1
0.1~3600
10
0.1~3600
15
Setting of drag coefficient gear ratio
0.10~200.00
Display method
Note: “0” displays frequency with power
0,1
switched on, and “1” displays rotating speed with
power switched on.
Display of direction
Note: “0” indicates clockwise rotation and “1”
0,1
indicates counter clockwise rotation.
10 | P a g e
Torrey Hills Technologies
0.43
0
0
Cd12
Cd13
Cd14
Cd15
Cd16
Fixed operating time (minutes)
Current correction (A)
Shutdown time for direction reversal operation
(minutes)
Repeat operation shutdown time (minutes)
Note: For unidirectional operations, the shutdown
time between each repeat operation
For repeat operation, number of restarts for the
same operation
11 | P a g e
Torrey Hills Technologies
1~999.0
1
0.1~10
9
0.0~999.0
1
1~999.0
1
0~100
0
7. The operation and functions of control panel
Figure 3
1.
LED digital display zone: Display of frequency, default and reverse rotating
direction, rotating speed, voltage, current, failure code, and function code.
2.
Menu/ESC Menu selection and switch button: A button for switching between
the state of programming and monitoring. It switches between parameter displays and
programming menus. If it is already operated in the state of programming menu,
pressing the button will return you to the previous menu.
3.
ENTER/DATA
operations.
4.
Up button: Increase to select function code, menu group, or set parameter
values.
5.
RUN
Access the next menu while programming or save programmed
Start button: To be used for starting VFD
12 | P a g e
Torrey Hills Technologies
6.
Down button: Decrease to select function code, menu group, or set parameter
values.
7.
Indicator light: Switch among the indications of rotating direction (FIR), frequency
(Hz), rotating speed (Hz, v), voltage (v), and current (A) by moving the green light
upwards or downwards
8.
. Shift button:
Shift the display of rotating direction, frequency, rotating
speed, voltage, and current.
Change the digit to be modified
9.
JOG
Inching button: This VFD has no such function.
10. Operation indicator light: This light turns green when the VFD operates.
11. STOP/RESET
Stop and reset button: Press this button to stop the operation of
VFD, or reset the operation in the occurrence of a failure alarm.
II. Operating method
(A) Test running of the VFD – with no milling jars installed
1. Connect 220V alternative current to the ball mill.
2. Turn on the power supply switch, and LED will display “P. OFF”. It also displays a
blinking “50.00” Hz. Indicator light turns on.
3. Press menu selection and switch button
function code “Cd0l”.
Menu/ESC
.
LED will display the
ENTER/DATA
4. Press function selection and save button
. LED will display the
current value of the function code “Cd0l”, such as “04”. If modification is necessary,
press
or
to set the value required. After setting, press the button
ENTER/DATA
again. The value will be confirmed and saved, and the next function code “Cd02” will
be displayed at the same time. If this button is not pressed, the set value will not be
memorized by the VFD, and the previous value will remain effective.
5. Set values as necessary under each function code by repeating the procedures
above. It is possible to press shift button
to make LED blink display the data
already set, so that data setting can be done more quickly.
13 | P a g e
Torrey Hills Technologies
6. After setting Cd16, press the button
ENTER/DATA
display “-b-—”. After pressing the down button
continue pressing the button
by one.
to confirm and the panel will
LED displays “Cd16”. If you
function code will change from Cd16 to Cd01 one
Note: While programming, if LED displays symbols such as “-b—- ‘, “-R.—”, “-P—
”, “-H—”, “-d—”, and “-c--”, these are other functions of VFD that have nothing to
do with the functions of the ball mill. Users only need to press the button
continuously to return to “Cd16”.
7. Explanation of function code:
1. Cd0l, Cd05, Cd06, Cd07, Cd08, Cd09 and Cd13 are fixed default values and shall
not be changed, or the accuracy of such parameters will be affected.
2. Settings Cd07 and Cd08 are to keep a time interval between rotations in reverse
directions in the automatic direction reversal operation mode. Settings that are too
small will possibly affect the life of motor.
3. When Cd10 is set at “0”, LED display shows the frequency after the VFD starts up.
When it is set at “1”, LED display shows the rotating speed.
4. When Cd11 reads “0”, LED display shows default rotation direction (ball mill
operates clockwise) after the VFD starts up; when it reads “1”, LED display shows
reverse rotation direction (ball mill operates counterclockwise).
.
8. The cooling fan for VFD will start operating when the temperature exceeds 43°C.
When the working temperature of the VFD rises above 43°C, the fan will turn on
automatically. On the opposite, when the working temperature drops below 43°C, it will
turn off automatically.
9. If the VFD is confirmed to work normally after the operations mentioned above, it’s
then OK to continue the non-load test running of the ball mill.
10. Put on the protection cover of ball mill, switch on the safety switch, and press the
operation button
start test running.
. The operation indicator light will turn on and the ball mill will
11. Press the up button and down button for accelerating and decelerating test of the
ball mill.
14 | P a g e
Torrey Hills Technologies
12. Adjust the rotating speed of the ball mill to the maximum rated rotating speed, and
make it operate for some time before judging if the operation sound of the ball mill is
normal.
13. After everything is proved normal, press the stop button
make ball mill stop. The LED will restore its blinking display.
STOP/RESET
to
14. After about 5 seconds switch off power. “P. OFF” will appear and then disappear.
(B) Test running with milling jars installed
1 .lf the VFD and ball mill are proved normal after all of the above operations, it is now
OK to fill the milling jars with milling materials and milling balls. Install the jars on the
jar stations following instructions in section II “Operation Procedures” of this manual.
2. Put on the protection cover, switch on power, and start the test running of planetary
ball mill.
(C) Practical examples of operation
Example 1: Unidirectional operation with shutdown at non-fixed time.
Ball milling some testing sample with non-fixed long-time unidirectional operation at the
rotating speed of 400 turns / minute
1. Cd02 – select “0” to set the operation method as unidirectional.
2. Cd03 – select “0” to set the operation as non-fixed time.
3. Press
Menu/ESC
4. Press
button to make ball mill start working.
5. Press button
mill.
6. Press
button to make the display panel blink.
or
till two red lights are on and display the rotation speed of ball
button to adjust the speed to 400 RPM.
7. After a prolonged period of operation, press button
down the machine manually.
STOP/RESET
8. Switch off the power supply and the milling is completed.
15 | P a g e
Torrey Hills Technologies
to shut
Example 2: Uni-directional operation with shutdown at fixed time.
Ball milling to be shut down after l0 hours unidirectional operation at 40Hz frequency
1. Cd02 – select “0” to set the operation method as unidirectional.
2. Cd03 – select “1” to set the operation as fixed time.
3. Cd12 – select “600.0” to set the operating time as 10 hours.
4. Cd16 – select “0” to set the number to repeat operation as none.
5. Press
Menu/ESC
button to make the display panel flicker.
button to make ball mill start working.
6. Press
button till red light Hz display turns on. The display shows the
7. Press
frequency.
8. Press
or
button to adjust the frequency to 40Hz.
9. The machine will stop automatically after 10 hours of ball milling.
10. When the ball milling is completed, switch off and disconnect the power supply.
Example 3: Automatic direction reversal operation with shutdown at fixed time.
Run automatic direction reversal operation and change direction every 1.5 hours, and the
machine will shut down automatically 15 hours later.
1.
Cd02 – select “1” to set the operational method as automatic direction reversal.
2.
Cd03 – select “1” to set the operation as fixed time.
3.
Cd04 – select “90” to set the alternative operating time as 1.5 hours.
4. Cd12 – select “900” to set the operating time as 15 hours.
5. Cd14 – set the pause time between rotations in reverse directions as “0.0”.
6.
Cd16 – set the numbers of repeat operations as “9”.
7.
Press
Menu/ESC
button to make the display blink.
16 | P a g e
Torrey Hills Technologies
8.
Press
button to make ball mill start working.
9.
Follow procedures in Example 2 and set rotating speed or frequency as required.
10. The machine will stop automatically 15 hours later. Switch off and disconnect the
power supply.
Note: In operation, the function code Cd16 displays countdown. It this example, it
will display a countdown from 9 to 0.
Example 4: Uni-directional operation with pauses at fixed time.
Ball milling operation requires 0.5 hours of operation followed by 1 hour of
shutdown. Then it runs for another 0.5 hours before shutting down for 1 hour again.
The process repeats 10 times, and then the machine shuts down.
1. Cd02 – select “0” to set the operational method as unidirectional.
2. Cd03 – select “1” to set the operation as fixed time.
3. Cd12 – select “30” to set the operating time as 0.5 hours.
4.
Cd15 – select “60” to set the interval shutdown time as 1 hour.
5. CD16 – set the number of operation and restart times as “9”.
6. Press
7. Press
Menu/ESC
button to make the display blink.
button to make ball mill start working.
8. Follow procedures in Example 2 and set rotating speed or frequency as required.
9.
The machine will stop automatically after 10 repeat operations. Switch off and
disconnect the power supply.
Note: In operation, the function code Cd16 displays countdown. It this example, it
will display a countdown from 9 to 0.
Example 5: Automatic direction reversal operation with pauses at fixed time.
Ball milling operation requires 0.8 hours of operation in the default direction
followed by 0.5 hours shutdown, and then 0.8 hours of operation in the reverse
direction, and finally shutdown after 20 repeats.
17 | P a g e
Torrey Hills Technologies
1. Cd02 – select “1” to set the operatona1 method as direction reversal operation.
2. Cd03 – select “1” to set the operation as fixed time.
3. Cd04 – select “48” to set the operating time as 0.8 hours.
4. Cd14 – select “30” to set the interval shutdown time as 0.5 hours.
5. Cd16 – set the number to operation and restart times as “19”.
6. Press
7. Press
Menu/ESC
button to make the display blink.
button to make ball mill start working.
8. Follow procedures in Example 2 and set rotating speed or frequency as required.
9. The machine will stop automatically after 20 repeats. Switch off and disconnect
the power supply.
(Three) Trouble shooting for VFD
If any abnormities occur to the VFD, its protection functions will start working. LED
will display the error code in a blinking manner and the ball mill will stop running
Menu/ESC
automatically. After such errors are eliminated, press
button and then
restart the ball mill for operation.
Error Codes and Countermeasures
18 | P a g e
Torrey Hills Technologies
19 | P a g e
Torrey Hills Technologies
Error
Code
Error Type
Possible Causes Of Error
Countermeasure
OC1
Overcurrent for the
accelerating
operation of the
frequency converter
I) Time for acceleration is set too short.
2) V/F curve or torque elevation is set up improperly;
3) Reset VFD when instant stop happens;
4) Capacity of VFD is on the low side;
5) There is a failure or disconnection of code wheel in the
process of accelerating operation of PG
I) Adjust accelerating time;
2) Adjust the V/F curve or torque elevation.
3) Set the starting mode A-OO as rotating speed
tracking restart mode;
4) Choose VFD with matching capacity;
5) Check the code wheel and its wiring
OC2
Overcurrent for the
decelerating
operation of the
frequency converter
I) Time for deceleration is set too short;
2) Potential energy load or load inertia is relatively big;
3) Capacity of VFD is on the low side;
4) There is a failure or disconnection of code wheel in the
process of decelerating operation of PG
I) Adjust decelerating time;
2) Connect braking resistance externally.
3) Choose VFD with matching capacity;
4) Check the code wheel and its wiring
OC
Overcurrent for
constant speed
operation of the
frequency converter
I) Voltage of the grid is on the low side;
2) Capacity of VFD is on the low side;
3) Reset motor when instant stop happens (during starting
period);
4) Load is too much.
I) Check the input electrical source;
2) Check whether the input is of phase lack;
3) Choose VFD with matching capacity grade
4) Set the starting mode A-GO as rotating speed
tracking restart mode
5) Check the code wheel and its wiring;
6) Check the load or replace the VFD with another
one with bigger capacity.
OE-1
Over-voltage for the
accelerating
operation of the
frequency converter
I) The input voltage is abnormal;
2) Start up the motor (non-speed tracking startup).
I) Check the input electrical source;
2) Set the starting mode A-GO as totaling speed
tracking restart mode.
20 | P a g e
Torrey Hills Technologies
Error
Code
Error Type
Possible Causes Of Error
Countermeasure
OE-2
Over-voltage for the
decelerating
operation of the
frequency converter
I) Time set for deceleration is too short;
2) Potential energy load or load inertia is relatively big;
3) The input voltage is abnormal.
I) Adjust the decelerating time;
2) Connect braking resistance externally;
3) Check the input power source.
OE
Over-voltage for
constant speed
operation of the
frequency converter
I) Abnormal change happens to input voltage
I) Install input reactor.
2) Check the input power source
FTL
Failure of power
module
I) Momentary overcurrent of VFD;
2) Inter-phase or earthing short circuit of three-phase
output;
3) The VFD is not well ventilated or the fan is broken;
I) Please refer to the countermeasure against over
current;
2) Check the output connecting line and conduct
wiring again;
3) Dredge air duct or change fan;
4) Seek technical support.
OH
Overheating of
radiator of power
module
I) Ambient temperature fails to meet specification
requirements;
2) Ventilation of VFD is poor;
3) Cooling fan failure;
4) Temperature testing circuit is damaged.
1) The working environment of VFDshall meet
specification requirements;
2) Rectify and improve the ambient ventilation and
heat dissipation environment of VFD;
3) Change fan;
4) Seek technical support.
OL
Motor overload
I) V/F range setting is improper;
2) The voltage of the grid is too low
3) Long-time operation of motor with heavy load at low
speed;
4) The over-load protection coefficient of motor is not set
properly;
5) Locked operation or over load of motor
1) Adjust V/F curve;
2) Check the input voltage of grid;
3) Select motor specially for VFD if long-term lowspeed operation is required;
4) Set the over-load protection coefficient 9-18 ofor
motor correctly;
5) Adjust on-load working conditions or select VFD
6) Adjust the wiring of code wheel or change the
direction
21 | P a g e
Torrey Hills Technologies
Error
Code
Error Type
Possible Causes Of Error
Countermeasure
EMS
Failure of exterior
equipment
1) Failed terminal of external equipment
I) Check the reasons for the operation of failed
terminal
CPU
Electromagnetic
Interference
1) Single Chip machine is severely interfered
1) Press STOP/RESET button to reset.
2) Seek technical support
CPUE
EEPROM Failure
1) EEPROM is severely interfered in reading and writing;
2) EEPROM is damaged.
1) Press STOP/RESET button to reset.
STOP
Locking for
emergency stop
1) Double press the button STOP/RESET on the panel to
relieve machine urgently, and lock the operation control
I) Double press the button STOP/RESET on the panel
to relieve machine urgently, and lock the operation
control, locking for emergency stop.
NOTE: (I) In the process of ball milling, the impact of milling balls on the milling jars will make the temperature of the jar rise, which is a normal
phenomenon and doesn’t relate to the over-heating protection of the frequency converter. If higher temperature has an effect on the nature of the milling
materials, users could adopt internal operation method for ball milling or other cooling methods.
(2) If users could not eliminate failures of the VFD, they should contact the manufacturer directly for further technical assistance.
V. Common Failures, Repairs and Maintenance of Ball Mill
1. Ball mill refusing to work
Situation 1: Nothing is displayed after VFD is switched on
Check if the power supply is normal first, and then check if the main switch is damaged.
Situation 2: The VFD displays, but the motor doesn’t start up after the operation button
is pressed.
Check the wiring between the VFD and the motor. Also check if the cover of the ball mill
is placed on correctly, and if the safety switch is damaged.
2. If the rotating speed of the sun wheel decreases significantly or is not even, or the
rotation is weak in the ball milling process, most likely the driving V-belt of the motor is
worn and shall be replaced with the method described later.
3. If abnormal noises occur abruptly in mill operation, it’s necessary to shut down the
machine immediately and check if the milling jars are loose. Tighten the bolts before
restarting the ball mill.
4. The noises of ball milling quiet down or disappear abruptly in the normal operation of
ball mill. In such conditions, it’s necessary to shut down the machine immediately, cut
the power supply, and rotate the milling jars with hands. If it’s discovered that one or
several milling jars are not able to rotate freely, most likely the gears are damaged and
shall be replaced.
5. If metal friction noises or abnormal smells appear in the operation of ball mill, it’s
necessary to shut down the machine immediately, and cut the power supply. Pull the jar
fixtures with hands. If they have come loose, mostly likely the bearing is worn and shall
be replaced.
6. Tips for self repair:
22 | P a g e
Torrey Hills Technologies
Figure 4
1. Belt
2. Big Pulley
3. Screw
4. Hex Bolt
A. Replacing belt of the motor
a. Lift the ball mill (as shown in figure 4);
b. Take out the belt and replace it with O type belt A1041 (accessory of this machine).
B. Replacing gears and bearing:
a. Unscrew the four hex bolts inside the jar fixture, and take out the four fixtures one by
one (please see figure 1).
b. Lift the ball mill.
c. Take out the belt of the motor.
d. Unscrew hex bolt, and screw in the two threaded rods M6 x 50(accessories of this
machine) into the screw holes to eject the big pulley slowly.
e. Immediately after taking out the big pulley, users will find 6 hex bolts. After
unscrewing the bolts, take out the big tray and the drive from the front side of the ball
mill together before changing damaged parts.
f. After replacing the spare parts, restore the ball mill in reversed steps.
7. Users can always contact the manufacturer for any kind of repair and maintenance
problems.
23 | P a g e
Torrey Hills Technologies
VI. Wiring Diagram of Electrical Appliance
VII. Appendix
1. The manufacturer provides limited one-year warranty for this machine. If problems
occur due to the improper operation by the users or harmful operation environment for
VFD, cost of parts and service fees will apply.
2. Packing list
Code
1
2
3
4
Name
User Manual
Belt
Threaded rod for maintenance
Stainless steel sieve
24 | P a g e
Torrey Hills Technologies
Qty
1
1
2
1
Remark
O type 1041
M6 × 50