1
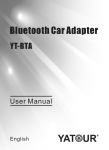
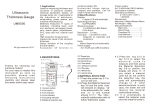
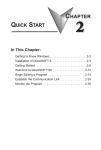
USER MANUAL
OD
P
I
SD
/
TH
B
O
US
TO
E
U
BL
WWW.XCARLINK.CO.UK
CONTENTS
INSTALLATION – IPOD AND USB INTERFACE
Bluetooth Module (optional)
5
10
OPERATING INSTRUCTIONS
ipod inteRFaCe
11
uSB/Sd inteRFaCe
14
Bluetooth Module (optional)
17
3
INTRODUCTION
Xcarlink ipod interface is a vehicle specific solution for connecting an ipod
directly to the external Cd changer port of a factory fitted oeM car radio. the
direct digital connection allows music on an ipod to be played through the car
radio with no loss of sound quality, whilst at the same time charging the ipod
and allowing it to be controlled via the radio or steering wheel buttons.
the Xcarlink uSB interface also connects directly to the Cd changer port for
digital sound quality but instead allows you to play and control music stored on a
uSB/Sd card via the steering factory radio or steering wheel buttons.
Both the uSB and ipod interface can be used to connect any portable audio
device via an aux in connection.
this manual covers installation and operation of the Xcarlink ipod interface, uSB
interface, and optional Bluetooth module. please refer to the instructions in
relation to the product you have purchased.
the kit should include the following parts:
IPOD INTERFACE
● Xcarlink ipod interface with vehicle specific Cd changer connection
● ipod connection Cable
● user manual
● Bluetooth module (optional)
USB/SD INTERFACE
● Xcarlink uSB interface with vehicle specific Cd Changer connection
● 3.5mm line in cable
● uSB extension cable
● user manual
● Bluetooth module (optional)
4
INSTALLATION – IPOD AND USB INTERFACE
CONNECTING THE INTERFACE TO THE CD CHANGER PORT
the first step is to remove your existing car radio, depending on the radio model
this would require the use of removal keys or removal of dashboard panels.
Removal of your factory radio should be carried out in accordance with the
correct procedure for your particular car radio model; you may be able to find
more information via websites such as www.fitaudio.com or by contacting a
dealer/qualified installer.
once the radio has been removed, locate the Cd changer port at the rear of the
radio and then connect the Vehicle specific connector to it (please note that
some models may require connection to the Cd changer port via the vehicle
harness). the Cd changer port on your radio should be easily identified and
should match the connector supplied with the interface. if you are in any doubt
please refer to the manufacturers documentaion supplied with the radio. it is
important to ensure that the Cd changer connection is pushed firmly in place so
that it makes a good full connection with the Cd changer port.
VAG (VW, Audi, Seat, Skoda) – With Existing CD Changer
these interfaces are supplied with Cd changer retention connections so you can
continue to use an existing Cd changer while the interface is connected. on
vehicles with an existing factory Cd changer, you would firstly need to remove
Cd changer from the back of the radio. the existing Cd changer connection is
then connected to the Male (Black) connector on the interface. the Female
(Blue) connector is then connected to the Cd changer port where your original
Cd changer was previously connected.
on some models there may be two ports with a similar connection – use the
diagram located on the radio casing or the manufacturers documentation to
ensure that the interface is connected to the Cd changer port.
the Male (Black) connector is only used if you have an existing Cd changer, if
there is no Cd changer present the male cable connector is not required and
should be left disconnected.
5
VAG (VW, Audi, Seat and Skoda) – Ground Connection
interfaces for VaG vehicles need to be grounded in order for the interface to
function correctly. the interface provides two ground connections (two black
wires, one with a larger ring connector and another with a smaller ring
connector). Connect at least one of the two ground connections to a suitable
earthing point such as the metal body of your factory radio (although it is
recommended that both cables are connected for extra security). Make sure
that the ground cable(s) are connected securely as the interface will fail to
operate without sufficient grounding.
6
CONNECTION OF THE AUDI 20 PIN ADAPTER (FOR AUDI ISO INTERFACES)
interfaces designed for audi radios with the 20 pin iSo connection (nonQuadlock) is supplied with a separate 20 pin adapter which needs to be
connected as follows:
1. Release the dark blue connector by pressing the clip at the bottom of the
connector inwards.
2. attach the dark blue connector to the black male connector on the Xcarlink.
3. then attach the light blue female connector on the Xcarlink to the red and
green connectors.
“Y” CONNECTION CABLES FOR TOYOTA AND HONDA
if your existing Cd changer port is already occupied, (this could be a connection
for the radio controls/Sat nav or external Factory Cd changer) a “Y” connection
cable would be required. in which case remove the existing connection and plug
the Female end of the Y cable into the Cd changer port. the Y cable branches
out into two connections - connect one end to the interface and the other to the
existing connection.
7
NISSAN CONNECTION
nissan interfaces have additional cables which need to be connected, simply
connect these cables as shown in the following diagram:
the Bat wire is live and must be connected to the power supply.
the aCC wire must be connected to the ignition live (i.e. 12v when ignition
has started).
please refer to the wiring diagram for your radio (which should be on the back of
the unit) to ensure that it is connected to the correct cables.
8
BMW CONNECTION
BMW interfaces also include 4 additional cables which should be connected as
follows:
note: if your BMW interface has a plug and play connector the above connection
would not be required.
FINAL STEPS
● once the interface has been successfully connected to the radio, route the
cable to the desired location, such as glovebox, dashboard, centre console,
armrest, behind the radio etc.
● if you are installing an ipod interface, connect the ipod cable with the round
connector to the interface and route it to the appropriate location.
● test the interface before you replace the factory radio; Check that all
connections at the back of the radio are firmly in place and your audio system
is functioning correctly. once everything has been tested, re-fit your factory
radio back to its original state.
9
BLUETOOTH MODULE (OPTIONAL)
the optional Bluetooth module allows you to use the interface as a hans-free
car kit and for wirelessly streaming music to your car radio. it can be paired
with any Bluetooth mobile phone/device for a complete in-car integration
solution.
the installation procedure is as follows:
1. Connect the Bluetooth module to the Micro uSB port on the interface
2. Route the Bluetooth module to the required location - you may prefer to
place the module within easy reach whilst driving so that the call answer
button can be operated.
3. Route the microphone cable so that the microphone is located as close as
possible to where you would be speaking from, such as the sun-visor or top
of the panel at the edge of the windscreen. the microphone can be held in
place with double sided tape if required.
4. power on the radio and ignition to ensure that the Bluetooth module is
receiving power and ready to be paired with a mobile device (see operating
instructions).
10
OPERATING INSTRUCTIONS – IPOD INTERFACE
Before you begin, please check that your ipod software is up to date. this can
be checked and upgraded if necessary via itunes. For further information please
visit www.apple.com/support.
We also recommend that playlists are setup on your ipod for easy navigation of
music via your radio/streering wheel controls.
GENERAL OPERATION
Connect your ipod to the Xcarlink interface via the supplied cable, power on the
radio and switch to Cd changer as the source, it will then switch to your ipod
and is now ready to use.
Xcarlink ipod interface has two operating modes:
1. Manual Mode
2. playlist Mode
the disk # buttons on your factory radio allow you to switch between the above
two modes. depending on the model of your radio the disk buttons could be
represented by numbers 1, 2, 3, 4, 5, 6 or on some models disk # are selected
via the disk+ disk- buttons. please refer to the user guide provided with your car
radio for further information and to familiarise yourself with the functions of your
particular radio and the procedure for disk # selection.
operation on your radio is as follows:
CD (Disk + - ) Button
Operation
disk #1
Switch to Manual Mode
disk #2
playlist 1
disk #3
playlist 2
disk #4
playlist 3
disk #5
playlist 4
disk #6
playlist 5
11
MANUAL MODE
Whilst in Manual Mode (disk #1) your ipod controls and screen display will
remain available as normal, allowing you to select, albums, artists, tracks etc all
via your ipod/iphone. Furthermore, tracks can selected using the seek button on
your radio or steering wheel controls. the Fast Forward (FF) and Rewind (RW)
buttons can also be used to seek within a track. Manual mode is ideal if you
require full access to your ipod without any restrictions. typical example would
be to use your ipod to select an album and then use the seek buttons on your
radio/steering wheel to browse tracks within that particular album.
in manual mode the information being displayed on the car radio display would
be irrelevant; the track timer would not accurately reflect the position within a
given song.
PLAYLIST MODE
Select disk #2 (or via disk + -) to switch to playlist mode and will start playing
the first playlist stored on your ipod.
in playlist mode each disk # (from disk #2 onwards) represents a playlists on
your ipod/iphone. Selecting disk #3 will select the 2nd playlist, disk #4 the 3rd
playlist etc. the number of playlists that the factory radio can select is
dependent on the way in which your radio has been designed to select “Cd’s”
in a changer, for example if your radio can control a maximum of 6 disks in a
changer, the number of playlists that it will control will be 5. Some factory radios
have the capability to select up to 10 disks representing 9 playlists.
12
during playlist mode the ipod will be locked and display the message “do not
disconnect”.
during playlist mode:
●
●
●
●
●
●
the track timer on the radio would be accurate for each song.
the repeat button can be used to repeat a song after if finishes playing
Fast Forward (FF) and Rewind (RW) buttons can be used to seek within a song
and the track timer will be updated to reflect the current position within the
song.
the Random button can be used to select tracks in random order, however if
you then select the skip button to select a track it will no longer play tracks
at random and instead will select the next track within the playlist. if you are
in random mode and would like to switch to another random track the
random button should be selected twice.
the information being displayed on the factory radio display represents the
playlist number and the track within that particular playlist. For example, Cd257 would indicate that it is playing the 57th song on the first playlist.
the ipod/iphone will automatically pause and remember the last playing
position when the ignition is turned off or when you switch to another source
such as FM radio.
SWITCHING FROM XCARLINK TO A FACTORY FITTED CD CHANGER
interfaces designed for audi, VW, Skoda and Seat have the ability to retain an
existing factory fitted Cd changer or external Single disk player (See installation
instructions). the procedure for switching from the interface to your Cd changer
is while listening to audio via the interface, toggle to FM radio (usually by
pressing the "FM" button ) and then back to Cd changer mode (Cd Button). on
some models it may be necessary to disconnect the device connected (Such as
ipod or uSB/Sd) when switching to Cd changer.
CONNECTING AN AUXILIARY DEVICE
any audio device can be connected to the auxiliary port which is labelled “aux”.
the device can be connected using an optional 3.5mm aux input cable. the
display on the radio will change to Cd8-88. using this method, it is not possible
to control the auxiliary device through the radio/steering wheel buttons however
the volume control can be adjusted. all other controls would have to be
performed directly via the device.
13
NOTES
● as the track number on the radio is limited to 2 digits, the corresponding
playlist track number is always truncated. For example if the 157th song on
the playlist is being played the display will be “57” ignoring the first digit.
● Functions such as disk select, seek (Back, next) Fast Forward (FF), Rewind (RW)
may operate differently in different car models/factory radios, therefore the
examples given above may not be accurate. please refer to your radios user
manual for the exact operation.
● text supported on some models.
OPERATING INSTRUCTIONS – USB/SD INTERFACE
USING AN SD CARD OR USB DRIVE
the uSB interface has a built in high quality Mp3/WMa encoder which allows
you to play and control Mp3 or WMa files from your factory car stereo. the
following procedure explains how to setup your Sd card or uSB drive.
●
●
14
Firstly you would need to ensure that your uSB drive or Sd card is formatted
to Fat32. and that all other files have been deleted
Create folders on your uSB/Sd card in the root directory using the format
Cd01, Cd02, Cd03 etc. the number of folders that the factory radio can
select is limited only by the number of “Cd’s” that your factory radio has been
designed to select within a Cd changer, for example if your radio can control a
maximum of 6 disks in a changer, the number of folders that it will control will
be 6. Some factory radios have the capability to select up to 10 folders.
●
●
●
●
●
●
load Mp3 or WMa files into each folder as required.
Connect your uSB drive or Sd card to the interface and then power on the
radio and switch to Cd changer as the source, it will then switch to your
uSB/Sd and is now ready to use.
You radio will now recognise each folder as a “disk”. to select folders use the
disk select buttons disk #1 disk #2 etc. on some radios this is operated via
the Cd+ and Cd- buttons.
once you have selected a folder use the seek button on the radio or steering
wheel controls to change tracks within the folder.
Fast Forward (FF) and Rewind (RW) buttons can be used to seek within a song
and the track timer will be updated to reflect the current position within the song.
the Random button can be used to select tracks in random order, if you
change tracks whilst in random mode the next track within the folder will be
selected. on some radios random tracks can be selected after you change
tracks by pressing the random button twice (once to cancel random mode,
and again to re-select it).
15
NOTES
● the information being displayed on the factory radio display represents the
folder number and the track within that particular folder For example Cd1-02
would indicate that it is playing the second track within folder 1. (display may
vary according to the radio model.) to manage the order in which tracks are
played on your radio you may wish to download play-order manager, which is
available to download from www.xcarlink.co.uk/helpdesk - select “file
library” to download.
● as the track number on the radio is limited to 2 digits, the corresponding
track number is always truncated. For example if the 157th song within the
folder the radio display will show “57”; ignoring the first digit.
the following should be avoided:
●
●
●
long file names
file names with the characters ‘ / \
Mp3s using different id3 tags - keep them consistent
CONNECTING AN AUXILIARY DEVICE
● any audio device can be connected to the aux in port. Firstly connect the
Micro uSB to 3.5mm cable to the aux/Bt port and then connect your device
to the 3.5mm connection. the display on the radio will change to Cd8-88.
using this method, it is not possible to control the auxiliary device through
the radio/steering wheel buttons however volume control can be adjusted. all
other controls would have to be performed directly via the device.
● if a uSB/Sd card is already connected it will stop playing as soon as an
auxiliary device is connected.
16
OPERATING INSTRUCTIONS – BLUETOOTH MODULE
the Bluetooth module is an optional accessory which utilises the technology
within an Xcarlink ipod or uSB interface to provide a hands free car kit solution
which integrates with your car radio system. it can also be used for wireless
streaming of music from an audio device to your car Via ad2p stereo Bluetooth.
the Bluetooth module simply connects to the Micro-uSB connection on an
Xcarlink ipod or uSB interface. it is plug and play operation with no additional
installation required to your car audio system.
Light
Call Answer/Reject Button
External Microphone
PAIRING WITH YOUR BLUETOOTH MOBILE PHONE
1. ensure that the ignition or radio is powered off before connecting the
Bluetooth module (See installation instructions above)
2. the next step is to pair your mobile phone or device with the Bluetooth
module. this can be achieved by accessing the Bluetooth menu on your
phone and activating search and discovery mode (Refer to your mobile
phones user guide for further information).
3. When your phone displays the list of available Bluetooth devices select
“Xcarlink”
4. When the phone asks for a pairing code enter “0000” and press
ok/Connect. the Bluetooth device is now paired with the Xcarlink
Bluetooth module, and you are ready to receive or make a call.
17
NOTES
● Most phones will automatically connect to the kit after pairing, therefore the
above procedure would only have to be carried out once. Some phones may
require manual connection after pairing.
● to pair with a new device, simply hold down the Bt button (or Fast Forward (FF)
button on some radios) for 2-3 seconds, then follow the pairing procedure
above.
MAKING A CALL
dial the number on your phone or select a contact. the sound will automatically
be routed to your car audio system.
ANSWERING A CALL
When a call is received you will hear a ringing tone via your car radio speakers.
the call can be answered in the following ways:
1. By pressing the call answer/reject button on the Bluetooth module
2. By pressing the Fast Forward (FF) button (on some radio models)
3. answering the call directly using your phone
DURING A CALL
● during a call the music playing on the ipod or uSB interface will automatically
interrupt and it will allow you to take the call. Music will then continue to play
from automatically after the call has ended.
● a call can be rejected by holding down the Bluetooth button for 3 seconds.
● press the Bluetooth button, or radio Fast Forward (FF) button (on some radios)
to end the call.
A2DP WIRELESS MUSIC STREAMING
an a2dp compatible Bluetooth device can be used to wirelessly stream music to
your car radio system via the Bluetooth module. Select the song/track that you
would like to play on your mobile phone and then select the option to send via
Bluetooth (see your phones user guide for more information). the call answer/
reject button can be used to pause/stop/play music.
18
WARRANTY
the Xcarlink ipod and uSB interface carries a one year limited warranty that
protects against manufacturing defects. We do not provide any warranty for
installation. if you experience a problem and require technical support please
submit a ticket at www.xcarlink.co.uk/helpdesk and include your order number.
We are unable to provide support if the product was not purchased directly from
us or one of our official dealers/distributors.
DISCLAIMER
all text and images contained within this manual are Copyright © and any
reproduction without our prior consent is strictly forbidden.
all photos/and instructions are for illustration purposes only and may differ from
the actual fitting in your car.
We do not accept any liability for any damage including incidental, consequential
or indirect damages/losses and will not be liable for any installation/diagnostic
fees incurred.
© 2009 DIGIBUyS LTD, ALL RIGhTS RESERVED, XCARLINk, ThE LOGO DESIGN ARE TRADEmARkS OR
REGISTERED TRADEmARkS OF DIGIBUyS LTD. IPOD IS A TRADEmARk OF APPLE INC. ThE
REPRODUCTION OF TEXT, ImAGES, DESIGN OR ANy CONTENT WIThIN ThIS mANUAL FOR ANy
PURPOSE, WIThOUT OUR WRITTEN CONSENT IS STRICTLy FORBIDDEN.