1
User Manual
020-101916-02
CP2208
User Manual
020-101916-02
CP2208
NOTICES
COPYRIGHT AND TRADEMARKS
Copyright ©2015 Christie Digital Systems USA Inc. All rights reserved.
All brand names and product names are trademarks, registered trademarks or trade names of their respective holders.
GENERAL
Every effort has been made to ensure accuracy, however in some cases changes in the products or availability could occur which may not be reflected in this
document. Christie reserves the right to make changes to specifications at any time without notice. Performance specifications are typical, but may vary
depending on conditions beyond Christie's control such as maintenance of the product in proper working conditions. Performance specifications are based
on information available at the time of printing. Christie makes no warranty of any kind with regard to this material, including, but not limited to, implied
warranties of fitness for a particular purpose. Christie will not be liable for errors contained herein or for incidental or consequential damages in connection
with the performance or use of this material. Canadian manufacturing facility is ISO 9001 and 14001 certified.
WARRANTY
Products are warranted under Christie’s standard limited warranty, the complete details of which are available by contacting your Christie dealer or Christie.
In addition to the other limitations that may be specified in Christie’s standard limited warranty and, to the extent relevant or applicable to your product, the
warranty does not cover:
a. Problems or damage occurring during shipment, in either direction.
b. Projector lamps (See Christie’s separate lamp program policy).
c. Problems or damage caused by use of a projector lamp beyond the recommended lamp life, or use of a lamp other than a Christie lamp supplied by
Christie or an authorized distributor of Christie lamps.
d. Problems or damage caused by combination of a product with non-Christie equipment, such as distribution systems, cameras, DVD players, etc., or
use of a product with any non-Christie interface device.
e. Problems or damage caused by the use of any lamp, replacement part or component purchased or obtained from an unauthorized distributor of
Christie lamps, replacement parts or components including, without limitation, any distributor offering Christie lamps, replacement parts or
components through the internet (confirmation of authorized distributors may be obtained from Christie).
f. Problems or damage caused by misuse, improper power source, accident, fire, flood, lightening, earthquake or other natural disaster.
g. Problems or damage caused by improper installation/alignment, or by equipment modification, if by other than Christie service personnel or a Christie
authorized repair service provider.
h. Problems or damage caused by use of a product on a motion platform or other movable device where such product has not been designed, modified
or approved by Christie for such use.
i. Problems or damage caused by use of a projector in the presence of an oil-based fog machine or laser-based lighting that is unrelated to the projector.
j. For LCD projectors, the warranty period specified in the warranty applies only where the LCD projector is in “normal use” which means the LCD
projector is not used more than 8 hours a day, 5 days a week.
k. Except where the product is designed for outdoor use, problems or damage caused by use of the product outdoors unless such product is protected
from precipitation or other adverse weather or environmental conditions and the ambient temperature is within the recommended ambient
temperature set forth in the specifications for such product.
l. Image retention on LCD flat panels.
m.Defects caused by normal wear and tear or otherwise due to normal aging of a product.
The warranty does not apply to any product where the serial number has been removed or obliterated. The warranty also does not apply to any product
sold by a reseller to an end user outside of the country where the reseller is located unless (i) Christie has an office in the country where the end user is
located or (ii) the required international warranty fee has been paid.
The warranty does not obligate Christie to provide any on site warranty service at the product site location.
PREVENTATIVE MAINTENANCE
Preventative maintenance is an important part of the continued and proper operation of your product. Please see the Maintenance section for specific
maintenance items as they relate to your product. Failure to perform maintenance as required, and in accordance with the maintenance schedule specified
by Christie, will void the warranty.
REGULATORY
The product has been tested and found to comply with the limits for a Class A digital device, pursuant to Part 15 of the FCC Rules. These limits are designed
to provide reasonable protection against harmful interference when the product is operated in a commercial environment. The product generates, uses, and
can radiate radio frequency energy and, if not installed and used in accordance with the instruction manual, may cause harmful interference to radio
communications. Operation of the product in a residential area is likely to cause harmful interference in which case the user will be required to correct the
interference at the user’s own expense.
CAN ICES-3 (A) / NMB-3 (A)
이 기기는 업무용 (A 급 ) 으로 전자파적합등록을 한 기기이오니 판매자 또는 사용자는 이점을 주의하시기 바라며 , 가정 외의 지역에서 사용하는 것을 목적
으로 합니다 .
Environmental
The product is designed and manufactured with high-quality materials and components that can be recycled and reused. This symbol
means that electrical and
electronic equipment, at their end-of-life, should be disposed of separately from regular waste. Please dispose of the product appropriately and according to local
regulations. In the European Union, there are separate collection systems for used electrical and electronic products. Please help us to conserve the environment we
live in!
Table of Contents
Installing and Setting Up . . . . . . . . . . . . . . . . . . . . . . . . . . . . . . . . . . . . . . 11
Safety precautions . . . . . . . . . . . . . . . . . . . . . . . . . . . . . . . . . . . . . . . . . . . . . . 11
AC/power precautions . . . . . . . . . . . . . . . . . . . . . . . . . . . . . . . . . . . . . . . . . . 12
Power cords and attachments
. . . . . . . . . . . . . . . . . . . . . . . . . . . . . . . . . . . . 12
Lamp precautions . . . . . . . . . . . . . . . . . . . . . . . . . . . . . . . . . . . . . . . . . . . . . 13
Projector components - front . . . . . . . . . . . . . . . . . . . . . . . . . . . . . . . . . . . . . . . 13
Projector components - rear
. . . . . . . . . . . . . . . . . . . . . . . . . . . . . . . . . . . . . . . 14
Positioning the projector . . . . . . . . . . . . . . . . . . . . . . . . . . . . . . . . . . . . . . . . . . 14
Stacking projectors . . . . . . . . . . . . . . . . . . . . . . . . . . . . . . . . . . . . . . . . . . . . . . 15
Adjusting tilt and level the projector . . . . . . . . . . . . . . . . . . . . . . . . . . . . . . . . . . 17
Installing the touch panel controller . . . . . . . . . . . . . . . . . . . . . . . . . . . . . . . . . . 18
Installing the lens . . . . . . . . . . . . . . . . . . . . . . . . . . . . . . . . . . . . . . . . . . . . . . . 18
Installing the lamp . . . . . . . . . . . . . . . . . . . . . . . . . . . . . . . . . . . . . . . . . . . . . . 20
Connecting devices to the projector
. . . . . . . . . . . . . . . . . . . . . . . . . . . . . . . . . . 23
Projector connections . . . . . . . . . . . . . . . . . . . . . . . . . . . . . . . . . . . . . . . . . . 24
Connecting the projector to a computer
. . . . . . . . . . . . . . . . . . . . . . . . . . . . . 25
Connecting devices to the 3D sync terminal . . . . . . . . . . . . . . . . . . . . . . . . . . . 25
Connecting power . . . . . . . . . . . . . . . . . . . . . . . . . . . . . . . . . . . . . . . . . . . . . . . 25
Turning the projector on . . . . . . . . . . . . . . . . . . . . . . . . . . . . . . . . . . . . . . . . . . 27
Logging on to the projector . . . . . . . . . . . . . . . . . . . . . . . . . . . . . . . . . . . . . . . . 27
Activating marriage
. . . . . . . . . . . . . . . . . . . . . . . . . . . . . . . . . . . . . . . . . . . . . 27
Adding the projector to a network . . . . . . . . . . . . . . . . . . . . . . . . . . . . . . . . . . . . 28
Adding the lamp information to the lamp history . . . . . . . . . . . . . . . . . . . . . . . . . . 28
Turning the lamp on . . . . . . . . . . . . . . . . . . . . . . . . . . . . . . . . . . . . . . . . . . . . . 29
Aligning the lamp . . . . . . . . . . . . . . . . . . . . . . . . . . . . . . . . . . . . . . . . . . . . . . . 29
Adjusting the image to fit the screen . . . . . . . . . . . . . . . . . . . . . . . . . . . . . . . . . . 30
Aligning dual projector images . . . . . . . . . . . . . . . . . . . . . . . . . . . . . . . . . . . . . . 32
Playing content
. . . . . . . . . . . . . . . . . . . . . . . . . . . . . . . . . . . . . . . . . . . . . . . . 33
Playing unencrypted content . . . . . . . . . . . . . . . . . . . . . . . . . . . . . . . . . . . . . 33
Playing encrypted content . . . . . . . . . . . . . . . . . . . . . . . . . . . . . . . . . . . . . . . 33
Adjusting the Image . . . . . . . . . . . . . . . . . . . . . . . . . . . . . . . . . . . . . . . . . . 34
Correcting keystone effect . . . . . . . . . . . . . . . . . . . . . . . . . . . . . . . . . . . . . . . . . 34
Correcting dual projector horizontal keystone . . . . . . . . . . . . . . . . . . . . . . . . . . . . 35
CP2208 User Manual
020-101916-02 Rev. 1 (08-2015)
5
Table of Contents
Correcting dual projector vertical keystone
Correcting vignetting
. . . . . . . . . . . . . . . . . . . . . . . . . . . . . 36
. . . . . . . . . . . . . . . . . . . . . . . . . . . . . . . . . . . . . . . . . . . . 36
Adjusting vertical boresight angle . . . . . . . . . . . . . . . . . . . . . . . . . . . . . . . . . . . . 37
Adjusting horizontal boresight . . . . . . . . . . . . . . . . . . . . . . . . . . . . . . . . . . . . . . 38
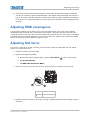
Adjusting DMD convergence . . . . . . . . . . . . . . . . . . . . . . . . . . . . . . . . . . . . . . . . 40
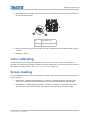
Adjusting fold mirror . . . . . . . . . . . . . . . . . . . . . . . . . . . . . . . . . . . . . . . . . . . . . 40
Color calibrating . . . . . . . . . . . . . . . . . . . . . . . . . . . . . . . . . . . . . . . . . . . . . . . . 41
Screen masking . . . . . . . . . . . . . . . . . . . . . . . . . . . . . . . . . . . . . . . . . . . . . . . . 41
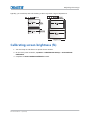
Calibrating screen brightness (fL) . . . . . . . . . . . . . . . . . . . . . . . . . . . . . . . . . . . . 42
Accessing the Projector and Running Diagnostics . . . . . . . . . . . . . . . . . . . 43
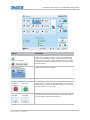
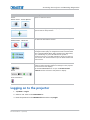
The touch panel controller . . . . . . . . . . . . . . . . . . . . . . . . . . . . . . . . . . . . . . . . . 43
Logging on to the projector . . . . . . . . . . . . . . . . . . . . . . . . . . . . . . . . . . . . . . . . 45
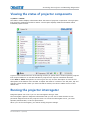
Viewing the status of projector components . . . . . . . . . . . . . . . . . . . . . . . . . . . . . 46
Running the projector interrogator . . . . . . . . . . . . . . . . . . . . . . . . . . . . . . . . . . . 46
Retrieving system logs . . . . . . . . . . . . . . . . . . . . . . . . . . . . . . . . . . . . . . . . . . . 47
Running a server test . . . . . . . . . . . . . . . . . . . . . . . . . . . . . . . . . . . . . . . . . . . . 47
Responding to alarms . . . . . . . . . . . . . . . . . . . . . . . . . . . . . . . . . . . . . . . . . . . . 48
Turning the projector off . . . . . . . . . . . . . . . . . . . . . . . . . . . . . . . . . . . . . . . . . . 48
Managing the DLP . . . . . . . . . . . . . . . . . . . . . . . . . . . . . . . . . . . . . . . . . . . 49
Stopping DLP communication . . . . . . . . . . . . . . . . . . . . . . . . . . . . . . . . . . . . . . . 49
Resetting the DLP . . . . . . . . . . . . . . . . . . . . . . . . . . . . . . . . . . . . . . . . . . . . . . . 49
Running a DLP self test . . . . . . . . . . . . . . . . . . . . . . . . . . . . . . . . . . . . . . . . . . . 49
Downloading an ICP certificate . . . . . . . . . . . . . . . . . . . . . . . . . . . . . . . . . . . . . . 50
Disabling the ICP signature test . . . . . . . . . . . . . . . . . . . . . . . . . . . . . . . . . . . . . 50
Managing Lamp Information . . . . . . . . . . . . . . . . . . . . . . . . . . . . . . . . . . . 51
Creating a new lamp file . . . . . . . . . . . . . . . . . . . . . . . . . . . . . . . . . . . . . . . . . . 51
Modifying an existing lamp file . . . . . . . . . . . . . . . . . . . . . . . . . . . . . . . . . . . . . . 52
Enabling or disabling LiteLOC on a lamp file . . . . . . . . . . . . . . . . . . . . . . . . . . . . . 52
Adjusting lamp power . . . . . . . . . . . . . . . . . . . . . . . . . . . . . . . . . . . . . . . . . . . . 52
Changing the lamp power percentage . . . . . . . . . . . . . . . . . . . . . . . . . . . . . . . . . 52
Viewing lamp information
. . . . . . . . . . . . . . . . . . . . . . . . . . . . . . . . . . . . . . . . . 52
Receiving an alarm when a lamp reaches its expiry date . . . . . . . . . . . . . . . . . . . . 53
Adding a lamp to the Lamp History . . . . . . . . . . . . . . . . . . . . . . . . . . . . . . . . . . . 53
Verifying current lamp intensity . . . . . . . . . . . . . . . . . . . . . . . . . . . . . . . . . . . . . 53
Working with Channels . . . . . . . . . . . . . . . . . . . . . . . . . . . . . . . . . . . . . . . 54
Creating a new channel . . . . . . . . . . . . . . . . . . . . . . . . . . . . . . . . . . . . . . . . . . . 54
CP2208 User Manual
020-101916-02 Rev. 1 (08-2015)
6
Table of Contents
Activating a channel . . . . . . . . . . . . . . . . . . . . . . . . . . . . . . . . . . . . . . . . . . . . . 56
Restoring default channel settings
. . . . . . . . . . . . . . . . . . . . . . . . . . . . . . . . . . . 56
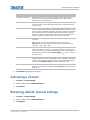
Changing the channel icon . . . . . . . . . . . . . . . . . . . . . . . . . . . . . . . . . . . . . . . . . 57
Adding or removing preferred channels from the Preferred Channels pane . . . . . . . . 57
Managing Projector Setting Files . . . . . . . . . . . . . . . . . . . . . . . . . . . . . . . . 58
Creating a source file . . . . . . . . . . . . . . . . . . . . . . . . . . . . . . . . . . . . . . . . . . . . 58
Modifying a source file
. . . . . . . . . . . . . . . . . . . . . . . . . . . . . . . . . . . . . . . . . . . 58
Creating a screen file . . . . . . . . . . . . . . . . . . . . . . . . . . . . . . . . . . . . . . . . . . . . 59
Modifying a screen file
. . . . . . . . . . . . . . . . . . . . . . . . . . . . . . . . . . . . . . . . . . . 59
Creating a MCGD file . . . . . . . . . . . . . . . . . . . . . . . . . . . . . . . . . . . . . . . . . . . . . 59
Modifying a MCGD file . . . . . . . . . . . . . . . . . . . . . . . . . . . . . . . . . . . . . . . . . . . . 60
Creating a TCGD file . . . . . . . . . . . . . . . . . . . . . . . . . . . . . . . . . . . . . . . . . . . . . 60
Modifying a TCGD file . . . . . . . . . . . . . . . . . . . . . . . . . . . . . . . . . . . . . . . . . . . . 60
Creating a new ILS file . . . . . . . . . . . . . . . . . . . . . . . . . . . . . . . . . . . . . . . . . . . 61
Editing an existing ILS file . . . . . . . . . . . . . . . . . . . . . . . . . . . . . . . . . . . . . . . . . 61
Enabling automatic ILS adjustment on a channel
. . . . . . . . . . . . . . . . . . . . . . . . . 61
Resetting ILS file settings . . . . . . . . . . . . . . . . . . . . . . . . . . . . . . . . . . . . . . . . . 61
Adding a lens serial number . . . . . . . . . . . . . . . . . . . . . . . . . . . . . . . . . . . . . . . . 62
Enabling automatic ILS on a lens . . . . . . . . . . . . . . . . . . . . . . . . . . . . . . . . . . . . 62
Resetting the lens position on projector startup . . . . . . . . . . . . . . . . . . . . . . . . . . 62
Completing a full lens calibration . . . . . . . . . . . . . . . . . . . . . . . . . . . . . . . . . . . . 62
Resetting the ILS and the lens position . . . . . . . . . . . . . . . . . . . . . . . . . . . . . . . . 62
Working with the Scheduler . . . . . . . . . . . . . . . . . . . . . . . . . . . . . . . . . . . 64
Scheduling the projector to turn on or off
. . . . . . . . . . . . . . . . . . . . . . . . . . . . . . 64
Editing a scheduled event . . . . . . . . . . . . . . . . . . . . . . . . . . . . . . . . . . . . . . . . . 65
Deleting a scheduled event . . . . . . . . . . . . . . . . . . . . . . . . . . . . . . . . . . . . . . . . 65
Deleting all scheduled events . . . . . . . . . . . . . . . . . . . . . . . . . . . . . . . . . . . . . . . 65
Turning off the scheduler . . . . . . . . . . . . . . . . . . . . . . . . . . . . . . . . . . . . . . . . . . 65
Viewing and Modifying Projector Settings . . . . . . . . . . . . . . . . . . . . . . . . 66
Setting projector and TPC preferences . . . . . . . . . . . . . . . . . . . . . . . . . . . . . . . . . 66
Adjusting projector time settings . . . . . . . . . . . . . . . . . . . . . . . . . . . . . . . . . . . . 66
Modifying projector communication settings . . . . . . . . . . . . . . . . . . . . . . . . . . . . . 67
Adding a network device . . . . . . . . . . . . . . . . . . . . . . . . . . . . . . . . . . . . . . . . . . 67
Accessing a network device . . . . . . . . . . . . . . . . . . . . . . . . . . . . . . . . . . . . . . . . 68
Calibrating the internal light meter . . . . . . . . . . . . . . . . . . . . . . . . . . . . . . . . . . . 68
Viewing the Microsoft Windows Task Manager
CP2208 User Manual
020-101916-02 Rev. 1 (08-2015)
. . . . . . . . . . . . . . . . . . . . . . . . . . . 68
7
Table of Contents
Viewing the Microsoft Windows Computer Management console
. . . . . . . . . . . . . . . 68
Viewing Microsoft Windows Explorer . . . . . . . . . . . . . . . . . . . . . . . . . . . . . . . . . . 69
Viewing the Microsoft Network Connections window
Viewing projector information
. . . . . . . . . . . . . . . . . . . . . . . 69
. . . . . . . . . . . . . . . . . . . . . . . . . . . . . . . . . . . . . . 69
Recording the lens serial number . . . . . . . . . . . . . . . . . . . . . . . . . . . . . . . . . . . . 69
Managing User Accounts . . . . . . . . . . . . . . . . . . . . . . . . . . . . . . . . . . . . . . 70
Interpreting user access permissions . . . . . . . . . . . . . . . . . . . . . . . . . . . . . . . . . . 70
Adding a user account . . . . . . . . . . . . . . . . . . . . . . . . . . . . . . . . . . . . . . . . . . . . 70
Changing a user account password or permissions
. . . . . . . . . . . . . . . . . . . . . . . . 71
Deleting a user account . . . . . . . . . . . . . . . . . . . . . . . . . . . . . . . . . . . . . . . . . . . 71
Backing up, Restoring, and Upgrading Projector Files . . . . . . . . . . . . . . . 72
Adding an upgrade file
. . . . . . . . . . . . . . . . . . . . . . . . . . . . . . . . . . . . . . . . . . . 72
Removing an upgrade file . . . . . . . . . . . . . . . . . . . . . . . . . . . . . . . . . . . . . . . . . 72
Installing an upgrade . . . . . . . . . . . . . . . . . . . . . . . . . . . . . . . . . . . . . . . . . . . . 72
Backing up projector settings and information . . . . . . . . . . . . . . . . . . . . . . . . . . . 73
Restoring a file . . . . . . . . . . . . . . . . . . . . . . . . . . . . . . . . . . . . . . . . . . . . . . . . . 73
Restoring factory default settings . . . . . . . . . . . . . . . . . . . . . . . . . . . . . . . . . . . . 73
Moving files to the projector
. . . . . . . . . . . . . . . . . . . . . . . . . . . . . . . . . . . . . . . 74
Deleting projector files . . . . . . . . . . . . . . . . . . . . . . . . . . . . . . . . . . . . . . . . . . . 74
Test Patterns . . . . . . . . . . . . . . . . . . . . . . . . . . . . . . . . . . . . . . . . . . . . . . . 75
Adding or removing test patterns from the preferred test patterns pane
Turning a test pattern on or off
. . . . . . . . . 75
. . . . . . . . . . . . . . . . . . . . . . . . . . . . . . . . . . . . . 75
Displaying a full screen test pattern . . . . . . . . . . . . . . . . . . . . . . . . . . . . . . . . . . 75
Viewing 3D Content . . . . . . . . . . . . . . . . . . . . . . . . . . . . . . . . . . . . . . . . . . 76
Display requirements . . . . . . . . . . . . . . . . . . . . . . . . . . . . . . . . . . . . . . . . . . . . 76
3D sync terminal pin map . . . . . . . . . . . . . . . . . . . . . . . . . . . . . . . . . . . . . . . . . 76
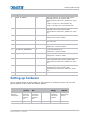
Setting up hardware . . . . . . . . . . . . . . . . . . . . . . . . . . . . . . . . . . . . . . . . . . . . . 77
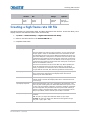
Creating a high frame rate 3D file . . . . . . . . . . . . . . . . . . . . . . . . . . . . . . . . . . . . 78
Editing the default 3D lamp file
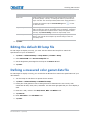
. . . . . . . . . . . . . . . . . . . . . . . . . . . . . . . . . . . . . 79
Defining a measured color gamut data file . . . . . . . . . . . . . . . . . . . . . . . . . . . . . . 79
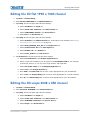
Editing the 3D flat 1998 x 1080 channel
Editing the 3D scope 2048 x 858 channel
. . . . . . . . . . . . . . . . . . . . . . . . . . . . . . . 80
. . . . . . . . . . . . . . . . . . . . . . . . . . . . . . 80
Displaying 3D diagnostic test patterns . . . . . . . . . . . . . . . . . . . . . . . . . . . . . . . . . 81
Verifying 3D cinema content
Troubleshooting 3D
. . . . . . . . . . . . . . . . . . . . . . . . . . . . . . . . . . . . . . . 82
. . . . . . . . . . . . . . . . . . . . . . . . . . . . . . . . . . . . . . . . . . . . . 82
Reversed 3D effect (Pseudo 3D) . . . . . . . . . . . . . . . . . . . . . . . . . . . . . . . . . . . 82
CP2208 User Manual
020-101916-02 Rev. 1 (08-2015)
8
Table of Contents
Image is too dark . . . . . . . . . . . . . . . . . . . . . . . . . . . . . . . . . . . . . . . . . . . . . 82
No 3D effect . . . . . . . . . . . . . . . . . . . . . . . . . . . . . . . . . . . . . . . . . . . . . . . . 83
Ghosting / cross-talk
. . . . . . . . . . . . . . . . . . . . . . . . . . . . . . . . . . . . . . . . . . 83
Motion artifacts . . . . . . . . . . . . . . . . . . . . . . . . . . . . . . . . . . . . . . . . . . . . . . 83
Disturbing flashing in one eye . . . . . . . . . . . . . . . . . . . . . . . . . . . . . . . . . . . . 83
Maintenance . . . . . . . . . . . . . . . . . . . . . . . . . . . . . . . . . . . . . . . . . . . . . . . . 84
Inspecting ventilation . . . . . . . . . . . . . . . . . . . . . . . . . . . . . . . . . . . . . . . . . . . . 84
Inspecting the lamp . . . . . . . . . . . . . . . . . . . . . . . . . . . . . . . . . . . . . . . . . . . . . 84
Inspecting and cleaning optics . . . . . . . . . . . . . . . . . . . . . . . . . . . . . . . . . . . . . . 84
Safety precautions . . . . . . . . . . . . . . . . . . . . . . . . . . . . . . . . . . . . . . . . . . . . 85
Recommended service kit . . . . . . . . . . . . . . . . . . . . . . . . . . . . . . . . . . . . . . . 85
Cleaning the lens . . . . . . . . . . . . . . . . . . . . . . . . . . . . . . . . . . . . . . . . . . . . . 85
Replacing the lamp . . . . . . . . . . . . . . . . . . . . . . . . . . . . . . . . . . . . . . . . . . . . . . 86
Removing the existing lamp . . . . . . . . . . . . . . . . . . . . . . . . . . . . . . . . . . . . . . 86
Installing the new lamp . . . . . . . . . . . . . . . . . . . . . . . . . . . . . . . . . . . . . . . . . 89
Inspecting the card cage filter . . . . . . . . . . . . . . . . . . . . . . . . . . . . . . . . . . . . . . 91
Inspecting the light engine compartment filter . . . . . . . . . . . . . . . . . . . . . . . . . . . 91
Cleaning a washable filter . . . . . . . . . . . . . . . . . . . . . . . . . . . . . . . . . . . . . . . . . 93
Replacing the lens
. . . . . . . . . . . . . . . . . . . . . . . . . . . . . . . . . . . . . . . . . . . . . . 94
Troubleshooting . . . . . . . . . . . . . . . . . . . . . . . . . . . . . . . . . . . . . . . . . . . . . 95
Projector functionality . . . . . . . . . . . . . . . . . . . . . . . . . . . . . . . . . . . . . . . . . . . . 95
Projector does not turn on . . . . . . . . . . . . . . . . . . . . . . . . . . . . . . . . . . . . . . . 95
Touch panel controller
. . . . . . . . . . . . . . . . . . . . . . . . . . . . . . . . . . . . . . . . . 95
Cannot establish communication with projector
. . . . . . . . . . . . . . . . . . . . . . . . 95
Lamp functionality . . . . . . . . . . . . . . . . . . . . . . . . . . . . . . . . . . . . . . . . . . . . . . 96
Lamp does not ignite
. . . . . . . . . . . . . . . . . . . . . . . . . . . . . . . . . . . . . . . . . . 96
Lamp suddenly turns off . . . . . . . . . . . . . . . . . . . . . . . . . . . . . . . . . . . . . . . . 96
LiteLOC™ not working . . . . . . . . . . . . . . . . . . . . . . . . . . . . . . . . . . . . . . . . . . 96
Display issues . . . . . . . . . . . . . . . . . . . . . . . . . . . . . . . . . . . . . . . . . . . . . . . . . 96
Flicker, shadows, or dimness . . . . . . . . . . . . . . . . . . . . . . . . . . . . . . . . . . . . . 96
Blank screen, no display of cinema image . . . . . . . . . . . . . . . . . . . . . . . . . . . . 97
Severe motion artifacts . . . . . . . . . . . . . . . . . . . . . . . . . . . . . . . . . . . . . . . . . 97
Image appears vertically stretched or squeezed into center of screen . . . . . . . . . 97
Inaccurate display colors . . . . . . . . . . . . . . . . . . . . . . . . . . . . . . . . . . . . . . . . 97
Display is not rectangular . . . . . . . . . . . . . . . . . . . . . . . . . . . . . . . . . . . . . . . 97
Display is noisy . . . . . . . . . . . . . . . . . . . . . . . . . . . . . . . . . . . . . . . . . . . . . . 98
Display has suddenly frozen
CP2208 User Manual
020-101916-02 Rev. 1 (08-2015)
. . . . . . . . . . . . . . . . . . . . . . . . . . . . . . . . . . . . . 98
9
Table of Contents
The projector is on, but alternate content does not display
The display is jittery or unstable
. . . . . . . . . . . . . . . . 98
. . . . . . . . . . . . . . . . . . . . . . . . . . . . . . . . . . 98
Portions of the display are cut off or warped to the opposite edge . . . . . . . . . . . . 98
Inconsistent picture quality . . . . . . . . . . . . . . . . . . . . . . . . . . . . . . . . . . . . . . 98
Projector Specifications . . . . . . . . . . . . . . . . . . . . . . . . . . . . . . . . . . . . . . . 99
Display . . . . . . . . . . . . . . . . . . . . . . . . . . . . . . . . . . . . . . . . . . . . . . . . . . . . . . 99
Panel resolution and refresh rate . . . . . . . . . . . . . . . . . . . . . . . . . . . . . . . . . . 99
Achievable brightness (measured at screen center) . . . . . . . . . . . . . . . . . . . . . . 99
Achievable contrast ratio
. . . . . . . . . . . . . . . . . . . . . . . . . . . . . . . . . . . . . . . 99
Color and gray scale . . . . . . . . . . . . . . . . . . . . . . . . . . . . . . . . . . . . . . . . . . . 99
White point . . . . . . . . . . . . . . . . . . . . . . . . . . . . . . . . . . . . . . . . . . . . . . . . 100
Gamma
. . . . . . . . . . . . . . . . . . . . . . . . . . . . . . . . . . . . . . . . . . . . . . . . . . 100
Control signal compatibility . . . . . . . . . . . . . . . . . . . . . . . . . . . . . . . . . . . . . . . 100
Ethernet port . . . . . . . . . . . . . . . . . . . . . . . . . . . . . . . . . . . . . . . . . . . . . .
100
RS232-PIBS1 . . . . . . . . . . . . . . . . . . . . . . . . . . . . . . . . . . . . . . . . . . . . . .
100
3D terminal . . . . . . . . . . . . . . . . . . . . . . . . . . . . . . . . . . . . . . . . . . . . . . . . 100
Touch panel controller . . . . . . . . . . . . . . . . . . . . . . . . . . . . . . . . . . . . . . . . . . . 101
Power requirements . . . . . . . . . . . . . . . . . . . . . . . . . . . . . . . . . . . . . . . . . . . . 101
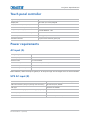
AC input (A)
. . . . . . . . . . . . . . . . . . . . . . . . . . . . . . . . . . . . . . . . . . . . . . . 101
UPS AC input (B) . . . . . . . . . . . . . . . . . . . . . . . . . . . . . . . . . . . . . . . . . . . . 101
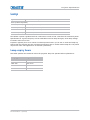
Lamp . . . . . . . . . . . . . . . . . . . . . . . . . . . . . . . . . . . . . . . . . . . . . . . . . . . . . . 102
Lamp expiry hours . . . . . . . . . . . . . . . . . . . . . . . . . . . . . . . . . . . . . . . . . . . 102
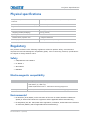
Physical specifications . . . . . . . . . . . . . . . . . . . . . . . . . . . . . . . . . . . . . . . . . . . 103
Regulatory . . . . . . . . . . . . . . . . . . . . . . . . . . . . . . . . . . . . . . . . . . . . . . . . . . . 103
Safety
. . . . . . . . . . . . . . . . . . . . . . . . . . . . . . . . . . . . . . . . . . . . . . . . . . . 103
Electro-magnetic compatibility . . . . . . . . . . . . . . . . . . . . . . . . . . . . . . . . . . . . . 103
Environmental . . . . . . . . . . . . . . . . . . . . . . . . . . . . . . . . . . . . . . . . . . . . . . 103
Certification . . . . . . . . . . . . . . . . . . . . . . . . . . . . . . . . . . . . . . . . . . . . . . . . 104
Environment . . . . . . . . . . . . . . . . . . . . . . . . . . . . . . . . . . . . . . . . . . . . . . . . . 104
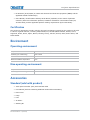
Operating environment . . . . . . . . . . . . . . . . . . . . . . . . . . . . . . . . . . . . . . . . 104
Non-operating environment . . . . . . . . . . . . . . . . . . . . . . . . . . . . . . . . . . . . . 104
Accessories . . . . . . . . . . . . . . . . . . . . . . . . . . . . . . . . . . . . . . . . . . . . . . . . . . 104
Standard (sold with product) . . . . . . . . . . . . . . . . . . . . . . . . . . . . . . . . . . . . 104
Accessories . . . . . . . . . . . . . . . . . . . . . . . . . . . . . . . . . . . . . . . . . . . . . . . . 105
CP2208 User Manual
020-101916-02 Rev. 1 (08-2015)
10
Installing and Setting Up
This manual is intended for professionally trained operators of Christie high-brightness projection
systems. These operators are qualified to replace the lamp and air filter, but should not attempt to
install or service the projector.
Only accredited Christie technicians who are knowledgeable about the hazards associated with
high-voltage, ultraviolet exposure, and the high temperatures generated by the projector lamp are
authorized to assemble, install, and service the projector. In addition, only Christie accredited
personnel are authorized to perform security procedures such as marriage.
This section provides information and procedures for positioning and installing the projector.
Safety precautions
When installing the projector, observe these important safety rules to avoid personal injury or
damage to the projector:
Warning! Failure to comply with the following could result in serious injury.
• Never look directly into the projector lens or at the lamp. The extremely high brightness can cause
permanent eye damage. For protection from ultraviolet radiation, keep all projector housings intact
during operation. Protective safety clothing and safety goggles are recommended when servicing.
• FIRE HAZARD! Keep hands, clothes, and all combustible material away from the concentrated light
beam of the lamp.
Danger! Failure to comply with the following results in serious injury.
Position all cables where they cannot contact hot surfaces or be pulled or tripped over.
This projector must be operated in an environment that meets the operating range specification, as
listed in Projector Specifications on page 99.
CP2208 User Manual
020-101916-02 Rev. 1 (08-2015)
11
Installing and Setting Up
AC/power precautions
Warning! Failure to comply with the following could result in serious injury.
• Use only the AC power cord that is provided with the projector. DO NOT attempt operation if the AC
supply is not within the specified voltage and power range.
• As a safety feature the projector is equipped with a three-wire plug with a third (grounding) pin. If
you are unable to insert the plug into the outlet, contact an electrician to have the outlet replaced.
DO NOT defeat the safety purpose of the grounding-type plug.
• DO NOT attempt operation if the AC supply is not within the rated voltage range, as specified on
the license label.
• Disconnect projector from AC before opening any enclosure.
Caution! Failure to comply with the following could result in minor or moderate injury.
• DO NOT allow anything to rest on the power cord. Locate the projector where the cord cannot be
damaged by persons walking on it or objects rolling over it. Never operate the projector if the
power cable appears damaged in any way.
• DO NOT overload power outlets and extension cords as this can result in fire or shock hazards.
• Only qualified service technicians are permitted to open projector enclosures and only if the
projector is disconnected from AC power.
Power cords and attachments
Warning! Failure to comply with the following could result in serious injury.
• A power cord rated for your region is provided with each projector. Ensure that you are using a
power cord, socket, and power plug that meets the appropriate local rating standards. Use only an
AC power cord recommended by Christie.
• DO NOT attempt operation if the AC supply and cord are not within the specified voltage and power
range.
• Use only the attachments and/or accessories recommended by Christie. Use of others may result
in the risk of fire, shock and personal injury.
• Position the projector where the appliance coupler or main supply plug on the power cord can be
easily accessible.
CP2208 User Manual
020-101916-02 Rev. 1 (08-2015)
12
Installing and Setting Up
Lamp precautions
Danger! Failure to comply with the following results in serious injury.
• EXPLOSION HAZARD! Lamp may explode causing bodily harm or death. Always wear protective
clothing whenever lamp door is open or while handling lamp. Ensure those within the vicinity of the
projector are also suited with protective clothing. Never attempt to access the lamp while the lamp
is ON. Wait at least 15 minutes after the lamp turns OFF before powering down, disconnecting from
AC and opening the lamp door.
• Never open the lamp door unless you are wearing protective clothing such as that included in a
Christie Protective Clothing Safety Kit (P/N: 598900-095). Recommended protective clothing
includes, but may not be limited to a polycarbonate face shield, protective gloves, and a quilted
ballistic nylon jacket or a welder’s jacket. Christie’s protective clothing recommendations are
subject to change. Any local or federal specifications take precedence over Christie
recommendations.
• Never attempt to remove the lamp directly after use. Any lamp used in the CP2208 is under high
pressure when hot or cold and may explode causing personal injury and /or property damage, and
must be handled with great care at all times. Lamps may explode if dropped or mishandled.
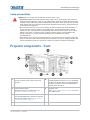
Projector components - front
A
Touch panel controller (TPC)
E
A touch-sensitive screen used to control the
projector.
B
Communications Panel
Located behind the air filter cover is a replaceable
air filter. The air filter filters the intake air before
it begins circulating in the front compartment to
cool the main electronics.
F
External devices are connected here. See
Projector connections on page 24.
C
Adjustable Feet
Air Filter Cover and Air Filter
Projector Lens
See Projector Specifications on page 99 for a list
of available lenses.
G
Lens Surround
H
Top Lid
Turn the adjustable feet to increase or decrease
the projector height. See Adjusting tilt and
level the projector on page 17.
D
Air Filter
CP2208 User Manual
020-101916-02 Rev. 1 (08-2015)
13
Installing and Setting Up
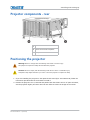
Projector components - rear
A
Service Access Door
B
Power Cord and AC Receptacle
C
Lamp Access Door
Positioning the projector
Warning! Failure to comply with the following could result in serious injury.
Two people are required to safely lift and install the projector.
Caution! Failure to comply with the following could result in minor or moderate injury.
Complete a lamp adjust whenever you move or level the projector or replace the lamp.
1. If you are installing the projector in the optional rack stand (P/N: 108-416102-XX) follow the
instructions provided with the rack stand to install it.
2. Position the projector so it is centered and parallel with the theatre screen. If space is limited,
aim the projector slightly off-center and use lens offset to center the image on the screen.
CP2208 User Manual
020-101916-02 Rev. 1 (08-2015)
14
Installing and Setting Up
Stacking projectors
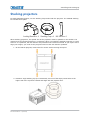
To stack CP2208 projectors, use the stacking kit provided with the projector. The CP2208 stacking
kit includes these parts:
Locking Bracket x 4
Stacking Cup x 4
M6 Screw x 4
When stacking projectors, the optical axis of the projectors must be parallel to one another. The
maximum tilt for stacked projectors is 13 degrees. When you install the stacked projectors in a rack
stand or on a pedestal, the rack stand or the pedestal must remain horizontal. If you require tilt to
align your images, you must tilt the projectors and not the rack stand or pedestal.
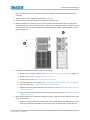
1. On the bottom projector, remove the four corner screws securing the top lid.
2. Position a single stacking cup (011-104349-XX) over one of the empty screw holes so the
higher side of the cup faces outward and aligns with the projector skin.
CP2208 User Manual
020-101916-02 Rev. 1 (08-2015)
15
Installing and Setting Up
3. Insert an M6 screw (012-101132-XX) through the stacking cup mounting hole and into the
projector.
4. With a torque wrench, tighten the M6 screw to 15 in-lb.
5. Repeat steps 3 to 5 to install the three remaining stacking cups.
6. With the assistance of another person, lift the second projector and position it on top of the
bottom projector so each of its feet fit into a stacking cup. The lenses of both projectors must
face the same direction and the optical axis of both projector lenses must be parallel (A) and
align vertically (B).
7. Complete the installation for both projectors, including:
a. Install the touch panel controller. See Installing the touch panel controller on page 18.
b. Install the lens. See Installing the lens on page 18.
c. Install the lamp. See Installing the lamp on page 20.
d. Connect devices to the projector. See Connecting devices to the projector on page 23.
e. Connect power. See Turning the projector on on page 27.
f. Adjust the bottom projector image to fit the screen. See Adjusting the image to fit the
screen on page 30.
g. Align the top projector image to the bottom projector image. See Aligning dual projector
images on page 32.
8. When both projectors are installed and aligned correctly, install the locking brackets on the feet
of the top projector:
a. Slide the locking bracket (011-104470-XX) over the flat sides of the stacking cup, so the
notch in the locking bracket fits around the projector leg and above projector foot nut.
CP2208 User Manual
020-101916-02 Rev. 1 (08-2015)
16
Installing and Setting Up
b. Turn the locking bracket so the flanges of the locking bracket fit tightly below the
stacking cup tabs.
c. Repeat steps a and b to install the three remaining locking brackets.
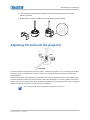
Adjusting tilt and level the projector
To ensure optimum performance of the projector, install the projector so it is centered and parallel
with the screen. To compensate for tilt or offset, you can adjust the projector feet and the lens
mount position.
To adjust the height of the projector, loosen the lock nut on the adjustable feet on the bottom of the
projector and then extend or retract the feet. When the adjustment is correct, tighten the lock nut.
Use the lens mount to align the images of stacked projectors and not projector tilt. If tilt is required
to fit the image to the screen, tilt only the lower projector.
The front-to-back tilt of the projector must not exceed 15°.
CP2208 User Manual
020-101916-02 Rev. 1 (08-2015)
17
Installing and Setting Up
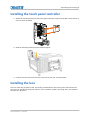
Installing the touch panel controller
1. Attach the mounting bracket to the touch panel controller using the three M4 screws and the 3
mm hex driver provided.
2. Slide the mounting bracket into the bracket support.
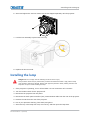
3. Connect the connector from the TPC to the port on the rear of the projector.
Installing the lens
The lens seals the projection head, preventing contaminants from entering the main electronics
area. Do not operate the projector without a lens installed. Install a lens plug when you install or
transport the projector.
CP2208 User Manual
020-101916-02 Rev. 1 (08-2015)
18
Installing and Setting Up
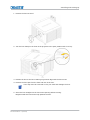
1. Remove the lens surround.
2. Turn the lens clamp on the front of the projector to the open position with a hex key.
3. Position the lens so the lens retaining ring mounts align with the lens mount.
4. Remove the lens caps from the front and rear of the lens.
Lens caps must be removed or they can melt and damage the lens.
5. Insert the lens straight into the lens mount opening without turning.
Magnets inside the lens mount help position the lens.
CP2208 User Manual
020-101916-02 Rev. 1 (08-2015)
19
Installing and Setting Up
6. Insert and tighten the two lens mount hex screws shipped separately with the projector.
7. Lock the lens assembly in place with a hex key.
8. Replace the lens surround.
Installing the lamp
Danger! Failure to comply with the following results in serious injury.
This procedure should only be performed by a Christie accredited technician. High-pressure lamp
may explode if improperly handled. Always wear approved protective safety clothing whenever the
lamp door is open or when handling the lamp.
1. If the projector is operating, turn it off and allow it to cool a minimum of 15 minutes.
2. Turn the breaker switch for the projector off.
3. Disconnect the projector from AC power.
4. Disconnect the touch panel controller (TPC) communication cable from the rear of the projector.
5. Remove the TPC from the rear of the projector.
6. Put on your protective clothing, face shield, and gloves.
7. Insert the key in the lamp door lock, turn the key, and then open the lamp door.
CP2208 User Manual
020-101916-02 Rev. 1 (08-2015)
20
Installing and Setting Up
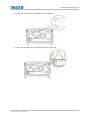
8. Loosen the two thumbscrews and open the fire wall door.
9. Loosen the two thumbscrews and open the lamp access door.
CP2208 User Manual
020-101916-02 Rev. 1 (08-2015)
21
Installing and Setting Up
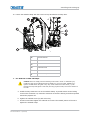
10. Loosen the cathode clamp with the 5 mm hex key attached to the lamp door.
A
Anode Terminal
B
Anode Wire
C
Reflector
D
Cathode Screw
E
Cathode Nut
F
Cathode Clamp
11. For CDXL-14 or CDXL-16 lamps:
Caution! Failure to comply with the following could result in minor or moderate injury.
Handle the lamp by the cathode/anode end shafts only, never the glass. DO NOT overtighten. DO NOT stress the glass in any way. Check leads. Ensure the anode (+) lead
between the lamp and igniter is well away from any projector metal, such as the reflector or
fire wall.
a. Install the lamp extension nut on the cathode clamp. To provide access to the locking
screw on the extension nut, rotate the extension nut until the locking screw faces upward
toward the projector lid.
b. Tighten the cathode screw (D) with a hex key.
c. Thread on and hand-tighten the cathode nut. Ensure the smooth portion of the nut is
against the cathode clamp.
CP2208 User Manual
020-101916-02 Rev. 1 (08-2015)
22
Installing and Setting Up
d. Hold the anode end of the new lamp in your left hand and angle it up through the hole in
the back of the reflector assembly. Insert your right index and middle finger through the
back of the reflector and thread the cathode end of the lamp into the extension nut.
When threading the lamp into the extension nut, make sure the anode wire does not hit
the reflector or the UV filter.
e. Tighten the extension nut screw.
f. Move to step 13.
12. For CDXL-19SC or CDXL-21S1 lamps:
a. Hold the anode end of the new lamp in your left hand and angle it up through the hole in
the back of the reflector assembly. Insert your right index and middle finger through the
back of the reflector and guide the lamp onto the cathode clamp. Be careful not to hit the
lamp against the reflector
b. Thread on and hand-tighten the cathode nut. Ensure the smooth portion of the nut is
against the cathode clamp.
c. Tighten the cathode screw (D) with a hex key.
13. Align the ring terminal on the anode wire with the mounting position ensuring the crimped side
of the wire is facing out. Tighten the anode screw. Route anode lead away from nearby metal
surfaces.
14. Close the lamp access door and tighten the two thumbscrews.
15. Close the fire wall door and tighten the two thumbscrews.
16. Close and lock the rear access door. Ensure the hex key is placed back into its holder before
closing the rear access door.
Connecting devices to the projector
To display content, you must connect a device that is capable of storing or playing content to the
projector.
CP2208 User Manual
020-101916-02 Rev. 1 (08-2015)
23
Installing and Setting Up
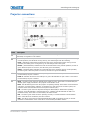
Projector connections
Item Description
A
Indicates the status of the regulator. A solid blue LED indicates the regulator is enabled. If the LED is not
illuminated, the regulator is not enabled.
B
• SOFTST - (Software State) Indicates the state of the software application running on the ICP. During
normal operation, this LED blinks. During start up, the LED changes from off to blinking.
• OSST - (Operating System State) Indicates the state of the ICP operating system. During normal
operation, the LED is green. During start up, the LED changes from off to green.
• FMTST - (FMT FPGA State) Indicates the state of the FMT FPGA. During normal operation, the LED is
green. When the power is turned on, the LED turns green immediately.
• ICPST - (ICP FPGA State) Indicates the configured state of the ICP FPGA. During normal operation,
the LED is green. When the power is turned on, the LED turns green immediately.
C
• PORT B - Indicates the status of the USB port. A green LED indicates the port is active. If the LED is
not illuminated, the port is inactive.
• PORT A - Indicates the status of the USB port. A green LED indicates the port is active. If the LED is
not illuminated, the port is inactive.
D
• STBY - The LED is green when the standby power supply is active. If the LED is not illuminated, the
standby power supply has failed or the projector circuit breaker is off.
• RUN - The LED flashes green when the projector is operating normally. If the LED is not illuminated or
solid green, a communication, software, or hardware error has occurred. If the LED is yellow, the
projector cannot communicate with the touch panel controller (TPC).
• PIB - The LED is green when the Projector Intelligence Board (PIB) is detected and operating
correctly. A red LED indicates a communication error. A flashing red LED indicates the PIB is not
installed correctly. If the LED is not illuminated, the PIB is inactive.
• ICP - The LED is green when the ICP is operating correctly. A red LED indicates a communication
issue. If the LED is not illuminated, the ICP is inactive.
• IMB - The LED is green when the Integrated Media Block (IMB) is operating correctly. A red LED
indicates a communication issue. If the LED is not illuminated, the IMB is inactive.
CP2208 User Manual
020-101916-02 Rev. 1 (08-2015)
24
Installing and Setting Up
Item Description
E
Indicates marriage status. In full power mode, a green LED indicates that the projector is properly
married and encrypted content can be displayed. A red LED indicates marriage is broken and encrypted
content cannot be displayed.
F
Turns the projector and the lamp on and opens the douser. Press and hold the button to close the douser,
turn the lamp off, and keep the power on. It is recommended that you use this button only when the TPC
is unavailable.
G
Resets the projector electronics. After restarting, the projector returns to its previous power mode. You
must strike the lamp manually.
H
Connects the projector to 3D devices such as MasterImage or RealD.
I
Connects the projector to Christie or third-party automation equipment. Utilizes the Christie-proprietary
protocol.
J
Connects the projector to a 10Base-T/100Base-TX Ethernet connection.
K
Connects the projector to high-definition cinema sources. The connectors can be used together to deliver
Dual Link HD-SDI following the SMPTE 372M standard.
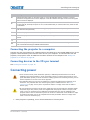
Connecting the projector to a computer
Connect one end of an Ethernet or a RS232 cable to the Ethernet or the RS232 PIBS1 ports on the
projector communications panel and the other end to your computer. To communicate with the
projector, the projector must be added to the same network as the computer. See Adding the
projector to a network on page 28.
Connecting devices to the 3D sync terminal
See Viewing 3D Content on page 76.
Connecting power
• In all countries with IT power distribution systems, a dedicated protected earth wire must be
installed on the projector before it can be connected to power. To connect the projector to an IT
power distribution system you must connect the building ground to the external ground lug next to
the AC receptacle on the rear corner of the projector.
• The dedicated earth wire can only be installed by a Christie accredited service technician or an
electrician. The protected earth wire must be green/yellow 12 AWG minimum. See Power
requirements on page 101 for power requirements. Failure to comply could result in death or
serious injury.
• Do not operate the projector if the AC power supply and cord are not within the specified voltage
and power range. Only use the power cord supplied with the projector. Failure to comply could
result in minor or moderate injury.A dedicated, protected earth wire must be installed on the
projector before it can be connected to power. You must use a 20A branch circuit breaker for Input
A. Install the projector near an AC receptacle that is easily accessible. Failure to comply could
result in minor or moderate injury.
1. If the projector is operating, turn it off and disconnect it from AC power.
CP2208 User Manual
020-101916-02 Rev. 1 (08-2015)
25
Installing and Setting Up
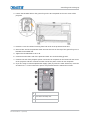
2. Loosen the threaded bolt on the ground lug on the AC receptacle on the rear corner of the
projector.
3. Remove 15 mm of insulated covering from both ends of the protected earth wire.
4. Insert a bare end of the protected earth wire into the hole on the top of the ground lug so it is
beneath the threaded bolt.
5. Tighten the threaded bolt to 50 in-lb.
6. Connect the other bare end of the protected earth wire to the building ground.
7. Connect one end of the projector power cord to the AC receptacle on the lower-left rear corner
of the projector and then connect the other end of the power cord to an AC receptacle.
8. If you are using an Uninterrupted Power Supply (UPS) to power the main electronics, move the
AC switch to A + B and connect the power cord provided with the UPS to the B outlet.
CP2208 User Manual
020-101916-02 Rev. 1 (08-2015)
A
AC Switch
B
100-240V secondary inlet
C
200-240V main inlet
26
Installing and Setting Up
Turning the projector on
Warning! Failure to comply with the following could result in serious injury.
DO NOT attempt to turn the projector on if the AC supply is not within the specified voltage range.
See Projector Specifications on page 99 for power requirements.
1. Ensure the circuit breaker for the projector is on.
2. On the touch panel controller (TPC), tap and hold the green power (
) icon.
Logging on to the projector
1. On the touch panel controller (TPC), tap Menu > Login.
2. Select a user name in the Username list. To view the permissions associated with each account
see Interpreting user access permissions on page 70.
3. Enter your password.
4. Tap Login.
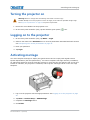
Activating marriage
You must complete marriage to display encrypted content and to comply with Digital Cinema
System Specification (the DCI specification). You cannot complete marriage remotely. In addition,
an authorized employee must be physically present to verify that the anti-tamper seal on the card
firewall is unbroken, the projector is unaltered, and to tap the marriage button on the card cage
faceplate.
1. Log on to the projector with marriage permissions. See Logging on to the projector on page
27.
2. Tap Menu > Service Setup > IMB Marriage.
3. Complete the Marriage wizard.
4. Click Finish.
CP2208 User Manual
020-101916-02 Rev. 1 (08-2015)
27
Installing and Setting Up
Adding the projector to a network
1. On the touch panel controller (TPC), tap Menu > Login.
2. Select an administrator account in the Username list.
3. Enter a password in the Password field and then tap Login.
4. Tap Menu > Administrator Setup > Communications Configuration.
5. Complete these fields:
Field
Description
Device Name
The name of the projector.
IP Address
The IP address of the projector.
Subnet Mask
The subnet mask to which the address belongs.
Gateway
The IP address for the network gateway.
Apply
Applies Ethernet settings.
Serial Speed (Baud)
The baud rate of the serial port. The default is 115200.
Enable SNMP
Enables SNMP.
SNMP V2 / SNMP V3
The SNMP protocol type. Contact Christie for the SNMP V3 user ID and
password.
Management IP
The IP address where SNMP information and notifications are sent.
Download MIB to USB
Sends the SNMP Management Information Base (MIB) file to a USB flash
drive.
Apply
Applies SNMP settings.
Serial Access
Grants access to serial connections.
Ethernet Access
Grants access to Ethernet connections.
Adding the lamp information to the lamp history
1. If the lamp is on, tap the lamp off (
) icon to turn it off.
2. Tap Menu > Advanced Setup > Lamp Change Wizard.
3. Tap Next.
4. Complete these fields:
Field
Description
Type
The lamp type.
Serial Number
The lamp serial number.
Reason for Change
The reason the lamp was changed.
CP2208 User Manual
020-101916-02 Rev. 1 (08-2015)
28
Installing and Setting Up
Field
Description
Lamp Expiry (Hours)
The number of hours the lamp can operate before replacement.
This field is auto-populated.
Hours Used
The number of hours the lamp has operated before installation.
5. Tap Save.
6. Tap Next.
Turning the lamp on
On the projector touch panel controller (TPC) tap the lamp on (
) icon.
Aligning the lamp
1. Tap Menu > Advanced Setup > Lamp Power.
2. Verify the value in the Power% field is at a level suitable for your requirements.
3. Tap Menu > Advanced Setup > Light Adjust.
4. Record the number in the Intensity field.
5. Tap Display Full Screen White Test Pattern.
6. Complete a coarse lamp adjustment:
a. Locate the Y axis adjustment label on the operator side of the projector.
CP2208 User Manual
020-101916-02 Rev. 1 (08-2015)
29
Installing and Setting Up
b. Insert a 5 mm hex driver through the louvers at an angle below the Y axis adjustment
label until it is firmly seated on the Y axis adjustment screw.
c. Turn the screw clockwise or counterclockwise until the value in the Intensity field peaks
and then reduces.
d. Remove the hex driver and repeat steps a to c to adjust the Z and X axis.
7. Complete a fine lamp adjustment:
a. Locate the Y axis adjustment label on the operator side of the projector.
b. Insert a 5 mm hex driver through the louvers until it is firmly seated on the Y axis
adjustment screw.
c. Turn the screw slowly clockwise or counterclockwise until you determine the highest
value.
d. Remove the hex driver and repeat steps a to c to adjust the Z and X axis.
8. Verify the value in the Intensity field is greater or equal to the number you recorded in step 4.
If value is lower, repeat steps 6 and Step 7.
Adjusting the image to fit the screen
This procedure must be completed before you complete a boresight adjustment.
1. Verify the projector is properly positioned relative to the screen. See Positioning the projector
on page 14.
2. Display a RGB-12bit-Full Screen White test pattern and center the image:
a. Tap the Test Pattern (
) icon in the task bar.
b. Tap All Test Patterns.
c. Tap RGB-12bit-Full Screen White.
CP2208 User Manual
020-101916-02 Rev. 1 (08-2015)
30
Installing and Setting Up
d. On the projector touch panel controller (TPC), tap the Lens Adjust (
) icon on the
main screen and then tap the left (
), right (
), up (
), or down (
) arrow icons
in the Offset area until the light created by the projector is centered on the screen.
3. Display the DC2K Framing2 test pattern:
a. On the projector TPC, tap the Test Pattern (
) icon in the task bar.
b. Tap All Test Patterns.
c. Tap DC2K Framing2.
4. On the projector TPC, tap the Lens Adjust (
) icon on the main screen and then tap the left
(
), right (
), up (
), or down (
) arrow icons in the Offset area to refine the position
of the test pattern on the screen.
5. In the Zoom area, tap the positive (
) and minus (
) icons until the image fits your screen.
6. In the Focus area, tap the left (
) and right (
) focus icons until the test pattern details are
in focus. When your adjustment is complete, the words and lines in the test pattern should be
distinguishable uniformly across the screen and there should not be any sections that are out of
focus.
7. With the framing test pattern displayed, re-check projector leveling so the top edge of the
image is parallel to the top edge of the screen.
8. Display a full white test pattern:
a. On the TPC, tap the Test Pattern (
) icon in the task bar.
b. Tap All Test Patterns.
c. Tap RGB-12bit-Full Screen White.
9. If the test pattern is focused and centered on the screen you do not need to complete further
image adjustment. If the image is not focused and centered on the screen, complete one of
these procedures:
a. See Correcting keystone effect on page 34 if the image appears distorted and resembles
a trapezoid.
b. See Correcting vignetting on page 36 or Aligning the lamp on page 29 if the image is
brighter at the center than it is at the sides.
c. See Adjusting fold mirror on page 40 if a corner or edge of an image is missing.
d. See Adjusting vertical boresight angle on page 37 if the image cannot be focused
uniformly on the screen with a focus adjustment.
e. See Adjusting horizontal boresight on page 38 if a large horizontal angular offset to the
screen is required.
CP2208 User Manual
020-101916-02 Rev. 1 (08-2015)
31
Installing and Setting Up
Aligning dual projector images
1. Stack the projectors. See Stacking projectors on page 15.
2. On the bottom projector, adjust the image to fit the screen. See Adjusting the image to fit the
screen on page 30.
3. On both projectors, turn the lamp on and open the douser. See Turning the lamp on on page
29.
4. On the top projector, display a RGB-12bit-Full Screen White test pattern and center the image:
a. Tap the Test Pattern (
) icon in the task bar.
b. Tap All Test Patterns.
c. Tap RGB-12bit-Full Screen White.
d. On the projector touch panel controller (TPC), tap the Lens Adjust (
) icon on the
main screen and then tap the left (
), right (
), up (
), or down (
) arrow icons
in the Offset area until the light created by the projector is centered on the screen.
5. On the top projector, display the DC2K Framing Green test pattern. See Turning a test
pattern on or off on page 75.
6. On the bottom projector, display the DC2K Framing Red test pattern. See pattern. See
Turning a test pattern on or off on page 75.
7. Align the top projector image horizontally to the bottom projector:
a. On the top projector, remove the locking brackets from the projector feet.
b. Move the front or the rear of the top projector to the right or left so the projected image
is aligned horizontally with the image of the bottom projector.
8. Align the top and bottom projector images vertically:
CP2208 User Manual
020-101916-02 Rev. 1 (08-2015)
32
Installing and Setting Up
a. Raise or lower the rear feet of the top projector so the projected images of both
projectors are vertically aligned. The lines appear yellow when the images are aligned
correctly.
b. Reinstall the locking brackets removed in step 7.
9. If the test pattern is focused and centered on the screen you do not need to complete further
image adjustment. If the image is not focused and centered on the screen, complete one of
these procedures:
a. See Correcting keystone effect on page 34 if the image appears distorted and resembles
a trapezoid.
b. See Correcting vignetting on page 36 or Aligning the lamp on page 29 if the image is
brighter at the center than it is at the sides.
c. See Adjusting fold mirror on page 40 if a corner or edge of an image is missing.
d. See Adjusting vertical boresight angle on page 37 if the image cannot be focused
uniformly on the screen with a focus adjustment.
e. See Adjusting horizontal boresight on page 38 if a large horizontal angular offset to the
screen is required.
Playing content
You can play encrypted and unencrypted content on the Christie CP2208 projector.
Playing unencrypted content
To play unencrypted content, connect the projector to a device with an HDMI to DVI connection. For
audio, connect the audio output cables to an audio processor. See the documentation included with
the device for detailed set up instructions.
Playing encrypted content
To play encrypted cinema content, an Integrated Media Block (IMB) is required. If you install the
optional IMB, you can connect the projector to a network-attached storage (NAS) or direct attached
storage (DAS) device.
CP2208 User Manual
020-101916-02 Rev. 1 (08-2015)
33
Adjusting the Image
This section provides information and procedures for adjusting the projector image.
Correcting keystone effect
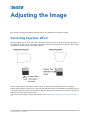
Keystone effect occurs when you project an image onto the screen at an angle and the projector is
not centered on the screen. The image will appear distorted and resemble a trapezoid. This image
identifies the different types of keystone effect:
If the image suffers from slight keystone effect, it can be corrected with electronic cropping.
If the keystone effect is severe, you can unevenly adjust the feet to compensate for projector tilt. It
is recommended that you use lens offset to align the center of the image to the center of the screen
before you correct the keystone effect.
If one side of the image is longer than another, see Adjusting tilt and level the projector on page
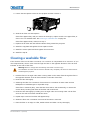
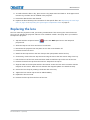
17.
CP2208 User Manual
020-101916-02 Rev. 1 (08-2015)
34
Adjusting the Image
Correcting dual projector horizontal keystone
1. On both projectors, turn the lamp on and open the douser. See Turning the lamp on on page
29.
2. Align the dual projector images. See Aligning dual projector images on page 32.
3. On the top projector, display the DC2K Framing Green test pattern. See Turning a test
pattern on or off on page 75.
4. On the bottom projector, display the DC2K Framing Red test pattern. See Turning a test
pattern on or off on page 75.
5. Verify that both projectors are level. See Adjusting tilt and level the projector on page 17.
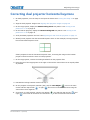
6. Identify which projector has the horizontal keystone issue. In this example, the top projector
has the horizontal keystone issue:
If both projectors have the horizontal keystone issue, correcting the image on the bottom
projector should resolve the issue on both projectors.
7. On the top projector, remove the locking brackets from the projector feet.
8. Move the rear of the top projector to the right or left until the vertical lines are as equally offset
as possible.
9. Reinstall the locking brackets removed in step 7.
10. On the projector touch panel controller (TPC), tap the Lens Adjust (
) icon on the main
screen and then tap the left (
) or right (
) arrow icons in the Offset area to bring the
vertical lines closer together.
11. If required, on each projector, tap the Lens Adjust (
) icon and then tap the left (
) and
right (
) focus icons in the Focus area until both images are the same size and focused.
CP2208 User Manual
020-101916-02 Rev. 1 (08-2015)
35
Adjusting the Image
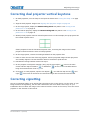
Correcting dual projector vertical keystone
1. On both projectors, turn the lamp on and open the douser. See Turning the lamp on on page
29.
2. Align the dual projector images. See Aligning dual projector images on page 32.
3. On the top projector, display the DC2K Framing Green test pattern. See Turning a test
pattern on or off on page 75.
4. On the bottom projector, display the DC2K Framing Red test pattern. See Turning a test
pattern on or off on page 75.
5. Identify which projector has the vertical keystone issue. In this example, the top projector has
the vertical keystone issue:
If both projectors have the horizontal keystone issue, correcting the image on the bottom
projector should resolve the issue on both projectors.
6. On the top projector, remove the locking brackets from the projector feet.
7. Raise or lower the rear feet of the top projector until the projected images of both projectors
are vertically aligned. The feet should be raised or lowered an equal amount.
8. Reinstall the locking brackets removed in step 6.
9. On the projector touch panel controller (TPC), tap the Lens Adjust (
) icon on the main
screen and then tap the forward (
) or backward (
) arrow icons in the Offset area to
bring the horizontal lines closer together.
10. If required, on each projector, tap the Lens Adjust (
) icon and then tap the left (
) and
right (
) focus icons in the Focus area until both images are the same size and focused.
Correcting vignetting
The term vignetting applies to an image that is brighter at the center than it is at the sides. If your
image suffers from vignetting, the lens has reached the end of its offset travel range. If your
installation does not allow the image to be centered with the center of the screen, move the entire
projector in the direction of lens travel.
CP2208 User Manual
020-101916-02 Rev. 1 (08-2015)
36
Adjusting the Image
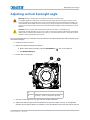
Adjusting vertical boresight angle
Warning! Failure to comply with the following could result in serious injury.
A boresight adjustment should only be made when the image cannot be focused uniformly on the
screen by aligning the projector to the screen and focusing the lens. When adjusting boresight, you
must maintain the boresight distance from the lens to the prism plane set by Christie. For example,
when you move the top screw outward, turn the bottom two boresight screws to maintain the overall
distance.
Caution! Failure to comply with the following could result in minor or moderate injury.
Only adjust vertical boresight 1/8 of a turn or less at one time to maintain optimal lens performance
(factory setup of absolute lens distance to the prism). It is critical that each turn of the cap screws is
tracked to ensure adjustments are accurate.
It is recommended that you complete a top and bottom boresight adjustment before adjusting the
horizontal boresight.
1. Remove the lens surround.
2. Display the DC2K Framing2 test pattern:
a. On the touch panel controller, tap the Test Pattern (
) icon in the task bar.
b. Tap DC2K Framing 2.
3. Loosen the set screw (B).
A
B
A
Cap Screw - Adjusts top and bottom boresight
B
Set Screw - Locks or unlocks the cap screw
4. Turn the vertical cap screw (A) 1/8 of a turn counter-clockwise.
5. Adjust both left and right horizontal adjusters by half the number of turns, in the opposite
direction of the vertical adjust. For example, if the vertical adjust cap screw was turned 1/8 of a
CP2208 User Manual
020-101916-02 Rev. 1 (08-2015)
37
Adjusting the Image
turn, the left and right horizontal cap screws should be turned 1/16 of a turn in the opposite
direction.
6. Check the screen each time an adjustment is made. If the quality of the projected image has
degraded, turn the vertical adjust cap screw 1/8 of turn clockwise. Ensure the left and right
horizontal adjusters are adjusted equally in the opposite direction to correct axial focus. The 1/
8 of a turn is a suggestion only and can be less if needed; however, it should never be
exceeded. Always compensate both left and right horizontal adjustments according to the
vertical adjustment.
7. Check the image after each adjustment. Continue to make adjustments until both top and
bottom are equally sharp. To make sure the lens is in the same relative position, adjust the left
and right horizontal adjusters in the opposite direction at the same time.
8. When the top and bottom of the image are equally in focus lock the set screw to hold it in
position. Recheck the image.
9. If additional adjustment is required, see Adjusting horizontal boresight on page 38.
10. Replace the lens surround.
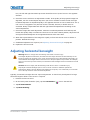
Adjusting horizontal boresight
Warning! Failure to comply with the following could result in serious injury.
A boresight adjustment should only be made when the image cannot be focused uniformly on the
screen by aligning the projector to the screen and focusing the lens. When adjusting boresight, you
must maintain the boresight distance from the lens to the prism plane set by Christie. For example,
when you move the top screw outward, turn the bottom two boresight screws to maintain the overall
distance.
Caution! Failure to comply with the following could result in minor or moderate injury.
Only adjust horizontal boresight 1/8 of a turn or less at one time to maintain optimal lens
performance (factory setup of absolute lens distance to the prism). It is critical that you count each
turn of the cap screws to ensure accurate adjustment.
Typically, horizontal boresight does not require adjustment. It should only be adjusted if a large
horizontal angular offset to the screen is required.
1. Remove the lens surround.
2. On the touch panel controller (TPC), tap the Test Pattern (
) icon in the task bar.
3. Tap All Test Patterns.
4. Tap DC2K Framing.
CP2208 User Manual
020-101916-02 Rev. 1 (08-2015)
38
Adjusting the Image
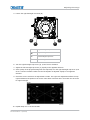
5. Loosen the right boresight set screw (B).
A
C
D
B
A
Right Boresight Cap Screw
B
Right Boresight Set Screw
C
Left Boresight Cap Screw
D
Left Boresight Set Screw
6. Turn the right boresight cap screw (A) 1/16 of a turn clockwise.
7. Adjust the left boresight cap screw (C) equally in the opposite direction.
8. If the quality of the projected image has not improved, turn the right boresight cap screw 1/16
of turn counter-clockwise. Make sure the left adjuster is adjusted equally in the opposite
direction.
9. Check the screen each time an adjustment is made. The right-side adjustments affect the top
right and bottom left points on the screen. Once both cross hairs are in focus lock the set screw
for right boresight.
10. Repeat Steps 5 to 7 for the left side.
CP2208 User Manual
020-101916-02 Rev. 1 (08-2015)
39
Adjusting the Image
11. Each corner of the screen should be equally in focus when horizontal boresight is completed
correctly. If necessary, repeat vertical boresight. Only adjust vertical boresight 1/8 of a turn or
less at one time to maintain optimal lens performance (factory setup of absolute lens distance
to the prism). It is critical that each turn of the cap screws is tracked to ensure adjustments are
accurate.
Adjusting DMD convergence
A convergence problem occurs when one or more projected colors (red, green, blue) appears
misaligned when examined with a convergence test pattern. Normally, the three colors should
overlap precisely to form pure white lines throughout the image and one or more poorly converged
individual colors may appear adjacent to some or all of the lines. Contact your Christie accredited
service technician to correct DMD convergence issues.
Adjusting fold mirror
If a corner or edge of an image is missing, the fold mirror might be misaligned with the optical
system. To correct this issue:
1. Remove the top lid and set it aside.
2. Display a full white test pattern:
a. On the touch panel controller (TPC), tap the Test Pattern (
) icon in the task bar.
b. Tap All Test Patterns.
c. Tap RGB-12bit-Full Screen White.
3. Insert a hex driver in the first set screw (A) and a hex driver in the first cap screw (B).
A
A
B
A
Set Screw (x2)
B
Cap Screw (x2)
4. Equally turn the set screw (A) and cap screw (B) in opposite directions until the black corner is
removed.
CP2208 User Manual
020-101916-02 Rev. 1 (08-2015)
40
Adjusting the Image
5. If the black corner remains, insert a hex driver in the second set screw (C) and a hex driver in
the second cap screw (D).
A
C
C
Set Screw (x2)
D
Cap Screw (x2)
D
6. Equally turn the set screw (A) and cap screw (B) in opposite directions until the black corner is
removed.
7. Replace the top lid.
Color calibrating
Create Measured Color Gamut Data (MCGD) files to correct on-screen colors. A colorimeter is
required to complete this procedure. Measure the colors displayed on the screen from the center of
the audience viewing location. See Creating a MCGD file on page 59.
Screen masking
You use masking to conceal the unused edges of a screen. These are the two most common types of
screen masking:
•
Top Masking – Movable flat black panels or curtains are installed along the top edge of the
screen. You raise the curtain for flat images, and you lower the curtain for scope images.
•
Side Masking – Movable flat black panels or curtains are installed on each side of the screen.
You close the curtain for flat images, and open the curtain and zoom for scope images.
CP2208 User Manual
020-101916-02 Rev. 1 (08-2015)
41
Adjusting the Image
Typically, you install top and side masking to allow a greater range of adjustment.
Calibrating screen brightness (fL)
1. Turn the lamp on and allow it to operate for 20 minutes.
2. On the touch panel controller, tap Menu > Administrator Setup > Foot Lamberts
Calibration.
3. Complete the Foot Lamberts Calibration wizard.
CP2208 User Manual
020-101916-02 Rev. 1 (08-2015)
42
Accessing the Projector
and Running Diagnostics
This section describes how to access the projector and run projector diagnostic utilities.
The touch panel controller
The touch panel controller (TPC) is a touch-sensitive screen that you use to control the projector.
You can use the TPC to turn the projector and lamp on or off, select channels, and view status
information. The TPC is mounted on the rear of the projector. You can tilt and turn the TPC to
improve the viewing angle. Use the USB port on the side of the TPC to download log files and install
software upgrades.
If the TPC fails or is disconnected, tap the emergency start button on the communications panel.
This starts the projector, turns the lamp on, and opens the douser. When using the emergency start
button, you cannot change channels.
Use the Main screen of the touch panel controller (TPC) to access power, lamp, douser, channel, and
test pattern settings.
CP2208 User Manual
020-101916-02 Rev. 1 (08-2015)
43
Accessing the Projector and Running Diagnostics
Control
Description
Status LED
Displays a green, yellow, or red LED. A green LED indicates that
the projector is operating properly. If a monitored system falls
below a normal reading, the LED is yellow or red. A yellow LED
indicates a warning, and a red LED indicates a critical error that
you must correct. Click the status LED to open the Status window
and resolve issues.
Status Error Message
Channel Buttons
Displays custom projector settings.
All Channels Button
Displays 64 saved channels.
Power
Turns the projector on or off. Press off to place the projector in
stand-by mode. To prevent accidental activation, you must press
and hold the on or off buttons. A message displays in the title bar
when the projector turns on or off.
Power OFF
Power ON
Lamp
Lamp OFF
Lamp ON
CP2208 User Manual
020-101916-02 Rev. 1 (08-2015)
Turns the lamp on or off. To prevent accidental activation, you
must press and hold the on or off buttons. A boot delay occurs if
you select lamp on before pressing power on.
44
Accessing the Projector and Running Diagnostics
Control
Description
Douser
Opens or closes the douser.
Douser Closed
Douser Opened
Lens Adjust
Controls the Intelligent Lens System (ILS) lens motors. Tap to
open the ILS File Setup window.
Douser
Disable Pattern Select Test
Selects or disables test patterns. Tap Select Test Pattern to open
the Preferred Test Patterns window.
Operational Status
Displays the status of projector functions including the Projector
Intelligence Board (PIB), the Integrated Cinema Processor Board
(ICP), Integrated Media Block (IMB), Standby Power, Main Power,
Run, and Marriage. A green LED indicates the system is
functioning correctly. A red LED indicates a critical error that you
must correct. Click the status LED to open the Status window and
resolve issues.
Menu Button
Tap the Menu button to access projector menus. These icons
change as these elements update from changes on the projector.
The current time also displays.
Status
Tap the Select Test Pattern icon to open the Preferred Test
Patterns window and select a test pattern to display.
Select Test Pattern
Logging on to the projector
1. Tap Menu > Login.
2. Select a user name in the Username list.
3. Enter the password in the Password field and then tap Login.
CP2208 User Manual
020-101916-02 Rev. 1 (08-2015)
45
Accessing the Projector and Running Diagnostics
Viewing the status of projector components
Tap Menu > Status.
The Status window displays information about the status of projector components. The right pane
lists projector components and their status. The left pane displays detailed information about
individual projector items.
A green circle indicates the item is functioning correctly. A yellow circle is a warning that a projector
item requires attention. A red LED indicates a projector item requires immediate attention.
If the Item or Value descriptions are too long for the cell, click the description to view the full
description at the bottom of the window. To adjust the width of a column in the left pane, tap and
drag the column border. When you close the Status window, the column widths return to their
default size.
Running the projector interrogator
Image disruption can occur if you run the interrogator during a show.
The interrogator captures diagnostic information that you can use to assist Christie service
personnel diagnose and correct projector issues. To access the Interrogator menu, you need
Operator, Administrator, or Service permissions.
When you run the interrogator, you cannot modify projector settings.
CP2208 User Manual
020-101916-02 Rev. 1 (08-2015)
46
Accessing the Projector and Running Diagnostics
Log files are compressed into a 7z or 7-zip file format. A tool for opening these archives can be
downloaded from http://www.7-zip.org.
1. On the touch Tap Menu > Diagnostics > Interrogator.
2. Tap Basic Mode. A basic projector interrogation returns only projector log files.
- or Tap Enhanced Mode. An enhanced interrogation returns projector log files and registered
batch files.
3. Tap Yes.
4. Insert a USB flash drive in the USB port on the side of the touch panel controller (TPC).
5. Tap Download to USB.
Retrieving system logs
System logs can help you identify and correct projector issues. To retrieve system logs you need
Operator, Administrator, or Service permissions.
1. Tap Menu > Diagnostics > System Logs.
2. Select a start date for the logs in the From list.
3. Select an end date for the logs in the To list.
4. Select a log type in the Type list.
5. Select the severity type in the Severity list.
6. Tap Retrieve Logs.
7. To download the log files to a USB:
a. Insert a USB flash drive in the USB port on the side of the touch panel controller (TPC).
b. Tap Download to USB.
Running a server test
You can run a server test to search the subtitle and metadata .xml files for errors in content or in
transmission from the server. You cannot use a server test to turn metadata or subtitling off or on.
1. Tap Menu > Diagnostics > Server Test.
2. Enter the location of the metafile in the Meta File URI field.
- or Enter the location of the subtitle file in the Subtitling URI field.
CP2208 User Manual
020-101916-02 Rev. 1 (08-2015)
47
Accessing the Projector and Running Diagnostics
Responding to alarms
When an alarm occurs, an Alarms window with a red border appears with a description of the alarm
condition, state, and time and date of the alarm. The window only displays alarms you have not
previously acknowledged. To acknowledge an alarm and remove it from the Alarms window, click
Acknowledge. To view all alarms, tap Menu > Status > All Alarms in the left pane.
Turning the projector off
1. On the touch panel controller (TPC), tap and hold the light bulb (
) icon to turn the lamp off.
2. On the TPC, tap and hold the red power
icon. The projector enters a cool down mode and
the fans and electronics stay on for 10 minutes. After this cool down period, the projector
enters standby mode.
3. If you are servicing the projector, or removing the protective cover, disconnect AC and turn the
breaker OFF.
CP2208 User Manual
020-101916-02 Rev. 1 (08-2015)
48
Managing the DLP
This section provides procedures for managing the Integrated Cinema Processor (ICP) electronics.
To access the DLP menus, you need Administrator or Service permissions
Stopping DLP communication
It is recommended that you stop DLP communication when you perform DLP maintenance.
1. Tap Menu > Diagnostics > DLP Management.
2. Tap Stop DLP Communication.
3. Tap Acknowledge.
Resetting the DLP
To remove image artifacts from the screen, try resetting the DLP before restarting the projector. Do
not reset the DLP if content is playing.
1. Tap Menu > Diagnostics > DLP Management.
2. Tap Reset DLP.
3. Tap Yes.
4. Tap Acknowledge if an alarm appears.
Running a DLP self test
Run a DLP self test to test the functionality of the Integrated Cinema Processor (ICP) and DLP.
1. Tap Menu > Diagnostics > DLP Management.
2. Tap DLP Self Test.
3. Tap Yes.
4. Tap Clear Results to close the Results pane.
CP2208 User Manual
020-101916-02 Rev. 1 (08-2015)
49
Managing the DLP
Downloading an ICP certificate
1. Insert a USB flash drive in the USB port on the side of the touch panel controller (TPC). If you
do not insert a USB flash drive, the ICP certificate is saved to the FTP root directory.
2. Tap Menu > Diagnostics > DLP Management.
3. Tap Download ICP Certificate.
4. Tap Close.
Disabling the ICP signature test
Error messages that appear when the ICP is turned on and the ICP signature test is run can disrupt
projector network monitoring. Use this procedure to disable the Signature Test.
1. Tap Menu > Diagnostics > DLP Management.
2. Tap Bypass Signature Test.
3. Tap Yes.
To re-enable the ICP signature test, clear the Bypass Signature Test checkbox.
CP2208 User Manual
020-101916-02 Rev. 1 (08-2015)
50
Managing Lamp
Information
Creating a new lamp file
1. Tap Menu > Advanced Setup > Lamp Power/LiteLOC Setup.
2. Complete these fields:
Field
Description
Power%
The percentage of power to supply to the lamp.
Enable LiteLOC™
Enables or disables LiteLOC™. LiteLOC™ is a power control
algorithm that increases the power level to maintain lamp
brightness as the lamp ages.
Light Meter - Set Target
Enables LiteLOC™ and maintains the current brightness level
for as long as possible. The Light Meter value is an arbitrary
unit of measure, not lumens or fL.
Amps
Lamp current in amperes.
Volts
Lamp voltage in volts.
Watts
Lamp power in watts.
~fL or ~cd/m2
Approximate Foot Lamberts reading on the light sensor. This
assumes a calibration was performed.
Hours
Number of hours the current lamp has operated.
Intensity
The current light sensor reading in arbitrary units-of -measure
and does not represent actual lumens or fL.
3. Tap Save As.
4. Enter a name for the lamp file in the Filename field.
5. Tap OK.
CP2208 User Manual
020-101916-02 Rev. 1 (08-2015)
51
Managing Lamp Information
Modifying an existing lamp file
1. Tap Menu > Advanced Setup > Lamp Power/LiteLOC Setup.
2. Select a lamp file in the Current Lamp File list.
3. Modify the lamp file settings.
4. Tap Save. If you want to revert your changes, tap Revert before you tap Save.
Enabling or disabling LiteLOC on a lamp file
LiteLOC™ is a power control algorithm that increases the power level to maintain lamp brightness
as the lamp ages.
1. Tap Menu > Advanced Setup > Lamp Power/LiteLOC Setup.
2. Select a lamp file in the Current Lamp File list.
3. Tap Enable LiteLOC to enable LiteLOC.
- or Clear the Enable LiteLOC check box to disable LiteLOC.
4. Tap Save.
Adjusting lamp power
1. Tap Menu > Advanced Setup > Lamp Power/LiteLOC Setup.
2. Increase or decrease the Power % value.
3. Tap Set Target.
4. Select Enable LiteLOC™.
Changing the lamp power percentage
Entering a new Lamp Power percentage temporarily disables LiteLOC settings.
1. Tap Menu > Advanced Setup > Lamp Power/LiteLOC Setup.
2. Increase or decrease the Power % value.
Viewing lamp information
To view information about the lamps previously installed in the projector:
Tap Menu > Advanced Setup > Lamp History.
CP2208 User Manual
020-101916-02 Rev. 1 (08-2015)
52
Managing Lamp Information
Receiving an alarm when a lamp reaches its
expiry date
To receive an alarm when the lamp reaches its operational limit:
1. Tap Menu > Administrator Setup > Preferences.
2. Tap Lamp Expiry in the Alarm Triggers area.
Adding a lamp to the Lamp History
You cannot remove or modify a lamp after you add it.
1. Tap Menu > Advanced Setup > Lamp History.
2. Tap Add Lamp.
3. Complete these fields:
Field
Description
Type
The lamp type.
Serial Number
The lamp serial number.
Reason for Change
The reason the lamp was changed.
Lamp Expiry (Hours)
The number of hours the lamp can operate before replacement.
Hours Used
The number of hours the lamp has operated before installation.
4. Tap Save.
Verifying current lamp intensity
Tap Menu > Advanced Setup > Lamp Power/LiteLOC Setup.
The current light intensity value appears in the Intensity field.
CP2208 User Manual
020-101916-02 Rev. 1 (08-2015)
53
Working with Channels
Create channels to store customized projector settings for different inputs. You can create a
maximum of 64 channels.
Creating a new channel
You need Advanced, Administrator, or Service permissions to create or modify channel settings. You
can create a maximum of 64 channels.
1. Tap Menu > Channel Setup.
2. Select a channel in the Channel Name list.
3. Tap the Launch Dialog (
) icon.
4. Enter a name for the channel and tap Enter.
5. Complete these fields on the Config 1 screen:
Field
Description
Icon
The icon associated with the channel.
Input
The location or connection for the current input.
Data Format
The source color depth (8-10-12 bit) for the channel.
Source File
The resolution and aspect ratio for the channel.
Screen File
The screen type, masking, cropping, and lens settings for the channel.
Use PCF
Associates the channel with a Projector Configuration File (PCF) and
prevents Channel adjustments.
PCF
The PCF file associated with the channel.
Lamp File
The lamp file associated with the channel. Tap the Launch Dialog icon
to edit the lamp file settings. Any changes made to the Lamp File
settings are applied to all channels that use this lamp file.
ILS File
The Intelligent Lens System (ILS) file associated with the channel. The
ILS file automatically adjusts the lens position so the content displays
correctly. Tap the Launch Dialog icon to edit the ILS file settings. Any
changes made to the ILS File settings are applied to all channels that
use this ILS file.
CP2208 User Manual
020-101916-02 Rev. 1 (08-2015)
54
Working with Channels
6. Tap Config 2 in the left pane and then complete these fields:
Field
Description
Measured Color
The Measured Color Gamut Data (MCGD) file used to calculate target
color processing.
Target Color
The Target Color Gamut Data (TCGD) value. This option is not available
when Use PCF is selected in the Config 1 screen.
Color Space
The method of color decoding for the current source. The default is
YCbCr for all DVI sources. The default for all cinema sources is Unity
RGB. This option is not available when Use PCF is selected.
Gamma
The gamma correction required for the proper tonal range of the source
material. This option is not available when Use PCF is selected.
LUT_CLUT
Applies a 3D color cube for increased color accuracy. This option is not
available when Use PCF is selected.
Scan Type
The video scan type. The default is Progressive.
Automatic Scan Type
Detection
Automatically performs scan type detection. This feature is supported
for PIBS1 inputs only.
Use PCT
Applies Christie Pureformity Color Technology (PCT) to the channel.
PCT File
Identifies the Christie Pureformity Color Technology (PCT) file associated
with the channel.
HDMI EDID Type
Identifies the extended display identification data (EDID) type used by
the channel when playing content from a device connected to the HDMI
A/LEFT or HDMI B/RIGHT ports.
Enable 3D Dual
Measured Color
Enables 3D Dual Measured Color on the channel. Select the color files for
the left and right eyes.
7. Tap 3D Control in the left pane if the channel will be used to display 3D content. Complete
these fields:
Field
Description
Enable 3D
Enables 3D.
3D Test Patterns
Displays 3D test patterns.
3D Sync Input Mode
Specifies whether a specific frame of input data has left eye or right eye
data.
Select Use White Line Code (true and inverted) if you are using a single
3D input signal in which an embedded white line at the bottom of each
frame identifies left and right, and an additional separate 3D stereo sync
input at the GPIO port is not present. The bottom row of the left-eye subfield should be pure white for the left-most 25% of the pixel row and pure
black for the remainder of the row. The bottom row of the right-eye subfield should be pure white for the left-most 75% of the pixel row and pure
black for the remainder of the row.
Select Use Line Interleave for 3D source data only. When specified, the
ICP will de-interleave each line into the left image or right image in
memory as specified. Line interleave can be used with PsF 3D data (left
and right data for one field, then left and right data for second field).
CP2208 User Manual
020-101916-02 Rev. 1 (08-2015)
55
Working with Channels
Field
Description
L/R Display Reference
Specifies which frame of eye data to display during a specific display
frame. This signal is referenced to the display frame rate which is
specified by the Frame Rate N:M.
Frame Rate N:M
Sets how many frames to display per number of frames that form one
complete image. Increase the display frame rate to reduce flicker from
your source(s).
L/R Display Sequence
Defines the frame order (L-R or R-L) required for 3D perspective. This
option only has meaning when the Frame Rate factor M is equal to 2. For
this case, two input frames of data are required to constitute a complete
frame of image data. This parameter tells the system which frames go
together to make a complete image. When using Line Interleave as the
3D Sync Input Mode, ensure that Left (L1R1 L2R2) is selected.
3D Sync Polarity
Keeps 3D stereo sync output the same as input (true) or reversed
(inverted).
True: 3D L/R sync output from GPO will match L/R sync input.
Inverted: 3D L/R sync output from GPO will be the opposite of sync
input (left = right, right = left).
Dark Time
Creates a blank time interval between left and right frames to allow for
LCD shutter glasses, Z screen, or rotating 3D wheel to synchronize the
output. See Dark Time and Output Delay Notes below. Values between 0
and 65535 are accepted. Tap the Launch Dialog (
) icon to enter the
dark time value.
Output Delay
The non-image time in Microseconds (μ). Offset 3D stereo sync output in
relation to dark time interval. Acceptable values are between -32768 and
32767 are accepted where a positive offset = delay and negative offset =
start early. Tap Launch Dialog to enter the output delay value.
Phase Delay
The degree of reference between the left and right sync output. Values
between -180 and 180 are accepted. Tap Launch Dialog to enter the phase
delay value.
8. Tap Activate to activate the channel.
Activating a channel
1. Tap Menu > Channel Setup.
2. Select a channel in the Channel Name list.
3. Tap Activate.
Restoring default channel settings
1. Tap Menu > Channel Setup.
2. Select a channel in the Channel Name list.
3. Tap Defaults.
CP2208 User Manual
020-101916-02 Rev. 1 (08-2015)
56
Working with Channels
4. Tap Default Current Channel to restore the default settings to the selected channel.
- or Tap Default All Channels to restore the default settings to all channels.
5. Tap OK.
Changing the channel icon
1. Tap Menu > Channel Setup.
2. Select a channel in the Channel Name list.
3. Tap Icon.
4. Tap an Icon.
5. Tap OK.
Adding or removing preferred channels from the
Preferred Channels pane
You need Administrator or Service permissions to complete this procedure.
Use this procedure to add or remove channels from the Preferred Channels pane of the primary
touch panel controller window.
1. Tap Menu >Administrator Setup > Preferred Channel Setup.
2. To add a channel to the Preferred Channels pane, tap and drag a channel from the All
Channels list to the Selected Channel Buttons (Drag and Drop) pane.
3. To remove a channel from the Preferred Channels pane, tap and drag a channel from the
Selected Channel Buttons (Drag and Drop) pane to the recycle bin in the bottom right
corner.
CP2208 User Manual
020-101916-02 Rev. 1 (08-2015)
57
Managing Projector
Setting Files
Creating a source file
Create source files to store resolution, offset, and aspect ratio settings for input devices.
1. Tap Menu > Advanced Setup > Source File Setup.
2. Tap Save As.
3. Enter a name for the source file in the Filename field.
4. Tap OK.
5. Enter values in these areas:
Area
Description
Resolution
The X and Y resolution of the incoming signal. For example, 2048 (X) and 858
(Y) or 1920 (X) and 1080 (Y). The resolution must match the incoming signal
format.
Offset
The amount of incoming data to discard. Set the values to zero to process all
incoming data. The allowable X range is -4096 to 4096 pixels and Y range of 2160 to 2160 pixels.
Aspect Ratio
The aspect ratio for the incoming signal. The allowable range is 0 to 7.99.
6. Tap Save.
Modifying a source file
1. Tap Menu > Advanced Setup > Source File Setup.
2. Select a source file in the Current Source File list.
3. Modify the Resolution, Offset, or Aspect Ratio values.
4. Tap Save.
CP2208 User Manual
020-101916-02 Rev. 1 (08-2015)
58
Managing Projector Setting Files
Creating a screen file
Use screen files to define the size of the display panel and image cropping. You can assign the same
screen file to multiple input devices.
1. Tap Menu > Advanced Setup > Screen File Setup.
2. Tap Save As.
3. Enter a name for the source file in the Filename field.
4. Tap OK.
5. Complete these fields:
Field
Description
Letter Box
All image data is displayed and the aspect ratio is maintained.
Lens Factor
The amount to stretch an image horizontally. Allowable values
can range from 0.00 to 7.99. Enter 1 if you are not using an
anamorphic lens.
Presentation
The size and location of the image. By default, the projector
uses a 2048 x 1080 panel.
Cropping
Hides unwanted image data.
6. Tap Save.
Modifying a screen file
1. Tap Menu > Advanced Setup > Screen File Setup.
2. Select a screen file in the Current Screen File list.
3. Modify the screen file settings.
4. Tap Save.
Creating a MCGD file
Create Measured Color Gamut Data (MCGD) files to correct on-screen colors. A colorimeter is
required to complete this procedure.
1. Turn the lamp on and allow it to operate for 20 minutes.
2. Tap Menu > Advanced Setup > MCGD File Setup.
3. Tap Save As.
4. Enter a name for the MCGD file in the Filename field and then tap OK.
5. Tap the option button in the red area of the chromaticity image to display the red test pattern.
6. Measure the red chromaticity with the colorimeter.
CP2208 User Manual
020-101916-02 Rev. 1 (08-2015)
59
Managing Projector Setting Files
7. Record the red chromaticity value.
8. Repeat steps 5 to 7 for the green, blue, white, and black chromaticity measurements. Select
the test pattern that matches the color you are measuring.
9. Enter the chromaticity measurements you recorded in step 7 in the red, green, blue, white, and
black x and y fields.
10. If the MCGD file will be associated with a 3D channel, tap Enable 3D and select a frame rate in
the Frame Rate N:M list.
11. Tap Save.
Modifying a MCGD file
1. Tap Menu > Advanced Setup > MCGD File Setup.
2. Select a MCGD file in the Current Measured (MCGD) File list.
3. Modify the MCGD file settings.
4. Tap Save.
Creating a TCGD file
Typically, Target Color Gamut Data (TCGD) file settings are defined by your content provider.
1. Turn the lamp on and allow it to operate for 20 minutes.
2. Tap Menu > Advanced Setup > TCGD File Setup.
3. Tap Save As.
4. Enter a name for the TCGD file in the Filename field.
5. Tap OK.
6. Tap Display Test Pattern.
7. Tap the option button in the red area of the chromaticity image to display the red test pattern.
8. Measure the red chromaticity with the colorimeter.
9. Enter the red chromaticity values in the x, y, and Gain fields.
10. Repeat steps 6 to 8 for the magenta, blue, white, yellow, and green chromaticity
measurements. Select the test pattern that matches the color you are measuring.
11. Tap Save.
Modifying a TCGD file
1. Tap Menu > Advanced Setup > TCGD File Setup.
2. Select a TCGD file in the Current Target (TCGD) File list.
CP2208 User Manual
020-101916-02 Rev. 1 (08-2015)
60
Managing Projector Setting Files
3. Modify the TCGD file settings.
4. Tap Save.
Creating a new ILS file
1. Tap Menu > Advanced Setup > ILS File Setup
2. Tap Save As.
3. Enter a name for the ILS file in the Filename field.
4. Tap OK.
5. Tap the left or right icons in the Focus area to adjust the focus of the image on the screen.
6. Tap the positive or negative icons in the Zoom area to adjust the image focus.
7. Tap the forward, backward, left, or right arrow icons in the Offset area to move the position of
the image on the screen.
8. Tap Save.
Editing an existing ILS file
1. Tap Menu > Advanced Setup > ILS File Setup.
2. Select an ILS file in the Current ILS File list.
3. Tap the left or right icons in the Focus area to adjust the focus of the image on the screen.
4. Tap the positive or negative icons in the Zoom area to adjust the image focus.
5. Tap the forward, backward, left, or right arrow icons in the Offset area to move the position of
the image on the screen.
6. Tap Save.
Enabling automatic ILS adjustment on a channel
1. On the main screen of the TPC, tap a channel in the Preferred Channels pane.
2. Tap the Lens Adjust icon.
3. Select Enable Automatic ILS.
4. Tap OK.
Resetting ILS file settings
You must reset the Intelligent Lens System (ILS) when you move the lens, you have manually
adjusted horizontal or vertical offset, focus, or zoom or when a power outage occurs during a
channel change.
CP2208 User Manual
020-101916-02 Rev. 1 (08-2015)
61
Managing Projector Setting Files
1. Tap Menu > Advanced Setup > ILS File Setup.
2. Select an ILS file in the Current ILS File list.
3. Tap Quick Reset.
4. Tap Yes.
Adding a lens serial number
1. Tap Menu > Advanced Setup > Lens Setup.
2. Select a lens in the Primary Lens list.
3. Tap the Launch Dialog (
) icon in the Serial Number field.
4. Enter the serial number for the lens and then tap Enter.
5. Tap Save.
Enabling automatic ILS on a lens
Use this procedure to move the lens to a position specified by the channel settings.
1. Tap Menu > Advanced Setup > Lens Setup.
2. Select a lens in the Primary Lens list.
3. Select Enable Automatic ILS in the Intelligent Lens System area.
Resetting the lens position on projector startup
1. Tap Menu > Advanced Setup > Lens Setup.
2. Select a lens in the Primary Lens list.
3. Select Reset on Startup in the Intelligent Lens System area.
Completing a full lens calibration
1. Tap Menu > Advanced Setup > Lens Setup.
2. Select a lens in the Primary Lens list.
3. Tap Full Calibration in the Intelligent Lens System area.
4. Tap Yes.
Resetting the ILS and the lens position
1. Tap Menu > Advanced Setup > Lens Setup.
CP2208 User Manual
020-101916-02 Rev. 1 (08-2015)
62
Managing Projector Setting Files
2. Select a lens in the Primary Lens list.
3. Tap Quick Reset in the Intelligent Lens System area.
4. Tap Yes.
CP2208 User Manual
020-101916-02 Rev. 1 (08-2015)
63
Working with the
Scheduler
Use the scheduler to schedule when the projector turns on or off.
Scheduling the projector to turn on or off
You need Administrator or Service permissions to complete this procedure.
1. Tap Menu > Administrator Setup > Scheduler.
2. Tap Enable Scheduler.
3. Tap and drag the scroll bar to view the available dates.
4. Tap a square below the date and next to the time that you want the projector to turn on or off.
5. Tap New.
6. Tap Power Off to turn the projector off at a specific date and time,
- or Tap Power On to turn the projector on at a specific date and time.
7. Tap Start to enable or disable the scheduled event. New scheduled events are enabled by
default.
8. Select a date and a time for the scheduled event.
9. Tap Weekly to have the scheduled event occur weekly and then select the days that you want
the event to occur.
- or Tap Once to have the scheduled event occur once at a specific date and time.
10. Tap Expire and select the date you want a weekly event to expire.
11. Tap Save.
12. Tap OK to return to the calendar view.
CP2208 User Manual
020-101916-02 Rev. 1 (08-2015)
64
Working with the Scheduler
Editing a scheduled event
You need Administrator or Service permissions to complete this procedure.
1. Tap Menu > Administrator Setup > Scheduler.
2. Tap and drag the scroll bar to view the available dates.
3. Tap the event you want to edit.
4. Tap Edit.
5. Adjust the settings for the event.
6. Tap Save.
7. Tap OK to return to the calendar view.
Deleting a scheduled event
You need Administrator or Service permissions to complete this procedure.
1. Tap Menu > Administrator Setup > Scheduler.
2. Tap and drag the scroll bar to view the available dates.
3. Tap the event you want to delete.
4. Tap Delete.
5. Tap OK to return to the calendar view.
Deleting all scheduled events
You need Administrator or Service permissions to complete this procedure.
1. Tap Menu > Administrator Setup > Scheduler.
2. Tap Delete All.
3. Tap Yes.
Turning off the scheduler
You need Administrator or Service permissions to complete this procedure.
1. Tap Administrator Setup > Scheduler.
2. Tap to clear the Enable Scheduler checkbox.
CP2208 User Manual
020-101916-02 Rev. 1 (08-2015)
65
Viewing and Modifying
Projector Settings
Use the procedures in this section to modify projector settings including the touch panel controller
(TPC) language, TPC screen brightness, and time settings.
Setting projector and TPC preferences
You need Administrator or Service permissions to complete this procedure.
1. Tap Menu > Administrator Setup > Preferences.
2. Adjust these settings:
Field
Description
Temperature Units
Display temperature information in Celsius or Fahrenheit.
Image Orientation
The direction of the on screen image.
Luminance Units
Display luminance information in Foot Lamberts or Candela.
Language
The language for the TPC and online help.
Beep on Screen Press
When selected, a sound plays when you tap the TPC screen.
Enable Screen Saver / Screen
Saver Delay
Enables a screen saver and determines the frequency that the
screen saver appears.
Over Temperature, Fan Failure,
Lamp Rotation, Lamp Expiry,
Opens an alarm window when a pre-defined event occurs.
Brightness
Adjusts the brightness of the touch screen display.
Calibrate Screen
Opens the Calibrate window and starts the TPC calibration.
Adjusting projector time settings
You need Administrator or Service permissions to complete this procedure.
1. Tap Menu > Administrator Setup > Time Setup.
CP2208 User Manual
020-101916-02 Rev. 1 (08-2015)
66
Viewing and Modifying Projector Settings
2. Adjust these settings:
Field
Description
Time Zone
The time zone where the projector is installed.
24 Hour Time
Displays time in a 24-hour format.
Adjust for Daylight Savings Time Automatically adjusts the time for daylight savings.
Time Offset
Increases or decreases the projector time.
Apply Time Adjustment
Applies time adjustment settings.
Modifying projector communication settings
You need Administrator or Service permissions to complete this procedure.
1. Tap Menu > Administrator Setup > Communications Configuration.
2. Complete these fields:
Field
Description
Device Name
The name of the projector.
IP Address
The IP address of the projector.
Subnet Mask
The subnet mask to which the address belongs.
Gateway
The IP address for the network gateway.
Apply
Applies Ethernet settings.
Serial Speed (Baud)
The baud rate of the serial port. The default is 115200.
Enable SNMP
Enables SNMP.
SNMP V2 / SNMP V3
The SNMP protocol type. Contact Christie for the SNMP V3 user ID and
password.
Management IP
The IP address where SNMP information and notifications are sent.
Download MIB to USB
Sends the SNMP Management Information Base (MIB) file to a USB flash
drive.
Apply
Applies SNMP settings.
Serial Access
Grants access to serial connections.
Ethernet Access
Grants access to Ethernet connections.
Adding a network device
You need Administrator or Service permissions to complete this procedure.
1. Tap Menu > Administrator Setup > Network Devices Setup.
CP2208 User Manual
020-101916-02 Rev. 1 (08-2015)
67
Viewing and Modifying Projector Settings
2. Tap the check box. If the check box is not selected, the device does not appear in the Network
Devices menu.
3. Tap the Launch Dialog (
device.
) icon in the Device Name field and enter a name for the network
4. Tap Enter.
5. Tap the Launch Dialog icon in the URL field and enter the URL for the network device.
6. Tap Enter.
Accessing a network device
Tap Menu > Network Devices > Christie ACT
To interact with the device tap
in the top right corner of the window.
Calibrating the internal light meter
To calibrate the internal light meter to Foot Lamberts you use the Foot Lamberts Calibration wizard.
If content is playing when you run the Foot Lamberts Calibration wizard, playback stops. To run the
Foot Lamberts Calibration wizard you need Administrator or Service permissions.
1. Tap Menu > Administrator Setup > Foot Lamberts Calibration.
2. Tap Next and complete the Foot Lamberts Calibration wizard.
Viewing the Microsoft Windows Task Manager
You use the Microsoft Task Manager to view information about programs or processes running on
your projector. The Task Manager also provides performance measures for processes.
1. Tap Menu > Service Setup > System Access.
2. Tap Task Manager.
3. Tap OK.
Viewing the Microsoft Windows Computer
Management console
You use the Microsoft Windows Computer Management console to manage local or remote computer
settings.
1. Tap Menu > Service Setup > System Access.
2. Tap Computer Management.
3. Tap OK.
CP2208 User Manual
020-101916-02 Rev. 1 (08-2015)
68
Viewing and Modifying Projector Settings
Viewing Microsoft Windows Explorer
Microsoft Windows Explorer displays the hierarchical structure of files, folders, and drives on your
projector.
1. Tap Menu > Service Setup > System Access.
2. Tap Windows Explorer.
3. Tap OK.
Viewing the Microsoft Network Connections
window
Use the Microsoft Network Connections to view and modify network connections.
1. Tap Menu > Service Setup > System Access.
2. Tap Network Connections.
3. Tap OK.
Viewing projector information
The About window provides projector information including the serial number, the current software
version, the Digital Light Processing (DLP) version, the lens and lamp type.
Tap Menu > About.
Recording the lens serial number
1. Tap Menu > Advanced Setup > Lens Setup.
2. Select a lens type in the Primary Lens list.
3. Tap the Launch Dialog (
) icon and enter the lens serial number.
4. Tap Enter.
5. Tap Save.
CP2208 User Manual
020-101916-02 Rev. 1 (08-2015)
69
Managing User
Accounts
Interpreting user access permissions
This table lists the touch panel controller (TPC) permissions:
Permission
Description
Status
Can view basic projector status, diagnostic information and software version information.
This is the default level for Serial Communication sessions.
Operator
Can activate channels and test patterns, view detailed diagnostic logs for in-depth
troubleshooting and view server errors. This is the default level at the TPC.
Advanced
Can define all display setups such as source resolution, aspect ratio, image cropping, and
color gamut information, optimize light output, record lamp changes, and define setup files
as selectable choices for processing a variety of incoming signals.
Administrator
Can perform screen Foot Lambert calibration, define Ethernet settings (IP network address),
restore backup files, and upgrade the system software. Administrators can add users and set
user access rights from its own level and below only.
Service
Can access all windows on the TPC, except marriage.
Marriage
Can access all windows on the TPC, including marriage.
Adding a user account
You need Administrator or Service permissions to complete this procedure.
1. Tap Menu > Administrator Setup > User Accounts.
2. Tap Add.
3. Tap the Launch Dialog (
) icon in the Username field and enter the user name.
4. Tap Enter.
5. Repeat steps 3 and 4 for the Password and Confirm Password fields.
6. Select access permissions for the user in the Permissions list.
7. Tap Accept.
CP2208 User Manual
020-101916-02 Rev. 1 (08-2015)
70
Managing User Accounts
Changing a user account password or
permissions
You need Administrator or Service permissions to complete this procedure.
1. Tap Menu > Administrator Setup > User Accounts.
2. Tap a user name in the Username list.
3. Tap Edit.
4. Change the password or the access permissions.
5. Tap Accept.
Deleting a user account
You need Administrator or Service permissions to complete this procedure.
1. Tap Menu > Administrator Setup > User Accounts.
2. Tap a user name in the Username list.
3. Tap Delete.
4. Tap Yes.
CP2208 User Manual
020-101916-02 Rev. 1 (08-2015)
71
Backing up, Restoring,
and Upgrading Projector
Files
Adding an upgrade file
You need Administrator or Service permissions to complete this procedure.
1. Tap Menu > Administrator Setup > Upgrade.
2. Tap Upload.
3. Select the location of the upgrade file in the Drive Letter list.
4. Browse to the location of the upgrade file in the Folder list.
5. Tap the upgrade file and then tap Open.
Removing an upgrade file
You need Administrator or Service permissions to complete this procedure.
1. Tap Menu > Administrator Setup > Upgrade.
2. Tap an upgrade file in the Available Upgrade Files list.
3. Tap Remove.
Installing an upgrade
You need Administrator or Service permissions to complete this procedure.
1. Tap Menu > Administrator Setup > Upgrade.
2. Tap an upgrade file in the Available Upgrade Files list.
3. Tap Next.
4. Tap a component in the Component list.
CP2208 User Manual
020-101916-02 Rev. 1 (08-2015)
72
Backing up, Restoring, and Upgrading Projector Files
5. Select one of these options:
Option
Description
Upgrade Different
Components Only
Upgrades system components that are newer or older than the currently
installed version.
ICP Only Force Install
Forces an ICP install regardless of what current version is installed.
Force Upgrade All
Upgrades all components in the upgrade package.
Factory Install
Removes all configurations and upgrades all components.
6. Tap Next.
Backing up projector settings and information
You need Service permissions to complete this procedure.
1. Tap Menu > Service Setup > File Management.
2. Tap Backup.
Restoring a file
You need Service permissions to complete this procedure. You can restore configuration,
preference, channel, user, and ICP files.
1. Tap Menu > Service Setup > File Management.
2. Tap Browse to the right of the File to restore field.
3. Select the location of the upgrade file in the Drive Letter list.
4. Browse to the location of the upgrade file in the Folder list.
5. Tap the upgrade file and then tap Open.
6. Select the type of file to restore in the Select type list.
7. Tap Restore.
8. Tap Yes.
Restoring factory default settings
You need Service permissions to complete this procedure. You can restore configuration, reference,
channel, and user files.
1. Tap Menu > Service Setup > File Management.
2. Select a file type to restore in the Select type list.
3. Tap Reset Defaults.
4. Tap Yes.
CP2208 User Manual
020-101916-02 Rev. 1 (08-2015)
73
Backing up, Restoring, and Upgrading Projector Files
Moving files to the projector
1. To move files from a USB Flash drive, insert the USB flash drive into the USB port on the side of
the touch panel controller (TPC).
2. Tap Menu > Service Setup > File Maintenance.
3. Select a file type in the File Type list.
4. Tap and drag a file from the TPC Files pane to the Projector Files pane.
Deleting projector files
1. Tap Menu > Service Setup > File Maintenance.
2. Select a file type in the File Type list.
3. Tap and drag a file from the Projector Files pane to the trash can icon.
4. Tap Yes.
CP2208 User Manual
020-101916-02 Rev. 1 (08-2015)
74
Test Patterns
Adding or removing test patterns from the
preferred test patterns pane
You need Administrator or Service permissions to complete this procedure.
1. Tap Menu > Administrator Setup > Preferred Test Pattern Setup.
2. To add a test pattern to the Preferred Test Pattern pane, tap and drag a test pattern from the
Unselected Patterns list to User Selected (Drag and Drop) pane.
3. To remove a test pattern from the Preferred Test Pattern pane, tap and drag a test pattern from
the User Selected (Drag and Drop) pane to the recycle bin in the bottom right corner.
Turning a test pattern on or off
1. Tap the Test Pattern (
) icon in the task bar.
2. Tap All Test Patterns.
3. Tap a test pattern in the Preferred Test Patterns pane to turn it on.
4. Tap Test Pattern Off to turn the test pattern off.
Displaying a full screen test pattern
1. Tap the Test Pattern (
) icon in the task bar.
2. Tap All Test Patterns.
3. Double-tap a test pattern in the Preferred Test Patterns pane to turn it on.
4. Tap Full Screen (Ignore screen file settings).
CP2208 User Manual
020-101916-02 Rev. 1 (08-2015)
75
Viewing 3D Content
This section provides information and procedures for setting up and managing 3D presentations.
Display requirements
To display 3D images with the CP2208 projector, you require these items:
•
A 3D hardware system:
•
Pi-Cell polarizer for display on a screen that has a silver polarization-preserving surface
for use with passive glasses (RealD).
•
Rotating polarizing wheel (external) with passive circular polarizing glasses
(MasterImage). Requires a silver screen.
•
IR emitter for controlling the left eye/right eye gating (switching) of active glasses
(Xpand).
•
Dual projector 3D - passive glasses (circular or linear). Requires a silver screen.
•
A 3D connection cable.
•
Power supply for your synchronization output device. The 3D sync port can power output
devices.
3D sync terminal pin map
The 3D Sync terminal is a 15-pin D-sub connector (female) located on the projector
communications panel. This table lists the control functions available through the 3D connector.
Pin
Signal name
Direction
Description
1
+12V
Out
Power to 3D device. Maximum 1A (total between
both +12V pins).
2
GND
/
Ground
3
GND
/
Ground
4
RS232_RX
In
Data to projector from 3D device. 1200 Baud, 8 bits,
no parity. Currently unsupported.
5
RS232_TX
Out
Data to projector from 3D device. 1200 Baud, 8 bits,
no parity. Currently unsupported.
CP2208 User Manual
020-101916-02 Rev. 1 (08-2015)
76
Viewing 3D Content
Pin
Signal name
Direction
Description
6
CONN_3D_MODE+
Out
SYNC from projector. To projector GPO collector.
Compatible with current projector GPIO
requirements and restrictions. (24VDC max, 50mA
max)
3D ON = Hi logic level = O/P transistor ON
3D OFF = Low logic level = O/P transistor OFF
7
CONN_SYNC+
Out
8
3D_INPUT_REFRERENCE+
In
SYNC from projector. To projector GPO collector.
Compatible with current projector GPIO
requirements and restrictions. (24VDC max, 50mA
max)
3D L/R Input Reference (P)
(Voltage Limit: 2 VDC to 12VDC)
9
+12V
Out
Power to 3D system. Maximum 1A (Total between
both +12V pins)
10
3D_INPUT_REFRERENCE-
In
3D L/R Input Reference (N)
(Voltage limit: 1.4VDC to 12VDC)
11
3D_DISPLAY_REFERENCE+
In
3D L/R Input Reference (P)
(Voltage limit: 1.4VDC to 12VDC)
12
3D_DISPLAY_REFERENCE-
In
3D L/R Input Reference (P)
(Voltage limit: 1.4VDC to 12VDC)
13
CONN_3D_MODE-
Out
3D mode state from projector. From projector GPO
emitter. Compatible with current projector GPIO
requirements and restrictions. (24VDC max, 50mA
max)
14
CONN_SYNC-
Out
SYNC from projector. From projector GPO emitter.
Compatible with current projector GPIO
requirements and restrictions. (24DC max, 50mA
max)
15
Not connected
Setting up hardware
Use an infrared emitter to control gating in active glasses, a polarizing Z-screen (Pi-cell) with
passive glasses or filter wheel with passive glasses.
RealD
Z-screen
RealD XL
Box
Xpand
Master
Image
Dual
Projector
Installed/
Mounted
Components
Z-screen
mounted in
front of the
projection
lens
XL box
mounted in
front of the
projection
lens
None
Wheel
installed in
front of the
projector
Polarizing
plates in front
of lenses
Silver Screen
Yes
Yes
No
Yes
Yes
CP2208 User Manual
020-101916-02 Rev. 1 (08-2015)
77
Viewing 3D Content
3D Glasses
RealD
Z-screen
RealD XL
Box
Xpand
Master
Image
Dual
Projector
Polarizing
circular
glasses
Polarizing
circular
glasses
Active glasses
Circular
polarized
glasses
Polarizing
circular or
linear glasses
Creating a high frame rate 3D file
Use this procedure to create 24Hz, 48Hz, and 60Hz high frame rate 3D files. These files allow you to
display content with different frame rates consecutively.
1. Tap Menu > Advanced Setup > High Frame Rate 3D File Setup.
2. Select a 3D frame rate file in the Current 3D File list.
3. Complete these fields:
Field
Description
3D Sync Input Mode
Specifies whether a specific frame of input data has left eye or right eye
data.
Select Use White Line Code (true and inverted) if you are using a single
3D input signal in which an embedded white line at the bottom of each
frame identifies left and right, and an additional separate 3D stereo sync
input at the GPIO port is not present. The bottom row of the left-eye subfield should be pure white for the left-most 25% of the pixel row and pure
black for the remainder of the row. The bottom row of the right-eye subfield should be pure white for the left-most 75% of the pixel row and pure
black for the remainder of the row.
Select Use Line Interleave for 3D source data only. When specified, the
ICP will de-interleave each line into the left image or right image in
memory as specified. Line interleave can be used with PsF 3D data (left
and right data for one field, then left and right data for second field).
L/R Display Reference
Specifies which frame of eye data to display during a specific display
frame. This signal is referenced to the display frame rate which is
specified by the Frame Rate N:M.
Frame Rate N:M
Sets how many frames to display per number of frames that form one
complete image. Increase the display frame rate to reduce flicker from
your source(s).
L/R Display Sequence
Defines the frame order (L-R or R-L) required for 3D perspective. This
option only has meaning when the Frame Rate factor M is equal to 2. For
this case, two input frames of data are required to constitute a complete
frame of image data. This parameter tells the system which frames go
together to make a complete image. When using Line Interleave as the
3D Sync Input Mode, ensure that Left (L1R1 L2R2) is selected.
3D Sync Polarity
Keeps 3D stereo sync output the same as input (true) or reversed
(inverted).
True: 3D L/R sync output from GPO will match L/R sync input.
Inverted: 3D L/R sync output from GPO will be the opposite of sync
input (left = right, right = left).
CP2208 User Manual
020-101916-02 Rev. 1 (08-2015)
78
Viewing 3D Content
Field
Description
Dark Time
Creates a blank time interval between left and right frames to allow for
LCD shutter glasses, Z screen, or rotating 3D wheel to synchronize the
output. See Dark Time and Output Delay Notes below. Values between 0
and 65535 are accepted. Tap the Launch Dialog button
the dark time value.
to enter
Output Delay
The non-image time in Microseconds (μ). Offset 3D stereo sync output in
relation to dark time interval. Acceptable values are between -32768 and
32767 are accepted where a positive offset = delay and negative offset =
start early. Tap Launch Dialog to enter the output delay value.
Phase Delay
The degree of reference between the left and right sync output. Values
between -180 and 180 are accepted. Tap Launch Dialog to enter the
phase delay value.
4. Tap Save.
Editing the default 3D lamp file
For 3D images to display correctly, you must edit the default 3D lamp file to match the
specifications of your 3D hardware.
1. Tap Menu > Advanced Setup > Lamp Power / LiteLOC™ Setup.
2. Select Default 3D in the Current Lamp File list.
3. Set the brightness percentage for the lamp in the Power % field.
4. Tap Save.
Defining a measured color gamut data file
For 3D images to display correctly, you must define an MCGD file to match the specifications of your
3D hardware.
1. Turn the lamp on and allow it to operate for 20 minutes.
2. Tap Menu > Advanced Setup > MCGD File Setup.
3. Hold a pair of 3D glasses in front of the light meter to determine the new x and y color
coordinates for Red, Green, Blue, and White. Use the same light path that you use to display a
show.
4. Enter the x and y values in the Red, Green, Blue and White fields.
5. Tap Save As.
6. Enter 3D Onsite in the File Name field.
7. Tap Save.
CP2208 User Manual
020-101916-02 Rev. 1 (08-2015)
79
Viewing 3D Content
Editing the 3D flat 1998 x 1080 channel
1. Tap Menu > Channel Setup.
2. Select 3D Flat 1998x1080 in the Channel Name list.
3. Tap Config 1 in the left pane and edit these settings:
a. Select 292-Dual in the Input list.
b. Select YCrCb 4:2:2 10 bits x2 in the Data Format list.
c. Select 1998x1080 1.85 Flat in the Source File list.
d. Select Flat in the Screen File list.
4. Tap Config 2 in the left pane and edit these settings:
a. Select 3D Onsite in the Measured Color list. If this option is not available, see Defining
a measured color gamut data file on page 79.
b. Select DC28_DCIXYZE_314_351 in the Target Color list.
c. Select YCxCz Inverse ICT in the Color Space list.
d. Select Gamma 2.6 in the Gamma list.
e. Select Linear_9x9x9 in the LUT-CLUT list.
5. Tap 3D Control in the left pane and edit these settings:
a. Select Line Interleave in the 3D Sync Input Mode list.
b. Select a frame rate suitable to your 3D system in the Frame Rate N:M list. For example,
for 24Hz 3D, select 2:2, 4:2, or 6:2 for single, double, and triple flash.
c. Select Left (L1R1 L2R2) in the L/R Display Sequence list.
d. Select True in the 3D Sync Polarity list.
e. Enter 430 in the Dark Time field or enter a value appropriate for your 3D hardware.
f. Enter -120 in the Output Delay field or enter a value appropriate for your 3D hardware.
g. Enter 0 in the Phase Delay field or enter a value appropriate for your 3D hardware.
Editing the 3D scope 2048 x 858 channel
1. Tap Menu > Channel Setup.
2. Select 3D Scope 2048x858 in the Channel Name list.
3. Tap Config 1 in the left pane and edit these settings:
a. Select 292-Dual in the Input list.
b. Select YCrCb 4:2:2 10 bits x2 in the Data Format list.
c. Select 2048x858 2.39 Scope in the Source File list.
d. Select Scope in the Screen File list.
CP2208 User Manual
020-101916-02 Rev. 1 (08-2015)
80
Viewing 3D Content
4. Tap Config 2 in the left pane and edit these settings:
a. Select 3D Onsite in the Measured Color list. If this option is not available, see Defining
a measured color gamut data file on page 79.
b. Select DC28_DCIXYZE_314_351 in the Target Color list.
c. Select YCxCz Inverse ICT in the Color Space list.
d. Select Gamma 2.6 in the Gamma list.
e. Select Linear_9x9x9 in the LUT-CLUT list.
5. Tap 3D Control in the left pane and edit these settings:
a. Select Line Interleave in the 3D Sync Input Mode list.
b. Select 6:2 in the Frame Rate N:M list.
c. Select Left (L1R1 L2R2) in the L/R Display Sequence list.
d. Select True in the 3D Sync Polarity list.
e. Enter 430 in the Dark Time field or enter a value appropriate for your 3D hardware.
f. Enter -120 in the Output Delay field or enter a value appropriate for your 3D hardware.
g. Enter 0 in the Phase Delay field or enter a value appropriate for your 3D hardware.
Displaying 3D diagnostic test patterns
You can use 3D test patterns to verify your 3D hardware is functioning correctly.
1. Tap Menu > Channel Setup.
2. Select a 3D channel in the Channel Name list.
3. Tap 3D Test Patterns.
4. Tap a test pattern.
5. Put on a pair of 3D glasses.
6. Look at the on-screen image, and then close your left eye and look at the image through your
right eye. Switch when the image alternates.
3D Test Pattern
Action
RGB-12bit -3D Dynamic Range
Alternates between two images.
RGB-12bit-3D Four Quadrant
Alternates between two images.
RGB-12bit-3D Full White
Alternates between two 100% white images.
RGB-12bit-3D Half Descending
Alternates between four images.
RGB-12bit-3D Horizontal Ramp
Alternates between two horizontal ramp images.
RGB-12bit-3D L-Pattern
Alternates between two images.
CP2208 User Manual
020-101916-02 Rev. 1 (08-2015)
81
Viewing 3D Content
Verifying 3D cinema content
1. Put on a pair of 3D glasses.
2. Play the 3D content.
3. Verify the left and right eye display correctly.
4. If the image is reversed:
a. Tap Menu > Channel Setup on the projector touch pad controller (TPC).
b. Select a 3D channel in the Channel Name list.
c. Select Inverted in the 3D Sync Polarity list.
Troubleshooting 3D
In addition to the information provided in this topic, it is also recommend that you consult the
documentation provided with your 3D hardware to help resolve issues.
Reversed 3D effect (Pseudo 3D)
1. Put your 3D glasses on upside down so the left lens is over your right eye and the right lens is
over your right eye.
2. If the image appears correct:
a. Tap Menu > Channel Setup on the projector touch pad controller (TPC).
b. Select a 3D channel in the Channel Name list.
c. Select Inverted or True in the 3D Sync Polarity list.
Image Breakup
1. Tap Menu > Channel Setup.
2. Select a 3D channel in the Channel Name list.
3. Tap 3D Control in the left pane.
4. Lower the Dark Time field value to match the values of your 3D system.
Image is too dark
The lamp power for 3D content is typically twice as high as for 2D content except when you are
using a RealD XL device.
1. Tap Menu > Advanced Setup > Lamp Power/LiteLOC™ Setup.
2. Increase the value in the Power % field.
CP2208 User Manual
020-101916-02 Rev. 1 (08-2015)
82
Viewing 3D Content
No 3D effect
1. Tap Menu > Channel Setup.
2. Select a 3D channel in the Channel Name list.
3. Tap 3D Control in the left pane.
4. Verify Enable 3D is selected.
Ghosting / cross-talk
1. Tap Menu > Channel Setup.
2. Select a 3D channel in the Channel Name list.
3. Tap 3D Control in the left pane.
4. Raise or lower the Dark Time field value.
5. Raise or lower the Output Delay field value to match the values of your 3D system.
Motion artifacts
1. Tap Menu > Channel Setup.
2. Select a 3D channel in the Channel Name list.
3. Tap 3D Control in the left pane.
4. Select Left (L1R1 L2R2) in the L/R Display Sequence list.
Disturbing flashing in one eye
1. Tap Menu > Channel Setup.
2. Select a 3D channel in the Channel Name list.
3. Tap 3D Control in the left pane.
4. Select Left (L1R1 L2R2) in the L/R Display Sequence list.
CP2208 User Manual
020-101916-02 Rev. 1 (08-2015)
83
Maintenance
This section provides information and procedures for performing projector maintenance. You should
read this section in its entirety before performing maintenance activities. When you perform
projector maintenance, obey all warnings and precautions.
Inspecting ventilation
Vents and louvers in the projector covers provide ventilation, both for intake and exhaust. Never
block or cover these openings. Do not install the projector near a radiator, heat register, or within
an enclosure. To ensure adequate airflow around the projector, keep a minimum clearance of 50cm
(19.69”) on the left and right sides of the projector.
It is recommended that you periodically check that the LVPS fan is operating. It is not monitored
and a failure can cause damage to the projector.
Inspecting the lamp
Danger! Failure to comply with the following results in serious injury.
Always disconnect from AC and wear authorized protective safety gear.
• Check the contact surfaces of the anode (positive) and the cathode (negative) connections for
cleanliness.
• Clean electrical contact surfaces every 5000 hours or after two lamp changes to prevent contact
resistance from scorching connectors. Use an approved contact cleaner.
• Verify that all electrical and lamp connections are secure.
Inspecting and cleaning optics
The procedures in this section must be performed by service personnel trained by Christie following
consultation with Christie support. Failure to follow this recommendation could result in damage to
the projector and void the warranty.
Typically, optical components do not need to be cleaned frequently if they are installed and
operated in a location that meets or exceeds the environmental standard recommended by Christie.
Christie recommends that all cinema projectors are installed and operated in an environment that
meets or exceeds Underwriters Laboratories (UL) standard 609.50 Pollution Degree 2 and ISO Class
9 Standard for Office Environments.
CP2208 User Manual
020-101916-02 Rev. 1 (08-2015)
84
Maintenance
Safety precautions
Danger! ELECTRICAL SHOCK HAZARD! Always turn off, disconnect, and disengage all power sources
to the projector before servicing. Failure to comply results in death or serious injury.
Caution! Only Christie accredited service technicians are permitted to open any enclosure on the
projector and only if the AC power has been fully disconnected. Failure to comply could result in
minor or moderate injury.
Notice.
• To prevent damage to electronic components by static electricity, wear an anti-static wrist strap
and follow anti-static protocols.
• When cleaning projector optics, never touch an optical surface with your bare hands.
• Always wear powder free latex gloves when handling and cleaning projector optics.
Recommended service kit
•
Powder free latex gloves
•
Soft camel-hair brush
•
Dust-free blower - air bulb or a canned air duster without additives such as Techspray 167110S Ultra-Pure Duster
•
Lint-free lens tissue, such as Lensx 90 tissue or Newport Optics cleaning tissue
•
Lens cleaning solution and a microfiber cloth (for the lens only)
•
Optical grade cotton swabs with wooden stems
•
A bright, portable illumination device such as an LED flashlight
Cleaning the lens
A small amount of dust or dirt on the lens has minimal effect on image quality-to avoid the risk of
scratching the lens, clean the lens only if absolutely required.
Removing dust
1. Brush most of the dust off with a camelhair brush or use a dust-free blower.
2. Fold a microfiber cloth and wipe the remaining dust particles off the lens with the smooth
portion of the cloth that has no folds or creases. Do not apply pressure with your fingers.
Instead, use the tension in the folded cloth to remove the dust.
3. If significant dust remains on the lens surface, dampen a clean microfiber cloth with lens
cleaning solution and wipe gently until clean.
Removing fingerprints, smudges, or oil
1. Brush most of the dust off with a camelhair brush or use a dust-free blower.
CP2208 User Manual
020-101916-02 Rev. 1 (08-2015)
85
Maintenance
2. Wrap a lens tissue around a swab and soak it in lens cleaning solution. The tissue should be
damp but not dripping.
3. Gently wipe the surface using a figure eight motion. Repeat until the blemish is removed.
Replacing the lamp
Danger! Failure to comply with the following results in serious injury.
• Lamp replacement must be performed by a qualified service technician.
• EXPLOSION HAZARD. Wear authorized protective clothing whenever the lamp door is open and
when handling the lamp. Never twist or bend the quartz lamp body. Use the correct wattage lamp
supplied by Christie.
• Ensure those within the vicinity of the projector are also wearing protective safety clothing.
• Never attempt to remove the lamp when it is hot. The lamp is under pressure when hot and may
explode, causing personal injury, death, or property damage. Allow the lamp to cool completely
before replacing it.
Warning! Failure to comply with the following could result in serious injury.
Improper installation of the lamp can damage the projector.
Removing the existing lamp
1. Tap and hold the red power button
on the touch panel controller (TPC) Main panel to turn
the lamp and projector off.
2. Allow the lamp to cool for a minimum of 15 minutes.
3. Unplug the projector.
4. Disconnect the touch panel controller (TPC) communication cable from the rear of the projector.
5. Remove the TPC from the rear of the projector.
6. Put on your protective clothing and face shield.
7. Insert the key in the lock on the lamp door, turn the key, and then open the lamp door. Do not
place heavy objects on the open lamp door.
CP2208 User Manual
020-101916-02 Rev. 1 (08-2015)
86
Maintenance
8. Loosen the two thumbscrews and open the firewall door.
9. Loosen the two thumbscrews and open the lamp access door.
10. For CDXL-14 or CDXL-16 lamps:
a. Loosen the extension nut screw (A).
CP2208 User Manual
020-101916-02 Rev. 1 (08-2015)
87
Maintenance
b. Hold the cathode end of the lamp with your right hand and the anode end with your left
hand and carefully turn the lamp with your right hand so that it unthreads from the
extension nut. Make sure the lamp does not contact the reflector or the UV filter.
c. With your left hand guide the cathode end of the lamp out of the reflector, on an angle
through the lamp access door.
11. For CDXL-19SC or CDXL-21S1 lamps:
a. Loosen the cathode screw (D) on the cathode clamp (F).
A
Anode Terminal
B
Anode Wire
C
Reflector
D
Cathode Screw
E
Cathode Nut
F
Cathode Clamp
b. Hold the anode end of the lamp with your left hand and then carefully unscrew and
remove the cathode nut with your right hand (E).
c. As you hold the anode end of the lamp, carefully guide the lamp through the reflector
ensuring not to make contact with the reflector.
d. With your right hand guide the cathode end out of the reflector, on an angle through the
lamp access door.
CP2208 User Manual
020-101916-02 Rev. 1 (08-2015)
88
Maintenance
12. Open a protective lamp case and then place the old lamp into the case. Thread the cathode nut
onto the lamp, close the protective case, and then place the lamp within the case, on the floor
where it cannot fall or be bumped.
Warning! Failure to comply with the following could result in serious injury.
Handle the protective case with extreme caution - the lamp is hazardous even when
packaged. Dispose of lamp box according to local area safety regulations.
Installing the new lamp
Caution! Failure to comply with the following could result in minor or moderate injury.
Handle the lamp by the cathode/anode end shafts only, never the glass. DO NOT over-tighten. DO
NOT stress the glass in any way. Check leads. Ensure the anode (+) lead between the lamp and
igniter is well away from any projector metal, such as the reflector or fire wall.
1. Remove the tape from the ends of the protective case.
2. Remove the plastic packing material from the lamp.
3. Remove the cathode nut from the lamp before removing it from the case.
4. For CDXL-14 or CDXL-16 lamps:
a. Install the lamp extension nut on the cathode clamp. To provide access to the locking
screw on the extension nut, rotate the extension nut until the locking screw faces upward
toward the projector lid.
b. Tighten the cathode screw with a hex key.
c. Thread on and hand-tighten the cathode nut. Ensure the smooth portion of the nut is
against the cathode clamp.
d. Hold the anode end of the new lamp in your left hand and angle it up through the hole in
the back of the reflector assembly. Insert your right index and middle finger through the
back of the reflector and thread the cathode end of the lamp into the extension nut.
When threading the lamp into the extension nut, make sure the anode wire does not hit
the reflector or the UV filter.
e. Tighten the extension nut screw.
f. Move to step 6.
5. For CDXL-19SC or CDXL-21S1 lamps:
a. Hold the anode end of the new lamp in your left hand and angle it up through the hole in
the back of the reflector assembly. Insert your right index and middle finger through the
back of the reflector and guide the lamp onto the cathode clamp. Be careful not to hit the
lamp against the reflector
b. Thread on and hand-tighten the cathode nut. Ensure the smooth portion of the nut is
against the cathode clamp.
c. Tighten the cathode screw with a hex key.
d. Hold the anode end of the new lamp in your left hand and angle it up through the hole in
the back of the reflector assembly. Insert your right index and middle finger through the
CP2208 User Manual
020-101916-02 Rev. 1 (08-2015)
89
Maintenance
back of the reflector and guide the lamp onto the cathode clamp. Be careful not to hit the
lamp against the reflector.
e. Thread on and hand-tighten the cathode nut. Ensure the smooth portion of the nut is
against the cathode clamp.
f. Tighten the cathode clamp with a hex key.
6. Align the ring terminal on the anode wire with the mounting position ensuring the crimped side
of the wire is facing out. Tighten the anode screw. Route anode lead away from nearby metal
surfaces.
7. Close the lamp access door and tighten the two thumbscrews.
8. Close the firewall door and tighten the two thumbscrews.
9. Close and lock the rear access door. Ensure the hex key is placed back into its holder before
closing the rear access door.
10. Connect the projector to AC power and then turn the projector on.
11. Tap Menu > Advanced Setup > Lamp Change Wizard.
12. Tap Next.
13. Complete these fields:
Field
Description
Type
The lamp type.
Serial Number
The lamp serial number.
Reason for Change
The reason the lamp was changed.
Lamp Expiry (Hours)
The number of hours the lamp can operate before replacement.
This field is auto-populated.
Hours Used
The number of hours the lamp has operated before installation.
14. Tap Save.
15. Tap Next.
16. Align the lamp. See Aligning the lamp on page 29.
CP2208 User Manual
020-101916-02 Rev. 1 (08-2015)
90
Maintenance
Inspecting the card cage filter
Caution! Failure to comply with the following could result in minor or moderate injury.
Use only high efficiency Christie approved filters. Never operate the projector without the filter
installed. Always discard used air filters.
You should check the condition of the card cage air filter monthly. Clean or replace the card cage air
filter sooner if you are operating the projector in a dusty or dirty environment. The filter is located
on the left side of the projector behind the air filter cover.
1. Loosen the two captive screws on the bottom of the filter cover.
2. Pull the cover out and down.
3. Slide the air filter out and inspect it.
If the filter appears dirty and you cannot see through it, replace it with a new paper filter, or
clean it if it is a washable filter. See Cleaning a washable filter on page 93.
If the filter appears clean, continue to step 4.
4. Replace the air filter with the airflow indicator facing toward the projector.
5. Install the air filter cover by inserting the two bottom tabs and then pushing the cover closed.
6. Tighten the two captive screws.
Inspecting the light engine compartment filter
1. Remove the top lid.
CP2208 User Manual
020-101916-02 Rev. 1 (08-2015)
91
Maintenance
2. Reach into the projector and then loosen the first service panel screw.
3. Open the integrator rod access door and loosen the second service panel screw.
4. Push the clips on the top of the service panel down and out to remove the service panel.
CP2208 User Manual
020-101916-02 Rev. 1 (08-2015)
92
Maintenance
5. Loosen the two captive screws on the cap plate and then remove it.
6. Slide the air filter out and inspect it.
If the filter appears dirty and you cannot see through it, replace it with a new paper filter, or
clean it if it is a washable filter. See Cleaning a washable filter on page 93.
If the filter appears clean, continue to step 7.
7. Replace the air filter with the airflow indicator facing toward the projector.
8. Install the cap plate and tighten the two captive screws.
9. Install the service panel and then tighten the two screws.
10. Install the top lid.
Cleaning a washable filter
If the amount of dirt on the filter is minimal, use a vacuum or compressed air to remove it. If you
use compressed air, the air must move through the filter in the opposite direction of the air flow
indicator on the side of the filter.
Warning! Failure to comply with the following could result in serious injury.
The installation of a filter that has not been allowed to dry completely can cause an electrical short
and damage the projector.
1. Hold the filter on an angle under warm running water so the water flows through the filter in
the opposite direction of the air flow indicator on the side of the filter.
2. Rinse the filter thoroughly.
3. Submerge the filter for a minimum of 30 minutes in a container of warm water and two
tablespoons of mild detergent or liquid dish soap.
If the filter is extremely dirty, move the filter from side to side occasionally, or remove the
excess dirt by brushing both sides of the filter with a soft brush.
4. Rinse the filter thoroughly by holding it on an angle under cool running water. The air flow
arrow on the side of the filter should face down.
5. Repeat steps 3 and 4 if the filter still appears dirty.
6. Shake the filter over a container until most of the water is removed.
7. Place the filter on its edge on a flat, stable surface and allow it to dry thoroughly.
CP2208 User Manual
020-101916-02 Rev. 1 (08-2015)
93
Maintenance
8. To confirm that the filter is dry, place it over a dry paper towel and shake it. If the paper towel
remains dry, the filter can be installed in the projector.
9. Record the date the filter was cleaned.
10. Replace the filter following the instructions for the specific filter. See Inspecting the card cage
filter on page 91 or Inspecting the light engine compartment filter on page 91.
Replacing the lens
The lens seals the projection head, preventing contaminants from entering the main electronics
area. Do not operate the projector without a lens installed. Install a lens plug when you install or
transport the projector.
1. Tap and hold the red power button
on the TPC Main panel to turn the lamp and
projector off.
2. Allow the lamp to cool for a minimum of 15 minutes.
3. Disconnect the projector from AC power or turn the circuit breaker off.
4. Remove the lens surround.
5. Install the lens cap and turn the lens clamp to the open position with a hex key.
6. If necessary, remove the two cap screws securing the lens to the lens mount using a hex key.
7. Pull the lens out of the lens mount and then install a small lens cap on the rear of the lens.
8. Remove the small rear cap from the new lens. Keep the front cap on.
9. Align the tabs on the lens plate with the lens mount. Insert the lens until it connects with the
magnets on the mount. When the lens contacts the magnetic plates it is seated correctly.
10. Secure the lens clamp by rotating it clockwise with a hex key.
11. Tighten the lens mount cap screws for added stability.
12. Replace the lens surround.
13. Remove the lens cap from the front of the lens.
CP2208 User Manual
020-101916-02 Rev. 1 (08-2015)
94
Troubleshooting
This section provides information and procedures for resolving common projector issues.
If you are unable to resolve your issue, contact Christie support. In order that a support
representative can better assist you, have the model and serial number of your projector ready. For
contact information for your region, see the back cover of this document.
Projector functionality
Projector does not turn on
•
Verify the power cord is connected to the projector and the AC power supply correctly and the
input selector switch is in the correct position.
•
Verify the wall circuit breaker is on. If there is a problem with the wall circuit breaker turning
off, contact a certified electrician.
•
Verify the touch panel controller (TPC) is on and the LEDs on the input panel are illuminated. If
the TPC is off and there are no LEDS illuminated, verify the AC outlet to which the projector is
connected is working and the TPC is connected to the projector. If the AC outlet is working and
the TPC is connected to the projector, contact Christie support.
•
If the TPC is connected to the projector and the LEDs on the input panel are illuminated, on the
TPC, verify in the Operational Status region of the Main panel does not indicate a PIB failure.
Touch panel controller
•
If the TPC fails to initialize, restart the projector.
•
If the TPC fails to initialize, make sure the compact flash on the left side is installed correctly.
•
Make sure the TPC is connected to the projector.
•
If the location of button presses on the screen are not interpreted correctly, the TPC screen may
need recalibrating. Tap Menu > Administrator Setup > Preferences. Tap Calibrate Screen and
follow the onscreen instructions.
Cannot establish communication with projector
Verify all input devices have the same subnet mask and gateway and unique IP addresses.
CP2208 User Manual
020-101916-02 Rev. 1 (08-2015)
95
Troubleshooting
Lamp functionality
Lamp does not ignite
•
Tap Menu > Advanced Setup > Lamp History and verify the number of hours the lamp has
operated. Replace a lamp nearing the end of its operational life.
•
Tap Menu > Status and then Interlocks in the left pane. Check and correct all interlock
failures.
•
Tap Menu > Status and then All Alarms in the left pane. If a ballast communication error has
occurred, restart the projector and turn the lamp on.
•
Tap Menu > Status and then Temperatures in the left pane. Verify if the DMD temperatures
are too high. If the temperatures are too high, cool the projector. Ensure the projector is
properly ventilated and the air filters are not blocked.
•
Listen for a clicking noise that indicates the ballast is attempting to strike the lamp. If you do
not hear a clicking noise, there might be a problem with the ballast. Contact a Christie
accredited service technician to resolve the issue.
•
If you hear a brief clicking noise, but the lamp does not ignite, replace the lamp.
Lamp suddenly turns off
•
Tap Menu > Advanced Setup >
Lamp Power/LiteLOC Setup. Increase the lamp power.
•
Tap Menu > Status and then Interlocks in the left pane. Review and correct all interlock
failures.
•
Tap Menu > Status and then Temperatures in the left pane. Verify if the DMD temperatures
are too high. If the temperatures are too high, cool the projector. Ensure the projector is
properly ventilated and the air filters are not blocked.
•
Replace the lamp.
LiteLOC not working
™
•
Tap Menu > Advanced Setup > LampPower/LiteLOC™ Setup. Tap Enable LiteLOC™.
•
If the lamp power is at the maximum setting to maintain a LiteLOC™ setting, LiteLOC™ is
automatically disabled. Reduce the LiteLOC™ setting, or install a new lamp.
Display issues
Flicker, shadows, or dimness
•
Ensure the douser is open.
•
Align the lamp. See Aligning the lamp on page 29.
CP2208 User Manual
020-101916-02 Rev. 1 (08-2015)
96
Troubleshooting
•
Tap Menu > Advanced Setup > LampPower/LiteLOC™ Setup. Monitor the Power % field
to determine if the power is consistent or if it varies. Increase the lamp power. Lamps which are
near end of service may not operate reliably at a lower power setting.
•
Fold mirror misalignment. Contact your Christie accredited service technician to resolve the
issue.
•
Integrator rod misalignment. Contact your Christie accredited service technician to resolve the
issue.
Blank screen, no display of cinema image
•
Ensure the lens cap is not on either end of the lens.
•
Ensure the lamp is ON.
•
Confirm all power connections are still OK.
•
Ensure the douser is OPEN by verifying the state of the douser on Main panel.
•
Ensure any test pattern other than the full black test pattern displays properly.
•
Verify the correct display file is selected.
•
For cinema connections, verify the correct port is selected.
Severe motion artifacts
Verify if there is a synchronization problem with reversed 3-2 pull-down in the 60Hz-to-24Hz film-to
digital conversion and correct it at the source.
Image appears vertically stretched or squeezed into center of
screen
Open the Source File Setup window and verify the resolution and aspect ratio settings. Open the
Screen File Setup window and verify the lens factor settings
Inaccurate display colors
Adjust the color, tint, color space, and color temperature settings of your input source. Tap Menu >
Channel Setup. Tap Config 1 in the left pane and verify the correct value is selected in the PCF
list. Tap Config 2 in the left pane and verify the correct value is selected in the Color Space field.
Display is not rectangular
•
Verify the projector is level and the lens surface and screen are parallel to one another.
•
Adjust the vertical offset of the lens mount with the vertical offset knob.
•
Tap Menu > Advanced Setup > Screen File Setup and verify the settings for the screen file
are correct.
CP2208 User Manual
020-101916-02 Rev. 1 (08-2015)
97
Troubleshooting
Display is noisy
•
Adjust the input source pixel tracking, phase, and filter.
•
Verify the cables connecting the input device to the projector meet the minimum requirements.
•
Add signal amplification or conditioning if the distance between the input device and the
projector exceeds 25 feet.
Display has suddenly frozen
Turn off the projector and unplug the power cord from the power source. Plug the projector power
cord into a power source and turn the projector on.
The projector is on, but alternate content does not display
•
Make sure the lens cover is removed from the lens.
•
Make sure the lamp is on.
•
Make sure the douser is open.
•
Tap
on the main TPC screen. If the lamp does not strike, see Lamp functionality on page
96.
•
Tap Menu > Channel Setup. Verify the correct channel is selected and the settings are
correct.
•
Ensure an active source is connected properly. Check the cable connections and make sure the
alternative source is selected.
•
Verify you can select test patterns. If you can, check your source connections again.
The display is jittery or unstable
•
Verify that the input device is connected properly. If the input device is not connected properly,
the projector repeatedly attempts to display an image.
•
The horizontal or vertical scan frequency of the input signal may be out of range for the
projector.
•
The sync signal may be inadequate. Correct the source problem.
Portions of the display are cut off or warped to the opposite
edge
If you have resized the image, adjust the resizing settings until the entire image is visible and
centered.
Inconsistent picture quality
Verify the quality of the signal from the input source.
CP2208 User Manual
020-101916-02 Rev. 1 (08-2015)
98
Projector Specifications
This section provides detailed CP2208 specifications. Due to continuing research, specifications are
subject to change without notice.
Display
Panel resolution and refresh rate
Pixel format (H x V square pixels)
2048 x 1080
Processing path
23.97 - 240Hz
Achievable brightness (measured at screen center)
Nominal
Maximum
1.4kW (CDXL-14M)
3,950 lumens
4,345 lumens
1.6kW (CDXL-16M)
5,350 lumens
5,850 lumens
1.9kW (CDXL-19SC)
7,000 lumens
7,700 lumens
2.1kW (CDXL-21S1)
9,000 lumens
9,900 lumens
Achievable contrast ratio
400:1 ANSI
1700:1 Full Frame ON/OFF
Color and gray scale
Displayable colors
35.2 trillion
Gray scale resolution
45 bits total linear, 15 bits per RGB component
CP2208 User Manual
020-101916-02 Rev. 1 (08-2015)
99
Projector Specifications
White point
Nominal White
(full white, after calibration to Telecine mode, Theatres)
x = 0.314 ± 0.006
y = 0.351 ± 0.006
Gamma
Theater (nominal)
2.6 ± 5%
Control signal compatibility
Ethernet port
Interface
10Base-T/100-Base-TX
Connector
Female RJ-45
Bit Rate
10 Mbps or 100 Mbps half and full duplex
RS232-PIBS1
Interface
TIA-232
Connector
9-pin subminiature D, female
Bit Rate
115,200 (default) bps
Flow Control
Hardware (RTS/CTS)
Data Format
1 start bit, 8 data bits, 1 stop bit, no parity
Communication Protocol
Christie Serial Protocol
3D terminal
See also 3D sync terminal pin map on page 76.
Interface
Proprietary 3D connector
Connector
15-pin subminiature D, female
Bit Rate
1,200 bps
Data Format
1 start bit, 8 data bits, 1 stop bit, no parity
Communication Protocol
RS232 and GPIO
CP2208 User Manual
020-101916-02 Rev. 1 (08-2015)
100
Projector Specifications
Touch panel controller
Type of Display
Color VGA TFT LCD, backlit
Display Size
144.8 mm (5.7 inches) diagonal
Display Resolution (H x V pixels)
640 x 480
Maximum Dimensions (W x H x D)
195 mm x 148 mm x 58 mm
Integrated Operating System
Microsoft Windows® XPe
Communication Interface with Projector
10/1000Base-T Ethernet
Power Requirement
0.71A (typical)
Interface Connector
12-pin Circular connector (push-pull)
Power requirements
AC input (A)
Voltage Range
200 - 240 VAC
Line Frequency
50 Hz - 60 Hz nominal
Inrush Current
<110 A maximum
Current Consumption
16 A maximum (at 200 VAC)
Power Consumption
3200 W maximum
Current Rating of AC Input
IEC-320-C19/20 A
Below 200VAC, when the lamp is ignited, a 25 A input surge current might occur for three seconds.
UPS AC input (B)
Activation
Discrete switch above the power inlet cord(s)
UPS inlet connector (rating for powering main electronics)
IEC-320-C13/10A, 240VAC
UPS Type
Universal 100-240VAC
Ballast Power AC Plug Type/Current rating (on projector)
IEC-320-C19/20 A
Line Frequency
50 Hz - 60 Hz nominal
Current Consumption
4 A maximum (at 100 VAC)
CP2208 User Manual
020-101916-02 Rev. 1 (08-2015)
101
Projector Specifications
Lamp
Type
Xenon Short Arc Lamp
Power (software adjustable)
CDXL-14M (1.4kW)
700W min., 1430W nom., 1575W max.
CDXL-16M (1.6kW)
1000W min., 1600W nom., 1760W max.
CDXL-19SC
1260W min., 1900W nom., 1900W max.
CDXL-21S1 (2.1kW)
1260W min., 2100W nom., 2300W max.
The ballast is power regulated and has a maximum current of 97A. Therefore the maximum power
specification for a given lamp may not be achievable until the lamp has aged, since lamp voltage
increases with hours of use.
Projectors typically force a 10 minute cool down period. Ensure you do not re-strike the lamp any
sooner than two minutes into this cool down period since hot re-strikes reduce lamp life. The period
required to reach full brightness is 20 minutes (maximum).
Lamp expiry hours
This table specifies the maximum hours the projector lamp can operate before replacement:
Lamp Type
Expected Life
CDXL-14M
3500 hours
CDXL-16M
3500 hours
CDXL-19SC
1500 hours
CDXL-21S1
1500 hours
CP2208 User Manual
020-101916-02 Rev. 1 (08-2015)
102
Projector Specifications
Physical specifications
Size (L x W x H):
688 mm (27.09 inches) x 685 mm (26.98 inches)
x 395 mm
(without lens, with feet at minimum length)
(15.55 inches)
Weight:
As installed with lens
53.75 kg (119 lbs)
Shipping (includes packaging)
77.2 kg (170 lbs)
Operating Position
Rotation about projection axis
± 5 degrees maximum
Tilt of projection axis from horizontal
+ 15 degrees maximum, - 3 degrees maximum
Regulatory
This product conforms to the following regulations related to product safety, environmental
requirements and electromagnetic compatibility (EMC). Due to continuing research, specifications
are subject to change without notice.
Safety
•
CAN/CSA C22.2 No. 60950-1
•
UL 60950-1
•
IEC 60950-1
•
EN60950
Electro-magnetic compatibility
Item
Description
Emissions
• FCC CFR47, Part 15, Subpart B, Class A - Unintentional Radiators
• CAN ICES-3 (A) / NMB-3 (A)
• CISPR 22/EN 55022 Class A - Information Technology Equipment
Immunity
CISPR 24/EN55024 EMC Requirements - Information Technology Equipment
Environmental
•
EU Directive (2011/65/EU) on the restriction of the uses of certain hazardous substances
(RoHS) in electrical and electronic equipment and the applicable official amendment(s).
•
EU Regulation (EC) No. 1907/2006 onthe registration, evaluation, authorization and restriction
of chemicals (REACH) and the applicable official amendment(s).
CP2208 User Manual
020-101916-02 Rev. 1 (08-2015)
103
Projector Specifications
•
EU Directive (2012/19/EU) on waste and electrical and electronic equipment (WEEE) and the
applicable official amendment(s).
•
China Ministry of Information Industry Order No.39 (02/2006) on the control of pollution
caused by electronic information products, hazardous substances concentration limits (SJ/
T11363-2006), and the applicable product marking requirements (SJ/T11364-2006).
Certification
The product is designed to comply with the rules and regulations required for the product to be sold
in various regional markets, including USA/Canada, EU, Australia/New Zealand, Kuwait, China,
Argentina, Brazil, Korea, Japan, Mexico, Norway, Turkey, Ukraine, Russia, India, South Africa, and
Saudi Arabia.
Environment
Operating environment
Temperature
10°C to 35°C (50°F to 95°F)
Humidity (non-condensing)
20% to 80%
Altitude
0 - 3000 meters
Maximum ambient temperature
35°C
Non-operating environment
Temperature
-20°C to 60°C (-13°F to 149°F)
Humidity (non-condensing)
0% to 95%
Accessories
Standard (sold with product)
•
Touch panel controller (TPC) with interface cable
•
User Manual (with CD containing additional technical documentation)
•
Power Cord
•
Lamp
•
Lens
•
Air Filters
•
Stacking Kit
CP2208 User Manual
020-101916-02 Rev. 1 (08-2015)
104
Projector Specifications
Accessories
•
Lenses
•
Zoom Lenses
•
1.2-1.72 .69”DLPCine Zoom (108-494108-XX)
•
1.33-2.1 .69”DLPCine Zoom (108-495109-XX)
•
1.62-2.7 .69”DLPCine Zoom (108-496100-XX)
•
2.09-3.9 .69”DLPCine Zoom (108-497101-XX)
•
Rack Stand (108-416102-XX)
•
Replacement Lamps
•
CDXL-14M (003-003066-XX)
•
CDXL-16M (003-003900-XX)
•
CDXL-19SC (003-005366-XX)
•
CDXL-21S1 (003-004258-XX)
•
Replacement Light Engine Air Filter (003-004460-XX)
•
Replacement Air Filter (003-002311-XX)
•
Replacement Light Engine Washable Air Filter (003-004654-XX)
•
Replacement Card Cage Washable Air Filter (003-004655-XX)
•
Extractor Adaptor Kit (119-103105-XX)
CP2208 User Manual
020-101916-02 Rev. 1 (08-2015)
105
Corporate offices
Worldwide offices
USA – Cypress
ph: 714-236-8610
Australia
ph: +61 (0) 7 3624 4888
Canada – Kitchener
ph: 519-744-8005
Brazil
ph: +55 (11) 2548 4753
Consultant offices
China (Beijing)
ph: +86 10 6561 0240
Italy
ph: +39 (0) 2 9902 1161
China (Shanghai)
ph: +86 21 6278 7708
Eastern Europe and
Russian Federation
ph: +36 (0) 1 47 48 100
France
ph: +33 (0) 1 41 21 4404
Germany
ph: +49 2161 664540
India
ph: +91 (080) 6708 9999
Singapore
ph: +65 6877-8737
Japan (Tokyo)
ph: 81 3 3599 7481
Spain
ph: + 34 91 633 9990
Korea (Seoul)
ph: +82 2 702 1601
United Arab Emirates
ph: +971 4 3206688
Republic of South Africa
ph: +27 (0)11 510 0094
United Kingdom
ph: +44 (0) 118 977 8000
For the most current technical documentation, please visit www.christiedigital.com