1
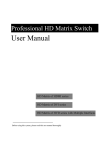
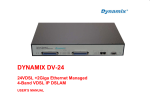
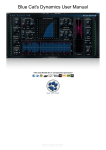
DYNAMIX PL-E
Powerline Adapter
User’s Manual
Copyright
Copyright 2003 by this company. All rights reserved. No part of this publication
may be reproduced, transmitted, transcribed, stored in a retrieval system, or
translated into any language or computer language, in any form or by any
means, electronic, mechanical, magnetic, optical, chemical, manual or
otherwise, without the prior written permission of this company.
Disclaimer
This company makes no representations or warranties, either expressed or
implied, with respect to the contents hereof and specifically disclaims any
warranties, merchantability or fitness for any particular purpose. Any software
described in this manual is sold or licensed "as is". Should the programs prove
defective following their purchase, the buyer (and not this company, its
distributor, or its dealer) assumes the entire cost of all necessary servicing,
repair, and any incidental or consequential damages resulting from any defect
in the software. Further, this company reserves the right to revise this
publication and to make changes from time to time in the contents hereof
without obligation to notify any person of such revision or changes.
All brand and product names mentioned in this manual are trademarks and/or
registered trademarks of their respective holders.
1
Important Safety Instructions
1. Read these instructions carefully.
2. Follow all warnings and instructions marked on the product.
3. Unplug this product from the wall outlet before cleaning. Do not use liquid
cleaners or aerosol cleaners. Use a damp cloth for cleaning.
4. Do not use this product near water.
5. This product should never be placed near or over a radiator or heat register,
or in a built-in installation unless proper ventilation provided.
6. This product should be operated from the type of power indicated on the
marking label. If you are not sure of the type of power available, consult your
dealer or local power company.
7. This product relies on the building’s electrical installation for short-circuit
(over current) protection. Ensure that a fuse or circuit breaker no larger than
120 VAC or 230 VAC (depends on the power supply type in your country) is
used on the phase conductors (all current-carrying conductors).
8. Plug the device directly into a 120 VAC or 230 VAC (depends on the power
supply type in your country) wall outlet. Do not use an extension cord
between the adapter and the AC power source.
9. Do not attempt to service this product yourself, as opening or removing
covers may expose you to dangerous voltage points or other risks as well as
ruin product warranty. Refer all servicing to qualified service personnel.
10. Unplug the AC coupler from the wall outlet and refer the product to
qualified service personnel for the following conditions:
- If liquid has been spilled into the product.
- If the product has been exposed to rain or water.
- If the product does not operate normally when the operating instructions
are followed.
- If the product exhibits a distinct change in performance.
2
About this Manual
Purpose
This user manual gives you all the information you need to install and operate
the Powerline Adapter properly.
Manual Structure
This user manual consists of four chapters:
Chapter 1 Getting Started
This chapter tells you what items are contained in the package and things that
you need to check before you proceed the installation.
Chapter 2 Overview
This chapter gives you all the necessary information that you need to know
about the Powerline Adapter, such as its features and layout.
Chapter 3 Setting Up
This chapter contains step-by-step procedure on how to install this product and
other necessary peripherals, configure it under Windows operating system,
and verify its installation.
Chapter 4 Troubleshooting
This chapter gives tips on how to solve the problems that you might encounter.
3
Table of Contents
Chapter 1 Getting Started
1.1 Package Contents
1.2 System Requirements
Chapter 2 Overview
2.1 Specifications
2.2 Front View
2.3 Back View
Chapter 3 Setting Up
3.1 ESD Precautions
3.2 Installing the Powerline Adapter
3.3 Installing the Driver and Utility
3.4 Configuring the Powerline Adapter
3.5 Uninstalling the Powerline Adapter Utility
Chapter 4 Troubleshooting
4
Chapter 1 Getting Started
Congratulations on your purchase of this Powerline Adapter. This product
features the latest innovations in high-speed network, making electronic
communication faster and easier. It allows you to network your computers
via your existing home power lines. It offers a data transmission speed of up
to 14 Mbps, and reaches up to 990 feet through standard power lines. This
User Manual will show you how to install and properly use this product in
order to take full advantage of its features.
1.1 Package Contents
Make sure that you have the following items:
1.
2.
3.
4.
Powerline Adapter with Ethernet or USB interface
User Manual
CD with Drivers and Configuration Utility
RJ-45 CAT 5 crossover cable or USB type A/B cable
If any of the items is damaged or missing, contact your dealer immediately.
1.2 System Requirements
Available AC power outlets in the room
Standard home power line wiring
Computers with 10/100Base-T adapters, or 10/100Base-T switch/hub
(For Ethernet Powerline Adapter)
Computers with available USB interface
(For USB Powerline Adapter)
CD-ROM drive
The laptop or desktop must have one of these operating systems, i.e.,
Microsoft Windows 98SE, Millennium, Windows 2000 and Windows
XP
Penitum II 300 MHZ MMX-Compatible PC or greater
At least 64MB hard disk space and memory
5
Chapter 2 Overview
Before you proceed with the installation, it is necessary that you have
enough information about this product. This chapter tells you all you need to
know about the Powerline Adapter.
2.1 Specifications
Features:
HomePlug 1.0 compliant
Operates on existing home electric wiring
Plug-and-Play ( PnP ) operation provides easy setup
LED indicators indicate connection status
Data transmission rate up to 14Mbps for Ethernet interface; 12Mbps
for USB interface
Built-in QoS and Error Correction features
56-bit DES Link Encryption with key management for secure
powerline communications
Driver and communication software suit provided
One USB type B connection or one 10Base-T/100Base-TX LAN
connection
2.2 Front View
The LED indicators located on the front panel show the status and activity.
USB Powerline Adapter
Col: Flash when transmitting has collision
Act: Flash during transmitting data
Link: Light when linked to a Powerline network
USB port
6
Ethernet Powerline Adapter
Col: Flash when transmitting has collision
Act: Flash during transmitting data
Link: Light when linked to a Powerline network
L/A: Light when connected with PC/Hub/etc
RJ-45 port
2.3 Back View
The LED indicators located on the front panel show the status and activity.
The table below lists the function of each LED indicator:
USB Powerline Adapter
Left: USA type power plug
Right: EUR. type power plug
Rotatable Pivot
Ethernet Powerline Adapter
Left: USA type power plug
Right: EUR. type power plug
7
Chapter 3 Setting Up
This chapter contains detailed instructions on how to install and configure the
Powerline Adapter as well as how to verify its installation. We recommend
that you follow the steps accordingly to avoid future problems.
3.1 ESD Precautions
Electrostatic discharge (ESD) can damage your processor, disk drives,
expansion boards, and other system components. Always observe the
following precautions before you install any system component.
1. Do not remove a component from its protective housing.
2. Wear a wrist grounding strap and attach it to a metal part of the system unit
before handling components. If a wrist strap is not available, maintain
contact with the system unit throughout any procedure requiring ESD
protection.
3.2 Installing the Powerline Adapter
1. Boot your computer system.
2. Arrange a power outlet nearby and then plug the Powerline Adapter into
the outlet.
3. Connect the USB Powerline Adapter and your computer with the USB
cable; connect the Ethernet Powerline Adapter and your computer via an
available LAN adapter with the RJ-45 crossover cable.
NOTE: Check the voltage range in your area before plugging your Powerline
Adapter into an outlet.
8
3.3 Installing the Driver and Utility
USB Powerline Adapter
1. Click Cancel to close the Found New Hardware Wizard and insert the
packaged CD into your CD-ROM drive.
2. The drivers are being installed into your computer.
9
3. Except Windows 98 operation system, you don’t need to reboot your
computer. There will be a new icon on your desktop after finishing driver
installation. Please verify that the LINK LED on the USB Powerline
Adapter lights up.
Ethernet Powerline Adapter
1. Insert the packaged CD into your CD-ROM drive, browse the CD the file
PowerlineAdapter.exe (ex: E:\USB DRIVERS\PowerlineAdapter.exe)
and double click it. The utility will be installed into your computer and a
new icon will appear on your desktop. Please verify that the LINK LED
and L/A LED on the Ethernet Powerline Adapter light up.
3.4 Configuring the Powerline Adapter
1. Double click the Powerline Configuration icon shown on your desktop.
The Device tab shows the MAC address of your Powerline device
connected to your computer. If you have installed more than two
Powerline devices, select the preferred one and click Connect to access
your network. Click Refresh whenever you add or eliminate Powerline
devices. The Link Quality depends on the site’s power circuit condition,
power stability, etc.
10
2. The Network tab shows all Powerline devices present on your network.
Click Scan Powerline Network to update Powerline network.
11
3. The Security tab shows the default network password is HomePlug. Enter
your own private network password if needed and click Set Local.
4. The Advanced tab allows you to add other remote device password. You
don’t need this password unless other devices set different network
password with yours. Each device password is different and listed on the
bottom case label stuck on each Powerline Adapter. Enter the device
password (The format is xxxx-xxxx-xxxx-xxxx) and click Add. Click Set
All to activate the new-added password and the status column will be
shown OK.
12
5. Click OK to close the Utility program.
3.5 Uninstalling the Powerline Adapter Utility
1. Detach the Powerline Adapter from your computer.
2. From your PC desktop, click Start -> Programs -> Powerline Adapter ->
Uninstall
13
Chapter 4 Troubleshooting
1. Why other Powerline Adapters aren’t listed on the network of my
Configuration Utility?
Ans: Make sure other devices are working properly and correctly installed.
Please also check if every device uses the same network password. Try to
set each device with the same network password or add other device’s
device password into your remote password list.
2. What types of security problems will I be encountering?
Ans: If your house is on the same power grid as your neighbor, it is possible
for a hacker to get in your network. However, this problem can be easily
overcome by activating the encryption key of each Powerline device.
3. Will HomePlug operate on different circuit breakers?
Ans: HomePlug can operate on different circuit breakers without affecting the
performance. However, the signal will not pass through the power
transformers outside your house.
4. What OS does the HomePlug utility software fully support?
Ans: Windows 98SE, ME, 2000, and XP. Windows NT and Mac are only
supported by the Ethernet Powerline Adapter as a Bridge.
5. How does 56bit-DES compare with Wireless 802.11b 128bit-WEP
encryption?
Ans: 56bit-DES is superior because of its DES type encryption. Just
because 802.11b uses 128bit-WEP with more bits doesn't mean the
encryption is better. HomePlug devices use hardware 56bit-DES encryption.
With hardware encryption the signal is almost impossible to crack. The
hardware encryption process does not affect bandwidth, and the encryption
is enabled at all times.
14