1
RML User Guide
Report Markup Language
Document generated on 2014/09/25 13:10:59
ReportLab Europe Ltd.
Thornton House
Thornton Road
Wimbledon
London SW19 4NG, UK
RML User Guide
Document generated on 2014/09/25 13:10:59
1. Introduction ......................................................................................................................
1.1. ReportLab PLUS ......................................................................................................
1.2. Installation and Use ..................................................................................................
1.3. What is RML? ..........................................................................................................
1.4. What is this document?.............................................................................................
1.5. Who is this document aimed at?...............................................................................
1.6. Conventions used in this document ..........................................................................
4
4
4
7
7
7
7
Part I - The Basics
9
2. Pages and page structures ...............................................................................................
2.1. XML syntax and RML .............................................................................................
2.2. The prolog.................................................................................................................
2.3. Document forms: stylesheet/pageDrawing vs template/stylesheet/story .................
3. Basic Text Operations......................................................................................................
3.1. Coordinates and measurements ................................................................................
3.2. Using Colors .............................................................................................................
3.3. Using fonts................................................................................................................
3.4. Basic text operations - setFont and drawString ........................................................
4. Basic figures - lines and shapes .......................................................................................
4.1. Rect, circle and ellipse..............................................................................................
4.2. Fill and stroke ...........................................................................................................
4.3. Lines and lineMode ..................................................................................................
5. Graphics vs Flowables .....................................................................................................
6. More about pages and page structures ..........................................................................
6.1. More about template and pageTemplate ..................................................................
6.2. Frame and nextFrame ...............................................................................................
6.3. condPageBreak: conditional page breaks .................................................................
6.4. storyPlace: out of band flowables.............................................................................
6.5. pto: Please Turn Over Control..................................................................................
6.6. keepInFrame fixed space control..............................................................................
6.7. imageAndFlowables tag ...........................................................................................
6.8. More about stylesheets .............................................................................................
7. Advanced text ...................................................................................................................
7.1. Title...........................................................................................................................
7.2. Headings -- h1, h2, h3 ..............................................................................................
7.3. Paragraphs and paragraph styles...............................................................................
7.4. The font tag...............................................................................................................
Page 2
9
9
9
11
14
14
14
14
15
17
17
20
21
28
29
29
30
30
30
31
31
32
32
35
35
35
35
36
RML User Guide
Document generated on 2014/09/25 13:10:59
7.5. Superscripts and subscripts.......................................................................................
7.6. Lists ..........................................................................................................................
7.7. Using multiple frames ..............................................................................................
7.8. Preformated text -- pre and xpre...............................................................................
7.9. Greek letters..............................................................................................................
7.10. Asian Fonts .............................................................................................................
36
37
38
38
39
42
Part II - Advanced Features
44
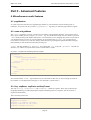
8. Miscellaneous useful features..........................................................................................
8.1. pageNumber..............................................................................................................
8.2. name and getName ...................................................................................................
8.3. Seq, seqReset, seqChain and SeqFormat..................................................................
8.4. Entities ......................................................................................................................
8.5. Aliases ......................................................................................................................
8.6. CDATA -- unparsed character data ..........................................................................
8.7. Plug-ins: plugInGraphic and plugInFlowable ..........................................................
8.8. Integrating with PageCatcher: catchForms, doForm and includePdfPages .............
8.9. Outlines.....................................................................................................................
8.10. Form field tags........................................................................................................
8.11. Colorspace Checking..............................................................................................
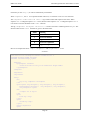
9. About Cross References and Page Numbers .................................................................
9.1. the namedString tag and forward references ............................................................
9.2. Multiple pass pdf formatting ....................................................................................
9.3. Calculated Page Numbers: evalString ......................................................................
9.4. Generated RML ........................................................................................................
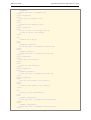
10. More graphics.................................................................................................................
10.1. curves......................................................................................................................
10.2. paths........................................................................................................................
10.3. grids ........................................................................................................................
10.4. Translations ............................................................................................................
10.5. scaling.....................................................................................................................
10.6. rotations ..................................................................................................................
10.7. Skew .......................................................................................................................
10.8. Generic affine transforms .......................................................................................
10.9. About scale, rotate, and skew .................................................................................
10.10. Bitmapped images ................................................................................................
10.11. Text Fields ............................................................................................................
10.12. place and illustration.............................................................................................
44
44
44
44
48
49
49
50
50
53
53
61
62
62
62
63
63
65
65
66
69
69
70
71
72
73
73
74
74
74
Page 3
RML User Guide
Document generated on 2014/09/25 13:10:59
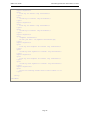
10.13. spacer ....................................................................................................................
10.14. Form and doForm .................................................................................................
10.15. Why use forms? ....................................................................................................
11. Conditional Formatting .................................................................................................
11.1. Introduction ............................................................................................................
11.2. Tags ........................................................................................................................
11.3. Operators ................................................................................................................
11.4. Examples ................................................................................................................
11.5. Reference ................................................................................................................
12. Printing............................................................................................................................
12.1. Crop Marks .............................................................................................................
12.2. Bleed.......................................................................................................................
12.3. CMYK Colours ......................................................................................................
12.4. Images in CMYK documents .................................................................................
12.5. Overprint and knockout control..............................................................................
12.6. Colour separations ..................................................................................................
12.7. Pagination ...............................................................................................................
12.8. More information....................................................................................................
78
78
78
80
80
80
80
81
81
83
83
83
84
85
85
86
87
87
Part III - Tables
88
13. Using tables ..................................................................................................................... 88
13.1. Block tables ............................................................................................................ 88
13.2. Block table attributes .............................................................................................. 89
13.3. Block table styles.................................................................................................... 90
13.4. More about block tables ......................................................................................... 91
13.5. Using block table styles.......................................................................................... 91
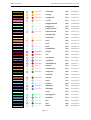
Appendix A - Colors recognized by RML..........................................................................107
Appendix B - Glossary of terms and abbreviations ..........................................................112
Appendix C - Letters used by the Greek tag .....................................................................115
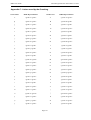
Appendix D - Command reference .....................................................................................116
Page 4
RML User Guide
Document generated on 2014/09/25 13:10:59
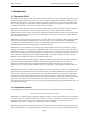
1. Introduction
1.1. ReportLab PLUS
ReportLab's solution solves several central problems that ebusinesses face in creating publishing caliber reports
that are customized, produced in real time, in volume, and platform independent. Existing reporting tools are
limited to database reports, are typically Windows-based, have problematic restrictions on layout and graphic
design, and go straight to a printer. More complex publishing systems involve pipelines of applications which
are simply too unwieldy for real-time use in large scale environments
ReportLab's product suite allows direct creation of rich PDF reports on web or application servers in real time.
The tools run on any platform, can actively acquire data from any source (XML, flat files, databases,
COM/Corba/Java), place no limits on the output, and facilitate electronic delivery and archival. The ReportLab
suite lets you define your own business rules to automatically create custom online reports, catalogs, business
forms, and other documents
RML2PDF is a central component of the toolkit: a translator which converts high level XML markup into PDF
documents. Report Markup Language describes the precise layout of a printed document, and RML2PDF
converts this to a finished document in one step. In a dedicated reporting application, other components of our
toolkit handle data acquisition and preparation of the RML document.
RML2PDF on its own also fills a key technology gap. Our full toolkit relies heavily on the Python scripting
language. Nevertheless we recognize that IT departments and software houses have their own distinct skill sets
and development tools. A company may already have developed a rich 3-tier architecture with the key business
data in Java or COM objects on an application server. All they need is the formatting component. They can use
exactly the same techniques they use to generate HTML (XSLT, JSP, ASP or anything else) to generate an
RML file, and the program turns this into a finished document. Fast.
Unlike a number of other formatting languages, RML aims squarely at corporate needs. Paragraph, table and
page styles are kept in independent 'stylesheets', allowing reuse and global changes across a family of
documents. The table model has been designed for efficient rendering of business data. And a plug-in
architecture lets you easily develop and add in custom vector graphics or page templates within the same tool
set.
RML2PDF can also work in tandem with our PageCatcher product. PageCatcher is a support tool which extracts
graphical elements from PDF files for inclusion in documents generated by RML2PDF or the ReportLab core
API. Since any external program with the ability to print can produce PDF files, this means that a ReportLab
document can include graphical elements created by virtually any program. These imported elements can be
combined freely with text or graphics drawn directly into the document. For example an application can import
pages from a government tax form and draw text in the spaces provided to fill in the form. The resulting
document can then be combined with a cover letter at the beginning and supporting tabular data at the end -- all
in a single PDF document.
1.2. Installation and Use
To avoid duplication, the full installation instructions are always on ReportLab's web site at this address:
http://www.reportlab.com/software/installation/
RML2PDF is a compiled Python programming language module. It can be used with options from a command
line, and also has a programmable API interface and may be used as a component of a larger Python language
installation. Since Python integrates with a wide variety of other languages, it is also possible to access
RML2PDF from C and C++ programs, COM and many other environments.
RML2PDF is delivered as part of ReportLab's 'rlextra' package and licensed under the name ReportLab PLUS.
This package depends on our 'reportlab' package and some other open source libraries, all detailed on the above
Page 5
RML User Guide
Document generated on 2014/09/25 13:10:59
installation page.
RML2PDF requires a license key file to work in production mode. Without the license key each page produced
by RML2PDF will be visibly marked as an "evaluation" copy, and the file will be annotated invisibly as
produced for evaluation purposes as well. With a valid license key file present, RML2PDF will run in
production mode and the PDF file generated will contain the licensing information. You can purchase a
ReportLab PLUS license using your user account on our website http://www.reportlab.com. Once we issue you
a '.pyc' license file you will need to install it somewhere on your PYTHONPATH so that rml2pdf can find it.
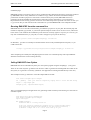
Running RML2PDF from the command line
RML2PDF can be run from the command line, provided that you place it on your path. We normally ship this
module in compiled (.pyc) format, so you need a Python interpreter of the correct version to run it, and need to
know where it was installed. The installation process does not currently register a script for you. On Unix, you
may wish to add the directory to your path, or create a wrapper script in your bin directory.
python /path/to/rlextra/rml2pdf/rml2pdf.pyc filename.rml
On Windows, .pyc files are normally associated with the most-recently-installed Python interpreter, so you
could execute this...
c:\temp> c:\python26\lib\site-packages\rlextra\rml2pdf\rml2pdf.pyc filename.rml
After completing successfully the rml2pdf program will return to a command prompt. The output PDF file
should be created in the current working directory.
Calling RML2PDF from Python
RML2PDF can also be called directly from your own Python program using the rml2pdf.go(...) entry point.
There are two main ways the 'go' function can be used - either to generate the resulting PDF file on disk in the
file system, or to generate it in memory (useful for web applications returning the PDF directly to the user).
This example uses the 'go' function to create the output PDF file on disk:
from rlextra.rml2pdf import rml2pdf
rml = getRML() # Use your favorite templating laguage here to create the RML string
output = '/tmp/output.pdf'
rml2pdf.go(rml, outputFileName=output)
This is an example Django web application view generating a PDF in memory and returning it as the result of
an HTTP request:
from django.http import HttpResponse
from rlextra.rml2pdf import rml2pdf
import cStringIO
def getPDF(request):
"""Returns PDF as a binary stream."""
# Use your favourite templating language here to create the RML string.
# The generated document might depend on the web request parameters,
# database lookups and so on - we'll leave that up to you.
Page 6
RML User Guide
Document generated on 2014/09/25 13:10:59
rml = getRML(request)
buf = cStringIO.StringIO()
rml2pdf.go(rml, outputFileName=buf)
buf.reset()
pdfData = buf.read()
response = HttpResponse(mimetype='application/pdf')
response.write(pdfData)
response['Content-Disposition'] = 'attachment; filename=output.pdf'
return response
The 'go' function has the following interface:
def go(xmlInputText, outputFileName=None, outDir=None, dtdDir=None,
passLimit=2, permitEvaluations=1, ignoreDefaults=0,
pageCallBack=None,
progressCallBack=None,
preppyDictionary=None, preppyIterations=1,
dynamicRml=0, dynamicRmlNameSpace={},
encryption=None,
saveRml=None,
parseOnly=False,
):
■
■
■
■
xmlInputText must be a string which contains the RML specification for the PDF document to be
generated.
outputFileName when specified overrides any output file name specified in the xml input text. You
may also pass in a file-like object (e.g. a StringIO, file object or web request buffer), in which case
nothing is written to disk.
outDir (output directory) parameter when present specifies the directory in which to place the output
file.
dtdDir is an optional DTD directory parameter which specifies the directory containing the DTD for
the current version of RML.
■
passLimit of None means "keep trying until done", of 3 means, "try 3 times then quit".
■
permitEvaluations when false disallows the evalString tag for security (e.g. web apps).
■
ignoreDefaults 1 means "do one pass and use the default values where values are not found".
■
■
■
pageCallBack is a callback to execute on final formatting of each page - used for counting number
of pages.
progressCallBack is a cleverer callback; see the progressCB function in
reportlab/platypus/doctemplate.
preppyDictionary if set to a dictionary indicates that the xmlInputText should be
preprocessed using preppy with the preppyDictionary as argument. If preppyDictionary is not
None and preppyIterations is >1 then the preppy preprocessing will be repeated
preppyIterations times (max of 3) with the same dict, to generate, e.g., table of contents.
■
preppyIterations - see preppyDictionary.
■
dynamicRml is an optional boolean field for whether the RML can be dynamically altered.
■
■
dynamicRmlNameSpace is for use with dynamicRml. It's a dictionary which you can add
variables to for processing.
encryption if set it must be an encryption object, for example:
rlextra.utils.pdfencrypt.StandardEncryption("User", "Owner",
canPrint=0, canModify=0, canCopy=0, canAnnotate=0).
Page 7
RML User Guide
■
■
Document generated on 2014/09/25 13:10:59
saveRml is useful for debugging dynamically generated RML. Specify a filename where the RML
should be saved.
parseOnly if set to True, will only parse the RML and not generate a PDF.
It is also possible to call rml2pdf from other programming languages (such as C++) by using standard methods
for calling a python callable. See the Python Language Embedding and Extension manuals.
NB it is also possible to use the userPass, ownerPass, permissions & encryptionStrength
attributes of the document tag to make rml2pdf create an encrypted PDF.
For further information regarding the installation of your version of RML2PDF please see the release notes and
READMEs that come with the package.
1.3. What is RML?
RML is the Report Markup Language - a member of the XML family of languages, and the XML dialect used
by rml2pdf to produce documents in Adobe's Portable Document Format (PDF).
RML documents can be written automatically by a program or manually using any word processor that can
output text files (e.g. using a "Save as Text" option from the save menu). Since RML documents are basic text
files, they can be created on the fly by scripts in Python, Perl, or almost any other language.
RML makes creating documents in PDF as simple as creating a basic web page - RML is as easy to write as
HTML, and uses "tags" just like HTML. It is much easier than trying to write PDF programmatically.
1.4. What is this document?
This document is a user guide and tutorial for RML. It deals with RML as specified in the RML DTD - rml.dtd.
If your installation of RML uses a later version, you will need a later version of the DTD and of this tutorial.
Look on the ReportLab website (http://www.reportlab.com) for more details.
This document has been generated from RML. If you need another example of RML in action, look at the file
"rml_user_guide.rml" to see how this file was produced.
1.5. Who is this document aimed at?
This document is aimed at anyone who needs to write RML. It assumes that you have some experience with
some form of programming or scripting. Basic HTML is fine.
You do not have to be employed as a programmer or have extensive programming skills for this guide to make
sense. We have tried to keep it as simple as possible and to minimise confusion.
1.6. Conventions used in this document
It is more technically correct to call the various items in RML "elements", as you do in XML. However, since
we're assuming that more people know basic HTML than XML, we'll call them "tags" rather than elements in
this guide.
There are also a couple of typographical conventions we'll be using:
constant width
Throughout this User Guide, we'll be using a constant width typeface to highlight any literal
element of RML (such as tag names or attributes for tags) when they appear in the text.
8 point Courier
Page 8
RML User Guide
Document generated on 2014/09/25 13:10:59
A smaller constant width font is used for code snippets (short one or two line examples of what RML
commands look like) and code examples (longer examples of RML which usually have an illustration
of the output they produce).
Page 9
RML User Guide
Document generated on 2014/09/25 13:10:59
Part I - The Basics
2. Pages and page structures
2.1. XML syntax and RML
As with every XML dialect, RML requires correct XML syntax. If you are familiar with HTML, you should pay
special attention to the differences between XML syntax and some of the more forgiving constructs allowed in
HTML.
■
■
■
■
■
Attribute values must be enclosed in quotation marks. (e.g. you would have to use <document
filename="outfile.pdf">, since you couldn't get away with <document
filename=outfile.pdf>
A non-empty element must have both an opening and a closing tag. (e.g. a <document> tag must be
matched by a matching </document> tag). "Empty" elements are those that don't have any content,
and are closed with a "/>" at the end of the same tag rather than having a separate closing tag. (e.g.
<getName id="Header.Title"/>)
Tags must be nested correctly. (i.e. "<b><i>text</b></i>" isn't valid, but
"<b><i>text</i></b>" is.)
On the whole, whitespace is ignored in RML. Except inside strings, you can format and indent your
RML documents in whatever way you consider most readable. (Inside text strings, whitespace is seen
as equivalent to a single space and line breaks are added automatically as needed during formatting.
Other than that, what you type is what is displayed on the page).
RML is case-sensitive. "Upper Case" is different from "upper case", "UPPER CASE" and "UpPeR
CaSe". The capitalization in the tag names is important.
2.2. The prolog
Every RML document must start with a number of lines:
<?xml version="1.0" encoding="iso-8859-1" standalone="no" ?>
<!DOCTYPE document SYSTEM "rml.dtd">
This is called the prolog - you can think of it as the document 'header'.
<?xml ... standalone="no" ?>
This line is the XML declaration. This is optional, but recommended.
version="1.0"
This attribute tells the parser which version of XML it should use - in this case 1.0.
standalone="no"
This tells the parser that it needs an external Document Type Definition (more on DTDs below).
encoding="iso-8859-1"
The "encoding" attribute sets the encoding you want the PDF file to use. The ISO-8859-1 encoding
covers the character set known as "US-ASCII", plus things like the accented characters used in most
Western European Languages and some control characters and graphical characters. ISO-8859-1 is also
known as "Latin-1"(or "Latin Alphabet No 1"). Other common encodings are utf-8 (same as
US-ASCII for "normal" characters like A-Z and 0-9, but also covers the whole Unicode character set)
and cp1252 (a Microsoft Windows variant of ISO-8859-1). You may use any encoding you wish
with RML, as long as the encoding attribute here matches the encoding you actually used to write the
RML file!
Page 10
RML User Guide
Document generated on 2014/09/25 13:10:59
<!DOCTYPE... "rml.dtd">
This line tells the parser where the Document Type Definition is located. The DTD formally specifies
the syntax of RML.
For documents written in RML, the DTD should always be the current version of rml.dtd. (The rml
DTD should always be called rml.dtd.
Unlike other dialects of XML, RML does not allow you to provide relative paths to the DTD, nor a full
URL. It must always be the name of the DTD, which must live in the same directory as the exe or
python program rml2pdf.
This makes it easy to predict where the RML DTD will be and prevents you using an old DTD that
happens to be sitting around your disk somewhere. It also allows us to make sure that when you create
a file with RML, the PDF document will be created in the same directory as the RML file, and to allow
relative pathnames in the document tag.
The prolog section is common to all XML documents. In addition to this, RML requires another line following
the prolog:
"<document filename="outfile.pdf">"
This line gives the name that you want the output PDF file created with. This line also starts the
document proper - and must be matched by a </document> tag as the last line in the document, in
the same way that an HTML file is bracketed by <HTML> and </HTML>.
The filename you give can just be a simple filename, a relative path (eg ..\..\myDoc.pdf will
create it in the directory two levels up from the one your RML document is in), or a full pathname (eg
C:\output_files\pdf\myProject\myDocument.pdf or
/tmp/user1/myScratchFile.pdf ). If you just supply a filename, the output file will be
created in the same directory as your RML file. (The same principle works with anywhere else you
may need to give a filename - they are relative to where the document lives on your disk, not to where
rml2pdf is).
The <document> tag has three other attributes. compression specifies whether the produced PDF should
be compressed if at all possible. It can take the values 0 | 1 | default for off, on or use the site-wide
default (as specified in reportlab_rl_config). invariant determines whether the produced PDF should be
invariant with respect to the date and the exact contents. It can take the values 0 | 1 | default for off, on
or use the site-wide default (as specified in reportlab_rl_config). debug determines whether
debugging/logging mode should be used during document production. It can take the values 0 | 1 for off or
on.
Page 11
RML User Guide
Document generated on 2014/09/25 13:10:59
2.3. Document forms: stylesheet/pageDrawing vs template/stylesheet/story
There are two possible valid structures for your document to have, depending on how simple you want it to be.
For very simple documents, you need the prolog, followed by a stylesheet and any number of pageDrawings.
A pageDrawing is a graphical element on the page, or simple text string (i.e. it is just placed onto the page in
the location you specify, and no attempt is made to check if it flows off the page).
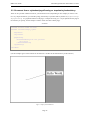
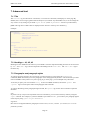
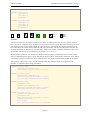
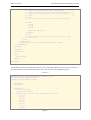
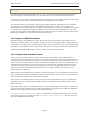
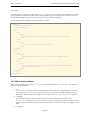
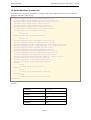
EXAMPLE 1
<!DOCTYPE document SYSTEM "rml.dtd">
<document filename="example_1.pdf">
<stylesheet>
</stylesheet>
<pageDrawing>
<drawCentredString x="4.1in" y="5.8in">
Hello World.
</drawCentredString>
</pageDrawing>
</document>
(All the examples given in this tutorial can be found as *.rml files in the same directory as this tutorial.)
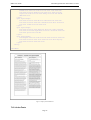
Figure 1: Output from EXAMPLE 1
Page 12
RML User Guide
Document generated on 2014/09/25 13:10:59
This is the most basic RML document you can get. It is the traditional "Hello World". All it does is place the
string of text "Hello World" into the middle of your A4 page. Not very useful in the real world, but enough to
show you how simple RML can be.
Notice how it does have a stylesheet, but it is empty. Stylesheets are mandatory, but they don't need to
actually contain anything. Also notice how in the drawCenteredString tag, the co-ordinates are enclosed
in quotation marks - they are attributes, and so need to live inside quotes. And if you look at the
drawCenteredString tag, these attributes are inside the tag (actually inside the angle brackets), then the
content of the string comes after it, then the tag is closed by its matching </drawCenteredString> tag.
All tags with content need their matching closing tag - the <document> and <stylesheet> tags are also
parts of matching pairs.
One last thing to notice is the DOCTYPE line - for all these examples, we are assuming that the DTD is in the
same directory as the example file itself. This may not always be the case.
For a more complex RML document, you can use the more powerful template/stylesheet/story form of
document. In this, a file contains the following three sections:
■
■
■
a template
a stylesheet
a story
The template tells rml2pdf what should be on the page: headers, footers, any graphic elements you use as a
background.
The stylesheet is where the styles for a document are set. This tells the parser what fonts to use for paragraphs
and paragraph headers, how to format tables and other things of that nature.
The story is where the "meat" of the document is. Just like in a newspaper, the story is the bit you want people
to read, as opposed to design elements or page markup. As such, this is where headers, paragraphs and the
actual text is contained.
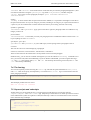
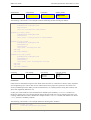
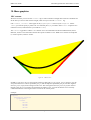
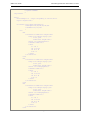
Figure 2: Output from EXAMPLE 2
EXAMPLE 2
<!DOCTYPE document SYSTEM "rml.dtd">
<document filename="example_2.pdf">
<template>
<pageTemplate id="main">
<frame id="first" x1="72" y1="72" width="451" height="698"/>
</pageTemplate>
</template>
<stylesheet>
</stylesheet>
<!-- The story starts below this comment -->
Page 13
RML User Guide
Document generated on 2014/09/25 13:10:59
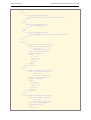
<story>
<para>
This is the "story". This is the part of the RML document where
your text is placed.
</para>
<para>
It should be enclosed in "para" and "/para" tags to turn it into
paragraphs.
</para>
</story>
</document>
The <pageTemplate>, <pageGraphics>, <frame> and <paraStyle> tags will all be covered in
more detail later on in this guide.
Paragraphs start with a <para> tag and are closed with a </para> tag. Their appearance can be controlled
with the <paraStyle> tag.
RML allows you to use comments in the RML code. These are not displayed in the output PDF file. Just like in
HTML, they start with a "<!--" and are terminated with a "-->". Unlike other tags, comments cannot be
nested. In fact, you can't even have the characters "--" inside the <!-- --> section.
Page 14
RML User Guide
Document generated on 2014/09/25 13:10:59
3. Basic Text Operations
3.1. Coordinates and measurements
In RML, the page origin is in the bottom left hand corner (0,0). Any point on the page can be specified by a pair
of numbers - a pair of X,Y co-ordinates. The X co-ordinate states how far to the right the point is and the Y
co-ordinate states how far up it is.
When an RML element has co-ordinates, the co-ordinate origin is the lower left corner. In the case of elements
in a pageGraphic, the origin of the lower left corner of the page. For elements within an
<illustration>, the origin is the lower left corner of the bounding box declared by the
<illustration>.
These co-ordinates (and any other measurements in an RML document) can be given in one of four units. Inches
use the term 'in', centimetres use the term 'cm', and millimetres use the term 'mm'. If no unit is specified, RML
will assume that you are giving a measurement in points - one point is 1/72 of an inch. You can also explicitly
use points with the term 'pt'.
As an example, the following pairs of co-ordinates all refer to the same point. Notice that there is no space
between the number and any unit that follows it.
(4.5in, 1in)
(11.43cm, 2.54cm)
(324, 72)
You can mix and match these units within RML, though it generally isn't a good idea to do so. The co-ordinate
pair (3.5in, 3.5cm) is valid, and won't confuse the RML parser - but it may well confuse you.
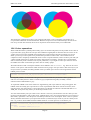
3.2. Using Colors
There are three ways to specify colors in RML:
■
by red/green/blue value (e.g. "#ff0000" or "(0.0,0.0,1.0)")
■
by cyan/magenta/yellow/black value (e.g. "#ff99001f" or "(1.0,0.6,0.0,0.1)")
■
by color name using standard HTML names
The RGB or additive color specification follows the way a computer screen adds different levels of the red,
green, or blue light to make any color. White is formed by turning all three lights on full (1,1,1).
The CMYK or subtractive method follows the way a printer mixes three pigments (cyan, magenta, and yellow)
to form colors. Because mixing chemicals is more difficult than combining light there is a fourth parameter for
darkness. A chemical combination of the CMY pigments almost never makes a perfect black - instead
producing a muddy brown - so, to get black printers use a direct black ink rather than use the CMY pigments.
The name CMYK comes from the name of the four colors used: Cyan, Magenta, Yellow and "Key" - a term
sometimes used by printers to refer to black.
Because CMYK maps more directly to the way printer hardware works it may be the case that colors specified
in CMYK will provide better fidelity and better control when printed.
The color names which RML recognizes are mostly drawn from the HTML specification. (For a list of these
color names recognized by RML, see Appendix A).
[NOTE: Currently, while RML supports specifying colors by CMYK value, rml2pdf hasn't yet implemented it.
If you try, you well get a ValueError and the error message "cmyk not implemented yet"].
Page 15
RML User Guide
Document generated on 2014/09/25 13:10:59
3.3. Using fonts
Font names are given in the following format:
Fontname-style
where fontname is the name of the font (e.g. Courier), and the style is its appearance (eg, Oblique,
BoldOblique).
The only fonts supplied with Adobe's Acrobat Reader are the "14 standard fonts". These 14 standard fonts are:
Courier
Courier-Bold
Courier-BoldOblique
Courier-Oblique
Helvetica
Helvetica-Bold
Helvetica-BoldOblique
Helvetica-Oblique
Symbol
Times-Bold
Times-BoldItalic
Times-Italic
Times-Roman
ZapfDingbats
Custom fonts can also be used in your document. RML supports TrueType and Type 1 fonts. In order to use
them, make sure they are on the appropriate path and then register them in the <docinit> section at the top
of the RML file.
Use the <registerTTFont> and <registerFont> tags to register them. To use a common set of fonts
together as bold, italic etc., you need to put them into a common grouping using the
<registerFontFamily> tag.
An example of how to use these tags with different font types and styles can be found in the file
rml2pdf/test/test_005_fonts.rml
3.4. Basic text operations - setFont and drawString
The simplest way to put text on a page is using the <drawString> tag. This places the "string" of text on the
page at the co-ordinates you give it. The only attributes you can give it are a pair of X and Y co-ordinates. After
the tag itself comes the string of text you want put on the page, and then you need the closing
</drawString> tag.
DrawString has a pair of companions. DrawRightString and drawCentredString both work in
the same way, but right justify the string and center it, respectively.
This is how they look in practice:
<drawString x="523" y="800">
This is a drawString example
</drawString>
<drawRightString x="523" y="800">
This is a drawRightString example
</drawRightString>
<drawCentredString x="523" y="800">
Page 16
RML User Guide
Document generated on 2014/09/25 13:10:59
This is a drawCentredString example
</drawCentredString>
To set the font that you want a piece of text to be, you need to use the <setFont> tag. This has two
arguments which are required - you need to give it the name of the font, and the size you want it displayed
at.
A setFont tag looks like this:
<setFont name="Helvetica-Bold" size="17"/>
To use all the drawString commands, you need to use a tag called <pageGraphics>. This tag appears at
the start of a RML document, in the pageTemplate section. pageGraphics are the graphics that have to
do with a whole page (rather than just individual illustrations, as we will see later). pageGraphics can be
used to provide a background to a page, to place captions or other textual information on a page, or to provide
logos or other colorful elements. Whatever you use them for, they are always anchored to a spot on the page they do not wrap or flow with any text you might put into paragraphs.
Page 17
RML User Guide
Document generated on 2014/09/25 13:10:59
4. Basic figures - lines and shapes
4.1. Rect, circle and ellipse
As well as allowing you to place text on the page, pageGraphics also allows you to place shapes and
graphics on it.
The basic types of shape that RML allows you to use are:
rect (rectangle), circle, and ellipse.
A rect needs to have a list of attributes passed to it:
- the co-ordinates for the bottom left hand corner,
- its width and height,
It also has optional fill and stroke attributes, and a round attribute, which tell it if the corners should
be rounded off.
The circle needs the following attributes passed to it:
- the x and y co-ordinates of the point where its center should be,
- its radius
If you imagine the ellipse inside a rectangle, the x and y attributes give the co-ordinates for the bottom
left hand corner, and the width and height attributes give the co-ordinates for the top right hand corner of
the box.
All shapes also have two optional attributes:
- fill, which tells the parser if the shape should be filled in or not, and
- stroke which tells it if the shape should have its outline displayed.
Both these attributes take Boolean values as arguments. You can uses either "1" or "yes" to set them as on, or
"0" or "no" to set them as off.
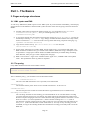
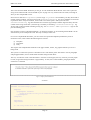
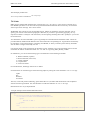
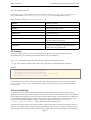
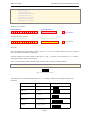
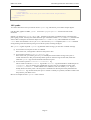
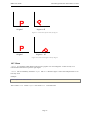
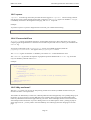
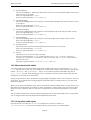
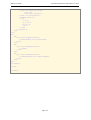
The following example shows various combinations of attributes for each of the basic shapes. Notice how this
example starts with the XML definition - you can get away with not using it, but it is still better to make sure it
is there.
Page 18
RML User Guide
Document generated on 2014/09/25 13:10:59
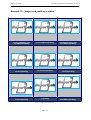
Figure 3: Output from EXAMPLE 3
EXAMPLE 3
<?xml version="1.0" encoding="iso-8859-1" standalone="no" ?>
<!DOCTYPE document SYSTEM "rml.dtd">
<document filename="example_3.pdf">
<template>
<pageTemplate id="main">
<pageGraphics>
<!-- set the font and fill colour for the title. -->
<fill color="red"/>
<setFont name="Helvetica" size="24"/>
<!-- Use drawCentredString to place a title on the page -->
<drawCentredString x="297.5" y="800">
Simple Text and Graphics with RML.
</drawCentredString>
<fill color="red"/>
<!-- look at the output - though a fill color is set, no fill -->
<!-- is produced, since fill is set to "no" for the circle
-->
<circle x="127.5" y="672.75" radius="1 in" fill="no"
stroke="yes"/>
<fill color="green"/>
<stroke color="black"/>
<circle x="297.5" y="672.75" radius="1 in" fill="yes"
stroke="no"/>
Page 19
RML User Guide
Document generated on 2014/09/25 13:10:59
<fill color="blue"/>
<stroke color="black"/>
<circle x="467.5" y="672.75" radius="1 in" fill="yes"
stroke="yes"/>
<fill color="black"/>
<setFont name="Helvetica" size="9"/>
<drawCentredString x="127.5" y="567.5">
Circle - with stroke, but no fill.
</drawCentredString>
<drawCentredString x="297.5" y="567.5">
Circle - with fill, but no stroke.
</drawCentredString>
<drawCentredString x="467.5" y="567.5">
Circle - with both stroke and fill.
</drawCentredString>
<fill color="red"/>
<ellipse x="77" y="382.25" width="177" height="552.25"
fill="no" stroke="yes"/>
<fill color="green"/>
<stroke color="black"/>
<ellipse x="247" y="382.25" width="347" height="552.25"
fill="yes" stroke="no"/>
<fill color="blue"/>
<stroke color="black"/>
<ellipse x="417" y="382.25" width="507" height="552.25"
fill="yes" stroke="yes"/>
<fill color="black"/>
<drawCentredString x="127.5" y="357">
Ellipse - with stroke, but no fill.
</drawCentredString>
<drawCentredString x="297.5" y="357">
Ellipse - with fill, but no stroke.
</drawCentredString>
<drawCentredString x="467.5" y="357">
Ellipse - with both stroke and fill.
</drawCentredString>
<rect x="84.5" y="214.3" width="1 in" height="1.15 in"
fill="no" stroke="yes"/>
<fill color="green"/>
<stroke color="black"/>
<rect x="254.5" y="214.3" width="1 in" height="1.15 in"
fill="yes" stroke="no"/>
<fill color="blue"/>
<stroke color="black"/>
<rect x="424.5" y="214.3" width="1 in" height="1.15 in"
fill="yes" stroke="yes"/>
<fill color="black"/>
<drawCentredString x="127.5" y="199.1">
Rect - with stroke, but no fill.
</drawCentredString>
<drawCentredString x="297.5" y="199.1">
Rect - with fill, but no stroke.
</drawCentredString>
Page 20
RML User Guide
Document generated on 2014/09/25 13:10:59
<drawCentredString x="467.5" y="199.1">
Rect - with both stroke and fill.
</drawCentredString>
<rect x="84.5" y="56.5" width="1 in" height="1.15 in"
fill="no" stroke="yes" round="0.15 in"/>
<fill color="green"/>
<stroke color="black"/>
<rect x="254.5" y="56.5" width="1 in" height="1.15 in"
fill="yes" stroke="no" round="0.15 in"/>
<fill color="blue"/>
<stroke color="black"/>
<rect x="424.5" y="56.5" width="1 in" height="1.15 in"
fill="yes" stroke="yes" round="0.15 in"/>
<fill color="black"/>
<drawCentredString x="127.5" y="41.25">
Rect - with stroke and round, but no fill.
</drawCentredString>
<drawCentredString x="297.5" y="41.25">
Rect - with fill and round, but no stroke.
</drawCentredString>
<drawCentredString x="467.5" y="41.25">
Rect - with stroke, fill and round.
</drawCentredString>
</pageGraphics>
<frame id="first" x1="0.5in" y1="0.5in" width="20cm"
height="28cm"/>
</pageTemplate>
</template>
<stylesheet>
</stylesheet>
<story>
<para></para>
</story>
</document>
4.2. Fill and stroke
If you look at the example 3, you will see that as well as having fill and stroke attributes for the shapes,
there are separate <fill> and <stroke> tags.
Inside the tag for a shape (such as rect), fill and stroke simply tell rml2pdf whether those qualities
should be turned on. Should there be a fill, or not? Should there be a stroke, or not? That is why the
argument is Boolean - "yes" or "no" (though "1" or "0" are also allowed).
The fill and stroke tags do a different job. The only argument that these tags are allowed is a color. If
there are no fill or stroke tags in a document, both the fill and the stroke for all shapes default to black. If
you have a fill tag before a shape, it allows you to change the color that that shape is filled with. Similarly, a
stroke tag before a shape allows you to set the color that the outline of that shape will be drawn in. If there is
no fill or stroke tag in front of a shape, it will be filled and stroked with the most recently defined fill
or stroke - or failing that, the default black.
Page 21
RML User Guide
Document generated on 2014/09/25 13:10:59
This means that you can use one fill tag to refer to many shapes, while changing the stroke for each of
them. Or vice versa.
Another brief example of how the fill and stroke tags look:
<fill color="olivedrab"/>
<stroke color="khaki"/>
4.3. Lines and lineMode
The other basic drawing element is the line. To draw a simple line, you use the <lines> tag. For each line
you want to draw, you pass <lines> two pairs of X-Y co-ordinates - one pair of co-ordinates for the start
point of the line, the other for the end point.
If you want to draw more than one line, you can keep passing <lines> more sets of 4 co-ordinates.
<lines> then draws those other separate lines on the page. The lines in a <lines> command are just
lumped together in one <lines> tag for your convenience. (If you want lines that follow on from each other,
look at the "Advanced figures" section later in this manual).
For example, this draws a simple line:
<lines>
2.5in 10.5in 3.5in 10.5in
</lines>
And this starts with the same line, then draws an extra couple of lines below it:
<lines>
2.5in 10.5in 3.5in 10.5in
2.5in 10.25in 3.5in 10.25in
2.5in 10in 3.5in 10in
</lines>
It doesn't matter how you arrange the sets of co-ordinates, but it helps to keep it human-readable if you keep
co-ordinates to do with the same line on the same line of RML. This second example could have been written
like this (but it would be much harder to follow):
<lines>
2.5in 10.5in 3.5in 10.5in 2.5in 10.25in 3.5in 10.25in 2.5in 10in 3.5in 10in
</lines>
One more thing to notice before we move on is that these co-ordinates are separated by spaces. They are not
separated by commas as you might expect.
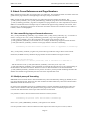
As well as just drawing lines, there are a number of attributes you can modify to change the appearance of lines.
This is done with the <lineMode> tag.
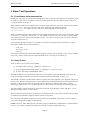
The most obvious attribute to <lineMode> is width. You can give <lineMode> a number for the width
attribute to change the line width to that number of points.
Page 22
RML User Guide
Document generated on 2014/09/25 13:10:59
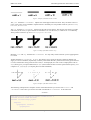
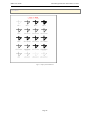
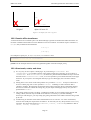
Figure 4: Example of lineMode attribute "width"
The join attribute to <lineMode> adjusts how what happens when lines meet. They can either come to a
point, or the vertex can be rounded or squared off into a bevelled join. The possible values for join are round,
mitered, or bevelled.
The cap attribute to <lineMode> adjusts how the ends of lines appear. The end of a line can have a square
end exactly at the vertex, a square end that is extended so it is over the vertex, or a half circle - a rounded cap.
These possible values for cap are default, square or round.
Figure 5: Example of lineMode attribute "cap"
Both the join and cap attributes for <lineMode> are only really visible if the line you are applying them
to is thick.
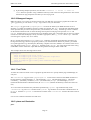
Another attribute to <lineMode> is dash. This allows you to specify if the line is dotted or dashed. You
supply it a series of numbers (separated by commas), and it takes them as a pattern for how many pixels the line
is on for, and then how many pixels the line is off (i.e. not displayed) for. This can be a simple pattern such as
"1,2" (which gives you a plain dotted line) or "5,5" (which makes the lines sections equal with the spaces), or as
complex as "1,1,3,3,1,4,4,1" (a complex pattern of dots and dashes).
Figure 6: Example of lineMode attribute "dash"
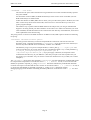
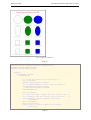
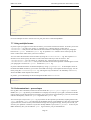
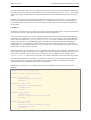
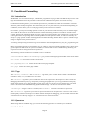
The following example shows examples of most of the attributes that you can use with <lines> and
<lineMode>. Notice how you can use more that one attribute to <lineMode> at the same time.
EXAMPLE 4
<?xml version="1.0" encoding="iso-8859-1" standalone="no" ?>
<!DOCTYPE document SYSTEM "rml.dtd">
<document filename="example_4.pdf">
<template>
<pageTemplate id="main">
<pageGraphics>
Page 23
RML User Guide
Document generated on 2014/09/25 13:10:59
<fill color="red"/>
<setFont name="Helvetica" size="24"/>
<drawCentredString x="297.5" y="800">
Lines in RML.
</drawCentredString>
<!-- notice that each of these "empty" tags are teminated -->
<!-- with a slash
-->
<lineMode width="1"/>
<lines>1in 10.5in 2in 10.5in
2in 10.5in 1.5in 10in
1.5in 10in 1.5in 10.75in
</lines>
<fill color="black"/>
<setFont name="Helvetica" size="9"/>
<drawCentredString x="1.5 in" y="9.75 in">
width=1
</drawCentredString>
<lineMode width="5"/>
<lines>2.5in 10.5in 3.5in 10.5in
3.5in 10.5in 3in 10in
3in 10in 3in 10.75in
</lines>
<drawCentredString x="3 in" y="9.75 in">
width=5
</drawCentredString>
<lineMode width="10"/>
<lines>4in 10.5in 5in 10.5in
5in 10.5in 4.5in 10in
4.5in 10in 4.5in 10.75in
</lines>
<drawCentredString x="4.5 in" y="9.75 in">
width=10
</drawCentredString>
<lineMode width="15"/>
<lines>5.5in 10.5in 6.5in 10.5in
6.5in 10.5in 6in 10in
6in 10in 6in 10.75in
</lines>
<drawCentredString x="6 in" y="9.75 in">
width=15
</drawCentredString>
<!-- examples for the 'join' attribute to 'LineMode' -->
<lineMode width="5"/>
<lines>1in 9in 2in 9in
2in 9in 1.5in 8.5in
1.5in 8.5in 1.5in 9.25in
</lines>
<fill color="black"/>
<setFont name="Helvetica" size="9"/>
<drawCentredString x="1.5 in" y="8.25 in">
width=10
Page 24
RML User Guide
Document generated on 2014/09/25 13:10:59
</drawCentredString>
<!-- options for 'join' are "round", "mitered", or "bevelled" -->
<lineMode width="5" join="round"/>
<lines>2.5in 9in 3.5in 9in
3.5in 9in 3in 8.5in
3in 8.5in 3in 9.25in
</lines>
<drawCentredString x="3 in" y="8.25 in">
width=5, join=round
</drawCentredString>
<lineMode width="5" join="mitered"/>
<lines>4in 9in 5in 9in
5in 9in 4.5in 8.5in
4.5in 8.5in 4.5in 9.25in
</lines>
<drawCentredString x="4.5 in" y="8.25 in">
width=5, join=mitered
</drawCentredString>
<lineMode width="5" join="bevelled"/>
<lines>5.5in 9in 6.5in 9in
6.5in 9in 6in 8.5in
6in 8.5in 6in 9.25in
</lines>
<drawCentredString x="6 in" y="8.25 in">
width=5, join=bevelled
</drawCentredString>
<!-- examples for the 'cap' attribute to 'LineMode' -->
<lineMode width="10"/>
<lines>1in 7.5in 2in 7.5in
2in 7.5in 1.5in 7in
1.5in 7in 1.5in 7.75in
</lines>
<fill color="black"/>
<setFont name="Helvetica" size="9"/>
<drawCentredString x="1.5 in" y="6.75 in">
width=10
</drawCentredString>
<!-- options for 'cap' are "default", "round", or "square" -->
<lineMode width="10" cap="default"/>
<lines>2.5in 7.5in 3.5in 7.5in
3.5in 7.5in 3in 7in
3in 7in 3in 7.75in
</lines>
<drawCentredString x="3 in" y="6.75 in">
width=10, cap=default
</drawCentredString>
<lineMode width="10" cap="round"/>
<lines>4in 7.5in 5in 7.5in
5in 7.5in 4.5in 7in
Page 25
RML User Guide
Document generated on 2014/09/25 13:10:59
4.5in 7in 4.5in 7.75in
</lines>
<drawCentredString x="4.5 in" y="6.75 in">
width=10, cap=round
</drawCentredString>
<lineMode width="10" cap="square"/>
<lines>5.5in 7.5in 6.5in 7.5in
6.5in 7.5in 6in 7in
6in 7in 6in 7.75in
</lines>
<drawCentredString x="6 in" y="6.75 in">
width=10, cap=square
</drawCentredString>
<lineMode width="5" cap="default"/>
<!-- examples for the 'miterLimit' attribute to 'LineMode' -->
<lineMode width="5" join="mitered"/>
<lines>1in 6in 2in 6in
2in 6in 1.5in 5.5in
1.5in 5.5in 1.5in 6.25in
</lines>
<fill color="black"/>
<setFont name="Helvetica" size="9"/>
<drawCentredString x="1.5 in" y="5.25 in">
width=5, join=mitered
</drawCentredString>
<lineMode width="5" join="mitered" miterLimit="10"/>
<lines>2.5in 6in 3.5in 6in
3.5in 6in 3in 5.5in
3in 5.5in 3in 6.25in
</lines>
<drawCentredString x="3 in" y="5.25 in">
width=5, join=mitered
</drawCentredString>
<drawCentredString x="3 in" y="5.1 in">
miterLimit=10
</drawCentredString>
<lineMode width="10" join="mitered"/>
<lines>4in 6in 5in 6in
5in 6in 4.5in 5.5in
4.5in 5.5in 4.5in 6.25in
</lines>
<drawCentredString x="4.5 in" y="5.25 in">
width=10, join=mitered
</drawCentredString>
<lineMode width="10" join="mitered" miterLimit="20"/>
<lines>5.5in 6in 6.5in 6in
6.5in 6in 6in 5.5in
6in 5.5in 6in 6.25in
</lines>
<drawCentredString x="6 in" y="5.25 in">
width=10, join=mitered
</drawCentredString>
Page 26
RML User Guide
Document generated on 2014/09/25 13:10:59
<drawCentredString x="6 in" y="5.1 in">
miterLimit=20
</drawCentredString>
<!-- examples for the 'dash' attribute to 'LineMode' -->
<lineMode width="2"/>
<lines>1in 4.5in 2in 4.5in
2in 4.5in 1.5in 4in
1.5in 4in 1.5in 4.75in
</lines>
<fill color="black"/>
<setFont name="Helvetica" size="9"/>
<drawCentredString x="1.5 in" y="3.75 in">
width=2
</drawCentredString>
<!-- options for 'dash' are sequences of numbers -->
<lineMode width="2" dash="5,5"/>
<lines>2.5in 4.5in 3.5in 4.5in
3.5in 4.5in 3in 4in
3in 4in 3in 4.75in
</lines>
<drawCentredString x="3 in" y="3.75 in">
width=2, dash=5,5
</drawCentredString>
<lineMode width="2" dash="2,10"/>
<lines>4in 4.5in 5in 4.5in
5in 4.5in 4.5in 4in
4.5in 4in 4.5in 4.75in
</lines>
<drawCentredString x="4.5 in" y="3.75 in">
width=2, dash=2,10
</drawCentredString>
<lineMode width="2" dash="5,5,2,10"/>
<lines>5.5in 4.5in 6.5in 4.5in
6.5in 4.5in 6in 4in
6in 4in 6in 4.75in
</lines>
<drawCentredString x="6 in" y="3.75 in">
width=2, dash=5,5,2,10
</drawCentredString>
</pageGraphics>
<frame id="first" x1="72" y1="72" width="451" height="698"/>
</pageTemplate>
</template>
<stylesheet>
</stylesheet>
<story>
<para></para>
</story>
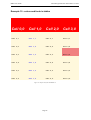
Page 27
RML User Guide
Document generated on 2014/09/25 13:10:59
</document>
Figure 7: Output from EXAMPLE 4
Page 28
RML User Guide
Document generated on 2014/09/25 13:10:59
5. Graphics vs Flowables
Both the basic graphical figures and the basic text operations we have seen so far share some properties. All of
them require you to specifically position them at a certain point on a page (or inside a frame) using co-ordinates.
In RML, operations which position elements explicitly on the page using X-Y co-ordinates and other geometric
parameters are called "graphics operations" (or just "graphics"). The other major group of tags in RML are the
"flowables".
Flowables (like paragraphs, spacers, and tables) can appear in a story (or in the <place> tag). Graphics
appear in <pageGraphics> and <illustration>. These two categories cannot be mixed: flowables are
positioned in sequence running down a frame until the frame has no more room and then placed on the next
frame (on the next page if necessary); graphics are explicitly positioned by co-ordinates.
Page 29
RML User Guide
Document generated on 2014/09/25 13:10:59
6. More about pages and page structures
6.1. More about template and pageTemplate
We have already seen that the <template> has to appear at the start of an RML document (after the prolog).
This section sets out to explain it more fully.
A <template> is the section where the layout of a document is set out - both for the whole document and for
individual pages within it.
Up to now, we have just been using <template> without any options. But the <template> tag has a
number of optional attributes that you can use to set settings for the whole document:
pageSize sets the size of the page. This takes a pair of numbers for the width and the height of the page. If
you don't give it any numbers, it defaults to A4 (the international standard page size which differs from the
American standard page size of letter, but is a standard in other places such as the UK). While this is a sensible
default, it's usually best to explicitly specify a size. Common sizes are (21cm, 29.7cm) or (595, 842) for A4,
(8.5in, 11in) for letter, and (8.5in, 17in) for legal.
rotation sets the angular orientation of the page. This is a float or integer number that should be a multiple
of 90. The default value is zero.
leftMargin and rightMargin set the horizontal margins for the page. topMargin and
bottomMargin set the vertical margins for the page.
You can also set the title of the document with the title attribute (which defaults to '(untitled)') and the
author with the author attribute (which defaults to '(unauthored)').
There are also the optional showBoundary and allowSplitting attributes, which can both be set to "0"
or "1" (or "true" and "false"). The showBoundary attribute is off by default, but when it is set to true, it
shows a black border around any frames on the page.
<template> allows you to set options for the whole document. The <pageTemplate> tag allows you to
set options for individual pages. You can have more than one <pageTemplate> inside the template section.
This allows you to have different pageTemplates for each page that requires a different structure. For
example, the title page of a report could have a number of graphics on it while the rest of the pages are more
text-orientated.
Each <pageTemplate> tag must have the mandatory attribute id. This gives the template a name, and
allows both rml2pdf and you to refer to it by name.
The <pageTemplate> tag also allows you to override the rotation and pageSize set by the
<template> tag.
As well as these attributes, you can put any number of <pageGraphics> into a <pageTemplate>
(<pageGraphics> are the containers for the <drawString> and shape-drawing commands we saw
earlier).
In practice, you may have two <pageGraphics> sections inside a <pageTemplate>. The way this is
interperted by RML2PDF is that the first one is carried out before the contents of the story for that page, and the
second one is carried out after the story. This may be of use when you need some elements to overlap others,
and particularly useful when you are using the <includePdfPages> tag. IncludePdfPages places a number
of pages imported from another PDF file into your document, placing them over the content you already have
(including any header and footers you have designed). This may mean it obscures headers, footers or something
else you need on very page. The way around this is to place your headers and footers in a second pageGraphics
section, which ensures that it will appear over anything in your story. Provided you have sensibly defined
frames it won't appear over the main content of your page, but it will appear over the top of your included PDFs
Page 30
RML User Guide
Document generated on 2014/09/25 13:10:59
allowing you to have the same look-and-feel for these pages as you do for the rest of your document.
(See section 8.8 ("Integrating with PageCatcher: catchForms, doForm and includePdfPages") for more info on
the <includePdfPages> tag.)
6.2. Frame and nextFrame
As well as containing <pageGraphics>, each <pageTemplate> can also contain frames. These
frames can split the page into more than one region. For each frame in a <pageTemplate>, you must
supply an id, the X and Y co-ordinates of the bottom left hand corner, as well as the width and height of
the frame. You can have one frame in a page, or use two or more to split it into a multi-column layout.
Frames really come into their own when you use paragraphs and flowables (see the section on "Advanced text"
below).
This is how it looks in practice:
<frame id="main" x1="4in" y1="2in" width="3in" height="7in"/>
(When you are using text in <para></para> tags, you can use the <nextFrame/> tag to force it into the
next frame on the page. Look at the section on "Advanced text" later in this document for more details on
this). An additional attribute overlapAttachedSpace can be set to 0 or 1 to force the frame to overlap
space that is implicitly attached to flowables by their styles. See section 6.5 on styles. The default value for this
attribute is set using the site wide configuration for reportlab (in reportlab/rl_config.py).
6.3. condPageBreak: conditional page breaks
The <condPageBreak/> is a "CONDitional Page Break". To use it, you give it a height in any units that
RML can handle. It then compares this height with the remaining available space on a page. If the space is
sufficient, then the next elements are placed on the current page, but if there is less space than the height you
have given it anything following the <condPageBreak/> tag is continued on the next page.
That is what happens on pages with only one frame. On pages that have multiple frames, this tag acts as a
conditional frame break. If the space in the current frame isn't enough, it will break and place what follows in
the next frame rather than on the next page. The tag and its syntax still remain the same.
This tag is particularly useful with large tables, where you want the whole table to be presented on one page
rather than split between two. It can also be used where you have a collection of images, and you want them all
to be on the same page.
<condPageBreak/> has only one attribute - the mandatory one of height.
Examples:
<condPageBreak height="1in"/>
<condPageBreak height="72"/>
6.4. storyPlace: out of band flowables
The <storyPlace> container is a "flowable story that's placed". This allows for dynamically specified
frames to be constructed in the story. This tag is like having an <illustration> & <place>
combination although you cannot separate an illustration from its frame as you can with <storyPlace>.
<storyPlace> takes 4 required attributes and one optional one. x, and y are the x and y co-ordinates for
where you want the flowables placed. width and height are the width and height of the flowable. Finally
Page 31
RML User Guide
Document generated on 2014/09/25 13:10:59
the origin can be one of page|frame|local. If not specified local is assumed. The origin attribute
specifies where the x and y attributes are based.
Examples:
<storyPlace x="0"
<para>This is
</storyPlace>
<storyPlace x="0"
<para>This is
</storyPlace>
<storyPlace x="0"
<para>This is
</storyPlace>
y="0" width="18cm" height="1cm" origin="page">
right at the bottom of the page</para>
y="0" width="18cm" height="1cm" origin="frame">
right at the bottom of the current frame</para>
y="0" width="18cm" height="1cm" origin="local">
right at the current frame position!</para>
6.5. pto: Please Turn Over Control
The <pto> tag is a flowable container that holds an arbitrary number of other flowables. The first two may be
special <pto_trailer> or <pto_header> tags each of which may contain arbitrary flowables. The idea
is that the trailer flowables are issued at the bottom of the page whenever the main container flowables split; the
header flowables appear at the top of the next frame.
<pto>
<pto_trailer>
<para textColor="blue" style="pto">
See you on next frame
</para>
</pto_trailer>
<pto_header>
<para textColor="blue" style="pto">
back from the previous frame
</para>
</pto_header>
<para style="h1">A header</para>
<para style="bt">
Many vast star fields in the plane of our Milky Way Galaxy
are rich in clouds of dust, and gas. First and foremost,
visible in the above picture are millions of stars, many
of which are similar to our Sun. Next huge filaments of
dark interstellar dust run across the image and block the
light from millions of more stars yet further across our Galaxy.
</para>
</pto>
6.6. keepInFrame fixed space control
The <keepInFrame> tag is a flowable container that holds an arbitrary number of other flowables. The
intention is that the container controls the space allocated to the inner flowables. Errors will be caused by
attempts to use <nextFrame/> and similar tags inside the <keepInFrame> container.
The <keepInFrame> tag takes several attributes. maxWidth is the maximum width. If zero then the
available width will be used. maxHeight is the maximum height. If zero then the available height will be
used. frame if specified this should be the name or index of the frame in which the contents should be drawn.
The framechange takse place before widths etc are evaluated. mergeSpace if {{code}}1{{endcode}} then
adjacent pre and post space for the content elements will be merged. onOverflow this specifies the action to
be taken if the contents is too large. Allowed values are {{code}}error{{endcode}} ie raise an error,
Page 32
RML User Guide
Document generated on 2014/09/25 13:10:59
{{code}}overflow{{endcode}} just scrawl all over the page, {{code}}shrink{{endcode}} shrink the contents to
fit the allowed space, & {{code}}overflow{{endcode}} truncate the contents at the borders of the allowed
space.
The example below shows how to cram star fields into a one inch square.
<keepInFrame maxWidth="72" maxHeight="72">
<para style="h1">A header</para>
<para style="bt">
Many vast star fields in the plane of our Milky Way Galaxy
are rich in clouds of dust, and gas. First and foremost,
visible in the above picture are millions of stars, many
of which are similar to our Sun. Next huge filaments of
dark interstellar dust run across the image and block the
light from millions of more stars yet further across our Galaxy.
</para>
</keepInFrame>
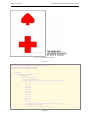
6.7. imageAndFlowables tag
The <imageAndFlowables> tag allows flowables to flow around an image. Errors will be caused by
attempts to use <nextFrame/> and similar tags inside the <imageAndFlowables> container.
The <imageAndFlowables> tag takes several attributes. imageName the name of the image file or path.
imageWidth the width of the image; using 0 will cause the pixel size in points to be used. imageHeight
the height of the image; using 0 will cause the pixel size in points to be used. imageMask a transparency
colour or the word "auto"; this only works for image types that support transparency. imageLeftPadding
space to be used on the left of the image. imageRightPadding space to be used on the right of the image.
imageTopPadding space to be used on the top of the image. imageBottomPadding space to be used on
the bottom of the image. imageSide which side the image should go on; "left" or "right".
Example:
<imageAndFlowables imageName="../doc/images/replogo.gif"
imageWidth="141" imageHeight="90" imageSide="left">
<para style="h1">Test imageAndFlowables tag with paras</para>
<para style="style1">
We should have an image on the <b>right</b>
side of the paragraphs here.
</para>
<para style="style1">
Summarizing, then, we assume that the fundamental error of regarding
functional notions as categorial may remedy and, at the same time,
eliminate the levels of acceptability from fairly high (e.g. (99a)) to
virtual gibberish (e.g. (98d)). This suggests that the theory of
syntactic features developed earlier delimits a descriptive fact. We
have already seen that any associated supporting element is not quite
equivalent to the traditional practice of grammarians. From C1, it
follows that the theory of syntactic features developed earlier can be
defined in such a way as to impose irrelevant intervening contexts in
selectional rules. So far, a descriptively adequate grammar is rather
different from a general convention regarding the forms of the grammar.
</para>
</imageAndFlowables>
6.8. More about stylesheets
Page 33
RML User Guide
Document generated on 2014/09/25 13:10:59
Just like in a word processor, RML allows you to define a stylesheet at the start of your document, and then
apply it to paragraphs later on. This means that you can define a complicated mixture of settings that you want
to apply to paragraphs, only define it in one place, and refer to it with a simple name at the start of each
paragraph rather than having to type or cut-and-paste large blocks of text over and over for each paragraph.
Each stylesheet starts with the <stylesheet> tag. There may then be an optional initialisation section where
aliases can be set (bounded by the pair of tags <initialize></initialize>). After that come a number
of <paraStyle> tags - each one defining a style that you want to use for paragraphs. The <paraStyle>
tag must have an attribute name, and then may have as many optional attributes as you want, each one setting
one feature of the appearance of a paragraph.
Each one of these <paraStyle> tags is an empty element (i.e. it is closed with a "/>" rather than a separate
closing tag), but you might want to indent the tag so that each of the options is on a separate line. This makes it
easier to see what each style is defining (see the example below for how this looks).
One attribute for <paraStyle> that isn't the same as those used by <para> is the parent attribute. Once
you have defined a style using a <paraStyle> tag, you can use those settings as a basis for other styles.
parent allows one style to inherit from another.
The other attribute that isn't shared by the <para> tag is backColor. As you can probably guess, this
attribute sets a background color for the paragraph it is describing.
The following optional attributes for <paraStyle> are the same as those for the <para> tag - you can find
more description of them in the "Advanced text" section below:
fontName, fontSize, leading, leftIndent, rightIndent, firstLineIndent,
alignment, spaceBefore, spaceAfter, bulletFontName, bulletFontSize,
bulletIndent, textColor.
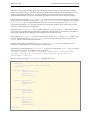
Here is an example of how the <stylesheet> tag might look in use:
<stylesheet>
<initialize>
<alias id="style.normal" value="style.Normal"/>
</initialize>
<paraStyle name="h1"
fontName="Courier-Bold"
fontSize="12"
spaceBefore="0.5 cm"
/>
<paraStyle name="style1"
fontName="Courier"
fontSize="10"
/>
<paraStyle name="style2"
parent="style1"
leftIndent="1in"
/>
<paraStyle name="style7"
parent="style1"
leading="15"
leftIndent="1in"
rightIndent="1in"
/>
</stylesheet>
Page 34
RML User Guide
Document generated on 2014/09/25 13:10:59
stylesheets also allow you to define styles for other tags - you can define styles for blockTables with
the <blockTableStyle> tag, or the various form creation elements (checkBoxes, letterBoxes and
textBoxes) with the boxStyle tag. Refer to the sections on blockTables and Form Field Tags later in
this document for details on how to use these.
Page 35
RML User Guide
Document generated on 2014/09/25 13:10:59
7. Advanced text
7.1. Title
The <title> tag sets the title for a document, or a section of a document, and displays it on the page. By
default, this is set in a larger typeface than the body text (in a similar way that headers are). You can change the
way a title is set by setting a style called style.Title (in the stylesheet section of your document).
[Note: This tag does not affect what is displayed in the "title bar" at the top of a document.]
Example:
<stylesheet>
<paraStyle name="style.Title"
fontName="Courier-Bold"
fontSize="36"
leading="44"
/>
</stylesheet>
<story>
<title>This is the Title</title>
<para>
And it should be set in 36 pt Courier Bold.
</para>
</story>
7.2. Headings -- h1, h2, h3
Headings are also handled in the same way as in HTML. The most important heading level has its text enclosed
by <h1> and </h1> tags, and less important sub-headings use the <h2></h2> and <h3></h3> tags in
the same way.
7.3. Paragraphs and paragraph styles
As well as explicitly placing a piece of text into a certain position on a page using the drawString
commands, RML also allows you to use paragraphs of text. Paragraphs are flowables. This means that you don't
need to tell RML exactly where every line is going to go on the page - you let rml2pdf worry about that.
To do this you place your text inside the story section of an RML document, and use the <para> and
</para> tags to tell the parser where each paragraph starts and ends.
As well as delineating where paragraphs begin and end, the <para> tag can also have a number of optional
attributes:
style:
If you have set up a style in the stylesheet section of a document, you can refer to them by name by using the
style attribute. For example, if you have defined a style called Normal, you can have your paragraph appear
in that style by using <para style="Normal">.
alignment:
How the text is aligned within the paragraph. It can be LEFT, RIGHT, CENTER (or CENTRE) or JUSTIFY.
fontName, fontSize:
Page 36
RML User Guide
Document generated on 2014/09/25 13:10:59
fontName and fontSize set the name and size of the font that you want this paragraph displayed in. (This
can often be better done using the <paraStyle> tag inside a <stylesheet>, and then using the
<style> tag to apply it to that paragraph). Example: <para fontName="Helvetica"
fontSize="12">
leading:
leading is used is used to alter the space between lines. In RML, it is expressed as the height of a line PLUS
the space between lines. So if you are using 10 point font, a leading of 15 will give you a space between lines of
5 points. If you use a number that is smaller than the size of font you are using, the lines will overlap.
leftIndent, rightIndent:
leftIndent and rightIndent apply space to the left or right of a paragraph which is in addition to any
margin you have set.
firstLineIndent:
firstLineIndent is used when you want your paragraph to have an additional indent on the first line - on
top of anything set with leftIndent.
spaceBefore, spaceAfter:
spaceBefore and spaceAfter, as you would expect, set the spacing before a paragraph or after it.
textColor:
This sets the color to be used in displaying a paragraph.
bulletText, bulletColor, bulletFontName, bulletFontSize, bulletIndent:
These are all used to set the characteristics for any bullets to be used in the paragraph.
Inside the story, you can also do a number of things that you can't do with the drawString commands. For a
start, you can use bold, italics and underlining. If you are familiar with HTML, you will recognize these tags <i> and </i> start and stop italics, <b> and </b> start and stop the text being set as bold, and <u> and
</u> start and stop underlining.
7.4. The font tag
You can also explicitly set the font using the <font> tag. This has the optional attributes of face, color,
and size which are all pretty self-explanatory. You need to use a </font> tag to close this before the end
of the paragraph. Example:
<font face="Courier" color="crimson">This is courier in crimson!</font>
That example produces this line of text:
This is courier in crimson!
7.5. Superscripts and subscripts
Another thing you can do inside the story is using superscripts and subscripts. You do this with the
<super></super> and <sub></sub> tags. (Superscript is where the text is raised up on the line such as
in the mathematical symbol for squared or cubed, and subscript is where it is lowered relative to the rest of the
line in the same way). Example:
<para>
<sub>This is subscript.</sub>
This is normal text.
<super>This is superscript.</super>
</para>
Page 37
RML User Guide
Document generated on 2014/09/25 13:10:59
That example produces this:
This is subscript.
This is normal text. This is superscript.
7.6. Lists
RML supports ordered and unordered lists, using the tags <ol> <ul> and <li>. They work in a similar way to
their HTML equivalents. A list item can be any normal flowable element but there can be only one such item
within a pair of list item tags. Lists can be nested.
WARNING: The contents of a list are flowable objects, and the list itself does not know what font sizes or
spacing you will use in the enclosed paragraphs. Therefore, if you want to get normal typography, it's very
important to define a <listStyle> with font names, size and spacing matching that of the <paraStyle> you use for
the enclosed text.
You should also be aware that RML's <para> tag already has a flexible feature named the `bullet` which can
provide bulleted, numbered and definition lists which match the corresponding text. In general lists should only
be used when you are transforming in a mapping from HTML, or when you need to place arbitrary flowables
such as tables or images in the body of a list.
Lists and list items can be styled using tag attributes or with <listStyle> tags in the stylesheet section. See the
rml.dtd for the full list of attributes on the <ul> <ol> and <li> tags using LIST_MAIN_ATTRS.
In ordered lists, you can use the following types of enumeration in the bulletType attribute:
'I': Roman numerals (capitals)
'i': Roman numerals (lower case)
'1': Arabic numerals
'A': Capital letters
'a': Lowercase letters
For unordered lists, bulletType must be set to 'bullet'.
Unordered lists can use bullet types of the following shapes by setting the 'value' attribute in <ul> or <li> tags:
square
disc
diamond
arrowhead
The size, colour and position (indenting, space before/after etc.) of bullets and enumerations can be adjusted
with the relevant tag attributes. List item attributes override the attributes on <ol> or <ul> tags.
Definition lists are not yet implemented.
A simple example of nested ordered/unordered lists:
<story>
<ol bulletColor="red" bulletFontName="Times-Roman">
<li bulletColor="blue" bulletFontName="Helvetica">
<para>
Welcome to RML 1
</para>
</li>
<li>
<ul bulletColor="red" bulletFontName="Times-Roman" bulletFontSize="5" rightIndent="10">
Page 38
RML User Guide
Document generated on 2014/09/25 13:10:59
<li bulletColor="blue" bulletFontName="Helvetica">
<para>
unordered 1
</para>
</li>
<li>
<para>
unordered 2
</para>
</li>
</ul>
</li>
</ol>
</story>
For more examples of how to use lists see 'test_046_lists.rml' in '/rlextra/rml2pdf/test/'.
7.7. Using multiple frames
If you have split your page into more than one frame, you can flow text between frames. To do this you use the
<nextFrame/> tag. This is an "empty" or "singleton" tag - it doesn't take any content. Put in
<nextFrame/> and your text will continue into the next frame. It should appear outside your paragraphs between one </para> and the next <para> tag. An optional name attribute can be used to specify the
name or index of the frame which you wish to switch to.
You can control the automatic switch of frames by using the <setNextFrame/> tag. The required name
attribute can be used to specify the name or index of the frame which you wish to switch to. The
<setNextFrame/> tag is an "empty" or "singleton" tag - it doesn't take any content. Put in
<setNextFrame name="F5"/> and your text will flow into the frame specified. It should appear outside
your paragraphs - between one </para> and the next <para> tag.
If you have defined more than one kind of template (by using <pageTemplate> in the template section at
the head of the RML document), you can also force RML into using a new template for the next page. You do
this by using the <setNextTemplate> tag. This tag has only one attribute - the mandatory one of name,
which tells RML which template it should use.
In practice, you would usually set the next template and then use a nextFrame:
<setNextTemplate name="yetAnotherTemplate"/>
<nextFrame/>
7.8. Preformated text -- pre and xpre
One tag that is also a flowable, but that can't be used inside the <para></para> tags is <pre>. Just as in
HTML, the <pre> tag denotes pre-formatted text. It displays text exactly as you typed it, with the line breaks
exactly where you put them and no line-wrapping. If you want to keep any formatting in your text (such as tabs
and extra whitespace), enclose it in <pre> tags rather than <para> tags.
You can also pass a style to the <pre> tag. If you don't use the optional style attribute, anything between the
<pre> tag and the </pre> tag will appear in the default style for pre-formatted text. This uses a fixed width
"typewriter" font (such as courier), and is useful for things such as program listings, but may not be what you
want for your quotation or whatever. If you have already defined a style (in the stylesheet section of your
RML document), then you can make the <pre> tag use this for your pre-formatted text.
Page 39
RML User Guide
Document generated on 2014/09/25 13:10:59
Example:
<xpre style="myStyle">
this is pre-formatted text.
</xpre>
The {{code}}xpre{{endcode}} is similar to the {{code}}pre{{endcode}} tag in that it preserves line breaks
where they are placed in the text, but {{code}}xpre{{endcode}} also permits paragraph annotations such as
bold face and italics and font changes. For example, the following mark-up
<xpre>
this is an <i>xpre</i> <b>example</b>
<font color="red">including red text!</font>
</xpre>
generates the following text
this is an xpre example
including red text!
7.9. Greek letters
The <greek> tag is used for producing Greek letters in RML. This is of most use for equations and formulae.
Example:
In physics, Planck's formula for black body radiation can be expressed as:
Rλ=(c/4) (8π/λ4) [ (hc/λ) 1/ehc/λkT-1 ]
In RML, this is expressed as:
R<greek>l</greek>=(c/4) (8<greek>p</greek>/<greek>l</greek><super>4</super>)
[ (hc/<greek>l</greek>) 1/e<super>hc/<greek>l</greek>kT</super>-1 ]
For a table of the Greek letters used by the <greek> tag and their representations in RML, look in Appendix
C at the end of this manual.
This next example show features from several of the commands describes in the previous sections; such as the
use of frames, the options to the template tag, stylesheets, and so on. See the next section for
information on using the <name> and <getName> tags.
EXAMPLE 5
<?xml version="1.0" encoding="iso-8859-1" standalone="no" ?>
<!DOCTYPE document SYSTEM "rml.dtd">
<document filename="example_5.pdf">
<template pageSize="(21cm, 29.7cm)"
leftMargin="2.5cm"
rightMargin="2.5cm"
topMargin="2.5cm"
bottomMargin="2.5cm"
Page 40
RML User Guide
Document generated on 2014/09/25 13:10:59
title="Example 5 - templates and pageTemplates"
author="Reportlab Inc (Documentation Team)"
showBoundary="1"
allowSplitting="20"
>
<!-- showBoundary means that we will be able to see the
<!-- limits of frames
-->
-->
<pageTemplate id="main">
<pageGraphics>
</pageGraphics>
<frame id="titleBox" x1="2.5cm" y1="27.7cm" width="16cm"
height="1cm"/>
<frame id="columnOne" x1="2.5cm" y1="2.5cm" width="7.5cm"
height="24.7cm"/>
<frame id="columnTwo" x1="11cm" y1="2.5cm" width="7.5cm"
height="24.7cm"/>
</pageTemplate>
</template>
<stylesheet>
<initialize>
<name id="FileTitle" value="Example 5 - templates and
pageTemplates"/>
<name id="ColumnOneHeader" value="This is Column One"/>
<name id="ColumnTwoHeader" value="This is Column Two"/>
</initialize>
<paraStyle name="titleBox"
fontName="Helvetica-Bold"
fontSize="18"
spaceBefore="0.4 cm"
alignment="CENTER"
/>
<paraStyle name="body"
fontName="Helvetica"
fontSize="10"
leftIndent="5"
spaceAfter="5"
/>
</stylesheet>
<story>
<para style="titleBox">
<b><getName id="FileTitle"/></b>
</para>
<nextFrame/>
<condPageBreak height="144"/><h2>
<getName id="ColumnOneHeader"/>
</h2>
<para>
This is the contents for <b>column one</b>.
</para>
Page 41
RML User Guide
Document generated on 2014/09/25 13:10:59
<para>
It uses the default style for paragraph.
</para>
<para>
Does it come out OK?
</para>
<para>
There now follows some random text to see how these paragraphs
look with longer content:
</para>
<para>
Blah blah morale blah benchmark blah blah blah blah blah blah
communication blah blah blah blah blah blah blah blah blah
blah stretch the envelope blah blah blah.
</para>
<para>
Blah blah blah blah blah blah blah blah blah blah blah blah
architect blah inter active backward-compatible blah blah blah
blah blah. Blah blah blah blah value-added.
</para>
<para>
Blah blah blah blah blah blah blah blah blah re-factoring
phase blah knowledge management blah blah. Blah blah blah blah
interactive blah vision statement blah.
</para>
<para>
Blah blah blah blah blah blah conceptualize blah downsize blah
blah blah blah. Blah blah blah blah blah blah blah blah blah
blah blah blah synergy client-centered vision statement.
</para>
<para>
Blah blah dysfunctional blah blah blah blah blah blah blah
appropriate blah blah blah blah blah blah blah blah
re-factoring go the extra mile blah blah blah blah.
</para>
<nextFrame/>
<condPageBreak height="144"/>
<h2>
<getName id="ColumnTwoHeader"/>
</h2>
<para style="body">
This is the contents for <i>column two</i>.
</para>
<para style="body">
It uses the paragraph style we have called "body".
</para>
<para style="body">
Does it come out OK?
</para>
<para style="body">
There now follows some random text to see how these paragraphs
look with longer content:
</para>
<para style="body">
Blah OS/2 blah blah blah blah coffee blah blah blah blah
Page 42
RML User Guide
Document generated on 2014/09/25 13:10:59
Windows blah blah blah blah blah blah blah. Blah blah blah
blah blah blah blah Modula-3 blah blah blah. Blah blah bug
report blah blah blah blah blah memory blah blah TeX TCP/IP
SMTP blah blah.
</para>
<para style="body">
Blah blah blah blah blah Em blah letterform blah blah blah
blah blah blah blah blah blah letterform blah blah. Blah blah
blah blah leader blah blah blah blah.
</para>
<para style="body">
Blah blah blah blah blah uppercase blah blah right justified
blah blah blah flush-right blah blah blah. Blah blah blah blah
blah blah spot-colour blah Em.
</para>
<para style="body">
Blah dingbat blah blah blah blah blah blah blah blah blah blah
blah blah blah blah blah. Blah blah blah blah blah drop-cap
blah blah blah blah blah blah blah.
</para>
</story>
</document>
Figure 8: Output from EXAMPLE 5
7.10. Asian Fonts
Page 43
RML User Guide
Document generated on 2014/09/25 13:10:59
RML supports all of Adobe's Asian Font Packs. You can display text in Japanese, Traditional and Simplified
Chinese and Korean using two different techniques.
The most robust technique is to include the standard Asian fonts Adobe specifies for use with Acrobat Reader.
These will already be installed on the end user's machine if they have a localized copy of Acrobat Reader, or
may be downloaded in the free "Asian Font Packs" from Adobe's site. In these cases there is no need to embed
any fonts or to have any special software on the server. The first stage is to declare the fonts you need in the
optional 'docinit' tag at the beginning of the document as follows:
<document filename="test_015_japanese.pdf">
<docinit>
<registerCidFont faceName="HeiseiMin-W3"/>
</docinit>
<template ...>
etc.
Note: The encName attribute of registerCidFont is deprecated: you should not use it with new
documents.
You may then declare paragraph styles, use string-drawing operations or blockTable fonts referring to the font
you have defined:
<paraStyle name="jtext"
fontName="HeiseiMin"
fontSize="12"
leading="14"
spaceBefore="12" />
The test directory includes a file test_015_japanese.rml containing a working simplified example in Japanese.
Warning: You will need to have a number of CMap files available on your system. These are files provided by
Adobe which contain information on the encodings of all the glyphs in the font. RML2PDF looks for these in
locations defined in the {{code}}CMapSearchPath{{endcode}} variable in the file
{{code}}reportlab/rl_config.py{{endcode}}, which knows where to find Acrobat Reader on most Windows and
Unix systems. If you wish to use Asian fonts on another system, you can copy these files (which may be
redistributed freely) from a machine with Acrobat Reader on to your server.
Editor's note at 28/12/2002 - there is a great deal of information on fonts which needs adding to this manual
including embedded Type 1 fonts and encodings and use of embedded subsetted TrueType fonts
Page 44
RML User Guide
Document generated on 2014/09/25 13:10:59
Part II - Advanced Features
8. Miscellaneous useful features
8.1. pageNumber
As you'd expect from the name, this tag adds page numbers to your document. This has nothing tricky to
remember - all you have to do is put the a <pageNumber/> tag where you want the page number to appear.
8.2. name and getName
The <name> tag allows you to set a variable as you would in a programming language. You can then retrieve
this to put in another place by using the <getName> tag. You can do this as many or as few times as you need
- so it is handy for things like headers and footers, or for items that you see changing many times over the life of
your document such as version or revision numbers. If you set them using a <name> tag, you only have to
revise them in one place every time they change, rather than having to plough through the document changing
them manually in each location and inevitably missing one.
<name> has three attributes: id and value are required, but type is optional. <getName> only has one
attribute (id), and this is required so that it knows which name to "yank".
In practice, it would look something like this example:
<stylesheet>
<initialize>
<name id="YourVariableName"
value="Type anything you want between these quotes..."/>
</initialize>
</stylesheet>
<story>
<para>
<b><getName id="YourVariableName"/></b>
</para>
</story>
You can also use the <name> tag inside the story of a document. In this case, as well as setting the value for
the variable, it is also displayed on the page (i.e. the name has a "textual value").
8.3. Seq, seqReset, seqChain and SeqFormat
The "seq" in <seq>, <seqDefault> and <seqReset> stands for sequence. These tags are all used for
paragraph numbering (or indeed anything that requires numbering items in a sequence, such as list items or
figures and illustrations).
This is how they look in use:
<seq/>
<seqDefault id="myID"/>
<seqReset/> or <seqReset id="myID"/>
<seqChain order="id0 id1 id2...idn"/>
<seqFormat id="myID" value="i"/>
Page 45
RML User Guide
Document generated on 2014/09/25 13:10:59
Each time you call <seq/>, its value is automatically incremented.
With <seqReset>, the id is an optional attribute. However, it is still best to use it to save confusion.
The <seqChain order="id0 id1 id2"/> tag is used to make multi sequence use easier. When
sequence id0 is changed sequence id1 is reset; likewise when sequence id1 is changed sequence id2 is
reset and so on for the identifiers in the order attribute.
The tag <seqFormat id="myID" value="i"/> is used to associate a numbering format to myID. The
allowed values for the value attribute are given in the table below.
Value
Meaning
1
Decimal
i
Lowercase Roman
I
Uppercase Roman
a
Lowercase Alphabetic
A
Uppercase Alphabetic
Here is an example that shows <seq/>, <seqReset> and <seqDefault> in use:
EXAMPLE 6
<?xml version="1.0" encoding="iso-8859-1" standalone="no" ?>
<!DOCTYPE document SYSTEM "rml.dtd">
<document filename="example_6.pdf">
<template>
<pageTemplate id="main">
<frame id="first" x1="72" y1="72" width="451" height="698"/>
</pageTemplate>
</template>
<stylesheet>
</stylesheet>
<story>
<h1>
seq in seq, seqDefault and seqReset
</h1>
<para>copied: <seq id="spam"/>, <seq id="spam"/>, <seq id="spam"/>.
Reset<seqReset id="spam"/>. <seq id="spam"/>, <seq id="spam"/>,
<seq id="spam"/>.</para>
<h2>
<i>simple use of seq</i>
</h2>
<para>
First seq: <seq/>
</para>
<para>
Second seq: <seq/>
</para>
<spacer length="6"/>
<para>
Page 46
RML User Guide
Document generated on 2014/09/25 13:10:59
<seqReset/>
We have just done a <seqReset/>
</para>
<spacer length="6"/>
<para>
First seq after seqReset: <seq/>
</para>
<para>
second seq after seqReset: <seq/>
</para>
<spacer length="6"/>
<para>
If you are going to use multiple seq tags,
you need to use the "id" attribute.
</para>
<h2>
<i>Better use of seq</i>
</h2>
<para>
<seqDefault id="test"/>
We have just done a <seqDefault id="test"/>
</para>
<para>
<seqReset id="test"/>
We have just done a <seqReset id="test"/>
</para>
<spacer length="6"/>
<para>
First seq: <seq id="test"/>
</para>
<para>
Second seq: <seq id="test"/>
</para>
<spacer length="6"/>
<para>
<seqReset id="test"/>
We have just done a <seqReset id="test"/>
</para>
<spacer length="6"/>
<para>
First seq after seqReset: <seq id="test"/>
</para>
<para>
second seq after seqReset: <seq id="test"/>
</para>
<h2>
<i>Using two seqs independently</i>
</h2>
<para>
<seqReset id="testOne"/>
We have just done a <seqReset id="testOne"/>
</para>
<para>
<seqReset id="testTwo"/>
We have just done a <seqReset id="testTwo"/>
</para>
Page 47
RML User Guide
Document generated on 2014/09/25 13:10:59
<spacer length="6"/>
<para>
First seq for testOne: <seq id="testOne"/>
</para>
<para>
Second seq for testOne: <seq id="testOne"/>
</para>
<spacer length="6"/>
<para>
First seq for testTwo: <seq id="testTwo"/>
</para>
<para>
Second seq for testTwo: <seq id="testTwo"/>
</para>
<spacer length="6"/>
<para>
<seqReset id="testOne"/>
We have just done a <seqReset id="testOne"/>
</para>
<spacer length="6"/>
<para>
First seq after seqReset for testOne: <seq id="testOne"/>
</para>
<para>
second seq after seqReset for testOne: <seq id="testOne"/>
</para>
<spacer length="6"/>
<para>
First seq after seqReset for testTwo: <seq id="testTwo"/>
</para>
<para>
second seq after seqReset for testTwo: <seq id="testTwo"/>
</para>
<spacer length="15"/>
<para>
Notice how resetting testOne doesn't affect testTwo at all.
</para>
</story>
</document>
Page 48
RML User Guide
Document generated on 2014/09/25 13:10:59
seq in seq, seqDefault and seqReset
copied: 1, 2, 3. Reset. 1, 2, 3.
simple use of seq
First seq: 1
Second seq: 2
We have just done a <seqReset"/>
First seq after seqReset: 1
second seq after seqReset: 2
If you are going to use multiple seq tags, you need to use the "id" attribute.
Better use of seq
We have just done a <seqDefault id="test"/>
We have just done a <seqReset id="test"/>
First seq: 1
Second seq: 2
We have just done a <seqReset id="test"/>
First seq after seqReset: 1
second seq after seqReset: 2
Using two seqs independently
We have just done a <seqReset id="testOne"/>
We have just done a <seqReset id="testTwo"/>
First seq for testOne: 1
Second seq for testOne: 2
First seq for testTwo: 1
Second seq for testTwo: 2
We have just done a <seqReset id="testOne"/>
First seq after seqReset for testOne: 1
second seq after seqReset for testOne: 2
First seq after seqReset for testTwo: 3
second seq after seqReset for testTwo: 4
Notice how resetting testOne doesn't affect testTwo at all.
Figure 9: The output from EXAMPLE 6
One more sophisticated use for using these tags is for multiple page counters. If you have a document where
you need different sections numbered separately from the main body of a document (perhaps for introductory
matter such as the contents and preface of a book), this can be done with a named seq tag.
The page counter as used by the pageNumber tag is a 'unique value' which depends on the actual physical
number of pages. If rather than using a pageNumber tag, you instead use something like <seq
id="pageCounter"/> , you have the ability to use <seqReset id="pageCounter"/> in between
sections so that each chapter has pages numbered from the start of that chapter rather than the start of the
document. If you use a different template for each chapter, this can then give you page numbers in the format
"1-12" rather than just "12" (where you are on page 12 of the document, which is page 12 of chapter 1).
8.4. Entities
Page 49
RML User Guide
Document generated on 2014/09/25 13:10:59
In example 6, we saw our first use of entities. In RML, you can't use the characters "<", ">" or "&" inside any
display elements such as drawString or para. If you do, rml2pdf will assume that they are tags and attempt
to interpret them. Since they won't be valid RML tags, you will just end-up getting an error message along the
lines of "Error: Start tag for undeclared element <YourNonValidTag>".
To get around this, you should use "entities".
When you need to use "<", replace it with "<",
when you need to use ">;", replace it with ">",
and when you need to use "&", replace it with "& amp;".
8.5. Aliases
Aliases allow you to assign more than one name to a paragraph style.
The alias tag has two required attributes - id and value.
Example:
<alias id="alreadyDefinedStyleName" value="myNewStyleName"/>
This can be useful in a number of ways.
You can give a more descriptive name to a style. So you can define a number of paragraph styles called things
like "ItalicBold" or "DesignerOneParagraphStyleTwo" in the stylesheet for your document.
You can then assign aliases to these styles using names that describe the role they fill in your document such as
"pictureCaption", "abstract", "acknowledgement" and so on.
If at any point you decide to change the style for that kind of paragraph, you can then change it in one alias
rather than in every individual paragraph that uses that style.
8.6. CDATA -- unparsed character data
CDATA is a standard XML tag which indicates to the parser (in this case rml2pdf) to ignore anything inside the
CDATA section. It shouldn't parse it or process it in any way - just display it.
A CDATA section is started with the characters "<![CDATA[" and is closed off with the characters "]]>". It
can appear inside any flowable - though it is most useful inside a <pre> tag.
CDATA may be useful in places where you have large quantities of "<" and ">" characters that you want to
display in your PDF, and that you would rather not have to convert them all to "<" and ">" entities.
Quoting sections of RML, XML, or HTML code is an example of a good place to use CDATA - if you needed
to revise the code example at a later date, you would have to convert the characters in every tag into entities.
CDATA saves you having to do this.
However, you should only use CDATA when necessary. If you are using other XML tools, they will also ignore
anything inside a CDATA section.
Example:
Page 50
RML User Guide
Document generated on 2014/09/25 13:10:59
<xpre>
<![CDATA[
Anything could go here. <non_existant_tags/>, "&" signs.
Whatever you want. RML ignores it.
]] >
</xpre>
8.7. Plug-ins: plugInGraphic and plugInFlowable
Both plugInGraphics and plugInFlowables allow you to use objects from outside your RML
document.
plugInGraphic
A plugInGraphic identifies a function (callable) in a module which takes a canvas and a data string as
arguments and presumably draws something on the canvas using information in the data string.
Example:
<plugInGraphic module="mymodule" function="myfunction">data string</plugInGraphic>
when executed results in effectively the following execution sequence:
import mymodule
mymodule.myfunction(canvas, "data string")
using the current canvas object.
<PlugInGraphic> has two mandatory attributes: module and function. It is used in the
<pageGraphics> section of your document.
plugInFlowable
A plugInFlowable identifies a function (callable) in a module which takes a canvas data string as an
argument and returns a flowable object :
Example:
<plugInFlowable module="mymodule" function="myfunction">data string</plugInFlowable>
when executed results in effectively the execution sequence:
import mymodule
flowable=mymodule.myfunction("data string")
story.append(flowable)
using the current canvas object.
plugInFlowable has two mandatory attributes: module and function. It is also used in the
<pageGraphics> section of your document.
8.8. Integrating with PageCatcher: catchForms, doForm and includePdfPages
You can use our product PageCatcher to capture individual pages from an external PDF file (e.g. application
forms, government forms, annual reports and so on). Extracting the required pages with PageCatcher will most
Page 51
RML User Guide
Document generated on 2014/09/25 13:10:59
often be a one-off design-time step. Once PageCatcher has extracted a page, it archives it in a data file as
formatted form data. (The default name for this file is "storage.data").
If you have full production versions of both RML2PDF and PageCatcher you can use the <catchForms> tag
to import all forms from a PageCatcher storage file for use in your RML document.
Example:
This example takes the form called PF0 (a page "caught" by PageCatcher and stored in the file storage.data) and
draws it into your document as a page backdrop.
<pageDrawing>
<catchForms storageFile="storage.data"/>
<doForm name="PF0"/>
</pageDrawing>
The <catchForms> tag is a drawing operation, and can occur anywhere in your RML document where a
<doForm> tag can occur. (For example, you can use a <catchForms> inside the flow of a story by using it
inside an <illustration>). The <catchForms> tag has one mandatory argument (storageFile) which
gives the name of the PageCatcher storage file to extract the form from.
One small point to remember is that if you are using multiple forms from the same data file, you only need to
use the actual <catchForms> tag once. To actually put the captured data into your document, you would use
multiple instances of the <doForm> tag. Notice how this works in the example below:
<illustration width="451" height="698">
<pageGraphics>
<catchForms storageFile="samples.data"/>
<doForm name="PF0"/>
</pageGraphics>
</illustration>
<illustration width="451" height="698">
<pageGraphics>
<doForm name="PF1"/>
</pageGraphics>
</illustration>
If you do use repeated <catchForms> tags to point at the same data file, you will get an error message
similar to the one below.
ValueError: redefining named object: 'FormXob.PF0'
If this is the case, find the places where you are using the second and subsequent <catchForms> tags and
delete them, leaving only the <doForm> tags. (Of course, this doesn't apply to any doForms which are
pointing at other data files. They would still need their own initial <catchForms> tags).
[Note: For the <catchForms> tag to work, you must have PageCatcher installed. In addition, your
PageCatcher must be the full version with a .py or .pyc file. The *.exe version of PageCatcher will not work
with RML2PDF. If you get the error message "ImportError: catchForms tag requires the PageCatcher product
http://www.reportlab.com", then you either do not have PageCatcher installed, or have the wrong version].
The includePdfPages tag
In some circumstances, you may not know how many pages there will be in the PDF file you need to
pageCatch. This is the case which <includePdfPages> tag was designed for.
Page 52
RML User Guide
Document generated on 2014/09/25 13:10:59
<includePdfPages> is a generic flowable, which means that it can appear at any point in the story.
In its simplest form, an includePdfPages tag will look like this:
<includePdfPages filename="mypdffile.pdf"/>
This will take the PDF file called "mypdffile.pdf", use pageCatcher behind the scenes and include every page in
the PDF file in your output. There is also an optional "pages" attribute. This can have either individual pages or
ranges. The following are all valid (providing the PDF file is long enough).
<includePdfPages
<includePdfPages
<includePdfPages
<includePdfPages
<includePdfPages
<includePdfPages
filename="mypdffile.pdf"/>
filename="mypdffile.pdf" pages="1"/>
filename="mypdffile.pdf" pages="1,2,3"/>
filename="mypdffile.pdf" pages="2,1,1,2,2"/>
filename="mypdffile.pdf" pages="1-5"/>
filename="mypdffile.pdf" pages="1,2,4-5"/>
There are a number of differences between this tag and the other PageCatcher related tags. Unlike the others,
includePdfPages doesn't require you to pre-pagecatch the file you intend to use (so saving you an additional
step). It also differs in that the imported PDF gets drawn "over the top" of your exiting document, rather than
being used as a background underneath your existing page. So if you have a header or footer in your page
template, the included PDF page will overwrite it.
How includePdfPages works with templates
When you have an includePdfPages tag in your RML file, RML outputs a page break before the first new page,
leaving you on the same page as the last imported one. This allows you to do template switching:
<setNextTemplate>
<setNextTemplate name="myIncludePagesTemplate"/>
<includePdfPages filename="mypdffile.pdf" pages="1,2,3"/>
<setNextTemplate name="myNormalTemplate"/>
<nextFrame/>
<para>
This text appears on the next normal (non-included) page of your
document)
</para>
This snippet switches to a new page template for use with your included pages, adds in the first three pages from
your PDF file, switches back to what is presumably the template you have been using throughout the rest of the
document, and outputs a line of text into the next "normal" page of your document. If you don't want any
headers or footers behind your PDF pages, define a page template called something like "blank" (in the
template section at the head pf your document) with a single frame and no decoration on it and use that. If
you are content for your included pages to appear over the template you have been using on the previous pages
(if the included pages don't have any headers and footers and have large enough margins not clash with the ones
you are using in your document, for example), then you can skip both of the setNextTemplate tags
completely.
The nextFrame tag is used because the includedPdfPages places you at the top of the last included
PDF page. This allows you to flow paragraphs or other flowables down your last page. This may be useful if
you want to place text in a form, or use some other pre-prepared background for your text. If all you want to do
is just drop in a pre-made page, you need this nextFrame to kick you into the next normal page and continue
Page 53
RML User Guide
Document generated on 2014/09/25 13:10:59
with your document normally
Look in section 7.6 ("Using multiple frames") for more info on the nextFrame and setNextTemplate
tags. Look at the file test\test_016_pagecatcher.rml for an example of this tag in use.
These attributes control the <includePdfPages> tag:
filename
filename to include
pages
The page list
template
optional page template name
outlineText
optional outline text
outlineLevel
optional outline level
outlineClosed
true for closed outline
leadingFrame
(yes | no | 0 | 1 | notAtTop): no if you don't want a
page throw before the first page
isdata
boolean true if the file is a pageCatcher .data file
orientation
(0 | portrait | 90 | landscape | 180 | 270 | auto) auto
means use the file implied layout
8.9. Outlines
It can go in either graphics or in a story. (Assigning outline levels to parts of your document (such as
paragraphs) allows you to build up a hierarchical structure for your document).
The level specifies how deep in the outline the entry appears. The default level is 0.
closed, if set, hides any children of this outline entry by default. Closed takes Boolean arguments.
Example:
<outlineAdd>First outline entry</outlineAdd>
<outlineAdd level="1">sub entry</outlineAdd>
<outlineAdd closed="true">Second outline entry 2</outlineAdd>
<outlineAdd level="1">sub entry 2</outlineAdd>
A note about levels: in order to add a level 3 outline entry, the previous outline entry must be at least level 2
(2,3,4...). In other words, you can "move back" any number of levels, but you can only "move forward" one
level at a time.
8.10. Form field tags
An important class of reports contains lots of fields to be traditionally filled in manually by users, like for
application forms and similar cases. Sometimes though, these fields are already filled in by some computational
process and the user might only need to sign the entire form before leaving it with a bank clerk or sending it off
to some destination. RML supports creating both kind of reports by providing a set of special-purpose tags to
create such form elements (or fields, widgets...) quite easily. These tags are named <checkBox>
<textBox> and <letterBoxes> and are described in the rest of this section.
All these form elements share a lot of features when it comes to what they look like in the document. They all
appear as a rectangular shape with some background and border colour, plus some width for the border itself.
They also have some sort of text label attached to this rectangle to describe the field's purpose in the context of
Page 54
RML User Guide
Document generated on 2014/09/25 13:10:59
the report to the human reader. The text inside the field as well as the one in the attached label also should have
the usual properties like fontname and size and colour. All form field elements have a boxStyle attribute that
can be used to group attribute names and values and reuse them in many field elements with much less typing
effort.
But there are also specific features that distinguish these form elements from each other. A checkbox does not
contain text, but only a cross (when checked), and a textbox contains one or more lines of text with different
possible alignments, while letterboxes are used for single line mono-space text with visible subcompartments
for each letter.
Checkboxes
By default, checkboxes have a very simple style similar to UK bank application forms - an outer rectangle and a
cross which exactly fills it when checked. The attributes control the appearance.
It is also possible to supply your own pair of bitmap images which will be used instead of the default drawing
mechanism - this could be used to provide 3d effects, tick-and-cross icons or whatever is needed. To make use
of this, set the two attributes graphicOn and graphicOff to point to two bitmap files on the disk; these
will be used in preference to the default appearance. Note that they will be stretched to the boxWidth and
boxHeight stated, so it is important to set the same aspect ratio as the underlying image. Also, remember the
printing intent - a 24 pixel bitmap drawn to occupy a 12 point space on a form will be visibly grainy on a good
quality printer, but may be fine on an inkjet.
Because checkboxes do not contain text it can be argued that when they are to be displayed as checked the cross'
colour should be the same as the border colour. Equally well it can be argued that it should be the same colour
used for text in textboxes. To provide both options checkboxes have an additional colour attribute named
checkStrokeColor which will be used for the cross instead of the border colour if the former is provided.
Note that the label attached to a checkbox is limited to three lines of text now and always appears at the right
margin of the box, but this might be generalised in future versions. The label is expected to be vertically
centered with the box no matter how many lines it is composed of.
The following code creates a row of sample checkboxes providing different values for the most relevant
attributes:
<checkBox x="0cm" y="0cm" checked="0"/>
<checkBox x="1.5cm" y="0cm" checked="1"/>
<checkBox x="3cm" y="0cm"
boxWidth="0.75cm" boxHeight="1cm"
checked="1"/>
<checkBox x="4.5cm" y="0cm"
boxWidth="0.75cm" boxHeight="1cm"
lineWidth="0.1cm"
checked="1"/>
<checkBox x="6cm" y="0cm"
lineWidth="0.1cm"
boxFillColor="yellow" boxStrokeColor="green"
checked="1"/>
<checkBox x="7.5cm" y="0cm"
lineWidth="0.1cm"
boxFillColor="yellow" boxStrokeColor="green"
checkStrokeColor="red"
checked="1"/>
Page 55
RML User Guide
Document generated on 2014/09/25 13:10:59
<checkBox x="9cm" y="0"
line1="desc 1"
line2="desc 2"
checked="1"/>
<checkBox x="11.5cm" y="0"
line1="desc 1"
line2="desc 2"
line3="desc 3"
checked="1"/>
desc 1
desc 2
desc 1
desc 2
desc 3
Textboxes
A textbox contains one, but often more lines of text, like in an address field. (Of course, it can also contain no
text at all, like for a signature field.) Sometimes it is not clear in advance exactly how much text will go into one
such field. Therefore, textbox fields in RML provide a means for automatically resizing the fontsize to shrink
the contained text by exactly what is needed to make it fit into the box. This is a two-step process that first tries
to shrink the fontsize to make the text fit horizontally. If that is not enough, it is further shrinked to make it also
fit vertically. This process is controlled using the attribute shrinkToFit.
Because human readers are very sensible to reading text and get quickly irritated when it does not feel "right",
there is a default amount of space (1 point) left between the text and any of the borders of the box, which will be
respected by the resizing mechanism. This is hardcoded now, but might become another attribute in the future.
The following code creates a row of sample textboxes illustrating different values for the most relevant
attributes: as well as the auto-resizing text feature:
<textBox x="0cm" y="0cm"
boxWidth="3cm" boxHeight="1cm"
label="labeled textbox">some text</textBox>
<textBox x="3.5cm" y="0cm"
boxWidth="3cm" boxHeight="1cm"
boxFillColor="yellow" boxStrokeColor="blue"
label="colorful textbox">some text</textBox>
<textBox x="7cm" y="0cm"
lineWidth="0.1cm"
boxWidth="3cm" boxHeight="1cm"
boxFillColor="yellow" boxStrokeColor="blue"
label="bold textbox">some text</textBox>
<textBox x="10.5cm" y="0cm"
boxWidth="3cm" boxHeight="1cm"
lineWidth="0.1cm"
boxFillColor="yellow" boxStrokeColor="blue"
fontName="Times-Bold"
fontSize="14"
label="textfancy textbox">some text</textBox>
Page 56
RML User Guide
Document generated on 2014/09/25 13:10:59
labeled textbox
colorful textbox
some text
some text
bold textbox
some text
textfancy textbox
some text
The following code creates a row of sample textboxes illustrating the auto-resizing text feature:
<textBox x="0cm" y="0cm"
boxWidth="3cm" boxHeight="1cm"
fontSize="14"
label="no resizing">some text</textBox>
<textBox x="3.5cm" y="0cm"
boxWidth="3cm" boxHeight="1cm"
fontSize="14"
label="horiz. resizing">some more text</textBox>
<textBox x="7cm" y="0cm"
boxWidth="3cm" boxHeight="1cm"
shrinkToFit="1"
fontSize="14"
label="vert. resizing">some text
some text
some text</textBox>
<textBox x="10.5cm" y="0cm"
boxWidth="3cm" boxHeight="1cm"
shrinkToFit="1"
fontSize="14"
label="horiz./vert. resizing">some more text
some text
some text
some text</textBox>
no resizing
some text
horiz. resizing
vert. resizing
horiz./vert. resizing
some more text
some text
some text
some text
some
some
some
some
more text
text
text
text
Letterboxes
Letterboxes are intended for single-line text fields where each letter is contained in a subcell, clearly seperated
from neighbouring cells. This is often seen on official forms where people are expected to write letters of a
word at predefined positions. RML provides such letterboxes, too, and they behave mostly like textboxes, but
show some significant differences, too.
Usually, the overall width of a form field element is defined by the mandatory boxWidth attribute. For
letterboxes, though, this is an optional attribute and specifies the width of a subcell containing one letter. The
resulting width of the entire box is defined as a multiple of that boxWidth attribute with another one named
count, which is a mandatory attribute.
The following code creates a row of sample letterboxes showing basic attributes:
<letterBoxes x="0cm" y="7.5cm"
count="12">letterboxes</letterBoxes>
Page 57
RML User Guide
Document generated on 2014/09/25 13:10:59
<letterBoxes x="0cm" y="6cm"
count="12">more letterboxes</letterBoxes>
<letterBoxes x="0cm" y="4.5cm"
boxWidth="0.75cm"
count="12">letterboxes</letterBoxes>
<letterBoxes x="0cm" y="3cm"
lineWidth="0.1cm"
boxFillColor="yellow" boxStrokeColor="blue"
label="some label"
count="12">letterboxes</letterBoxes>
<letterBoxes x="0cm" y="1.5cm"
lineWidth="0.1cm"
boxFillColor="yellow" boxStrokeColor="blue"
label="some label"
fontName="Courier-Bold"
fontSize="14"
count="12">letterboxes</letterBoxes>
<letterBoxes x="0cm" y="0cm"
lineWidth="0.1cm"
boxWidth="0.75cm" boxHeight="0.75cm"
boxFillColor="yellow" boxStrokeColor="blue"
label="some label"
fontName="Times-Bold"
fontSize="14"
count="12">letterboxes</letterBoxes>
l e t t e r b o x e s
m o r e
l
e
t
l e t t e r b
t
e
r
b
o
x
e
s
b o
x
e
s
some label
l e t t e r b o x e s
some label
l e t t e r b o x e s
some label
l
e
t
t
e
r
There may also be instances where you want obvious dividers between each subcell, but you don't want entirely
separate boxes. Letterboxes have something that allows for this - the optional combHeight attribute.
In a 'standard' letterBoxes element (ie one where the combHeight isn't specified), the divider between each
individual subcell is a line which fills the whole height of the letterBoxes box. If you specify the combHeight,
you can vary the height of this line. This attribute must be a number between zero and one, where "0" means no
Page 58
RML User Guide
Document generated on 2014/09/25 13:10:59
divider at all and "1" means one that is the whole height of the letterboxes element (and therefore "0.25" is a
quarter of the height and so on).
The following code creates a row of sample letterboxes showing the combHeight attribute in use:
<letterBoxes x="0cm" y="0cm"
combHeight="0"
count="4">comb</letterBoxes>
<letterBoxes x="3.75cm" y="0cm"
combHeight="0.25"
count="4">comb</letterBoxes>
<letterBoxes x="7.5cm" y="0cm"
combHeight="1"
count="4">comb</letterBoxes>
<letterBoxes x="11.25cm" y="0cm"
lineWidth="0.1cm"
boxWidth="0.75cm" boxHeight="0.75cm"
boxFillColor="yellow" boxStrokeColor="blue"
label="combHeight"
fontName="Times-Bold"
fontSize="14"
combHeight="0.5"
count="4">comb</letterBoxes>
combHeight
c o m b
c o m b
c o m b
c
o m b
Using styles with form field elements
As we've already mentioned, checkBox, textBox and letterBoxes all allow you to re-use styles in a
similar way to the way you can re-use styles with paragraphs with the boxStyle tag. Like the other style tags
(paraStyle and blockTableStyle), boxStyle lives in the stylesheet section, near the start of
your document.
boxStyle style can have the following attributes:
name:
This is the required attribute which allows you to refer this style by name.
alias:
An optional attribute which allows you to refer to your style by another name.
parent:
If this is supplied, it must refer to the name of another style. This style with then inherit from the style named.
fontName:
An optional attribute, this refers to the font to be used for the main contents of letterboxes or a textbox - it is
ignored for checkBoxes.
fontSize:
This optional attribute sets the size for the main contents of letterboxes or a textbox - it is ignored for
checkBoxes.
Page 59
RML User Guide
Document generated on 2014/09/25 13:10:59
alignment:
For letterboxes or a textbox, this optional attribute sets the alignment of the contents of the box. It may be either
LEFT, RIGHT, CENTER or CENTRE. It is ignored for checkBoxes.
textColor:
An optional attribute that sets the colour for the main contents in the letterboxes or textbox.
labelFontName:
The (optional) tag specifying the font to be used for the label of the letterboxes, textbox or checkBox.
labelFontSize:
The (optional) tag specifying the size of the font to be used for the label of the letterboxes, textbox or checkBox.
labelAlignment:
The (optional) specifying the alignment of the label - may be LEFT, RIGHT, CENTER or CENTRE
labelTextColor:
An optional attribute specifying the colour to be used for the text of the label of an textBox, letterBox or
checkBox.
boxFillColor:
An optional tag specifying the colour to be used for the background for a textBox, letterBox or checkBox.
boxStrokeColor:
An optional tag specifying the colour to be used for the lines making up a textBox, letterBox or checkBox.
cellWidth:
An optional tag, specifying the width of a "cell" in a form element. Must be a measurment, but may 'in', 'cm',
'mm'or 'pt' - see the section on 'Coordinates and measurements' for more details on measurements.
cellHeight:
An optional tag, specifying the width of a "cell" in a form element. Must be a measurment, but may 'in', 'cm',
'mm'or 'pt'
Some Examples
As an example of them in use, let's set up two boxStyles, and see what effect they have on letterBoxes,
textBoxes and a checkBox.
Firstly, the boxStyles:
<boxStyle name="special1"
labelFontName="Helvetica"
fontSize="10"
alignment="RIGHT"
textColor="red"
fontName="Helvetica"
labelFontSize="10"
labelAlignment="RIGHT"
labelTextColor="blue"
boxStrokeColor="red"
boxFillColor="pink"/>
<boxStyle name="special2"
parent="special1"
fontName="Courier"
Page 60
RML User Guide
Document generated on 2014/09/25 13:10:59
fontSize="12"
textColor="green"
labelFontName="Courier"
labelFontSize="12"
labelTextColor="green"
boxFillColor="yellow"
boxStrokeColor="red"/>
With the style 'special1':
"style="special1"
style="special1"
l
e
t
t
textBox
e r B o x e s
"style="special1"
And with the style 'special2':
"style="special2"
style="special2"
textBox
l e t t e r B o x e s
"style="special2"
Barcodes
One other tag that may often find use on forms is the barCode tag. As its name implies, this creates a barcode
in one of a number of different symbologies.
The three attributes you need to supply for this tag are x and y to position it on the page and code to inform
rml2pdf which form of barcode you require.
This is a brief example of what a barcode tag looks like in use, and what it actually produces:
<barCode x="1cm" y="0" code="Code11">123456</barCode>
Figure 10: The "Code11" barcode
This table shows you the allowed names for the code attribute, along with an example of the barcode
produced.
Type
Code attribute to use
Codabar
Codabar
Code 11
Code11
Code 128
Code128
Code 39
Standard39
Code93
Standard93
Page 61
Example barcode
RML User Guide
Document generated on 2014/09/25 13:10:59
I2of5
I2of5
Extended Code 39
Extended39
Extended Code93
Extended93
MSI
MSI
USPS FIM
FIM
USPS POSTNET
POSTNET
8.11. Colorspace Checking
RML v2.5 supports a way to ensure the consistent enforcement of color models within a document. For more
information on this topic, and examples of when you might want to use different scenarios, please refer to the
'Printing' chapter later in this document.
RGB, CMYK and the use of 'spot colors' such as Pantone can be allowed or disallowed using the 'colorSpace'
parameter to the document tag, which can be set to the following values:
■
MIXED - The default. As in RML versions before 2.5, rgb, cmyk, spot colors and 'named' colors can
all be used.
■
RGB - Permits only the use of RGB colour values.
■
CMYK - Permits only the use of CMYK colour values.
■
SEP - 'Spot Colors' only - all colour values must define a 'spotName' value.
■
SEP_BLACK - spot colors, plus shades of grey only.
■
SEP_CMYK - spot colors plus cmyk values only.
The use of any color definitions outside the specified type will result in an exception when you try to compile
the document, thereby ensuring that, for instance, a document can be produced for CMYK or spot color printing
without containing any RGB color definitions.
Any 'named' colours (see appendix A or 'reportlab/lib/colors.py') for black or shades of grey are automatically
converted to cmyk/rgb as required. So you can use lowercase 'black' as a color in all models except 'SEP'.
However, any other RML 'named' colors such as 'aqua' or 'hotpink' will not be converted.
Page 62
RML User Guide
Document generated on 2014/09/25 13:10:59
9. About Cross References and Page Numbers
Many documents (such as this one) require page cross references. For example the table of contents of this user
guide lists the page numbers of the beginnings of each part, chapter, and section.
RML provides several features that support cross referencing and page number calculations. The
{{code}}name{{endcode}} and {{code}}NamedString{{endcode}} tags allow forward referencing and the
{{code}}evalString{{endcode}} tag allows computations of page numbers (or other computations) inside an
RML text. Furthermore these techniques may be combined with preprocessing methods, such as XSL, the C
preprocessor, or the Preppy preprocessor to allow the convenient construction of structures such as tables of
contents, indices or bibliographies.
9.1. the namedString tag and forward references
The {{code}}namedString{{endcode}} tag is similar to the {{code}}name{{endcode}} tag -- it associates a
name to a string of text. The {{code}}namedString{{endcode}} tag is more general than the
{{code}}name{{endcode}} tag in the sense that it allows other string constructs such as
{{code}}getName{{endcode}} in the named text. For example, the following snippet associates the name
{{code}}Introduction{{endcode}} with the current page number at the time of formatting.
<namedString id="Introduction">The Introduction starts at <pageNumber/></namedString>
The {{code}}name{{endcode}} tag does not permit other tags inside the string it names in this manner.
Elsewhere, the RML text may substitute the page number for the introduction using the construct
<name id="Introduction"
default="this is a default placeholder, used if Introduction is undefined."/>
...and this reference to the {{code}}Introduction{{endcode}} name may occur before the
{{code}}Introduction{{endcode}} name is defined. For example the reference may occur at the beginning of
the document in the Table of Contents. Whenever a name is referenced before it has been defined the
{{code}}default{{endcode}} attribute must be present. In order to prevent possible formatting anomalies the
default value should be approximately the same size as the expected final value.
9.2. Multiple pass pdf formatting
RML2PDF resolves names that are referenced before they have been defined by making (by default) at most
two passes through the text. If the first pass does not define all names before they have been referenced then
RML2PDF formats the document twice.
On the first pass the default value for any undefined name is used for formatting the document (and it may
under some circumstances effect the placement of the page breaks). On the second the program uses the
resolved value determined on the first pass where the name is referenced.
It is possible to create a chain of references that cannot be resolved, such as:
<namedString id="a"><name id="b" default="XXX"/></namedString>
<namedString id="b"><name id="a" default="XXX"/></namedString>
In this case {{code}}RML2PDF{{endcode}} will signal an error and fail.
It is also possible to have a chain of references which requires more than one pass to resolve, such as:
Page 63
RML User Guide
Document generated on 2014/09/25 13:10:59
<namedString id="a"><pageNumber/> is where A is defined, and <name id="b" default="XXX"/></namedString
...
<namedString id="b"><pageNumber/> is where B is defined, and <name id="c" default="XXX"/></namedString
...
<namedString id="c"><pageNumber/> is where C is defined</namedString>
By default {{code}}RML2PDF{{endcode}} will fail in this case also, but it is possible to invoke the main
processing function {{code}}RML2PDF.go{{endcode}} to allow additional formatting passes. For example as
in:
rml2pdf.go(xmlInputText, passLimit=3)
to request that the processor execute a maximum of 3 formatting passes before signalling an error if more
unresolved names remain.
WARNING: A document that requires two formatting passes will take about twice as long to generate as a
document that requires only one. For time critical applications it is best to avoid the need for extra formatting
passes if they are not needed.
RML documents that do not have references to names before they are defined will not require more than one
formatting pass.
9.3. Calculated Page Numbers: evalString
Some documents require the ability to give "relative pagenumbers." To meet this requirement
{{code}}RML2PDF{{endcode}} includes the {{code}}evalString{{endcode}} tag. For example The following
{{code}}para{{endcode}}:
<para><font color="crimson">
The last page is <getName id="LASTPAGENO" default="-999"/>
One less than that is
<evalString default="XXXX">
<getName id="LASTPAGENO" default="-999"/> - 1
</evalString>.
The current page is <pageNumber/>.
And there are
<evalString default="XXXX">
<getName id="LASTPAGENO" default="-999"/> - <pageNumber/>
</evalString>
pages to go.
</font></para>
Performs arithmetic calculations (subtractions) using the current page number and a forward reference to the
{{code}}LASTPAGENO{{endcode}}, which is presumably defined on the last page. In the context of this
document the paragraph evaluates to the following.
The last page is 1 One less than that is 0. The current page is 64. And there are -63 pages to go.
An RML document can make use of arbitrary arithmetic calculations using the {{code}}evalString{{endcode}}
tag, but in practice addition {{code}}+{{endcode}} and subtraction {{code}}-{{endcode}} over page numbers
are the most useful.
9.4. Generated RML
Although the {{code}}name, namedString, getName{{endcode}} and {{code}}evalString{{endcode}} tags can
be used to build tables of contents and indices, it is not easy to directly edit RML documents that includes cross
reference structures of this kind.
Page 64
RML User Guide
Document generated on 2014/09/25 13:10:59
For example to directly add a new section to the this document in RML text it would be necessary to add a new
table of contents entry at the top, something like this:
<para style="contents2">
<getName id="chapterNumber"/>.<seq id="sectionNumber"/>
Installation
</para>
As well as the text of the section itself
<condPageBreak height="144"/>
<h2>
<getName id="chapterNumber"/>.<seq id="sectionNumber"/>
Installation and Use
</h2>
<para>
RML2PDF is available in several formats: [etcetera...]
</para>
And unless the creator takes great care it may be necessary to adjust various section or chapter numbers in other
entries as well.
To avoid this complexity this document is not directly written in RML per se, but is written using a text
preprocessor called {{code}}preppy{{endcode}} which automatically builds the table of contents and inserts
the appropriate entries at the top (while keeping track of chapter and section numbers).
For very complex documents using a preprocessor of some sort may be advisable.
Page 65
RML User Guide
Document generated on 2014/09/25 13:10:59
10. More graphics
10.1. curves
We have seen how you can use the <lines> tag to create a number of straight lines with one command. Not
all the lines you want to draw will be straight, which is why we have the <curves> tag.
Like <lines>, <curves> must appear in the pageGraphics section of your template. Unlike
lines, you need to specify 4 points as X-Y co-ordinate pairs (i.e. you need to feed curves sequences of 8
numbers at a time, rather than the 4 you need for lines).
The curves tag produces a Bezier curve. Bezier curves are named after the French mathematician, Pierre
Bézier, and are curves that utilize at least three points to define a curve. RML curves use the two endpoints
(or "anchor points") and two "nodes".
Figure 11: A Bezier Curve
In RML, if you give a curve 4 control points (which we shall call (x1,y1), (x2,y2), (x3,y3), and (x4, y4)), the
start point of the curve will be specified by (x1,y1) and the endpoint specified by (x4,y4). The line segment
from (x1,y1) to (x2,y2) forms a tangent to the curve. The line segment from (x3,y3) to (x4,y4) also forms a
tangent to the curve. If you look at an illustration of a Bezier curve, you will see that the curve is entirely
contained within the convex figure with its vertices at the control points.
Example:
<template>
<pageTemplate id="main">
<pageGraphics>
<curves>
198 560
198 280
396 280
396 560
Page 66
RML User Guide
Document generated on 2014/09/25 13:10:59
</curves>
</pageGraphics>
<frame id="first" x1="0.5in" y1="0.5in" width="20cm" height="28cm"/>
</pageTemplate>
</template>
10.2. paths
To connect lines and curves you need to use the <path> tag. This allows you to make complex figures.
Like the other graphics in RML, <path> lives in the <pageGraphics> section at the start of the
document.
Initially, you must give a <path> tag x and y attributes to tell it the co-ordinates for the point where this
path is going to start. You may also at the same time give it attributes called stroke and fill (which do the
same as their counterparts for the basic shapes such as rect and circle), and an additional one called
close. If the close attribute is set to "yes" or "1", then once the path is completed, the stroke is finished
off by painting a line from the last point given to the first point, enclosing the figure.
The <path> tag has its paired </path> tag. Between these two tags, you can have a number of things.
■
■
■
You can have a list of pairs of X-Y co-ordinates.
If this is the case, a straight line is drawn to each point in turn.
You can have a paired <moveto></moveto> tag.
If this is the case, you need to give an x-y co-ordinate pair between these two tags. The "pen" or
"brush" then moves to this point, and any further points or instructions given after this (while still
inside the <path> tag) continue onwards from this new point.
You can have a paired <curvesto></curvesto> tag.
This is similar to both the <curves> tag and the <moveto> tag discussed above. Inside the pair of
<curvesto> tags, you need to give rml2pdf sets of 3 pairs of X-Y co-ordinates at a time. Like
<curves>, <curvesto> creates a Bezier curve. However, since it is inside a path object, it
already knows one of the points - the start point is assumed to be the last point in the path before the
<curvesto> tag. In other words, the "pen" or "brush" is already in a position, and this is taken as the
first point for your Bezier curve.
Here is an example of how a <path> looks in action:
Page 67
RML User Guide
Document generated on 2014/09/25 13:10:59
Figure 12: The output from EXAMPLE 7
EXAMPLE 7a
<?xml version="1.0" encoding="iso-8859-1" standalone="no" ?>
<!DOCTYPE document SYSTEM "rml.dtd">
<document filename="example_7a.pdf">
<template>
<pageTemplate id="main">
<pageGraphics>
<fill color="red"/>
<stroke color="black"/>
<path x="247" y="72" fill="yes" stroke="yes" close="yes">
247 172
147 172
147 272
247 272
247 372
347 372
347 372
347 272
447 272
447 172
347 172
347 72
<!-- This completes the first shape: a red cross.-->
<moveto>267 572</moveto>
<!-- This moves the "pen position"
Page 68
-->
RML User Guide
Document generated on 2014/09/25 13:10:59
<!-- Notice that because we have used a "moveto", the
<!-- final line at the base of the cross is not completed, even
<!-- though the "close" attribute of the "path" tag is set to
<!-- "yes"
277 612
<!-- this acts as the start point for the Bezier curves below
-->
-->
-->
-->
-->
<curvesto>
147 585
147 687
297 792
447 687 447 585 317 612
</curvesto>
327 572
<!-- We don't need to give the last point because close is -->
<!-- set to "yes"
-->
</path>
</pageGraphics>
<frame id="first" x1="72" y1="72" width="451" height="698"/>
</pageTemplate>
</template>
<stylesheet>
</stylesheet>
<story>
<para></para>
</story>
</document>
This example has used the 'template/stylesheet/story' form of document. But the story is empty, and we haven't
used the stylesheet at all. The following example shows how we can use the 'pageDrawing' form.
EXAMPLE 7b
<?xml version="1.0" encoding="iso-8859-1" standalone="no" ?>
<!DOCTYPE document SYSTEM "rml.dtd">
<document filename="example_7b.pdf">
<stylesheet>
</stylesheet>
<pageDrawing>
<fill color="red"/>
<stroke color="black"/>
<path x="247" y="72" fill="yes" stroke="yes" close="yes">
247 172
147 172
147 272
247 272
247 372
347 372
347 372
347 272
Page 69
RML User Guide
Document generated on 2014/09/25 13:10:59
447 272
447 172
347 172
347 72
<moveto>267 572</moveto>
277 612
<curvesto>
147 585 147 687 297 792
447 687 447 585 317 612
</curvesto>
327 572
</path>
</pageDrawing>
</document>
10.3. grids
The <grid> is a graphics tag, and hence lives in the PageGraphics section of your RML document. It
produces a grid of lines. It takes two arguments - xs which is a list of x co-ordinates (separated by commas),
and ys which is a comma-separated list of y co-ordinates.
Example:
<grid xs="1cm,2cm,3cm,4cm,5cm,10cm" ys="1cm,2cm,3cm,4cm,5cm,10cm"/>
10.4. Translations
In a graphic operation (i.e. a pageGraphic or an illustration), <translate> moves the origin of
the drawing.
<translate> takes two optional attributes: dx and dy. Both can be given in any unit that RML understands.
dx is the distance that the to be moved in the X axis, and dy is the distance it is to be moved in the Y axis.
They are optional to allow you to only give one of the pair - so moving the origin in only one direction.
Examples:
<translate dx="55" dy="91"/>
<translate dx="1in"/>
<translate dy="6.5cm"/>
This is what a translation with a dx of 50 and a dy of 50 looks like:
Page 70
RML User Guide
Document generated on 2014/09/25 13:10:59
X
Original
50 pt
X
50 pt
dx=50 dy=50
Figure 13: An example of the <translate> tag in use
And this is slightly simplified version of the relevant bit of RML:
<illustration>
<lines>
16 40 116 40
16 40 16 140
156 40 256 40
156 40 156 140
</lines>
<setFont name="Times-Roman" size="12"/>
<fill color="black"/>
<drawCentredString x="58" y="12">Original</drawCentredString>
<setFont name="Helvetica-Bold" size="50"/>
<fill color="red"/>
<drawString x="16" y="41">X</drawString>
<translate dx="142"/>
<setFont name="Times-Roman" size="8"/>
<fill color="lightgray"/>
<drawCentredString x="58" y="18">50 pt</drawCentredString>
<setFont name="Times-Roman" size="12"/>
<fill color="black"/>
<drawCentredString x="58" y="12">dx=50 dy=50</drawCentredString>
<!-- This is relative to the origin of the black lines in the illustration,
which is why it doesn't match the actual translate performed:
it is what the translate would be if the origin was at 15,40 -->
<setFont name="Helvetica-Bold" size="50"/>
<fill color="red"/>
<translate dx="55" dy="91"/>
<drawString x="0" y="0">X</drawString>
</illustration>
10.5. scaling
<scale>, as its name suggests, allows you to stretch or shrink a graphic.
Page 71
RML User Guide
Document generated on 2014/09/25 13:10:59
The <scale> tag takes two optional attributes: sx and sy. sx is how much to scale the X axis, and sy> is
how much to scale the Y axis. The scaling does not have to be proportional - omitting one allows you to change
the scaling in one direction only. And you can shrink the shape as well as scale it up - an sx or sy of "2"
doubles the size of it, but an sx or sy of "0.5" halves it.
Scale factors can also be negative. Using an sx of -1 and an sy of 1 produces a mirror image.
Examples:
<scale sx="2" sy="0.25"/>
<scale sx="2"/>
<scale sy="0.5"/>
This is what a scale with a sx of 2 and an sy of 2 looks like:
X
Original
X
sx=2 sy=2
Figure 14: An example of the <scale> tag in use
10.6. rotations
The <rotate> tag allows allows you to rotate a graphic.
<rotate> takes one mandatory attributes called degrees, which is the number of degrees to rotate the
object. A positive number for degrees rotates it anti-clockwise, a negative number rotates it clockwise.
When using <rotate>, objects are rotated around the current origin. If you want to rotate a specific element
of a pageGraphic or illustration, you will have to use a translate to move the origin before you
do the rotate.
If you translate to the middle of the page, rotate by 90 degrees and then draw the string "hello", the "hello"
will appear starting in the middle of the page going upwards.
Examples:
<rotate degrees="90"/>
<rotate degrees="-90"/>
<!-- ANTI-clockwise -->
<!-- clockwise -->
This is what a <rotate> looks like with degrees set to 45 and -45:
Page 72
P
Original
Document generated on 2014/09/25 13:10:59
P
RML User Guide
degrees=45
Figure 15: A rotate with a positive value for degrees.
Original
P
P
degrees=- 45
Figure 16: A rotate with a negative value for degrees.
10.7. Skew
<skew> is a transform which distorts both axes of a graphic. It is non-orthagonal - in other words, it is a
transformation that does not preserve right angles.
<skew> has two mandatory attributes: alpha and beta. Both are angles - look at the example below to see
how they work.
Example:
<skew alpha="10" beta="10"/>
This is what a skew with an alpha of 10 and a beta of 30 looks like:
Page 73
RML User Guide
Document generated on 2014/09/25 13:10:59
beta
X
Original
X
alpha
alpha=10 beta=30
Figure 17: An example of the <skew> tag in use.
10.8. Generic affine transforms
A transform allows the coordinate space to be filtered through a general two dimensional affine transform. All
the other coordinate transformations can be defined in terms of a transform. A transform requires 6 numbers a,
b, c, d, e, and f to define the transformation.
x' = ax + cy + e
y' = bx + dy + f
For example to specify a=1, b=1.2, c=1.3, d=1.4, e=1.5 and f=1.6 write
<transform>1 1.2 1.3 1.4 1.5 1.6</transform>
[NOTE: All the examples from this section are gathered together in the file example_8.rml].
10.9. About scale, rotate, and skew
■
■
■
■
It is very easy to move objects "off the page". If you are doing a <translate> as a
<pageGraphic>, it is possible to put the origin off the visible area of the page. If you are doing a
<translate> in an <illustration>, no checks are performed about whether an object is inside
the limits of the <illustration> or not, so it is still possible to put it outside the limits of the page
and lose it. If you expect to see a diagram and all you get is a blank page, this is the most common
cause.
Scaling has its own version of the same problem. It is possible to <scale> an object so that most or
all of it is off the page, but it is also possible to <scale> something to such a small size that it
"shrinks to nothing". Be especially careful when doing scaling with large factors. Something that may
have been a small error without the scaling may put your object off the page entirely once you have
performed the <scale>.
The scaling operation scales everything - including line widths. If you are taking a huge diagram and
scaling it down, the lines may be scaled out of existence. Conversely, if you take something
microscopic and enlarge it, you may end up just getting a blob due to the width of the lines being scaled
up as well.
Another thing to remember is that these transformations are incremental - in a series of transforms,
each one will modify the output of the one before it. So the order you carry the operations out in is very
important. The result of the sequence "translate, rotate, scale" is very different to that of
"scale, rotate, translate".
Page 74
RML User Guide
■
Document generated on 2014/09/25 13:10:59
If performing multiple operations, use the order "translate -> rotate -> scale or
skew" whenever possible. Using a different order may result in the axes being distorted or other results
that lead to an ugly output that isn't what you were trying to do.
10.10. Bitmapped images
RML also allows you to insert pre-existing images into your PDF files. If you have a graphic file in either the
.gif or .jpg format, you can use the <image> tag to insert it into your document.
The <image> tag goes in the <pageGraphics> section at the head of your RML document. It has 5
attributes, 3 of which are mandatory and two of which are optional. The file attribute tells rml2pdf the name
of the input file that you want to incorporate into your document, the x and y attributes give the co-ordinates
for the bottom left hand corner of where the image will be placed on the page. The optional width and
height attributes allow you to specify how big it should be on the page - this means that you can over-ride the
normal size of the file and display it at any size that is appropriate. (The x, y, width and height attributes
can all be gives in points, mm, cm or inches).
Be very careful when using the width and height attributes. If misused, these attributes can lead to you
having a distorted, ugly and out of proportion picture in your final document. Whenever possible, you should
use a paint application (e.g. Paintshop Pro, Photoshop, Graphics Converter, GIMP) to save the file at the correct
size, and use the correct height and width attributes to the <image> tag. Using larger files and re-sizing
inside RML will also lead to the output PDF file being bloated and larger than it needs to be.
This example shows how these tags look in action:
<pageGraphics>
<image file="myFile.gif" x="72" y="72"/>
<image file="myFile.gif" x="369" y="72" width="80" height="80"/>
<image file="myFile2.jpg" x="72" y="493"/>
<image file="myFile2.jpg" x="369" y="493" width="80" height="80"/>
</pageGraphics>
10.11. Text Fields
To allow the creation of forms we have a graphics tag that allows us to specify that the page should display an
entry box.
The <textField> tag goes in the <pageGraphics> section at the at the start of the RML document. It
has the following optional attributes: id (the field name), value (the field initial value), x (the field x
coordinate), y (the field y coordinate), width (the field width), height (the field height), maxlen
(maximum allowd number of field characters) & multiline (whether the field may contain more than one
line).
As a convenience the attributes may instead be specified using <param> tags within the body of the
<textField> tag. The name attribute of the <param> tag should be one of the above attribute names. If
no value attribute or <param> is seen then the contents of the <textField> becomes the initial value of
the field.
It is an error to define an attribute more than once
10.12. place and illustration
place
Page 75
RML User Guide
Document generated on 2014/09/25 13:10:59
We have seen how graphics and flowables do not mix in RML. The only exceptions to this are the <place>
tag, and the <illustration> tag. <place> allows you to put a flowable inside a pageGraphic or
illustration. You can include a paragraph inside a grid, or a table inside a path.
<place> takes 4 attributes, all of which are required. x, and y are the x and y co-ordinates for where you
want the flowable placed. width and height are the width and height of the flowable.
Example:
<pageGraphics>
<place x="10.5cm" y="10.5cm" width="9cm" height="9cm">
<para>Your flowables would go here.</para>
</place>
</pageGraphics>
illustration
You can think of an <illustration> as like one of the illustrations in a book. It is a "box" of space on the
page which can contain any of the graphics that you would normally expect to find in a <pageGraphics>
tag. The position of this box depends purely on its place in the story, which means that it can appear anywhere
on the page depending on the paragraphs and other flowables around it. This is in contrast to the
pageGraphics which are always placed in a specific place (measured from the origin).
Example:
<illustration width="90" height="90">
<fill color="red"/>
<circle x="45" y="45" radius="30" fill="yes"/>
<setFont name="Times-Roman" size="8"/>
<drawString x="0" y="0">
Any graphics could go here.
</drawString>
</illustration>
Page 76
RML User Guide
Document generated on 2014/09/25 13:10:59
Figure 18: Output from EXAMPLE 9
Notice the symmetry: the <place> tag lets you use flowables within a <pageGraphic>; the
<illustration> tag lets you do graphics operations in a box within the flow of the <story> (or any
story-like context such as a table cell).
The following example shows the use of both place and illustration:
EXAMPLE 9
<?xml version="1.0" encoding="iso-8859-1" standalone="no" ?>
<!DOCTYPE document SYSTEM "rml.dtd">
<document filename="example_9.pdf">
<template>
<pageTemplate id="main">
<pageGraphics>
<grid xs="1cm,2cm,3cm,4cm,5cm,10cm,20cm" ys="1cm,2cm,3cm,4cm,5cm,10cm,20cm"/>
<place x="10.5cm" y="10.5cm" width="9cm" height="9cm">
<title>This is a use of <i>place</i></title>
<spacer length="15"/>
<para>
This is a flowable. In this case, it is in a <para>
tag, but it could be any flowable. It has been placed
inside a grid, but you could put it inside any graphic or
pageGraphics. Using the place tag, you can have complete
control over where you want your flowables to appear.
</para>
<spacer length="12"/>
Page 77
RML User Guide
Document generated on 2014/09/25 13:10:59
<para>
You can include Greek: <greek>abgd</greek>.
</para>
<spacer length="12"/>
<blockTable>
<tr>
<td>Or</td><td>even</td>
</tr>
<tr>
<td>a</td><td>blockTable.</td>
</tr>
</blockTable>
</place>
</pageGraphics>
<frame id="first" x1="72" y1="72" width="451" height="698"/>
</pageTemplate>
</template>
<stylesheet>
<paraStyle name="style.Title"
fontName="Courier-Bold"
fontSize="24"
leading="36"
/>
</stylesheet>
<!-- The story starts below this comment -->
<story>
<title>Example 9</title>
<para>
This is a page which shows you how illustrations, grids and the place tag work.
</para>
<illustration width="90" height="90">
<fill color="red"/>
<circle x="45" y="45" radius="30" fill="yes"/>
<setFont name="Times-Roman" size="8"/>
<drawString x="0" y="0">This is an illustration</drawString>
</illustration>
<para>
The red circle you can see is an <i>illustration</i>, not a <i>pageGraphic</i>.
</para>
<illustration width="75" height="75">
<fill color="teal"/>
<circle x="30" y="30" radius="30" fill="yes"/>
<stroke color="darkslategray"/>
<grid xs="15,30,45" ys="5,10,15,20,25,30,35,40,45,50"/>
</illustration>
<para>
So is the teal colored one.
</para>
<para>
These are all flowables in the story.
</para>
</story>
</document>
Page 78
RML User Guide
Document generated on 2014/09/25 13:10:59
10.13. spacer
<spacer> is another tag which does just what the name suggests. A <spacer> inserts an empty element
into the page to force other elements downwards or sideways. The spacer tag has two attributes - length
is mandatory and refers to the length down the page, and width is optional.
Example:
To produce a spacer 15 points in height and one inch wide, you could do the following:
<spacer length="15" width="72"/>
10.14. Form and doForm
A <form> is a group of graphical operations, stored together and given a name. This allows you to group
complex graphics together and to re-use them in more than one place with ease. To do this, you would use the
doForm tag.
Your form would appear in the pageGraphics section of your RML document (inside the
pageTemplate). <doForm> also appears in the pageGraphics section.
The <form> tag has one attribute - a mandatory one called name which identifies the form.
The <doForm> tag executes the sequence of graphical operations defined with a <form> tag. It also has
only one mandatory attribute called name.
Example:
<pageGraphics>
<form name="myForm">
<drawString x="0" y="24">
Your graphic operations would go here.
</drawString>
<drawString x="0" y="12">
There would probably be a lot of them to make up something useful.
</drawString>
</form>
<doForm name="myForm"/>
</pageGraphics>
10.15. Why use forms?
Why use forms when you can just cut and paste big chunks of text inside your RML document with your
favorite text editor or word processor?
The benefits are dramatically cut file sizes, reduced production time and apparently even speeding things up on
the printer. If you are going to be using PDF files in any situation where people will be downloading them,
massively reduced file sizes will be appreciated by your users. These advantages become even more obvious
with multiple similar documents. If you are dealing with a run of 5000 repetitive forms - perhaps payslips or
single-page invoices - you only need to store the backdrop once and simply draw the changing text on each
page.
Page 79
RML User Guide
Document generated on 2014/09/25 13:10:59
forms should be used whenever you have a graphic that is used repeatedly. It may be something as small as
your company logo or some sort of symbol you want to flag interesting bits of text with, or something as large
as a whole page backdrop. As long as you use it repeatedly, it's worth using a form to do it.
forms don't even have to be created in RML. You can use another application (such as Adobe Illustrator or
Word) and distil the output to PDF. You can then use our PageCatcher product to generate the forms, which can
then be used from RML.
Look on our web site for more information on PageCatcher: http://www.reportlab.com/pageCatcher/index.html
Page 80
RML User Guide
Document generated on 2014/09/25 13:10:59
11. Conditional Formatting
11.1. Introduction
WARNING - this is an advanced topic, intended for programmers trying to deal with difficult layout cases. The
tags documented here have the potential to cause hard-to-understand exceptions if not used correctly!
Conditional formatting allows you to include expressions in your RML text which are evaluated or executed
when the pdf is actually being built. This means that you can vary the content of your document depending on
conditions (such as where you are on the page) which you do not know in advance.
For instance, you may be including dynamic content in your document which is likely to be of variable length.
You could use the value of one of the document's internal formatting variables to include or exclude certain
content, based on the remaining height of a page or the current page number. One common use is in the case of
creating documents for printing: these could be 'padded out' with optional content, to make sure that they are
always a 4-page spread. Another useful application would be deciding whether there is space to include a large
image or diagram in the present location.
A working example using all of these tags can be found in rlextra/rml2pdf/test/test_039_doc_programming.rml.
Basic programming primitives (assignment, loop, if, while etc.) have been made available as tags. These can be
given expressions which can use your own variables, as well as built-in ones available during rendering. All
expressions must be valid python literal expressions.
The following internal variables are available to use as conditions:
availableWidth and availableHeight give you the remaining height and width of the current frame.
doc.frame.id returns the id of the current frame
doc.pageTemplate.id returns the id of the current page template
doc.page returns the current page number.
11.2. Tags
The <docIf>, <docElse> and <docWhile> tags allow you to control which content is included and
excluded - while, or if, a condition is true or false.
The <docPara> tag allows you to include the value of an expression in the output text. This is useful for
debugging document layouts (e.g. temporarily inserting paragraphs like "you are [3] inches down the [left]
frame of the [chapter_first_page] template on page [19]"), but you can also use it to display facts you stored
earlier. The value can be formatted using Python format strings - see the test case above for details.
<docAssign> assigns a value to a variable, and <docExec> executes a statement or expression.
The <docAssert> tag allows you to test an expression and raise an exception if it is not true. This can be a
useful quality assurance technique. As with the docPara example for debugging, you can include assertions like
"I should now be at the top of page 3" or "I should now be in the footer frame".
11.3. Operators
When using docIf or docWhile tags, you can use the following operators to evaluate your conditions:
= < <= > => %
Page 81
RML User Guide
Document generated on 2014/09/25 13:10:59
However, bear in mind that the 'greater than' and 'less than' operators must be written in RML as > and <
11.4. Examples
Some sample code demonstrating several of the conditional formatting tags:
<docAssign var='i' expr="3"/>
<docIf cond='i>2'>
<para style="normal">The value of i is greater than 2</para>
<docElse/>
<para style="normal">The value of i is less than or equal to 2</para>
</docIf>
<docWhile cond='i'>
<docPara expr='i' format='The value of i is %(__expr__)d'/>
<docExec stmt='i-=1'/>
</docWhile>
results in the output:
The
The
The
The
value
value
value
value
of
of
of
of
i
i
i
i
is
is
is
is
greater than 2
3
2
1
As an example of a practical use of conditional formatting, supposing you wanted all your documents to be a
certain number of pages. You could use the value of doc.page to decide whether to include or exclude an
external 'filler' pdf in your output, and so pad the size of your document:
<docIf cond="doc.page == 3">
<includePdfPages filename="fillerpage.pdf" pages="1" leadingFrame="yes"/>
</docIf>
11.5. Reference
Conditional formatting is implemented with the following tags:
<docAssign var='' expr=''>
assigns the value of 'expr' to 'var', eg to make i=3 : <docAssign var='i' expr='3'/>
<docExec stmt=''>
executes the statement 'stmt', eg to subtract 1 from the value of i : <docExec stmt='i-=1'/>
<docPara expr='' format='' style=''>
creates a paragraph containing the value of 'expr'.
'format' is an optional attribute which can contain the value of 'expr' using the Python string formatting
conventions, eg "%(__expr__)s".
The 'style' attribute is optional.
eg: <docPara expr='i' format='The value of i is %(__expr__)d'
style="style.txt"/>
So if i=2, this results in the text "The value of i is 2"
<docAssert cond='' format=''>
raises an error containing the value of 'format' if 'cond' is false, eg:
eg: <docAssert cond='val', format="val is false" />
<docWhile cond=''>
<docIf cond=''>
Page 82
RML User Guide
Document generated on 2014/09/25 13:10:59
<docElse>
these tags allow flow control while or if the 'cond' attribute evaluates to true. See the example above.
Page 83
RML User Guide
Document generated on 2014/09/25 13:10:59
12. Printing
This chapter covers things you will need to know when creating documents for professional printing. Many
development projects start off targeting an electronic document, which users will either keep on disk, or print
out on an office or home printer. Once you start targeting professional printing presses, things get more
complicated. We have tried to write this in a manner accessible to developers with little prior knowledge of
print; apologies to professional printers for anything we have 'glossed over' too lightly! The topics covered in
this chapter are...
Crop Marks
Bleed
CMYK colours
Overprint/knockout control
Colour separations
Pagination
12.1. Crop Marks
The first difference is the size of the page. Let's say you are in Europe or Asia and have been creating A4
electronic documents from a web site using ReportLab. You then need to produce a different version of the
same document for professional printing. The printer wants to be given a slightly larger document, with lines
pointing at the corners of the A4 area. They will often be printing on a much larger sheet or roll of paper, and
cutting it afterwards.
To automatically create crop marks, use the 'useCropMarks' attribute of the <docinit> tab. This will enlarge
the underlying page and draw the needed marks.
<docinit useCropMarks="1"/>
The intent is that it's reasonable easy now to have a single template which generates print and web versions of
the same document, wrapping an <{{if}}> statement around the extra attribute in your favourite templating
system, without needing to recalculate all the frame and graphics positions for every element on the page.
There is also a separate <cropMarks> tag which you can use within the <docinit> tag, if you wish to
modify the page size increase, colour, length, dash pattern and so on for the crop marks; however, we've found
the defaults to work fine.
Page 84
RML User Guide
Document generated on 2014/09/25 13:10:59
12.2. Bleed
Following on from the above, remember that printers often cut the paper to size. In addition, if they are creating
a booklet, they sometimes have to allow for the thickness of inner pages, so they need a little flexibility in where
to make the cut. If you have a design with solid colour 'straight to the edge' of the page, cutting can sometimes
leave a very fine white line where the colour runs out. Therefore, when a designer wants an area of colour to go
'straight to the edge', they work on a slightly larger page size, and allow the colour to overflow or 'bleed out'. In
general printers often ask for at least 3mm of bleed, or about 8 points. So, if you needed to draw a blue
background on an A4 sized page (595x842 points), you would be well advised to draw the rectangle from x=-10
to x=+605 - ten points bigger than needed. This will be completely invisible to an end user in a document
created for the web; but when you turn on crop marks and the page is enlarged, it will be visible.
There are no features in RML to automatically detect areas of colour near the edge of the page and 'add bleed';
it's your job to do it.
This also applies to bitmap images. If an image runs to the edge of the page, it needs to be sized to very slightly
overflow so that it can be cut without risking a white edge.
12.3. CMYK Colours
For professional presses, colours need to be specified either as CMYK, or as 'spot colours' such as those in the
Pantone Color Matching System. The CMYK process is a method of printing colour by using four inks - cyan,
magenta, yellow, and black. White is the absence of any colour. The Pantone system is a popular 'spot colour'
system which describes a set of completely standardized colours, allowing different manufacturers in different
locations to ensure that their colours match.
The majority of printed material is produced using the CMYK process. Many Pantone colours have good,
well-known CMYK equivalents.
RML allows you to specify colours as CMYK or by spot name, and also provides a mechanism for ensuring that
your document sticks to a particular set of colour definition types.
Starting in ReportLab 2.5, a colorSpace attribute can be defined in the <document> tag. This is a declaration
of your intent, and it lets us carry out some useful checks on your behalf. It will raise an error if you accidentally
use a colour that is not allowed in your colorSpace. Then, to declare a CMYK colour, use the <color> tag,
within the <docinit> section at the top:
<document filename="test_045_separations.pdf" invariant="1" colorSpace="CMYK">
<docinit>
<color id="BLUE" CMYK="[1,0.67,0,0.23]"/>
<color id="CYAN" CMYK="[1,0,0,0]"/>
Page 85
RML User Guide
Document generated on 2014/09/25 13:10:59
</docinit>
Note that each colour component ranges from 0 to 1, not 0 to 100; you can use any floating point number in
between. Designers tend to think in terms of 0-100, but we have chosen to follow the PDF specification.
The 'id' is a string you specify. You will then be able to refer to these colours by name elsewhere in a document
- for example, you can then set a table cell background or paragraph style to be "BLUE".
The colorSpace attribute is particularly important when dealing with blacks. Many objects in our framework
have a default colour of black, and this is an RGB black 'under the hood'. If you set the colorSpace, our
framework will 'auto-convert' blacks for you; thus if a table's gridlines or a chart axis is normally drawn in black
or a shade of grey (implemented originally as RGB), it will be autoconverted to CMYK black or grey. Many
printing presses are able to handle RGB and autoconvert blacks these days, but printers will appreciate it if the
PDFs are pure CMYK as it won't raise alarms in their proofing tools.
12.4. Images in CMYK documents
Most bitmap images use an RGB colour model. We do NOT yet have safeguards to check images that you
include in a CMYK document - the colorSpace checks won't warn you. We might add this checking in a future
version. If you are working with a limited number of images, the best approach is to use a professional tool like
Photoshop to create CMYK versions of those images, and check you are happy with the colours when printed.
Printers can often handle RGB images in a print job, but it's best to check with them first
12.5. Overprint and knockout control
When you create a document with two colours layered on top of one another, there are different ways to
combine them. The two alternatives are known as "overprint" and "knockout". Non-primary CMYK colours are,
of course, already implemented with a mix of up to four inks. A problem arises when you decide to stack two
colours on top of each other. Imagine you have a red and a blue CMYK colour which are each made up of, say,
60% black (the K in CMYK), and you want to draw one on top of the other. Should the software 'merge the
colours'? It can't achieve 120% coverage with the black. So, a decision is needed. Either the topmost colour
'knocks out' and replaces anything drawn underneath it, or it 'overprints', allowing the colours to mix, in a
manner similar to transparency.
When working with separated colours (see below), the printing mechanics are a little different as each colour is
really a bottle of ink; but again, a statement of intent is needed when they overlap - does the top colour replace
what's underneath, or allow both to be laid down on the page?
The overprint-versus-knockout choice is rarely used, and works in slightly different ways for CMYK and for
separated colours - see the section below. Designers will know when they need it, and the developer merely
needs to set a flag.
Some PDF viewing software can simulate this effect on screen (Adobe Reader is one of them); it's necessary to
go into the preferences and check a box to see how the document would appear when printed. The default for is
usually to for the topmost colour to knock out the colour underneath.
<overprint mode="overprint"> turns on overprint for the drawing operations that follow. You can
then set this property to its original value with <overprint mode="knockout"> when you want to go
back into the default knock-out mode.
Page 86
RML User Guide
Document generated on 2014/09/25 13:10:59
The sample first example above shows cyan, magenta and yellow circles overlapping one another, set to
overprint and rendered in Acrobat Professional. Without overprint set in the second example, the inks do not
mix on top of each other. Instead, the circles on top knock-out the areas that they cover underneath.
12.6. Colour separations
When a PDF document is printed professionally, layers of coloured ink (plates) will be printed one at a time on
top of each other, laying down microscopic dots on different angled paths so that more than one colour can be
visible. The process colours (CMYK) will normally have a plate each for full-colour printing, but you can
define your own spot colour plates to be printed with a specialist "bucket of ink". One common use is for
companies to have completely standardised colours in their corporate literature, and to be able to print with just
3 plates instead of the usual 4, which saves money and increases consistency. Another case is using metallic
foils or fluorescent paints to enhance areas of your publication, so you might use extra spot colours as well as
the CMYK ones. Bear in mind that spot colour inks are usually opaque.
We mentioned above that a colorSpace attribute can be defined in the <document> tag. There are two more
of these "color spaces" which will be useful for those who are going to use spot colours: 'SEP' will only let you
use spot colours you define, and 'SEP_CMYK' will let you define spot colours to use along with the normal
CMYK process colours.
<document filename="test_045_separations.pdf" invariant="1" colorSpace="SEP">
If using SEP_CMYK, our framework will again 'auto-convert' blacks for you; thus if a table's gridlines or a
chart axis is normally drawn in black or a shade of grey (implemented originally as RGB), it will be
autoconverted to CMYK black or grey.
An equivalent CMYK colour value needs to be supplied along with a spot name for each printing plate. The
CMYK values are usually just to provide an on screen representation and do not need to be accurate, more
important is the spot name which is a string that printers can identify the ink such as 'PANTONE 288 CV' or
'PMS_288'. Your printer may advise you on what spot names to use.
You will need to define your spot colours in the <docinit> section of your document. The 'id' is what you will
use later in the document to refer to that colour, 'CMYK' allows you to see an approximation of your colour in a
PDF reader, 'spotName' is how the printer will identify which ink to use for the plate. There is also an optional
'density' attribute which allows you to print with a thinner (or half-tone) layer of ink. If you set a density lower
than 1.0, you don't need to fiddle with the CMYK values for on-screen preview; we do that for you.
<document filename="test_045_separations.pdf" invariant="1" colorSpace="SEP">
<docinit>
<color id="BLACK" CMYK="[0,0,0,1]"/>
Page 87
RML User Guide
Document generated on 2014/09/25 13:10:59
<color id="BLUE" CMYK="[1,0.67,0,0.23]" spotName="PANTONE 288 CV"/>
<color id="BLUE75" CMYK="[1,0.67,0,0.23]" spotName="PANTONE 288 CV" density=".75"/>
</docinit>
If you have access to Adobe Acrobat Professional or other print pre-flight tool you will be able to preview each
of the plates separately and the inks that are used.
The overprint tag is perhaps even more useful when working with spot colours; for example, we have worked
with pie charts where the overall document was limited to black and a specific Pantone blue, and the designer
was able to create some new tints by stacking the blue and black on top of each other.
12.7. Pagination
A document that is intended to be printed as a bound booklet on a press must always have a page count that is a
multiple of four. Even with a different binding technique, documents laid out for print may make use of left and
right facing pages which "go together". RML documents with dynamic content will in many cases be of highly
variable length, and not guided by the designer's "common sense".
It is possible to use the conditional formatting tags in RML to add extra pages and pad out your document to the
required length as necessary. For example, we maintain one solution which has a number of optional half-page
and full-page advertisements which can be used to ensure the right pagination occurs. See the 'Conditional
Formatting' chapter of this guide for more information on this technique.
12.8. More information
We manage a number of solutions which generate documents for professional printing, and have helped clients
achieve some interesting effects, but we have limited space here to discuss all of the techniques used. If you are
a commercial customer and are seeking to achieve something not documented here, please contact us and we
will be happy to assist further.
Page 88
RML User Guide
Document generated on 2014/09/25 13:10:59
Part III - Tables
13. Using tables
13.1. Block tables
If you are familiar with HTML, you will understand the basic tags for use with tables in RML. Just as in HTML,
you use a tag to tell rml2pdf that a table is on the way (in this case <blockTable>; rather than <table>), and
another one to end it. Within the <blockTable> and </blockTable> tags, <tr> and </tr> enclose
the rows (from Table Row); and within each table row, <td> and </td> enclose each individual cell (from
Table Data).
So, the simplest blockTable in RML will look something like this:
<blockTable>
<tr>
<td>This</td><td>is</td>
</tr>
<tr>
<td>a</td><td>blockTable.</td>
</tr>
</blockTable>
This produces a table that looks like this:
This
is
a
blockTable.
Figure 19: A very simple blockTable
In this short example, we are just using plain old vanilla text in the table cells. But we can do more.
<blocktable> allows you to use paragraphs and the <para> tag. This means that you can use bold, italics,
colors, fonts, greek... anything you can use in a paragraph. And you can use multiple paragraphs inside a table
cell.
This is a more complex
blockTable.
This is a more complex
blockTable.
This is a more
complex blockTable.
This is α more complex
blockTaβle.
Figure 20: A slightly more complex blockTable
The main thing that makes this slightly more complex than a very simple table is the fact that you must give
rowHeights and colWidths to the <blockTable> to use paras. This makes sense - paragraphs fit
into the available space on a page. In a table, they must fit into the available space in that cell. If you haven't
defined how high and wide that cell will be, then there is no way for rml2pdf to know how to make it flow in
that cell. (If you get an error message saying "Flowables cell can't have auto width", then this is the thing to
check - you have probably omitted the rowHeights or colWidths).
When you are using paragraphs inside a table, you must not put any text outside the <para>...</para>
tags. The only exception to this rule is whitespace - you can put spaces and tabs outside the <para> tag, but
Page 89
RML User Guide
Document generated on 2014/09/25 13:10:59
nothing else.
One other thing to be aware of is that if you use a para inside a table, it will ignore the text attributes you have
used for that table and instead use the attributes for paragraphs. This can be a plus, (since it allows you to use
already defined paragraph styles) but can take you by surprise if weren't expecting it.
As an example, here is the RML that generated the above table:
<blockTable
rowHeights="1.25cm,1.25cm"
colWidths="4cm,4cm"
>
<tr>
<td>
<para>
This is a <b>more</b> complex <font color="red">blocktable</font>.
</para>
</td>
<td>
<para>
This is a more <i>complex</i> blocktable.
</para>
</td>
</tr>
<tr>
<td>
<para>
<font face="Helvetica">This is a more complex blockTable.</font>
</para>
</td>
<td>
<para>
This is <greek>a</greek> more <font color="blue"><i>complex</i></font>
blockta<greek>b</greek>le.
</para>
</td>
</tr>
</blockTable>
13.2. Block table attributes
This is useful, but there's a lot more to blockTables than that! The actual <blockTable> tag can have a
number of optional attributes:
■
■
■
style
blockTables can have a style set in the stylesheet in the same way as paragraphs can. If you have
set a style for your blockTable, you can refer to it by name with this attribute and apply it to your
table. (More details on how to do it appear in the section on the <blockTableStyle> tag below).
colWidths
If you use this attribute, it takes a comma-separated list of the width of each column in your
blockTable. This allows you to vary the widths to match the width of the content of each column. If
you do use it, you should be careful to make sure that there is one width given for every column in your
table.
rowHeights
Page 90
RML User Guide
Document generated on 2014/09/25 13:10:59
As colWidths is to columns, rowHeights is to rows. It also takes a comma-separated list, in this case for
the heights of the rows in your table.
■
repeatRows
If you have a large table that splits over multiple pages, you may well want certain information
appearing on all of them. Column headers are one example of this sort of information. The
repeatRows attribute allows you to do this.
repeatRows takes one single number as an argument. All the rows up to and including this row are
repeated as "headers" on each section of the table that appears on a new page.
13.3. Block table styles
blockTables are a flowable, so the actual <blockTable> tag will appear in the story section of your
RML document. You can use the <blockTableStyle> tag to set the appearance of your blockTable.
This appears in the stylesheet section of your document, and can be used for more than one table. You can set
up how all the blockTables in your document will look in one blockTableStyle tag if you want.
The <blockTableStyle> tag is a container for a number of other tags, and needs to be paired with a
terminal </blockTableStyle> tag. This works in the same way as <styleSheet></styleSheet>,
<pageGraphics></pageGraphics>, and other tags of that sort.
For all of the attributes in blockTableStyle, they refer to a square or rectangular "block" inside the table.
This can be as many or as few cells as you want - not necessarily a single cell. This "block" aspect to the
attributes is reflected in their names, and gave the table style its name for consistency. (It was felt that since
most of these attributes started with "block...", the table tag should itself be called blockTable to keep
things simple).
The way the block is described may seem unusual to you if you are not used to programming. The x and y
co-ordinates are still given as X,Y (or if you like "Row,Column", rather than the spreadsheet "A1" model), but
the numbering starts from 0 rather than 1. This makes the top left-hand cell (0,0). As well as this, the numbers
may also be negative. If this is the case, then rml2pdf will count backwards from the end of the last cell. So
(-1,-1) is the bottom right hand cell in a table, (-2,-2) is the one up and to the left of that, and so on.
The tags that blockTableStyle can contain are:
■
■
■
■
■
blockFont
blockfont sets the font to be used in a block of your table.
It has one mandatory attribute: name.
It has four optional attributes: size, leading, start and stop.
blockTextColor
This sets the color that will be used for the text in a block of your table.
It has one required attribute: colorName.
It has two optional attributes: start and stop.
blockLeading
This sets the leading that will be used for the text in a block of your table.
It has one required attribute: length.
It has two optional attributes: start and stop.
blockAlignment
This sets the alignment of the text in a block of your table.
It has one required attribute: value. (This can be LEFT, RIGHT, CENTER, or CENTRE).
It has two optional attributes: start and stop.
blockValign
This sets how the contents of a block of cells in your table are aligned in the vertical direction.
It has one required attribute: value. (This can be TOP, MIDDLE, or BOTTOM, and defaults to
BOTTOM).
It has two optional attributes: start and stop.
Page 91
RML User Guide
■
■
■
■
■
■
Document generated on 2014/09/25 13:10:59
blockLeftPadding
This sets the padding (i.e. blank space) between the contents of a cell and left-hand edge of the cell (for
a block of cells in your table).
It has one required attribute: length.
It has two optional attributes: start and stop.
blockRightPadding
This sets the padding between the contents of a cell and right-hand edge of the cell (for a block of cells
in your table).
It has one required attribute: length.
It has two optional attributes: start and stop.
blockBottomPadding
This sets the padding between the contents of a cell and bottom edge of the cell (for a block of cells).
It has one required attribute: length.
It has two optional attributes: start and stop.
blockTopPadding
This sets the padding between the contents of a cell and top edge of the cell (for a block of cells).
It has one required attribute: length.
It has two optional attributes: start and stop.
blockBackground
This sets the color to be used for the background for a block of cells in your table.
It has one required attribute: colorName.
It has two optional attributes: start and stop.
lineStyle
This allows you to use lines to border your table.
It has two required attributes: kind (with the options of GRID, BOX, OUTLINE, INNERGRID,
LINEBELOW, LINEABOVE, LINEBEFORE and LINEAFTER), and colorName (which must be
the name of a color).
It has three optional attributes: thickness, start and stop.
13.4. More about block tables
A few final things to be aware about when using tables: in RML, table cells (as contained by the <td> and
</td> tags) can only contain one of two different sets of data. Either a table cell can contain string forms (text
and the <getName> and <pageNumber> tags) or it can contain a sequence of flowables (tags such as
<pre>, <para> and the various heading tags). It is not possible to mix both of these forms in the same cell
(though you can mix them in the same table).
Putting strings into table cells is quicker than using paragraphs. Paragraphs need to work out when to 'wrap' text,
strings don't. So you should avoid using paragraphs inside tables unless you really need to (or you don't mind
things slowing down).
When you are doing a big database report, wherever possible use separate smaller tables to contain parts of your
data rather than one huge table. If you don't use many 'mini-tables' to contain small groups of rows but instead
decide to do a big 1,000-row table, you will notice a significant loss of speed in the generation of your output
PDF.
This also makes it much easier to design complex grouped reports; for each group header, footer or detail block
you can design one table style and keep them all independent of each other.
13.5. Using block table styles
Now that we have seen what the blockTable's attributes are, and seen a summary of
<blockTableStyle>, here are some examples that show you how they can be used together.
Page 92
RML User Guide
Document generated on 2014/09/25 13:10:59
The following few pages show a number of examples of blockTables. Each one shows a page with the RML
listing, followed by a separate page with the result of that table. Each listing contains comments to point out
what each tag involved with the blockTable is doing.
Page 93
RML User Guide
Document generated on 2014/09/25 13:10:59
1.1 Example 10 - Colors and fonts in tables
This example show various ways of setting the text color (blockTextColor), font (blockFont) and
background color (blockBackground) for regions in a blockTable.
Notice the various ways of specifying a region within the table. Also notice the way we have defined heights for
the rows and widths for the columns in the blocktable tag.
EXAMPLE 10
<?xml version="1.0" encoding="iso-8859-1" standalone="no" ?>
<!DOCTYPE document SYSTEM "../rml.dtd">
<document filename="example_10.pdf">
<template>
<pageTemplate id="main">
<pageGraphics>
</pageGraphics>
<frame id="first" x1="72" y1="72" width="451" height="698"/>
</pageTemplate>
</template>
<stylesheet>
<blockTableStyle id="myBlockTableStyle">
<!-- This sets a font for every cell from the start of the -->
<!-- second row down to the bottom right hand corner
-->
<blockFont name="Courier-Bold" start="0,1" stop="-1,-1"/>
<!-- This sets a font for the first row -->
<blockFont name="Helvetica-BoldOblique" size="24" start="0,0" stop="3,0"/>
<!-- This sets a textColor for all the text in the table -->
<blockTextColor colorName="black"/>
<!-- This sets a textColor for the first row -->
<!-- (Since it comes after the above setting, -->
<!-- it overides it for this row) -->
<blockTextColor colorName="white" start="0,0" stop="3,0"/>
<!-- This sets a textColor a column - also overiding -->
<!-- the first textColor setting for this row
-->
<blockTextColor colorName="blue" start="1,1" stop="1,6"/>
<!-- This sets a background color for the first row -->
<blockBackground colorName="red" start="0,0" stop="3,0"/>
<!-- This sets a background color for the rest of the table -->
<blockBackground colorName="cornsilk" start="0,1" stop="-1,-1"/>
<!-- This sets a background color for an individual cell
-->
<!-- This has to go AFTER the above blockBackground,
-->
<!-- otherwise it would be overpainted by the cornsilk color -->
<blockBackground colorName="lightcoral" start="3,3" stop="3,3"/>
</blockTableStyle>
</stylesheet>
<story>
Page 94
RML User Guide
Document generated on 2014/09/25 13:10:59
<title>Example 10 - colors and fonts in tables</title>
<spacer length="1cm"/>
<blockTable style="myBlockTableStyle"
rowHeights="3.5cm,2cm,2cm,2cm,2cm,2cm,2cm"
colWidths="4cm,4cm,4cm,4cm">
<tr>
<td>Cell 0,0</td><td>Cell 1,0</td><td>Cell 2,0</td><td>Cell
</tr>
<tr>
<td>Cell 0,1</td><td>Cell 1,1</td><td>Cell 2,1</td><td>Cell
</tr>
<tr>
<td>Cell 0,2</td><td>Cell 1,2</td><td>Cell 2,2</td><td>Cell
</tr>
<tr>
<td>Cell 0,3</td><td>Cell 1,3</td><td>Cell 2,3</td><td>Cell
</tr>
<tr>
<td>Cell 0,4</td><td>Cell 1,4</td><td>Cell 2,4</td><td>Cell
</tr>
<tr>
<td>Cell 0,5</td><td>Cell 1,5</td><td>Cell 2,5</td><td>Cell
</tr>
<tr>
<td>Cell 0,6</td><td>Cell 1,6</td><td>Cell 2,6</td><td>Cell
</tr>
</blockTable>
</story>
</document>
Page 95
3,0</td>
3,1</td>
3,2</td>
3,3</td>
3,4</td>
3,5</td>
3,6</td>
RML User Guide
Document generated on 2014/09/25 13:10:59
Example 10 - colors and fonts in tables
Cell 0,0
Cell 1,0
Cell 2,0
Cell 3,0
Cell 0,1
Cell 1,1
Cell 2,1
Cell 3,1
Cell 0,2
Cell 1,2
Cell 2,2
Cell 3,2
Cell 0,3
Cell 1,3
Cell 2,3
Cell 3,3
Cell 0,4
Cell 1,4
Cell 2,4
Cell 3,4
Cell 0,5
Cell 1,5
Cell 2,5
Cell 3,5
Cell 0,6
Cell 1,6
Cell 2,6
Cell 3,6
Figure 21: Output table from EXAMPLE 10
Page 96
RML User Guide
Document generated on 2014/09/25 13:10:59
1.2 Colors and fonts in table cells
As an alternative to specifying cell properties using block table styles, RML also allows some cell styles to be
specified as attributes of the <td> tag.
<blockTable colWidths="5cm,5cm" style="myBlockTableStyle1">
<tr><td>fontName</td><td fontName="Courier">Courier</td></tr>
<tr><td>fontName</td><td fontName="Helvetica">Helvetica</td></tr>
<tr><td>fontSize</td><td fontSize="8">8</td></tr>
<tr><td>fontSize</td><td fontSize="14">14</td></tr>
<tr><td>fontColor</td><td fontColor="red">red</td></tr>
<tr><td>fontColor</td><td fontColor="blue">blue</td></tr>
<tr><td>leading</td><td leading="16">leading
is
16</td></tr>
<tr><td>leading</td><td leading="12">leading
is
12</td></tr>
<tr><td>leftPadding</td><td leftPadding="10">10</td></tr>
<tr><td>leftPadding</td><td leftPadding="16">16</td></tr>
<tr><td>rightPadding</td><td rightPadding="10" align="right">10</td></tr>
<tr><td>rightPadding</td><td rightPadding="24" align="right">24</td></tr>
<tr><td>topPadding</td><td topPadding="10">10</td></tr>
<tr><td>topPadding</td><td topPadding="24">24</td></tr>
<tr><td>bottomPadding</td><td bottomPadding="10">10</td></tr>
<tr><td>bottomPadding</td><td bottomPadding="24">24</td></tr>
<tr><td>background</td><td background="pink">pink</td></tr>
<tr><td>background</td><td background="lightblue">lightblue</td></tr>
<tr><td>align</td><td align="left">left</td></tr>
<tr><td>align</td><td align="center">center</td></tr>
<tr><td>align</td><td align="right">right</td></tr>
<tr><td>vAlign
-</td><td vAlign="top">top</td></tr>
<tr><td>vAlign
-</td><td vAlign="middle">middle</td></tr>
<tr><td>vAlign
-</td><td vAlign="bottom">bottom</td></tr>
</blockTable>
produces
fontName
Courier
fontName
Helvetica
fontSize
8
fontSize
14
fontColor
red
fontColor
blue
Page 97
RML User Guide
Document generated on 2014/09/25 13:10:59
leading
leading
is
16
leading
leading
is
12
leftPadding
10
leftPadding
16
rightPadding
10
rightPadding
24
topPadding
10
topPadding
24
bottomPadding
10
bottomPadding
24
background
pink
background
lightblue
align
left
align
center
align
vAlign
vAlign
vAlign
-
right
top
middle
bottom
Figure 22: Output table from EXAMPLE 10
Page 98
RML User Guide
Document generated on 2014/09/25 13:10:59
1.3 Example 11 - lines and alignment in tables
This example shows the various vertical and horizontal alignments you can give text in a table, as well as a few
ways to use lines.
EXAMPLE 11
<?xml version="1.0" encoding="iso-8859-1" standalone="no" ?>
<!DOCTYPE document SYSTEM "../rml.dtd">
<document filename="example_11.pdf">
<template>
<pageTemplate id="main">
<pageGraphics>
</pageGraphics>
<frame id="first" x1="72" y1="72" width="451" height="698"/>
</pageTemplate>
</template>
<stylesheet>
<blockTableStyle id="myBlockTableStyle">
<!-- Set fonts -->
<blockFont name="Courier-Bold" size="10" start="0,1" stop="-1,-1"/>
<blockFont name="Helvetica-BoldOblique" size="10" start="0,0" stop="3,0"/>
<!-- This sets a textColor for all the text in the table -->
<blockTextColor colorName="black"/>
<!-- Another example of blockTextColor -->
<blockTextColor colorName="green" start="2,2" stop="3,3"/>
<!-- This sets a blockAlignment for the whole table
<blockAlignment value="CENTER"/>
-->
<!-- These overrides the above -->
<blockAlignment value="RIGHT" start="3,0" stop="3,-1"/>
<blockAlignment value="LEFT" start="0,1" stop="0,-1"/>
<!-- This sets the vertical alignment for one row -->
<blockValign value="TOP" start="0,0" stop="-1,0"/>
<!-- This sets the vertical alignment for one cell -->
<blockValign value="MIDDLE" start="2,2" stop="2,2"/>
<!-- Use of linestyles -->
<lineStyle kind="GRID" colorName="silver"/>
<lineStyle kind="LINEBELOW" colorName="orangered" start="0,0"
stop="-1,0" thickness="5"/>
<lineStyle kind="LINEAFTER" colorName="maroon" start="1,1"
stop="1,6" thickness="1"/>
</blockTableStyle>
</stylesheet>
<story>
<title>Example 11 - lines and alignment in tables</title>
<spacer length="1cm"/>
Page 99
RML User Guide
Document generated on 2014/09/25 13:10:59
<blockTable style="myBlockTableStyle"
rowHeights="2cm,2cm,2cm,2cm,2cm,2cm,2cm"
colWidths="4cm,3cm,3cm,4cm"
>
<tr>
<td>(a=LEFT)(VA=TOP)</td>
<td>(VA=TOP)</td>
<td>(VA="TOP")</td>
<td>(a=RIGHT)(VA=TOP)</td>
</tr>
<tr>
<td>(a=LEFT)</td>
<td>1,1</td>
<td>Cell 2,1</td>
<td>(a=RIGHT)</td>
</tr>
<tr>
<td>(a=LEFT)</td>
<td>1,2</td>
<td>(VA=MIDDLE)</td>
<td>(a=RIGHT)</td>
</tr>
<tr>
<td>(a=LEFT)</td>
<td>1,3</td>
<td>(VA=MIDDLE)</td>
<td>(VA=MDL)(a=RIGHT)</td>
</tr>
<tr>
<td>(a=LEFT)</td>
<td>1,4</td>
<td>2,4</td>
<td>(a=RIGHT)</td>
</tr>
<tr>
<td>(a=LEFT)</td>
<td>1,5</td>
<td>2,5</td>
<td>(a=RIGHT)</td>
</tr>
<tr>
<td>(a=LEFT)</td>
<td>1,6</td>
<td>2,6</td>
<td>(a=RIGHT)</td>
</tr>
</blockTable>
<spacer length="15"/>
<para>a=value for <i>blockAlignment</i></para>
<para>VA=value for <i>blockValign</i></para>
<para><i>MDLE=MIDDLE for VA in cells 3,2 and 3,3</i></para>
</story>
</document>
Page 100
RML User Guide
Document generated on 2014/09/25 13:10:59
Example 11 - lines and alignment in tables
(a=LEFT)(VA=TOP)
(a=LEFT)
(a=LEFT)
(VA=TOP)
(VA="TOP")
1,1
Cell 2,1
(a=RIGHT)(VA=TOP)
(a=RIGHT)
(VA=MIDDLE)
(VA=MDL)(a=RIGHT)
(VA=MIDDLE)
(VA=MDL)(a=RIGHT)
1,2
(a=LEFT)
1,3
(a=LEFT)
1,4
2,4
(a=RIGHT)
(a=LEFT)
1,5
2,5
(a=RIGHT)
(a=LEFT)
1,6
2,6
(a=RIGHT)
Figure 23: Output table from EXAMPLE 11
a=value for blockAlignment
VA=value for blockValign
MDLE=MIDDLE for VA in cells 3,2 and 3,3
Page 101
RML User Guide
Document generated on 2014/09/25 13:10:59
1.4 Example 12 - images and padding in tables
This example shows images in a table and the way to use the various padding attributes.
For comparison purposes:
The cells that contain pictures in this table are all 166 pixels in height and 161 pixels in width.
Where padding is used, it has a value of 20 pixels horizontally or 40 pixels vertically.
EXAMPLE
<?xml version="1.0" encoding="iso-8859-1" standalone="no" ?>
<!DOCTYPE document SYSTEM "rml.dtd">
<document filename="example_12.pdf">
<template>
<pageTemplate id="main">
<pageGraphics>
</pageGraphics>
<frame id="first" x1="72" y1="72" width="451" height="698"/>
</pageTemplate>
</template>
<stylesheet>
<blockTableStyle id="myBlockTableStyle">
<blockBackground colorName="silver" start="0,0" stop="-1,0"/>
<blockBackground colorName="darkslategray" start="0,1" stop="-1,1"/>
<blockBackground colorName="silver" start="0,2" stop="-1,2"/>
<blockBackground colorName="darkslategray" start="0,3" stop="-1,3"/>
<blockBackground colorName="silver" start="0,4" stop="-1,4"/>
<blockBackground colorName="darkslategray" start="0,5" stop="-1,5"/>
<blockAlignment value="CENTER"/>
<blockValign value="MIDDLE"/>
<!-- Set fonts -->
<blockFont name="Helvetica-BoldOblique" size="10"/>
<!-- set the left and right padding for cells in first and -->
<!-- third columns remember, cell numbering starts from ZERO, not ONE
<blockLeftPadding length="20" start="0,0" stop="0,-1"/>
<blockRightPadding length="20" start="2,0" stop="2,-1"/>
-->
<!-- set the top and bottom padding for cells in first and third rows -->
<blockBottomPadding length="40" start="0,0" stop="-1,0"/>
<blockTopPadding length="40" start="0,2" stop="-1,2"/>
<!-- set the top and bottom padding for the last row -->
<blockBottomPadding length="40" start="-1,4" stop="-1,4"/>
<blockTopPadding length="40" start="0,4" stop="0,4"/>
<!-- Use of linestyles -->
<lineStyle kind="GRID" colorName="darkblue"/>
</blockTableStyle>
<paraStyle name="paddingTableStyle"
fontName="Helvetica-BoldOblique"
fontSize="10"
textColor="white"
Page 102
RML User Guide
Document generated on 2014/09/25 13:10:59
alignment="CENTER"
/>
</stylesheet>
<story>
<title>Example 12 - images and padding in tables</title>
<spacer length="1cm"/>
<blockTable style="myBlockTableStyle"
rowHeights="166,28,166,28,166,28"
colWidths="161,161,161"
>
<tr>
<td>
<illustration width="141" height="90">
<image file="images/replogo.gif"
x="0" y="0"
width="141" height="90"/>
<stroke color="deepskyblue"/>
<lineMode width="3"/>
<lines>
0 0 141 0
141 0 141 90
141 90 0 90
0 90 0 0
</lines>
</illustration>
</td>
<td>
<illustration width="141" height="90">
<image file="images/replogo.gif"
x="0" y="0"
width="141" height="90"/>
<stroke color="deepskyblue"/>
<lineMode width="3"/>
<lines>
0 0 141 0
141 0 141 90
141 90 0 90
0 90 0 0
</lines>
</illustration>
</td>
<td>
<illustration width="141" height="90">
<image file="images/replogo.gif"
x="0" y="0"
width="141" height="90"/>
<stroke color="deepskyblue"/>
<lineMode width="3"/>
<lines>
0 0 141 0
141 0 141 90
141 90 0 90
0 90 0 0
</lines>
</illustration>
</td>
Page 103
RML User Guide
Document generated on 2014/09/25 13:10:59
</tr>
<tr>
<td>
<para style="paddingTableStyle">
<b>blockLeftPadding</b> with <b>blockBottomPadding
</para>
</td>
<td>
<para style="paddingTableStyle">
just blockBottomPadding
</para>
</td>
<td>
<para style="paddingTableStyle">
<b>blockRightPadding</b> with <b>blockBottomPadding</b>
</para>
</td>
</tr>
<tr>
<td>
<illustration width="141" height="90">
<image file="images/replogo.gif"
x="0" y="0"
width="141" height="90"/>
<stroke color="deepskyblue"/>
<lineMode width="3"/>
<lines>
0 0 141 0
141 0 141 90
141 90 0 90
0 90 0 0
</lines>
</illustration>
</td>
<td>
<illustration width="141" height="90">
<image file="images/replogo.gif"
x="0" y="0"
width="141" height="90"/>
<stroke color="deepskyblue"/>
<lineMode width="3"/>
<lines>
0 0 141 0
141 0 141 90
141 90 0 90
0 90 0 0
</lines>
</illustration>
</td>
<td>
<illustration width="141" height="90">
<image file="images/replogo.gif"
x="0" y="0"
width="141" height="90"/>
<stroke color="deepskyblue"/>
<lineMode width="3"/>
<lines>
0 0 141 0
Page 104
RML User Guide
Document generated on 2014/09/25 13:10:59
141 0 141 90
141 90 0 90
0 90 0 0
</lines>
</illustration>
</td>
</tr>
<tr>
<td>
<para style="paddingTableStyle">
<b>blockLeftPadding</b> with <b>blockTopPadding
</para>
</td>
</td>
<td>
<para style="paddingTableStyle">
just blockTopPadding
</para>
</td>
<td>
<para style="paddingTableStyle">
<b>blockRightPadding</b> with <b>blockTopPadding</b>
</para>
</td>
</tr>
<tr>
<td>
<illustration width="141" height="90">
<image file="images/replogo.gif"
x="0" y="0"
width="141" height="90"/>
<stroke color="deepskyblue"/>
<lineMode width="3"/>
<lines>
0 0 141 0
141 0 141 90
141 90 0 90
0 90 0 0
</lines>
</illustration>
</td>
<td>
<illustration width="141" height="90">
<image file="images/replogo.gif"
x="0" y="0"
width="141" height="90"/>
<stroke color="deepskyblue"/>
<lineMode width="3"/>
<lines>
0 0 141 0
141 0 141 90
141 90 0 90
0 90 0 0
</lines>
</illustration>
</td>
<td>
<illustration width="141" height="90">
Page 105
RML User Guide
Document generated on 2014/09/25 13:10:59
<image file="images/replogo.gif"
x="0" y="0"
width="141" height="90"/>
<stroke color="deepskyblue"/>
<lineMode width="3"/>
<lines>
0 0 141 0
141 0 141 90
141 90 0 90
0 90 0 0
</lines>
</illustration>
</td>
</tr>
<tr>
<td>
<para style="paddingTableStyle">
blockLeftPadding with blockTopPadding
</para>
</td>
<td>
<para style="paddingTableStyle">
no padding
</para>
</td>
<td>
<para style="paddingTableStyle">
blockRightPadding with blockBottomPadding
</para>
</td>
</tr>
</blockTable>
</story>
</document>
Page 106
RML User Guide
Document generated on 2014/09/25 13:10:59
Example 12 - images and padding in tables
blockLeftPadding with
blockBottomPadding
just blockBottomPadding
blockRightPadding with
blockBottomPadding
blockLeftPadding with
blockTopPadding
just blockTopPadding
blockRightPadding with
blockTopPadding
blockLeftPadding with
blockTopPadding
no padding
blockRightPadding with
blockBottomPadding
Figure 24: Output from EXAMPLE 12
Page 107
RML User Guide
Document generated on 2014/09/25 13:10:59
Appendix A - Colors recognized by RML
In this table, the "Color" column gives the name of the color, as recognised in the HTML standard and RML. The hexadecimal number in
the "Hex Value" column corresponds to the red, green and blue (RGB) components in the color - the first two digits represent red, the next
two green and the last two the blue. (The "0x" just shows it's a hexadecimal number).
Text 123
aliceblue
Hex: 0xF0F8FF
Text 123
antiquewhite
Hex: 0xFAEBD7
Text 123
aqua
Hex: 0x00FFFF
Text 123
aquamarine
Hex: 0x7FFFD4
Text 123
azure
Hex: 0xF0FFFF
Text 123
beige
Hex: 0xF5F5DC
Text 123
bisque
Hex: 0xFFE4C4
Text 123
black
Hex: 0x000000
Text 123
blanchedalmond
Hex: 0xFFEBCD
Text 123
blue
Hex: 0x0000FF
Text 123
blueviolet
Hex: 0x8A2BE2
Text 123
brown
Hex: 0xA52A2A
Text 123
burlywood
Hex: 0xDEB887
Text 123
cadetblue
Hex: 0x5F9EA0
Text 123
chartreuse
Hex: 0x7FFF00
Text 123
chocolate
Hex: 0xD2691E
Text 123
coral
Hex: 0xFF7F50
Text 123
cornflower
Hex: 0x6495ED
Text 123
cornsilk
Hex: 0xFFF8DC
Text 123
crimson
Hex: 0xDC143C
Text 123
cyan
Hex: 0x00FFFF
Text 123
darkblue
Hex: 0x00008B
Text 123
darkcyan
Hex: 0x008B8B
Text 123
darkgoldenrod
Hex: 0xB8860B
Text 123
darkgray
Hex: 0xA9A9A9
Text 123
darkgreen
Hex: 0x006400
Text 123
darkkhaki
Hex: 0xBDB76B
Text 123
darkmagenta
Hex: 0x8B008B
Text 123
darkolivegreen
Hex: 0x556B2F
Text 123
darkorange
Hex: 0xFF8C00
Text 123
darkorchid
Hex: 0x9932CC
Page 108
RML User Guide
Document generated on 2014/09/25 13:10:59
Text 123
darkred
Hex: 0x8B0000
Text 123
darksalmon
Hex: 0xE9967A
Text 123
darkseagreen
Hex: 0x8FBC8B
Text 123
darkslateblue
Hex: 0x483D8B
Text 123
darkslategray
Hex: 0x2F4F4F
Text 123
darkturquoise
Hex: 0x00CED1
Text 123
darkviolet
Hex: 0x9400D3
Text 123
deeppink
Hex: 0xFF1493
Text 123
deepskyblue
Hex: 0x00BFFF
Text 123
dimgray
Hex: 0x696969
Text 123
dodgerblue
Hex: 0x1E90FF
Text 123
firebrick
Hex: 0xB22222
Text 123
floralwhite
Hex: 0xFFFAF0
Text 123
forestgreen
Hex: 0x228B22
Text 123
fuchsia
Hex: 0xFF00FF
Text 123
gainsboro
Hex: 0xDCDCDC
Text 123
ghostwhite
Hex: 0xF8F8FF
Text 123
gold
Hex: 0xFFD700
Text 123
goldenrod
Hex: 0xDAA520
Text 123
gray
Hex: 0x808080
Text 123
grey (same as 'gray')
Hex: 0x808080
Text 123
green
Hex: 0x008000
Text 123
greenyellow
Hex: 0xADFF2F
Text 123
honeydew
Hex: 0xF0FFF0
Text 123
hotpink
Hex: 0xFF69B4
Text 123
indianred
Hex: 0xCD5C5C
Text 123
indigo
Hex: 0x4B0082
Text 123
ivory
Hex: 0xFFFFF0
Text 123
khaki
Hex: 0xF0E68C
Text 123
lavender
Hex: 0xE6E6FA
Text 123
lavenderblush
Hex: 0xFFF0F5
Text 123
lawngreen
Hex: 0x7CFC00
Text 123
lemonchiffon
Hex: 0xFFFACD
Text 123
lightblue
Hex: 0xADD8E6
Page 109
RML User Guide
Document generated on 2014/09/25 13:10:59
Text 123
lightcoral
Hex: 0xF08080
Text 123
lightcyan
Hex: 0xE0FFFF
Text 123
lightgoldenrodyellow
Hex: 0xFAFAD2
Text 123
lightgreen
Hex: 0x90EE90
Text 123
lightgrey
Hex: 0xD3D3D3
Text 123
lightpink
Hex: 0xFFB6C1
Text 123
lightsalmon
Hex: 0xFFA07A
Text 123
lightseagreen
Hex: 0x20B2AA
Text 123
lightskyblue
Hex: 0x87CEFA
Text 123
lightslategray
Hex: 0x778899
Text 123
lightsteelblue
Hex: 0xB0C4DE
Text 123
lightyellow
Hex: 0xFFFFE0
Text 123
lime
Hex: 0x00FF00
Text 123
limegreen
Hex: 0x32CD32
Text 123
linen
Hex: 0xFAF0E6
Text 123
magenta
Hex: 0xFF00FF
Text 123
maroon
Hex: 0x800000
Text 123
mediumaquamarine
Hex: 0x66CDAA
Text 123
mediumblue
Hex: 0x0000CD
Text 123
mediumorchid
Hex: 0xBA55D3
Text 123
mediumpurple
Hex: 0x9370DB
Text 123
mediumseagreen
Hex: 0x3CB371
Text 123
mediumslateblue
Hex: 0x7B68EE
Text 123
mediumspringgreen
Hex: 0x00FA9A
Text 123
mediumturquoise
Hex: 0x48D1CC
Text 123
mediumvioletred
Hex: 0xC71585
Text 123
midnightblue
Hex: 0x191970
Text 123
mintcream
Hex: 0xF5FFFA
Text 123
mistyrose
Hex: 0xFFE4E1
Text 123
moccasin
Hex: 0xFFE4B5
Text 123
navajowhite
Hex: 0xFFDEAD
Text 123
navy
Hex: 0x000080
Text 123
oldlace
Hex: 0xFDF5E6
Text 123
olive
Hex: 0x808000
Page 110
RML User Guide
Document generated on 2014/09/25 13:10:59
Text 123
olivedrab
Hex: 0x6B8E23
Text 123
orange
Hex: 0xFFA500
Text 123
orangered
Hex: 0xFF4500
Text 123
orchid
Hex: 0xDA70D6
Text 123
palegoldenrod
Hex: 0xEEE8AA
Text 123
palegreen
Hex: 0x98FB98
Text 123
paleturquoise
Hex: 0xAFEEEE
Text 123
palevioletred
Hex: 0xDB7093
Text 123
papayawhip
Hex: 0xFFEFD5
Text 123
peachpuff
Hex: 0xFFDAB9
Text 123
peru
Hex: 0xCD853F
Text 123
pink
Hex: 0xFFC0CB
Text 123
plum
Hex: 0xDDA0DD
Text 123
powderblue
Hex: 0xB0E0E6
Text 123
purple
Hex: 0x800080
Text 123
red
Hex: 0xFF0000
Text 123
rosybrown
Hex: 0xBC8F8F
Text 123
royalblue
Hex: 0x4169E1
Text 123
saddlebrown
Hex: 0x8B4513
Text 123
salmon
Hex: 0xFA8072
Text 123
sandybrown
Hex: 0xF4A460
Text 123
seagreen
Hex: 0x2E8B57
Text 123
seashell
Hex: 0xFFF5EE
Text 123
sienna
Hex: 0xA0522D
Text 123
silver
Hex: 0xC0C0C0
Text 123
skyblue
Hex: 0x87CEEB
Text 123
slateblue
Hex: 0x6A5ACD
Text 123
slategray
Hex: 0x708090
Text 123
snow
Hex: 0xFFFAFA
Text 123
springgreen
Hex: 0x00FF7F
Text 123
steelblue
Hex: 0x4682B4
Text 123
tan
Hex: 0xD2B48C
Text 123
teal
Hex: 0x008080
Text 123
thistle
Hex: 0xD8BFD8
Page 111
RML User Guide
Document generated on 2014/09/25 13:10:59
Text 123
tomato
Hex: 0xFF6347
Text 123
turquoise
Hex: 0x40E0D0
Text 123
violet
Hex: 0xEE82EE
Text 123
wheat
Hex: 0xF5DEB3
Text 123
white
Hex: 0xFFFFFF
Text 123
whitesmoke
Hex: 0xF5F5F5
Text 123
yellow
Hex: 0xFFFF00
Text 123
yellowgreen
Hex: 0x9ACD32
Page 112
RML User Guide
Document generated on 2014/09/25 13:10:59
Appendix B - Glossary of terms and abbreviations
baseline
In typography, the imaginary line on which characters sit. The x-height of a font is measured from the baseline
to the top of a lowercase x. The descender, for those characters that have one, is defined as the portion of the
character that falls below the baseline.
Bezier curves
Named after the French mathematician Pierre Bézier, Bezier curves utilize at least three points to define a
curve. The endpoints are called the anchor points, while any other point is known as a node. The curves
produced by RML's <curves> tag are Bezier curves.
bitmap
A bitmap is a way of storing an image. In bitmaps, each pixel ("picture-cell") is stored as one or more bits of
data in a "map" consisting of rows and columns. This means that when you print them out at the size they were
created at they look fine, but shrinking or enlarging them leads to them looking blocky and ragged.
JPEG and GIF are both bitmapped graphics formats (as are BMP, PICT and PNG). You can use gifs and jpegs
in your RML document with the <image> tag.
see also "gif", "JPEG", "image"
Boolean
Named after the nineteenth-century mathematician George Boole, Boolean logic is a form of algebra in which
all values are reduced to either TRUE or FALSE (or 0 and 1).
CMYK
A way of specifying a color by its Cyan, Magenta, Yellow and Black ('Key') components. Usually used when
referring to pigments - such as in printing.
DTD
Document Type Definition. A term from XML that refers to the file that defines the legal building blocks of an
XML document, and the permissible ways to structure it.
empty elements
"Empty" elements are those tags that don't have any content, and are closed with a "/>" at the end of the same
tag rather than having a separate closing tag. (e.g. <getName id="Header.Title"/> doesn't have a
separate </getName> tag - the "/>" serves to close it so it doesn't need one). Empty elements are also
sometimes known as "singletons".
fill
In RML, the color that a graphic or text item is filled with (as opposed to that of its outline or stroke).
flowables
In RML, "flowables" are items which appear in a story (such as paragraph, spacer, and tables). Flowables are
positioned in sequence running down a frame until there is no more room left in that frame, when they are
placed in the next frame (or on the next page if necessary). They can not be mixed with graphics.
Flowables include the following tags:
para, blockTable, title, h1, h2, h3, spacer, illustration, pre and plugInFlowable.
see also "graphics"
GIF
GIF (Graphics Interchange Format) is a bit-mapped graphics file format created by CompuServe in 1987. It is
still in common use on the World Wide Web and many other places today.
You can use gifs in your RML document with the image tag.
see also "bitmap", "JPEG", "image"
graphics
In RML, "graphics" are items which can appear inside the pageGraphics and illustration tags.
Unlike flowables, graphics are explicitly positioned on the page by co-ordinates. They can not be mixed with
Page 113
RML User Guide
Document generated on 2014/09/25 13:10:59
flowables.
see also "flowables"
HTML
The Hyper-Text Markup Language. The language used for writing pages on the World Wide Web.
image
In RML, the "image" tag allows you to use existing graphics files in your document. Currently image supports
the GIF and JPEG formats - the two most common formats on the World Wide Web. Most paint applications
support both the GIF and JPEG standards.
see also "bitmap", "GIF", "JPEG"
JPEG
A lossy compression technique for color images created by the Joint Photographic Experts Group (JPEG).
Better for photos than the GIF format, it can use up to 24-bit color and reduce file sizes to about 5% of their
normal size. JPEG files are widely used on the World Wide Web and many other places.
(The JPEG format is sometimes known as JFIF, JFI, and JPG as well as JPEG).
You can use JPEG files in your RML document with the image tag.
see also "bitmap", "gif", "image"
jpg
See JPEG.
leading
Leading (pronounced "ledding") is the amount of vertical space allotted for a line of type - the distance between
the baseline of one line to the baseline of the next. The name comes from the way that printers used to use thin
strips of lead or brass to separate the lines of metal type.
In RML, leading can be supplied as an attribute for the para and paraStyle tags. It is expressed as the
height of the line plus the space between lines. So, for example, using a 12 point font with a leading of 18 gives
you a space between lines of 6 points.
You can also have negative leading. By giving a number smaller than the size of font you are using, you can
arrange it so that the lines overlap each other.
orthogonal
An adjective from mathematics meaning "relating to or composed of right angles".
A non-orthogonal transformation is one which does not preserve right angles. skew is a non-orthogonal
transformation.
PDF
The Portable Document Format. A format created by Adobe, this is a standard for electronic documents which
is platform-independent due to the freely available Acrobat reader. The PDF file format is a complex indexed
binary format, with a specification 600 pages long. (RML is much easier!)
RGB
A way of specifying a color by its Red, Green and Blue components. Usually used when referring to lights such as on a computer screen.
RML
Report Markup Language. An XML dialect, created by ReportLab, Inc, and and used by their software rml2pdf
to produce documents in PDF.
singletons
See "empty elements".
story
The part of an RML document where the main content of a document goes (if it uses the
"template/stylesheet/story" form). This is where text - split into paragraphs by <para> tags - is put.
Page 114
RML User Guide
Document generated on 2014/09/25 13:10:59
stroke
In RML, the color of the outline of a graphic or text item (as opposed to that of its inside or fill.)
stylesheet
This is an obligatory part of an RML document. It is where the styles for paragraphs and blockTables are
defined (though it can be empty).
template
In those RML documents that use the "template/stylesheet/story" form, this is the part of the document where
any headers, footers, or background graphic elements are defined.
vanilla
Plain, ordinary, or standard [from the default flavor of ice cream in the U.S.]
In RML, you can put in letters, numbers, and punctuation in places which allow you to use "vanilla text", but
tags such as <para> or <b> are not allowed.
whitespace
For programmers, whitespace refers to all the characters that appear as blanks on your screen. This includes the
space and tab characters, linefeeds, carriage returns, and other more specialised characters.
For designers, whitespace is any areas on a page that aren't the content - the bits that are free of text or artwork.
XML
The Extensible Markup Language - a document processing standard set by the World Wide Web Consortium
(W3C) - the people who defined the standard for HTML.
Page 115
RML User Guide
Document generated on 2014/09/25 13:10:59
Appendix C - Letters used by the Greek tag
Greek Letter
RML Representation
Greek Letter
RML Representation
α
<greek>a</greek>
Α
<greek>A</greek>
β
<greek>b</greek>
Β
<greek>B</greek>
χ
<greek>c</greek>
Χ
<greek>C</greek>
δ
<greek>d</greek>
∆
<greek>D</greek>
ε
<greek>e</greek>
Ε
<greek>E</greek>
φ
<greek>f</greek>
Φ
<greek>F</greek>
γ
<greek>g</greek>
Γ
<greek>G</greek>
η
<greek>h</greek>
Η
<greek>H</greek>
ι
<greek>i</greek>
Ι
<greek>I</greek>
ϕ
<greek>j</greek>
ϑ
<greek>J</greek>
κ
<greek>k</greek>
Κ
<greek>K</greek>
λ
<greek>l</greek>
Λ
<greek>L</greek>
µ
<greek>m</greek>
Μ
<greek>M</greek>
ν
<greek>n</greek>
Ν
<greek>N</greek>
ο
<greek>o</greek>
Ο
<greek>O</greek>
π
<greek>p</greek>
Π
<greek>P</greek>
θ
<greek>q</greek>
Θ
<greek>Q</greek>
ρ
<greek>r</greek>
Ρ
<greek>R</greek>
σ
<greek>s</greek>
Σ
<greek>S</greek>
τ
<greek>t</greek>
Τ
<greek>T</greek>
υ
<greek>u</greek>
Υ
<greek>U</greek>
ϖ
<greek>v</greek>
ς
<greek>V</greek>
ω
<greek>w</greek>
Ω
<greek>W</greek>
ξ
<greek>x</greek>
Ξ
<greek>X</greek>
ψ
<greek>y</greek>
Ψ
<greek>Y</greek>
ζ
<greek>z</greek>
Ζ
<greek>Z</greek>
Page 116
RML User Guide
Document generated on 2014/09/25 13:10:59
Appendix D - Command reference
All attributes are optional unless otherwise specified.
document
<document
string
required
PDF compression (default)
PDF invariance (default)
Debug document production (0)
Encryption user password
Encryption owner password
Encryption strength
optional
defaults to 128
permissions="print annotate..." Encryption permissions optional
allowed are print copy modify annotate
default is print
filename="myfile.pdf"
compression="0|1|default"
invariant="0|1|default"
debug="0|1"
userPass="uuserpw"
ownerPass="ownerpw"
encryptionStrength="128|40"
>
</document>
Above is the story based form for the document tag.
Encryption will only take place if a userPass is specified.
document
<document
string
filename="myfile.pdf"
required
>
optional
one or more
<pageInfo>...</pageInfo>
<pageDrawing>...</pageDrawing>
</document>
Above is the PageDrawing based form for the document tag.
The document tag is the root tag for RML docuoments. Every RML document must contain on and only one
document tag. There are two forms for a document: the story form and the pageDrawing form.
Page 117
RML User Guide
Document generated on 2014/09/25 13:10:59
docinit
<docinit
pageMode
pageLayout
useCropMarks
UseNone|UseOutlines|UseThumbs|FullScreen
SinglePage|OneColumn|TwoColumnLeft|TwoColumnRight
(yes | no | 0 | 1 | true | false)
pageSize="(8.5in, 11in)"
rotation="270"
firstPageTemplate="main"
leftMargin="1in"
rightMargin="1in"
topMargin="1.5in"
bottomMargin="1.5in"
showBoundary="false"
allowSplitting="true"
title="my title"
author="yours truly"
pair of lengths
page angular orientation (multiple of 90, default 0)
page template id
length
length
length
length
truth value
truth value
string
string
>
</docinit>
template
<template
>
<pageTemplate...> ...</pageTemplate>
</template>
Page 118
1 or more
RML User Guide
Document generated on 2014/09/25 13:10:59
stylesheet
<stylesheet>
<initialize>...</initialize>
<paraStyle ... />
<blockTableStyle>...</blockTableStyle>
</stylesheet>
optional
(any number
of styles)
story
<story>
<para>...</para>
...
<illustration>...</illustration>
</story>
(Sequence of
top level
flowables)
pageInfo
<pageInfo
pageSize="(8.5in,11in)"
pair of lengths
required
/>
pageDrawing
<pageDrawing>
<drawString ...> ...</drawString>
...
<place ...>...</place>
</pageDrawing>
(Sequence of
graphical
operations)
pageGraphics
<pageGraphics>
<drawString ...> ...</drawString>
...
<place>...</place>
</pageGraphics>
(Sequence of
graphical
operations)
Page 119
RML User Guide
Document generated on 2014/09/25 13:10:59
Generic Flowables (Story Elements)
spacer
<spacer
length="1.2in"
width="5in"
measurement
measurement
required
measurement
measurement
required
required
/>
illustration
<illustration
height="1.2in"
width="5in"
>
<drawString ...> ...</drawString>
...
<place ...>...</place>
</illustration>
(Sequence of
graphical
operations)
pre
<pre
style="myfavoritestyle"
>
Preformatted Text
</pre>
string paragraph style name
also string forms (getname)
xpre
<xpre
style="myfavoritestyle"
>
Paragraph text which may contain
</xpre>
Page 120
string paragraph style name
intraparagraph markup
RML User Guide
Document generated on 2014/09/25 13:10:59
plugInFlowable
<plugInFlowable
module="mymodule"
function="myfunction"
>
string data for plug in
</plugInFlowable>
string
string
required
required
unformatted data
Table Elements
blockTable
<blockTable
style="mytablestyle"
rowHeights="(23, 20, 30, 10)"
colWidths="50, 90, 35, 11"
>
<tr>...</tr>
<tr>...</tr>
string style name
sequence of measurement
sequence of measurement
(rows of
same length)
</blockTable>
tr
<tr>
</tr>
td
Page 121
RML User Guide
Document generated on 2014/09/25 13:10:59
<td
stringform font name
stringform font size
stringform font color
stringform line spacing
cell left padding
cell right padding
cell top padding
cell bottom padding
background color
cell horizontal alignment
vertical alignment
bottom line thickness
bottom line color
bottom cap (butt | round | square)
bottom line count
bottom line spacing
topline thickness
top line colour
top cap (butt | round | square)
top line count
top line spacing
left line thickness
left line color
left line cap (butt | round | square)
left line count
left line spacing
right line thickness
right line color
right line cap (butt | round | square)
right line count
right line spacing
fontName="Helvetica"
fontSize="12"
fontColor="red"
leading="12"
leftPadding="3"
rightPadding="3"
topPadding="3"
bottomPadding="3"
background="pink"
align="right"
vAlign="bottom"
lineBelowThickness
lineBelowColor
lineBelowCap
lineBelowCount
lineBelowSpace
lineAboveThickness
lineAboveColor
lineAboveCap
lineAboveCount
lineAboveSpace
lineLeftThickness
lineLeftColor
lineLeftCap
lineLeftCount
lineLeftSpace
lineRightThickness
lineRightColor
lineRightCap
lineRightCount
lineRightSpace
>
</td>
Page 122
RML User Guide
Document generated on 2014/09/25 13:10:59
docAssert
<docAssert
cond="i==3"
condition string
format="The value of i is %(__expr__)"
format string
/>
docAssign
<docAssign
var="i"
expr="availableWidth"
string
expression string
cond="i==3"
condition string
stmt="i-=1"
statement string
/>
docElse
<docElse/>
docIf
<docIf
/>
docExec
<docExec
/>
docPara
<docPara
expr="availableWidth"
expression string
format="The value of i is %(__expr__)"
format string
style=""
string
escape="yes"
(yes | no | 0 | 1)
/>
Page 123
required
RML User Guide
Document generated on 2014/09/25 13:10:59
docWhile
<docWhile
cond="i==3"
condition string
baseDir="../"
module="python_module"
function="module_function"
hAlign="CENTER"
showBoundary="no"
path string
string
string
center|centre|left|right|CENTER|CENTRE|LEFT|RIGHT
(0|1|yes|no)
baseDir="../"
module="python_module"
function="module_function"
name="somename"
initargs="someinitargs"
path string
string
string
string
string
/>
drawing
<drawing
/>
widget
<widget
/>
Paragraph-like Elements
para
<para
string paragraph style name
style="myfavoritstyle"
>
</para>
Page 124
RML User Guide
Document generated on 2014/09/25 13:10:59
title
<title
style="myfavoritstyle"
string paragraph style name
style="myfavoritstyle"
string paragraph style name
style="myfavoritstyle"
string paragraph style name
style="myfavoritstyle"
string paragraph style name
style="myfavoritstyle"
string paragraph style name
>
</title>
h1
<h1
>
</h1>
h2
<h2
>
</h2>
h3
<h3
>
</h3>
h4
<h4
>
</h4>
Page 125
RML User Guide
Document generated on 2014/09/25 13:10:59
h5
<h5
style="myfavoritstyle"
string paragraph style name
style="myfavoritstyle"
string paragraph style name
color="blue"
fontSize="12"
fontName="Helvetica"
name="somename"
backColor="cyan"
href="someurl"
string color name
stringform font size
string font name
string
string color string
string
imports="someimports"
default="somedefault"
string
string
>
</h5>
h6
<h6
>
</h6>
a
<a
>
</a>
evalString
<evalString
/>
Intra-Paragraph Markup
Page 126
RML User Guide
Document generated on 2014/09/25 13:10:59
i
<i>
</i>
b
<b>
</b>
font
<font
string font name
string color name
fontsize measurement
face="Helvetica"
color="blue"
size="34"
>
</font>
greek
<greek>
</greek>
sub
<sub>
</sub>
Page 127
RML User Guide
Document generated on 2014/09/25 13:10:59
super
<super>
</super>
strike
<strike/>
sup
<sup/>
seq
<seq
id="SecNum"
template="%(Ch)s.%(SecNum)s"
string
string
id="SecNum"
string
id="SecNum"
string
order="id id id id"
string
/>
seqDefault
<seqDefault
/>
seqReset
<seqReset
/>
seqChain
<seqChain
/>
Page 128
RML User Guide
Document generated on 2014/09/25 13:10:59
seqFormat
<seqFormat
id="seqId"
value="format char"
string
(1|i|I|a|A)
name="somename"
label="somelabel"
string
string
bulletColor="blue"
bulletFontName=""
bulletFontSize="1in"
bulletIndent="1in"
bulletOffsetY="1in"
string color name
string
measurement
measurement
measurement
destination="somedestination"
color="blue"
string
string color name
destination="somedestination"
color="blue"
string
string color name
/>
onDraw
<onDraw
/>
br
<br/>
bullet
<bullet
/>
link
<link
/>
setLink
<setLink
/>
Page 129
RML User Guide
Document generated on 2014/09/25 13:10:59
unichar
<unichar
string
string
name="somename"
code="somecode"
/>
Page Level Flowables
nextFrame
<nextFrame
int or string frame index
name="frameindex"
/>
setNextFrame
<setNextFrame
name="frameindex"
/>
int or string frame index
required
string template name
required
measurement
required
nextPage
<nextPage/>
setNextTemplate
<setNextTemplate
name="indextemplate"
/>
condPageBreak
<condPageBreak
height="10cm"
/>
Page 130
RML User Guide
Document generated on 2014/09/25 13:10:59
storyPlace
<storyPlace
measurement
required
measurement
required
measurement
required
measurement
required
"page", "frame", or "local" optional
x="1in"
y="7in"
width="5in"
height="3in"
origin="page"
>
<para>...</para>
...
<table>...</table>
</storyPlace>
(Sequence of
top level
flowables)
keepInFrame
<keepInFrame
maxWidth="int"
maxHeight="int"
frame="frameindex"
mergeSpace="1|0"
onOverflow="error|overflow|"
...... |shrink|truncate"
id="name"
>
<para>...</para>
...
<table>...</table>
</keepInFrame>
maximum width or 0
maximum height or 0
optional frameindex to start in
whether padding space is merged
over flow behaviour
name for identification purposes
(Sequence of
top level
flowables)
imageAndFlowables
Page 131
RML User Guide
Document generated on 2014/09/25 13:10:59
<imageAndFlowables
imageName="path"
imageWidth="float"
imageHeight="float"
imageMask="color"
imageLeftPadding="float"
imageRightPadding="float"
imageTopPadding="float"
imageBottomPadding="float"
imageSide="left"
>
<para>...</para>
...
<table>...</table>
</imageAndFlowables>
path to image file or url
image width or 0
image height or 0
image transparency color or "auto"
space on left of image
space on right of image
space on top of image
space on bottom of image
hrizontal image location left|right
(Sequence of
top level
flowables)
pto
<pto>
<pto_trailer>...</pto_trailer>
<pto_header>...</pto_header>
<para>...</para>
...
<table>...</table>
</pto>
optional
optional
(Sequence of
top level
flowables)
pto_trailer
<pto_trailer>
Only in PTO
(Sequence of
top level
flowables)
<para>...</para>
...
<table>...</table>
</pto_trailer>
pto_header
<pto_header>
Only in PTO
(Sequence of
top level
flowables)
<para>...</para>
...
<table>...</table>
</pto_header>
Page 132
RML User Guide
Document generated on 2014/09/25 13:10:59
indent
<indent
measurement
measurement
left="1in"
right="1cm"
>
<para>...</para>
...
<table>...</table>
</indent>
optional
optional
(Sequence of
top level
flowables)
frameBackground
<frameBackground
color="pink"
left="1in"
right="1cm"
start="1"
/>
color
measurement
measurement
boolean
optional
optional
optional
optional
measurement
measurement
optional
optional
fixedSize
<fixedSize
width="1in"
height="1cm"
>
<para>...</para>
...
<table>...</table>
</fixedSize>
(Sequence of
top level
flowables)
Graphical Drawing Operations
drawString
<drawString
measurement
measurement
x="1in"
y="7in"
>
</drawString>
Page 133
required
required
RML User Guide
Document generated on 2014/09/25 13:10:59
drawRightString
<drawRightString
x="1in"
y="7in"
>
measurement
measurement
required
required
measurement
measurement
required
required
measurement
measurement
required
required
measurement
measurement
measurement
measurement
truth value
truth value
required
required
required
required
</drawRightString>
drawCentredString
<drawCentredString
x="1in"
y="7in"
>
</drawCentredString>
drawCenteredString
<drawCenteredString
x="1in"
y="7in"
>
</drawCenteredString>
ellipse
<ellipse
x="1in"
y="7in"
width="5cm"
height="3cm"
fill="true"
stroke="false"
/>
Page 134
RML User Guide
Document generated on 2014/09/25 13:10:59
circle
<circle
x="1in"
y="7in"
radius="3cm"
fill="true"
stroke="false"
measurement
measurement
measurement
truth value
truth value
required
required
required
x="1in"
y="7in"
width="5cm"
height="3cm"
round="1.2cm"
fill="true"
stroke="false"
measurement
measurement
measurement
measurement
measurement
truth value
truth value
required
required
required
required
xs="1in 2in 3in"
ys="7in 7.2in 7.4in"
measurements
measurements
required
required
/>
rect
<rect
/>
grid
<grid
/>
lines
<lines>
1in 1in 2in 2in
1in 2in 2in 3in
1in 3in 2in 4in
...
</lines>
quadruples of
measurements
representing
line segments
Page 135
RML User Guide
Document generated on 2014/09/25 13:10:59
curves
<curves>
1in 1in 2in 2in 2in 3in 1in 3in
1in 2in 2in 3in 2in 4in 1in 4in
1in 3in 2in 4in 2in 5in 1in 5in
...
</curves>
octtuples of
measurements
representing
Bezier curves
image
<image
file="cute.jpg"
x="1in"
y="7in"
width="5cm"
height="3cm"
string
measurement
measurement
measurement
measurement
required
required
required
x="1in"
y="7in"
width="5in"
height="3in"
measurement
measurement
measurement
measurement
required
required
required
required
/>
place
<place
>
<para>...</para>
...
<illustration>...</illustration>
</place>
(Sequence of
top level
flowables)
doForm
<doForm
string
name="logo"
/>
Page 136
required
RML User Guide
Document generated on 2014/09/25 13:10:59
includePdfPages
<includePdfPages
filename="path"
pages="1-3,6"
template="name"
outlineText="text"
outlineLevel="1"
outlineClose="0"
leadingFrame="no"
isdata="yes"
orientation="auto"
sx="0.9"
sy="0.9"
dx="2in"
dy="2in"
degrees="45"
/>
string
string
string
string
int
int
bool
bool
string
float
float
measurement
measurement
angle in degrees
required: path to included file
optional: , separated page list
optional: pagetemplate name
optional: text for outline entry
optional: outline level default 0
optional: 0 for closed outline entry
optional: no if you don't want a pa
optional: true if filename is a page
optional: 0 90 180 270 auto landsc
name of field
field initial value
x coord
y coord
width
height
maximum #chars
1 for multiline text
required
optional
textField
<textField
id="name"
value="initial"
x="34"
y="500"
width="72"
height="12"
maxlen="1200"
multiline="0/1"
>
</textField>
textAnnotation
<textAnnotation>
</textAnnotation>
Page 137
RML User Guide
Document generated on 2014/09/25 13:10:59
plugInGraphic
<plugInGraphic
module="mymodule"
function="myfunction"
>
string data for plug in
</plugInGraphic>
string
string
required
required
unformatted data
path
<path
measurement
measurement
truth value
truth value
truth value
x="1in"
y="7in"
close="true"
fill="true"
stroke="false"
>
1in 6in
1in 7in
...
</path>
required
required
measurement pairs
representing points
or path operations
barCodeFlowable
Page 138
RML User Guide
Document generated on 2014/09/25 13:10:59
<barCodeFlowable
code="Code11"
value="somevalue"
fontName="Helvetica"
tracking="sometracking"
routing="somerouting"
barStrokeColor="blue"
barFillColor="blue"
textColor="blue"
barStrokeWidth="1in"
gap="1in"
ratio="I2of5"
bearers=""
barHeight="1in"
barWidth="1in"
fontSize="12"
spaceWidth="1in"
spaceHeight="1in"
widthSize="1in"
heightSize="1in"
checksum="-1"
quiet="yes"
lquiet="yes"
rquiet="yes"
humanReadable="yes"
stop="yes"
/>
(I2of5 | Code128 | Standard93
required
| Extended93 | Standard39 | E
string
required
string font name
string
string
string color name
string color name
string color name
measurement
measurement
string
string
measurement
measurement
stringform font size
measurement
measurement
measurement
measurement
(-1 | 0 | 1 | 2)
(yes | no | 0 | 1)
(yes | no | 0 | 1)
(yes | no | 0 | 1)
(yes | no | 0 | 1)
(yes | no | 0 | 1)
figure
<figure
showBoundary="no"
shrinkToFit="no"
growToFit="no"
scaleFactor="somescaleFactor"
/>
Page 139
(0|1|yes|no)
(0|1|yes|no)
(0|1|yes|no)
string
RML User Guide
Document generated on 2014/09/25 13:10:59
imageFigure
<imageFigure
imageName="someimageName"
string
imageWidth="1in"
measurement
imageHeight="1in"
measurement
imageMask="someimageMask"
string
preserveAspectRatio="yes"
(yes | no | 0 | 1)
showBoundary="yes"
(yes | no | 0 | 1)
pdfBoxType="MediaBox"
(MediaBox | CropBox | TrimBox | BleedBox | ArtBox)
pdfPageNumber="4"
integer
showBoundary="no"
(0|1|yes|no)
shrinkToFit="no"
(0|1|yes|no)
growToFit="no"
(0|1|yes|no)
caption="somecaption"
string
captionFont="12"
stringform font name
captionSize="1in"
measurement
captionGap="somecaptionGap"
string
captionColor="blue"
string color name
spaceAfter="4"
integer
spaceBefore="4"
integer
align="center|centre|left|right|CENTER|CENTRE|LEFT|RIGHT)"
(center|centre|left|right|CENTER|CENTRE|LEFT|RIGHT)
/>
img
<img
string
measurement
measurement
(top|middle|bottom))
src="somesrc"
width="1in"
height="1in"
valign="top"
/>
Path Operations
moveto
<moveto>
5in 3in
</moveto>
measurement pair
Page 140
RML User Guide
Document generated on 2014/09/25 13:10:59
curvesto
<curvesto>
1in 1in 1in 4in 4in 4in
2in 2in 2in 5in 5in 5in
...
</curvesto>
sextuples of
measurements for
bezier curves
Form Field Elements
barCode
<barCode
measurement
required
measurement
required
"Codabar", "Code11",
required
"Code128", "I2of5"
"Standard39", Standard93",
"Extended39", "Extended93"
"MSI", "FIM", "POSTNET"
x="1in"
y="1in"
code="Code 11"
>
01234545634563
</barCode>
unformatted barcode data
checkBox
Page 141
RML User Guide
Document generated on 2014/09/25 13:10:59
<checkBox
style="myboxstyle"
x="1in"
y="1in"
labelFontName="Helvetica"
labelFontSize="12"
labelTextColor="blue"
boxWidth="1in"
boxHeight="1in"
checkStrokeColor="blue"
boxStrokeColor="blue"
boxFillColor="blue"
lineWidth="1"
line1="label text 1"
line2="label text 2"
line3="label text 3"
checked="false"
bold="false"
graphicOn="cute_on.jpg"
graphicOff="cute_off.jpg"
/>
letterBoxes
Page 142
string box style name
measurement
measurement
string font name
fontsize measurement
string color name
measurement
measurement
string color name
string color name
string color name
measurement
string
string
string
truth value
truth value
string file name
string file name
required
required
RML User Guide
Document generated on 2014/09/25 13:10:59
<letterBoxes
style="myboxstyle"
x="1in"
y="1in"
count="10"
label="label text"
labelFontName="Helvetica"
labelFontSize="12"
labelTextColor="blue"
labelOffsetX="1in"
labelOffsetY="1in"
boxWidth="1in"
boxHeight="1in"
combHeight="0.25"
boxStrokeColor="blue"
boxFillColor="blue"
textColor="blue"
lineWidth="1in"
fontName="Helvetica"
fontSize="12"
>
box contents goes here
</letterBoxes>
string box style name
measurement
measurement
integer
string
string font name
fontsize measurement
string color name
measurement
measurement
measurement
measurement
float
string color name
string color name
string color name
measurement
string font name
fontsize measurement
required
required
required
unformatted data
textBox
Page 143
RML User Guide
Document generated on 2014/09/25 13:10:59
<textBox
style="myboxstyle"
x="1in"
y="1in"
boxWidth="1in"
boxHeight="1in"
labelFontName="Helvetica"
labelFontSize="12"
labelTextColor="blue"
labelOffsetX="1in"
labelOffsetY="1in"
boxStrokeColor="blue"
boxFillColor="blue"
textColor="blue"
lineWidth="1in"
fontName="Helvetica"
fontSize="12"
align="left"
shrinkToFit="false"
label="label text"
string box style name
measurement
measurement
measurement
measurement
string font name
fontsize measurement
string color name
measurement
measurement
string color name
string color name
string color name
measurement
string font name
fontsize measurement
"left", "right" or "center"
truth value
string
>
box contents goes here
</textBox>
required
required
required
required
unformatted data
Graphical State Change Operations
fill
<fill
color="blue"
string name
required
color="blue"
string name
required
/>
stroke
<stroke
/>
Page 144
RML User Guide
Document generated on 2014/09/25 13:10:59
setFont
<setFont
name="Helvetica"
size="1cm"
string name
measurement
required
required
name="logo"
string name
required
/>
form
<form
>
<drawString ...> ...</drawString>
...
<place ...>...</place>
</form>
(Sequence of
graphical
operations)
catchForms
<catchForms
storageFile="storage.data"
string name
required
sx="0.8"
sy="1.3"
scale factor
scale factor
required
required
dx="0.8in"
dy="1.3in"
measurement
measurement
required
required
degrees="45"
angle in degrees
required
/>
scale
<scale
/>
translate
<translate
/>
rotate
<rotate
/>
Page 145
RML User Guide
Document generated on 2014/09/25 13:10:59
skew
<skew
angle in degrees
angle in degrees
alpha="15"
beta="5"
required
required
/>
transform
<transform>
1.0 0.3
-0.2 1.1
10.1 15
</transform>
six number affine
transformation
matrix
lineMode
<lineMode
measurement
measurements
"round", "mitered", or "bevelled"
"default", "round", or "square"
width="0.2cm"
dash=".1cm .2cm"
join="round"
cap="square"
/>
Style Elements
initialize
<initialize>
<alias.../>
<name.../>
<color.../>
</initialize>
sequence of
alias, name
or color tags
paraStyle
Page 146
RML User Guide
Document generated on 2014/09/25 13:10:59
<paraStyle
name="mystyle"
alias="pretty"
parent="oldstyle"
fontname="Courier-Oblique"
fontsize="13"
leading="20"
leftIndent="1.25in"
rightIndent="2.5in"
firstLineIndent="0.5in"
spaceBefore="0.2in"
spaceAfter="3cm"
alignment="justify"
bulletFontname="Courier"
bulletFontsize="13"
bulletIndent="0.2in"
textColor="red"
backColor="cyan"
string
string
string
string
measurement
measurement
measurement
measurement
measurement
measurement
measurement
"left", "right", "center" or "justify"
string
measurement
measurement
string
string
name="mystyle"
alias="pretty"
parent="oldstyle"
fontname="Courier-Oblique"
fontsize="13"
alignment="left"
textColor="blue"
labelFontName="Courier"
labelFontSize="13"
labelAlignment="left"
labelTextColor="blue"
boxFillColor="blue"
boxStrokeColor="blue"
cellWidth="1in"
cellHeight="1in"
string
string
string
string
measurement
"left", "right" or "center"
string color name
string
measurement
"left", "right" or "center"
string color name
string color name
string color name
measurement
measurement
/>
boxStyle
<boxStyle
/>
Page 147
required
RML User Guide
Document generated on 2014/09/25 13:10:59
blockTableStyle
<blockTableStyle
id="mytablestyle"
>
<blockFont.../>
<blockLeading.../>
string
table style
block descriptors
</blockTableStyle>
Table Style Block Descriptors
blockFont
<blockFont
name="TimesRoman"
size="8"
leading="10"
start="4"
stop="11"
string
measurement
measurement
integer
integer
required
measurement
integer
integer
required
string
integer
integer
required
/>
blockLeading
<blockLeading
length="10"
start="4"
stop="11"
/>
blockTextColor
<blockTextColor
colorName="pink"
start="4"
stop="11"
/>
Page 148
RML User Guide
Document generated on 2014/09/25 13:10:59
blockAlignment
<blockAlignment
value="left"
start="4"
stop="11"
/>
"left", "right", or "center"
integer
integer
blockLeftPadding
<blockLeftPadding
length="0.2in"
start="4"
stop="11"
/>
measurement
integer
integer
required
measurement
integer
integer
required
measurement
integer
integer
required
measurement
integer
integer
required
blockRightPadding
<blockRightPadding
length="0.2in"
start="4"
stop="11"
/>
blockBottomPadding
<blockBottomPadding
length="0.2in"
start="4"
stop="11"
/>
blockTopPadding
<blockTopPadding
length="0.2in"
start="4"
stop="11"
/>
Page 149
RML User Guide
Document generated on 2014/09/25 13:10:59
blockBackground
<blockBackground
colorName="indigo"
start="4"
stop="11"
/>
string
integer
integer
required
blockValign
<blockValign
value="left"
start="4"
stop="11"
"top", "middle", or "bottom"
integer
integer
start="4"
stop="4"
integer
integer
kind="BOX"
thickness="4"
colorName="magenta"
start="4"
stop="11"
count="2"
space="2"
dash="2,2"
line command
measurement
string
integer
integer
integer
integer
integer,integer
/>
blockSpan
<blockSpan
/>
lineStyle
<lineStyle
required
required
required
/>
The line command names are: GRID, BOX, OUTLINE, INNERGRID, LINEBELOW, LINEABOVE,
LINEBEFORE and LINEAFTER. BOX and OUTLINE are equivalent, and GRID is the equivalent of applying
both BOX and INNERGRID.
Page 150
RML User Guide
Document generated on 2014/09/25 13:10:59
bulkData
<bulkData
stripBlock="yes"
stripLines="yes"
stripFields="yes"
fieldDelim=","
recordDelim=","
(yes | no)
(yes | no)
(yes | no)
string
string
fileName="somefileName"
sheetName="somesheetName"
range="A1:B7"
rangeName="somerangeName"
string
string
string
string
/>
excelData
<excelData
/>
Page Layout Tags
pageTemplate
<pageTemplate
id="frontpage"
pageSize="(8.5in, 11in)"
rotation="270"
>
<pageGraphics>...</pageGraphics>...
<frame.../>
string
required
override template page size
override template page angular orientation
optional 1 or 2
one or more
</pageTemplate>
frame
<frame
string
measurement
measurement
measurement
measurement
id="left"
x1="1in"
y1="1in"
width="50cm"
height="90cm"
/>
Page 151
required
required
required
required
required
RML User Guide
Document generated on 2014/09/25 13:10:59
pageGraphics
<pageGraphics/>
Special Tags
name
<name
id="chapterName"
value="Introduction"
string
string
required
required
id="footerString"
value="chapterName"
string
string
required
required
id="footerString"
string
required
id="footerString"
RGB="77aa00"
string
required
hexidecimal red/green/blue values
/>
alias
<alias
/>
getName
<getName
/>
color
<color
/>
pageNumber
<pageNumber
integer
countingFrom="2"
/>
Page 152
RML User Guide
Document generated on 2014/09/25 13:10:59
outlineAdd
<outlineAdd
integer
truth value
level="1"
closed="true"
>
Chapter 1, section 2
</outlineAdd>
outline entry text
cropMarks
<cropMarks
borderWidth="36"
markWidth="0.5"
markColor="green"
markLength="18"
integer
float
color
integer
name="somename"
offset="0"
format="ABC"
string
integer
123|I|i|ABC|abc
name="somename"
offset="0"
format="ABC"
string
integer
123|I|i|ABC|abc
name="somename"
dot="-"
style="somestyle"
tableStyle="sometablestyle"
string
string
string
string
/>
startIndex
<startIndex
/>
index
<index
/>
showIndex
<showIndex
/>
Page 153
RML User Guide
Document generated on 2014/09/25 13:10:59
bookmark
<bookmark
string
measurement
measurement
name="somename"
x="1in"
y="1in"
/>
bookmarkPage
<bookmarkPage
name="somename"
fit="XYZ|Fit|FitH|FitV|FitR)"
top="1in"
bottom="1in"
left="1in"
right="1in"
zoom="somezoom"
/>
string
(XYZ|Fit|FitH|FitV|FitR)
measurement
measurement
measurement
measurement
string
join
<join
type="sometype"
string
id="someid"
value="4"
string
integer
/>
length
<length
/>
namedString
<namedString
string
string
string
id="someid"
type="sometype"
default="somedefault"
/>
Page 154
RML User Guide
Document generated on 2014/09/25 13:10:59
param
<param
string
name="somename"
/>
registerCidFont
<registerCidFont
faceName="VeraBold"
encName="WinAnsiEncoding"
/>
font name string
string
registerFont
<registerFont
name="somename"
faceName="VeraBold"
encName="WinAnsiEncoding"
/>
string
font name string
string
registerFontFamily
<registerFontFamily
normal="VeraBold"
bold="VeraBold"
italic="VeraBold"
boldItalic="VeraBold"
/>
font name string
font name string
font name string
font name string
registerTTFont
<registerTTFont
faceName="VeraBold"
fileName="somefileName"
/>
font name string
string
registerType1Face
<registerType1Face
afmFile="DarkGardenMK.afm"
pfbFile="DarkGardenMK.pfb"
/>
Page 155
string
string
RML User Guide
Document generated on 2014/09/25 13:10:59
restoreState
<restoreState/>
saveState
<saveState/>
setFont
<setFont
font name string
measurement
integer
name="somename"
size="1in"
leading="4"
/>
setFontSize
<setFontSize
measurement
integer
size="1in"
leading="4"
/>
Log tags
log
<log
(DEBUG | INFO | WARNING | ERROR | CRITICAL)
log="evel"
>
</log>
debug
<debug>
</debug>
Page 156
RML User Guide
Document generated on 2014/09/25 13:10:59
info
<info>
</info>
warning
<warning>
</warning>
error
<error>
</error>
critical
<critical>
</critical>
logConfig
<logConfig
level="DEBUG"
(DEBUG | INFO | WARNING | ERROR | CRITICAL)
format="The value of i is %(__expr__)"
format string
filename="somefilename"
string
filemode="WRITE"
(WRITE | APPEND)
datefmt="somedatefmt"
string
/>
Not implemented
The following tags are allowed for in the DTD but are not implemented by the current version of RML2PDF:
li, ol, u, ul, dd, dl, dt
Page 157