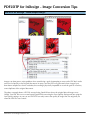
1
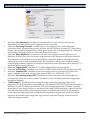
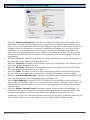
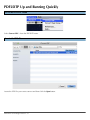
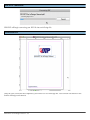
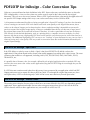
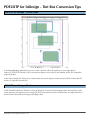
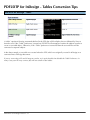
PDF2DTP® for InDesign® Manual
Copyright © 2012 Markzware
PDF2DTP® for InDesign® Manual
1
2
3
4
PDF2DTP for InDesign System Requirements
1.1
PDF2DTP for InDesign Mac System Requirements
5
1.2
PDF2DTP for InDesign Win System Requirements
6
PDF2DTP for InDesign Installation
2.1
PDF2DTP for InDesign Installation on Mac
8
2.2
PDF2DTP for InDesign Installation on Win
12
PDF2DTP for InDesign Activation
3.1
PDF2DTP for InDesign Successful Activation
17
3.2
PDF2DTP for InDesign Failed Activation
20
3.3
Proxy Setup and Issues
21
PDF2DTP for InDesign Registration
4.1
5
6
5.1
Accessing PDF2DTP for InDesign
29
5.2
PDF2DTP for InDesign Preferences
30
What is PDF2DTP for InDesign?
About PDF2DTP for InDesign (a few words from the creator)
35
PDF2DTP for InDesign Quick Start Guide
7.1
8
25
PDF2InDesign Menu and Preferences
6.1
7
PDF2DTP for InDesign Registration
PDF2DTP Up and Running Quickly
37
PDF2DTP for InDesign Conversion Tips
8.1
PDF2DTP For InDesign - Document Conversion Tips
41
9
8.2
PDF2DTP for InDesign - Font Conversion Tips
43
8.3
PDF2DTP for InDesign - Style Sheet Conversion Tips
44
8.4
PDF2DTP for InDesign - Text Conversion Tips
45
8.5
PDF2DTP for InDesign - Text Box Conversion Tips
46
8.6
PDF2DTP for InDesign - Image Conversion Tips
47
8.7
PDF2DTP for InDesign - Color Conversion Tips
49
8.8
PDF2DTP for InDesign - Tint Box Conversion Tips
50
8.9
PDF2DTP for InDesign - Tables Conversion Tips
51
8.10 PDF2DTP for InDesign - Drop Shadow Conversion Tips
52
PDF2DTP for InDesign Known Limitations
9.1
10
PDF2DTP for InDesign Known Limitations
54
PDF2DTP for InDesign and InDesign Threshold Limits
10.1 PDF2DTP for InDesign and Threshold Limits
57
PDF2DTP for InDesign System Requirements
PDF2DTP® for InDesign® Manual - 4
PDF2DTP for InDesign Mac System Requirements
PDF2DTP for InDesign Mac is available in three versions.
Each version is sold separately:
1. PDF2DTP for InDesign CS6 Mac
2. PDF2DTP for InDesign CS5.5 Mac
3. PDF2DTP for InDesign CS5 Mac
Each version listed above ONLY runs under the specified version of InDesign. You cannot run PDF2DTP for
InDesign CS5.5 under InDesign CS6 or vice versa.
In order to run your version of PDF2DTP for InDesign you will need at least the minimum
specifications Adobe requires to run that version of InDesign.
In addition, Markzware products are only officially supported in Mac OS X 10.6 and higher on Intel
based Mac hardware. While PDF2DTP for InDesign may run in older versions of the Mac OS and on
older hardware, Markzware's development environment will no longer support these older operating
systems and hardware. Bugs specifically related to these older operating systems and hardware will not
be fixed.
System Requirements Summary:
•
Mac OS X 10.6 or higher
•
Intel based Macintosh computer
•
A valid license for the version of Adobe InDesign® you run the Plug-In under
•
Internet connection to activate and register PDF2DTP for InDesign
PDF2DTP® for InDesign® Manual - 5
PDF2DTP for InDesign Win System Requirements
PDF2DTP for InDesign Win is available in three versions.
Each version is sold separately
1. PDF2DTP for InDesign CS6 Win
2. PDF2DTP for InDesign CS5.5 Win
3. PDF2DTP for InDesign CS5 Win
Each version listed above ONLY runs under the specified version of InDesign. You cannot run
PDF2DTP for InDesign CS5.5 under InDesign CS6 or vice versa.
In order to run your version of PDF2DTP for InDesign you will need at least the minimum
specifications Adobe requires to run that version of InDesign. In addition, Markzware will only
support Win XP/SP3 and Win 7 operating systems. While PDF2DTP for InDesign may run under
other versions of Windows, any bugs specific to those versions will not be fixed.
System Requirements Summary:
•
Win XP/SP3 or Win 7
•
•
A valid license for the version of Adobe InDesign® you run the Plug-In under
Internet connection to activate and register PDF2DTP for InDesign
PDF2DTP® for InDesign® Manual - 6
PDF2DTP for InDesign Installation
PDF2DTP® for InDesign® Manual - 7
PDF2DTP for InDesign Installation on Mac
Important Note: This manual describes how to install the latest version of PDF2DTP for InDesign CS6
Mac. You may have purchased PDF2DTP for InDesign CS5.5 or InDesign CS5. The Installation process
for InDesign CS5.5 and InDesign CS5 are the same as for InDesign CS6 except the Installers are named
for the appropriate version of InDesign and where you select to install will need to reflect the version of
InDesign you are running. Please use this manual as a guide and not as a verbatim step by step guide.
PDF2DTP For InDesign ZIP File
When you have completed your download of PDF2DTP For InDesign you will have a zip file that
needs to be decompressed.
PDF2DTP For InDesign Decompressed ZIP File
On most Macs you can simply double-click on the PDF2DTP For InDesign zip file and this will
produce a folder. Double-click on this folder to reveal the PDF2DTP For InDesign Installer.
If you receive a checksum error when decompressing the ZIP file, use the Mac OS built in ZIP Utility to
decompress the ZIP file. This can be accessed by highlighting the ZIP file, then Right-Clicking (or
Control-Clicking) the ZIP file. From the popup menu, select Open With and then select the first item at
the top of the list. (For Mac OS X 10.7.4 this will be called Archive Utility.app).
PDF2DTP For InDesign Installer
Double-click on the Setup icon to start the PDF2DTP For InDesign installation process.
PDF2DTP® for InDesign® Manual - 8
Application Downloaded From Internet
On many Macs the security settings are set to warn you when trying to run an application downloaded
from the internet. You can change these settings on your Mac under the Preferences/Security area (it is
safest to leave this warning on as a prevention for malicious apps you may accidentally download
while surfing the net).
Click on the Open button to open up the Setup PDF2DTP for InDesign Installer application.
Most likely due to the above warning, you will see the Setup InDesign icon bouncing in your Dock. If
nothing is happening, please check your Dock and if the Setup InDesign icon is bouncing, Click on it
to continue with the PDF2DTP For InDesign installation process.
PDF2DTP For InDesign - Select InDesign Folder
After clicking the Install button you will asked to find your InDesign Application folder.
Once you have located the folder, click on it once to highlight it and then click on the Choose button
to proceed with installation.
PDF2DTP® for InDesign® Manual - 9
PDF2DTP For InDesign Setup Window
The Setup CS6 application has three buttons:
1. Cancel - clicking Cancel will Close the Setup InDesign application and PDF2DTP For InDesign will
not be installed
2. Install - clicking Install will proceed with the PDF2DTP For InDesign installation
3. Remove - clicking Remove will proceed with removal of existing installations of PDF2DTP For
InDesign
PDF2DTP For InDesign - Asking For Password
Installing PDF2DTP For InDesign requires you enter in your Password as PDF2DTP will be adding
items to your Applications folder. Type in your User Name and Password and then click on the OK
button.
PDF2DTP® for InDesign® Manual - 10
PDF2DTP For InDesign - Installation Complete
Once the PDF2DTP For InDesign Plug-In has been installed you will see a confirmation screen. Click
on the Finish button to close the screen.
You are now ready to start up InDesign and Activate and Register PDF2DTP For InDesign.
PDF2DTP® for InDesign® Manual - 11
PDF2DTP for InDesign Installation on Win
Important Note: This manual describes how to install the latest version of PDF2DTP for InDesign CS6. You
may have purchased PDF2DTP for InDesign CS5.5 or InDesign CS5. The Installation process for these versions
of PDF2DTP for InDesign is the same as for InDesign CS6 except the Installer is named for the appropriate
version of InDesign and where you select to install will need to reflect which version InDesign you will be
using. Please use this manual as a guide and not as a verbatim step by step guide.
PDF2DTP For InDesign ZIP File
When you have completed your download of PDF2DTP For InDesign you will have a zip file that
needs to be decompressed.
IMPORTANT NOTE*** - If you receive a checksum error message when trying to decompress the ZIP file,
use Windows Explorer to decompress the file, instead of a third party ZIP Utility.
PDF2DTP for InDesign Installer Folder
When you decompress the PDF2DTP ZIP file you will wind up with a folder. Double-click the folder to open it.
PDF2DTP for InDesign Installer
In the folder you will find the PDF2DTP Installer for InDesign. Double-click on the Installer .exe file to begin
the Installation process.
PDF2DTP® for InDesign® Manual - 12
PDF2DTP for InDesign Permission or Password
When you first run the PDF2DTP for InDesign installer you may see a User Account Control window (UAC
window). This window will differ depending on whether you are logged into an Admin or a Non-Admin
account.
Click on the Yes button to continue with the PDF2DTP installation.
PDF2DTP for InDesign Welcome Install Screen
Click on the Next button to continue with the install.
PDF2DTP® for InDesign® Manual - 13
PDF2DTP for InDesign User/Company Name
Your User Name will automatically be filled in based on the name of your computer or account.
For Company Name, type in the name of your Company. If you do not work for a company, you can leave the
default of My Company.
Install this application for: - By default "Anyone who uses this computer (all users)" is selected. Unless you want
to restrict PDF2DTP for InDesign to just your account, leave the default value for all users enabled.
PDF2DTP for InDesign Setup Type
Unless instructed by Markzware Tech Support, you should select the Complete install type.
PDF2DTP® for InDesign® Manual - 14
PDF2DTP for InDesign Review
The installer will present a Review window that will show you where the PDF2DTP for InDesign Plug-In will
be installed.
PDF2DTP for InDesign Installation Complete
Click the Finish button to close the PDF2DTP for InDesign Installer.
PDF2DTP® for InDesign® Manual - 15
PDF2DTP for InDesign Activation
PDF2DTP® for InDesign® Manual - 16
PDF2DTP for InDesign Successful Activation
Important Note: While the screen shots in this section show a Successful Activation on a Mac, the same
screens will appear on Windows versions of PDF2DTP for InDesign. Please use this section as a guide as there
may be differences in the look and feel of screens due to operating system differences and the version of
PDF2DTP for InDesign you are activating.
Start Up InDesign
After you have installed PDF2DTP for InDesign, start up InDesign
PDF2DTP® for InDesign® Manual - 17
PDF2DTP for InDesign - Activation
The very first time you start up InDesign after installing PDF2DTP, the Plug-In will attempt to contact
Markzware's License Server and activate your product. This should be a fairly transparent process, but
may take a few minutes. If the Plug-In is able to contact the License Server, then you will be activated.
First you will see the screen shown above. This screen can be present for up to several minutes, so
please be patient. You can click the Close button to dismiss the screen and if the PDF2DTP Plug-In is
able to successfully activate you will see the screen shown in the next step once activation has
completed.
PDF2DTP® for InDesign® Manual - 18
PDF2DTP for InDesign - Activation Complete
If PDF2DTP can successfully activate, you will see the above pictured screen. Click on the Close button to
dismiss this screen and start using PDF2DTP. At this time you should also have the PDF2DTP for InDesign
Registration Screen visible. Please fill out the Registration form before starting to use PDF2DTP for InDesign.
Should you have any issues we have provided links on the Activation Complete screen to contact Markzware
Tech Support.
PDF2DTP® for InDesign® Manual - 19
PDF2DTP for InDesign Failed Activation
Important Note: While the screen shots in this section show a Failed Activation on a Mac, the same screens
will appear on Windows versions of PDF2DTP for InDesign. Please use this section as a guide as there may be
differences in the look and feel of screens due to operating system differences and the version of PDF2DTP for
InDesign you are using.
PDF2DTP for InDesign - Non-Activated Product
The above is a reminder screen to Activate your product. If for any reason PDF2DTP for InDesign was
unable to reach our License Server, you can still run the product, but every time you start up InDesign
you will presented with the above screen reminding you that you must take action by the specified date.
VERY IMPORTANT!!!--- If you do not Activate PDF2DTP for InDesign by the date listed on your
screen, YOU WILL LOSE YOUR LICENSE AND NEED TO REPURCHASE PDF2DTP for InDesign.
If you continuously see this window, you need to contact Markzware Tech Support and get this issue
cleared up. Otherwise after the specified date, you are out of luck. For all standard software, this grace
period is long enough and should be annoying enough that you will take action and contact
Markzware well before the expiration date arrives.
PDF2DTP® for InDesign® Manual - 20
Proxy Setup and Issues
If you are unable to connect to the internet due to a proxy server, PDF2DTP has some built in features that
might help.
PDF2DTP Accessing Proxy settings
Access the proxy settings by clicking on the word here
PDF2DTP® for InDesign® Manual - 21
PDF2DTP Enter Proxy Information
You may need to contact your IT or Support person to obtain the information for proxy setup.
Once you enter the requested information, click on the Save button and then click on the Close button.
PDF2DTP® for InDesign® Manual - 22
PDF2DTP Successful Activation
If the proxy data you entered allows you to contact the Markzware License Server, you will eventually see a
successful activation screen.
If you do not get a successful activation screen, please contact Markzware Technical Support.
PDF2DTP® for InDesign® Manual - 23
PDF2DTP for InDesign Registration
PDF2DTP® for InDesign® Manual - 24
PDF2DTP for InDesign Registration
Why should you register your software?
1. If you are not Registered you may be denied Tech Support as we do not know who you are.
2. If you are not Registered and we run any special promo deals for PDF2DTP for InDesign users,
you will not qualify as we won't know who you are or how to contact you.
Important Note: While the screen shots in this section show the Registration screens on a Mac, the same
screens will appear on Windows versions of PDF2DTP for InDesign as well. Please use this section as a guide
as there may be differences in the look and feel of screens due to operating system differences and the version
of PDF2DTP for InDesign you are activating.
PDF2DTP for InDesign Registration Screen
Please register your version of PDF2DTP for InDesign. The importance of this cannot be emphasized
enough.
Should you refuse to register your product, and contact us for Tech Support, since we have no record
of who you are, we will be unable to help you.
PDF2DTP® for InDesign® Manual - 25
PDF2DTP for InDesign Registration Required Field
Although your email address is the only required field to register PDF2DTP for InDesign, it is strongly
suggested you at least provide your Name and a phone number as well.
Better yet, why not fill out the full form. You purchased the software license, why not make sure that it is
associated with you and your proper contact info.
PDF2DTP® for InDesign® Manual - 26
PDF2DTP for InDesign Thank You For Registering
Once you have successfully submitted your PDF2DTP for InDesign Registration form you will receive a
Thank You screen. Click on the Close button to dismiss this screen. At this point you are ready to start
using PDF2DTP for InDesign.
PDF2DTP® for InDesign® Manual - 27
PDF2InDesign Menu and Preferences
PDF2DTP® for InDesign® Manual - 28
Accessing PDF2DTP for InDesign
The PDF2DTP for InDesign Menu
Once PDF2DTP for InDesign has been properly installed and activated you will see a new menu in InDesign
called Markzware. Under the Markzware menu you will see the PDF2DTP for InDesign menu. Following is
an overview of each menu item:
1.
2.
3.
4.
Convert PDF… - This menu item allows you to select and convert a PDF file. All pages in the PDF file
will be converted. The settings used will be the currently set values under the Preferences area.
Convert Page Range… - This menu item allows you to select a PDF file to convert, but it also allows you
to specify a range of pages to convert. The settings used will be the currently set values under the
Preferences area
Preferences… - This menu item will bring up the PDF2DTP for InDesign Preferences window where you
can set certain parameters and options for the conversion of PDF files
Help… - This menu item will bring up a help/about window
PDF2DTP for InDesign Help… Menu Item
When you select the Help… menu item you will be presented with a small window that contains several
things:
1. The version number of PDF2DTP for InDesign you are running. This version will be asked for should you
contact Tech Support.
2. Link to the PDF2DTP for InDesign online manual. Clicking this will open up your default web browser
and take you to the online PDF2DTP for InDesign manual.
3. Link to the Markzware Tech Support Request Form. Clicking on this will open up your default web
browser and take you to the Markzware Online Technical Support Form. The form should have your
License ID pre-pasted in to save you some time.
***Note - A PDF version of the PDF2DTP for InDesign manual is included as part of your initial download.
PDF2DTP® for InDesign® Manual - 29
PDF2DTP for InDesign Preferences
PDF2DTP for InDesign General Preferences
1.
2.
Select the “Show Preferences Before Converting” checkbox in order to display the Preferences window
prior to the conversion process. This may be annoying and slow you down, so by default this is disabled.
When disabled, the current settings will be used for conversion of a PDF file.
Select the “Convert Page Range” checkbox to be prompted for the start and ending page numbers prior
to the conversion process.
PDF2DTP® for InDesign® Manual - 30
PDF2DTP for InDesign Document and Font Settings
1.
2.
3.
4.
5.
6.
7.
8.
Select the “Save Document” checkbox to automatically save your new document to the
designated conversion folder upon completion of the conversion.
Select the “Save Image Previews” checkbox to save the image previews in the PDF to the
conversion folder, otherwise the previews will have no link (similar to a pasted PICT). Since these
images have no known pathname they will be given names such as “Image09-p03.tif” (where the
last number is the page number on which the picture box resides).
Select the “Reuse Duplicates” checkbox to save only one image preview file if there are any
duplicates in which case each occurrence of the preview in the document will use the same file.
This preference is useful because it can speed up the conversion process especially when the
same large preview is used on multiple pages. The drawback is the file name will be formed by
using the page number of the first occurrence of the preview in the document with a plus sign (“+”)
appended to the preview file name.
Select the “Clipping Paths” checkbox to save the Clipping Path in the preview file.
Select the “ICC Profiles” checkbox to save an ICC Profile, if defined in the PDF, to the preview file.
Select the “Duotones EPS” checkbox to save the image preview to a Duotone EPS if the color
space is defined as DeviceN and uses Spot (named) colors (i.e. “PANTONE 123 C”).
Select the “Save Missing Images (OPI)” checkbox to create a file in the conversion folder for a
missing image which has a known name. This allows you to eventually update the images upon
locating the originals.
"Unlink Images" is related to the Save Image Previews and the Save Missing Images (OPI)
preferences. If a PDF contains an image path (i.e., OPI data) and PDF2DTP can locate that image, it
will link to it. If no OPI data is present in the PDF, or the image pointed to by OPI data cannot be
found, then, if Save Image Previews is unchecked, the image will be listed with a Status of No Disk
File under the Links window. If Save Image Previews is checked, then PDF2DTP will attempt to
create a preview image and name it using the following format: Image01-p01.tif, where Image01
represents the number of the image on a page and p01 represents the page in the document
where the image is located.
PDF2DTP® for InDesign® Manual - 31
PDF2DTP for InDesign Document and Font Settings
1.
2.
3.
4.
5.
6.
7.
8.
Select the "Substitute Missing Fonts" checkbox to substitute missing fonts with the application’s
default font. Leave this item unchecked if you eventually plan on locating and activating missing
fonts. You can set the application default font by editing the style when no documents are open in
InDesign. When the conversion is complete the application will display a list of missing fonts at
which time you can change fonts as desired, or you can edit the style sheets at any time in the
future. Note that switching fonts may cause a different or undesirable text flow. This is due to the
fact that the calculations for the text attributes are based on the info contained in the PDF for the
original fonts.
Select the “Scale Text” checkbox to scale the text using a substituted font (usually horizontally) so
that characters closely match their original positions.
Select the "CharStyles"checkbox to add Character Styles to your application. This will allow you to
easily make global changes to your text.
Select the "ParaStyles" checkbox to add Paragraph Styles to your application which will likewise
allow you to make global changes to your text.
Select the “Tables” checkbox to convert Tables. Leaving this preference unchecked will convert
the document using separate lines and text boxes instead of attempting to create true tables.
Select the "Include Pasteboard Items" checkbox to include any items that when converted reside
on the Pasteboard area, such as registration marks and targets, etc.
When "Page Numbering" is selected, PDF2DTP will look for small text boxes with text equal to a
Page Number and will then replace the text in the box with InDesign's AutoPage Marker. This will
make editing the document easier, as you can now rearrange pages without having to manually
renumber them.
Select the “Replace ‘Marked Content" checkbox to ignore a large quantity of small objects. For
example, when a complex Illustrator drawing is placed in a document the generated PDF could
contain a large number of small drawings which makes editing the document slow and
cumbersome. In this case, choose this preference and a gray box will be created that will serve as a
“place holder” so that you can eventually locate your drawing file and replace the box.
PDF2DTP® for InDesign® Manual - 32
PDF2DTP for InDesign Save To Preferences
1.
2.
Under "Save To:" choose the desired radio button to set the location of the conversion folder. The
“PDF2InDesign folder <default>” location will be in the Users:Documents folder. Select “PDF Folder” to
use the folder in which the original PDF resides. Select “Other Folder” and then click the Browse button
to locate and choose a different destination folder.
Select the "Overwrite Existing Folder" checkbox to write over any existing files in your conversion
folder, otherwise a new folder will be created for each converted PDF.
PDF2DTP® for InDesign® Manual - 33
What is PDF2DTP for InDesign?
PDF2DTP® for InDesign® Manual - 34
About PDF2DTP for InDesign (a few words from
the creator)
PDF (Portable Document Format) is an open standard for document exchange. This file format created by
Adobe Systems in 1993 is used for representing documents in a manner independent of application software,
hardware, and operating systems. Each PDF file encapsulates a complete description of a fixed-layout flat
document, including the text, fonts, graphics, and other information needed to display it.
PDF2DTP for InDesign is an extremely valuable utility that converts a PDF to an editable application
document. If for example you discover you have lost your original document but only have a PDF you can
convert the PDF back into a document thus saving a lot of time it would otherwise take to re-create the
document from scratch by hand. However, a conversion may not reproduce the original document 100% and
there are several limitations of which you need to be aware of (See the full list later in this manual).
It helps to always think of a PDF as a “drawing” and that because the conversion process is quite complex the
software sometimes needs to make an “educated guess” where the end-result may not be a completely
satisfactory conversion. In other words you will no doubt need to make some manual changes to compensate.
By a “drawing” we mean a PDF contains specific information in order to render the fonts and images on the
computer screen, or to print the PDF. For example, a PDF can contain certain “glyphs” which are comprised
of drawing commands which enable the data to be drawn or printed, but the original TEXT characters may not
be defined within the PDF and so a conversion to an actual story may not even be possible.
A PDF often contains embedded fonts so that it can be displayed or printed on any platform. However, if the
fonts are missing (or not activated at the time) then the document created by the conversion will have
limitations or text flow problems.
A PDF also often contains images but the links to the original file path may not be known. The images may
also be down-sampled (lower resolution) and this poses a problem if you intend to create a document and wish
to use the original hi-res images.
Therefore, the actual goal isn’t necessarily to obtain a 100% conversion back to the original document. The
only real way to achieve a complete “full circle” is to embed the generated PDF with additional data that will
serve as “hints” to assist a conversion tool to be able to perform an accurate conversion. This could include
information for Styles Sheets, Guidelines and so forth, not to mention saving the image pathnames.
If you do run into some problems, please feel free to contact Markzware Technical support so that we can
learn how to improve and provide the best conversion solutions for you.
PDF2DTP® for InDesign® Manual - 35
PDF2DTP for InDesign Quick Start Guide
PDF2DTP® for InDesign® Manual - 36
PDF2DTP Up and Running Quickly
Go to the PDF2DTP Menu
Select Convert PDF… from the PDF2DTP menu
Locate the PDF file
Locate the PDF file you want to convert and then click the Open button.
PDF2DTP® for InDesign® Manual - 37
PDF2DTP Conversion
PDF2DTP will begin converting your PDF file into an InDesign file.
Converted PDF
Once the PDF conversion has completed, you will have a new InDesign file. You can now edit this file in the
familiar InDesign environment.
PDF2DTP® for InDesign® Manual - 38
Don't forget to Save
Once you are done making your edits ands tweaks, don't forget to Save the file.
PDF2DTP for InDesign Preferences
For more control over your PDF conversion, check out the PDF2InDesign Menu and Preferences Section
earlier in the manual.
That's all there is to it.
PDF2DTP® for InDesign® Manual - 39
PDF2DTP for InDesign Conversion Tips
PDF2DTP® for InDesign® Manual - 40
PDF2DTP For InDesign - Document Conversion
Tips
PDF2DTP For InDesign - Trim Size
The document size of the converted PDF will be based on what is called the “Trim” area as defined by the
PDF. This may be different than the dimensions displayed by a PDF viewer that uses the CropBox area.
PDF2DTP For InDesign - Media Size
 PDF may also define a “Media” area which consists of a larger size which will contain various markings
A
such registration targets and slugs. Typically you can direct PDF2DTP to ignore these objects by turning off the
“Include Pasteboard Items” in the Preferences.
PDF2DTP For InDesign - Bleed
A PDF may also define a “Bleed” area which is slightly larger than the page size.
PDF2DTP For InDesign - Bad PDFs
S ometimes a PDF can become corrupted and cannot be displayed in a PDF viewer. In this case try using
PDF2DTP for it has built-in routines that will attempt to salvage the document as much as possible. Although
this is not PDF2DTP's main feature, it may come in handy in certain cases.
PDF2DTP For InDesign - Subpar Conversion Results
If a PDF does not convert very well, especially if the PDF was created many years ago, try opening it and
re-saving it in a PDF editor, such as Acrobat, and retry the conversion. Most PDF editors have the capability of
repairing or improving the PDF, or perhaps allowing you to save to a higher version.
PDF2DTP® for InDesign® Manual - 41
PDF2DTP For InDesign - Printers Marks
If you see Printers Marks such as fold and trim marks, try disabling the Include Pasteboard Items Preference.
This will not convert any items outside the trim area.
PDF2DTP® for InDesign® Manual - 42
PDF2DTP for InDesign - Font Conversion Tips
PDF2DTP for InDesign - Missing Fonts
 issing fonts (fonts which are not active when performing a conversion) pose the biggest problems.
M
Calculations for text positions are based on information (such as character widths) provided by the PDF
according to the original fonts and therefore text may flow undesirably until the fonts are located and
activated.
PDF2DTP for InDesign - Unknown Character or Glyph
If for some reason a character used in the PDF cannot be converted it will be substituted with a question mark
(“?”). In this case you will need to locate and activate the original font and retry the conversion. For example,
a Type0 font embedded in the PDF contains drawing commands in order to display little “images”, such as a
bar code, but the specific Unicode values may be unknown and it is therefore impossible to obtain the TEXT.
When question marks appear, an interesting test you can perform is to open the PDF in an Editor, such as
Acrobat, and copy and paste the text into a Text Editor to see if “garbage” is displayed. This would be proof
that it is physically impossible to convert the drawing commands into Unicode values (that is to say without
using sophisticated OCR algorithms.)
PDF2DTP for InDesign - Substitute Missing Fonts Enabled
If you turn on the “Substitute Missing Fonts” preference then missing (inactive) fonts will be substituted with the
application’s default font (commonly Minion Pro, Times, Arial or Helvetica, etc.) The actual font will be based
on the “Normal” character style which can be changed manually to a different default replacement font
(usually by editing the style sheet when no documents are open, or by changing the application’s font
substitution preferences). Using the substitute active font may often result in a more desirable text flow,
especially when combined with the “Scale Text” Preference.
Important Note*** - Based on in-house testing, enabling the Scale Text option dramatically increases the time
it takes a conversion to complete. You may want to consider using this option on a range of pages instead of
entire documents, especially if the document is long and has many text styles used in it.
PDF2DTP for InDesign - Substitute Missing Fonts Disabled
 hen the conversion is complete the application may display a list of missing fonts at which time you can
W
change them as desired, or you can edit the style sheets at any time in the future.
PDF2DTP® for InDesign® Manual - 43
PDF2DTP for InDesign - Style Sheet Conversion
Tips
PDF2DTP for InDesign - ParaStyle and CharStyle
If the “ParaStyle” or “CharStyle” Preferences are selected then for each major text attributes change a
Paragraph or Character Style will be conveniently added to the application. This allows you to easily make
global changes to the text by simply editing the Style.
Important Note! --- PDF files do not carry any style names defined in the original document used to create
the PDF. PDF2DTP creates its own Para and Char Styles based on what it detects during conversion. So if you
have a series of style names you always use, these will not appear in the converted file. What you may be
able to do is to rename the Para or Char styles PDF2DTP created during conversion to match the style names
in your original document.
PDF2DTP for InDesign - ParaStyle and CharStyle Names
 he Paragraph Style name will include settings such as Leading and Indents while the Character Style name
T
will include the name of the font and the point size.
PDF2DTP for InDesign - The "+"
 ote that some Character or Paragraph Styles will have a plus sign “+” in front or at the end of their names on
N
the Styles palette indicating the selected text has local formatting changes that deviate from the Style settings.
In this case you can option-click the Style to override the formatting and apply the exact attributes of the Style.
PDF2DTP® for InDesign® Manual - 44
PDF2DTP for InDesign - Text Conversion Tips
PDF2DTP for InDesign - How PDFs Render Text
It’s important to understand how a PDF renders text. The PDF contains various commands to move to a
location and draw a character. The PDF also contains the width of the character so that it can know where to
draw the next character. However, a space character is often absent from the text stream. In this case, after a
word has been drawn, the next command will be to move a short distance further to the right to draw the
character that begins the next word. A problem arises in determining what to do with this “gap” in the text
drawings. PDF2DTP performs several calculations in order to come up with the best estimate on how to
handle the “gap”, such as to insert a Space character, or to apply tracking (a form of letter-spacing) or to insert
a Tab if the spatial distance is fairly great.
PDF2DTP for InDesign - Underlined Text
 here can be problems with text that was underlined in the original document. The PDF will draw a word and
T
then draw a line underneath. PDF2DTP attempts to detect this situation and if discovered will apply the
Underline attribute to the text. Otherwise a line object will be created. Note that Underlines are set using the
default line offset and width. A Character Style for the Underline will be conveniently created so that the
settings can be easily changed.
PDF2DTP® for InDesign® Manual - 45
PDF2DTP for InDesign - Text Box Conversion Tips
PDF2DTP for InDesign - Text Box Boundaries
 text box is the calculated boundary for a group of lines of text. PDF2DTP works by calculating the ending
A
positions for a series of related lines that will determine the rectangle that can be formed to fully encompass
the group of lines. The text box will then be used to determine various paragraph attributes such as
Justifications and Indents. In some cases PDF2DTP makes a determination that a specific line of text may not
relate very well to previous lines in which case a new text box will be started.
PDF2DTP for InDesign - Text Flow
 ext “flow” is another major problem for a conversion, especially when a referenced font is missing. In some
T
cases the text will not break as desired on each line, thus causing the last part of the story to overflow the box
at the bottom. In this case, a common remedy is to simply widen the text box manually to see if you can get
the text to flow better.
PDF2DTP® for InDesign® Manual - 46
PDF2DTP for InDesign - Image Conversion Tips
PDF2DTP for InDesign - Down sampled Images
Images can often pose a major problem when considering a goal of attempting to convert the PDF back to the
same level of quality as the original document. In many cases the PDF was generated where images have
been down-sampled to a lower resolution, thus making it physically impossible to reach the goal of a flawless,
exact duplicate of the original document.
The above example shows a PDF file created using QuarkXPress where the original placed images were
305dpi. Two PDF files were created out of QuarkXPress one using the Press Quality settings and one using the
Low Quality settings. As you can see PDF2DTP can only extract the quality of image that was originally set
when the PDF file was created.
PDF2DTP® for InDesign® Manual - 47
PDF2DTP for InDesign - OPI
It is important to understand a term known as “OPI” which stands for “Open Prepress Interface”. This is where
a low-resolution image is placed on the document page as a “placement holder” for a higher resolution image
stored in a known location. The hi-res image, which is of course a much larger file, will be located and used
in place of the lo-res picture at print time. If an image in the PDF is available on disk then a link to it will be
created. If a PDF was generated with no OPI comments then the original image name and location will of
course be unknown. If you choose “Save Missing Images” from the PDF2DTP Preferences a preview file will
be conveniently created using the original name.
PDF2DTP for InDesign - Found Links
If the link to the original image is known, PDF2DTP will import the file. If the image cannot be located then it
will convert the lo-res picture preview stored in the PDF. A problem arises due to the fact that the preview is
comprised of only those pixels that are viewable within the picture box. If you were to locate and import the
original image then its offset in the picture box may change if the image dimensions are greater than the
picture box.
PDF2DTP for InDesign - Standard OPI Disabled at PDF Creation Time
 ost PDFs are generated by an application where the Export PDF “Use OPI” setting is not turned on in which
M
case the PDF will not contain a name for the image. The link to the path location of the original image is
therefore unknown.
PDF2DTP for InDesign - Clipping Paths
If the original image exists it will be imported and the application will use the default Clipping Path for the
image (if one exists). If the image is missing, or no link exists, you can add a Clipping Path to the created
preview file by selecting the PDF2DTP “Clipping Paths” Preference.
If a conversion reveals a picture box where the image is not being shown properly, for example is only
partially displayed, the first trick to try is to examine the Clipping Path. This can be done in the application by
either editing the points of the path or by deleting the path altogether.
PDF2DTP® for InDesign® Manual - 48
PDF2DTP for InDesign - Color Conversion Tips
 olors are converted based on their definitions in the PDF. Some colors may not look the same as when the
C
PDF is displayed by a viewer or the colors may not be exactly equal to the colors used by the original
document. This can occur for several reasons. When a PDF is generated from a document, the application will
use specific PDF Output settings which may cause color conversions, such as CMYK to RGB.
It is important to understand the effects of using an application’s Export PDF settings if you have the intention
of ever wanting to convert the PDF in the future back to the same quality as the original document. Just as
colors can be altered, images can be downsized to a lower resolution making it impossible to convert the
preview to match the original image quality. If fonts are embedded then this too can become a huge issue if
the original fonts cannot be located and activated. Therefore, it is often a good idea to learn how to Export a
PDF not only for the desired destination, such as a printing device, computer screen or to display in a web
browser, but also to create a high quality PDF that can be used for a much more precise conversion back to a
document. The additional high quality PDF can serve as a “backup” of your document in case you ever lose it
whereas having only a low quality PDF may result in conversion issues due to the limitations dictated by the
original Export settings.
PDF2DTP for InDesign - Spot Colors
If the PDF defines a color by name (called a “Spot” color) then PDF2DTP will add the color to the
application’s Color palette based on the closest color model supported according to the color’s name. The most
common color models are all supported, including ANPA, DIC, FOCOLTONE, HKS, PANTONEs, TOYO,
TRUMATCH, etc.
It is possible that a Pantone color, for example, defined by the original application that created the PDF may
not have the exact same color values as the application using the PDF2DTP Plug-In even though they use the
same color name.
If a PDF does not contain named colors then this means it was generated by an application which had PDF
Output preferences set to export all colors to RGB or CMYK. Even though the original document may have
used Spot colors, a PDF created using only CMYK will of course not contain any named Spot colors
PDF2DTP for InDesign - Process Colors
 he naming convention for Process colors (which have no names defined in the PDF) are dependent upon the
T
application. Some applications handle Process colors using percentages from 0% to 100% for the RGB or
CMYK channels whereas other applications may use numerical values 0 to 255.
PDF2DTP® for InDesign® Manual - 49
PDF2DTP for InDesign - Tint Box Conversion Tips
PDF2DTP for InDesign - Fill and Frame
In desktop publishing applications you can create a tint box with a fill and frame as one single object.
However, PDF2DTP currently will create separate objects: one for the fill and another for the line around the
edges of the box.
In the above sample, the frames were intentionally moved out of place on the converted PDF to show that the
frames are separate from the fills.
PDF2DTP for InDesign - Blends
 PDF sometimes defines a Blend as a series of lines that are drawn with changing colors. Because this would
A
cause too many line objects to be created, PDF2DTP will examine the lines to determine if a simple Blend can
be used for the box with the Starting and Ending colors.
PDF2DTP® for InDesign® Manual - 50
PDF2DTP for InDesign - Tables Conversion Tips
PDF2DTP for InDesign - Tables
 “table” consists of drawing commands defined in the PDF that will first display the text followed by lines to
A
form the cells. If the “Table” preference is turned on, PDF2DTP will attempt to examine the objects in order to
create a true table object. Otherwise, if the “Table” preference is turned off then the text and lines will be
converted as separate objects.
In the above sample, a true table was created when the PDF (which was originally created in InDesign) was
converted into a InDesign document.
If you try converting a file and it hangs or crashes, try it again but this time disable the Table Preference. In
many cases your file may convert, but will not contain actual tables.
PDF2DTP® for InDesign® Manual - 51
PDF2DTP for InDesign - Drop Shadow Conversion
Tips
PDF2DTP for InDesign - Drop Shadow As An Image
 Drop Shadow is sometimes defined in a PDF as an image in which case it is not possible to determine that it
A
is really supposed to be a Drop Shadow.
PDF2DTP for InDesign - Missing Font
 ext which has a Drop Shadow can pose a problem especially if the font is missing because the text
T
characters will not correctly match the positions of the individual shadows.
PDF2DTP® for InDesign® Manual - 52
PDF2DTP for InDesign Known Limitations
PDF2DTP® for InDesign® Manual - 53
PDF2DTP for InDesign Known Limitations
PDF2DTP for InDesign and Embedded Fonts in PDF Files
An embedded font poses a problem where the information in the PDF will be sufficient to draw the glyphs
(characters), but there may be no equivalent Unicode character values given, thus making a conversion to
TEXT utterly impossible.
PDF2DTP for InDesign and Document Page Size
The resulting converted document page size will be based on the Trim area with all registration marks
positioned outside the page boundary.
PDF2DTP for InDesign and PDFs with Multiple Page Sizes
A PDF that consists of multiple page sizes will be converted using the largest Page Size.
PDF2DTP for InDesign and Line Styles
Some Line Styles, such as Triple, are not supported and will convert as separate lines.
PDF2DTP for InDesign and Underlines
Underlines are set using the default line offset and width.
PDF2DTP for InDesign and Colors Used in PDF Files
Colors are converted based on their definition in the PDF. Some colors may not look the same on screen as the
original PDF colors.
PDF2DTP for InDesign and OPI Comments
If an image in the PDF is available on disk a link will be created. If a PDF was generated with no OPI
comments then the original image name and location will of course be unknown. In this case choose “Save
Missing Images” from the Preferences to create a preview file.
PDF2DTP for InDesign and No Defined Image Path
When an image has no path defined in the PDF the preview data saved inside the PDF is only for the
viewable area, which could be a mere sliver of the original. The preview created by PDF2DTP for InDesign
will accommodate this problem by generating a large image file in order to better replace the image and
retain the offsets once the original image is found.
PDF2DTP® for InDesign® Manual - 54
PDF2DTP for InDesign and Hyperlinks
PDF2DTP does not convert hyperlinks in PDF files. The text of the hyperlink should appear in the converted
file, but the text will not be clickable.
PDF2DTP® for InDesign® Manual - 55
PDF2DTP for InDesign and InDesign Threshold
Limits
PDF2DTP® for InDesign® Manual - 56
PDF2DTP for InDesign and Threshold Limits
There are limits to certain attribute settings of objects due to thresholds dictated by an application. Some
values which are possible in a PDF drawing are not legal settings according to the application thresholds. For
example, the widest tracking value allowed by InDesign is 1000 ems. Therefore a converted document will
need to use a Tab setting rather than a tracking value to separate characters if the distance between
characters is greater than 1000 ems.
PDF2DTP and InDesign Threshold Limits
Minimum Point Size --- .1 points
Maximum Point Size --- 1296 points (18 inches)
Minimum Leading --- 0 points
Maximum Leading --- 5000 points (69.44 inches)
Minimum Horizontal/Vertical Scale --- 1 percent
Maximum Horizontal/Vertical Scale --- 1000 percent
Minimum Baselineshift --- -5000 points
Maximum Baselineshift --- 5000 points
Minimum Tracking/Kerning ---100 ems
Minimum Character Spacing --- -100 points
Maximum Character Spacing --- 500 points
Minimum Word Spacing --0 points
Maximum Word Spacing --- 1000 points
Minimum Left/Right Indent --- 0 points
Maximum Left/Right Indent --- 8640 points (120 inches)
Minimum First Indent --- -8640 points (-120 inches)
Maximum First Indent --- 8640 points (120 inches)
Minimum Space Before/After --- 0 points
Maximum Space Before/After --- 8640 points (120 inches)
PDF2DTP® for InDesign® Manual - 57