1
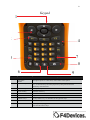
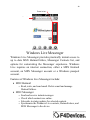
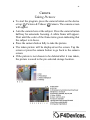
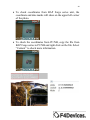
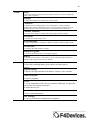
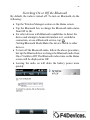
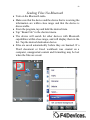
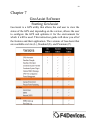
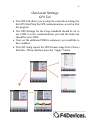
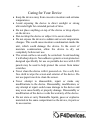
1
FORGE
HANDHELD USER
MANUAL
2
Table of Contents
Chapter 1 ....................................................................................................................................................... 6
Getting Started .......................................................................................................................................... 6
Identifying Hardware Components ....................................................................................................... 6
Front of Device ................................................................................................................................. 6
Keypad .............................................................................................................................................. 8
Top View .......................................................................................................................................... 9
Back of Device .................................................................................................................................. 9
Base ................................................................................................................................................. 10
Preparing your Device ......................................................................................................................... 11
Installing the Battery and SIM Card (select models) ..................................................................... 11
Connecting to A/C Power/Charging the Battery............................................................................. 13
Initial Startup .................................................................................................................................. 14
Syncing Device to Your PC ................................................................................................................ 14
Installing ActiveSync and WMDC ................................................................................................. 15
User Options ....................................................................................................................................... 16
Using the MicroSD card ................................................................................................................. 16
Using the Ultrasonic Ranging Module................................................................................................ 17
Chapter 2 ..................................................................................................................................................... 17
The Basics ............................................................................................................................................... 17
Powering On/Off ................................................................................................................................. 17
Power Saving ...................................................................................................................................... 17
Turning the backlight on/off ........................................................................................................... 17
Suspend Mode ................................................................................................................................. 18
On-Screen Navigation ......................................................................................................................... 18
Using the Stylus .............................................................................................................................. 18
Home Screen ....................................................................................................................................... 19
Portrait/Landscape View ................................................................................................................. 20
Navigation Bar ................................................................................................................................ 20
Tool Bar .......................................................................................................................................... 20
Programs ............................................................................................................................................. 20
Notifications.................................................................................................................................... 21
Entering Information Into Your Device .............................................................................................. 21
3
Writing on the Screen ..................................................................................................................... 22
Drawing on the Screen .................................................................................................................... 22
Recording a Message ...................................................................................................................... 23
Securing Your Device ......................................................................................................................... 24
Securing Your Device with a Password .......................................................................................... 24
Chapter 3 ..................................................................................................................................................... 25
Device Management ............................................................................................................................... 25
Power Management ............................................................................................................................ 25
Low Battery Signals/Actions .......................................................................................................... 25
Power-Saving Tips .............................................................................................................................. 26
Customizing Your Device................................................................................................................... 27
Chapter 4 ..................................................................................................................................................... 28
Microsoft Pocket Outlook ....................................................................................................................... 28
Calendar: Scheduling Appointments and Meetings ............................................................................ 28
Creating an Appointment ................................................................................................................ 29
Using the Calendar Summary Screen ............................................................................................. 29
Contacts: Tracking Friends and Colleagues........................................................................................ 30
Creating a Contact........................................................................................................................... 30
Tasks: Keeping a To-Do List .............................................................................................................. 30
Creating a Task ............................................................................................................................... 30
Notes: Capturing Thoughts and Ideas ................................................................................................. 31
Creating a Note ............................................................................................................................... 31
Email: Sending and Receiving Email Messages ................................................................................. 31
Synchronizing Email Messages ...................................................................................................... 31
Connecting Directly to an Email Server ......................................................................................... 32
Using the Message List ................................................................................................................... 32
Composing /Sending an Email ........................................................................................................ 32
Managing Email Messages and Folders.......................................................................................... 33
Chapter 5 ..................................................................................................................................................... 34
More Programs........................................................................................................................................ 34
ActiveSync/WMDC ............................................................................................................................ 34
Synchronizing Data ......................................................................................................................... 35
Office Mobile ...................................................................................................................................... 35
4
Creating an Office File.................................................................................................................... 36
Opening an Office File.................................................................................................................... 36
Internet Explorer ................................................................................................................................. 37
Browsing the Internet ...................................................................................................................... 37
Windows Live Messenger................................................................................................................... 38
Setting up Windows Live................................................................................................................ 39
Signing into Messenger................................................................................................................... 39
Windows Media Player ....................................................................................................................... 39
Pictures & Videos ............................................................................................................................... 40
Viewing Pictures & Videos............................................................................................................. 40
Camera ................................................................................................................................................ 41
Taking Pictures ............................................................................................................................... 41
Recording Video Clips .................................................................................................................... 42
Geotagging ...................................................................................................................................... 43
Chapter 6 ..................................................................................................................................................... 45
Getting Connected .................................................................................................................................. 45
Types of Connections ......................................................................................................................... 45
Setting up a Cellular (HSDPA) Connection.................................................................................... 45
Searching and Organizing Information ............................................................................................... 47
Remote Desktop .................................................................................................................................. 47
Setting up a Dial-up Connection ..................................................................................................... 48
Using a Wireless Network .................................................................................................................. 48
Switching On or Off the Wi-Fi Radio ............................................................................................. 48
Using Bluetooth .................................................................................................................................. 50
Switching On or Off the Bluetooth ................................................................................................. 51
Sending Files Via Bluetooth ........................................................................................................... 52
Receiving Files Via Bluetooth ........................................................................................................ 53
Creating a Bluetooth Partnership .................................................................................................... 53
Chapter 7 ..................................................................................................................................................... 54
GeoAssist Software................................................................................................................................. 54
Starting GeoAssist .............................................................................................................................. 54
GeoAssist Settings .............................................................................................................................. 55
GPS Tab .......................................................................................................................................... 55
5
Satellite Detail Tab ......................................................................................................................... 56
Use Mode Tab ................................................................................................................................. 57
Log Tab ........................................................................................................................................... 59
About Tab ....................................................................................................................................... 59
Chapter 8 ..................................................................................................................................................... 60
Recommended Settings ........................................................................................................................... 60
GPS Settings and Best Practices ......................................................................................................... 60
Handheld and Best Practices ............................................................................................................... 60
Chapter 9 ..................................................................................................................................................... 61
Troubleshooting & Maintenance ............................................................................................................ 61
Resetting Your Device ........................................................................................................................ 61
Restoring Device to Factory Settings.................................................................................................. 62
Troubleshooting .................................................................................................................................. 63
Caring for Your Device....................................................................................................................... 65
Chapter 10 ................................................................................................................................................... 66
Safety Precautions................................................................................................................................... 66
About Charging ................................................................................................................................... 66
About the Charger ............................................................................................................................... 66
About the Battery ................................................................................................................................ 67
FCC Warning ...................................................................................................................................... 67
6
Chapter 1
Getting Started
Identifying Hardware Components
Front of Device
1
2
3
6
5
4
7
Ref
1.
Component
LED1 Indicator
Description
LED1: System Notification and Battery Status Indication
Blinking Green displays charging battery
Solid Green displays full battery
Blinking Red displays low battery
Solid Red displays faulty battery
Alternating Green and Amber displays charging battery with
Windows notifications
Alternating Red and Amber displays low battery with Windows
notifications
Alternating Amber and Green displays full battery with Windows
notifications
Alternating Amber and Red displays faulty battery with Windows
notifications
2.
3.
4.
LED2 Indicator
LED2: Status Indication for Integrated Module
Touch Screen
Video display that responds to finger taps and gestures
Microphone
Voice recorder
5.
6.
Reset
Resets the device
Keypad
See “Keypad” section for details
8
Keypad
1
2
3
4
7
5
8
6
Ref
1.
2.
9
Component
Navigation
Button
Function Keys
Description
Navigates options in 4 directions, center button selects option
F1 ~ F7 Function keys are multi-purpose keys that perform functions
defined by individual API
3.
Back Tab Key
Backspace key
4.
Front Tab Key
Forward delete key
5.
6.
7.
Power Button
Start Menu
Numeric Keys
Turns device on and off
Opens Start Menu
12 key numeric keys is embedded in the typewriter keys
8.
Camera Button
Press to take a photo
9.
Num Lock
Pressing this key toggles the Num Lock on and off. When on, the Num Lock
activates the numeric keys
9
Top View
1
Back of Device
5
6
2
3
4
7
8
9
2
10
Top View/Back of Device
Component
Description
1.
2.
3.
4.
5.
Ultrasonic Cover
Covers and protects ultrasonic
Hand Strap hole
Install hand strap
LED flash light
Flashlight
Camera
Takes pictures and records video
Stylus
Used to input information and select options on the
touch screen
6.
External GPS
Antenna
7.
8.
Speaker
Allows for use of optional external antenna. Antenna
may be placed on top of a vehicle/building to gain
greater reception
Plays music, sounds and voices
Battery Cover
Screw
Locks the battery cover
9.
Battery Cover
Covers and protects battery
Base
Ref
Component
1. Power Connector
Description
Allows for battery charging through an A/C adapter
2. USB OTG (Host & Client) Allows for USB connection
Connector
3. UART(RS232) Connector Connects to a RS232 device
11
Preparing your Device
Installing the Battery and SIM Card (select models)
1. Detach the battery cover from device.
2. If your model has the 3.5G capability, you will need to
install the SIM card provided by your mobile provider and
insert the SIM card into the slot, then push to lock.
12
3. To remove the SIM card, slide to open, then remove card.
4. To install the battery, insert the connector side of the
battery first, then secure the connection.
5. Attach the battery cover to the device.
13
Connecting to A/C Power/Charging the Battery
• Fully charge battery before initial use of your device
• Connect the converter to the A/C charger.
• The LED indicator will blink green when the battery is
charging. Do not disconnect your device from A/C power
until the battery is fully charged. This may take a couple of
hours.
For Optimal Performance:
• Only use the included A/C charger.
• The lithium battery does NOT need to be fully discharged
before next charging.
• Do NOT charge the battery in high temperatures (i.e. direct
sunlight).
• The battery MUST be fully charged at least once every two
weeks even if the device is not in use. Over-discharge of the
battery creates negative battery performance.
• The battery will also charge if the device is connected via
USB to a computer.
14
Initial Startup
• Connect the device to A/C power or make sure the battery
has been fully charged.
• Turn on device by pressing the Power button.
• Select the language you prefer to use.
• Follow the Setup Wizard’s on screen instructions.
o If a SIM card has been inserted and the 3.5G network
provider has set the PIN, you will be prompted to
enter PIN.
o Once Setup is complete, the Home screen will appear.
The device is now ready for use.
Syncing Device to Your PC
Your device can connect and synchronize data with a Windowsbased computer through ActiveSync and Windows Mobile
Device Center (WMDC). ActiveSync is compatible with
Windows XP. WMDC is only compatible with Windows Vista
or Windows.
ActiveSync and WMDC act as gateways between your device and
your computer. They allow for transferring Outlook email,
appointments, contacts, and tasks as well as media (i.e. pictures,
music, and videos).
15
Installing ActiveSync and WMDC
• Before installation, make sure Microsoft Outlook is installed
on your computer.
• Be sure to install ActiveSync or Windows Mobile Device
Center before connecting to your device.
• For Windows XP, download and install ActiveSync.
• For Windows Vista or Windows 7, download and install
Windows Mobile Device Center. Visit the Microsoft website
to download the program and to obtain operating
instructions: http://www.microsoft.com.
• ActiveSync connection problems may occur in some cases.
Likely causes include:
o Interoperability with firewall applications
o Network management applications
o For troubleshooting information, visit the
Microsoft website: http://www.microsoft.com.
• After software installation is complete, connect your device
to your computer via the USB cable. The device is now
ready to be synchronized.
16
User Options
Using the MicroSD card
The device supports micro Secure Digital (microSD). Use the
following steps to insert a microSD card:
•
•
•
•
•
Detach the battery cover from device.
Remove the battery.
Insert the card into the slot.
Re-insert the battery.
Re-attach the battery cover to device.
Make sure the microSD card slot is free of debris and always store
microSD card in a protective case to avoid heat, dust, & humidity.
17
Using the Ultrasonic Ranging Module
This device supports the Ultrasonic Ranging Module. For
additional product information, please contact your reseller or an
authorized service provider.
Chapter 2
The Basics
Powering On/Off
To turn off the device, hold down the power button; the device
will display a 3 second countdown notification, then power off.
Power Saving
Turning the backlight on/off
• The touchscreen’s backlight dims after inactivity. By
default, the touchscreen will dim after 30 seconds of activity
on battery power.
• While connected to A/C charger, the touchscreen will dim
after 1 minute of activity.
• To restore the backlight, either double tap the touchscreen or
press any button.
18
Suspend Mode
• The device sets itself into suspend mode after inactivity. By
default, the device will set itself into suspend mode after 3
minutes of inactivity on battery power.
• The device will set itself into suspend mode after 5 minutes
of inactivity while connected to A/C power.
• To manually set the device into suspend mode, briefly press
the power button.
• To resume operation, press the power button.
On-Screen Navigation
Using the Stylus
This tool is used to navigate the device’s touchscreen. The stylus
is located at the device’s left side; remove from slot for use.
Tap
To open items and select options, touch the screen once with the
stylus.
Drag
To drag text and images across the screen, tap, hold, and drag text
or image. Lists and multiple items can also be selected and
moved.
Tap and Hold
Tap and hold the stylus on an item to view a shortcut menu of
available options. From the shortcut menu, select preferred
option.
19
Home Screen
• When the device is turned on, the default screen is the Home
screen.
• The Home screen can be accessed by tapping:
and then
Home.
• The Home screen displays upcoming appointments, active
tasks, email messages and notifications, and more. If a
section of the Home screen is tapped, the associated program
will open.
20
Portrait/Landscape View
To change the view preference, tap: Settings/System/Screen/
General/then select “Landscape” or “Portrait”.
Navigation Bar
The navigation bar is located at the top of the screen. It displays
active programs and tools, such as: volume, battery, time,
connectivity, and more. Tap the navigation bar to setup related
items.
Navigation Bar:
Tool Bar
The toolbar is located at the bottom of the screen, including
options such as an onscreen keyboard and the Menu button.
Tool Bar:
Programs
To switch from one program to another without closing other
programs, tap:
to open the Start menu.
All available programs can be accessed through the Start menu.
21
Notifications
The device has a variety of reminder notifications, such as:
calendar appointments, tasks, alarm clock, etc. Notifications
types include the following:
• A screen message
• A sound, which can be changed or specified
• The notification flashes in amber
To specify and choose reminder types and sounds, tap:
/Settings/Sounds & Notifications.
Entering Information into Your Device
Text can be entered by:
• Using the onscreen keyboard
• Using the handwriting recognizer
To show or hide the onscreen keyboard, tap: :
keyboard appears by default.
. The soft
To change input modes, tap and hold:
, and select “preferred
mode” from the popup menu.
• When using the onscreen keyboard, the device auto-detects
words that are being typed.
• Tap on the displayed word to insert it.
22
Writing on the Screen
In programs that accept writing, such as Notes, a stylus can be
used to write onto the screen. Writing can be edited and formatted
into text later.
To write on the screen, tap:
mode.
/Draw to switch to drawing
Drawing on the Screen
Pictures, diagrams, charts, etc. can be drawn onto the screen using
the same input method for writing text:
1. Tap: /Draw to enter drawing mode.
2. To draw, cross 3 ruled lines on first stroke; a drawing box
should appear.
3. Any strokes or marks made within the guidelines will
become part of the drawing.
4. Drawings that do not cross three ruled lines will be treated
as writing.
Drawing Box
23
Recording a Message
This device has the capability to record messages. Located in the
“Notes” program, a stand-alone recording can be created with the
note.
To create a recording:
• Tap:
/Notes to open the program
• Tap:
/View Recording Toolbar
• Place the device’s microphone near your mouth or the source
of the sound.
• Tap the “Record” button on the Recording toolbar to begin
recording.
• To stop recording, tap the “Stop” button on the Recording
toolbar. The new recording will appear in the note list or as
an embedded icon. To play a recording, select the recording
in the list or tap its icon in the note.
Volume Control
Recording File
24
Securing Your Device
Locking Your Device
Your device can be locked
when not in use. This
prevents accidental/undesired
operation of the touchpad or
keypad.
To lock the device:
• Tap: Device Unlocked
on the Home screen
To unlock the device:
• Tap:
/Unlock
Securing Your Device with a Password
To keep data secure, a password can be assigned to be inputted
each time the device is turned on.
• Tap:
/Settings/Lock
• Tap to select prompt if phone unused for. In the box to the
right, select a desired period of time.
• Select password type.
• Enter desired password. Confirm the password.
• Tap “OK” to save the settings.
• If the password is forgotten, the memory must be cleared
before accessing the device.
25
Chapter 3
Device Management
Power Management
A fully charged battery should supply power for approximately 8
hours. Operation time will vary depending on usage of the device.
Continuous multimedia operation or micro SD card operation will
decrease the battery’s power supply.
Low Battery Signals/Actions
• The battery should be charged for at least 30 minutes if the
device displays a warning of low power. Failure to do so
may result in insufficient battery power for operation.
• Battery power can be monitored by tapping:
/Settings/System/Power
• The available remaining power is displayed on a status bar
in the “Power” control panel.
• When the battery is low, a warning message will appear.
• As a precaution, all data should be saved and the battery
should recharged immediately via A/C power or USB
power.
• Failure to do so may result in data loss.
26
Power-Saving Tips
The following describes how to maximize the, battery power and
operation time.
• Set the device to suspended mode when not in use. By
default, the screen will automatically dim. When the device
has remained in idle mode for an extended period of time,
the device will automatically go into suspend mode.
• The idle time required before the device goes into suspend
mode can be adjusted by tapping:
/Settings/System/Power/Advanced
• The device can also be set into suspended via the Power
button.
• Disable functions and features you don’t intend on using.
• Decrease the volume.
• Disable unused or unnecessary sounds and lights.
• Keep only the most necessary sounds and lights. These
settings can be adjusted by tapping:
/Settings/Sounds & Notifications
• Avoid power-consuming operations such as: using a modem
or other peripheral, multimedia playback and recording, and
using or monitoring wireless network signals.
27
Customizing Your Device
You can customize the settings of the device to your own
preferences by tapping:
/Settings.
The items you can customize are described as follows:
Items
Description
Bluetooth
To set up or change the Bluetooth connection.
Clock & Alarms
To change the time, date, and alarms.
Home
To select the information, theme, and background to be
displayed on the Home screen.
Lock
To set a security password.
Sounds &
Notifications
To change the settings for the system’s sounds, volume,
and notifications.
Connections
Connections
To set up or change connection information.
Domain Enroll
To connect the device with company resources. An
enrollment password should be provided by the company’s
system administrator.
Beam mode
To enable to receive incoming files.
USB to PC
To adjust settings for the type of USB connection and to
enable advanced network functionality.
Wi-Fi
To configure the wireless network module.
Personal
Buttons
To assign hardware buttons to specific programs and to
adjust sensitivity levels of the buttons, i.e. repetition rate of
scroll.
Owner Information
To enter personal information.
28
Chapter 4
Microsoft Pocket Outlook
Microsoft Pocket Outlook includes Calendar, Contacts, Tasks,
Notes, and Messaging. These programs can be used individually
or together. For detailed information on using Microsoft
programs, tap:
/Help.
Calendar: Scheduling Appointments and
Meetings
Use Calendar to schedule appointments, including meetings and
other events. Appointments can be viewed as Agenda, Day,
Week, Month, or Year. Notifications can be set as reminders for
appointments. Appointments can also be displayed on the Home
screen. Tap:
/Calendar to access the program.
Tap to access
29
Creating an Appointment
• In “Day” or “Week” view, tap the desired date and time for
the appointment.
• Tap: /New Appointment
• Using the Onscreen Keyboard, tap first to select the field,
and then enter a description and location.
• If needed, tap the date and time to change them.
• Enter other desired information. You will need to hide the
Onscreen Keyboard to see all available fields.
• Tap “ok” to save and return to Calendar.
Tap to add new
Using the Calendar Summary Screen
When you tap an appointment Calendar, a summary screen is
displayed. To change the appointment, tap /Edit.
30
Contacts: Tracking Friends and Colleagues
• Contacts maintains a list of friends and colleagues.
Tap:
/Contacts for access.
• For model with the 3.5G connection function, contacts
stored in the SIM card will also appear in the list.
• They are indicated by the icon.
Creating a Contact
• In contacts, tap:
• For model with the 3.5G connection function: Outlook or
SIM contact should be selected.
• Using the Onscreen Keyboard, enter a contact’s information.
Scroll to view all available fields.
• Tap “ok” to save and return to contact list.
• When a contact in the contact list is tapped, a summary
screen is displayed.
Tasks: Keeping a To-Do List
Use Tasks to create a To-Do list. Tap
/Tasks to access.
Creating a Task
• In “Tasks”, tap: /New Task
• Using the Onscreen Keyboard, enter a description.
• Enter a start date and due date, or enter other information by
first tapping the field. Hide the Onscreen Keyboard to view
all available fields.
• Tap “OK” to save and return to the task list.
• A summary of a task appears when it is tapped. To change
the task, tap: .
31
Notes: Capturing Thoughts and Ideas
Reminders, thoughts, ideas, drawings, etc. can be quickly jotted
with Notes. A note can be a written note, an audio recording, or
a written note with an audio recording. Tap: /Notes to open the
program.
Creating a Note
• In “Notes”, tap:
.
• Create a note by writing, drawing, typing, or recording.
• Tap “OK” to save and return to the note list.
Email: Sending and Receiving Email Messages
The email program can be used to send and receive email
messages in two ways:
• Sync the device with Microsoft Exchange or Outlook on a
computer.
• Connect directly to an email server through an Internet
Service Provider (ISP) or a network.
• Tap:
/Email to access the program.
Synchronizing Email Messages
• Email messages can be synchronized as part of the general
synchronization process.
• Enable “Inbox synchronization in ActiveSync/Windows
Mobile Device Center”. For information on enabling Inbox
synchronization, see “ActiveSync/Windows Mobile Device
Center Help” on the desktop computer.
32
Connecting Directly to an Email Server
Email messages can be sent and received by connecting to a POP3
or IMAP4 email server through an ISP or local area network.
Multiple email services can be used to receive messages. To use
multiple email services, each email service needs to be set up and
named.
Using the Message List
Received messages are displayed in the message list. Tap a
message to open it. By default, when the device is synchronized
with a desktop computer or a server, only messages from the
previous three days and only the first 2 kb will be synced with the
device. Attachments will not be synced with the device. The
original messages will remain on the desktop computer.
Messages can be marked so that the device will retrieve the
messages in full during the next synchronization or email server
connection. To do so, tap and hold the desired message to retrieve
from the message list. On the shortcut menu, tap Download
Message. An icon will appear in the Inbox message list to display
the message status.
Composing /Sending an Email
• Select the account in “Email”.
• In the message list, tap: /New.
• In the “To” field, enter an email address of one or more
recipients, separating them with a semicolon. If the address
is already in the contact list, tap “To” to select the email
address.
• Enter message.
33
• To check spelling, tap: /Spell Check.
• To attach a file to the message, tap: /Insert and select the
desired file.
• Tap ”Send” when complete. If working offline, the message
is moved to the Outbox folder and is sent the next time the
device is connected to a server or a desktop computer.
• Messages in the Outbox folder will be delivered in one of
two ways:
o The message is transferred to the Outbox folder in
Exchange or Outlook upon next synchronization.
o The message is transferred to the email server upon
connection.
Managing Email Messages and Folders
Each email service account has its own folder hierarchy with five
default folders: Inbox, Outbox, Deleted Items, Drafts, and Sent
Items. The messages received and sent through the mail service
are stored in these folders. Additional folders can be created
within each hierarchy. To create folders, tap:
/tools/Manage
Folders. The “Deleted Items” folder contains messages that have
been deleted on the device. The behavior of the “Deleted” and
“Sent Items” folders depends on the chosen options.
34
Chapter 5
More Programs
This chapter overviews other programs built into the device and
how to use the programs. For detailed information on using
Microsoft programs, tap: /Help.
ActiveSync/WMDC
ActiveSync on the device works with ActiveSync on a Windows
XP computer and with Windows Mobile Device Center (WMDC)
on a Windows Vista/Windows 7 computer.
When a connection is established between the device and a
computer, information can be synchronized on the device and the
computer with ActiveSync or WMDC. Synchronization
compares the data on both the device and the computer and
updates both systems with the most recent information.
For example: Outlook Contacts, Calendar and Tasks databases on
the device can be kept up to date by synchronizing the device with
Microsoft Outlook data on the computer.
Synchronize email messages in the device Outlook Inbox with
email messages in Microsoft Outlook on the computer.
Synchronize Microsoft Word, Excel, and PowerPoint files
between the device and the computer. Files are automatically
converted to the correct format.
There are options to control which information types are
synchronized and how much data is synchronized.
35
ActiveSync can also:
• Copy (not synchronize) files between the device and
computer.
• Add and remove programs on the device.
• Pass through the computer to a network or the Internet.
Synchronizing Data
Once synchronization set is complete, date can be synchronized
between the device and the computer.
To synchronize data:
• Connect the device to computer
• On the device, tap:
/ActiveSync
• Tap “Sync” to begin synchronization
Office Mobile
Microsoft Office Mobile works with Microsoft Office on the
computer to give easy access to copies of office documentation.
Tap:
/Office Mobile 2010 and select program.
•
•
•
•
Excel Mobile 2010
OneNote Mobile 2010
PowerPoint 2010
SharePoint WorkSpace
Mobile 2010
• Word Mobile 2010
36
Creating an Office File
• Tap: /Office Mobile and select program.
• Enter the information.
• After entering the information, tap “OK”. The file is
automatically saved and named according to the first
characters of text entered in the file.
• PowerPoint presentations on the device cannot be created or
edited.
Opening an Office File
Upon opening an Office Mobile program, a file list will appear.
Tap a file to open it. Only one file may be opened at the time. If
a second file is opened, the first file will be saved and closed
automatically.
If the HSDPA connection requires manual setup, you must obtain
the specific settings from the cellular service provider and do the
following:
• Tap /Settings/Connections/Connections
• In either group, tap “Add a New Modem Connection”.
• In the “Enter a Name for the Connection” field, enter a name
for the connection.
• In the “Select a Modem” field, select “Cellular Line
(HSDPA)”, and then tap “Next”.
• Enter the access point name provided by the cellular service
provider, and tap “Next”.
• Enter the username and password and tap “Finish”.
37
Internet Explorer
Internet Explorer can be used to view Webpages in the following
ways:
• Connect to an ISP or network and browse the Web. To do
this, a connection must be created.
• During synchronization with a computer, download links
and mobile favorites that are stored in the Mobile Favorites
subfolder in Internet Explorer on the computer. While
connected to an ISP or network, the device can download
files and programs from the Internet or an intranet.
• Tap:
/Internet Explorer. The Internet Explorer Mobile
home page appears.
Browsing the Internet
•
•
•
•
Tap:
/Internet Explorer.
Tap the “Favorites” soft key to display the Favorites list.
Tap the desired page to view.
To visit webpages not include in “Favorites”, enter a web
address in the address bar at the top of the screen and
tap: , or tap the arrow to choose from a previously
entered address.
38
Zoom in/out
Favorite
Windows Live Messenger
Windows Live Messenger provides practically instant access to
up to date MSN Hotmail Inbox, Messenger Contacts list, and
options for customizing the Messenger experience. Windows
Live requires an internet connection, either a MSN Hotmail
account, an MSN Messenger account or a Windows passport
account.
Features of Windows Live Messenger include:
• MSN Hotmail
o Read, write, and send email. Delete email and manage
Hotmail folders.
• MSN Messenger
o
o
o
o
Send and receive instant messages.
Check which contacts are online.
Subscribe to status updates for selected contacts.
Synchronize the Windows Live contacts, Hotmail inbox, and
MSN Messenger to the device.
39
Setting up Windows Live
•
•
•
•
Tap: /Windows Live to access program
Tap “Sign into Windows Live”
Tap “Accept”
Follow the onscreen instructions to complete the setup
Signing into Messenger
Before signing into Messenger, Windows Live must be signed
into first.
• Tap
/Messenger to access the program
• Tap “Sign In”
Windows Media Player
Windows Media Player can be used to play digital audio or video
stored on the device, on a network, or on a website. Supported
formats are Windows Media or MP3 format (including files with
the extensions: .asf, .wma, .wmv, and .mp3) Microsoft Windows
Media Player on a desktop computer can be used to copy digital
audio and video files to the device.
40
Pictures & Videos
Features of Pictures & Videos includes:
•
•
•
•
•
Viewing pictures and video clips
Sending pictures and videos to others
Setting a picture as the background on the Home screen
Playing a slideshow
Editing pictures
Viewing Pictures & Videos
• To view pictures or video stored on a storage card,
tap: /Pictures & Videos.
• By default, the program displays thumbnails of the pictures
and videos in the “My Pictures” folder, within the “My
Documents” folder on the device.
• Thumbnails of pictures and videos appear on the screen. Tap
one of them to view in full screen.
41
Camera
Taking Pictures
• To start the program, press the camera button on the device
or tap: /Pictures & Videos/ /Camera. The camera screen
will appear.
• Aim the camera lens at the subject. Press the camera button
halfway for automatic focusing. A white frame will appear.
Wait until the color of the frame turns green indicating that
the subject is in focus.
• Press the camera button fully to take the picture.
• The taken picture will be displayed on the screen. Tap the
screen or press the camera button to go back to the camera
screen.
• If the picture is not chosen to be deleted after it was taken,
the picture is saved to the pre-selected storage location.
42
Recording Video Clips
• To start the program, press the camera button or tap:
/Programs/Pictures & Videos/Camera.
• Tap the “/” at left corner of the screen to switch between
camera and video modes.
• Press the camera button to start recording.
• To stop recording, press the camera button.
• The video clip is saved to the pre-selected storage location.
To view the video clip, tap “Thumbnails”.
43
Geotagging
• This picture shows you the user interface of the Geo Camera.
Tap the “Set up” item on the bottom of the screen.
• To enable the coordinate and date marks, tap the upper right
icons. The upper left icon (flag) shows the GPS position
fixed or not.
• To enable the coordinate and date marks, tap the upper right
icons. The upper left icon (flag) shows the GPS position
fixed or not.
44
• To check coordinates from BAP Forge series unit, the
coordinate and date marks will show on the upper left corner
of the photo.
• To check the coordinates from PC/NB, copy the file from
BAP Forge series to PC/NB and right click on the file. Select
“Content” to check more information.
45
Chapter 6
Getting Connected
Types of Connections
The device can connect to the Internet, a computer, and to other
devices and services. Using Cellular Connection (Select model
only) Model with 3.5G connection function, allow the device to
access the Internet via the mobile phone service network.
Setting up a Cellular (HSDPA) Connection
HSDPA service requires a subscription with a mobile phone
service network operator. In most cases, the cellular (HSDPA)
connection will be preconfigured by the cellular service provider
and does not need to be setup or changed.
46
System
About
To show the hardware information and to define the device name for identifying
itself to other computers.
Backlight
To adjust the brightness level and power saving options.
Certificates
To establish personal identification or the identification of other computers.
Establishing a personal identification of the device and other computers prevents
unauthorized users from accessing the device and information on the device.
Customer Feedback
To send personal feedback to Microsoft regarding the Windows Mobile
Encryption
To encrypt files on the storage card.
Error Reporting
To enable or disable error reporting to Windows Mobile technical support group.
External GPS
To configure the GPS hardware settings.
Managed Programs
To show the installation history of managed programs.
Memory
To view the system memory or the memory of any installed storage card and to
manually stop a program if it becomes unstable.
Power
To show the remaining battery power and to set battery power
settings.
Regional Settings
To specify the region and the local number, currency, time, and date.
Remove Programs
To remove programs.
Screen
To set the orientation of the screen to portrait or landscape. To adjust the
touch screen for accurate screen taps.
To adjust the text size.
System Information
To view system information.
Task Manager
To view or perform task management of programs.
47
Searching and Organizing Information
The “Search” feature on the device helps quickly locate
information.
To Search for a file:
• Tap “Search Phone”, enter the file name, select data type,
and tap “Search” to start the search.
• File Explorer can also be used to find files on the device and
to organize these files into folders. Tap:
/File Explorer
• Files can be moved in File Explorer by tapping and holding
the item. Tap “Cut” or “Copy” on the shortcut menu, browse
to the new location, and tap “Paste”.
Remote Desktop
Remote Desktop allows the device to log onto a Windows
Terminal Server and use the programs installed on the server.
• Access to a remote computer requires that the computer have
Terminal Services or Remote Desktop installed.
• To connect to a remote computer:
o Tap
/Remote Desktop Mobile
o Select the computer. Enter the username, password, and
domain
o Tap “Connect”
48
Setting up a Dial-up Connection
Depending on the wireless service provider, dial up connections
may or may not be supported. With dial up, the service provider
gives a phone number that connects the device to the Internet.
• Tap /Settings/Connections/Connections
• In either group, tap “Add a new modem connection”
• In the “Enter a name for the connection” field, enter a name
for the connection
• In the “Select a modem” field, select “Cellular Line”, and
then tap “Next”
• Enter the phone number provided by the service provider,
and tap “Next”
• Enter the username and password, and tap “Finish”
Using a Wireless Network
The device has a built-in wireless network module. If the device
is within a wireless LAN (WLAN) environment, it can connect to
the network without any cables.
Switching On or Off the Wi-Fi Radio
By default, the Wi-Fi radio is turned off. To turn on or off the
Wi-Fi radio:
• Tap the Wi-Fi icon on the Home screen to access Wireless
Manager.
• Tap the Wi-Fi box to change the Wi-Fi radio status from
Off to Available.
49
When the Wi-Fi radio is on, the Wi-Fi radio status on the Home
screen will be displayed as Available. To turn off the Wi-Fi radio,
follow the above procedure, but tap the Wi-Fi box to change the
Wi-Fi radio status from Available to Off. The Wi-Fi radio status
on the Home screen will be displayed as Off.
• Turn on the Wi-Fi radio.
• Tap Menu/Wi-Fi Settings to open the Wireless Networks
Configuration screen. By default, the device will
automatically detect available wireless networks.
• If more than one network is detected, the screen will display
a network list. Tap the desired network and follow the
procedure to configure the wireless network.
• If the selected network requires a network key, enter the key
and tap Next/Finish on the screen.
• End the Wi-Fi connection by switching off its radio.
50
• Search for a network to connect to by tapping:
/Settings/Connections/Wi-Fi/Search Networks
• Once connected to a network, a shortcut is created on
Settings. To change the network settings, tap:
Settings/Connections/Wi-Fi. Tap the desired network and
change the settings.
• Leaving the radio on will drain the battery power at quicker
rate.
Using Bluetooth
BAP does not guarantee that all Bluetooth headsets/devices from
all manufacturers are compatible with the device. The device
incorporates Bluetooth capability. Bluetooth technology is a
short-range (approximately 10m or 30ft) wireless
communications technology.
Bluetooth technology features the ability to do the following:
• Beam information, such as files, tasks, contacts, etc. to other
Bluetooth supported devices.
• Connect the device to a Bluetooth enabled phone to be used
as a modem. When the device is connected to another device
or computer, the device can locate and use the services
available on the other device or computer.
51
Switching On or Off the Bluetooth
By default, the radio is turned off. To turn on Bluetooth, do the
following:
• Tap the Wireless Manager section on the Home screen.
• Tap the Bluetooth box to change the Bluetooth radio status
from Off to On.
• For other devices with Bluetooth capabilities to detect the
device and attempt to beam information to it, establish a
connection, or use a Bluetooth service, tap:
/Setting/Bluetooth Mode/Make this device visible to other
devices.
• To turn off the Bluetooth radio, follow the above procedure,
but tap the Bluetooth box to change the Bluetooth radio from
On or Visible to Off. The Bluetooth radio status on the Home
screen will be displayed as Off.
• Leaving the radio on will drain the battery power more
quickly.
52
Sending Files Via Bluetooth
• Turn on the Bluetooth radio.
• Make sure that the device and the device that is receiving the
information are within close range and that the device is
discoverable.
• From the program, tap and hold the desired item.
• Tap “Beam File” in the shortcut menu.
• The device will search for other devices with Bluetooth
capabilities within close range, and will display them in the
list. Tap the desired destination device.
• Files are saved automatically before they are beamed. If a
Word document or Excel workbook was created on a
computer, unsupported content and formatting may be lost
when the files are saved.
53
Receiving Files Via Bluetooth
• Make sure that “Make this device visible to other devices”
in Bluetooth settings is selected.
• Make sure that the device and the destination device are
within close range and that the device is discoverable.
• When prompted to receive an incoming beam, tap “Yes” to
receive.
Creating a Bluetooth Partnership
A Bluetooth partnership is a connection that allows for secure
information exchange via Bluetooth technology. When a
partnership between two devices is created, the devices do not
need to be discoverable for secure information exchange. A
matching passkey is required on both devices to create a
partnership. A Bluetooth partnership will work as long as the
Bluetooth function is turned on.
• Turn both devices, set them to discoverable, and place them
in close range.
• Tap: /Settings/Bluetooth/Devices/Add new device.
• The device will search for other devices with Bluetooth
capabilities and display them in the list.
54
Chapter 7
GeoAssist Software
Starting GeoAssist
GeoAssist is a GPS utility that allows the end user to view the
status of the GPS and, depending on the version, allows the user
to configure the GPS and optimize it for the environment for
which it will be used. This instruction guide will show you all of
the features and their application. The versions of GeoAssist that
are available are Lite (L), Standard (S), and Premium (P).
55
GeoAssist Settings
GPS Tab
• The GPS Tab allows you to setup the connection settings for
the GPS, Start/Stop the GPS communications, as well as Exit
the program.
• The GPS Settings for the Forge handheld should be set to
use COM 9 as the communications port and the baud rate
should be set to 9600.
• Next, set the additional NMEA sentences you would like to
have enabled.
• The GST string reports the GPS Pseudo-range Error (Noise)
Statistics. When satisfied, press the “Apply” button.
56
Satellite Detail Tab
The Satellite Detail tab (L,S,P) gives you information regarding
each satellite being used.
• PRN: Pseudo-Random Noise (unique identifier for each
satellite
• SNR: Signal to Noise Ratio
• Active: Used in Position – True/False
• Azimuth: Position in the sky from True North
• Elevation: Elevation of satellite above the horizon
57
Use Mode Tab
Link Mode: Autonomous (L,S,P)
• Default (L,S,P) – offers no enhanced settings or filter
algorithms; Default mode in Lite version
• Precise Point Positioning (P) – Precision, Open Sky
• For Canopy Environments (S,P) – Precision
High-Multipath Environments
SBAS (P)
SBAS is enabled by default to automatically (auto-scan) locate
the SBAS for the local position. The GeoAssist Premium version
gives you the following control over SBAS:
• Subsystem (P):
o Disable – Turn SBAS off
o Enable – Turn SBAS on
PRN Codes (P)
Choose the SBAS that best fits your needs.
• Press apply when ready
• In order for “Apply” to be active, the GPS must be started.
Network DGPS (P)
• Host: Enter your host name IP address
• Port: Enter the port given by provider
• User ID: Enter your User ID
• Password: Enter your password
• Advanced – Some NTRIP servers require the GGA string in
order to process the correction. Here you can set the location
from where the GGA string is set.
• When the settings are correct, press the “Connect” button
58
1)
3)
2)
4)
59
Log Tab
• The Log Tab (P) gives you the ability to store NMEA date
in a .nmea file.
• This will not store feature attribute or value data, just raw
.nmea string from the GPS receiver.
• Choose a storage location, then press “Start”. When you are
finished, press “Stop”.
About Tab
The “About Tab” validates your license edition as well as version.
60
Chapter 8
Recommended Settings
GPS Settings and Best Practices
• Starting the GPS: Open GeoAssist and start the GPS. Choose
the “Mode” tab and select the mode for which you want to
use the GPS. Leave GeoAssist running while in use and
collecting data.
• GPS COM Port: COM 9
• GPS Baud Rate: 9600
• While in “Canopy” mode, it is best to walk directly to target
and stop to collect data. Wandering around target or moving
the unit aimlessly may cause inaccurate data.
• If GPS performance is slow, reset the handheld.
Handheld and Best Practices
• Begin each day be resetting the handheld. This normal
practice for most devices and will help with performance.
• For best results and when possible, charge the device via the
provided A/C wall charger or desktop battery charger.
Charging via the auto adapter or USB may take the unit
longer to reach a full charge.
61
Chapter 9
Troubleshooting & Maintenance
Resetting Your Device
If the device stops responding, or appears to be “frozen” or is
“locked up”, the device may need resetting.
Reset button
62
Restoring Device to Factory Settings
The device can be restored back to its factory default state by
clearing the memory from the device. Restoring the device back
to its factory default state should be done in the following cases:
• When the device does not respond after being restarted.
• When the password is forgotten.
• Clearing the memory deletes all data, files, system settings,
and additional programs that were installed or synchronized.
• Back up data on a computer, storage media, or another
device before restoring to factory default state. Regular
back-up of data ensures data integrity during emergency or
accidental situations.
To clear the memory from the device, proceed with the
following:
• Turn off the system
• Press F1 soft key, F2 soft key and power button
simultaneously
• Release all the keys. A “Hive Clean” message should appear
• Press “Yes”
63
Troubleshooting
If a problem occurs that cannot be solved, contact the dealer for
assistance.
Problem
Solution
Power does not switch on when The remaining battery power may be too low to
using battery power.
run the device. Charge the battery for 20 minutes
before use.
Screen responds slowly.
Make sure that the device is not running out of
battery power. If the problem still persists, restart
the device.
Screen freezes.
Restart the device.
Cannot establish a connection
with a computer via USB.
Make sure that the device and the computer are
both switched on before trying to establish a
connection.
Make sure that the cable is securely plugged into
the USB port on the computer and on the device.
Connect the USB cable directly to the computer.
Do not run the cable through a USB hub.
64
In some specific cases, the device may experience connection
problems when it is connected to a Windows computer running
ActiveSync. To resolve the problems, please tap:
/Settings/
Connections/USB to PC/Enable advanced network functionality.
Problem
A warning message of not
enough memory appears.
Solution
Delete unneeded files.
Remove unneeded programs.
Delete all files and clear history in Internet
Explorer.
Stop programs that are not being currently
used. To check the state of active programs,
tap: /Settings /System/Task Manager. To
stop the program by tapping End Task.
Restart the device.
Move the data/file to the storage card using file
explorer.
Move Email attachments to storage card.
65
Caring for Your Device
• Keep the device away from excessive moisture and extreme
temperatures.
• Avoid exposing the device to direct sunlight or strong
ultraviolet light for extended periods of time.
• Do not place anything on top of the device or drop objects
on the device.
• Don not drop the device or subject it to severe shock.
• Do not expose the device to sudden and severe temperature
changes. This could cause moisture condensation inside the
unit, which could damage the device. In the event of
moisture condensation, allow the device to dry out
completely before next use.
• The screen surface can easily be scratched. Avoid touching
it with sharp objects. Non-adhesive generic screen protectors
designed specifically for use on portable devices with LCD
panels may be used to help protect the screen from minor
scratches.
• Never clean the device with it powered on. Use a soft, lintfree cloth to wipe the screen and exterior of the device. Do
not use paper towels to clean the screen.
• Never attempt to disassemble, repair or make any
modifications to the device. Disassembly, modification, or
any attempt at repair could cause damage to the device and
may even cause bodily or property damage. Disassembly or
modification of the device voids the warranty of the device.
• Do not store or carry flammable liquids, gases or explosive
materials in the same compartment as the device, its parts or
its accessories.
66
Chapter 10
Safety Precautions
• Prolonged listening of music at maximum volume can
damage the ears.
• The use of headphones other than those recommended/
supplied can cause hearing impairment due to excessive
sound pressure.
About Charging
• Use only the A/C adapter supplied with your device. Use of
another A/C adapter will result in malfunction and/or
danger.
• Use only the car charger supplied by the manufacturer. Use
of another type of car charger will result in malfunction
and/or danger.
• Use a specified cradle approved by the manufacturer.
• Use a specified battery.
About the Charger
• Do not use the charger in a high moisture environment.
Never touch the charger with wet hands, feet or any other
body part.
• Allow adequate ventilation around the charger when using it
to operate the device or charge the battery. Do not cover the
charger with paper or other objects that will reduce cooling.
Do not use the charger while it is inside a carrying case.
Connect the charger to a proper power source.
• If damaged, replace the charger with a manufacturer’s
approved charger. Once damaged, the charger cannot be
repaired.
67
About the Battery
• Use a specified battery approved by the manufacturer.
• Do not place the battery in fire. The battery can burst or
explode, releasing hazardous chemicals.
• Dispose or recycle used batteries according to the
instructions.
• Only use a replacement battery recommended by the
manufacturer.
• The battery should only be used in the specified device.
FCC Warning
This equipment has been tested and found to comply with the
limits for a Class B digital device, pursuant to part 15 of the FCC
rules. These limits are designed to provide reasonable protection
against harmful interference in a residential installation. This
equipment generates, uses and can radiate radio frequency energy
and, if not installed and used in accordance with the instructions,
may cause harmful interference to radio communications.
However, there is no guarantee that interference will not occur in
a particular installation. If this equipment does cause harmful
interference to radio or television reception, which can be
determined by turning the equipment off and on, the user is
encouraged to try to correct the interference by one or more of the
following measures; reorient or relocate the receiving antenna.