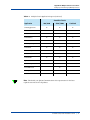
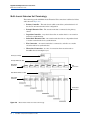
1
Installation Guide
SmartBits 600x/6000x
October 2004
P/N 340-1309-001 REV B
Spirent Communications, Inc.
26750 Agoura Road
Calabasas, CA
91302 USA
Support Contacts
E-mail: [email protected]
Web: http://support.spirentcom.com
Toll Free: 1-800-SPIRENT (1-800-774-7368)
Phone: + 1 818-676-2300
Fax: +1 818-880-9154
Copyright
© 2004 Spirent Communications, Inc. All Rights Reserved.
All of the company names and/or brand names and/or product names referred to in this document, in particular, the
name “Spirent” and its logo device, are either registered trademarks or trademarks of Spirent plc and its subsidiaries,
pending registration in accordance with relevant national laws. All other registered trademarks or trademarks are the
property of their respective owners.
The information contained in this document is subject to change without notice and does not represent a commitment
on the part of Spirent Communications. The information in this document is believed to be accurate and reliable,
however, Spirent Communications assumes no responsibility or liability for any errors or inaccuracies that may appear
in the document.
Warranty
Spirent Communications, Inc.(“Spirent”) warrants that its Products will conform to the description on the face of
order, that it will convey good title thereto, and that the Product will be delivered free from any lawful security interest
or other lien or encumbrance.
Spirent further warrants to Customer that hardware which it supplies and the tangible media on which it supplies
software will be free from significant defects in materials and workmanship for a period of twelve (12) months, except
as otherwise noted, from the date of delivery (the “Warranty Period”), under normal use and conditions.
To the extent the Product is or contains software (“Software”), Spirent also warrants that during the Warranty Period,
the Software which it supplies will operate substantially in accordance with the specifications supplied by Spirent for
such Software. Spirent does not warrant that the functions contained in the Software will meet a specific requirement
or that the operation will be uninterrupted or error free. Spirent shall have no warranty obligations whatsoever with
respect to any Software which has been modified in any manner by Customer or any third party. The Warranty Period
for Wireless software products shall be defined as ninety (90) days from the date of delivery.
Defective Products and Software under warranty shall be, at Spirent’s discretion, repaired or replaced or a credit issued
to Customer’s account for an amount equal to the price paid for such Product provided that: (a) such Product is
returned to Spirent after first obtaining a return authorization number and shipping instructions, freight prepaid, to
Spirent’s location in the United States; (b) Customer provides a written explanation of the defect or Software failure
claimed by Customer; and (c) the claimed defect actually exists and was not caused by neglect, accident, misuse,
improper installation, improper repair, fire, flood, lightning, power surges, earthquake, or alteration. Spirent will ship
repaired Products to Customer, freight prepaid, within ten (10) working days after receipt of defective Products.
Except as otherwise stated, any claim on account of defective materials or for any other cause whatsoever will
conclusively be deemed waived by Customer unless written notice thereof is given to Spirent within the Warranty
Period. Spirent reserves the right to change the warranty and service policy set forth above at any time, after reasonable
notice and without liability to Customer.
TO THE EXTENT PERMITTED BY APPLICABLE LAW, ALL IMPLIED WARRANTIES, INCLUDING BUT
NOT LIMITED TO IMPLIED WARRANTIES OF MERCHANTABILITY, NONINFRINGEMENT AND FITNESS
FOR A PARTICULAR PURPOSE, ARE HEREBY EXCLUDED, AND THE LIABILITY OF SPIRENT, IF ANY,
FOR DAMAGE RELATING TO ANY ALLEGEDLY DEFECTIVE PRODUCT SHALL BE LIMITED TO THE
ACTUAL PRICE PAID BY THE CUSTOMER FOR SUCH PRODUCT. THE PROVISIONS SET FORTH ABOVE
STATE SPIRENT’S ENTIRE RESPONSIBILITY AND CUSTOMER’S SOLE AND EXCLUSIVE REMEDY WITH
RESPECT TO ANY BREACH OF ANY WARRANTY.
Contents
About This Guide . . . . . . . . . . . . . . . . . . . . . . . . . . . . . . . . . . . . . . . . . . . . . . . . . . . . . . . . . 1
Purpose. . . . . . . . . . . . . . . . . . . . . . . . . . . . . . . . . . . . . . . . . . . . . . . . . . . . . . . . . . . . . . . . . . . . 2
Audience . . . . . . . . . . . . . . . . . . . . . . . . . . . . . . . . . . . . . . . . . . . . . . . . . . . . . . . . . . . . . . . . . . 2
Manual Content . . . . . . . . . . . . . . . . . . . . . . . . . . . . . . . . . . . . . . . . . . . . . . . . . . . . . . . . . . . . . 2
Conventions . . . . . . . . . . . . . . . . . . . . . . . . . . . . . . . . . . . . . . . . . . . . . . . . . . . . . . . . . . . . . . . . 3
Related Manuals. . . . . . . . . . . . . . . . . . . . . . . . . . . . . . . . . . . . . . . . . . . . . . . . . . . . . . . . . . . . . 5
Online Help . . . . . . . . . . . . . . . . . . . . . . . . . . . . . . . . . . . . . . . . . . . . . . . . . . . . . . . . . . . . . . . . 5
SmartBits Hardware Handling/Cleaning Practices . . . . . . . . . . . . . . . . . . . . . . . . . . . . . . . . . . 5
How to Contact Us. . . . . . . . . . . . . . . . . . . . . . . . . . . . . . . . . . . . . . . . . . . . . . . . . . . . . . . . . . . 6
Chapter 1: About SmartBits Chassis . . . . . . . . . . . . . . . . . . . . . . . . . . . . . . . . . . . . . 7
Introduction . . . . . . . . . . . . . . . . . . . . . . . . . . . . . . . . . . . . . . . . . . . . . . . . . . . . . . . . . . . . . . . . 8
SmartBits Overview. . . . . . . . . . . . . . . . . . . . . . . . . . . . . . . . . . . . . . . . . . . . . . . . . . . . . . . . . . 8
SmartBits Chassis Models . . . . . . . . . . . . . . . . . . . . . . . . . . . . . . . . . . . . . . . . . . . . . . . . . . . . . 9
SmartBits 600x/6000x Chassis Features . . . . . . . . . . . . . . . . . . . . . . . . . . . . . . . . . . . . . . . . . . 9
SmartBits 600 Chassis . . . . . . . . . . . . . . . . . . . . . . . . . . . . . . . . . . . . . . . . . . . . . . . . . . . . . . 11
SmartBits 600B Chassis . . . . . . . . . . . . . . . . . . . . . . . . . . . . . . . . . . . . . . . . . . . . . . . . . . . . . 11
SmartBits 6000B Chassis. . . . . . . . . . . . . . . . . . . . . . . . . . . . . . . . . . . . . . . . . . . . . . . . . . . . . 13
SmartBits 6000C Chassis. . . . . . . . . . . . . . . . . . . . . . . . . . . . . . . . . . . . . . . . . . . . . . . . . . . . . 14
SmartBits 6000B Cover Replacement . . . . . . . . . . . . . . . . . . . . . . . . . . . . . . . . . . . . . . . 16
SmartBits 6000C Chassis Enhancements . . . . . . . . . . . . . . . . . . . . . . . . . . . . . . . . . . . . . 16
SmartBits Applications . . . . . . . . . . . . . . . . . . . . . . . . . . . . . . . . . . . . . . . . . . . . . . . . . . . . . . 17
Supported Modules . . . . . . . . . . . . . . . . . . . . . . . . . . . . . . . . . . . . . . . . . . . . . . . . . . . . . . . . . 18
Specifications . . . . . . . . . . . . . . . . . . . . . . . . . . . . . . . . . . . . . . . . . . . . . . . . . . . . . . . . . . . . . . 21
Safety Requirements . . . . . . . . . . . . . . . . . . . . . . . . . . . . . . . . . . . . . . . . . . . . . . . . . . . . . . . . 23
Chapter 2: Installation and Setup . . . . . . . . . . . . . . . . . . . . . . . . . . . . . . . . . . . . . . . 27
Summary of Installation Procedures . . . . . . . . . . . . . . . . . . . . . . . . . . . . . . . . . . . . . . . . . . . . 28
Procedure 1: Check the System Requirements . . . . . . . . . . . . . . . . . . . . . . . . . . . . . . . . . . . . 29
Procedure 2: Check the Chassis and Package . . . . . . . . . . . . . . . . . . . . . . . . . . . . . . . . . . . . . 30
Checking the SmartBits Package . . . . . . . . . . . . . . . . . . . . . . . . . . . . . . . . . . . . . . . . . . . 30
Adding or Rearranging Modules . . . . . . . . . . . . . . . . . . . . . . . . . . . . . . . . . . . . . . . . . . . 31
Procedure 3: Install SmartBits Applications . . . . . . . . . . . . . . . . . . . . . . . . . . . . . . . . . . . . . . 32
Installing the SmartBits Applications . . . . . . . . . . . . . . . . . . . . . . . . . . . . . . . . . . . . . . . . 32
Printing/Reviewing the Release Notes . . . . . . . . . . . . . . . . . . . . . . . . . . . . . . . . . . . . . . . 33
Printing User Guide and Reference Manuals . . . . . . . . . . . . . . . . . . . . . . . . . . . . . . . . . . 33
Procedure 4: Connect SmartBits to PC, Power, and LAN. . . . . . . . . . . . . . . . . . . . . . . . . . . . 34
Procedure 5: Install the Ferrite Block . . . . . . . . . . . . . . . . . . . . . . . . . . . . . . . . . . . . . . . . . . . 36
Procedure 6: Connect the SmartBits Power Cord . . . . . . . . . . . . . . . . . . . . . . . . . . . . . . . . . . 38
SmartBits 600x/6000x Installation Guide |
iii
Contents
Procedure 7: Start SmartWindow . . . . . . . . . . . . . . . . . . . . . . . . . . . . . . . . . . . . . . . . . . . . . . 38
SmartWindow Launcher . . . . . . . . . . . . . . . . . . . . . . . . . . . . . . . . . . . . . . . . . . . . . . . . . . 39
Procedure 8: Set the IP Address. . . . . . . . . . . . . . . . . . . . . . . . . . . . . . . . . . . . . . . . . . . . . . . . 41
Default IP Address Connection . . . . . . . . . . . . . . . . . . . . . . . . . . . . . . . . . . . . . . . . . . . . 42
Setting the IP Address via HyperTerminal . . . . . . . . . . . . . . . . . . . . . . . . . . . . . . . . . . . . 43
Setting the IP Address via Telnet . . . . . . . . . . . . . . . . . . . . . . . . . . . . . . . . . . . . . . . . . . . 47
Setting the IP Address via SmartWindow . . . . . . . . . . . . . . . . . . . . . . . . . . . . . . . . . . . . 48
Procedure 9: Confirm the Ethernet Link . . . . . . . . . . . . . . . . . . . . . . . . . . . . . . . . . . . . . . . . . 51
Checking your Ethernet Cable Connection . . . . . . . . . . . . . . . . . . . . . . . . . . . . . . . . . . . 51
Procedure 10: Update Firmware Version (optional) . . . . . . . . . . . . . . . . . . . . . . . . . . . . . . . . 56
Procedure 11: Connect SmartBits to an Application . . . . . . . . . . . . . . . . . . . . . . . . . . . . . . . 65
Procedure 12: Connect to the DUT and Check Cabling . . . . . . . . . . . . . . . . . . . . . . . . . . . . . 67
Chapter 3: LED Indicators . . . . . . . . . . . . . . . . . . . . . . . . . . . . . . . . . . . . . . . . . . . . . . . 69
SmartBits 600x/6000x Chassis Front Panel LEDs . . . . . . . . . . . . . . . . . . . . . . . . . . . . . . . . . 70
Over-temperature Sequence Condition (SmartBits 6000C). . . . . . . . . . . . . . . . . . . . . . . . . . . 72
SmartBits 600x/6000x Chassis Back Panel LEDs. . . . . . . . . . . . . . . . . . . . . . . . . . . . . . . . . . 73
ATM TeraMetrics Module LEDs . . . . . . . . . . . . . . . . . . . . . . . . . . . . . . . . . . . . . . . . . . . . . . 74
Ethernet Module LEDs . . . . . . . . . . . . . . . . . . . . . . . . . . . . . . . . . . . . . . . . . . . . . . . . . . . . . . 75
LEDs on Ethernet SmartMetrics/TeraMetrics XD Modules . . . . . . . . . . . . . . . . . . . . . . . . . . 77
Packet Over SONET (POS) Module LEDs . . . . . . . . . . . . . . . . . . . . . . . . . . . . . . . . . . . . . . . 78
Fibre Channel Module LEDs . . . . . . . . . . . . . . . . . . . . . . . . . . . . . . . . . . . . . . . . . . . . . . . . . . 79
10 Gigabit Ethernet Module LEDs . . . . . . . . . . . . . . . . . . . . . . . . . . . . . . . . . . . . . . . . . . . . . 80
Chapter 4: Troubleshooting and Maintenance . . . . . . . . . . . . . . . . . . . . . . . . . . 81
Ethernet Connection Problems. . . . . . . . . . . . . . . . . . . . . . . . . . . . . . . . . . . . . . . . . . . . . . . . . 82
Replacing Fuses in SmartBits 600x/6000B Chassis . . . . . . . . . . . . . . . . . . . . . . . . . . . . . . . . 83
SmartBits 6000C Circuit Breaker . . . . . . . . . . . . . . . . . . . . . . . . . . . . . . . . . . . . . . . . . . . . . . 83
Appendix A: Multiple Chassis Local Connect . . . . . . . . . . . . . . . . . . . . . . . . . . . . 85
Multiple Chassis Connections . . . . . . . . . . . . . . . . . . . . . . . . . . . . . . . . . . . . . . . . . . . . . . . . . 86
Cable Information . . . . . . . . . . . . . . . . . . . . . . . . . . . . . . . . . . . . . . . . . . . . . . . . . . . . . . . 86
Multiple Chassis Connection Terminology . . . . . . . . . . . . . . . . . . . . . . . . . . . . . . . . . . . 87
Stacking Connections (SmartBits 2000 chassis only) . . . . . . . . . . . . . . . . . . . . . . . . . . . 88
Expansion Connections (all chassis). . . . . . . . . . . . . . . . . . . . . . . . . . . . . . . . . . . . . . . . . 89
Setting Up and Powering Up Multiple Chassis . . . . . . . . . . . . . . . . . . . . . . . . . . . . . . . . . . . . 90
Multi-chassis Extension Unit . . . . . . . . . . . . . . . . . . . . . . . . . . . . . . . . . . . . . . . . . . . . . . . . . . 97
Multi-chassis Extension Unit Terminology . . . . . . . . . . . . . . . . . . . . . . . . . . . . . . . . . . . 98
Multi-chassis Extension Unit Cable Connections . . . . . . . . . . . . . . . . . . . . . . . . . . . . . . 99
Multi-chassis Extension Unit Configurations. . . . . . . . . . . . . . . . . . . . . . . . . . . . . . . . . . 99
Appendix B: Cable Information . . . . . . . . . . . . . . . . . . . . . . . . . . . . . . . . . . . . . . . . 105
Ethernet Cables . . . . . . . . . . . . . . . . . . . . . . . . . . . . . . . . . . . . . . . . . . . . . . . . . . . . . . . . . . . 106
Ethernet Connectors. . . . . . . . . . . . . . . . . . . . . . . . . . . . . . . . . . . . . . . . . . . . . . . . . . . . . . . . 107
XAUI Extender Module RJ-45 Pinouts . . . . . . . . . . . . . . . . . . . . . . . . . . . . . . . . . . . . . . . . . 112
SmartBits-to-GPS/CDMA Control Interface . . . . . . . . . . . . . . . . . . . . . . . . . . . . . . . . . . . . 112
Fiber Connectors . . . . . . . . . . . . . . . . . . . . . . . . . . . . . . . . . . . . . . . . . . . . . . . . . . . . . . . . . . 113
iv |
SmartBits 600x/6000x Installation Guide
Contents
Appendix C: Download and Install Applications . . . . . . . . . . . . . . . . . . . . . . . . 115
Downloading SmartBits Applications . . . . . . . . . . . . . . . . . . . . . . . . . . . . . . . . . . . . . . . . . . 116
Example Download. . . . . . . . . . . . . . . . . . . . . . . . . . . . . . . . . . . . . . . . . . . . . . . . . . . . . 116
Running the Application . . . . . . . . . . . . . . . . . . . . . . . . . . . . . . . . . . . . . . . . . . . . . . . . . . . . 117
Key Files . . . . . . . . . . . . . . . . . . . . . . . . . . . . . . . . . . . . . . . . . . . . . . . . . . . . . . . . . . . . . . . . 117
Appendix D: Serial Port and Telnet Commands . . . . . . . . . . . . . . . . . . . . . . . . . 119
Overview of the Serial Command Set . . . . . . . . . . . . . . . . . . . . . . . . . . . . . . . . . . . . . . . . . . 120
Serial Command Interface Updates . . . . . . . . . . . . . . . . . . . . . . . . . . . . . . . . . . . . . . . . . . . . 121
Serial Port Command Set. . . . . . . . . . . . . . . . . . . . . . . . . . . . . . . . . . . . . . . . . . . . . . . . . . . . 121
Superuser Commands . . . . . . . . . . . . . . . . . . . . . . . . . . . . . . . . . . . . . . . . . . . . . . . . . . . . . . 122
Netmask Commands . . . . . . . . . . . . . . . . . . . . . . . . . . . . . . . . . . . . . . . . . . . . . . . . . . . . . . . 124
Gateway Commands . . . . . . . . . . . . . . . . . . . . . . . . . . . . . . . . . . . . . . . . . . . . . . . . . . . . . . . 125
External Time Reference Commands . . . . . . . . . . . . . . . . . . . . . . . . . . . . . . . . . . . . . . . . . . 126
ETR Commands . . . . . . . . . . . . . . . . . . . . . . . . . . . . . . . . . . . . . . . . . . . . . . . . . . . . . . . 126
AUX Commands. . . . . . . . . . . . . . . . . . . . . . . . . . . . . . . . . . . . . . . . . . . . . . . . . . . . . . . 130
Appendix E: ESD Requirements . . . . . . . . . . . . . . . . . . . . . . . . . . . . . . . . . . . . . . . . 131
General Equipment Handling. . . . . . . . . . . . . . . . . . . . . . . . . . . . . . . . . . . . . . . . . . . . . . . . . 132
Workstation Preparation . . . . . . . . . . . . . . . . . . . . . . . . . . . . . . . . . . . . . . . . . . . . . . . . . . . . 133
Appendix F: Fiber Optic Cleaning Guidelines . . . . . . . . . . . . . . . . . . . . . . . . . . . 135
Cleaning Guidelines. . . . . . . . . . . . . . . . . . . . . . . . . . . . . . . . . . . . . . . . . . . . . . . . . . . . . . . . 136
Appendix G: Revision History . . . . . . . . . . . . . . . . . . . . . . . . . . . . . . . . . . . . . . . . . . 137
Index . . . . . . . . . . . . . . . . . . . . . . . . . . . . . . . . . . . . . . . . . . . . . . . . . . . . . . . . . . . . . . . . . . 139
SmartBits 600x/6000x Installation Guide |
v
vi | SmartBits 600x/6000x Installation Guide
About This Guide
In About this Guide . . .
This section of the installation guide contains the following topics:
•
Purpose . . . . 2
•
Audience . . . . 2
•
Manual Content . . . . 2
•
Conventions . . . . 3
•
Related Manuals . . . . 5
•
Online Help . . . . 5
•
SmartBits Hardware Handling/Cleaning Practices . . . . 5
•
How to Contact Us . . . . 6
SmartBits 600x/6000x Installation Guide
| 1
About This Guide
Purpose
Purpose
This installation guide provides information for first-time SmartBits chassis connections
and installation.
Audience
This installation guide is designed for engineers and technicians who are familiar with
PCs and have a working knowledge of telecommunications equipment.
Manual Content
This installation guide contains the following sections:
2
Section
Description
“About This Guide”
Provides information on this guide including its purpose,
intended audience, content and organization, conventions
used, and related documentation and online Help. Also
explains how to contact technical support.
Chapter 1, “About
SmartBits Chassis”
Introduces the SmartBits 600x/6000x chassis.
Chapter 2, “Installation and
Setup”
Describes the installation and set up of the SmartBits
chassis.
Chapter 3, “LED
Indicators”
Describes the LED status indicators on the chassis and
different card types.
Chapter 4,
“Troubleshooting and
Maintenance”
Describes troubleshooting, error messages, and
maintenance conditions.
Appendix A, “Multiple
Chassis Local Connect”
Provides details for setting up, connecting, and powering up
multiple SmartBits chassis used in stacking and expansion
configurations. Also provides details for various Multichassis Extension Unit connections and configurations.
Appendix B, “Cable
Information”
Provides cable information and connector pin assignments
used with when making SmartBits chassis connections.
Appendix C, “Download
and Install Applications”
Provides the general steps for downloading and updating
Spirent Communications software applications.
| SmartBits 600x/6000x Installation Guide
About This Guide
Conventions
Section
Description
Appendix D, “Serial Port
and Telnet Commands”
Describes the serial port command set including Superuser,
Netmask, Gateway, and External Time Reference
commands.
Appendix E, “ESD
Requirements”
Provides ESD guidelines and procedures.
Appendix F, “Fiber Optic
Cleaning Guidelines”
Provides cleaning guidelines for fiber optic equipment.
Appendix G, “Revision
History”
Provides a Revision History for this user guide including
updates for this current revision.
“Index”
Comprehensive index listing.
Conventions
This section explains the typographical conventions used in this guide.
•
Italics are used to indicate titles of books, volumes, documents, sections of documents
(such as chapters), areas or panes within windows, tabs, options, field or parameter
names, and for general emphasis. For example:
• For additional information on SmartBits hardware, refer to the SmartBits System
Reference manual.
• The Traffic area of the window contains four options.
• The test results provide information on the frame loss of the device.
•
Bold type is used to indicate selections made during a procedure (such as menu
options that you select, or tabs or buttons that you click). Bold type is also used for
names of parameters being acted upon, for parameter options, and to indicate
directory paths. For example:
• To connect to your SmartBits chassis click the Connect button or select Tools >
Connect.
• To transmit traffic for 10 seconds for each iteration of the test, enter 10 in the Test
Duration field.
• The configuration files are automatically saved to the Config folder that was created when you installed the software application (C:\Program Files\Config).
•
•
Courier text is used for code samples and to indicate text that you need to enter.
SmartBits 600x refers to the SmartBits 600, 600B, or any later version of this chassis.
SmartBits 6000x refers to the SmartBits 6000B, 6000C, or any later version of this
SmartBits 600x/6000x Installation Guide
| 3
About This Guide
Conventions
chassis. Specific versions of the SmartBits 600x/6000x chassis are mentioned only
when required for clarification.
•
The terms DUT and device under test, as well as SUT and system under test, are used
interchangeably in this guide. DUT/SUT is also used to indicate either.
•
•
The terms packet and frame are used interchangeably.
The term SmartCard refers to a printed circuit board used in a SmartBits 200/2000
chassis. The term module generally refers to a printed circuit board used in a
SmartBits 600x/6000x chassis. The term card is often used in SmartBits software
applications and in this guide to refer to either type of circuit board.
Notes, cautions, warnings, and important information are indicated as follows:
Note: Calls attention to additional information or explanation.
!
Caution: Calls attention to procedures or practices that should be followed to avoid damage to hardware, or corruption and possible loss of software files and/or data.
Warning: Calls attention to operating procedures or practices that should be followed to
avoid bodily injury or damage to equipment.
Important: Calls attention to important information or characteristics that might be overlooked.
Tip: Calls attention to helpful information about a product's operation or setup that eases
its use.
Indicates the beginning of a procedure.
4
| SmartBits 600x/6000x Installation Guide
About This Guide
Related Manuals
Related Manuals
Additional manuals related to the SmartBits 600x/6000x Installation Guide include:
•
SmartBits System Reference: Explains SmartBits system architecture and hardware,
basic concepts for using SmartBits systems, and general maintenance/upgrade
procedures.
•
All user guides supplied with both core and optional software applications.
Online Help
In each SmartBits GUI application, you can access online Help in two ways:
•
•
Press the F1 key in the window for which you require information.
From the menu bar, select Help > Contents to view the entire contents of the Help
file.
SmartBits Hardware Handling/Cleaning Practices
SmartBits cards and module contain electronic components that are sensitive to
Electrostatic Discharge (ESD) damage. To prevent premature component failure or latent
product damage, it is crucial that you handle this equipment following industry standard
ESD handling practices. Refer to Appendix E, “ESD Requirements,” for further
information.
Some SmartBits equipment contains fiber optic components that are very susceptible to
contamination from particles of dirt and dust. Product performance may be damaged if
these components are not kept clean. Refer to Appendix F, “Fiber Optic Cleaning
Guidelines,” for proper cleaning practices for these components.
SmartBits 600x/6000x Installation Guide
| 5
About This Guide
How to Contact Us
How to Contact Us
Technical support is available Monday through Friday between 06:00 and 18:00 Pacific
Time.
To obtain technical support for any product, please contact our Technical Support
Department using any of the following methods:
U.S.
E-mail: [email protected]
Web: http://support.spirentcom.com
Toll Free: 1-800-SPIRENT (1-800-774-7368)
Phone: + 1 818-676-2616
Fax: +1 818-880-9154
Europe
E-mail: [email protected]
Web: http://support.spirentcom.com
Phone: +33 (0) 1 61 37 22 70
Fax: +33 (0) 1 61 37 22 51
In addition, the latest versions of user manuals, application notes, and software and
firmware updates are available on the Spirent Communications Customer Service Center
website at http://support.spirentcom.com.
Company Address
Spirent Communications, Inc.
26750 Agoura Road
Calabasas, CA 91302
USA
6
| SmartBits 600x/6000x Installation Guide
Chapter 1
About SmartBits Chassis
In this chapter . . .
This chapter contains the following topics:
•
Introduction . . . . 8
•
SmartBits Overview . . . . 8
•
SmartBits Chassis Models . . . . 9
•
SmartBits 600x/6000x Chassis Features . . . . 9
•
SmartBits 600 Chassis . . . . 11
•
SmartBits 600B Chassis . . . . 11
•
SmartBits 6000B Chassis . . . . 13
•
SmartBits 6000C Chassis . . . . 14
•
SmartBits Applications . . . . 17
•
Supported Modules . . . . 18
•
Specifications . . . . 21
•
Safety Requirements . . . . 23
SmartBits 600x/6000x Installation Guide
| 7
Chapter 1: About SmartBits Chassis
Introduction
Introduction
Networks and the communications industry are growing in size and complexity. Switches
and routers contain faster ports and in response to this growth, networks have a greater
number of nodes, with each node carrying more flows of traffic. In response to this
growth, test system capabilities must also grow. Testing under real-world conditions can
involve generating more than 64,000 flows of traffic. The SmartBits600x/6000x chassis
are the next generation of test platforms that meet these growing requirements.
The SmartBits 600x/6000x chassis are high-density network performance analysis test
systems. All chassis support most of the same features and functionalities, and use
SmartBits modules to support a variety of port types.
This installation guide explains how to install and set up the SmartBits 600x/6000x chassis
after a brief introduction to the systems’ features. For more information about the
hardware descriptions of the modules used in these chassis, refer to the SmartBits System
Reference manual.
For installation details and a description of each software application, see the specific user
guide and online help file for each application.
SmartBits Overview
SmartBits 600x/6000x chassis multiport performance analysis systems allow you to test,
simulate, analyze, troubleshoot, quality assure, develop, and certify the following
protocols:
• 10/100/1000 Mbps Ethernet
•
•
•
•
10 Gigabit Ethernet
OC-3c, OC-12c, OC-48c, and OC-192c Packet over SONET (POS)
OC-3c, OC-12c ATM
Fibre Channel
The following network types are supported:
• Switching hubs, routers, repeaters, and bridges
•
•
•
8
Live networks
Network interface cards (NICs)
VLANs and ELANs
| SmartBits 600x/6000x Installation Guide
Chapter 1: About SmartBits Chassis
SmartBits Chassis Models
SmartBits Chassis Models
This installation guide describes the following four chassis models:
•
•
•
•
SmartBits 600 chassis with 2 slots, up to 16 ports.
SmartBits 600B chassis with 2 slots, up to 16 ports.
SmartBits 6000B chassis high-density model, 12 slots, up to 96 ports
SmartBits 6000C chassis high-density model, 12 slots, up to 96 ports.
Additional SmartBits chassis models that are also available are listed below. Refer to the
SmartBits 200/2000 Installation Guide for the description of these chassis.
•
•
•
SmartBits 10 chassis, 20 slots, up to 80 ports (used as a slave chassis only).
SmartBits 200 chassis, 4 slots, up to 16 ports.
SmartBits 2000 chassis, 20 slots, up to 80 ports.
SmartBits 600x/6000x Chassis Features
The SmartBits 600x/6000x chassis provide the following features and capabilities:
•
A default IP Address, Gateway address, and Netmask address allow for quick and easy
connection of your chassis without the need for a serial cable connection.
•
•
Serial console interface for easy configuration.
•
•
Telnet support for remote access to all console functions.
The 10/100 Mbps Ethernet port allows you to test a remote device by connecting it to
the SmartBits chassis over a local Ethernet network.
The Ethernet or Telnet port provides a link to your PC or UNIX workstation. The
Ethernet port decreases the time it takes to update SmartBits chassis and module
firmware, or to download configurations or upload data.
•
High resolution and accuracy with internal clock.
This clock is used for latency and timestamps. The clock’s oscillator is specified for
an error rating of less than 2 parts per million (ppm). The high level of accuracy provides long-term measurements, which are especially important when using higher
speed interfaces such as Gigabit Ethernet.
•
Higher performance levels than the SmartBits 2000.
•
•
Faster downloads of test configurations.
Faster statistics data and captured traffic transfers to a PC or UNIX workstation.
SmartBits 600x/6000x Installation Guide
| 9
Chapter 1: About SmartBits Chassis
SmartBits 600x/6000x Chassis Features
•
External Time Reference (ETR) support.
External Time References can be used to provide the 10 mHZ and 1 PPS clocks. This
is typically used to synchronize multiple chassis that are separated by a greater distance than allowed when using an interchassis synchronization cable. The most common usage of these interfaces is for connecting to attached GPS or CDMA time
reference receivers.
•
External clock support.
You can use a standard 10 MHz external clock. Once the SmartBits detects the external clock through the BNC connector, it automatically switches to the external clock
for timestamping of latency measurement tests.
The external clock allows you to:
• Synchronize measurements between different systems.
• Use the high-accuracy reference clock often available in large network control
centers.
•
Clock Synchronization on Multiple Connected SmartBits.
You can synchronize different systems to one clock by connecting multiple chassis as
described in Appendix A, “Multiple Chassis Local Connect.”
•
Reset button.
The Reset button is located above the LEDs on the front of the SmartBits 600x chassis
(see Figure 1-3 on page 11) and the SmartBits 6000B chassis (see Figure 1-4 on
page 13). It is the uppermost button on the SmartBits 600x/6000B chassis.
When pushed in, such as with a paper clip or other small object, the Reset button
resets the chassis hardware and firmware and functions as a warm boot. The Reset
Button on the SmartBits 600x/6000B chassis is recessed and requires the use of a
small object (such as a paper clip or other sharp object).
Note: For information concerning the SmartBits 6000C chassis reset button and other
improvements, see “SmartBits 6000C Chassis Enhancements” on page 16.
10 |
SmartBits 600x/6000x Installation Guide
Chapter 1: About SmartBits Chassis
SmartBits 600 Chassis
SmartBits 600 Chassis
The SmartBits 600 chassis (see Figure 1-1) is a portable chassis that has been designed to
combine high port density, portability, compact design, and high-performance in a single
system. It is compatible with the SmartBits 600B/6000B/6000C chassis and can be
synchronized to other chassis in an expansion connection to provide higher port density.
Figure 1-1. SmartBits 600 Chassis
SmartBits 600 Chassis with a SmartMetrics/TeraMetrics XD Module
When using SmartMetrics/TeraMetrics XD modules in a SmartBits 600 chassis, it is
important you understand the restrictions listed in Table 1-1 on page 12. An example of a
SmartBits 600 housing a 4-port SmartMetrics/TeraMetrics XD module is shown in
Figure 1-2.
Top slot must be empty - blank panel
4-port SmartMetrics/TeraMetrics XD module
Figure 1-2. SmartBits 600 Chassis Utilizing a 4-port SmartMetrics/TeraMetrics XD
Module
Table 1-1 on page 12 describes the maximum number of ports and modules that can be
used per chassis.
SmartBits 600B Chassis
The SmartBits 600B chassis (see Figure 1-3) is a portable ultra high-density network
performance analysis chassis that has been designed to combine high port density,
portability, compact design, and high-performance in a single system. It is compatible
with the SmartBits 600/6000B/6000C chassis and can be synchronized with other chassis
in an expansion connection to provide higher port density.
Figure 1-3. SmartBits 600B Chassis Utilizing Two 4-port SmartMetrics/TeraMetrics XD
Modules
SmartBits 600x/6000x Installation Guide
| 11
Chapter 1: About SmartBits Chassis
SmartBits 600B Chassis
Table 1-1 describes the maximum number of ports and modules that can be used per
chassis.
Table 1-1.
Maximum Number of Ports and Modules per SmartBits 600/600B Chassis
SmartBits 6001
Type of Module
SmartBits 600B2
Maximum
Ports per
Module
Maximum
Modules
per
Chassis
Maximum
Total
Ports per
Chassis
Maximum
Ports per
Module
Maximum
Modules
per
Chassis
Maximum
Total
Ports per
Chassis
8
2
16
8
2
16
4
2
8
4
2
8
10/100 Mbps Ethernet
non-XD modules only
Gigabit Ethernet
1000 Mbps Ethernet
(non-XD modules only)
10/100/1000 Mbps and Gigabit Ethernet Fiber SmartMetrics/TeraMetrics XD
LAN-3306A, LAN-3324A,
LAN-3325A
4
11
4
4
2
8
LAN-3320A, LAN-3321A
2
23
4
2
2
4
LAN-3327A
1
24
2
1
2
2
LAN-3710AL/AE
1
1
1
1
1
1
XLW-3720A/XLW-3721A
1
1
1
1
1
1
1
2
2
10 Gigabit Ethernet
XFP-3730A/XFP-3731A
Not Supported
Fibre Channel
1 and 2Gigabit Fibre
Channel (FBC-3601A/
FBC-3602A)
2
2
4
2
2
4
OC-3c/OC-12c POS
2
2
4
2
2
4
OC-48c POS
1
2
2
1
2
2
OC-192c POS
1
1
1
1
1
1
POS Modules
12 |
SmartBits 600x/6000x Installation Guide
Chapter 1: About SmartBits Chassis
SmartBits 6000B Chassis
1 You must leave an empty slot above any 4-port SmartMetrics/TeraMetrics XD module. Cover the empty
slot with a blank panel. When using a 4-port XD module, a second module is not allowed.
2 Supports any combination of SmartMetrics/TeraMetrics XD modules or other SmartBits compatible
modules.
3 When installing a LAN-3321A with an XD Security Module in a SmartBits chassis, you must leave an
empty slot above each module.
4 The SmartBits 600 chassis supports only one LAN-3327A with an XD Security Module. The other module slot can contain either a LAN-3321A or a LAN-3327A without an XD Security Module.
SmartBits 6000B Chassis
Designed to meet ever-increasing port density, the SmartBits 6000B chassis (Figure 1-4)
delivers high port density and functionality at the lowest cost per port. A single SmartBits
6000B chassis holds up to 12 modules that can support up to 96 10/100 Ethernet ports, 24
Gigabit Ethernet ports, 6 10 Gbps Ethernet ports, 24 POS ports, 12 Fibre Channel ports, or
a combination of these port types. SmartBits 6000B chassis can be daisy-chained in an
expansion connection to achieve higher port density.
Figure 1-4. SmartBits 6000B Chassis
Table 1-2 on page 14 describes the maximum number of ports and modules that can be
used per chassis.
SmartBits 600x/6000x Installation Guide
| 13
Chapter 1: About SmartBits Chassis
SmartBits 6000C Chassis
SmartBits 6000C Chassis
The SmartBits 6000C chassis (Figure 1-5) is an ultra high-density network performance
analysis test system with enhanced cooling and power capabilities that support full loads
(up to 96 ports) of Spirent’s powerful SmartBits modules. The SmartBits 6000C chassis
performs the same functions, uses the same modules, and uses the same applications as the
SmartBits 600x/6000B chassis.
Figure 1-5. SmartBits 6000C Chassis
Table 1-2 on page 14 describes the maximum number of ports and modules that can be
used per chassis.
Table 1-2.
Maximum Number of Ports and Modules per SmartBits 6000B/6000C Chassis
Type of Module
SmartBits 6000B1,2
SmartBits 6000C3
Maximum
Ports per
Module
Maximum
Modules
per
Chassis
Maximum
Total
Ports per
Chassis
Maximum
Ports per
Module
Maximum
Modules
per
Chassis
Maximum
Total
Ports per
Chassis
8
12
96
8
12
96
4
12
48
4
12
48
10/100 Mbps Ethernet
non-XD modules only
Gigabit Ethernet
1000 Mbps Ethernet
(non-XD modules only)
10/100/1000 Mbps and Gigabit Ethernet Fiber SmartMetrics/TeraMetrics XD
LAN-3306A, LAN-3324A,
LAN-3325A
4
64
24
4
12
48
LAN-3320A, LAN-3321A
2
125
24
2
12
24
LAN-3327A
1
12
12
1
12
12
14 |
SmartBits 600x/6000x Installation Guide
Chapter 1: About SmartBits Chassis
SmartBits 6000C Chassis
Table 1-2.
Maximum Number of Ports and Modules per SmartBits 6000B/6000C Chassis (continued)
SmartBits 6000B1,2
SmartBits 6000C3
Maximum
Ports per
Module
Maximum
Modules
per
Chassis
Maximum
Total
Ports per
Chassis
Maximum
Ports per
Module
Maximum
Modules
per
Chassis
Maximum
Total
Ports per
Chassis
LAN-3710AL/AE
1
6
6
1
6
6
XLW-3720A/XLW-3721A
1
6
6
1
6
6
1
12
12
Type of Module
10 Gigabit Ethernet
XFP-3730A/XFP-3731A
Not Supported
Fibre Channel
1 and 2 Gigabit Fibre
Channel (FBC-3601A/
FBC-3602A)
2
12
24
2
12
24
OC-3c/OC-12c POS
2
12
24
2
12
24
OC-48c POS
1
12
12
1
12
12
OC-192c POS
1
6
6
1
6
6
POS Modules
1 You must leave an empty slot above any 4-port SmartMetrics/TeraMetrics XD module. Cover the empty
slot with a blank panel. Other available chassis slots can be filled with any 1- or 2-port SmartMetrics/TeraMetrics XD modules, or any other SmartBits 600x/6000x compatible modules.
2 It is recommended that all SmartBits 6000B chassis received an enclosure upgrade prior to operating
SmartMetrics/TeraMetrics XD modules. Contact your Spirent Communications sales representative.
3 Supports any combination of SmartMetrics/TeraMetrics XD modules or other SmartBits compatible modules.
4 Due to cooling requirements, you must leave an empty slot above each of these XD modules if used with
this SmartBits chassis. Be sure to cover the empty slots with blank panels.
5 When installing a LAN-3321A with an XD Security Module in a SmartBits 6000B chassis, you must
leave an empty slot above each module.
SmartBits 600x/6000x Installation Guide
| 15
Chapter 1: About SmartBits Chassis
SmartBits 6000C Chassis
SmartBits 6000B Cover Replacement
The SmartBits 6000B chassis offers a new cover replacement (P/N 300-4181-011) that
maximizes optimal ventilation, thereby allowing more flexibility in the use of SmartBits
modules.
This cover removes the previous restriction of not being able to use more than four POS3518As/AR or POS-3519As/AR modules per chassis. This cover also optimizes the chassis
cooling when the chassis is populated with XLW-3720A and XLW-3721A XENPAK
modules.
It is also recommended that all SmartBits 6000B chassis receive a cover replacement
upgrade prior to operating SmartMetrics/TeraMetrics XD modules.
To purchase a new cover, contact your Spirent Communications Sales Representative.
SmartBits 6000C Chassis Enhancements
The SmartBits 6000C chassis (Figure 1-6) is like the SmartBits 6000B but with the
following enhancements:
•
Front panel Power button. This allows safe removal and insertion of SmartBits
modules without having to use the master (AC) power switch on the rear of the
chassis.
•
Over-temperature thermal sense circuitry and front panel (TEMP) indicator. (See
“Over-temperature Sequence Condition (SmartBits 6000C)” on page 72.)
•
New SmartBits 6000C front panel Power and Reset buttons, and LEDs. The LEDs are
described in Table 3-1 on page 71.
•
Rear panel power switch. Contains a circuit breaker eliminating the use of fuses (see
“SmartBits 6000C Circuit Breaker” on page 83.
•
•
Stronger power supply – maximum AC power consumption: 1600W.
Increased cooling.
Figure 1-6. Front Panel on a SmartBits 6000C Chassis
16 |
SmartBits 600x/6000x Installation Guide
Chapter 1: About SmartBits Chassis
SmartBits Applications
SmartBits Applications
The following SmartBits software applications are available for use on the SmartBits
600x/6000x chassis:
•
•
•
•
•
•
•
•
•
•
•
•
•
•
•
•
•
•
•
•
•
AST II (Advanced Switch Tests)
Avalanche SmartBits
Block Storage Tester
Fabric Services Tester
SAN Routing Tester
SmartApplications
SmartBits Automation
SmartCableModem Test
SmartFabric
SmartFlow
SmartLibrary
SmartMulticastIP
SmartTCP
SmartVoIPQoS
SmartWindow
SmartxDSL
Spirent Connect
TeraRouting Tester
TeraVPN Tester
Turn Up Connect
WebSuite
Note: For the latest software applications, release notes, online help, and updates to
manuals, check the Spirent Communications website at http://
support.spirentcom.com.
SmartBits 600x/6000x Installation Guide
| 17
Chapter 1: About SmartBits Chassis
Supported Modules
Supported Modules
Table 1-3 is a list of SmartBits 600x/6000x chassis supported modules and their connector
types. For a complete description of each module, plus cabling information, refer to the
appropriate module chapter in the SmartBits System Reference manual.
Table 1-3.
SmartBits 600x/6000x Supported Modules
Module
Description
Connector
ATM-3451A
ATM OC-3c (STM-1c), 2-port, multi-mode, 1300nm, TeraMetrics module
SC Fiber
ATM-3451As
ATM OC-3c (STM-1c), 2-port, single mode, 1310nm, TeraMetrics
module
SC Fiber
ATM-3453A
ATM OC-3c/OC-12c (STM-1c/STM-4c), 2-port, multi-mode, 1300nm,
TeraMetrics module
SC Fiber
ATM-3453As
ATM OC-3c/OC-12c (STM-1c/STM-4c), 2-port, single mode, 1310nm,
TeraMetrics module
SC Fiber
FBC-3601A
Fibre Channel 1G, 2-port, SmartMetrics module
GBIC
FBC-3602A
Fibre Channel 1G and 2G, 2-port, SmartMetrics module
GBIC
LAN-3100A
10/100Base-TX Ethernet, 8-port module
RJ-45
LAN-3101B
10/100Base-TX Ethernet, 6-port, SmartMetrics module
RJ-45
LAN-3102A
10/100Base-TX Ethernet, 2-port, SmartMetrics module
RJ-45
LAN-3111A
100Base-FX Ethernet, 6-port, multi-mode, 1300nm, SmartMetrics
module
LC Connector
LAN-3111As
100Base-FX Ethernet, 6-port, single mode, 1310nm, SmartMetrics
module
LC Connector
LAN-3200A
1000Base-SX Ethernet, 2-port, multi-mode, 850nm module
SC Fiber
LAN-3200As
1000Base-LX Ethernet, 2-port, single mode, 1310nm module
SC Fiber
LAN-3201B
1000Base Ethernet, GBIC, 1-port, SmartMetrics module
GBIC
LAN-3201C
1000Base Ethernet, GBIC, 1-port, SmartMetrics module
GBIC
LAN-3300A
10/100/1000Base-T Ethernet, Copper, 2-port, SmartMetrics module
RJ-45
LAN-3301A
10/100/1000Base-T Ethernet, Copper, 2-port, TeraMetrics module
RJ-45
LAN-3302A
10/100Base-T Ethernet, Copper, 2-port, TeraMetrics module
RJ-45
LAN-3306A
10/100Base-T Ethernet, Copper, 4-port, TeraMetrics XD module
RJ-45
LAN-3310A
1000Base-X Ethernet, GBIC, 2-port, SmartMetrics module
GBIC
18 |
SmartBits 600x/6000x Installation Guide
Chapter 1: About SmartBits Chassis
Supported Modules
Table 1-3.
SmartBits 600x/6000x Supported Modules (continued)
Module
Description
Connector
LAN-3311A
1000Base Ethernet, GBIC, 2-port, TeraMetrics module
GBIC
LAN-3320A
10/100/1000 Mbps and Gigabit Ethernet Fiber, 2-port, SmartMetrics XD
module
RJ-45/SFP MSA
Dual Media
LAN-3321A
10/100/1000 Mbps and Gigabit Ethernet Fiber, 2-port, TeraMetrics XD
module
RJ-45/SFP MSA
Dual Media
LAN-3324A
10/100/1000 Mbps and Gigabit Ethernet Fiber, 4-port, SmartMetrics XD
module
RJ-45/SFP MSA
Dual Media
LAN-3325A
10/100/1000 Mbps and Gigabit Ethernet Fiber, 4-port, TeraMetrics XD
module
RJ-45/SFP MSA
Dual Media
LAN-3327A
10/100/1000 Mbps and Gigabit Ethernet Fiber, 1-port, TeraMetrics XD
module
RJ-45/SFP MSA
Dual Media
LAN-3710AL
10GBase-LR Ethernet, 1-port, 2-slot, single mode, 1310nm module
SC Fiber
LAN-3710AE
10GBase-ER Ethernet, 1-port, 2-slot, single mode, 1550nm module
SC Fiber
POS-3500B
POS OC-3c/OC-12c (STM-1c/STM-4c), 1-port, multi-mode, 1300nm,
SmartMetrics module
SC Fiber
POS-3500Bs
POS OC-3c/OC-12c (STM-1c/STM-4c), 1-port, single mode, 1310nm,
SmartMetrics module
SC Fiber
POS-3504As
POS OC-48c (STM-16c), 1-port, single mode, 1310nm, SmartMetrics
module
SC Fiber
POS-3504AR
POS OC-48c (STM-16c), 1-port, single mode, 1550nm, SmartMetrics
module
SC Fiber
POS-3505As
POS OC-48c (STM-16c), 1-port, single mode, 1310nm, TeraMetrics
module
SC Fiber
POS-3505AR
POS OC-48c (STM-16c), 1-port, single mode, 1550nm, TeraMetrics
module
SC Fiber
POS-3510A
POS OC-3c/OC-12c (STM-1c/STM-4c), 2-port, multi-mode, 1300nm,
SmartMetrics module
SC Fiber
POS-3510As
POS OC-3c/OC-12c (STM-1c/STM-4c), 2-port, single mode, 1310nm,
SmartMetrics module
SC Fiber
POS-3511A
POS OC-3c/OC-12c (STM-1c/STM-4c), 2-port, multi-mode, 1300nm,
TeraMetrics module
SC Fiber
POS-3511As
POS OC-3c/OC-12c (STM-1c/STM-4c), 2-port, single mode, 1310nm,
TeraMetrics module
SC Fiber
SmartBits 600x/6000x Installation Guide
| 19
Chapter 1: About SmartBits Chassis
Supported Modules
Table 1-3.
SmartBits 600x/6000x Supported Modules (continued)
Module
Description
Connector
POS-3518As
POS OC-192c (STM-64c), 1-port, 2-slot, single mode, 1310nm,
SmartMetrics module
SC Fiber
POS-3518AR
POS OC-192c (STM-64c), 1-port, 2-slot, single mode, 1550nm,
SmartMetrics module
SC Fiber
POS-3519As
POS OC-192c (STM-64c), 1-port, 2-slot, single mode, 1310nm,
TeraMetrics module
SC Fiber
POS-3519AR
POS OC-192c (STM-64c), 1-port, 2-slot, single mode, 1550nm,
TeraMetrics module
SC Fiber
XFP-3730A
10GBase Ethernet, XFP MSA, 1-port, 1-slot, SmartMetrics module
SC Fiber
XFP-3731A
10GBase Ethernet, XFP MSA, 1-port, 1-slot, TeraMetrics module
SC Fiber
XLW-3720A
10Gbps Ethernet, XENPAK MSA, 1-port, 2-slot, SmartMetrics module
XENPAK MSA
SC
XLW-3721A
10Gbps Ethernet, XENPAK MSA, 1-port, 2-slot, TeraMetrics module
XENPAK MSA
SC
20 |
SmartBits 600x/6000x Installation Guide
Chapter 1: About SmartBits Chassis
Specifications
Specifications
Specifications for the SmartBits 600x/6000x chassis are the same except as noted in
Table 1-4.
Table 1-4.
SmartBits 600x/6000x Specifications
Category
Description
Dimensions
SmartBits 600x chassis:
Height: 3.26 in. (8.280 cm) without legs
Height: 3.42 in. (8.687 cm) with legs
Width: 12.25 in. (31.115 cm)
Depth: 12.56 in. (31.910 cm)
Weight: 5.25 lb (2.4 kg) fully loaded
Shipping weight, approximately 7 lb. 12.7 oz. (3.535 kg)
with two blank panels
Shipping weight, approximately 7 lb. 9 oz. (3.430 kg)
without blank panels
SmartBits 6000B chassis:
Height: 8.5 in. (21.59 cm)
Width: 19 in. (48.26 cm)
Depth: 16.5 in. (41.91 cm)
Weight: 45 lb (20.41 kg) fully loaded
Shipping weight, approximately 48 lb (21.77 kg)
SmartBits 6000C chassis:
Height: 8.5 in. (21.59 cm)
Width: 19 in. (48.26 cm)
Depth: 19.75 in. (50.16 cm)
Weight: 54 lb (24.49 kg) fully loaded
Shipping weight, approximately 58 lb (26.31 kg)
Input Power
SmartBits 600x: 2 Amp, 250V AC, 50-60 Hz
SmartBits 6000B: 10 Amp, 250V AC, 50-60 Hz
SmartBits 6000C: 15 Amp, 250V AC, 50-60 Hz circuit breaker
Controllable over the Internet or from a PC with Windows 2000/
NT/XP
Number of Slots
SmartBits 600x – 2
SmartBits 6000B/6000C – 12
Max number of Ports
SmartBits 600x – 16
SmartBits 6000x – 96
SmartBits 600x/6000x Installation Guide
| 21
Chapter 1: About SmartBits Chassis
Specifications
Table 1-4.
SmartBits 600x/6000x Specifications (continued)
Category
Description
Front Panel LEDs
SmartBits 600x – POWER, FAN, LINK, STATUS
SmartBits 6000B – POWER, FAN, LINK, STATUS
SmartBits 6000C – POWER and RESET switches;
TEMP, FAN, LINK, STATUS, POWER indicators
Back Panel LEDs
SmartBits 600x/6000x – ACT/COL (Activity/Collision), LINK/
ERR (Link/Error), HDX/FDX (Full/Half Duplex), and 10/100M
(10/100 Base Ethernet)
Connectors
RS-232 for workstation connection
RJ-45 10/100Base-T connector for Ethernet connection
RJ-45 Expansion In/Out connectors for multiple chassis
connection
Connectors to attach to an optional GPS/CDMA receiver
Layout Requirements
Must have unimpeded airflow into the fans at the side of the
chassis
Must meet EMI guidelines (see “Safety Requirements” on page
23)
Must be positioned to meet ESD requirements (see Appendix E,
“ESD Requirements”)
See Appendix A, “Multiple Chassis Local Connect” for
connection and layout information.
22 |
GPS/CDMA Option
Available Cabling Interface Kits – ACC-1020, ACC-1040,
ACC-1060
NTP Operation
Available
Operating temperature
59-104°F (15-40°C). Must have unimpeded airflow into the fans
at the side of the chassis.
Operating Humidity
20 to 80% relative humidity, non-condensing.
Applications Supported
See “SmartBits Applications” on page 17
Modules Supported
See “Supported Modules” on page 18
SmartBits 600x/6000x Installation Guide
Chapter 1: About SmartBits Chassis
Safety Requirements
Safety Requirements
Emissions
•
•
FCC Part 15 Compliant
EMI Class A Standard
Safety
•
•
CSA Listed (CSA 22.2 No. 22)
TUV (IEC 950) approved
The SmartBits 600x/6000x chassis are marked in conformity with the following European
Commission Directives:
•
•
•
The Low Voltage Directive (72/23/EEC)
The Electromagnetic Compatibility Directive (89/336/EEC)
The CE Marking Directive (93/68/EEC)
FCC PART 15 Statement
This equipment has been tested and found to comply with the limits for a CE Mark class A
digital devices, pursuant to part 15 of the FCC Rules. These limits are designed to provide
reasonable protection against harmful interference in a residential installation.
This equipment generates, uses, and can radiate radio frequency energy and if not installed
and used in accordance with the instructions, may cause harmful interference to radio
communications. However, there is no guarantee that interference will not occur in a
particular installation.
If this equipment does cause harmful interference to radio or television reception, which
can be determined by turning the equipment off and on, the user is encouraged to try to
correct the interference by one or more of the following measures:
•
•
•
Re-orient or re-locate the receiving antenna.
•
Consult the dealer or an experienced radio/TV technician for help.
Increase the separation between the equipment and receiver.
Connect the equipment into an outlet on a circuit different from that to which the
receiver is connected.
SmartBits 600x/6000x Installation Guide
| 23
Chapter 1: About SmartBits Chassis
Safety Requirements
SmartBits Compliance with CE Requirements
All SmartBits products, including chassis and SmartCards/modules, are designed and
manufactured in compliance with CE directives on EMI and EMC Class A standards, as
indicated by the CE Mark on the products. The CE Mark and declaration of conformity
are made by submitting each product to an independent, EU-certified test lab. In this lab,
each SmartBits card/module is tested individually while installed in the chassis that
supports it. All certifications (including details of test configuration with photographs) are
available to any customer who requires a copy.
The CE mark establishes a generic compatibility among different equipment in terms of
EMI emissions. The CE directive (as with the equivalent FCC Part 15 directives) is an
established standard in terms of laboratory support, available tools, and resources. It is
currently the most commonly recognized and accepted engineering practice in designing
electronic equipment. Spirent Communications designs and produces its products in
conformance with CE directives in order to quantify performance measurements, with the
ultimate goal of designing the best possible products in every respect.
To obtain the CE Mark declaration of conformity, each SmartBits product must pass the
following standard tests:
•
•
•
•
•
•
•
EN 50081-1 Electro-Magnetic Emission Standard
EN 50082-1 Electro-Magnetic Immunity Standard
EN-55022 Radiated and Conducted Emissions Standard
IEC 801-2 Electro-Static Discharge Standard
IEC 801-3 Radiated Immunity Standard
IEC 801-4 Electrical Fast Transients/Burst Standard
EN 61000 Power Analysis Harmonics and Flicker Standard
Guidelines on Equipment Use
In general, any equipment that is in compliance with the tests listed above will work well
in a standard industrial environment. Such equipment will present minimum interference
and similarly will experience minimum interference from other nearby equipment. Having
passed the above tests, however, does not guarantee that the equipment will work in a
“strong” EMI environment. Furthermore, it is difficult to specify what constitutes a
“strong” EMI environment in the absence of any measurement standard.
With respect to SmartBits systems and cards, a typically equipped operating lab should
cause no interference provided that all other equipment is in minimum compliance with
CE Mark requirements.
24 |
SmartBits 600x/6000x Installation Guide
Chapter 1: About SmartBits Chassis
Safety Requirements
To ensure that SmartBits systems perform well in your environment, observe the
following guidelines when installing and using SmartBits in your lab:
•
All cables must be terminated, both at the SmartBits and at the DUT. Do not leave an
unused port with a cable plugged in and dangling.
•
Use only certified cable in any SmartBits Ethernet port (both control port and test
ports).
•
•
Use only yellow optical cable with SmartBits ports that support single-mode optics.
•
All SmartBits cards and modules should be fully inserted into the chassis, and all
thumb screws should be tightened.
•
In a crowded engineering prototype lab, be careful of the layout of test cables used to
connect the SmartBits and devices under test. Avoid passing test cables over or under
other DUT or live equipment. If test cables are very long, avoid looping cables around
live equipment.
Use only orange or gray optical cable with SmartBits ports that support multi-mode
optics.
Important: Use the ferrite clamp supplied with each SmartBits chassis on one end of the
Ethernet cable connecting the SmartBits to the LAN or to the PC.
•
Use common sense. For example, a test or control cable laid over the AC power
supply of an open DUT will most likely produce faulty measurement results.
SmartBits 600x/6000x Installation Guide
| 25
26 |
SmartBits 600x/6000x Installation Guide
Chapter 2
Installation and Setup
In this chapter . . .
This chapter contains the following topics:
•
Summary of Installation Procedures . . . . 28
•
Procedure 1: Check the System Requirements . . . . 29
•
Procedure 2: Check the Chassis and Package . . . . 30
•
Procedure 3: Install SmartBits Applications . . . . 32
•
Procedure 4: Connect SmartBits to PC, Power, and LAN . . . . 34
•
Procedure 5: Install the Ferrite Block . . . . 36
•
Procedure 6: Connect the SmartBits Power Cord . . . . 38
•
Procedure 7: Start SmartWindow . . . . 38
•
Procedure 8: Set the IP Address . . . . 41
•
Procedure 9: Confirm the Ethernet Link . . . . 51
•
Procedure 10: Update Firmware Version (optional) . . . . 56
•
Procedure 11: Connect SmartBits to an Application . . . . 65
•
Procedure 12: Connect to the DUT and Check Cabling . . . . 67
SmartBits 600x/6000x Installation Guide
| 27
Chapter 2: Installation and Setup
Summary of Installation Procedures
Summary of Installation Procedures
This chapter explains how to install your SmartBits 600x/6000x chassis. A description of the
following procedures is provided:
Check SmartBits Requirements and Package Contents
1
Check the system requirements (see page 29).
2
Check the SmartBits chassis and package (see page 30).
Install Application and Review Documentation
3
Install the SmartBits application software onto your PC. Print/review important Release
Notes for the chassis and module firmware, and for the applications. Print user
documentation now or later, as needed (see page 32).
Set up SmartBits
4
Connect the SmartBits to a power outlet, to a PC for initial IP address configuration and
software management, and to your LAN (see page 34).
5
Install the ferrite block onto the Ethernet cable (see page 36).
6
Start SmartWindow (see page 38).
7
Set up the SmartBits IP address (see page 41).
8
Assign the Netmask and Gateway values for the SmartBits chassis using HyperTerminal
or Telnet. (See Appendix D, “Serial Port and Telnet Commands.”)
9
Confirm the Ethernet link: Ping the Ethernet link between the PC and SmartBits; if
unsuccessful, check the TCP/IP stack on the PC and add the appropriate IP address (see
page 51).
10 Update module or chassis firmware if needed (optional) (see page 56).
Connect SmartBits to an Application
11 Configure the SmartWindow-to-SmartBits Ethernet connection (see page 65).
Connect SmartBits to the DUT
12 Connect SmartBits to the device(s) under test, check cabling, and ensure that EMI
guidelines are met. Then use SmartWindow, SmartLibrary, or any other SmartBits test
software to access and use the capabilities of the SmartBits system (see page 67).
For more detailed explanations of these procedures, refer to the sections that follow.
28 |
SmartBits 600x/6000x Installation Guide
Chapter 2: Installation and Setup
Procedure 1: Check the System Requirements
Procedure 1: Check the System Requirements
You must have the following hardware and software in order to use a SmartBits 600x/
6000x chassis. Review these requirements carefully to ensure successful installation.
PC/UNIX Workstation Requirements
•
An IBM compatible PC (400 MHz Pentium III recommended) or a UNIX workstation
with the following items:
• One 10/100Base-T UTP cable and a 10 Mbps or 10/100 Mbps Ethernet NIC card
installed in the PC.
• Minimum of 128 MB RAM; 256 MB RAM is recommended.
• Minimum 40 MB space on the hard drive; a 4 GB (or larger) hard drive is
recommended.
• A 3.5 in. (8.9 cm.) high density floppy disk drive, a mouse, and a SVGA color
monitor or equivalent.
• Serial port capable of running at least 38,400 baud.
• CD-ROM drive
•
•
•
•
•
•
Microsoft Windows 2000 Pro SP4, NT SP6a, XP SP1a (for PCs)
•
Acrobat Reader 5.0 with extended Search functionality for UNIX. Required by UNIX
users who want to view and search SmartBits documentation, including the
SmartLibrary Documentation Catalog. (Versions of Acrobat Reader later than 5.0 do
not currently support the extended Search function on UNIX operating systems.)
When using Acrobat Reader 5.0, Linux and Solaris users may experience limitations
in the extended Search capabilities used to navigate the SmartLibrary Documentation
Catalog. Please refer to the SmartLibrary Release Notes for more information.
Solaris OS 7.0 (aka 2.7) and 8.0 (aka 2.8)
Linux OS Red Hat 7.3 and Red Hat EL 3
TCL 8.3.5 and 8.4.5 support
Microsoft Terminal or HyperTerminal or another communications application.
Acrobat Reader 5.0 or later with extended Search functionality for Windows.
Required by Windows users who want to view and search SmartBits documentation,
including the SmartLibrary Documentation Catalog.
SmartBits 600x/6000x Installation Guide
| 29
Chapter 2: Installation and Setup
Procedure 2: Check the Chassis and Package
SmartBits Minimum Requirements
•
A SmartBits 600x/6000x chassis (with one or more ordered modules, card panels, and
firmware installed).
•
•
Chassis firmware version 2.60 or higher.
SmartWindow, SmartLibrary, or SmartApplications (supplied and to be installed on
the PC that is connected to the SmartBits chassis). Use these applications to configure
SmartBits to test your device.
Note: SmartBits systems can be controlled by using the various SmartBits Windowsbased applications (including SmartWindow and SmartApplications) or by using
SmartBits applications that support both Windows and UNIX (including SmartLibrary).
For details regarding each of these application's specific PC/workstation memory and
operating system requirements, refer to the Release Notes shipped with each software
product.
Procedure 2: Check the Chassis and Package
Review the contents of the SmartBits package and follow these important guidelines if
you are rearranging any modules in the chassis.
Checking the SmartBits Package
The following standard items are shipped with each SmartBits chassis. Check your
package to ensure you have received all of the items listed here:
•
A SmartBits 600x/6000x chassis (with two or more ordered modules, with card panels
and firmware installed).
•
Cable Kit 620-5000-003, which includes:
•
•
•
•
•
•
•
30 |
One black power cord, either domestic or European.
One white 10 ft. (3.048 m.) crossover Ethernet LAN cable (RJ-45); used to
connect the SmartBits chassis directly to a PC.
One blue 10 ft. (3.048 m.) straight-through Ethernet LAN cable (RJ-45); used to
connect SmartBits chassis to a LAN.
One purple 3 ft. (.9144 m.) straight-through Ethernet LAN cable (RJ-45); used to
connect one SmartBits chassis to another SmartBits chassis.
One DB9-to-DB9 cable; used to connect the SmartBits auxiliary serial port to a
PC serial port when setting the first-time IP address of the SmartBits chassis.
Two DB9-to-DB25 adapters; if using the optional serial port cable connection.
One Ferrite block; connects onto the Ethernet cable that attaches the SmartBits
chassis to your network or a hub. The ferrite block reduces potential EMI
interference.
SmartBits 600x/6000x Installation Guide
Chapter 2: Installation and Setup
Procedure 2: Check the Chassis and Package
•
•
•
SmartBits application CDs for bundled and optional software packages.
•
SmartBits Documentation CD (for SmartWindow, SmartLibrary, and
SmartApplications user guidess).
•
SmartBits 600x/6000x Installation Guide (this document).
SmartBits 3.5 in. (8.9 cm) firmware disks or a SmartBits firmware CD.
SmartBits 3.5 in. (8.9 cm) Key File disk(s) (for optional applications ordered; not
required for SmartWindow, SmartLibrary, or SmartApplications).
Adding or Rearranging Modules
Each SmartBits 600x chassis can hold up to two modules; each SmartBits 6000x chassis
can accommodate up to 12 modules. The connector and interface for each module slot on
either chassis is configured identically. Therefore, any SmartBits module may be installed
into any SmartBits 600x/6000x chassis module slot. (Note that some SmartBits modules
require two SmartBits 600x/6000x chassis slots or have other special installation
requirements.
Warnings: •
•
Always turn the power off to the SmartBits chassis before inserting or
removing modules.
All unused slots MUST BE COVERED with the provided blank faceplates to maximize airflow inside the chassis and reduce ambient noise
level.
SmartBits 600x/6000x Installation Guide
| 31
Chapter 2: Installation and Setup
Procedure 3: Install SmartBits Applications
Procedure 3: Install SmartBits Applications
Before proceeding with the chassis setup and installation, you should:
•
•
Install the SmartBits applications software.
•
Print user documentation now or later, as needed.
Print/review the Release Notes, which sometimes have important last-minute
installation and test setup details not included in this installation guide.
Installing the SmartBits Applications
To install SmartBits applications:
1
To install the core applications (SmartWindow, SmartLibrary, and
SmartApplications), insert each SmartBits CD into the CD-ROM drive of your PC.
2
If the autoplay on your PC does not automatically start the installation, click on the
setup.exe file in the Setup folder on the CD. The Installation Wizard will prompt you
to install the specific application.
To install the SmartLibrary programming library, follow the instructions in the
SmartLibrary documentation or Release Notes.
Note: Documentation for the SmartBits chassis, as well as for SmartWindow,
SmartLibrary, and SmartApplications (user guides and reference manuals), is provided on
the SmartBits Documentation CD. Documentation for additional software applications is
provided on the CD for each application.
3
If you have purchased any optional SmartBits software applications, such as
SmartFlow, you will have an additional CD per application, which will provide both
the software and the user guide for that application. You may wish to install those
applications now.
4
If you purchased any optional SmartBits applications, such as SmartFlow, you should
also have a 3.5 in. (8.9 cm.) disk which contains one or more key files needed to run
the optional application. Be sure to copy the licensed <application>key.txt file into
the program directory of each optional application. (Also refer to “Key Files” on page
117.)
Important: If you do not install the required key file for an optional application and you
access the software, you will receive an error message and automatically be placed in
demo mode.
32 |
SmartBits 600x/6000x Installation Guide
Chapter 2: Installation and Setup
Procedure 3: Install SmartBits Applications
Printing/Reviewing the Release Notes
It is important to check the Release Notes for your SmartBits products and highlight key
items that may affect your installation, test configuration, or test results. Release Notes
will inform you of important last-minute requirements or changes in each product.
Locate the appropriate Release Notes (readme.pdf files):
•
•
•
On the SmartBits firmware CD.
In the applications directory of each installed application.
At the Spirent Communications Customer Service Center website located at
http://support.spirentcom.com.
Take a few minutes to review the Release Notes for critical information.
Printing User Guide and Reference Manuals
For each application, programming library, or script option, you may wish to print the
related documentation either now or later, as needed.
Core documentation resides on the SmartBits Documentation CD (for SmartWindow,
SmartLibrary, and SmartApplications). The user guide for each optional application
resides on the CD for each application.
Important: To view and search SmartBits documentation, including the SmartLibrary
Documentation Catalog, Adobe Acrobat Reader must be installed on your PC or workstation. Please see “PC/UNIX Workstation Requirements” on page 29 for the versions of
Acrobat Reader required for use on Windows and UNIX platforms. The required versions
of Adobe Acrobat Reader are provided on the SmartBits Documentation Set CD that is
shipped with your SmartBits chassis. This software is also available on the Internet at
www.adobe.com.
For the best print quality, use a postscript printer. The print driver you use may also affect
the print quality. For the best results, use one of the Adobe postscript print drivers for your
printer model. You can download these print drivers from the Internet at www.adobe.com.
SmartBits 600x/6000x Installation Guide
| 33
Chapter 2: Installation and Setup
Procedure 4: Connect SmartBits to PC, Power, and LAN
Procedure 4: Connect SmartBits to PC, Power, and LAN
This procedure explains how to connect the back panel connectors on your SmartBits
chassis. We recommend that you complete Procedures 4 through 10 before you connect to
an application or device under test (Procedures 11/12).
The back panel connectors of the SmartBits 600x/6000x chassis are identical. The chassis
differ only in the location of the power supply connector and the ON/OFF switch.
Figure 2-1 shows the back panel on a SmartBits 6000C chassis.
Serial Console Port
Expansion port (optional) is used to
synchronize timing for up to 8
connected SmartBits chassis
Ethernet
Port
Master
ON/OFF
Switch
Power Supply
Connector
BNC Connectors for
External Clock
Connects to a GPS/
CDMA Receiver
Back Panel LEDs
for Ethernet Port
Status
Auxiliary DB9 Connector Connects to a GPS/CDMA Receiver
Figure 2-1. SmartBits 6000C Chassis Back Panel Connectors
34 |
SmartBits 600x/6000x Installation Guide
Chapter 2: Installation and Setup
Procedure 4: Connect SmartBits to PC, Power, and LAN
Table 2-1 describes the back-panel connectors, their functions, and the cables to be used
for each connector.
Table 2-1.
SmartBits Chassis Connections and Cables
Connect the SmartBits chassis…
to …
using this cable...
Power supply connector located on
the back panel
Power outlet
Power cord
CONSOLE port (DB25) – for IP
address assignment and other
administrative uses
PC Serial port (RS-232)
DB9-to-DB9 cable (plus
two DB9-to-DB25
adapters if needed)
10/100BASE-T (RJ-45) port – to
connect a SmartBits chassis to
applications and to the network
Your hub or LAN
Blue 10 ft. (3.048 m.)
straight-through
Ethernet LAN cable
10/100BASE-T (RJ-45) port – To
connect a SmartBits chassis directly
to a PC using the Default IP Address
PC
White 10 ft. (3.048 m.)
Ethernet crossover cable
EXPANSION OUT or IN RJ-45 port
(optional)
Another SmartBits
chassis and its RJ-45
EXPANSION IN port
Purple 3 ft. (.9144 m.)
straight-through LAN
cable
EXT CLK INPUT port
10 MHz1
1 PPS
An external timing
device
RG58 coaxial cable
(BNC)
AUX (DB9)
(for GPS/CDMA)
A GPS or CDMA
external time reference
receiver
Not included with the
chassis.1
1 These specifications are for interfacing to specific External Time Reference
devices. For further information, see the Using GPS/CDMA with SmartBits Chassis
User Guide (P/N 340-0106-001)
Important: If you are connecting multiple SmartBits chassis for your test environment, it
is critical to power up the chassis in the correct sequence or the test results may be invalid.
Refer to Appendix A, “Multiple Chassis Local Connect” for details. To connect multiple
chassis remotely via GPS/CDMA or a modem, refer to the Using GPS/CDMA with SmartBits Chassis User Guide.
SmartBits 600x/6000x Installation Guide
| 35
Chapter 2: Installation and Setup
Procedure 5: Install the Ferrite Block
Procedure 5: Install the Ferrite Block
This procedure describes how to attach the ferrite block to the Ethernet cable before
connecting the cable to your SmartBits chassis.
The ferrite block is designed to absorb excess electronic magnetic interference (EMI) that
is transferred through the Ethernet cable to your SmartBits chassis. This prevents potential
damage to your SmartBits chassis and module and helps ensure that test data is not
corrupted.
The ferrite block (see Figure 2-2) is packaged as part of the Base Unit Cable Kit that is
sent with your SmartBits chassis.
Figure 2-2. Ferrite Block
Warning: Before you begin using your SmartBits chassis, make sure that you have
attached the ferrite block to the Ethernet cable using the procedure below.
Installing the Ferrite Block
To install the ferrite block:
36 |
1
Remove the ferrite block and the Ethernet cable from the Base Unit Cable Kit
package.
2
Release the built-in clip on the side of the ferrite block and open it so that the center of
the ferrite block faces up. Place the Ethernet cable in the open ferrite block
(see Figure 2-3 on page 37, #1).
3
Clamp the ferrite block around the Ethernet cable making sure the built-in clip snaps
together (see Figure 2-3 on page 37, #2).
4
Connect the Ethernet cable to the chassis (see Figure 2-3 on page 37, #3).
SmartBits 600x/6000x Installation Guide
Chapter 2: Installation and Setup
Procedure 5: Install the Ferrite Block
1
2
Clamp the ferrite
block around the
Ethernet cable.
Place the Ethernet
cable in the opened
ferrite block.
3
Note:
In this example, the ferrite block is placed near the
end of the Ethernet cable that connects to the
SmartBits chassis.
The ferrite block is designed to slide along the
Ethernet cable to allow you to move it as needed.
Figure 2-3. Ferrite Block Installation
SmartBits 600x/6000x Installation Guide
| 37
Chapter 2: Installation and Setup
Procedure 6: Connect the SmartBits Power Cord
Procedure 6: Connect the SmartBits Power Cord
Before establishing actual SmartBits-to-PC communication, you need to connect the
power cord to the SmartBits back panel and then activate power. Based on your order, your
shipment will contain either a standard 110 AC power cord (USA), or an international 220
AC power cord (either for Continental Europe or the United Kingdom). (Other locations
may require a customer-provided cable or adapter.
To connect the power cord and activate power:
1
Plug the female end of the power cord into the power cord connector on the back of
the SmartBits chassis.
2
Plug the other end of the power cord into the electrical outlet.
3
Activate power by switching the SmartBits chassis power switch to ON ( I ).
Procedure 7: Start SmartWindow
Once SmartWindow is installed (see “Procedure 3: Install SmartBits Applications” on
page 32), you can launch the program in two ways:
•
•
Double-click on the SmartWindow icon on your desktop.
Use the Start button on the task bar. Select Start > Programs > SmartBits Systems
Applications > SmartWindow.
Note: The information contained in this procedure only describes the basic start-up
information when using a SmartBits chassis and SmartWindow. For a complete
description of SmartWindow configuration and other options, refer to the SmartWindow
User Guide or the SmartWindow online Help.
38 |
SmartBits 600x/6000x Installation Guide
Chapter 2: Installation and Setup
Procedure 7: Start SmartWindow
SmartWindow Launcher
When SmartWindow opens, it displays the SmartWindow Launcher. Use the Launcher to
select the target SmartBits chassis.
Note: Use a single mouse-click to select any icon from the Launcher.
Shortcuts Tab
The Launcher opens with the SmartBits Shortcuts tab displayed. Use this to organize
access to the SmartBits that you use frequently. Select Add New SmartBits Shortcut to
set up access to a chassis (Figure 2-4, left).
If you have already added shortcuts, they appear on the tab (Figure 2-4, right). When you
select one of these, SmartWindow opens your saved configuration file.
No shortcuts defined
Shortcuts for SmartBits
chassis that are
frequently used.
SmartWindow loads the
saved configuration file
for the chassis.
Figure 2-4. SmartBits Tab (SmartWindow Launcher)
SmartBits 600x/6000x Installation Guide
| 39
Chapter 2: Installation and Setup
Procedure 7: Start SmartWindow
SmartBits Tab
The SmartBits tab displays icons for each type of SmartBits chassis:
•
•
•
•
SMB-200 – SmartBits 200
SMB-2000 – SmartBits 2000
SMB-600(B) – SmartBits 600 or SmartBits 600B
SMB-6000(B/C) – SmartBits 6000B or SmartBits 6000C
When you select one of these, the Launcher displays the GUI for that chassis type
(Figure 2-5). It opens a default configuration file. This tab can be used to set up a test
configuration offline, before connecting to the SmartBits chassis to run a test.
SmartBits tab shows chassis types
for connection or configuration.
Figure 2-5. SmartBits Tab (SmartWindow Launcher)
40 |
SmartBits 600x/6000x Installation Guide
Chapter 2: Installation and Setup
Procedure 8: Set the IP Address
Connecting to the SmartBits Chassis
When you select an icon on the SmartBits tab, SmartWindow tries to find an accessible
SmartBits chassis of the selected type and connect to it.
The Launcher informs you of its progress (Figure 2-6). If it cannot find a chassis, you may
need to check the setup connections shown in “Procedure 4: Connect SmartBits to PC,
Power, and LAN” on page 34.
Figure 2-6. Connection Status Messages (SmartBits Tab)
Procedure 8: Set the IP Address
All SmartBits chassis are now designed with a default IP address of 192.168.0.100. This
feature enables quick and easy connection/start up of your chassis without the need of a
serial cable connection. This procedure is described on page 42.
If you prefer not to use the default IP address and want to set a unique IP address in an
unconfigured SmartBits chassis, you can use any of the following means to do so:
•
•
•
HyperTerminal (serial port) – see page 43
Telnet (Ethernet) – see page 47
SmartWindow (Ethernet) – see page 48.
SmartBits 600x/6000x Installation Guide
| 41
Chapter 2: Installation and Setup
Procedure 8: Set the IP Address
Default IP Address Connection
To establish a default IP Address connection, you need to connect the chassis directly to a
PC using the white, 10-foot (3.048 m), RJ-45 Ethernet crossover cable (Spirent part
number 620-0083-001), included in your SmartBits shipment.
To connect the chassis to a PC using the crossover cable:
1
Locate the blue, 10-foot, RJ-45 Ethernet crossover cable included in your SmartBits
package.
2
Plug the chassis to its power source.
3
Turn the chassis ON ( I ).
4
Connect the crossover cable between the SmartBits chassis’ Ethernet Management
Port (10/100BASE-T) connector and the PC NIC card.
5
Reconfigure the PC to use the same Subnet as the SmartBits chassis (example:
reconfigure the NIC card to 192.168.0.101 with a Mask of 255.255.255.0).
6
If needed, reset the PC in order for the new IP address to take effect. (For some PC
operating systems this step is necessary.)
7
Verify that the status light on the front of the chassis is green (see Table 3-1 on
page 71).
8
When the PC is ready, use the DOS prompt and ping the SmartBits chassis (see
“Pinging the SmartBits IP Address” on page 52). At the DOS prompt type in:
> ping 192.168.0.100.
Important: If the ping does not work, refer to the following sections of this manual for
more information:
•
Check that your cable connection is in place from “Procedure 4: Connect SmartBits
to PC, Power, and LAN” on page 34.
•
•
•
“Checking the TCP/IP Stack/Address/Gateway on Your PC” on page 53.
“Procedure 9: Confirm the Ethernet Link” on page 51.
Chapter 4, “Troubleshooting and Maintenance.”
You may now connect a SmartBits application (such as SmartWindow) to the chassis.
42 |
SmartBits 600x/6000x Installation Guide
Chapter 2: Installation and Setup
Procedure 8: Set the IP Address
Setting the IP Address via HyperTerminal
The following procedure references the HyperTerminal application, which is included
with Microsoft Windows. However, you can use any equivalent ASCII terminal emulator
application.
To set the IP Address via HyperTerminal:
1
Select Start > Programs > Accessories > HyperTerminal. The following window
opens.
Note: Depending on the Windows version that you are running, you may see another
menu after the Start > Programs > Accessories > HyperTerminal menu. Select
HyperTerminal from that menu. This will bring you directly to Step 3.
2
Double-click on Hypertrm.exe to see the Connection Description window.
3
In the Connection Description window, enter a name for the new connection. Select
the link you are making. In this example, we are using smblink. Click OK.
SmartBits 600x/6000x Installation Guide
| 43
Chapter 2: Installation and Setup
Procedure 8: Set the IP Address
44 |
4
In the Connect To window beside the Connect using field, select COM (1, 2, 3, or 4).
Click OK to access the COM Properties window.
5
Set the port settings (38400, 8, None, 1, and Xon/Xoff) as shown in the Properties
window below, and then click OK.
SmartBits 600x/6000x Installation Guide
Chapter 2: Installation and Setup
Procedure 8: Set the IP Address
6
In the HyperTerminal Console Command window which then appears, click the
Properties button as shown below (or choose File > Properties).
7
In the Properties window on the Settings tab, set the Emulation field to Auto detect or
VT100. Click OK.
SmartBits 600x/6000x Installation Guide
| 45
Chapter 2: Installation and Setup
Procedure 8: Set the IP Address
8
Click the ASCII Setup button. To enable local echo (which allows characters to
appear in the terminal window), make sure the Echo typed characters locally box is
unchecked. Click OK.
9
Save your settings by using the File menu Save or Save As command in the
HyperTerminal Console Command window.
10 Close HyperTerminal and then reopen HyperTerminal with the saved configuration
(for the settings to take effect).
If you receive garbled characters, check your settings shown in the Properties window
in Step 5 on page 44.
Important: If the chassis has already completed its startup before HyperTerminal is
open, press Esc for a menu prompt.
11 To display the current or default IP address, enter ipaddr, and then press Return.
The terminal window will look similar to the following screen:
>>ipaddr
Unmodified IP Address is: 192.169.100.27.
12 Set the IP address after you have checked with your system or network administrator
for the correct IP address. For example, to set the IP address to 192.169.100.19, you
would enter ipaddr 192.169.100.19.
13 Assign the Gateway and Netmask values for the chassis. (See Appendix D, “Serial
Port and Telnet Commands.”)
14 When you have finished, you can check to be sure the IP address was entered
correctly by entering ipaddr and then press Return.
15 Save the configuration setup using the SAVE command.
16 Power off the SmartBits chassis and then power it back on.
Important: You must reset (power cycle) the SmartBits chassis to implement the IP
address change.
46 |
SmartBits 600x/6000x Installation Guide
Chapter 2: Installation and Setup
Procedure 8: Set the IP Address
Setting the IP Address via Telnet
Telnet uses the same commands that are available on the console port and provides a
means for Spirent’s Customer Support group to access a customer’s SmartBits chassis for
troubleshooting. In the following example we are using a SmartBits 600x chassis.
To set the IP Address via Telnet:
1
Start a telnet session on your PC or workstation using your preferred Telnet Interface
software.
2
Connect to the SmartBits 600x chassis by providing the chassis default IP address
(192.168.0.100) to the Telnet software. You should see the following prompt:
SmartBits SMB-600 Chassis
Copyright @ 2003, Spirent Communications
login:
3
At the prompt, type:
login <enter>
4
Once connected, you should see the same command prompt, “>>”, as if you are
connected over the console port.
5
Follow steps 10 through 13 on page 46.
6
To disconnect from the chassis, type:
quit <enter>
SmartBits 600x/6000x Installation Guide
| 47
Chapter 2: Installation and Setup
Procedure 8: Set the IP Address
Setting the IP Address via SmartWindow
To set the IP Address using SmartWindow, you can use the Serial CONSOLE port or the
10/100BASE-T Ethernet port for a point-to-point connection from your SmartBits chassis
to your PC. This configuration is used to set up the SmartBits IP address for the first time,
and can be used to run applications as well.
Notes: •
•
You must have SmartWindow 6.53 Build 19 or later to use this feature, and
you must be Offline to access Connection Setup.
The Serial CONSOLE port is used for making a point-to-point connection
only. To run SmartWindow, you must use the 10/100BASE-T port.
Make sure the SmartBits chassis is connected to the PC with the white Ethernet (RJ-45)
crossover cable.
Setting or Changing the IP Address via SmartWindow
You can launch the program in two ways:
•
•
Double-click on the SmartWindow icon on your desktop.
Use the Start button on the task bar. Select Start > Programs > SmartBits Systems
Applications > SmartWindow.
Note: Before you proceed any further, you must add Allow Admin=1 to the Smartbit6k.ini
file. To do this, open the SmartBit.ini file C:\WINNT\Smartbit6k.ini file, and add
Allow Admin=1 as follows:
Add Line
Important: After making the change to the Smartbit6k.ini file, reset the SmartBits
chassis by closing and then reopening SmartWindow to enable the option.
48 |
SmartBits 600x/6000x Installation Guide
Chapter 2: Installation and Setup
Procedure 8: Set the IP Address
1
After launching SmartWindow, you will see the following window.
2
Click SmartBits and then select the type chassis you are using. (This example uses
the SMB-600.)
SmartBits 600x/6000x Installation Guide
| 49
Chapter 2: Installation and Setup
Procedure 8: Set the IP Address
50 |
3
Select Options > Connection Setup. You will see the following window.
4
Type in the default IP Address (192.168.0.100) and click OK.
5
Select Actions > Connect or choose the Connect icon.
6
Choose Actions > Connect, then choose Admin > SmartBits IP Configuration. The
following window appears.
7
Click the box labeled Change the SmartBits IP address. Type in the IP address that
you want to assign and click OK.
8
Choose Actions > Disconnect.
9
For the changes to take effect, reset the SmartBits chassis.
SmartBits 600x/6000x Installation Guide
Chapter 2: Installation and Setup
Procedure 9: Confirm the Ethernet Link
Procedure 9: Confirm the Ethernet Link
Note: If you have not already connected the chassis to a PC, hub, or network, do so now.
Use a Category 5 UTP straight-through cable to connect the SmartBits Ethernet port to the
local Ethernet network, or use a Category 5 UTP crossover cable to connect the SmartBits
chassis to the PC’s NIC.
Checking your Ethernet Cable Connection
To check the Ethernet link to the SmartBits chassis:
1
Check your Ethernet cable connection (from SmartBits to the PC, hub, or network).
2
Ping the Ethernet link between the PC and SmartBits.
3
If the ping does not work, check the TCP/IP stack on your PC. Set up the PC’s IP
address to be on the same subnet or on a different subnet from the SmartBits chassis,
as needed. Add a gateway if needed.
Check that your Ethernet cable connection is in place from “Procedure 4: Connect
SmartBits to PC, Power, and LAN” on page 34, or connect the cables now, as needed.
PC on Same Subnet as SmartBits 600x/6000x Chassis
To connect a PC on the same local subnet as the SmartBits chassis, you can connect the
PC to the chassis locally through either of the following connections:
•
•
A direct connection using a crossover Ethernet cable.
Through a hub or other network device using a straight-through Ethernet cable.
Direct Connection Locally. You can connect the SmartBits chassis directly to the PC
Network module using a crossover cable. A crossover (MDI-X) cable is made with the
transmit and receive wires crossed to allow two PCs with 10 Base-T Ethernet modules to
make a “back-to-back” connection without using a hub.
1
Connect one end of a crossover cable to the Ethernet module (NIC) in the PC.
2
Connect the other end of the crossover cable to the 10/100BASE-T (RJ-45) connector
located on the back of the SmartBits chassis.
The LINK LED next to the 10/100BASE-T connector on the SmartBits chassis should
light. If the LINK LED does not light, refer to Chapter 4, “Troubleshooting and
Maintenance.”
SmartBits 600x/6000x Installation Guide
| 51
Chapter 2: Installation and Setup
Procedure 9: Confirm the Ethernet Link
Local Connection through a Hub. If you are connecting the controlling PC to a
SmartBits chassis through a hub or network device, you must connect the chassis to the
hub or network using a straight-through Ethernet cable (a blue Ethernet 10 inch [25.4 cm.]
cable is provided).
The LINK LED will light when a cable is connected from the hub to the SmartBits
chassis. If the LINK LED does not light, refer to Chapter 4, “Troubleshooting and
Maintenance.”
Pinging the SmartBits IP Address
To ping the SmartBits chassis IP address to confirm that the Ethernet link is
working:
52 |
1
On your PC, open an MS-DOS prompt by selecting Start > Programs > MS-DOS
Prompt.
2
Ping the SmartBits IP address on the remote subnet as shown below, with the ping
command followed by the IP address. A series of four replies indicates that the link
is working.
3
If you were unable to ping the address, proceed to the next topic, “Checking the TCP/
IP Stack/Address/Gateway on Your PC” on page 53.
SmartBits 600x/6000x Installation Guide
Chapter 2: Installation and Setup
Procedure 9: Confirm the Ethernet Link
Checking the TCP/IP Stack/Address/Gateway on Your PC
The PC must be configured for TCP/IP to be able to connect to the SmartBits chassis via
Ethernet. If you are uncertain about how to configure TCP/IP on the controlling PC and
how to specify the correct IP address, contact your local System Administrator.
To check these parameters, you must access the Network window and the related TCP/IP
adapter for your Ethernet connection, and then define the PC’s IP address and subnet mask
as needed. If the PC is on a subnet different from that of the SmartBits chassis, you will
also need to set a gateway address.
To check IP address parameters:
1
Select Start > Settings > Control Panel.
2
In the Control Panel window, click on Network and Dial-up Connections.
3
In the window that appears, right-click on Local Area Connection and select
Properties.
4
In the next window, select the Ethernet interface to be used (e.g., Internet Protocol
(TCP/IP) and click on Properties.
Note: Depending on the SmartWindow version you are running, you may see a different
window after selecting Start > Settings > Control Panel > Network. For example, a PC
Configuration window may appear. In this case, click on the TCP/IP adapter card, and
then click on the IP Address tab to review IP address parameters.
SmartBits 600x/6000x Installation Guide
| 53
Chapter 2: Installation and Setup
Procedure 9: Confirm the Ethernet Link
5
Using the radio buttons, specify a new IP address for the PC if needed. For example,
you can set an IP address of 192.169.100.19 and a subnet mask of 255.255.255.0.
This means that systems on this same subnet will all have IP numbers that start with
192.169.100.
6
Set the Netmask and Gateway addresses (default for Netmask is 255.255.255.0 –
default for Gateway is 192.169.100.1). Click Apply.
Note: The screens and procedures listed here may differ slightly depending on the
SmartWindow version that you are running. You may see a different window after
selecting Start > Settings > Control Panel > Network. For example, a PC Configuration
window may appear. In this case, click on the TCP/IP Adapter card, and then click on
the IP Address Add tab.
54 |
7
If your PC is on the same subnet as the subnet of your SmartBits chassis, proceed to
step 9.
8
If your PC is on a different subnet from the subnet of your SmartBits chassis, you also
need to add a gateway, which is the address of the connecting router. Select the
Advanced tab in the window. The following window appears.
SmartBits 600x/6000x Installation Guide
Chapter 2: Installation and Setup
Procedure 9: Confirm the Ethernet Link
9
Click the Add button under the Gateways pane to add the new gateway address.
10 Enter the IP address of the router port for the subnet where the SmartBits chassis is
located. In this example, the connecting chassis has an IP address of 192.169.100.19.
Enter 192.169.100.19 and click Add.
The gateway address now appears in the Gateways pane (see the following figure).
11 Click OK to close the Advanced IP Addressing window.
12 Click OK to close the Network window.
13 Shut down and restart Windows 2000/NT/XP for the change to take effect.
14 Ping the SmartBits IP address again, as described on page 52. If you are unable to
ping the SmartBits chassis, refer to Chapter 4, “Troubleshooting and Maintenance.”
SmartBits 600x/6000x Installation Guide
| 55
Chapter 2: Installation and Setup
Procedure 10: Update Firmware Version (optional)
Procedure 10: Update Firmware Version (optional)
Firmware for your new SmartBits has been factory installed and is also supplied on your
firmware CD. However, when you purchase a new module, or wish to obtain the latest
upgrade, you need to load new firmware. (See Appendix C, “Download and Install
Applications,” for a detailed downloading/installing procedure.
You can obtain the firmware from these sources:
•
Spirent Communications’ Customer Service Center website at: http://
support.spirentcom.com.
•
An email message from Spirent’s Technical Support department (no password
required).
Checking the Current Firmware Version
To determine the version level of the software you are using, look on the CD label, or:
Note: You must be connected to a SmartBits chassis to perform the following tasks.
1
Select the Help > About SmartWindow option from the menu bar of the
SmartWindow main menu.
You will see the following window. This window identifies the SmartWindow Version
number, plus the Controller Type, Serial Number, and Firmware Revision number.
SmartWindow Version
Firmware Revision Number
Displays slot number, card description, and firmware version for each card.
56 |
SmartBits 600x/6000x Installation Guide
Chapter 2: Installation and Setup
Procedure 10: Update Firmware Version (optional)
2
Click Show Card Versions to display version information for the SmartBits chassis
and installed cards. Below is an example of the window you will see. The window will
vary depending on the modules you are using:
Note: In the multi-user interface, SmartWindow does not display card information unless
the chassis is connected and the specified card is reserved. Only the component firmware
version numbers are displayed in the SmartWindow Help About window, not the overall
firmware release number. For information on reserving SmartCards/modules, refer to the
documentation for the application that you are using.
Downloading Firmware from the Spirent Website or Email
To download firmware updates from the Spirent website or an email message:
Important: •
Close all SmartBits applications such as SmartWindow and
SmartApplications. If you keep an application open, the chassis
connection will not be available.
•
All other users must be disconnected from the SmartBits chassis in order
for files to be download to the chassis.
•
Firmware updates from the website are contained in .exe files that
require a password obtained from Spirent Communications’ Technical
Support department.
1
Contact Spirent Communications for one or more firmware passwords, by phone, fax,
or email: [email protected]
2
Download the desired firmware .exe file(s) from the Spirent Communications’
Customer Service Center website at http://support.spirentcom.com into the desired
directory on your PC. Allow a minimum of 500 MB of free space on your local hard
drive.
3
Select Start > Run. The Browse window appears.
4
In the Browse window, select the CD-ROM drive, select the Setup.exe file, and click
Open.
SmartBits 600x/6000x Installation Guide
| 57
Chapter 2: Installation and Setup
Procedure 10: Update Firmware Version (optional)
58 |
5
Follow the on-screen prompts to install the firmware onto your hard drive. The
firmware files are copied to the directory that you specify as shown below.
6
Once the firmware files are copied, locate the directory where the files were copied
(see preceding window), and click on fdlmgr.exe. This launches the Download
Manager application, which you use to download the firmware. You will see the
Download Firmware window shown below.
SmartBits 600x/6000x Installation Guide
Chapter 2: Installation and Setup
Procedure 10: Update Firmware Version (optional)
7
If you are downloading chassis firmware, make sure that Superuser mode is activated.
To do this,
a
Choose Action > Preferences. You will see the Download Manager Preferences
window shown below.
b
Check the Enter SMB Superuser mode checkbox and enter the Superuser
Password (default is SMB-6000). If you only plan to download module firmware,
you do not need to activate the Superuser mode.
c
Click OK. This takes you back to the Download Firmware window shown in
Step 6 above.
Important: It is important to record your password for easy reference. If you lose the
password and later need the password to download new chassis firmware, you may
need to return the chassis to the factory to reset the firmware.
SmartBits 600x/6000x Installation Guide
| 59
Chapter 2: Installation and Setup
Procedure 10: Update Firmware Version (optional)
8
Click on the chassis icon.
Chassis Icon
The Connection Setup window appears.
60 |
SmartBits 600x/6000x Installation Guide
Chapter 2: Installation and Setup
Procedure 10: Update Firmware Version (optional)
9
Enter the IP address of your SmartBits chassis (refer to “Procedure 8: Set the IP
Address” on page 41). Click on the Ping button to make sure the connection is
working properly. The following window appears.
Check to see if the system is “pinging;” click on Close and then click OK on the
Connection Setup window.
10 There are three options for connecting to the chassis:
• Select Action > Connect to connect to the chassis.
• Press the F8 key.
• Click on the Connect icon
in the tool bar.
The Download Firmware window appears, displaying the current firmware versions
for the chassis and for every module installed in the chassis.
SmartBits 600x/6000x Installation Guide
| 61
Chapter 2: Installation and Setup
Procedure 10: Update Firmware Version (optional)
Note: The letter A affixed to the slot number determines a left-hand port; the letter B
affixed to the slot number determines a right-hand port.
11 Continue the firmware download procedure by following the steps in one of the
following three sections:
• Download firmware to a non-TeraMetrics module
• Download firmware to an individual TeraMetrics module
• Download firmware to all TeraMetrics modules
Download Firmware to a Non-TeraMetrics Module
To download firmware to the chassis:
1
Maximize the Download Firmware window so that the Status column is displayed (if
the Download Firmware window is not displayed, then select the Firmware (BFT)
tab to display it).
Note: For non-TeraMetrics modules, an OK in the Status column indicates that a file is
available for download. TeraMetrics modules will display the message “Only can be used
by RPM download.”
2
Click the green button next to a chassis or module to reserve it for download (the
button turns blue to indicate reserved status), or click the Select All Available box to
reserve all listed non-TeraMetrics modules.
3
Click the Download button to load the firmware to the selected chassis/modules.
Note: To find out if there are other users active in the chassis, select Action > Show
Active Users.
62 |
SmartBits 600x/6000x Installation Guide
Chapter 2: Installation and Setup
Procedure 10: Update Firmware Version (optional)
Download Firmware to an Individual TeraMetrics Module
To download firmware to a TeraMetrics module:
1
Select the Software (RPM) tab. The Download Software (RPM) window appears,
displaying the current firmware version of every TeraMetrics module installed in the
chassis.
2
To reserve an individual TeraMetrics module, click the green button next to the
module to reserve it for download (the button turns blue to indicate reserved status).
3
Select the To Download tab, then click the Files button and select Add.
4
Using the mouse and the Ctrl key or Shift key, select the .rpm file(s) that you want to
download to the selected module and then select Open. You must select the
appropriate .rpm file(s) for each TeraMetrics module.
If the version of the firmware that you are downloading is older or the same as the
version you already are using, you will see one of the following windows:
SmartBits 600x/6000x Installation Guide
| 63
Chapter 2: Installation and Setup
Procedure 10: Update Firmware Version (optional)
5
Click the Download button to download the .rpm file(s).
Note: To find out if there are other users active in the chassis, select Action > Show
Active Users.
Download Firmware to All TeraMetrics Modules
To download firmware to all TeraMetrics modules:
64 |
1
Select the Software (RPM) tab. The Download Software (RPM) window appears,
displaying the current and new firmware versions for every TeraMetrics module
installed in the chassis.
2
To reserve all TeraMetrics modules, click the Reserve/Release All Modules box. The
green button next to each module turns blue to indicate reserved status.
3
Select the To Download tab, then click the Files button and select Add to All
Reserved Modules.
4
Using the mouse and the Ctrl key or Shift key, select the .rpm file(s) that you want to
download to the selected modules and then select Open. You must select the
appropriate .rpm file(s) for the selected TeraMetrics modules.
SmartBits 600x/6000x Installation Guide
Chapter 2: Installation and Setup
Procedure 11: Connect SmartBits to an Application
If the version of the firmware that you are downloading is older or the same as the
version you already are using, you will see one of the following windows:
5
Click the Download button to download the .rpm file(s).
Important: When conducting a Restart, all modules that have been reserved will restart.
Therefore, be careful which modules you reserve (.e.g., do not reserve a module that is in
the middle of a test). The chassis and any other modules that are not reserved will not be
restarted.
Procedure 11: Connect SmartBits to an Application
After the SmartBits IP address is set up via the serial console port, make sure that the PC
is connected to the SmartBits chassis using the Ethernet cable (see “Procedure 9: Confirm
the Ethernet Link” on page 51). Then you may proceed with configuration and testing.
Notes: •
The procedure detailed in this section is for installing SmartWindow. The
installation of other applications may vary slightly. Refer to each
application’s specific user documentation and Release Notes for details.
•
The serial cable cannot be used to connect any of the SmartBits software
applications to the SmartBits 600x/6000x chassis. This feature is only
available with the SmartBits 200/2000 chassis.
To connect a SmartBits application to a specific SmartBits chassis for the first time:
1
Check that you have:
• Installed the application on your PC.
• Connected the PC to SmartBits with the Ethernet cable.
• Set the IP address for the SmartBits chassis.
• Power up the SmartBits chassis.
2
Enter the application by selecting Start > Programs > SmartBits Applications >
<APPLICATIONname>.
SmartBits 600x/6000x Installation Guide
| 65
Chapter 2: Installation and Setup
Procedure 11: Connect SmartBits to an Application
3
To change or enter chassis IP address, the application must be offline (disconnected
from any chassis). To disconnect from other chassis, choose Actions > Disconnect.
4
Specify the IP address via the Connection Setup command of an application (located
under the Options menu).
For example, in SmartWindow, select Options > Connection Setup from the menu
bar. The Connection Setup window appears (see below).
5
Type in the IP address and select Ping.
6
For the Remote Host address, enter the SmartBits IP address that you loaded into
SmartBits in “Procedure 7: Start SmartWindow” on page 38.
7
Ensure that the TCP port value is set to 16385.
8
Click OK to close the Connection Setup window.
9
Select Actions > Connect to connect to the specific chassis. If a message box with
“Unable to reach remote host” is displayed, refer to Chapter 4, “Troubleshooting and
Maintenance.”
Note: If you close SmartWindow now and then re-open it, the application will
automatically try to connect to the IP address last specified in the Connection Setup
window.
66 |
SmartBits 600x/6000x Installation Guide
Chapter 2: Installation and Setup
Procedure 12: Connect to the DUT and Check Cabling
Procedure 12: Connect to the DUT and Check Cabling
To connect the SmartBits chassis either to your PC or to the network to which your PC is
connected, use the SmartBits 600x/6000x chassis Ethernet port labeled 10/100BASE-T
located on the backplane.
Connect the SmartBits chassis to the desired device(s) or network to be tested via one of
the following methods:
Connect to the Ethernet port on
the chassis backplane
DUT/SUT
Figure 2-7. Connecting the PC Directly to the Chassis and to the DUT/SUT
Connect to the Ethernet port
on the chassis backplane
WAN/LAN
DUT/SUT
Figure 2-8. Connecting the PC via a WAN/LAN to the Chassis and to the DUT/SUT
Important: •
You must position and install the provided ferrite block onto the Ethernet
cable (at the SmartBits end) that attaches the SmartBits chassis to your
network. The ferrite block reduces potential EMI interference. Refer to
“Procedure 5: Install the Ferrite Block” on page 36 for details on
connecting the ferrite block.
SmartBits 600x/6000x Installation Guide
| 67
Chapter 2: Installation and Setup
Procedure 12: Connect to the DUT and Check Cabling
•
Before you begin testing, check your environment and make sure that
you follow the EMI guidelines as described in the “Safety
Requirements” on page 23, and in the ESD Requirements on page 131.
Once the testing environment is properly prepared, you are ready to use
the appropriate software for the tests you want to perform. Failure to
comply with these guidelines may produce invalid test results.
Most test setups require a minimum of two module connections to the DUT – one module
to transmit traffic, and one to receive traffic. Many tests are also set up as partial or full
mesh, uni-directional or bi-directional, full or half duplex, single-to-many ports, or manyto-many ports.
Notes: •
•
68 |
For sample test scenarios, refer to the user guide for each software
application.
For cable description and pinout information, refer to Appendix B, “Cable
Information.”
SmartBits 600x/6000x Installation Guide
Chapter 3
LED Indicators
Light-Emitting Diodes (LEDs) confirm the status of your installed SmartBits chassis,
modules, and network link.
For module specifications, refer to the particular module type in the SmartBits System
Reference manual and in the SmartWindow online help.
In this chapter . . .
This chapter contains the following topics:
•
SmartBits 600x/6000x Chassis Front Panel LEDs . . . . 70
•
Over-temperature Sequence Condition (SmartBits 6000C) . . . . 72
•
SmartBits 600x/6000x Chassis Back Panel LEDs . . . . 73
•
ATM TeraMetrics Module LEDs . . . . 74
•
Ethernet Module LEDs . . . . 75
•
LEDs on Ethernet SmartMetrics/TeraMetrics XD Modules . . . . 77
•
Packet Over SONET (POS) Module LEDs . . . . 78
•
Fibre Channel Module LEDs . . . . 79
•
10 Gigabit Ethernet Module LEDs . . . . 80
SmartBits 600x/6000x Installation Guide
| 69
Chapter 3: LED Indicators
SmartBits 600x/6000x Chassis Front Panel LEDs
SmartBits 600x/6000x Chassis Front Panel LEDs
Every SmartBits 600x/6000x chassis has LEDs located on the front panel of the chassis
(see Figure 3-1). On the SmartBits 600x chassis, the LEDs are located on the left side on
the front panel; on the SmartBits 6000x chassis, they are located on the lower left side of
the front panel.
The functions of the LEDs are the same for the SmartBits 600x/6000x chassis with the
exception of the SmartBits 6000C chassis which has an additional TEMP LED.
SmartBits 600
SmartBits 600B
SmartBits 6000B
SmartBits 6000C
Figure 3-1. SmartBits 600x/6000x Chassis LED Locations (Front Panel)
70 |
SmartBits 600x/6000x Installation Guide
Chapter 3: LED Indicators
SmartBits 600x/6000x Chassis Front Panel LEDs
Table 3-1.
SmartBits 600x/6000x Chassis Front Panel LEDs
LED
Color/Status
Description
FAN
Green
Internal fans are operating properly.
Red
One or more of the fans are not working properly.
Green
One or more users are connected to the SmartBits
chassis.
Off
No user or application is connected to the SmartBits
chassis.
Green
Operationally ready to connect.
Red
Not ready to connect.
Yellow
Blinking – indicates an unrecoverable error. Power cycle
the chassis to recover. If persistent, contact Spirent’s
Customer Support department.
Green
The chassis is on.
Off
The chassis is off.
Green
Ambient temperature inside chassis is nominal (within
upper limits).
Yellow
Over-temperature condition detected, evasive
procedures in process, temperature is being more closely
monitored.
Red
Temperature is consistently in excess of upper limit.
Numerous chassis functions are disabled to attempt to
reduce thermal load.
LINK
STATUS1
POWER
TEMP2
1 During bootup, the Status LED starts out red, turns to yellow while initializing,
then turns to green when modules are initialized and Ethernet logins are enabled.
2 SmartBits 6000C chassis only. See “Over-temperature Sequence Condition
(SmartBits 6000C)” on page 72.
SmartBits 600x/6000x Installation Guide
| 71
Chapter 3: LED Indicators
Over-temperature Sequence Condition (SmartBits 6000C)
Over-temperature Sequence Condition (SmartBits 6000C)
The TEMP LED on the SmartBits 6000C automatically goes through a sequence
monitoring procedure when the chassis is operating. These functions are automated and
prevent users from experiencing incorrect tests.
When the chassis is running properly, the LED will be Green.
When an “over-temperature” condition is sensed:
72 |
1
The LED will continue to be Green. The chassis will start to monitor the temperature
for one minute.
2
If the “over-temperature” condition is still present after the (one minute) delay, the
LED will turn Yellow and the chassis will attempt to suspend all test module operations (such as, SyncStart). It will also reserve all modules to the controller and stop all
test traffic.
3
The chassis will continue to monitor the temperature for one additional minute.
4
If the chassis is still in “over-temperature” after the additional minute, the chassis will
automatically reset all modules being used. The LED will turn red to further draw
attention to the condition.
5
At any point during this sequence, the user could issue a RESET to the controller/
chassis. This RESET will perform the normal initialization; but will also continue
monitoring the thermal characteristics of the chassis.
6
If the chassis is still over the operational temperature, the above sequence will be reinitiated. If the thermal condition improves to be within the upper limit, then the chassis will once again be usable.
7
If a user logs onto the chassis using a TELNET session while the chassis is in an
“over-temperature” condition, an additional message will be displayed to indicate the
condition.
SmartBits 600x/6000x Installation Guide
Chapter 3: LED Indicators
SmartBits 600x/6000x Chassis Back Panel LEDs
SmartBits 600x/6000x Chassis Back Panel LEDs
Every SmartBits 600x/6000x chassis has four LEDs located on the back panel of the
chassis (see Figure 3-2). These LEDs indicate the status of the Ethernet control port to the
chassis controller. The LED functions and descriptions for the chassis are the same and are
described in Table 3-2. Figure 3-2 shows the back panel on a SmartBits 6000C chassis.
LEDs
Figure 3-2. SmartBits 6000C LED Locations (Back Panel)
Table 3-2.
SmartBits 600x/6000x Back Panel LEDs
LED
Color/Status
Description
10/100M
(Transfer Rate)
Green
100 Mbps Ethernet rate.
Yellow
10 Mbps Ethernet rate.
ACT/COL
(Activity/Collision Status)
Green
Traffic is being sent or received.
Yellow
Collisions have occurred.
Off
No traffic activity is occurring.
HDX/FDX
(Communications Protocol)
Green
Full duplex.
Yellow
Half duplex.
LINK/ERR
(Link/Error Status)
Green
Physically connected to the network;
confirmed with an Ethernet link pulse.
Red
Errors have occurred on the link.
Off
Not connected to the network.
SmartBits 600x/6000x Installation Guide
| 73
Chapter 3: LED Indicators
ATM TeraMetrics Module LEDs
ATM TeraMetrics Module LEDs
Every SmartBits ATM TeraMetrics module has its own LEDs, which are located on the
left side of each module’s front panel (see Figure 3-3). Although the LEDs are similar for
all modules, some vary according to the features of each module. Ethernet module LEDs
are described in Table 3-3.
Figure 3-3. Example of LED Locations on an ATM TeraMetrics Module
Note: ATM TeraMetrics modules are listed in Table 1-3 on page 18. For complete
descriptions of the ATM TeraMetrics modules, refer to the SmartBits System Reference
manual.
Table 3-3.
LED Functions for ATM TeraMetrics Modules
LED
Color/Status
Description
TX/INIT
Green
Frame is transmitting. LED flashes briefly for each
frame transmitted. If continuous transmission,
light is in steady on condition.
Red
Link is not ready.
Green
Receiving frame.
Red
SONET/SDH alarm active.
Green
Receiving management frame.|
Red
Loss of Frame.
Green
Trigger event.
Red
Loss of signal.
RX/ERR
MGMT/LOF
TRIG/LOS
74 |
SmartBits 600x/6000x Installation Guide
Chapter 3: LED Indicators
Ethernet Module LEDs
Ethernet Module LEDs
Every SmartBits Ethernet module has its own LEDs, which are located on the left side of
each module’s front panel (see Figure 3-4). Although the LEDs are similar for all
modules, some vary according to the features of each module. Ethernet module LEDs are
described in Table 3-4.
Figure 3-4. Example of LED Locations on an Ethernet Module
Note: Ethernet modules are listed in Table 1-3 on page 18. For complete descriptions of
the Ethernet modules, refer to the SmartBits System Reference manual.
Table 3-4.
Ethernet Module LEDs
LED
Color/Status
Description
100M PAUSE
Green
100 Base-TX operation.
Yellow
Receiving PAUSE frames.
Off
10 Base-T operation.
Green
Solid green for 100 Mbps Full Duplex.
Yellow
Solid yellow for 100 Mbps Half Duplex.
Green
Flashes green for 10 Mbps Full Duplex.
Yellow
Flashes yellow for 10 Mbps Half Duplex.
Green
Full-duplex with valid link.
Yellow
No link detected.
Green
Full-duplex with valid link.
Yellow
Half duplex with valid link.
Red
No link detected.
Green
Link up at 1 Gbps.
Red
Link up at 2 Gbps.
Off
No GBIC or loss of signal.
LINK 1000
Green
Autonegotiated at 1000 Mbps.
LINK 100
Yellow
Autonegotiated at 100 Mbps.
DUPLEX/
SPEED
LINK
LINK/DPLX
LINK SPEED
SmartBits 600x/6000x Installation Guide
| 75
Chapter 3: LED Indicators
Ethernet Module LEDs
Table 3-4.
Ethernet Module LEDs (continued)
LED
Color/Status
Description
LOS
Yellow
Loss of Signal (optical signal) condition exists.
MGMT/LOF
Yellow
Loss of Frame condition exists.
Flashing Green
“Management” frame is received.
Green
Flashes for management frames.
Yellow
Flashes for pause frames.
Red
Receiving CRC errors.
Green
Receiving frame.
Off
Not receiving.
Green
Receive. Flashes Green once for each frame
detected on the network.
Red
CRC errors. Flashes Red once for each bad CRC
detected in receive frames.
Off
Not receiving.
Green
Receiving trigger frames.
Red
Flashes for collisions.
Off
No collision or trigger.
Green
Transmitting.
Red
Module not ready.
Off
Not transmitting.
Green
Triggered frame is received.
Yellow
Loss of Signal (optical signal) condition exists.
Red
Receiving encoding errors.
Green
Receive trigger.
Off
No OS error or trigger.
Green
Receiving trigger frames.
Yellow
Receiving PAUSE frames.
Off
No trigger or pause events.
MGMT/PAUSE
RX/CRCERR
RX/ERR
TRIG/COL
TX/INIT
TRIG/LOS
TRIG/OSERR
TRIG/PAUSE
76 |
SmartBits 600x/6000x Installation Guide
Chapter 3: LED Indicators
LEDs on Ethernet SmartMetrics/TeraMetrics XD Modules
LEDs on Ethernet SmartMetrics/TeraMetrics XD Modules
Every SmartBits Ethernet Dual-media XD module has its own LEDs, which are located on
the left side of each module’s front panel (see Figure 3-5). The LEDs for the Ethernet
Dual-media modules have their own features and are described in Table 3-5.
Figure 3-5. Example of LED locations on an Ethernet Dual-media XD Module
Note: SmartMetrics/TeraMetrics XD modules are listed in Table 1-3 on page 18. For
complete descriptions of the XD modules, refer to the SmartBits System Reference
manual.
Table 3-5.
LED Descriptions for Ethernet Dual-media Modules
LED
Color/Status
Description
TX/INIT
Red
Port not initialized.
Green
Transmitting frame.
Off
Ready.
Red
Receiving CRC errors.
Green
Receiving frame.
Off
Collision.
Yellow
Collision/paused.
Green
Receiving trigger.
Off
No pause condition or trigger.
Yellow
Autonegotiation in progress.
Green
Link initialized.
Off
No link.
RX/ERR
TRIG/COLLPAUSE
LINK
SmartBits 600x/6000x Installation Guide
| 77
Chapter 3: LED Indicators
Packet Over SONET (POS) Module LEDs
Packet Over SONET (POS) Module LEDs
Every SmartBits POS module has its own LEDs, which are located on the left side of each
module’s front panel (Figure 3-6). Although the LEDs are similar for all modules, some
vary according to the features of each module. POS module LEDs are described in
Table 3-6.
Figure 3-6. Example of LED Locations on a POS Module
Note: POS modules are listed in Table 1-3 on page 18. For complete descriptions of the
POS modules, refer to the SmartBits System Reference manual.
Table 3-6.
POS Module LEDs
LED
Color/Status
Description
TX/INIT
Red
Link is not ready.
Flashing Green
Frame is transmitting.
Flashing Red
Rx frame is received with a CRC error.
Flashing Green
Rx frame is received.
Off
Not receiving.
Yellow
Loss of Frame condition exists.
Flashing Green
“Management” frame is received.
Green
Triggered frame is received.
Yellow
Loss of Signal (optical signal) condition exists.
Yellow
Loss of Signal (optical signal) condition exists.
RX/ERR
MGMT/LOF
TRIG/LOS
LOS
78 |
SmartBits 600x/6000x Installation Guide
Chapter 3: LED Indicators
Fibre Channel Module LEDs
Fibre Channel Module LEDs
Every SmartBits Fibre Channel module has its own LEDs, which are located on the left
side of each module’s front panel (Figure 3-7). Although the LEDs are similar for all
modules, some vary according to the features of each module. Fibre Channel module
LEDs are described in Table 3-7.
Figure 3-7. Example of LED Location on a Fibre Channel Module
Note: Fibre Channel modules are listed in Table 1-3 on page 18. For complete
descriptions of the Fibre Channel modules, refer to the SmartBits System Reference
manual.
Table 3-7.
Fibre Channel Module LEDs
LED
Color/Status
Description
TX/INIT
Red
Port not initialized.
Green
Frame is transmitting.
Off
Ready.
Red
Receiving CRC errors.
Green
Receiving frame.
Off
Not receiving.
Red
Receiving encoding errors.
Green
Receive trigger.
Off
No OS error or trigger.
Green
Link up at 1 Gbps.
Red
Link up at 2 Gbps.
Off
No GBIC or loss of signal.
RX/CRCERR
TRIG/OSERR
LINK SPEED
SmartBits 600x/6000x Installation Guide
| 79
Chapter 3: LED Indicators
10 Gigabit Ethernet Module LEDs
10 Gigabit Ethernet Module LEDs
Every SmartBits 10 Gigabit module has its own LEDs, which are located on the left side
of each module’s front panel (Figure 3-8). Although the LEDs are similar for all modules,
some vary according to the features of each module. The module LEDs are described in
Table 3-8.
Figure 3-8. Example of LED Location on 10 Gigabit Modules
Note: 10 Gigabit modules are listed in Table 1-3 on page 18. For complete descriptions of
the various 10 Gigabit modules, refer to the SmartBits System Reference manual.
Table 3-8.
10 Gigabit Module LEDs
LED
Color/Status
Description
TX/INIT
Red
Port not initialized.
Green
Frame is transmitting.
Off
Ready.
Flashing Red
Rx frame is received with a CRC error.
Flashing Green
Rx frame is received.
Off
Not receiving.
Green
Receiving trigger frames.
Yellow or Green
Receiving PAUSE frames.
Off
No trigger or pause events.
Green
Link up.
Yellow
Loss of signal.
Off
Empty XENPAK slot.
RX ERR
TRIG/PAUSE
LINK
80 |
SmartBits 600x/6000x Installation Guide
Chapter 4
Troubleshooting and Maintenance
This chapter provides solutions for common serial and Ethernet connection problems, as
well as HyperTerminal problems.
In this chapter . . .
This chapter contains the following topics:
•
Ethernet Connection Problems . . . . 82
•
Replacing Fuses in SmartBits 600x/6000B Chassis . . . . 83
•
SmartBits 6000C Circuit Breaker . . . . 83
SmartBits 600x/6000x Installation Guide
| 81
Chapter 4: Troubleshooting and Maintenance
Ethernet Connection Problems
Ethernet Connection Problems
LINK LED on SmartBits Chassis Does Not Light
Ensure that the cable is good. If it is a straight-through cable, switch it with a crossover
cable and connect it directly to the controlling PC.
SmartBits Chassis Does Not Respond To Ping
Check that you can ping to other nodes on the local network.
If you cannot ping to a SmartBits chassis on another subnet, try pinging the gateway to be
sure it is alive and at the IP address you have configured. Try pinging other nodes on the
other subnet.
Unable to Reach the Remote Host
If you receive this message when you start SmartWindow, try pinging the SmartBits
chassis. Check that the IP address you have entered in SmartWindow is the same IP
address you set on the SmartBits chassis. Check that cables are connected properly and are
the correct cable type.
82 |
SmartBits 600x/6000x Installation Guide
Chapter 4: Troubleshooting and Maintenance
Replacing Fuses in SmartBits 600x/6000B Chassis
Replacing Fuses in SmartBits 600x/6000B Chassis
The power supply in the SmartBits 600x/6000B chassis has a universal input that accepts
120/240 VAC requiring no selection or adjustment. The Power Supply Inlet is the main
disconnect device and is located on the rear of the chassis. It houses the power switch, fuse
holder, and a universal 3-wire instrument power cord jack. Replacement fuses are metric.
Note: The SmartBits 6000C chassis is controlled by a 15 Amp, 250V circuit breaker and
does not use fuses.
The fuse requirements for each SmartBits chassis is as follows:
•
Smartbits 600x chassis: 2.0 Amp, 250V,
fast action
•
SmartBits 6000B chassis: 10.0 Amp,
250V, fast action
Important: When cycling power to a SmartBits chassis, be sure to let the power stay off
for a few seconds to allow the capacitors to discharge before restoring power to the unit.
To remove the fuse holder:
1
Remove the power cord from the jack.
2
Lever out the fuse holder by prying outward on the tab using a small flat-head screwdriver or other thin-edged tool.
SmartBits 6000C Circuit Breaker
The SmartBits 6000C chassis is controlled by a 15 Amp, 250V circuit breaker located in
the rear rocker panel and does not use fuses. This is built into the switch.
If you have a power failure:
1
Turn off the chassis (power switch at the rear of the chassis).
2
Wait 10 seconds.
3
Turn the chassis back on (power switch at the rear of the chassis).
Note: After the chassis is powered back on, make sure that the power inhibit switch
button, located on the front panel, is pressed in (see Figure 1-6 on page 16).
SmartBits 600x/6000x Installation Guide
| 83
84 |
SmartBits 600x/6000x Installation Guide
Appendix A
Multiple Chassis Local Connect
In this appendix . . .
This appendix contains the following topics:
•
Multiple Chassis Connections . . . . 86
•
Setting Up and Powering Up Multiple Chassis . . . . 90
•
Multi-chassis Extension Unit . . . . 97
SmartBits 600x/6000x Installation Guide
| 85
Appendix A: Multiple Chassis Local Connect
Multiple Chassis Connections
Multiple Chassis Connections
If you are connecting multiple SmartBits chassis locally with CAT-5 UTP cables for use
with any SmartBits application, you MUST synchronize all chassis with the procedure
presented in this document.
Many SmartBits applications are designed to perform tests with hundreds of SmartBits
ports by connecting multiple chassis together as defined in this document. Multiple
chassis environments may include any mixed combination of SmartBits 10, SmartBits
200/2000, or SmartBits 600x/6000x chassis. This document references all of these chassis
types.
Important: The following rules must be followed to ensure proper multiple chassis
connections, synchronization, and correct test results. Failure to comply with these
procedures will result in faulty tests results such as frame loss and out of order frames:
•
When using a multiple chassis configuration that contains SmartBits 600x/6000x
chassis, you must use a synchronous CAT-5 straight-through (not crossover) cable to
connect the chassis together. (Refer to “Cable Information” on page 86.) The use of
the synchronous cable is required in order for overall test results to be accurate (not
just the latency test results, but all test results). Maximum distance between chassis is
3 feet (.9144m).
•
All of the chassis in the arrangement must be booted in the proper order. (Refer to
“Power Up the Multiple Chassis In Sequential Order” on page 94.)
•
The synchronized clock and pulse signals passing through the connected chassis
require careful sequential powering up. Failure to do so will cause random errors and
incorrect test results. (Refer to “Power Up the Multiple Chassis In Sequential Order”
on page 94.)
Failure to comply with these connection and synchronization procedures will result in
faulty tests results, including frame loss and out-of-order frames.
Cable Information
Spirent Communications provides the following cable kit (Spirent part number
620-5000-003) which is described in “Checking the SmartBits Package” on page 30.
In addition, when using a SmartBits 2000 chassis, you will receive the following:
•
•
•
86 |
One Cable Assembly Terminator (Spirent part number 620-0032-001)
One CPU-Card Cage Cable Assembly (Spirent part number 620-0017-001)
One Expansion Cable (Spirent part number 620-0019-001) for each chassis used, if
you are using multi-chassis stacking.
SmartBits 600x/6000x Installation Guide
Appendix A: Multiple Chassis Local Connect
Multiple Chassis Connections
Multiple Chassis Connection Terminology
Use Figure A-1 and the descriptions listed below to help you understand multiple chassis
connection terminology.
•
Controller – A chassis that can be connected via IP (#4, #5, #8, #10). A controller
can be a SmartBits 200/2000 chassis or a SmartBits 600x/6000x chassis.
•
Primary Controller – The controller that supplies the synchronization in an
expansion configuration (#4). A primary controller can be a SmartBits 200/2000
chassis or a SmartBits 600x/6000x chassis.
•
Dependent Controller – Any controller that is connected side-by-side, through the
RJ-45 expansion connectors, and relies on the primary controller for synchronization
(#5, #8, #10).
•
Master Controller – If a controller is a SmartBits 2000 chassis, it can also be the
master controller (top) chassis in a stacking configuration (#4, #8, #10).
•
Slave Unit – In a stacking configuration, a unit (SmartBits 10 or SmartBits 2000) that
relies on the master controller for its source (#1, #2, #3, #6, #7, #9).
Note: Each controller that is connected via expansion needs a separate IP connection to
the application. This cable should have a maximum distance of 3 feet in length. Using
cables longer than 3 feet in length will cause faulty test results. Use the supplied purple
3 foot (.9144 m.) straight-through Ethernet LAN cable for this connection.
3 foot cable
3 foot cable
3 foot cable
#8
#10
#3
#7
#9
#2
#6
#4
#5
#1
Figure A-1.
Multiple Chassis Connection Terminology
SmartBits 600x/6000x Installation Guide
| 87
Appendix A: Multiple Chassis Local Connect
Multiple Chassis Connections
Stacking Connections (SmartBits 2000 chassis only)
A stacking connection involves a SmartBits 2000 chassis (master controller) and up to
three units (slave units) connected vertically via DB37 connectors (see Figure A-2). A
SmartBits 2000 chassis must serve as the master controller chassis. The three slave units
in the stack can be any combination of SmartBits 10 or SmartBits 20000 chassis.
See Figure A-2 for an example of using the maximum number of units in a single stack.
Master
Controller
SmartBits 2000
Slave
Units
Figure A-2.
Any combination of SmartBits 10 and
SmartBits 2000 chassis
Example of the Multiple Chassis Stacking Order
Connect a SmartBits Stack of 80 Ports via DB37 Connectors
Note: Refer to “Procedure 4: Connect SmartBits to PC, Power, and LAN” on page 34
when making any SmartBits chassis connection.
To connect a SmartBits via DB37 connectors:
1
With the power turned off on all chassis, remove the terminator from the top chassis
(which must be a SmartBits 2000 chassis). This will be the master controller chassis
in the stack.
2
Remove all cables from the lower (slave) units in the stack.
3
Install the long SmartBits cable from the lower port (where you removed the terminator) of the master controller chassis to the middle port on the lower (slave) unit. Install
the terminator in the bottom port of the slave unit.
4
The hub of the slave unit will be empty. Note that the SmartBits 10 chassis has no hub
port and can only be used as a slave.
Note: Only the master controller chassis is connected to the PC or LAN, and has a
cable on the HUB port. Only the last unit in the stack has a terminator on the bottom
port.
88 |
5
Connect third and fourth SmartBits slave units if needed.
6
When you power up the SmartBits stack (see “Setting Up and Powering Up Multiple
Chassis” on page 90, turn on the slave chassis first, then turn on the SmartBits 2000
chassis (master controller) last.
SmartBits 600x/6000x Installation Guide
Appendix A: Multiple Chassis Local Connect
Multiple Chassis Connections
Important: If you fail to follow the power up sequential order, the master controller
(SmartBits 2000) chassis will not recognize the slave unit/s.
7
To power off multiple units in a stack, you must turn off the SmartBits 2000 (master
controller) chassis first and then turn off the slaves.
Expansion Connections (all chassis)
An expansion connection involves any combination of SmartBits chassis connected
horizontally, via the RJ-45 expansion connectors using a straight-through Ethernet LAN
cable. You may connect up to eight chassis (one primary controller and seven dependent
controller chassis). This allows for multiple chassis test synchronization with one clock
source (primary controller), which supplies the synchronization in the system. Figure A-3
shows an example of an expansion connection.
Note: Each controller that is connected via expansion needs a separate IP connection to
the application. This cable should have a maximum distance of 3 feet in length. Using
cables longer than 3 feet in length will cause faulty test results. Use the supplied purple
3 foot (.9144 m.) straight-through Ethernet LAN cable for this connection.
Primary
Controller
Any combination of SmartBits 200/2000 and SmartBits 600x/6000x
Dependent Controller Chassis
3-foot cables only
Figure A-3.
Example of a Multiple Chassis Expansion Connection
If you are using a SmartBits 2000 chassis as the primary controller or one of the
dependent controller chassis, you can also stack and connect up to three additional units
below it via the DB37 ports. In this configuration, the chassis would then become a master
controller chassis as described in “Stacking Connections (SmartBits 2000 chassis only)”
on page 88.
SmartBits 600x/6000x Installation Guide
| 89
Appendix A: Multiple Chassis Local Connect
Setting Up and Powering Up Multiple Chassis
Setting Up and Powering Up Multiple Chassis
Important: Prior to powering up your system, make sure that the following tasks have
been performed:
•
All chassis in the expansion connection are properly connected using the RJ-45
expansion cables as described in “Expansion Connections (all chassis)” on page 89.
•
All chassis in the stacking connection are properly connected using the DB37 cables
supplied as described in “Stacking Connections (SmartBits 2000 chassis only)” on
page 88.
•
If you are connecting remotely via GPS or CDMA, make sure that the GPS/CDMA
receiver to the primary controller chassis is connected and synchronized using the
coaxial cables supplied. Refer to the Using GPS/CDMA with SmartBits Chassis
manual for more information.
•
You have read and understand the following safety information:
• “Specifications” on page 21
• Appendix E, “ESD Requirements”
• Appendix F, “Fiber Optic Cleaning Guidelines.”
Check Applications to be Used with Multiple Chassis
To use multiple chassis connections correctly, first check that you have the appropriate
version of the application to be used with the chassis. If you have an appropriate
application, proceed to “Assign an IP Address to Each Smartbits Chassis” on page 92.
The SmartBits applications that support multiple chassis connections are listed in
Table A-1:
Table A-1.
Multiple Chassis Application Support
SmartBits Chassis
Application
AST II
600x/6000x
Combined
X
X
X
Avalanche SmartBits
X
Block Storage Tester
X
Fabric Services Tester
X
SAN Routing Tester
X
SmartCableModem Test
90 |
200/2000
SmartBits 600x/6000x Installation Guide
X
X
X
Appendix A: Multiple Chassis Local Connect
Setting Up and Powering Up Multiple Chassis
Table A-1.
Multiple Chassis Application Support (continued)
SmartBits Chassis
Application
SmartApplications
200/2000
600x/6000x
Combined
X
X
X
SmartFabric
X
SmartFlow
X
X
X
SmartLibrary
X
X
X
SmartMulticastIP
X
X
X
SmartSignaling
X
SmartTCP
X
X
X
SmartVoIPQoS
X
X
X
SmartWindow
X
X
SmartxDSL
X
X
X
Spirent Connect
X
X
X
TeraRouting Tester
X
TeraVPN Tester
X
Turn Up Connect
WebSuite
X
X
X
X
Note: Check with your Spirent Communications sales representative for the latest
required version levels for all products.
SmartBits 600x/6000x Installation Guide
| 91
Appendix A: Multiple Chassis Local Connect
Setting Up and Powering Up Multiple Chassis
Assign an IP Address to Each Smartbits Chassis
Each chassis must have its own IP address and be connected to a LAN or WAN (see
“Procedure 8: Set the IP Address” on page 41, and Figure A-4 on page 93).
Connect Multiple Synchronized Chassis
The connected primary controller and dependent controller chassis may be any
combination of SmartBits chassis, totaling up to eight chassis. The maximum number of
ports to configure is 768 ports (eight SmartBits 6000x chassis x 12 slots x 8-port LAN3100A modules).
For information regarding the configuration of more than eight SmartBits chassis, refer to
“Multi-chassis Extension Unit” on page 97.
A dependent controller may also be a master controller if it is a SmartBits 2000 chassis
and is also used in a stacking configuration as shown in Figure A-5 on page 95.
Important: The following rules must be followed to ensure proper multiple chassis
connections, synchronization, and correct test results. Failure to comply with these
procedures will result in faulty tests results such as frame loss and out of sequence frames.
92 |
•
When using a multiple chassis configuration that contains SmartBits 600x/6000x
chassis, you must use a synchronous CAT-5 straight-through (not crossover) cable to
connect the chassis together. (Refer to Table 2-1 on page 35.) The use of the
synchronous cable is required in order for overall test results to be accurate (not just
the latency test results, but all test results).
•
If you are connecting multiple SmartBits chassis locally with CAT-5 UTP cables for
use with any SmartBits application, you must synchronize all chassis with the
procedure presented in this document.
•
The synchronized clock and pulse signals passing through the connected chassis
require careful sequential powering up. Failure to do so will cause random errors and
incorrect test results.
•
To maintain synchronization, the dependent controller you are using must always be
connected to the primary controller chassis through one or more dependent
controllers as needed, even if you are not using ports in the primary chassis.
SmartBits 600x/6000x Installation Guide
Appendix A: Multiple Chassis Local Connect
Setting Up and Powering Up Multiple Chassis
To connect multiple synchronized chassis:
1
With power off to all chassis, use a standard Category 5 UTP straight-through cable
and connect the Expansion Out RJ-45 port of the primary controller chassis to the
Expansion In RJ-45 port of a dependent controller chassis. The cable should not
exceed 39 inches or 1 meter in length.
Note: The primary controller chassis uses only the RJ-45 Expansion Out port. It does not
use the RJ-45 Expansion In port. The primary controller chassis is viewed as the first
chassis (Chassis #1) in the series of connected synchronized chassis. See Figure A-4.
LAN/WAN
Primary Controller
192.168.99.1
Figure A-4.
!
Dependent Controller
192.168.99.2
Dependent Controller
192.168.99.8
Example of a Synchronized Multiple Chassis Connection using SmartBits 6000x Chassis
2
Connect the remaining chassis in your system, (Category 5 UTP cables) not to exceed
a total of eight chassis (one primary controller and seven dependent controllers). For
an example, refer to Figure A-3 on page 89.
3
After all the chassis have been connected and the IP addresses have been set, proceed
with “Power Up the Multiple Chassis In Sequential Order” on page 94 for power up
instructions.
Caution: To prevent false test results, make sure that the Expansion In and Expansion
Out cables are attached to the proper connectors at each end. Any cables left
disconnected may cause problems.
SmartBits 600x/6000x Installation Guide
| 93
Appendix A: Multiple Chassis Local Connect
Setting Up and Powering Up Multiple Chassis
Power Up the Multiple Chassis In Sequential Order
Important: Follow the power up sequence procedures as shown below. Failure to do so
will cause random errors and incorrect test results.
When powering up your multiple chassis configuration:
•
SmartBits 200/2000 – Allow the LINK LED on the chassis to stop flashing before
powering up the next chassis in sequence. (Time varies between 30 and 60 seconds.)
•
SmartBits 600x/6000x – Allow the STATUS LED on the chassis to turn green before
powering up the next chassis in sequence. (Time varies between 30 and 200 seconds.)
•
Stacking configuration – Turn on all the slave units (any sequential order). Wait at
least 30 seconds and then power up the master controller of the stack. If this sequence
is not followed, the master controller may not recognize the slaves.
For an example of powering up multiple chassis in sequential order, we will use the
example shown in Figure A-5 on page 95.
To power up multiple chassis:
1
Turn on the slave units #1, #2, #3, #6, #7, #9.
2
Allow the LINK LEDs on the chassis’ to stop flashing (at least 30 seconds) and then
power on the primary controller (chassis #4).
3
When the LINK LED has stabilized on the primary controller, power on the
dependent controllers in sequential order, (chassis #5, #8, 10). Wait for the LINK
LED or the STATUS LED to stabilize in between powering up each chassis, until you
have completely powered up all the chassis in a given series.
Important: If any of the dependent controllers get power-cycled or disconnected, repeat
the power-up sequence to ensure the system clock connection.
94 |
SmartBits 600x/6000x Installation Guide
Appendix A: Multiple Chassis Local Connect
Setting Up and Powering Up Multiple Chassis
Step 2
Step 1
#5
#4
#8
#10
#3
#7
#9
#2
#6
#1
Figure A-5.
Multiple Chassis Power Up Sequence
Important: While your system is operating, the following connect/disconnect rules
apply:
•
If powering up too quickly or out of sequence, the PC or workstation may report
“ethernet connection timeout” and “socket timeout” errors.
•
If you disconnect the primary master controller chassis, you break the
synchronization of the entire series of connected (RJ-45 Expansion In and Out
connected) chassis.
•
If you disconnect a dependent chassis within a synchronized series, it breaks the
connection for itself and for all chassis following it (downstream) in the series.
•
If you disconnect a master controller chassis in a stack, you automatically disconnect
all slave units connected (DB37) to it.
•
If you disconnect a slave unit within a stack, the entire stack is disabled.
SmartBits 600x/6000x Installation Guide
| 95
Appendix A: Multiple Chassis Local Connect
Setting Up and Powering Up Multiple Chassis
Power Down and Disconnect the Chassis
For powering down and disconnecting the chassis, we will use the example shown in
Figure A-5 on page 95.
To power down and disconnect the chassis:
96 |
1
Power down the expansion chassis in the reverse order of the powering up sequence,
starting with the last dependent controller chassis (#10) that has an RJ-45 Expansion
In connection only, and no Expansion Out connection.
2
Power down the dependent controller chassis #8 and #5.
3
Power down the master controller chassis #4.
4
You may power down the slave units (#1, #2, #3, #6, #7, and #9) any time after the
master controller chassis that they are connected to has been powered down.
SmartBits 600x/6000x Installation Guide
Appendix A: Multiple Chassis Local Connect
Multi-chassis Extension Unit
Multi-chassis Extension Unit
The Multi-chassis Extension Unit (see Figure A-6 and Figure A-7 below) enables the
connection of up to 512 synchronized SmartBits chassis. Each extension unit supports up
to eight chassis; each of these chassis can connect to another extension unit that supports
up to eight additional chassis, and so on, until reaching the 512 quantity limit. This
extension unit also provides flexibility in cable length and cable distribution, and supports
the regeneration of signals and timing at each extension unit.
Expansion Ports
Expansion Ports
Connect to Dependent Controllers In: from a Primary Controller
Out: to a Subordinate Extension Unit
Figure A-6.
Multi-chassis Extension Unit – Front View
An AC/DC power converter is included with the Multi-chassis Extension Unit. This
converter connects to the back of the unit and into any 120V outlet (see Figure A-7).
Power Converter Receptacle
Figure A-7.
Multi-chassis Extension Unit – Back View
SmartBits 600x/6000x Installation Guide
| 97
Appendix A: Multiple Chassis Local Connect
Multi-chassis Extension Unit
Multi-chassis Extension Unit Terminology
The terminology used with Multi-chassis Extension Unit connections is defined as follows
and is shown in Figure A-8:
•
Primary Controller – The main chassis which controls the synchronization for all
the chassis and extension units in the configuration.
•
Principle Extension Unit – The extension unit that is connected to the primary
chassis.
•
Dependent Controller – Any chassis that relies on another chassis or an extension
unit for its synchronization.
•
Subordinate Extension Unit – An extension unit that relies on a dependent chassis
or another extension unit for its synchronization.
•
Flat Connection – An extension unit that is connected to, and relies on, another
extension unit for its synchronization.
•
Hierarchical Connection – A series of connections from extension units to
SmartBits chassis in multiple layers.
Primary Controller
Principle Extension Unit
Dependent
Controller
Flat
Connection
Subordinate Extension Unit
Dependent
Controller
Hierarchical
Connection
Figure A-8.
98 |
Multi-chassis Extension Unit Terminology
SmartBits 600x/6000x Installation Guide
Appendix A: Multiple Chassis Local Connect
Multi-chassis Extension Unit
Multi-chassis Extension Unit Cable Connections
Important: The total accumulative length of the Category 5 UTP cable (RJ-45) used for
all connections between a layer of SmartBits chassis and another SmartBits chassis must
not exceed 50 feet in length (15.24 meters).
The primary SmartBits chassis connection that measures from the Primary Controller (or
#1 chassis) to the Principle Extension Unit (see Figure A-9) determines the maximum
cable length of subsequent cables used between a SmartBits chassis connected to the
Multi-chassis Extension Unit.
To determine the cable length limitation for these connections, subtract the length of the
Primary Controller/Principle Extension Unit cable from 50 feet (15.24 meters). In the
example shown in Figure A-9, the cable used to connect the master chassis to the Principle
Extension Unit is 3 feet in length. Therefore, the maximum accumulative cable length
from the extension unit to all directly connected chassis can be any variable under 47 feet
(50 - 3 = 47) in length (see Figure A-10 on page 100).
Multi-chassis Extension Unit Configurations
The Multi-chassis Extension Unit may be configured in various ways. For this connection
example, we will discuss using the OUT port of the Extension Unit exclusively.
Note: Refer to “Multi-chassis Extension Unit Terminology” on page 98 for terminology
descriptions.
Flat Connection
To set a flat connection:
1
Connect a cable from the expansion OUT port of the Primary Controller to the IN
port on the Principle Expansion Unit as shown in Figure A-9.
Chassis OUT Port
Category 5 UTP Cable
Primary Controller
Principle Extension Unit IN Port
Figure A-9.
Initial Connection of a SmartBits Chassis to an Extension Unit
SmartBits 600x/6000x Installation Guide
| 99
Appendix A: Multiple Chassis Local Connect
Multi-chassis Extension Unit
2
From each of the Principle Extension Unit’s eight ports, connect up to eight
dependent controllers IN ports as shown in Figure A-10.
3-Foot Cable
Cables lengths may vary
and can be any
variable under 47 feet
(50 - 3 = 47).
Dependent
Controllers
Figure A-10.
Connecting SmartBits Chassis to an Extension Unit
Note: In this example, we are using a 3-foot cable to connect the Primary Controller to
the Principle Extension Unit. Each cable that connects the extension unit to the next
SmartBits chassis may vary in length and can be any variable under 47 feet (50 - 3 = 47) in
length (14.33 meters).
3
You can connect another extension unit to the Principle Extension Unit by connecting
a cable from the OUT expansion port of the Principle Extension Unit to the IN port of
the Subordinate Extension Unit as shown in Figure A-11. You may continue adding
extension units and chassis until you reach 512 chassis.
Principle
Extension Unit
Subordinate
Extension Unit
Figure A-11.
100 |
Connecting an Extension Unit to Another Extension Unit
SmartBits 600x/6000x Installation Guide
Appendix A: Multiple Chassis Local Connect
Multi-chassis Extension Unit
You can connect up to an additional eight chassis to the Subordinate Extension Unit as
shown in Figure A-12.
Important: The example shown in Figure A-12 uses a 5-foot cable to connect the
Principle Extension Unit to the Subordinate Extension Unit. Subtract the length of this
cable from 50 to determine the maximum cable length allowed between chassis. In this
example, each cable connected from the Subordinate Extension Unit to the next chassis
can be any variable under 45 feet in length (50 - 5 = 45).
5 foot cable
Principle
Extension
Unit
The length of each
of these cables
may vary and can
be any variable
under 45 feet
(50 - 5 = 45)
Figure A-12.
Subordinate
Extension Unit
Connecting Additional SmartBits Chassis to a Second Extension Unit
Continue adding extension units and chassis until you reach the desired number of chassis
that you want to synchronize (up to 512).
SmartBits 600x/6000x Installation Guide
| 101
Appendix A: Multiple Chassis Local Connect
Multi-chassis Extension Unit
Hierarchical Connection
To set up a hierarchical connection:
Note: Refer to “Multi-chassis Extension Unit Terminology” on page 98 for terminology
descriptions.
1
Connect the Primary Controller chassis to the Principle Extension Unit (see
Figure A-13).
2
Connect the Principle Extension Unit to eight Dependent Controller chassis.
3
Connect each Dependent Controller chassis to another Multi-chassis Extension Unit.
You may repeat this procedure to obtain the required ports.
Important: Once the cable connections pass through another SmartBits chassis, the cable
measuring process starts over again.
The cable length
measuring
process starts over
when exiting the
chassis.
Figure A-13.
102 |
Example of Hierarchical Connection Configuration
SmartBits 600x/6000x Installation Guide
3-foot cable
Each of these cables can be
any variable under 47 feet
(50 - 3 = 47)
Appendix A: Multiple Chassis Local Connect
Multi-chassis Extension Unit
Beginning with the configuration shown in Figure A-13 on page 102, you can add eight
more chassis to each extension unit (Figure A-14). You may repeat this procedure until
you reach 512 chassis.
Important: When measuring cable length from a SmartBits chassis to an extension unit,
and to another SmartBits chassis, remember that the total cable length can be any variable
under 50 feet.
Figure A-14.
Connecting Chassis Through an Extension Unit in a Hierarchical Connection Configuration
SmartBits 600x/6000x Installation Guide
| 103
104 |
SmartBits 600x/6000x Installation Guide
Appendix B
Cable Information
In this appendix . . .
•
Ethernet Cables . . . . 106
•
Ethernet Connectors . . . . 107
•
XAUI Extender Module RJ-45 Pinouts . . . . 112
•
SmartBits-to-GPS/CDMA Control Interface . . . . 112
•
Fiber Connectors . . . . 113
SmartBits 600x/6000x Installation Guide
| 105
Appendix B: Cable Information
Ethernet Cables
Ethernet Cables
Each interface requires a different pin out depending on the type of interface and if the
connection is a DCE-to-DTE or DCE-to-DCE.
Unless otherwise specified, the Ethernet cables specified below use 4-pair Category 5
unshielded twisted pair (UTP) cables with a patch length of one meter used between the
RJ-45 connectors.
Straight-through Cable for 10/100/1000 Base
Pin
1
2
3
4
5
6
7
8
Color
Color
BLUE
BLUE-WHITE
ORANGE
GREEN
GREEN-WHITE
ORANGE-WHITE
BROWN
BROWN-WHITE
BLUE
BLUE-WHITE
ORANGE
GREEN
GREEN-WHITE
ORANGE-WHITE
BROWN
BROWN-WHITE
Pin
1
2
3
4
5
6
7
8
Crossover Cable for 10/100/1000 Base
Pin
1
2
3
4
5
6
7
8
106 |
Color
Color
BLUE
BLUE-WHITE
ORANGE
GREEN
GREEN-WHITE
ORANGE-WHITE
BROWN
BROWN-WHITE
ORANGE
ORANGE-WHITE
BLUE
BROWN
BROWN-WHITE
BLUE-WHITE
GREEN
GREEN-WHITE
SmartBits 600x/6000x Installation Guide
Pin
1
2
3
4
5
6
7
8
Appendix B: Cable Information
Ethernet Connectors
Ethernet Connectors
RJ-45 Connector
LAN-3100A, LAN-3101B, LAN-3102A, LAN-3300A, LAN-3301A, LAN-3302A,
LAN-3306A, LAN-3320A, LAN-3321A, LAN-3324A, LAN-3325A, LAN-3327A
modules
Table B-1.
RJ-45 Connector Pin Assignments
Pin
Signal
1
TRD 0 +
2
TRD 0 -
3
TRD 1 +
4
TRD 2 +
5
TRD 2 -
6
TRD 1 -
7
TRD 3 +
8
TRD 3 -
80-pin Connector
The LAN-3150A has two female 80-pin connectors, J1 and J2. The J1 connector is for the
first four ports. The J2 connector is for the second four ports.
The DUT should have the corresponding 80-pin female connector, and can be connected
to the LAN-3150A by using the two 12-inch cables that are supplied and recommended by
Spirent Communications.
The J1 and J2 connectors both carry one set of MII management signals. These signals can
be configured independently for each four-port DUT. However, for a single eight-port
DUT, the MII management signal from the J2 connector should be used and the
corresponding signal at the J1 connector should be ignored.
Table B-2 on page 108 shows the LAN-3150A 80-pin connector assignment for SMII and
RMII. Input and output are identified in the left column as I and O respectively.
The J1 and J2 pin structures are exactly the same except for the port numbers (0, 1, 2, 3 for
J1; and 4, 5, 6, 7 for J2).
SmartBits 600x/6000x Installation Guide
| 107
Appendix B: Cable Information
Ethernet Connectors
Table B-2. 80-Pin Connector Assignments
Signal Name
I/O
Pin
O
Signal Name
RMII
SMII
1
3VCC
3VCC
O
2
5VCC
O
3
O
RMII
SMII
41
3VCC
3VCC
5VCC
42
5VCC
5VCC
REF_CLK+
REF_CLK+
43
REF_CLK–
REF_CLK–
4
GND
GND
44
GND
GND
O
5
DNC (Note 5)
SYNC+
45
DNC (Note 5)
SYNC–
O
6
/SMII (Note 1)
/SMII (Note 1)
46
/BRDCON (Note 2)
/BRDCON (Note 2)
O
7
TXD1_0+
TXD1+
47
TXD1_0–
TXD1–
O
8
TXD1_1+
DNC (Note 5)
48
TXD1_1–
DNC (Note 5)
O
9
TXEN1+
DNC (Note 5)
49
TXEN1–
DNC (Note 5)
I
10
RXD1_0+
RXD1+
50
RXD1_0–
RXD1–
I
11
RXD1_1+
DNC (Note 5)
51
RXD1_1–
DNC (Note 5)
I
12
CRS_DV1+
DNC (Note 5)
52
CRS_DV1–
DNC (Note 5)
I
13
R_CLK+ (Note 3)
R_CLK+ (Note 3)
53
R_CLK– (Note 3)
R_CLK– (Note 3)
O
14
GND
GND
54
GND
GND
O
15
TXD2_0+
TXD2+
55
TXD2_0–
TXD2–
O
16
TXD2_1+
DNC (Note 5)
56
TXD2_1–
DNC (Note 5)
O
17
TXEN2+
DNC (Note 5)
57
TXEN2–
DNC (Note 5)
I
18
RXD2_0+
RXD2+
58
RXD2_0–
RXD2–
I
19
RXD2_1+
DNC (Note 5)
59
RXD2_1–
DNC (Note 5)
I
20
CRS_DV2+
DNC (Note 5)
60
CRS_DV2–
DNC (Note 5)
I
21
DNC (Note 5)
R_SYNC+ (Note
3)
61
DNC (Note 5)
R_SYNC– (Note 3)
O
22
GND
GND
62
GND
GND
108 |
SmartBits 600x/6000x Installation Guide
Pin
Appendix B: Cable Information
Ethernet Connectors
Table B-2. 80-Pin Connector Assignments (continued)
Signal Name
I/O
Pin
O
Signal Name
RMII
SMII
23
TXD3_0+
TXD3+
O
24
TXD3_1+
O
25
I
Pin
RMII
SMII
63
TXD3_0–
TXD3–
DNC (Note 5)
64
TXD3_1–
DNC (Note 5)
TXEN3+
DNC (Note 5)
65
TXEN3–
DNC (Note 5)
26
RXD3_0+
RXD3+
66
RXD3_0–
RXD3–
I
27
RXD3_1+
DNC (Note 5)
67
RXD3_1–
DNC (Note 5)
I
28
CRS_DV3+
DNC (Note 5)
68
CRS_DV3–
DNC (Note 5)
I
29
/RESET (Note 4)
DNC (Note 5)
69
DNC (Note 5)
DNC (Note 5)
O
30
GND
GND
70
GND
GND
O
31
TXD4_0+
TXD4+
71
TXD4_0–
TXD4–
O
32
TXD4_1+
DNC (Note 5)
72
TXD4_1–
DNC (Note 5)
O
33
TXEN4+
DNC (Note 5)
73
TXEN4–
DNC (Note 5)
I
34
RXD4_0+
RXD4+
74
RXD4_0–
RXD4–
I
35
RXD4_1+
DNC (Note 5)
75
RXD4_1–
DNC (Note 5)
I
36
CRS_DV4+
DNC (Note 5)
76
CRS_DV4–
DNC (Note 5)
n/a
37
DNC (Note 5)
DNC (Note 5)
77
DNC (Note 5)
DNC (Note 5)
O
38
GND
GND
78
GND
GND
Note 6
39
MDIO (Note 6)
MDIO (Note 6)
79
MDC (Note 6)
MDC (Note 6)
O
40
3VCC
3VCC
80
3VCC
3VCC
1 SMII Output. Low for SMII, high for RMII. Disregard this signal for single mode DUTs.
2 BRDCON Input. Active low, DUT connected flag. It should be tied to ground at the DUT.
3 R_CLK+/– and R_SYNC+/–. These two LVDS input pairs should be the output of 65LVDS31 drivers on the DUT. These signals must be
supplied to LAN-3150A through J2.
4 RESET This low active output can be used as PHY hardware reset signal.
5 DNC Do not connect.
6 MDIO This signal is bi-directional.
MDC This is an output signal.
SmartBits 600x/6000x Installation Guide
| 109
Appendix B: Cable Information
Ethernet Connectors
SFP MSA Connectors
LAN-3320A, LAN-3321A, LAN-3324A, LAN-3325A, LAN-3327A, XD modules
Table B-3.
SFP MSA Connector Pin Assignments
Pin
Signal
Pin
Signal
20
TX GND
1
TX GND
19
TD- (TX DATA IN-)
2
TX FAULT
18
TD+ (TX DATA IN+)
3
TX DISABLE
17
TX GND
4
MOD-DEF2
16
VccTX
5
MOD-DEF1
15
VccRX
6
MOD-DEF0
14
RX GND
7
N/C
13
RD+ (RX DATA OUT-)
8
LOS
12
RD- (RX DATA OUT-)
9
RX GND
11
RX GND
10
RX GND
GBIC (9-pin) Connector
LAN-3201B, LAN-3310A, LAN-3311A, LAN-3710AL, LAN-3710AE modules
Table B-4. GBIC (9-pin) Connector Pin Assignments
110 |
Pin
Signal
1
Rx Gnd
2
RD+ (Rx Data Out +)
3
RD- (Rx Data Out -)
4
Rx Signal Detect)
5
Vcc Rx
6
Vcc Tx
7
TD- (Tx Data In -)
8
TD + (Tx Data In +)
9
Tx Gnd
SmartBits 600x/6000x Installation Guide
Appendix B: Cable Information
Ethernet Connectors
GBIC (20-pin) Connector
FBC-3601A, FBC-3602A modules
Table B-5. GBIC (20-pin) Connector Pin Assignments
Pin Name
Pin Number
Sequence
RX_LOS
1
2
GND
2
2
GND
3
2
MOD_DEF(0)
4
2
MOD_DEF(1)
5
2
MOD_DEF(2)
6
2
TX_DISABLE
7
2
GND
8
2
GND
9
2
TX_FAULT
10
2
GND
11
1
-RX_DAT
12
1
+RX+DAT
13
1
GND
14
1
Vcc
15
2
Vcc
16
2
GND
17
1
+TX_DAT
18
1
-TX_DAT
19
1
GND
20
1
SmartBits 600x/6000x Installation Guide
| 111
Appendix B: Cable Information
XAUI Extender Module RJ-45 Pinouts
XAUI Extender Module RJ-45 Pinouts
XLW-3720A and XLW-3721A modules
Table B-6.
XAUI RJ-45 Connector Pin Assignments
Pin
Signal
Input/Output
Voltage
1
LASI
Output
Active High
2
MDIO
Input/Output
1.2v
3
MDC
Output
1.2v
4
XENPAK reset
Output
Active Low
5, 6, 7, 8
Tied together
N/A
Ground
SmartBits-to-GPS/CDMA Control Interface
The serial (AUX) port on the rear panel of the SmartBits is used to configure the ETR
receiver and to read the clock (yy:mm:dd:hh:mm:ss). The serial port on the SmartBits is
DCE, with pinouts as described below.
Note: Refer to the appropriate user manual for the Interface Kit you are using for the
cable information pertaining to that kit.
SmartBits (DCE
RS-232 (9-pin)
TXD
2
RXD
3
GND
5
DB9P
DB9S
Male
Female
Chassis Cable
112 |
SmartBits 600x/6000x Installation Guide
Appendix B: Cable Information
Fiber Connectors
Fiber Connectors
SC Fiber, Multi- and Single Mode, LC Fiber Connector
LAN-3111A, LAN-3111As
SC Fiber, Multi-Mode, 850nm Connector
LAN-3200A module
SC Fiber, Multi-Mode, 1300nm Connector
ATM-3451A, ATM-3453A, POS-3500B, POS-3502A, POS-3510A, POS-3511A modules
SC Fiber, Single Mode, 1310nm Connector
ATM-3451As, ATM-3453As, LAN-3200As, LAN-3710AL, POS-3500Bs, POS-3502As,
POS-3504As, POS-3505As, POS-3510As, POS-3511As, POS-3518As, POS-3519As
modules
Fiber, SC duplex, single mode, 1550nm
LAN-3710AE, POS-3504AR, POS-3505AR, POS-3518AR, POS-3519AR modules
SmartBits 600x/6000x Installation Guide
| 113
Appendix B: Cable Information
Fiber Connectors
Table B-7. Wavelength and Speed Definitions per SmartBits Fiber Optics Modules
Multi-Mode
Module
850nm
ATM-3451A
1300nm
Single Mode
1310nm
1550nm
OC-3c (STM-1c)
ATM-3451As
OC-3c (STM-1c)
ATM-3453A
OC-3c/OC-12c
(STM-1c/STM-4c)
ATM-3453As
OC-3c/OC-12c
(STM-1c/STM-4c)
LAN-3200A
1000Base-SX
LAN-3200As
100Base-LX
POS-3500B
OC-3c/OC-12c
(STM-1c/STM-4c)
POS-3502A
OC-3c (STM-1c)
POS-3504As
OC-48c (STM-16c)
POS-3504AR
OC-48c (STM-16c)
POS-3505As
OC-48c (STM-16c)
POS-3505AR
POS-3510A
OC-48c (STM-16c)
OC-3c/OC-12c
(STM-1c/STM-4c)
POS-3510As
POS-3511A
OC-3c/OC-12c
(STM-1c/STM-4c)
OC-3c/OC-12c
(STM-1c/STM-4c)
POS-3511As
OC-3c/OC-12c
(STM-1c/STM-4c)
POS-3518As
OC-192c (STM-64c)
POS-3518AR
POS-3519As
POS-3519AR
114 |
SmartBits 600x/6000x Installation Guide
OC-192c (STM-64c)
OC-192c (STM-64c)
OC-192c (STM-64c)
Appendix C
Download and Install Applications
In this appendix . .
This appendix contains the following topics:
•
Downloading SmartBits Applications . . . . 116
•
Running the Application . . . . 117
•
Key Files . . . . 117
SmartBits 600x/6000x Installation Guide
| 115
Appendix C: Download and Install Applications
Downloading SmartBits Applications
Downloading SmartBits Applications
The latest SmartBits software applications are available from the Spirent
Communications’ Customer Service Center website at http://support.spirentcom.com.
In order to enter this website, you need to register with Spirent Communications. Once
registered, you can use the Customer Service Center to download new versions of
software applications, scripts, and firmware. You will also have access to Spirent product
FAQs, service tracking information, and Spirent news issues.
Example Download
To download SmartBits software from the web:
1
Call Spirent Communications Technical Support for a password or a set of passwords
for the applications you are authorized to download via your current Software
Upgrade Support (SUS) contract. Be ready to give the representative the serial number of your SmartBits chassis when you call.
2
Go to Spirent’s Customer Service Center website (http://support.spirentcom.com) and
login in the upper left Members area of the website’s main page.
Note: To register your email address and password for login, click the SignUp button
in the Members area of the website’s main page and then follow the instructional
screens.
3
In the Self Service Tools area, click on Download Software Updates.
4
In the Software Downloads product tree that appears, locate the product line and product category that contains the product you want to download (e.g., SmartBits/ Applications).
5
Click the + sign next to the appropriate product category (APIs, Applications, etc.) to
display the list of products available for download.
6
Locate the desired product listing and click on the product name.
7
If you want to download a software version that is different from the one that appears
in the default listing, then select the alternative version from the Other Versions
Available pull-down menu.
8
Click the Download button on the Software Downloads page to launch the File
Download window.
9
Select Save to download the setup.exe file to your PC. Specify the preferred download directory.
10 Follow the installation instructions provided by the software installer. The software
files will be copied to the directory that you specify.
Note: It is recommended that you install upgrades in a new directory and that you
only install one application per directory (do not install all of the SmartBits
applications in a single directory).
116 |
SmartBits 600x/6000x Installation Guide
Appendix C: Download and Install Applications
Running the Application
11 Once installation is complete, you need to install a key file that allows you to use
the product with your particular SmartBits chassis. This key file is contained on a
3.5-inch diskette that is shipped with the product CD or is emailed to you from
Spirent Communications Technical Support. Download the key file, which appears in
the format <application>key.txt, into the directory where the product is installed.
(See below for more information on key files.)
Running the Application
The applications icon will be installed by default in the SmartBits Applications directory.
You also have the option to install a shortcut on your desktop. To run the application,
select Start > Programs > SmartBits Applications > DesiredApplication or click twice
on the applications icon.
Note: Some SmartBits applications may use the directory: Start > Programs > Netcom
Systems Applications > DesiredApplication.
Key Files
When you start a SmartBits application, you may get the No Authorization message. This
indicates that the application cannot find the key file for the application.
All SmartBits applications, except the core applications (SmartWindow,
SmartApplications, and SmartLibrary), require a key file. Look for the 3.5 in. (8.9 cm.)
disk supplied with your application; it will contain your key file, which you can copy into
the directory where your application resides.
If the key file is not found, the application will run in demo mode; that is, it will run for a
limited time and then timeout and close.
If you had a previous installation of the application, copy the <application>key.txt file
from that directory to the new installation directory.
If you have lost your <application>key.txt file, you will need to call Spirent
Communications Technical Support to have another file created for you. You will need to
have the chassis serial number associated with the key file, as well as an email address to
receive the key file. When you receive the file, copy it to the directory where the SmartBits
application is installed.
Key files are keyed to a specific SmartBits chassis. If you want to move your application
to another PC, you simply move the key file to the new PC with the application. If you
want to run the application on a different SmartBits chassis, you will need another key file.
Note: Spirent Communications Technical Support can generate special keys with more
than one chassis number. See “How to Contact Us” on page 6.
SmartBits 600x/6000x Installation Guide
| 117
118 |
SmartBits 600x/6000x Installation Guide
Appendix D
Serial Port and Telnet Commands
In this appendix . . .
•
Overview of the Serial Command Set . . . . 120
•
Serial Command Interface Updates . . . . 121
•
Serial Port Command Set . . . . 121
•
Superuser Commands . . . . 122
•
Netmask Commands . . . . 124
•
Gateway Commands . . . . 125
•
External Time Reference Commands . . . . 126
SmartBits 600x/6000x Installation Guide
| 119
Appendix D: Serial Port and Telnet Commands
Overview of the Serial Command Set
Overview of the Serial Command Set
This appendix contains the serial port commands, shown in Figure D-1 and Figure D-2.
You can send these commands from your PC directly over a serial port connection to a
SmartBits 600x/6000x chassis using HyperTerminal or an equivalent terminal emulation
program.
The following SmartBits firmware commands are available when you connect your PC
HyperTerminal program using a serial port to a SmartBits 600x/6000x chassis. To view
each help window and the chassis firmware version level, enter the HELP command and
press Return, in the HyperTerminal window.
Note: Figure D-1 and Figure D-2 are examples of the Help menu. Some release versions
may vary and the actual content may change in presentation and content with respect to
the version you are using.
Figure D-1.
SmartBits 600x/6000x Firmware Commands Available Using HyperTerminal
The SmartBits 600x/6000x chassis offers a superuser mode with additional commands as
shown in Figure D-2.
Figure D-2.
120 |
SmartBits 600x/6000x Firmware Commands Using Superuser Mode
SmartBits 600x/6000x Installation Guide
Appendix D: Serial Port and Telnet Commands
Serial Command Interface Updates
Serial Command Interface Updates
Starting with firmware version 2.00, the SmartBits 600x/6000x chassis serial command
interface has been enhanced to improve the basic user/card management command
structures and by adding Netmask and Gateway commands. The Netmask and Gateway
commands listed in this appendix are for 2.00 or later firmware releases.
Most of the command structure changes will define and support commands in more of a
hierarchical fashion. In most commands, the order of the command name and first
argument can be swapped; in some cases, this may make the alternate command form
more intuitive command and easier to remember.
The Help command has been updated to reflect the new commands and hierarchical
command structure.
Serial Port Command Set
The following commands apply to all chassis unless otherwise specified.
HELP – Displays the available commands.
VER – Displays the chassis firmware version.
HISTORY – Displays the previous 16 commands.
!! [#] – Recalls any of the previous 16 commands displayed and executes them again.
IPADDR [xxx.xxx.xxx.xxx] – Displays [or modifies] IP address. This command allows
you to change the SmartBits IP address. The change takes effect following a power cycle
or reset. If a new IP address is not entered, the SmartBits will display the current IP
address. If the IP address or the syntax is bad, it will display the following error message:
Invalid IP address entered.
NETMASK – See “Netmask Commands” on page 124.
GATEWAY – See “Gateway Commands” on page 125.
PORTNO [xxxxx] – Displays or modifies the TCP port number for the SmartBits chassis.
IDLEMAX [x] – Displays [or modifies] idle logout time, in seconds (60 seconds to a
maximum of 604800 seconds). This command sets a time limit for the SmartBits
controller to close any inactive open connection. The SmartBits controller has been
designed to be a high-performance multi-user system. Any user who connects to the
controller but does not use it (i.e., does not send any command) will be disconnected and
all resources freed after the set idle time limit expires.
If a new idle time limit value is not entered, the SmartBits controller will display the
current idle time limit value. The largest value for the idle_time_limit_value that is
accepted is 604800.
MACADDR – Displays the SmartBits MAC address. For information only.
SERNUM – Displays the SmartBits serial number. For information only.
SmartBits 600x/6000x Installation Guide
| 121
Appendix D: Serial Port and Telnet Commands
Superuser Commands
ECHO ON – Allows text entries through the serial port to be echoed while entered.
ECHO ON allows the user to see their keystrokes as they occur. It is the default echo
setting.
ECHO OFF – Does not allow text entries through the serial port to be displayed while
being entered. The ECHO state is temporarily forced to ECHO OFF during all password
entry sessions.
CARDS SHOW – Displays the use and status of all cards being used.
ETH SHOW – Displays the current operational configuration of the chassis controller’s
(host) Ethernet port. This information includes the current speed and duplex settings.
SU – Enter super-user mode, enables the super-user command set. This command
provides entry into the super-user mode, where the current logged-on Ethernet
connections on the unit can be examined, and if desired, closed. The super-user mode is
password protected and prompts you for an 8-character password. The factory default
password is SMB-6000.
Superuser Commands
These commands are available under the superuser mode of the SmartBits 6000x
controller chassis using either the serial port or Telnet interface.
USERS – Sets the way log-in and card reservation permissions are handled. These
command parameters can be combined into groups to better understand their functionality.
USERS SHOW|STATUS – (A command for information purposes only.) Lists those
users currently logged in to the chassis, and which cards those users have reserved. A
single character will designate if the user has (S) super-user or (A) administrative
privileges, or if the user is on a (T) Telnet connection. The status command is used only
for displaying user information regarding cards reserved with the USER RESERVE
command. If no users have cards reserved for them in this manner, an empty table will be
displayed.
USERS RESERVE/RELEASE [ipaddress][cardlist] – Reserves the cardlist for
exclusive access by the host at ipaddress. Card reservation is terminated with the release
command.
USERS ALLOW|DISALLOW [ipaddress] – Removes the ability of any host matching
ipaddress to log in to the chassis. The allow switch removes this limitation, but does not
grant any special privileges.
USERS MAXIMUM [1...15] – Displays the current setting for the maximum number of
users allowed to concurrently log in to the chassis (when entered without a number). The
maximum number of users must be a number between 1 and 15.
USERS CLOSE [1...15/ALL] – Closes the connection(s) for either the indicated usernum
or for ALL users. A console (serial port) connection does not have a user number and
cannot be closed.
122 |
SmartBits 600x/6000x Installation Guide
Appendix D: Serial Port and Telnet Commands
Superuser Commands
CARDS SHOW – Displays the status of each slot in the system as well as the user
information for any cards currently shared or reserved.
CARDS ENABLE|DISABLE [cardlist] – Enables or disables all access to the card(s) in
cardlist. Users currently reserving or sharing these cards will not have their access affected
until they unreserve or stop sharing the card, after which they will be affected as any other
user.
CARDS RESET [cardlist] – Issues a warm boot command to each card in the cardlist.
Note: IPFW commands only work with TeraMetrics modules.
IPFW SET [ip][card][port][user] – Assigns the IP Address to the card.
IPFW CLEAR [ip] – Removes the address definitions.
IPFW SHOW – Returns to the list of current IP Addresses.
SYNC STATUS/ABORT – (SyncOps are multi-chassis tests.) Allows for the inquiry of
the status of the SyncOps or to abort the operation.
ETR MODE/STATUS/TIME/DATE/FFOM/TFOM – See “ETR Commands” on page
126.
ETH SET – Allows the user to set the speed and duplex of the chassis controller’s (host)
Ethernet port. The value for speed can be 10, 100, or Auto; indicating 10 Mbps, 100 Mbps,
or autonegotiable. The value for duplex can be half, full or Auto; indicating half duplex,
full duplex, or autonegotiate.
REBOOT – Issues a warm boot command to each card in the cardlist.
INITFLASH – Resets the chassis to its default settings.
SUPASS – Provides a mechanism to alter the Super User password. First, the current
password must be correctly entered at the prompt Please enter Super-user password:. If
not correctly entered, an error string “Incorrect Super-user password” is displayed. Then
the prompt Please enter new Super-user password: for the new password is displayed.
This password must be entered twice and must be exactly eight characters. Once a new
password is entered, it will be encrypted and stored in a non-volatile Flash RAM. The user
is prompted again Please re-enter new Super-user password: to confirm the new
password. If a mismatch is detected, the error string “The new passwords are not same.
Existing Super-user password will not be changed.” is displayed, and the change is
rejected.
EXITSU – Exits superuser mode and exits access to the superuser command set.
SmartBits 600x/6000x Installation Guide
| 123
Appendix D: Serial Port and Telnet Commands
Netmask Commands
Netmask Commands
In administering Internet sites, a netmask is a string of 0’s and 1’s that mask or screen out
the network part of an IP address (IP) so that only the host computer part of the address
remains. The binary 1’s at the beginning of the mask turn the network ID part of the IP
address into 0’s. The binary 0’s that follow allow the host ID to remain. The default
netmask is 255.255.255.0 (255 is the decimal equivalent of a binary string of eight ones).
Used for a Class C subnet (one with up to 255 host computers), the “.0” in the
“255.255.255.0” netmask allows the specific host computer address to be visible.
Important: •
The following Netmask commands were initially released with the 1.10
firmware. You must have firmware version 1.10 or later installed to be
able to access these commands.
•
Resetting the netmask values while other users are connected may cause
those TCP sessions to be disrupted or terminated.
•
Netmask definitions are not persistent through a reset until the user
invokes the save command. Typing save at the command prompt will
update the Flash RAM, including the current netmask and gateway
settings.
NETMASK [MASK] – Sets the netmask for the subnet. The NETMASK value uses the
same type of format as an IP address, except that restrictions exist upon its value. For
example, the default value 255.255.255.0 represents a valid netmask, while the value
255.0.255.0 does not. The user-defined gateway will be used to access any IP address that
is not on the chassis’ subnet, where the subnet’s bounds are defined by this netmask. This
command is similar to the one used to display the netmask, except that it includes the
defined mask (which is in the same type format as an IP address).
When issued with no parameters, this command reports the current netmask assignment
defining the chassis subnet. The user-defined gateway(s) will be used when accessing any
IP addresses that are not on the chassis’ subnet (as determined by this netmask).
For the firmware versions prior to 2.00, the netmask could not be directly changed once it
was defined. A specific NETMASK RESET command needed to be issued (see below).
Starting with the 2.00 release, the netmask can be changed at any time.
Note: If the user has not defined a gateway (see “Gateway Commands” on page 125)
prior to the initial definition of the netmask, the firmware will automatically define a
default gateway which is consistent with the chassis’ IP address and netmask. Therefore,
the user needs to define the gateway only if it is different from the default. For example, if
the chassis’ IP address is 192.169.100.24, a netmask of 255.255.255.0 will default to a
gateway of 192.169.100.1.
NETMASK RESET – (Only used for firmware versions prior to 2.00.) Resets the
netmask to 0.0.0.0, allowing a new netmask to be defined by the user.
124 |
SmartBits 600x/6000x Installation Guide
Appendix D: Serial Port and Telnet Commands
Gateway Commands
Gateway Commands
A gateway is a network point that acts as an entrance to another network. On the Internet,
a node or stopping point can be either a gateway node or a host (end-point) node. Both the
computers of Internet users and the computers that serve pages to users are host nodes.
The computers that control traffic within your company’s network or at your local Internet
service provider (ISP) are gateway nodes.
In the network for an enterprise, a computer server acting as a gateway node is often also
acting as a proxy server and a firewall server. A gateway is often associated with both a
router, which knows where to direct a given packet of data that arrives at the gateway, and
a switch, which furnishes the actual path in and out of the gateway for a given packet.
Important: •
•
The following Gateway commands were initially released with the 1.10
firmware. You must have firmware version 1.10 or later installed to be
able to access these commands.
Gateway definitions are not persistent through a reset until the user
invokes the save command. Typing save at the command prompt will
update the Flash RAM, including the current netmask and gateway
settings.
GATEWAY [IPADDRESS] – Allows the user to set or query the default gateway address
(192.168.0.1) used by the chassis controller. When the command is issued without an
address, the current default gateway is returned. Supplying an IP address will set the
default gateway to that address.
Gateway commands evolved over several firmware releases. Differences between versions
are summarized in Table D-1.
Table D-1.
Summary of Version Releases
Firmware
Version
Behavior Notes
1.10
Every time the GATEWAY command was issued with an IP address,
the address was added to a list of used gateways. These were only
cleared from the list on reset.
1.2x
Gateways are added and removed by typing GATEWAY ADD
<ADDRESS> or GATEWAY DEL <ADDRESS>. These are still
tracked as a list of gateways.
2.00 or later
Only one gateway is user-definable, and this is used by default.
Subsequent gateway definitions will replace the default gateway.
Other gateways are tracked automatically in response to received
ICMP redirect messages.
SmartBits 600x/6000x Installation Guide
| 125
Appendix D: Serial Port and Telnet Commands
External Time Reference Commands
Note: The netmask must be defined prior to defining the gateway(s) (see “Netmask
Commands” on page 124), and all gateways must reside on the chassis’ subnet (as defined
by the netmask). If the user has not defined a gateway prior to the initial definitions of the
netmask, the firmware will automatically define a default gateway during the execution of
the netmask command. In this case, the automatically defined gateway is created
consistent with the chassis’ IP address and user-defined netmask. Therefore, the user
needs to explicitly define the gateway only if it is different from the default.
Important: The following information is subject to change in subsequent releases:
•
The netmask should not be changed once the gateway is defined. A
warning will be printed for every gateway that becomes part of a
different subnet if the chassis netmask is changed.
•
The netmask and gateway definitions are not persistent through chassis
reset operations, and must either be explicitly saved or manually
redefined as needed.
External Time Reference Commands
External Time Reference (ETR) is a Spirent Communications generic term for providing a
way to offer either GPS or CDMA protocols within a network. These commands are used
to confirm your system is operational. Refer to Using GPS/CDMA with SmartBits Chassis
User Guide for complete information about these commands and the receivers available.
ETR Commands
Important: Although these commands are prefixed with “ETR”, they apply equally to
both GPS and CDMA, since they all mimic the same interface. Also, these commands will
accept “GPS” or “CDMA” as equivalent aliases for “ETR.” These commands may also
return “GPS” as part of a command response. This is for backwards compatibility and
applies equally to a CDMA receiver.
ETR TIME – Queries the GPS/CDMA receiver for the current time of day, and displays it
to the user. A binary version of this command also exists, and is indirectly supported by
SmartLibrary.
ETR DATE – Queries the GPS/CDMA receiver for the current date, and displays it to the
user. A binary version of this command also exists, and is indirectly supported by
SmartLibrary.
ETR MODE – Determines the mode of operation of the chassis, with respect to its
connection to other SmartBits chassis and/or a GPS/CDMA receiver. A binary version of
this command also exists, and is indirectly supported by SmartLibrary.
126 |
SmartBits 600x/6000x Installation Guide
Appendix D: Serial Port and Telnet Commands
External Time Reference Commands
ETR MODE command responses:
•
MASTER – No GPS/CDMA is detected, no other chassis are detected on the chassis’
Expansion IN connection.
•
SLAVE – No GPS/CDMA is detected, another SmartBits chassis is detected on the
chassis Expansion IN connection.
•
GPS MASTER – GPS/CDMA is detected, no other chassis are detected on the
chassis’ Expansion IN connection.
•
INVALID GPS SLAVE – GPS/CDMA is detected, and another SmartBits chassis is
detected on the chassis’ Expansion IN connection. This is an invalid configuration.
ETR STATUS – Returns a summary of the operational status of the GPS/CDMA receiver.
A binary version of this command exists, and is indirectly supported by SmartLibrary.
ETR STATUS command responses:
•
•
“GPS OK” – GPS/CDMA is detected, and appears to be operational (ready for use).
•
“GPS NOT CONNECTED” – GPS/CDMA is not connected or not connected
correctly.
“GPS NOT READY” – GPS/CDMA is either not detected or appears to not be
operational (not ready for use).
ETR FFOM [FFOM] – Allows the user to display or change the threshold for the
Frequency Figure of Merit (FFOM), by which the firmware determines the GPS/CDMA’s
readiness. This command was added to allow specialized testing even while the GPS/
CDMA is operating in a degraded state, such as holdover mode.
More specifically, this command sets the maximum acceptable FFOM. As described in
Figure D-2 on page 120, this value indicates the accuracy of the UTC time reference and
related 1 Hz (i.e., 1 PPS) and 10 MHz output signals. A value of 0 indicates a stable output
synchronized to the GPS satellites or CDMA cell site transmitter, and is the normal
requirement for the chassis SYNC operation. A value of 2 indicates that the GPS/CDMA
receiver is not currently receiving sufficient satellite information to provide an accurate
time reference; but is providing a secondary time reference utilizing its internal oscillator
and the last known synchronization. A value of 3 indicates that the receiver is not
synchronized and should not be used. The value of 1 indicates that the ETR is receiving
some timing information, and is in the process of synchronizing its internal phase-locked
loop (PLL) to the time reference. For more details refer to the specific manual for the time
reference being used.
The SmartBits chassis checks the reported value for the FFOM against the limiting value
set by this command when determining if the GPS’s time is usable. The default value on
reset is 0.
SmartBits 600x/6000x Installation Guide
| 127
Appendix D: Serial Port and Telnet Commands
External Time Reference Commands
Table D-2.
Frequency Figure of Merit Value Descriptions
FFOM Value
Definition
SmartBits Chassis Notes
0
PLL stabilized, 1 PPS and
10 MHz output within
specification.
Default requirement for GPS Sync
operations.
1
PLL stabilizing
(transient state)
2
PLL unlocked (in holdover
mode)
Allowable state, for a short period
after antenna signal is disrupted.
Both the 1 PPS and 10 MHz signals
are generated, but may not be as
accurate.
3
PLL unlocked (not in
holdover mode). The 1 PPS
and 10 MHz output should
not be considered stable or
usable.
Should not be used for SmartBits
chassis.
ETR TFOM [TFOM] – Allows the user to change the threshold for the Time Figure of
Merit (TFOM), by which the firmware determines the GPS/CDMA’s readiness. This
command was added to allow specialized testing even while the ETR is operating in a
degraded state, such as holdover mode.
More specifically, the TFOM command sets the maximum acceptable TFOM; the largest
range by which the reported time differs from GPS/CDMA time. Valid entries for x for the
GPS (NanoSync and HP/Symmetricom 58503) are 3 through 9; although values of 0
through 2 are also allowed for other compatible GPS/CDMA receivers (available on HP/
Symmetricom 59551 GPS; but not available on HP/Symmetricom 58503 (GPS),
NanoSync (GPS), or Praecis Cf (CDMA). Valid entries for x using the CDMA (Praecis
Cf) are 6 through 9. As illustrated in Table D-3 on page 129, the value of x is a power of
10, in nanoseconds. For example, x = 5 indicates an accuracy of no less than 105, or
100000 nanoseconds.
The SmartBits chassis checks the reported value for the TFOM against the limiting value
set by this command when determining if the time is usable. In order to run a GPS- or
CDMA-based SmartBits SYNC operation without a sufficient antenna signal, this value
should be set to the lowest value possible. In most cases, the default value is
recommended. The default value on reset is 3 for GPS and 6 for CDMA.
Note: When a GPS receiver is not actively tracking a GPS satellite, its Time Figure of
Merit is an estimate only, based on measured performance of the internal crystal oscillator.
Similarly, if a CDMA loses reception of the cellular signal, its TFOM is also estimated.
128 |
SmartBits 600x/6000x Installation Guide
Appendix D: Serial Port and Telnet Commands
External Time Reference Commands
Table D-3.
Time Figure of Merit Value Descriptions
TFOM Value
Time Error
Notes
0
Less than 1 ns
Not available for 58503, NanoSync, or CDMA.
1
1-10 ns
Not available for 58503, NanoSync, or CDMA.
2
10-100 ns
Not available for 58503, NanoSync, or CDMA.
3
100-1000 ns
Default requirement for GPS Sync operation.
Not available for CDMA.
4
1-10 µs
GPS Sync operation only.
Not available for CDMA.
5
10-100 µs
GPS Sync operation only.
Not available for CDMA.
6
100-1000 µs
Available for both GPS and CDMA.
7
1-10 ms
Available for both GPS and CDMA.
8
10-100 ms
Available for both GPS and CDMA.
9
Greater than 100 ms
Available for both GPS and CDMA.
SmartBits 600x/6000x Installation Guide
| 129
Appendix D: Serial Port and Telnet Commands
External Time Reference Commands
AUX Commands
The following AUX commands support the auxiliary serial interface path to and from the
External Time Reference (GPS/CDMA).
AUX TYPE – Allows the user to display and change the type of External Time Reference
connected to the chassis. This change is not persistent until/unless the user issues a SAVE
command.
The following AUX TYPE # are for the internal storage definition (and value):
0 – UNKNOWN
1 – HP/Symmetricom 58503 (GPS)
2 – HP/Symmetricom 59551 (GPS)
3 – Zyfer NanoSync or NanoSync II (GPS)
4 – EndRun Technologies Cf or Cfr (CDMA)
AUX BAUD – Allows the user to display or change the BAUD rate of the chassis’
auxiliary serial interface. This change is not persistent; since generally the BAUD rate is
preset based on the TYPE of External Time Reference connected. This command is
provided as a means of manually configuring the serial port to temporarily allow access
external devices that do not match the standard settings. Supported BAUD rates are
currently limited to 9600, 19200, and 38400.
AUX LEARN – Causes the chassis to execute a test to try to determine what type of
External Time Reference is connected to the chassis. This does not automatically change
the value defined by the AUX TYPE command. This is most useful for determining the
type of time reference connected to a remotely configured chassis using a TELNET
session.
AUX ID – Queries and displays the identification string associated with an External Time
Reference. Commonly these identification strings include such information as the type
and version of the time reference. The AUX TYPE must be correctly set before executing
this command.
AUX CMD – Supports a pass-through path to and from the External Time Reference’s
serial interface. This allows access to any of the External Time Reference’s native
commands. Refer to the vendor specific documentation for a description of the available
commands.
130 |
SmartBits 600x/6000x Installation Guide
Appendix E
ESD Requirements
In this appendix . . .
This appendix contains the following topics:
•
General Equipment Handling . . . . 132
•
Workstation Preparation . . . . 133
SmartBits 600x/6000x Installation Guide
| 131
Appendix E: ESD Requirements
General Equipment Handling
Spirent Communications manufactures and sells products that require industry standard
precautions to protect against damage from electrostatic discharge (ESD). This document
explains the proper process for handling and storing electrostatic discharge sensitive
(ESDS) devices, assemblies, and equipment.
The requirements presented in this document comply with the EIA Standard, ANSI/ESD
S20.20-1999: Development of an Electrostatic Discharge Control Program, and apply to
anyone who handles equipment that is sensitive to electrostatic discharge. Such equipment
includes, but it not limited to:
•
•
•
•
•
!
All electronic assemblies manufactured by Spirent Communications
Discrete and integrated circuit semiconductors
Hybrid microcircuits
Thin film passive devices
Memory modules
Caution: Failure to comply with the requirements explained in this document poses risks
to the performance of ESDS devices, as well as to your investment in the equipment.
General Equipment Handling
Whenever you handle a piece of ESDS equipment, you must be properly grounded to
avoid harming the equipment. Also, when transporting the equipment, it must be packaged
properly. Follow the requirements below to help ensure equipment protection.
132 |
•
Wrist straps must be worn by any person handling the equipment to provide normal
grounding.
•
The use of foot straps is encouraged to supplement normal grounding. If foot straps
are used exclusively, two straps (one on each foot) should be used. Note that foot
straps are only applicable in environments that use ESD flooring and/or floor mats.
•
Hold ESDS equipment by the edges only; do not touch the electronic components or
gold connectors.
•
When transporting equipment between ESD protected work areas, the equipment
must be contained in ESD protective packaging. Equipment that is received in ESD
protective packaging must be opened either by a person who is properly grounded or
at an ESD protected workstation.
•
Any racks or carts used for the temporary storage or transport of ESDS equipment
must be grounded either by drag chains or through direct connection to earth ground.
Loose parts that are not protected by ESD-safe packaging must not be transported on
carts.
SmartBits 600x/6000x Installation Guide
Appendix E: ESD Requirements
Workstation Preparation
Workstation Preparation
The ideal setup for working with ESDS equipment is a workstation designed specifically
for that purpose. Figure E-1 illustrates an ESD protected workstation. Please follow the
requirements listed below to prepare a proper ESD protected workstation.
•
The ESD Ground must be the equipment earth ground. Equipment earth ground is the
electrical ground (green) wire at the receptacles.
•
An ESD protected workstation consists of a table or workbench with a static
dissipative surface or mat that is connected to earth ground. A resistor in the
grounding wire is optional, providing that surface resistance to ground is ≥ 105 to
≤ 109 Ω.
•
The workstation must provide for the connection of a wrist strap. The wrist strap must
contain a current limiting resistor with a value from ≥ 250K Ω to ≤ 10M Ω.
•
ESD protective flooring or floor mats are required when floor-grounding devices (foot
straps/footwear) are used or when it is necessary to move in between ESD protected
workstations when handling ESDS equipment.
Optional resistor
ESD protective
surface or mat
Wrist strap
ESD protective
floor mat (optional)
Figure E-1. ESD Protected Workstation
Note: The equipment needed for proper grounding is available in ESD service kits, such
as the ESD Field Service Kit available from Spirent Communications (P/N 170-1800).
Additional information on ESD can be found on the following website:
http://www.esda.org/aboutesd.html.
SmartBits 600x/6000x Installation Guide
| 133
134 |
SmartBits 600x/6000x Installation Guide
Appendix F
Fiber Optic Cleaning Guidelines
In this appendix . . .
This appendix contains the following topics:
•
Cleaning Guidelines . . . . 136
SmartBits 600x/6000x Installation Guide
| 135
Appendix F: Fiber Optic Cleaning Guidelines
Cleaning Guidelines
Spirent Communications manufactures and sells products that contain fiber optic
components, including fiber optic transmitters and receivers. These components are
extremely susceptible to contamination by particles of dirt or dust, which can obstruct the
optic path and cause performance degradation. To ensure optimum product performance,
it is important that all optics and connector ferrules be kept clean.
This appendix presents guidelines for maintaining clean fiber optic components. Spirent
Communications recommends that these guidelines be followed very closely.
!
Caution: •
•
Failure to comply with the guidelines explained in this appendix poses
risks to the performance of fiber optic-based devices, as well as to your
investment in the equipment.
Whenever you handle a piece of equipment that contains fiber optic
components, you must be properly grounded to avoid harming the
equipment. Refer to Appendix E, “ESD Requirements” for more details on
ESD.
Cleaning Guidelines
To ensure the cleanliness of fiber optic components, follow the guidelines below:
136 |
•
Use fiber patch cords (or connectors if you terminate your own fiber) only from a
reputable supplier. Low-quality components can cause many hard-to-diagnose
problems during an installation.
•
Dust caps are typically installed on fiber optic components to ensure factory-clean
optical devices. These protective caps should not be removed until the moment of
connecting the fiber cable to the device. Ensure that the fiber is properly terminated,
polished, and free of any dust or dirt. Also make sure that the location of installation is
as free of dust and dirt as possible.
•
•
Should it be necessary to disconnect the fiber device, reinstall the protective dust caps.
If you suspect that the optics have been contaminated, alternate between blasting with
clean, dry, compressed air and flushing with methanol to remove particles of dirt.
SmartBits 600x/6000x Installation Guide
Appendix G
Revision History
Spirent Communications increments the revision letter in a manual’s part number when
the technical content changes. When minor non-technical changes (cosmetic or editorial)
are made, the revision letter does not increment, but remains the same.
Revision A: (March 2004) First release of this manual.
Revision B: (October 2004) Updated manual to include the following changes:
•
Added the following modules to Table 1-3 on page 18:
•
•
XFP-3730A 10GBase Ethernet XFP MSA, 1-port, 1-slot, SmartMetrics module
XFP-3731A 10GBase Ethernet XFP MSA, 1-port, 1-slot, TeraMetrics module
•
Fixed ON/OFF switch information to read I for ON and O for OFF (see “Procedure 6:
Connect the SmartBits Power Cord” on page 38).
•
•
•
Corrected dimension specifications (see Table 1-4 on page 21).
•
Corrected PC/UNIX workstation requirements (see page 29).
Updated cabling kit information (see “Checking the SmartBits Package” on page 30
and Table 2-1 on page 35).
Added graphics to “Procedure 12: Connect to the DUT and Check Cabling” on page
67.
SmartBits 600x/6000x Installation Guide
| 137
138 |
SmartBits 600x/6000x Installation Guide
Index
Numerics
10 Gig Ethernet module LEDs 80
A
applications
connecting to 65
installing 32
supported 17
audience (user) 2
AUX commands 130
B
back panel, SmartBits chassis 34
BNC connector 34
C
cables
connecting to a DUT 67
Ethernet 106
GPS/CDMA-to-SmartBits 112
on multi-chassis extension unit 99
SmartBits chassis 30
supplied 30
CD installation 32
chassis
description
SmartBits 600 11
SmartBits 6000B 13
SmartBits 6000C 14
SmartBits 600B 11
disconnect, multiple chassis 96
packaging 30
replacing fuses 83
version command 57
clock
external 10
synchronized among chassis 10
command
connection setup 50
hyperterminal console 45
ipaddr 46
ping 52
Telnet 47
commands, serial port
AUX 130
command set 121
external time reference (ETR) 126
Gateway 125
Netmask 124
summary 120
superuser 122
configuration, multi-chassis extension unit 99
confirming, Ethernet link 51
connection
chassis through an extension unit 103
chassis to a PC 42
DUT/SUT 67
Ethernet 51
Ethernet problems 82
expansion 89
gateway 54
GPS/CDMA 34
local 51
local via hub 52
multiple chassis 86
setting or changing IP address 50
setup 60
setup Ethernet/TCP Address 66
SmartBits chassis 34
SmartBits chassis to an application 65
stacking 88
to a DUT 67
to a LAN 34
to a PC 34
to power 34
connectors 107, 110, 111, 113
contact information 6
cycling power 83
D
DB9 connector 34
disconnect multiple chassis 96
download
firmware 57
to a TeraMetrics module 63
to all TeraMetrics modules 64
to any non-TeraMetrics module 62
to chassis 62
print drivers 33
SmartBits applications 116
DUT, connecting to 67
SmartBits 600x/6000x Installation Guide
| 139
Index
E
emissions 23
equipment handling
ESD service kits 133
guidelines 132
preparing your workstation 133
equipment use, guidelines 24
ESD requirements 132
Ethernet
cables 106
confirm link 51
connection problems 82
expansion connector location 34
module LEDs 75
port location 34
Ethernet XD module LEDs 77
expansion connection 89
expansion port, location 34
external time reference commands 126
F
FCC statement 23
features, SmartBits chassis 9
ferrite block
installing 36
fiber connectors 113
fiber optic cleaning guidelines 136
Fibre Channel modules LEDs 79
firmware, checking and updating 56
fuse holder 83
fuses, replacing 83
G
Gateway commands 125
gateway to connect 54
GPS/CDMA, connector location 34
GPS/CDMA-to-SmartBits cable 112
guidelines
equipment handling 132
fiber optic cleaning 136
on equipment use 24
H
hardware handling and cleaning 5
help, online 5
hub, connection 52
I
installation guide
conventions 3
hardware handling and cleaning 5
outline 2
printing 33
typographical conventions 3
installation, procedures 28
IP address
pinging 52
setting via SmartWindow 48
ipaddr command 46
140 |
SmartBits 600x/6000x Installation Guide
K
key files 117
L
launching SmartWindow 38
LEDs
10 Gig Ethernet modules 80
back panel 73
description 71
Ethernet modules 75
Ethernet XD modules 77
Fibre Channel modules 79
Packet over SONET modules 78
SmartBits chassis, front panel 70
local connection
Ethernet 51
via hub 52
location
BNC connectors 34
DB9 connector 34
Ethernet expansion connector 34
Ethernet port 34
expansion port 34
GPS/CDMA connector 34
ON/OFF switch 34
power supply connector 34
serial console port 34
M
manuals, printing 33
modules
adding or rearranging 31
supported 18
multi-chassis extension unit 97
cables 99
configuration 99
connections 99
terminology 98
multiple chassis
connection terminology 87
connections 86
powering up 90
supported applications 90
N
Netmask commands 124
O
ON/OFF switch, location 34
online help 5
P
Packet over SONET modules LEDs 78
PC on same subnet 51
pinging 52
pinouts
80-pin connector 107
crossover cable 106
GBIC (20-pin) connector 111
Index
GBIC (9-pin) connector 110
RJ-45 connector 107
SFP MSA connector 110
straight cable 106
XAUI extender module 112
power supply connector location 34
printing, user guide/reference manuals 33
R
reference manuals, printing 33
requirements 23
electrostatic discharge 132
PC workstation 29
RAM 29
system 29
reset button 10, 16
S
safety requirements 23
serial port command summary 120
setup.exe file 32
SmartBits chassis
applications supported 17
back panel 34
cables and connectors 105
compliance with EC requirements 24
description
SmartBits 600 11
SmartBits 6000B 13
SmartBits 6000C 14
SmartBits 600B 11
features 9
front panel LEDs 70
introduction 8
IP Configuration window 50
models 9
modules supported 18
package 30
serial console port location 34
SmartWindow
installing 38
launcher 39
start-up 38
software
download from web 116
installation 32
specifications 21
Spirent Communications
company address 6
technical support 6
website 56
stacking connection 88
starting SmartWindow 39
superuser
command 122
password 122
superuser commands 122
synchronized multiple chassis connection 92
system requirements 29
T
technical support 6
Telnet 47
terminology
multi-chassis extension unit 98
multiple chassis connection 87
troubleshooting
chassis does not respond to a ping 82
Ethernet connection problems 82
LINK LED does not light 82
unable to reach remote host 82
U
updating
firmware 56
software applications 116
W
workstation preparation 133
X
XAUI extender module pinouts 112
SmartBits 600x/6000x Installation Guide
| 141